For many of us in the Florida Panhandle, managing land for and hunting deer are two of the pastimes that we’ll spend the most time and money on each year. I greatly enjoy spending time in the woods and value the opportunity to fill the freezer with high-quality protein and occasionally hang a trophy rack on the wall. Managing a deer herd isn’t without its annoyances though. One of the main complaints I hear each winter from hunters is regarding their food plots not performing as well as they’d like. While all manner of things could be at fault, there are three common reasons for poor food plot performance and a few possible solutions to each – let’s take a look.
Not doing your soil homework. Crops of all kinds, winter food plot forages like small grains, clovers, and ryegrass included, perform best when their pH and nutrition needs are met. The only way to ensure that your food plot plants’ needs are being met is to perform a soil test well before planting. Soil tests show the actual levels of various nutrients (N, P, K, and other essential elements) and pH in your food plots. It is important to remember that even if your soil fertility is adequate or you plan to get it there through fertilizer applications, those nutrients are only available for plants to uptake if your pH is correct (a pH of around 6.5 is ideal for winter grasses and legumes). If your pH is low and needs adjusting, make sure to apply lime several months in advance as it takes time to change your soil’s chemistry.
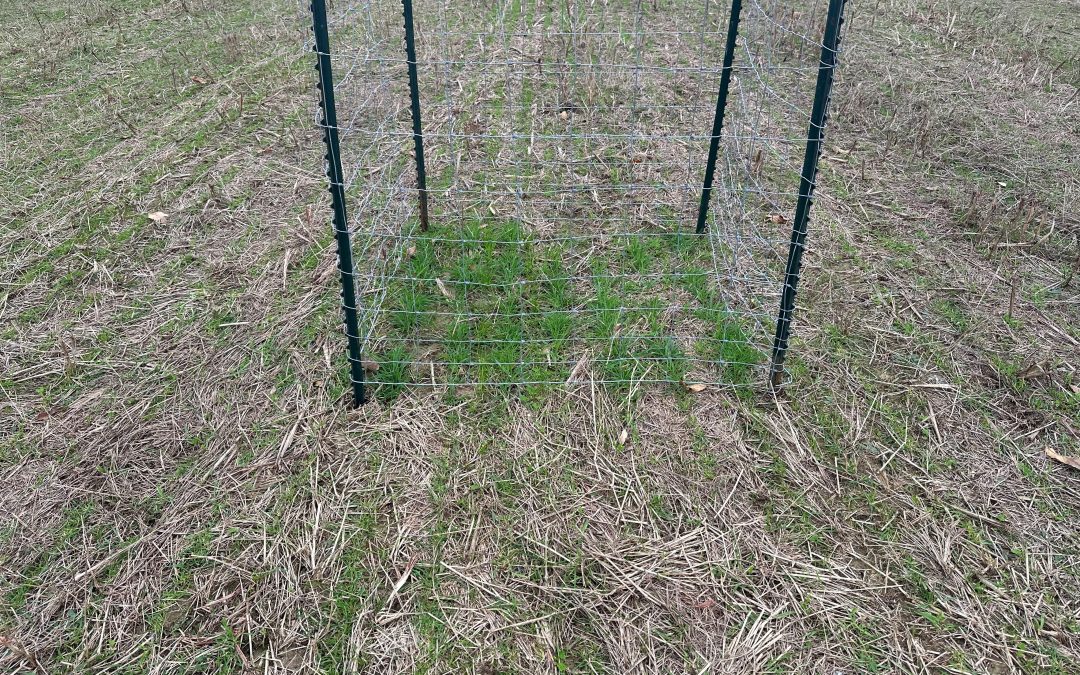
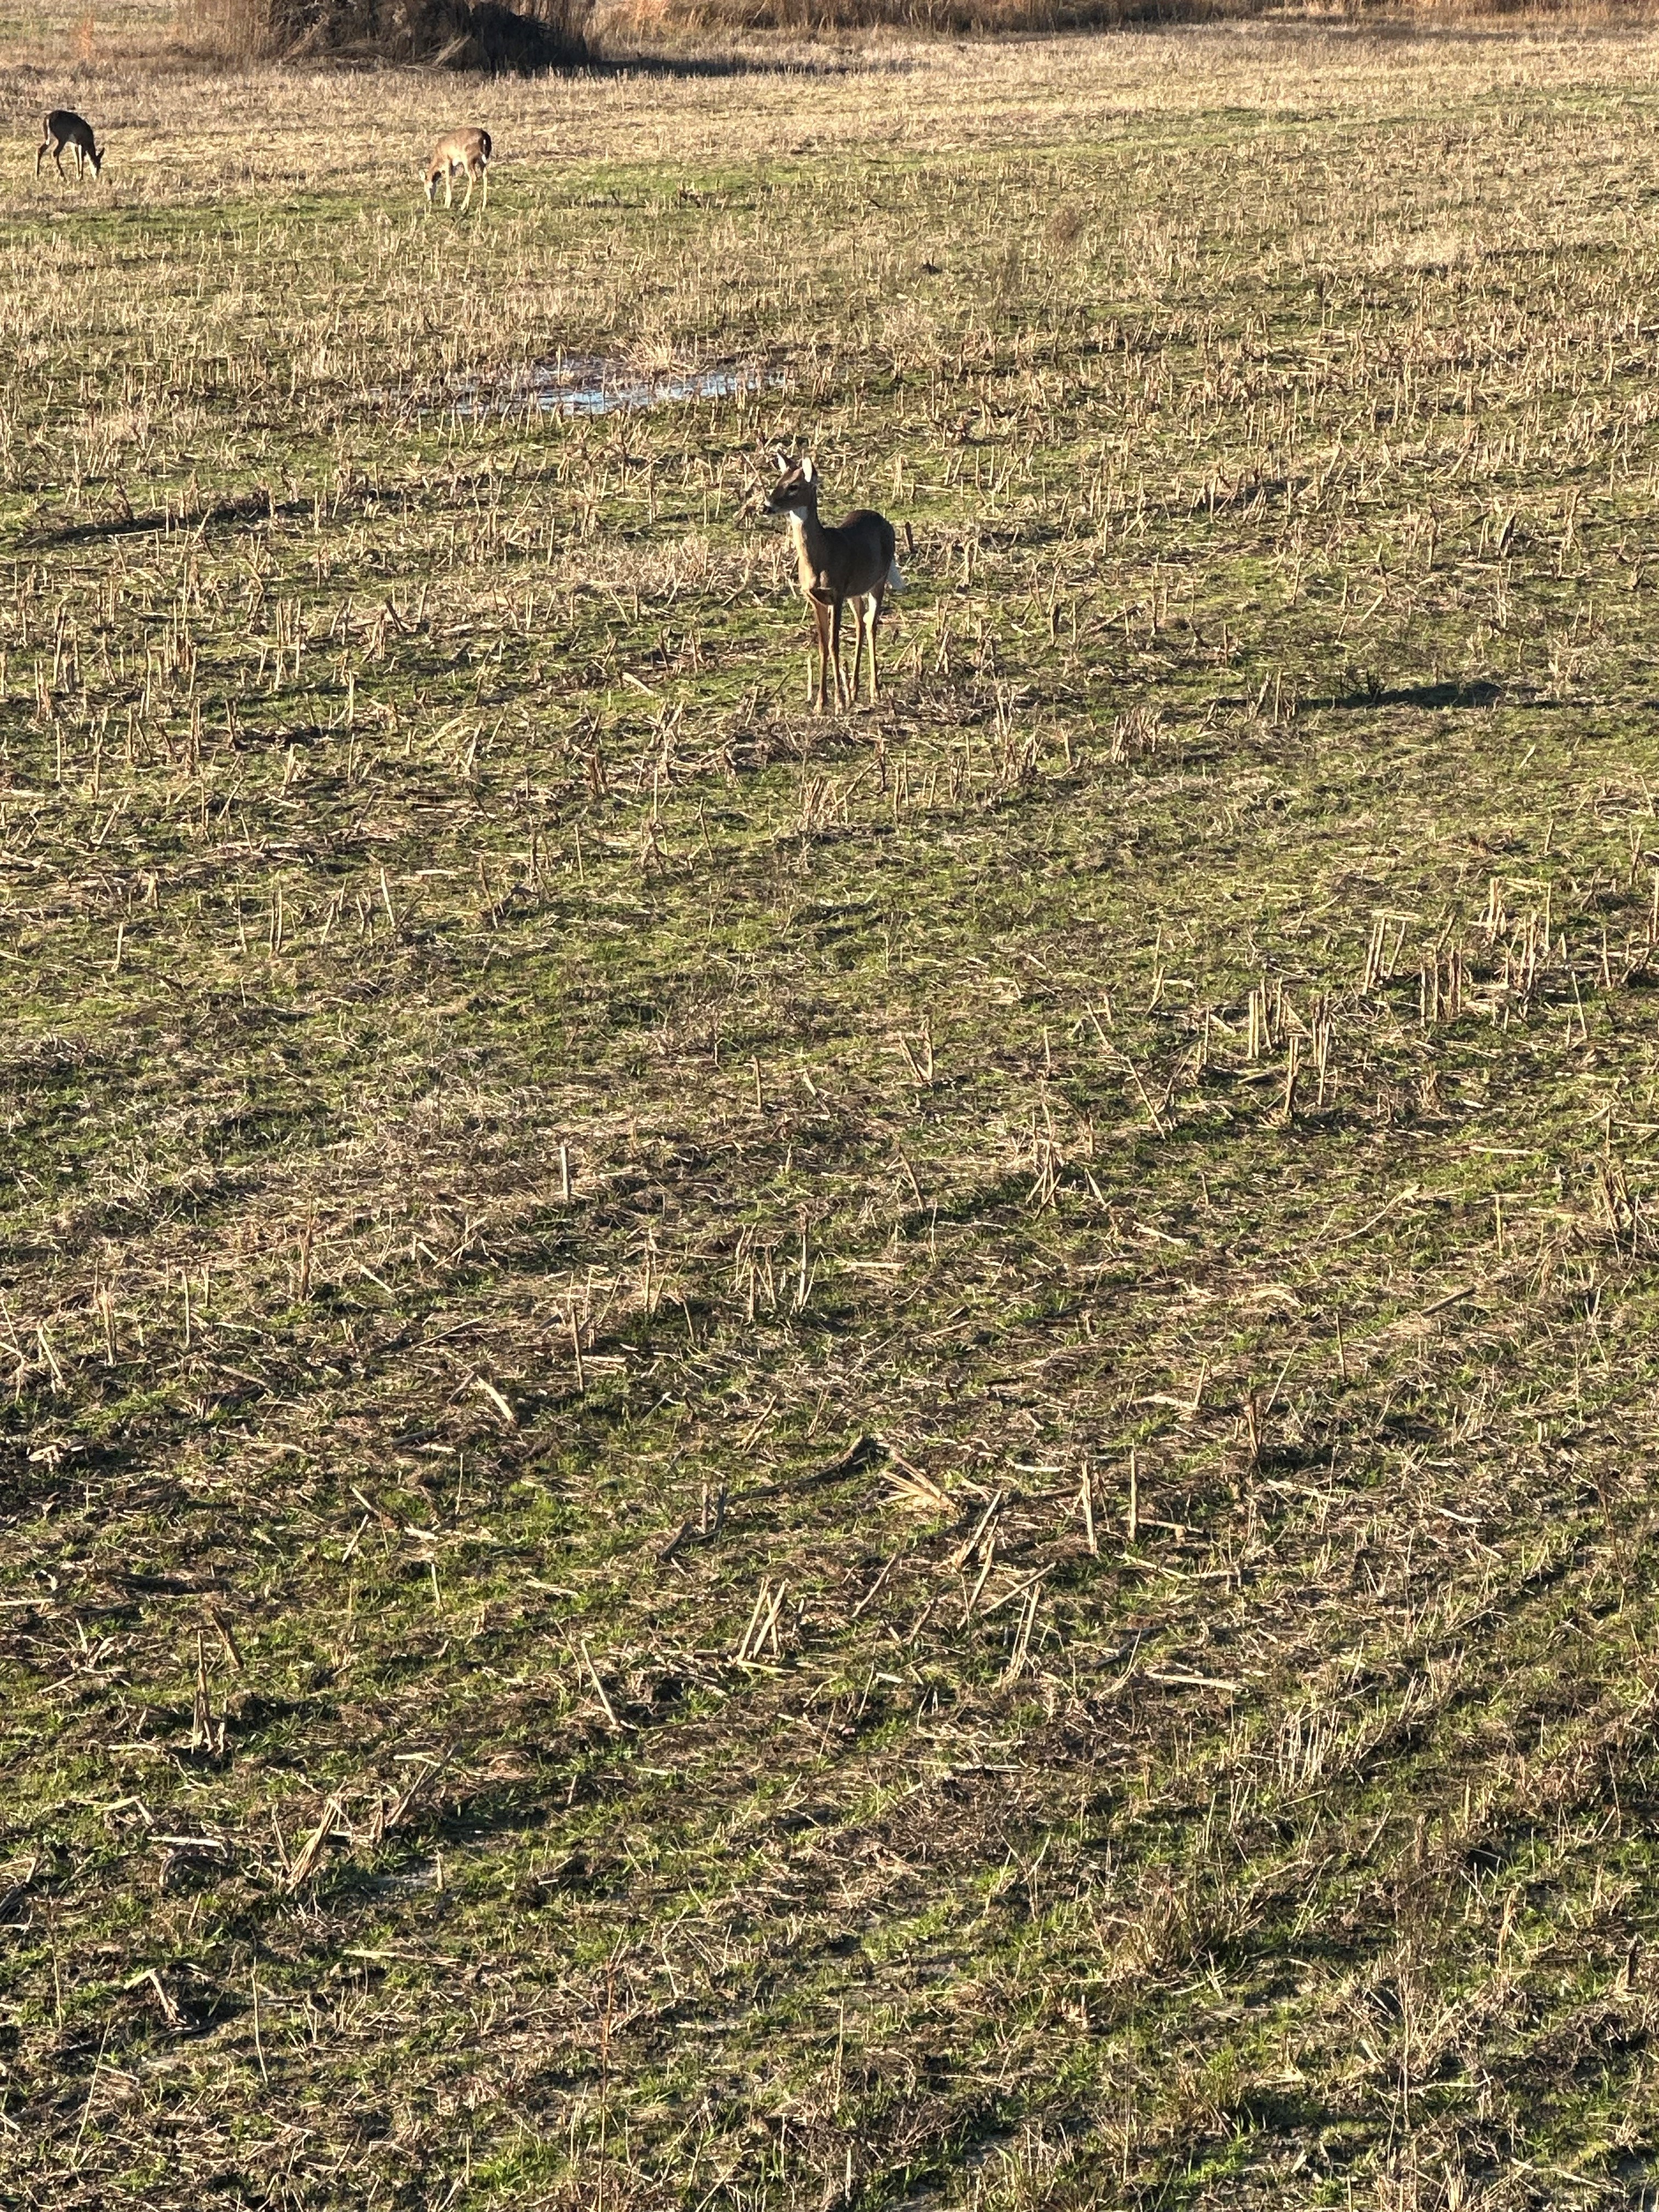
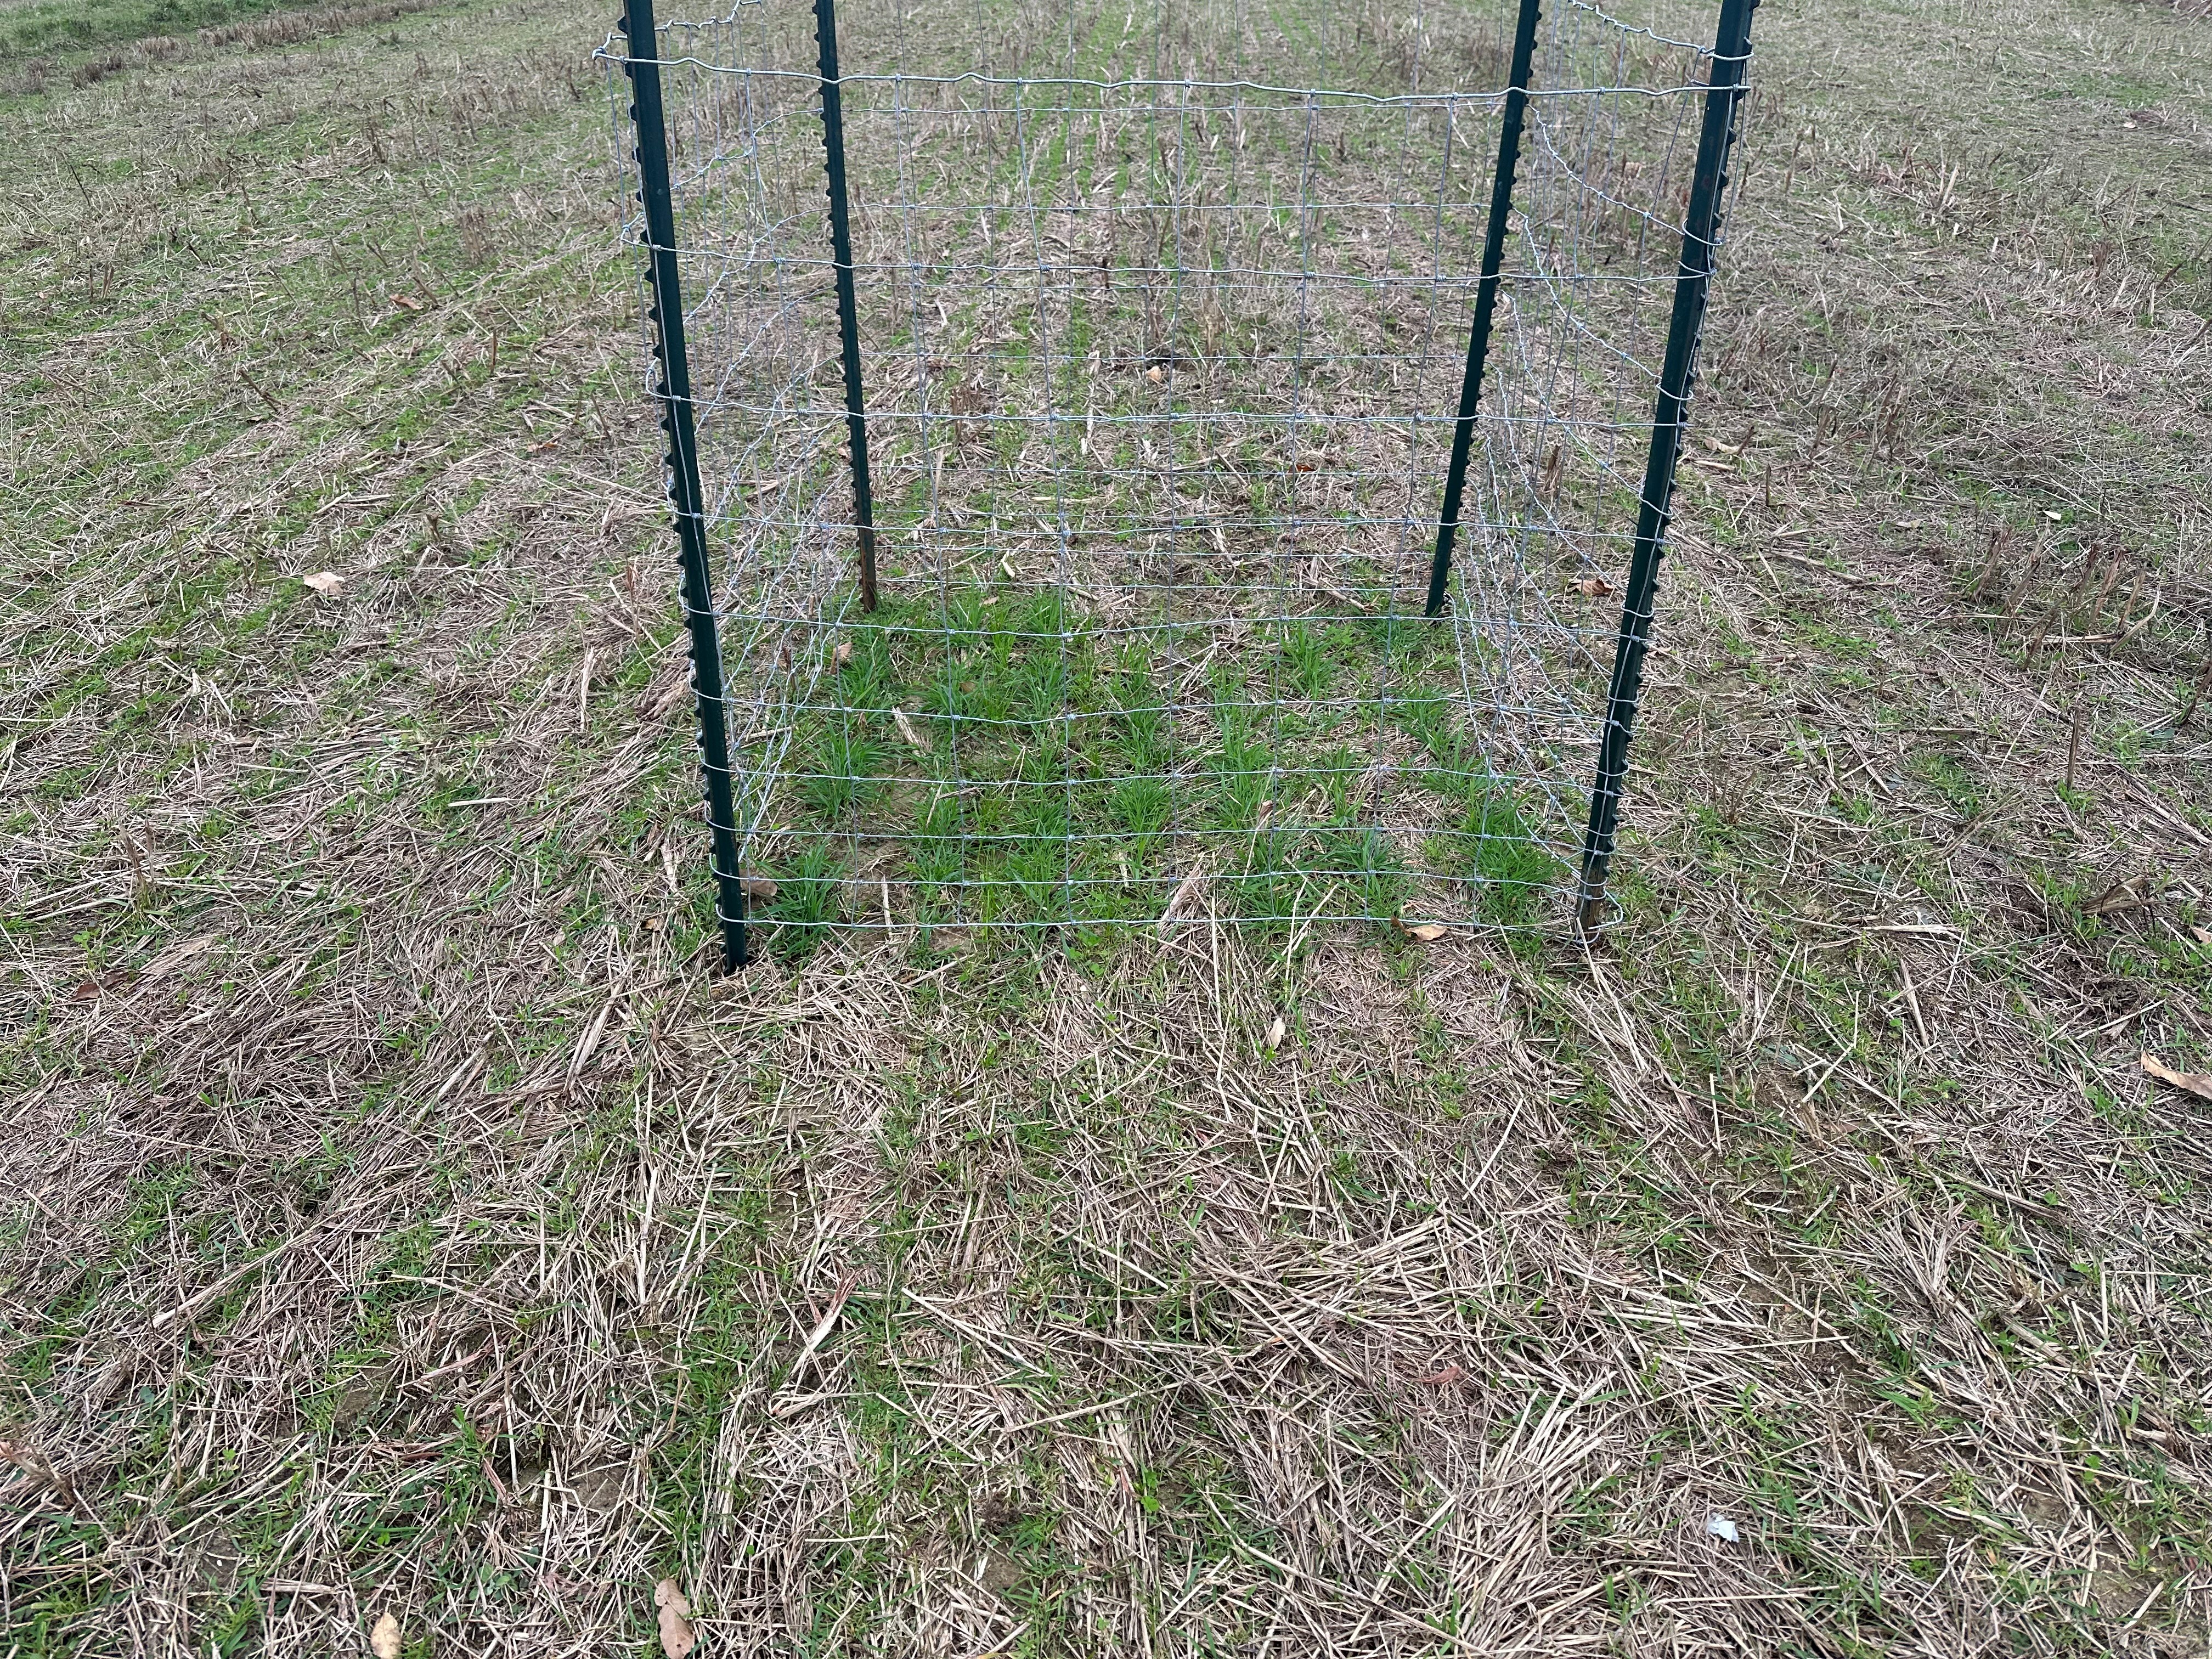
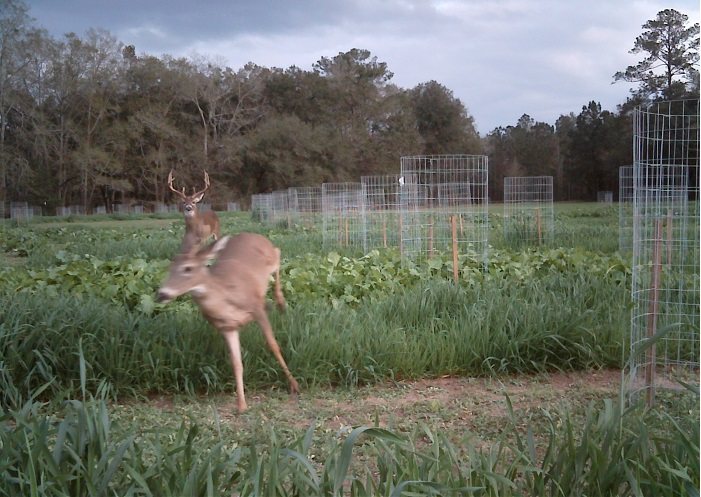
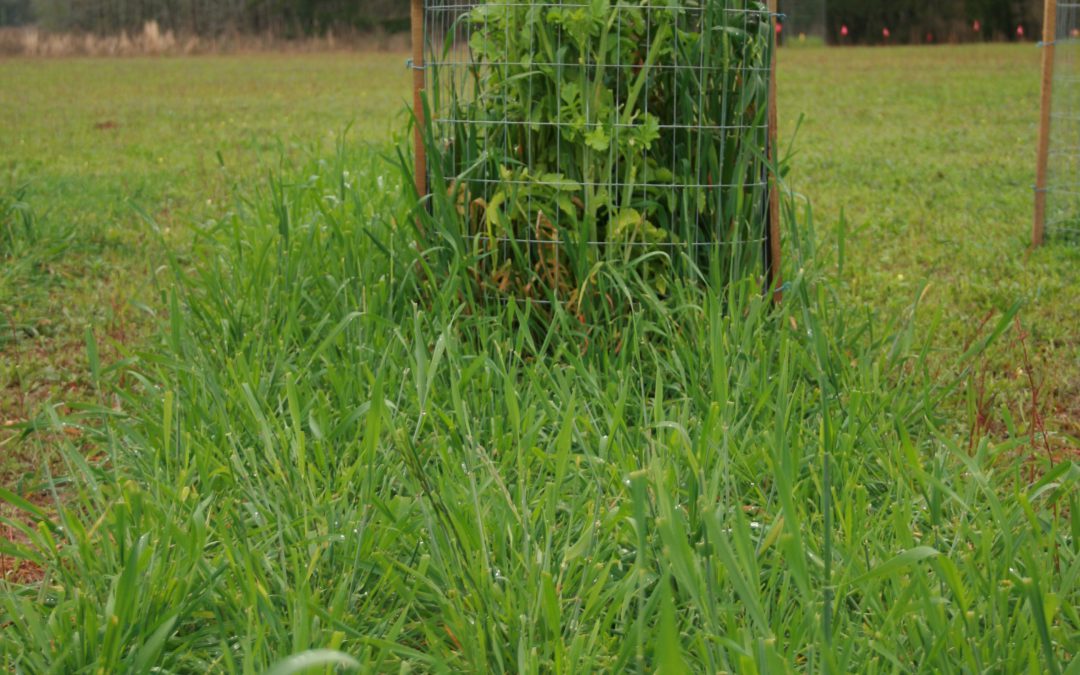
Too small food plot size. Just like with grazing a cattle pasture, there is a finite amount of grazing pressure that food plots can support and many that I see are overgrazed. So, what can hunters do? If possible, the best solution is to enlarge small food plots to a minimum of ½ acre, preferably larger (1-5 acres). It’s not complicated – the plants we grow in winter wildlife food plots (small grains, ryegrass, clovers, etc.) are extremely palatable to deer and very nutritious. Combine that with greatly reduced native forage options in Panhandle winters, and a quality food plot will often draw large numbers of deer, in excess of what small food plots can bear. To be certain deer pressure is the issue and not poor growing practices, construct exclusionary cages for your food plots; these will allow you to see how your forages grow in the absence of grazing pressure. You might be surprised how good your grass looks with no deer on it and be motivated to increase food plot size accordingly.
Not harvesting enough deer. Even when hunters do all the above correctly, forage performance sometimes lags. This can be a strong indication that too many deer are using the food plot. Stocking rates for deer are difficult to determine because there are many variables involved (native vegetation in your area, hunting pressure around you, etc.). However, if exclusionary cages show quality forage growth, food plots are adequately large, and your forage still struggles, it is likely as simple as too many deer using the forage available. Harvesting only a buck or two a year and no does isn’t going to solve the problem either. In this situation, the solution is often as simple as taking advantage of Florida’s anterless deer harvest periods (doe weekends) to harvest some does, applying for antlerless deer permits if your property meets the qualifications for that program, and filling your freezer with more tasty, nutritious venison.
While there can be many causes for poor winter food plot performance, most hunters can improve their forage situation by simply soil testing and amending accordingly ahead of planting, enlarging food plots where possible, and harvesting a few more deer than they have previously. For more information about winter food plots and any other wildlife management topic, contact your local UF/IFAS Extension office. Happy Hunting!
As hunters we are all concerned and want to understand what is going on with Chronic Wasting Disease (CWD). With the cool in the air, hunting season is defiantly on everyone’s mind. With that there has been a lot of information that has come out recently to clarify and update the public on new regulations and to provide guidance for the hunting season regarding Chronic Wasting Disease (CWD) including Executive Order EO 23-30. As a hunter myself, I have attended the meetings and read the executive orders but that doesn’t always make it super clear. So here is a breakdown of the information I have gained from visiting with law enforcement officers and officials from the Florida Fish and Wildlife Conservation Commission (FWC).
Baiting
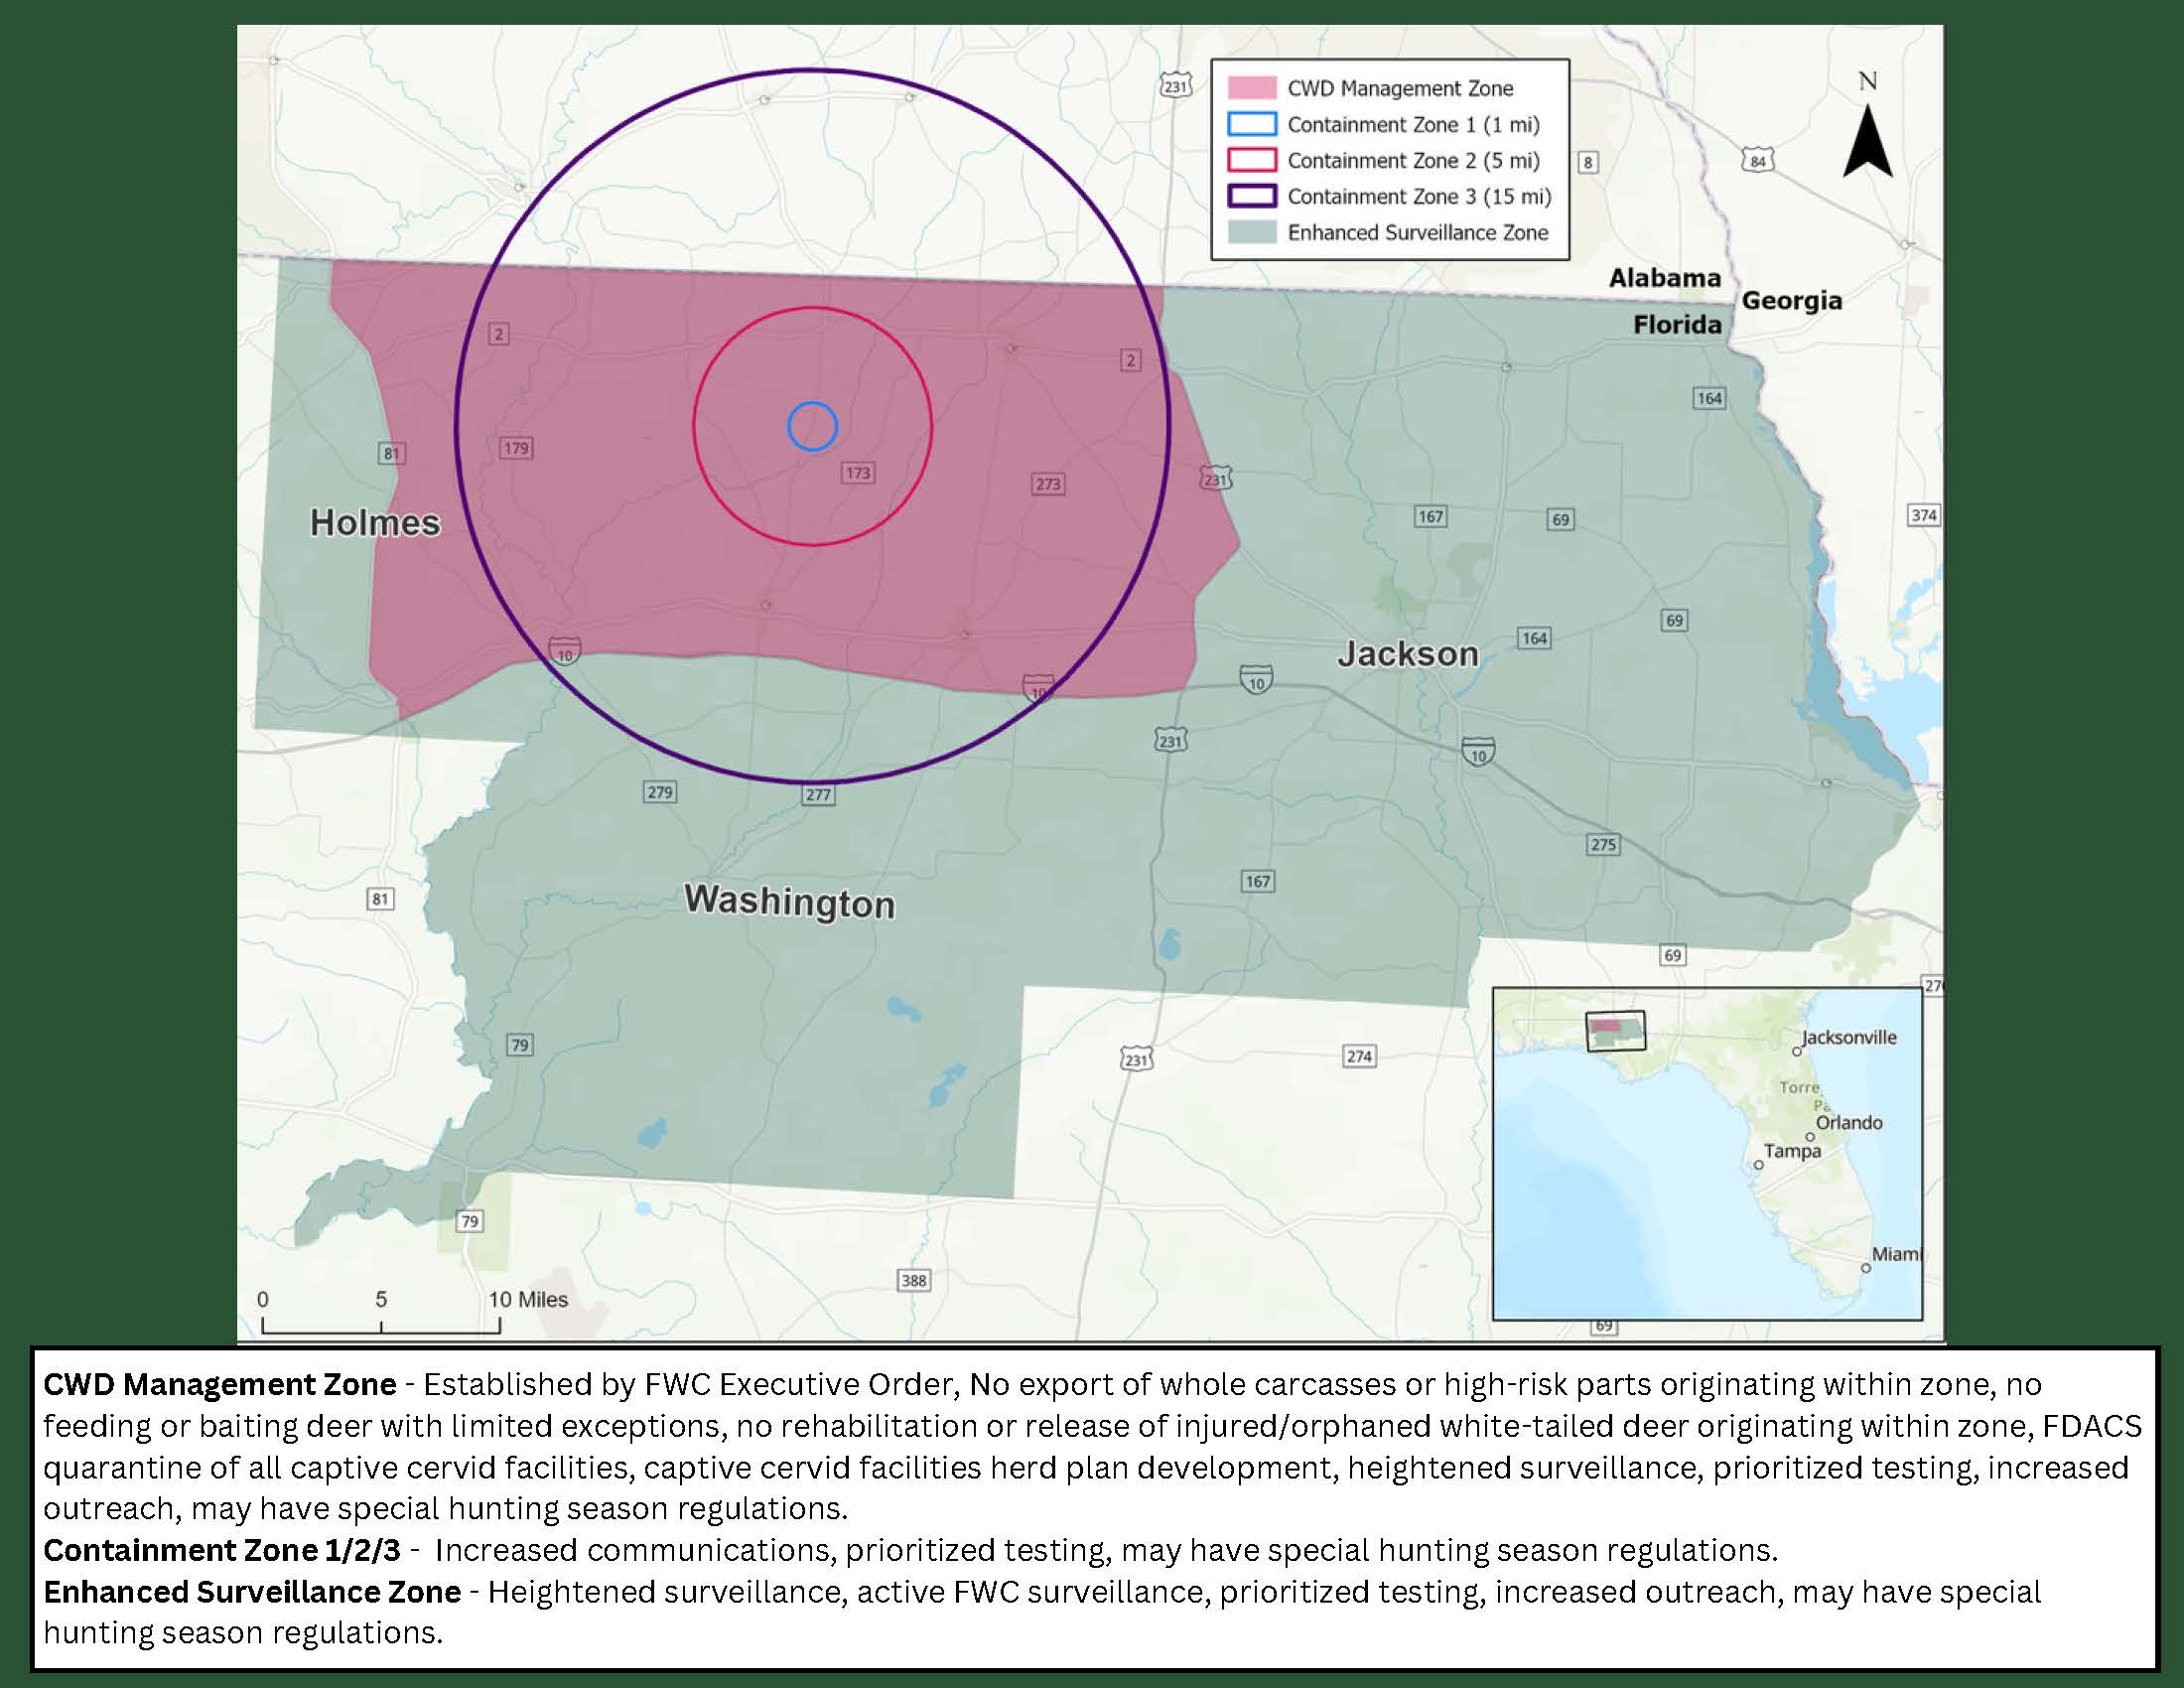
No baiting (feeding) is allowed within the CWD management Zone, including baiting with corn or other grains/feed and the placement of salt/mineral products. This includes feeders or feeding on the ground, but this does not include food plots. If you are illegally baiting deer, it will be considered a 2nd degree misdemeanor, punishable up to a $500 fine and 6 months in jail. There are no current or future plans to charge a fee for a baiting permit. According to the comments at the public meeting on 9/19/23, baiting is something we can control. Deer are social animals that will naturally interact in the wild, and hunters cannot control that natural interaction. Yes, deer are still interacting at food plots, but the interaction is less concentrated than at a feeder for example. Not baiting is a useful tool for the early stages of CWD management. Food plots are not perfect, but it is a reduced risk and a compromise. This baiting rules only applies to the Management Zone above, not to the expanded monitoring zone seen below.
Bag Limits
There were no changes made to total bag limits. Each hunter is still allowed 5 total deer, two of which can be antlerless. Deer that test positive do not count toward an individual’s bag limit. If you harvest a deer, decide to get it tested, and it comes back positive, you can surrender the positive deer the harvest to FWC, and that deer will not count toward your bag limits.
Movement of Harvested Deer
Deer that were harvested in Florida outside the CWD management zone can be brought into the zone without being deboned/processed. They can also come in and go back out of the zone after harvest (example: I kill a deer outside the zone, then I travel into the zone. I can then take the whole, harvested deer back out of the zone). Deer harvested within the CWD management zone CAN NOT leave the zone without being deboned and all soft tissue removed from the hide and skull. If you harvest a deer in the management zone and it comes back negative for CWD, you still can not move the deer out of the zone. Only deboned meat, cleaned hides, or skulls/skull caps with soft tissue removed can leave the CWD management zone.
–
Testing
Currently the only mandatory deer harvest check is planned for December 9-10, 2023 in Holmes, Washington and Jackson Counties. This is during the added antlerless deer weekend for those counties. If you harvest a deer during this weekend, you will need to take it to one of the multiple check stations. For testing you will bring the whole deer (maybe field dressed) to the check station. They will collect additional information about the deer (age, etc.), as well as the needed sample for CWD testing. FWC will be posting the locations of those check stations later. Currently, testing time is expected to be approximately 30 days. FWC understands that 30 days is a long time to hold meat before processing and are working on ways to shorten that turnaround. There will be voluntary testing opportunities available within the CWD management zone throughout the entire hunting season. Current sampling goals call for an estimated 1000+ samples from the CWD Management Zone to determine an approximate prevalence of the disease in the area.
–
Changes to Antlerless Deer Harvest
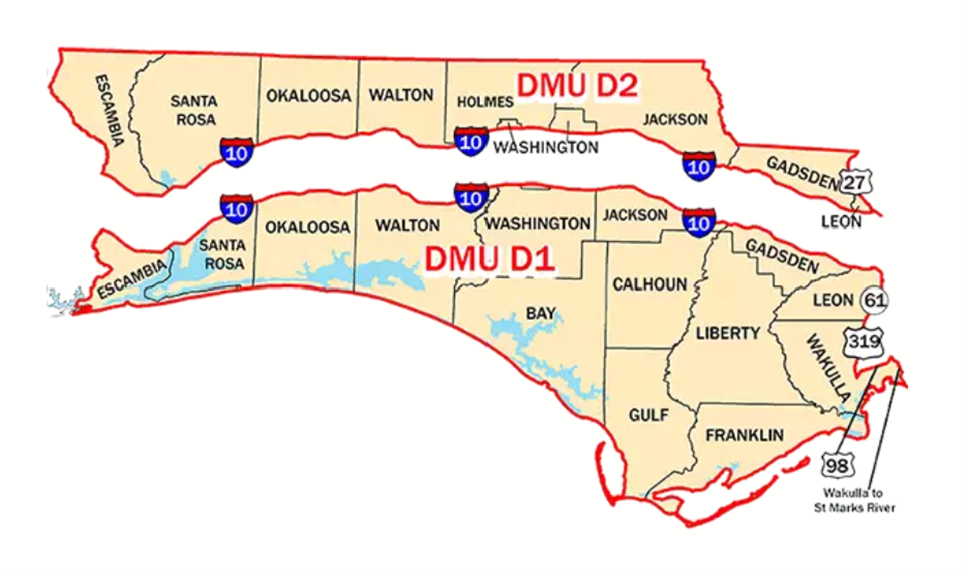
DMU-D2
Doe harvest has been extended to encompass the entire hunting general gun season. Meaning you may harvest a doe or antlerless deer during the dates where antlerless harvest was previously allowed in archery season (Oct. 21 – Nov. 22) and in muzzleloader season (Dec. 2-3) as well as during the entirety of the general gun season (Nov. 23-26, Dec. 9 – Feb. 18) However, THIS DOES NOT CHANGE BAG LIMIT. Each hunter is still only allowed to harvest two antlerless deer this season. Antlerless deer season dates have not changed for Wildlife Management Areas (public land) because those have their own regulations. DMU-D2 is the western and northern boundary is the Florida/Alabama line. The eastern boundary is U.S. 27. The southern boundary is Interstate 10.
DMU-D1
The only change to antlerless deer or does during the season for D1 is that they can be harvested during the check station weekend on Dec. 9-10, but only in Holmes, Washington and Jackson Counties. This does not include Wildlife Management Areas. DMU-D1 is the western boundary is the Florida/Alabama line. The northern boundary is Interstate 10. The eastern boundary is Hwy 61 south to U.S. 319 to U.S Hwy 98, east along U.S. 98 to the Wakulla River, south along the river to St. Marks River and on to the Gulf of Mexico. The southern boundary is the Gulf of Mexico.
Taxidermy
Deer harvested within the CWD management zone cannot be taken out of the management zone without proper cleaning. Deer should be caped out with a clean cape and the head or skull cap must be free of soft tissue before leaving the CWD management zone. Deer harvested outside the CWD management zone do not have to be handled differently from past seasons.
Processors
Deer harvested within the CWD management zone cannot be taken to a processor outside the management zone without being fully cleaned and deboned. Deer harvested outside the CWD management zone can be brought into the zone for processing without being cleaned or deboned.
The FWC is asking anyone who sees a sick, abnormally thin deer or finds a deer dead from unknown causes to call the CWD hotline, 866-CWD-WATCH (866-293-9282) and report the animal’s location. If you need any clarification for the rule changes, bag limit updates or other matters related to the upcoming hunting season please feel free to reach out.
With the recent discovery of CWD in Florida and the subsequent prohibition of feeding deer within the CWD Management Zone there has been some additional motivation applied to hunters/land managers to establish new food plots. Moreover, the timing and unexpected nature of the discovery have hunter/land managers somewhat in “scramble mode” to make the shift away from feeders to plantings before archery season starts (10/21 in the Panhandle). Whether or not you are in the CWD Management Zone or if you have been contemplating establishing food plots for a long time the following comments are worth considering as you work through the process of establishing a new food plot.
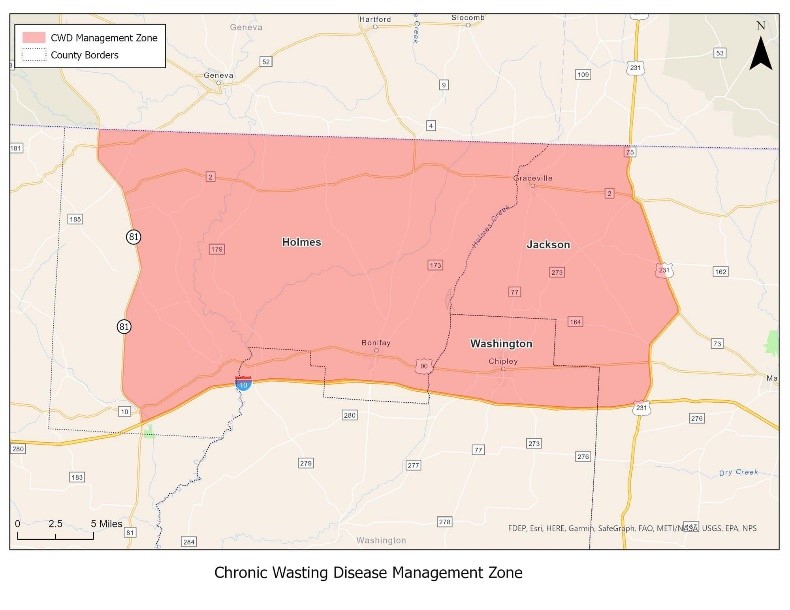
CWD Management Zone Map. Feeding and/or baiting deer is no longer allowed within the management zone (red area on map). Courtesy myfwc.com
First, food plots are not corn feeders. That is to say that food plots should be viewed as habitat improvements, not attractants (even though they may well improve the likelihood of seeing deer and other game species at a specific location) and their success should be evaluated accordingly. Food plots have the most positive impact when they are maintained year-round with cool and warm season plantings. They are long term investments.
When it comes to food plots, size really does matter. Food plots need to be no less than ½ acre in size, preferably between 1 and 5 acres. Maximum habitat benefit being reached when food plots make up approximately 5 percent of the managed acreage. The kinds of plants in food plots are, by design, ones that wildlife find highly desirable (because they are highly nutritious). Considering this, it is easy to understand why plantings smaller than ½ acre struggle to establish – the plants simply don’t get a chance grow past the seedling stage.
After a location is identified, it is crucial to manage unwanted vegetation prior to preparing the soil and planting the food plot. If it is not eliminated, existing vegetation will compete tremendously with food plot plantings. Even if mechanical disturbance (disking, tilling, etc.) appears to remove the existing vegetation, much of it will regrow. This regrowth from established root systems will be more than a match for new seedlings. Apply herbicide before you begin soil preparation. Equally as important, give the herbicide sufficient time to do its work before mechanically disturbing the site (weeks, not days). Specific herbicide recommendations will vary depending on what vegetation you are trying to manage, but most food plot site prep applications will involve fairly high rates of glyphosate. Don’t hesitate to call me (850-638-6180) – we can discuss your site and dial in an herbicide recommendation. You do not want to skip this step; get in front of weed pressure before you plant.
If you want a food plot to be productive and successful you must effectively address soil fertility. First and foremost, soil pH must be corrected. Any needed applications of lime/dolomite need to take place first, well before any other fertilizer is applied (ag lime can take months to go into soil solution and alter soil pH). If fertilizers are applied before the soil pH is corrected the nutrients may still be unavailable to the plants. Once a food plot site is determined, collect a representative sample of the rooting zone soil and submit it to a lab for analysis. This is the best way to get the information needed to make informed choices regarding lime and fertilizer applications. Talk with the folks at your local Extension Office for more info on how to collect and submit soil samples. Take and submit soil samples now. Apply any need lime soon, during land preparation. Apply recommended fertilizer (N, P, K, and micros) at planting or soon after emergence. Fertilizer applied when there are no plant roots present to adsorb it is wasted.
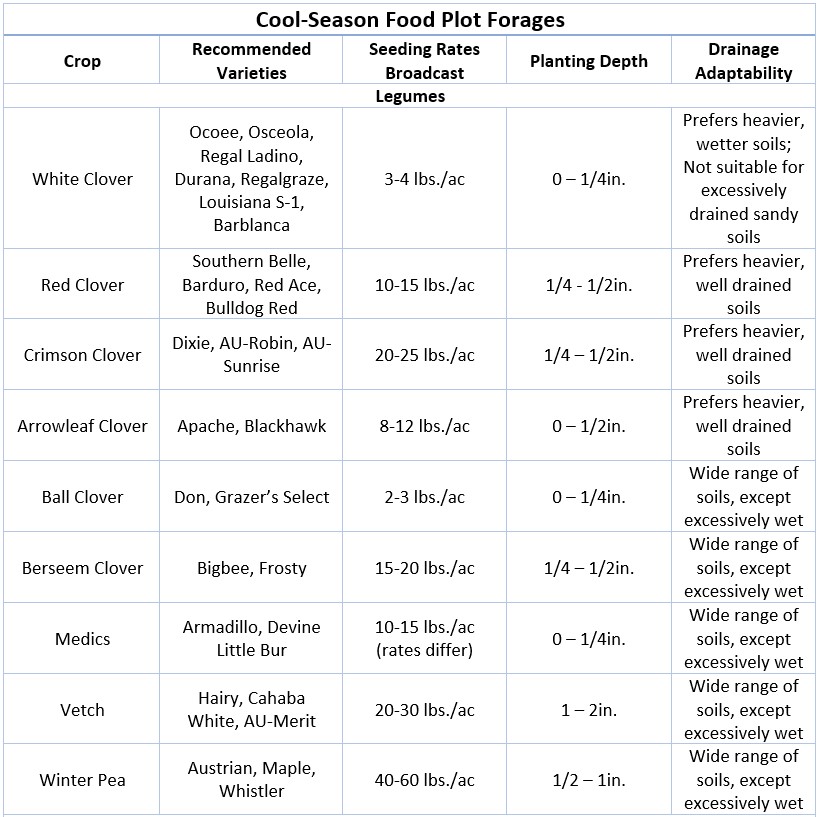
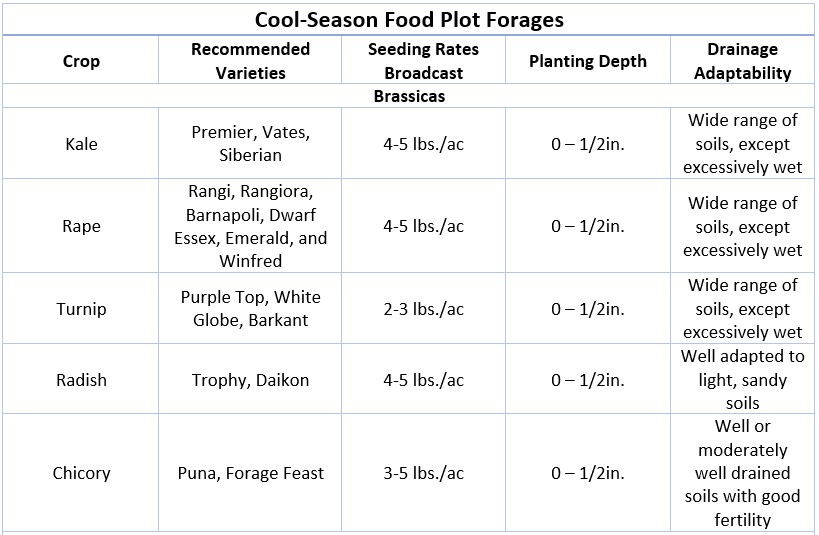
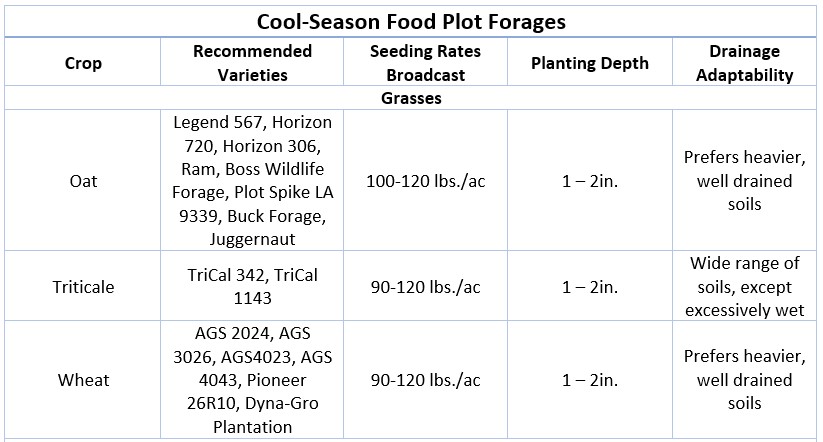
By far the most common food plot question I receive is “what should I plant?”. I intentionally held this until last because if the topics above are not addressed properly plantings will not be successful. I included the table below to help answer the “what should I plant?” question. To accompany the table, here are some additional statements to help guide your crop selection.
Note the exclusion cages in the plots of forages being evaluated at the University of Florida’s North Florida Research and Education Center. Photo Courtesy of Holly Ober
Forage varieties matter. Use varieties that will work in Florida (see table for specifics). There are lots of forages sold that will not grow well locally. Sourcing seed can be challenging, start now.
The concept of blending forages is great, and highly recommended. That said, be careful with pre-packaged mixtures. You’ll generally get more of the “good stuff” by putting together your own blend. When making your own blend, use ½ of the high end of the seeding rate for each forage you include. Don’t go crazy, 3-5 different forages is plenty.
Try to utilize forages are well adapted to your site. The table shows varieties that are adapted to Florida and includes comments on site preference as it relates to drainage. You need to account for your site’s drainage characteristics when selecting forage varieties. Excessively well drained – deep sands; Moderately well drained – good soil by FL standards; Poorly drained – stays damp and/or will stand water seasonally.
If deer are the primary game species you are managing, focus on broadleaf plants (legumes and brassicas), not grasses. Hunters like grasses because they come up fast and are relatively easy to grow, deer like broadleaf plants because they are generally more digestible and higher in nutrients. Some grass in the blend is fine but don’t skimp on the broadleaves.
Some of the broad-leaved plants, particularly clovers, are highly preferred by deer but somewhat slow to establish. This combination can make it appear that the clovers don’t come up at all or preform very poorly. Before you jump to those conclusions, I would encourage you to use an exclusion cage or two in your plot. The cage will show you how the plant performs without grazing pressure. A few years of observation can really enable you to dial in what your deer prefer the most and adjust your plantings accordingly.
Don’t forget about planting date and depth. To keep life simple, let’s say that everything included on the table should be planted between October 1 and November 15 (ideally, triticale, wheat, and rye would be held until after October 15). Planting depth is very important and is a major factor in determining which forages can/should be planted together. It is perfectly acceptable to plant the deeper seeded grasses first and then come back over the field to plant the shallow seeded broadleaves. To achieve a target planting depth of ½” or less the soil will need to be packed prior to planting.
Food plots are not simple, but they can be very rewarding. There are way more factors to consider than what I included here. See the additional resources linked below and contact your local Extension Office or myself to discuss further.
When people put in food plots and are not successful, I normally see the following three problems as possible cause. First, they didn’t consider soil pH or fertility. Second, they didn’t choose the right plant varieties for our area. Third, they didn’t manage weeds properly or at all. So following these three steps can help establish a successful food plot.
Soil pH and fertility
Often wildlife enthusiasts ignore soil pH and fertility. If the soil pH isn’t right, fertilization is a waste of time and money. Different plants have different needs. Some plants need more phosphorus than others. Some need more iron or zinc or copper. The availability of these elements not only depends on whether they are present in the soil but also on the soil pH. Test, Don’t Guess! It takes a week or two to get the full soil sample results back and costs only $10 per sample. That’s a pretty cheap investment to insure a successful food plot.
Variety selection
Cool season food plots are generally used as attractants for hunters. It does provide some nutrition for the wildlife as well. The goal is to select forages that are desirable to the animals as well as varieties that grow well in our area. Some great choices include: oats, triticale, clovers, daikon radish and Austrian winter peas. We recommend a blend because it extends the length of time that forages are available to the animals as well as decreased risk of food plot failure. For a more information on recommended cool season forages, go to https://edis.ifas.ufl.edu/ag139.
Tetra Treat Clover Mixture Plot
Weed management
Often tilling the food plot prior to planting is enough to manage most weeds. This is okay when you have native weeds on relatively flat land. If erosion is an issue, or if more problematic weeds such as cogongrass are present, a different weed management strategy is recommended. Glyphosate is a good choice as it is a broad spectrum herbicide that will not negatively affect the food plot. Spray the area with glyphosate 3-4 weeks prior to planting to give it time to kill the weeds. Also, remember that many herbicides are not effective during droughts, so you either need to wait until we have rainfall or work with your extension agent to find a solution that will work for your situation.
These three steps are crucial to successful food plots. First, get your soil pH right and then fertilize properly. Next, choose the right forages and varieties to plant. Then control the weeds so they don’t choke out your food plots. The next step is to enjoy this hunting season. For more information on wildlife food plots, you can contact your local county extension agent.
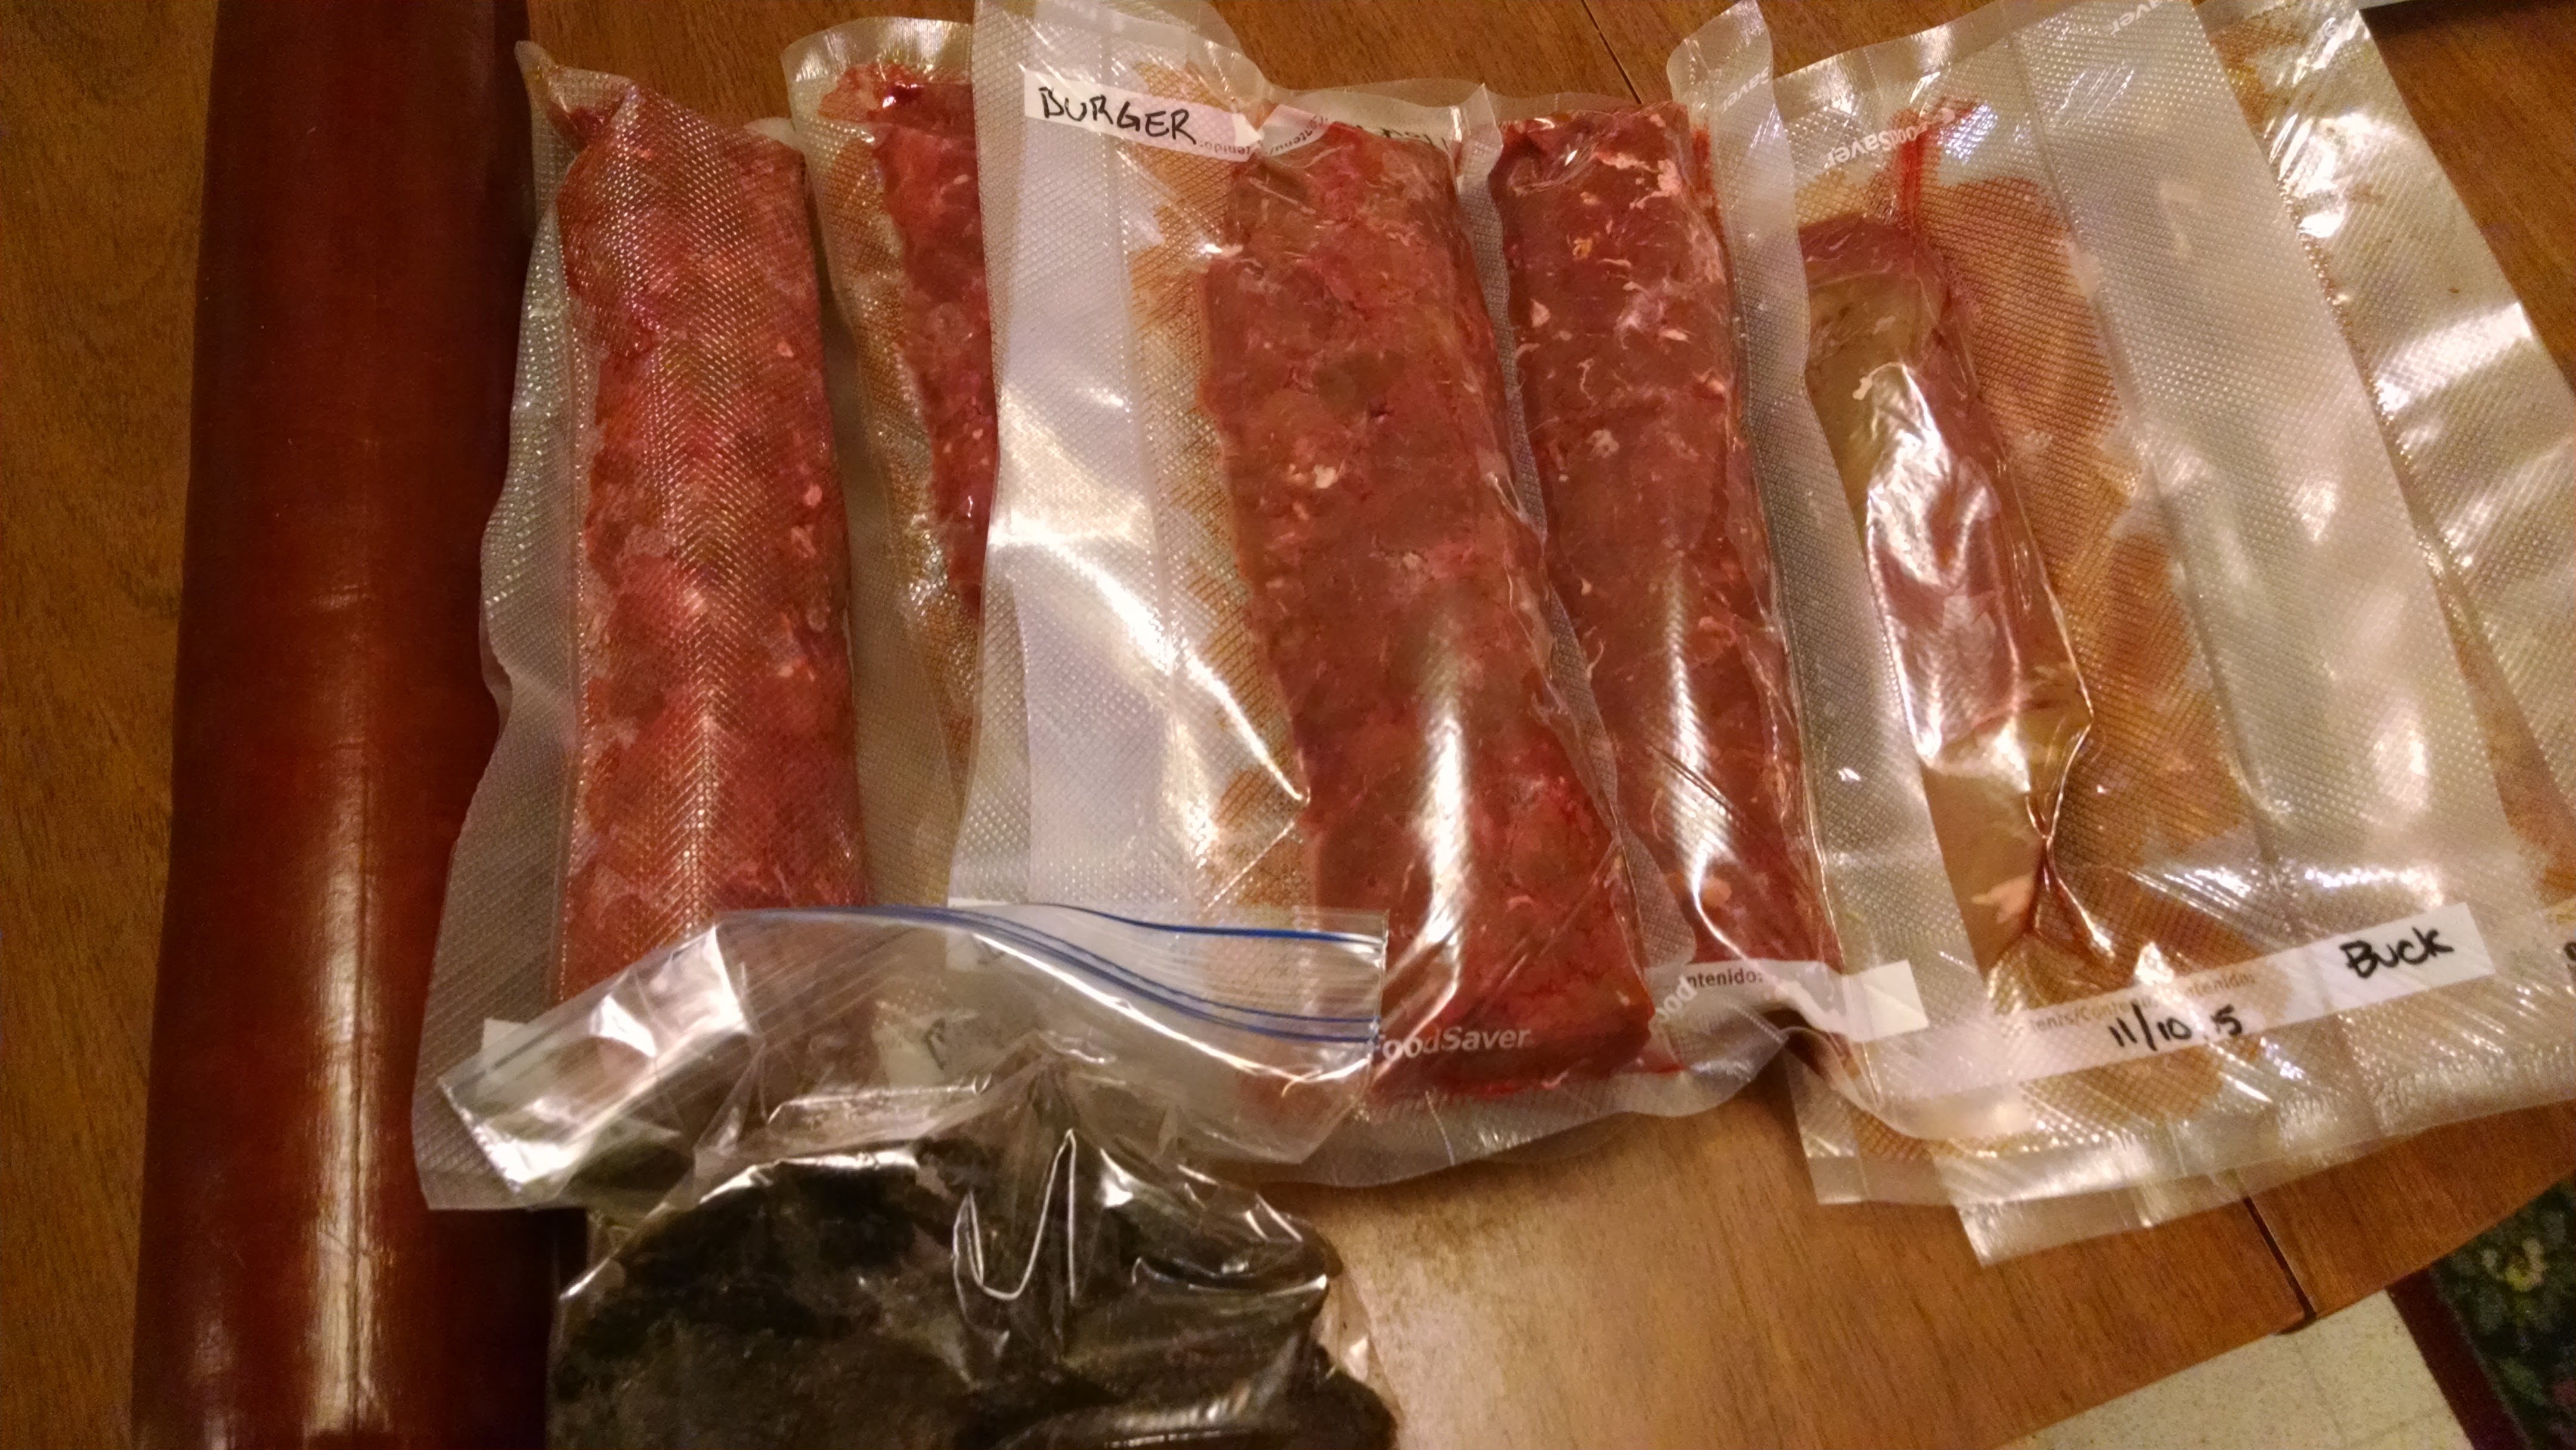
Freshly processed venison. Photo credit: Jennifer Bearden
When hunting, food safety begins in the field. The goal is to have safe meat for you and your family to eat. Here are a few ways to keep your food safe:
Shot placement – that’s right. Food safety begins with an accurate shot. Your goal should be to prevent the contents of the digestive tract from touching the meat. A gut shot can quickly ruin meat and make cleaning the animal harder.
The quicker you get the meat chilled the better. Improper temperature is meat’s number one enemy. The recommended storage temperature to prevent bacterial growth is 35-40°F.
Handle the knife with one hand and the carcass with the other. The hide can harbor dirt and pathogens so care should be taken to prevent contamination of the meat.
Have vinegar water and chlorine water on hand. Vinegar water (50/50) can be sprayed on areas where hair or hide touch the meat. Rinse hands and tools periodically in a bucket of sanitizing solution of 1 tbsp of chlorine per gallon of water.
Think food safety through the whole process. Prevent cross contamination by keeping anything from contacting the meat unless it has been sterilized. Keep the digestive tract intact and prevent the contents of it from contacting the meat. Chill the meat as quickly as possible. When further processing, continue to use sterile surfaces and tools.
Many hunters age deer meat to increase tenderness and improve flavor. This is safe if done properly. There are two ways to safely age meat. Dry aging in a walk-in cooler or refrigerator is the best but not feasible for all hunters. The walk-in cooler or refrigerator must be clean and have good air circulation and proper temperature control (34-38°F). The meat can aged for 7-21 days depending on the amount of moisture in the cooler. Too much moisture can increase microbial growth on the meat which should be cut away before further processing. There will also be a layer of dry meat that will need to be cut away.
An ice chest can also be safely used to age meat. First, fill the clean ice chest with ice and water. Add meat immediately to ice water and soak for 12-24 hours. This will quickly cool the meat to the proper temperature. Then drain the water out of the cooler and add more ice. Keep cooler drained of water and full of ice for 5-7 days. There may be “freezer burn” on the outside of the meat that can be cut away before further processing.
Remember food safety when further processing and storing. Wild game food safety begins in the field and ends with consumption.
For more information about safe handling of venison:


