
The end of the year is the best time to winterize irrigation systems, prior to freezing winter temperatures. Photo credit: Doug Mayo
Gary L. Hawkins, Department of Crop and Soil Sciences Department & Calvin D. Perry, C.M. Stripling Irrigation Research Park
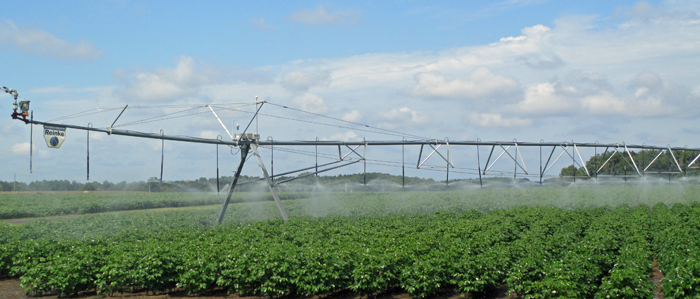
Irrigation systems are typically used during the summer months to supply supplemental irrigation water to crops as needed. This application of water can be through drip irrigation systems on the surface or sub-surface. Application of water can also be provided overhead with center pivots, travelers, or solid set systems. Regardless of how supplemental water is supplied to the crop, the irrigation system should be checked at the end of the season to maintain proper operation for the coming season. There are some things that should be done at the end of each season to “winterize” an irrigation system, through normal maintenance, and draining the water out of the system, prior to hard winter freezes. The University of Georgia Faculty have a nice publication to guide farmers on steps to winterize drip and center pivot irrigation systems. Some basic steps can protect your irrigation system, as well as ensure that the system is ready for the next growing season.
Center Pivot Winterizing Checklist
- Conduct a sprinkler package performance check
Prior to shutting the system down for the year, perform a “catch-can” uniformity test to verify that the system is applying water uniformly (see UGA Extension Circular 911, “Evaluating and Interpreting Application Uniformity of Center Pivot Irrigation Systems”). Check for leaks, malfunctioning or missing sprinklers, damaged pipes, etc., and repair the problems. Consider a new sprinkler package that could replace what’s on your system now if it’s not performing well. There are many new, innovative sprinkler designs on the market. - Drain the irrigation system
Remove the plugs to drain pipes, valves, pumps, sprinklers, booster pumps, and anything else on the above ground portion of the irrigation system that can hold water. Drain the pump casing to remove any water that may still be in the casing. - Secure system components
Close or cover openings (even on motors and pumps) that would allow mice to enter. Lock the control box in the OFF position. - Service required parts.
Service gearboxes, drive lines, motors on pivot towers. Service engine used to drive the pump. - Restore the ground around the tracks
Repair any rutted pivot wheel tracks. Repairing tracks at the end of the season will help reduce erosion during the winter and spring. - Test the metering equipment
Make sure the flow meter on your withdrawal point (usually at your pump) is functioning properly. A properly functioning meter can be used as a means to determine proper operation of the pumping unit. Note the end reading so that, in conjunction with a starting reading, you will have a record of water used over the growing season.
 Drip Irrigation Winterizing Checklist
- Flush with clean water
Flushing of drip tube based systems (like micro-spray systems, inserted emitters, in-line emitters) will allow removal of small debris that could potentially clog emitters during winter drainage or upon start-up the next season. Instructions for adequate flushing: 1 – Open the end or flush plugs on drip lines, 2 – Increase the pressure on the system slightly above that of the operating pressure, 3 – Flush with clean, debris free water, 4 – Continue flushing until the farthest point from the pump has water flowing for at least three times as long as the time required for the water to reach the end point, and 4 – Close the end plugs and turn pump off. - Run a chlorination flush
Running a chlorination flush on drip irrigation systems with drip tubing and emitters (in a permanent or semi-permanent system) prior to storage over the winter months will kill and remove any algae that has built up. A short clean water flush after the chlorination will remove most of the chlorine from the lines. - Open any drain plugs at the lowest most points
When all chlorination and clean flushes have been completed, remove the drain plugs at the lowest points on the irrigation system to allow extra water to drain from the system. This will allow water to drain from the lines and standpipes and reduce the potential of water standing in pipes and freezing if low temperatures occur during the winter months. - Back flush the media filters
Back flushing the media filters will remove any sediment that has accumulated since the last back flush. Removing this sediment will reduce the potential of a crust forming over the media during the winter months when there is no water in the filters. If a crust forms, it potentially would have to be removed prior to the next operation. Otherwise performance will be less than optimum. Any sediment remaining in the filter could also potentially be introduced into the system upon start-up and plug up the emitters. After the back flush process and a good clean stream of water is produced, stop and open all drain ports to allow the water to drain from filter(s). - Drain screen filters
Draining the filter will remove all water and reduce the potential of static water freezing during the winter months. At the time of draining the filter, the screen should also be checked to determine if it is still in a good condition and cleaned of any sediment. The case and screen can be reassembled at this time, or the case and screen can be removed during the winter months. If the case is removed, the opening should be covered to stop any rodents or small animals from getting into the filter case or lines, which have the potential to form a stoppage. If the case and screen is returned, then the flush valve should be opened and covered to prevent any water from accumulating in the case and to prevent any animals from making a home in the case over winter. - Drain or remove control valves
If possible, control valves should be removed and stored in a location where freezing is not likely to occur. If the valve is removed, any openings should be covered to prevent rodents or animals from getting in and blocking water flow upon start-up. If valves CANNOT be removed, then the valves should be drained to remove as much water as possible. Draining the valves will reduce the potential of valves if any freezing temperatures occur. After draining, leave the drain port open, but cover it to stop any animals from getting in the valves during winter months. - Remove drain plug and drain water from any above ground pumps
Above ground pumps can hold water in the casing, so pumps should be drained prior to storage. This removal of water will prevent water from accumulating at the low points of the case and freezing during periods of sub-freezing temperatures. If water remains in the case, the expansion of the freezing water can cause the case to crack. - Remove or drain any other system components that may hold water
On some systems, there maybe other components that can hold water. If there are such components in your irrigation system, drain or remove them from the system. As before, if there are any openings remaining after removing the component, they should be covered during the winter. - Secure any electrical components
To prevent the unintentional starting of irrigation components, the electrical boxes should be locked. This will prevent the system from being turned on, which could introduce water into parts of the system that would potentially freeze and crack the irrigation components. - Service any engines used for pumping
All engines used to move water should be serviced prior to storing for the winter. This will be a way to clean the engine, change the oil, and get the engine ready for the next growing season.
Source: UGA Bulletin 1439 – Winterizing Your Irrigation System
demayo@ufl.edu - 850-482-9620
Follow me on Twitter
@UFCowman