by Judy Corbus | Jun 26, 2015

Photo Credit: Chris Luczkow, www.flickr.com
The bright, beautiful colors of a fireworks displays are a sight to behold and the highlight of July 4 celebrations across the country. But, it’s important to be careful when selecting and using fireworks for your family’s celebration. The National Council on Fireworks Safety offers these consumer safety tips:
- Check and obey local laws regarding what types of fireworks are legal in your area. Laws vary by state and municipality.
- Only buy consumer fireworks from a licensed store, tent, or stand. Never buy fireworks from an individual’s house or from someone on the street. Such devices are likely illegal explosives or professional 1.3G fireworks that can seriously injure you. Illegal explosives are often unpackaged and wrapped in brown paper. They are unlikely to have any safety warnings or the place of manufacture.
- Know your fireworks; read the cautionary labels and performance descriptions before igniting.
- A responsible adult should ALWAYS supervise fireworks activities. Never give fireworks to children.
- Do not consume alcohol while using fireworks.
- Wear safety glasses when shooting fireworks.
- Always have a bucket of water and charged water hose nearby.
- Light one firework at a time and then quickly move away.
- Use fireworks OUTDOORS in a clear area, away from buildings and vehicles.
- Never relight a “dud” firework. Wait 20 minutes and then soak it in a bucket of water.
- Never carry fireworks in your pocket or shoot them into metal or glass containers.
- Do not experiment with homemade fireworks.
- Dispose of spent fireworks by wetting them down and placing in a metal trash can away from any building or combustible materials until the next day.
- FAA regulations PROHIBIT the possession and transportation of fireworks in your checked baggage or carry-on luggage.
- Report illegal explosives, like M-80s, Quarter Sticks, and Cherry Bombs, to your local fire or police department.
Use your fireworks according to instructions and safety warnings and enjoy a safe, happy Fourth of July!
Source: National Council on Fireworks Safety, http://www.fireworksafety.com/
by Judy Corbus | Feb 14, 2015

Photo credit: IFAS Communication Services
Do you have a high school senior in your life in the near or not-so-near future? If so, it’s never too early to begin planning and preparing for the expenses associated with senior year. For starters, here are some typical expenses:
- Class ring – While this may be purchased during the sophomore or junior year, the cost can amount to several hundred dollars, depending on the material, design, and vendor.
- Senior pictures – Many photographers offer portrait packages featuring shots taken at off-site locations in addition to the traditional black drape and tux headshots for the yearbook.
- Yearbook – In addition to the average base price of $100, many schools offer ad space for purchase to mark your child’s special year. Prices can run from $25 for a quarter-page space to $200 for a full-page scrapbook-type ad.
- Class dues – Many schools charge students annual dues for various expenses associated with their particular grade level.
- Cap and gown rental, graduation announcements, thank-you cards
- Test fees – If your child will be taking the SAT, ACT, or other placement test, be prepared to shell out $50 or more per each test sitting. Prep classes will be an additional cost.
- College application fees – these generally run $35 or higher per school.
- Dances and Prom – Tickets, corsages, the dress, shoes, hair and makeup, tux rental, limousine rental, and dinner can add up quickly; the average cost of prom in 2014 was approximately $1,000.
- Class trip – Whether it’s a trip to a theme park or a white-water rafting adventure, factor in the costs of transportation, lodging, meals, admission tickets, and spending money for the excursion.
As you can see, senior year expenses can add up quickly! To ease the burden on the family budget, plan ahead. First, contact your child’s school for a list of anticipated expenses. Next, sit down with your high schooler and discuss the expenses he or she is likely to have. Decide together which are needs and which are wants – many items are “nice to have” but not necessary and there may be some items, like a class ring, that are of no interest to your child.
Set a realistic budget for the year and discuss ways in which your child can contribute through, say, babysitting or a part-time job. Explore alternatives to reduce costs – enlist a “shutterbug” friend to take photos, shop consignment stores for prom wear, print your own graduation announcements, purchase inexpensive thank-you cards. If your child is just starting high school, you can set up a special savings account now and contribute regularly so you are prepared when that time finally arrives.
With planning, senior year can be a very special and memorable time in your family’s life without breaking the budget. For more information on setting up a budget, contact your local UF/IFAS Extension Office or visit http://edis.ifas.ufl.edu/topic_budgeting.
Source: National Endowment for Financial Education, “Costs Heavy on Road to High School Graduation – Plan Ahead to Manage Expense of Child’s Senior Year’” http://www.nefe.org/press-room/news/senior-costs-2011.aspx
by Judy Corbus | Nov 21, 2014
 Do you have food containers growing green fuzzies in the back of your refrigerator? It’s easy for leftovers and other food items to overstay their welcome in the fridge, creating a food safety hazard as well as unnecessary clutter. With Thanksgiving and the start of the holiday season just around the corner, now is the perfect time to super-clean your refrigerator. Follow these tips to get your refrigerator ready for Thanksgiving leftovers and other holiday treats:
- Remove everything from the refrigerator.
- Examine each container – discard outdated leftovers and any items of whose age you are uncertain or you don’t plan to use in the near future.
- Remove shelves, drawers, and bins. Wash with a solution of baking soda and warm (not hot) water.
- Clean the interior of the refrigerator with baking soda and warm water. Dishwashing detergent can leave a residue that can lead to odors if not rinsed thoroughly. Dry with a soft cloth or paper towel.
- Clean each container before returning it to the refrigerator.
- Wash the outside of the refrigerator with sudsy water (using hand dishwashing detergent), rinse, and dry. Wash the gaskets around the refrigerator doors – sticky gaskets can cause air leaks, costing you more energy over time.
- Vacuum the dust off the condenser coils, usually on the back of the refrigerator, or under it. Dirty, dusty coils make the refrigerator work harder to cool and use more energy, costing you more money.
- Remove and clean the “pan” or plastic tray at the very bottom of the refrigerator that collects the condensation or defrost water. Look in your care manual to find where this “pan” is located. Dust and moisture in this “pan” can cause mold to grow, causing health problems for people with allergies.
- Clean the floor around and underneath the refrigerator.
Your fridge is now ready for the holidays!
Sources: My Florida Home Book – Taking Care of Your Home, Chapter 5. Taking Care of Indoor Features, University of Florida/IFAS Extension, 2008.
http://www.cooksinfo.com/clean-out-your-refrigerator-day
by Judy Corbus | Jun 27, 2014
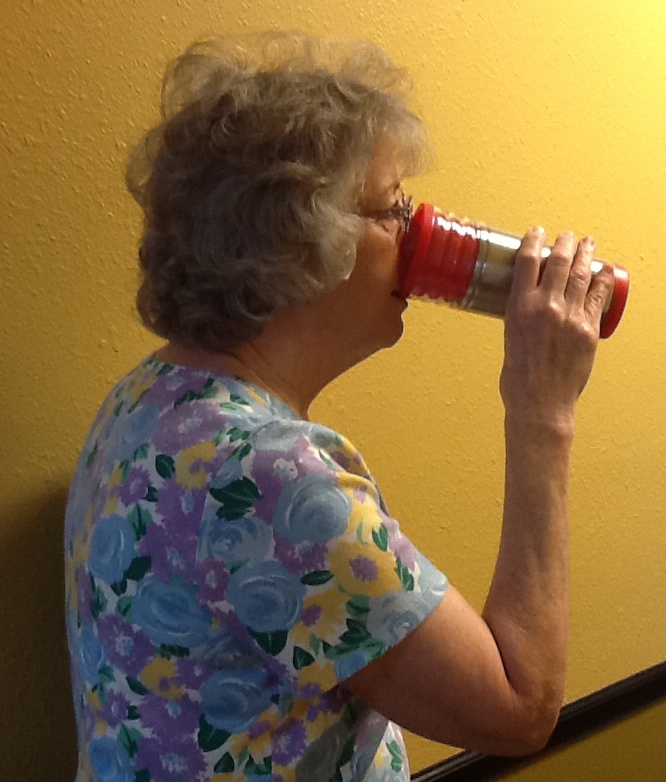
 “Whew, I’m thirsty!” As temperatures rise, you may be saying that more frequently and for good reason. Better than one-half of our body weight is water and we lose water daily in sweat, urine, and feces. Water converts food into energy, regulates our body temperature, protects and cushions vital organs, and promotes regular bowel movements. In hot weather and during physical activity, it is easy to become dehydrated if we lose more water than we consume. Symptoms of dehydration include: difficulty swallowing, dry mouth due to low saliva production, headaches, fatigue, loss of appetite, dry eyes, muscle cramps, and kidney stones.
Most persons need six to eight cups of fluid every day. If you are eating high-fiber foods or taking a fiber supplement, taking certain medications, especially diuretics or “water pills,” engaging in vigorous physical activity, or the weather is hot and humid, you will need to increase your fluid intake. One-third of healthy persons 65 years or older have mild dehydration. If you have a senior adult in your life, encourage them to drink plenty of fluids to stay hydrated.
In addition to water, include these beverages regularly:
- Fruit juices – 100 percent juice, not a juice drink, which has added sugar. Six fluid ounces a day is enough.
- Low-sodium vegetable juices
- Low-fat or fat-free milk
- Vegetable or milk-based soups
Here are a few tips for adding more fluids:
- Start the day with a cup of water.
- Drink a cup of water about ½ hour before meals.
- Drink a full glass of water with your medications. This is best for most medications, but check with your pharmacist.
- Drink water before heading outdoors for yardwork or recreation. Thirst indicates fluid loss so drink before you feel thirsty. Take frequent water breaks during outdoor activity, especially in heat and high humidity. Drink one to two cups, or more if needed, of water during and after being outdoors.
- Fill a water bottle and carry it with your during the day.
- Eat “juicy” fruits, such as watermelon, peaches, cantaloupe, and honeydew. Chill for a refreshing treat.
What about sports drinks? Sports drinks contain water, sugar for energy, and electrolytes, including sodium, to replace those lost through perspiration. They promote fluid retention and tend to encourage fluid intake because of their taste. They are highly recommended during intense physical activities that last over one hour. For casual activities of less than an hour, water is a good choice for hydration. Be aware that beverages high in sugar, including fruit juices, can cause nausea or gastrointestinal distress. Caffeine or alcohol increase urine output and reduce fluid retention. Carbonated beverages can make you feel full, decreasing the amount of fluid you drink.
So stay hydrated this summer with healthy fluid choices to beat the heat!
Sources: Healthy Eating: Fluids
Casa, D.J., et al. Fluid Replacement for Athletes Journal of Athletic Training. 2000; 35(2): 212224.
by Judy Corbus | Apr 14, 2014
Normal
0
false
false
false
EN-US
X-NONE
X-NONE
/* Style Definitions */
table.MsoNormalTable
{mso-style-name:”Table Normal”;
mso-tstyle-rowband-size:0;
mso-tstyle-colband-size:0;
mso-style-noshow:yes;
mso-style-priority:99;
mso-style-parent:””;
mso-padding-alt:0in 5.4pt 0in 5.4pt;
mso-para-margin-top:0in;
mso-para-margin-right:0in;
mso-para-margin-bottom:8.0pt;
mso-para-margin-left:0in;
line-height:107%;
mso-pagination:widow-orphan;
font-size:11.0pt;
font-family:”Calibri”,”sans-serif”;
mso-ascii-font-family:Calibri;
mso-ascii-theme-font:minor-latin;
mso-hansi-font-family:Calibri;
mso-hansi-theme-font:minor-latin;}
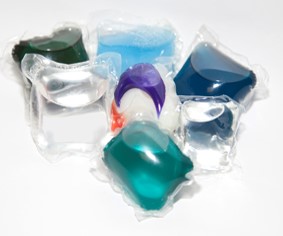
Photo credit: American Cleaning Institute
Are you familiar with the new single-load liquid laundry packets? They are a convenient new laundry product which contains highly concentrated detergent in single pouches. However, if not stored properly, the packets can pose a danger to curious young children leading to injury from ingestion or exposure to the eyes. The American Cleaning Institute urges parents and caregivers to keep these products in a secure location out of reach and sight of young children.
For best results with the laundry packets, follow these tips:
- Like all other cleaning products, keep single-load liquid laundry packets out of the reach of children and pets between every load to prevent unintended exposure.
- For best results, add the single-load liquid laundry packets to the bottom – also known as the drum – of the washing machine, both for top-loader and high-efficiency front-loader machines, before adding clothes. Do not put this product in your machine’s dispenser drawer.
- Do not cut or tear the single-load liquid laundry packets. They are designed to dissolve completely in the machine, even in cold water.
- Read the product label to determine how much product you should use.
- Do not use the single-load liquid laundry packets for washing laundry by hand or to pretreat fabric.
- If the single-load liquid laundry packets stick together, throw them away. The packets can rupture if you try to separate them.
- Handle this product with dry hands only, and remember to close the product container completely after each use to keep out moisture. The film that encases the laundry detergent is designed to dissolve quickly, even in small amounts of water. Store this product away from water.
- Always ensure the re-closable bag or container is tightly sealed after use and during storage.
- As with other laundry products, keep product in its original container with intact labels.
- Store products away from food, as you would with other laundry products.
Take the KEY Pledge (one grand prize winner will receive one electronic gift card in the amount of $2,500.)
- Keep single-load liquid laundry packets out of the reach of children.
- Educate your family and friends about the safe use and storage of these new laundry products.
- You serve a key role in laundry safety.
For more information, watch this short animated video available in both English and Spanish.
Source: American Cleaning Institute