by Samantha Kennedy | Jan 26, 2018

Convenient prepackaged snacks such as these can add extra salt, fat, and sugar to your diet. (Photo credit: Lyon Duong, UF/IFAS)
Snacks are an important part of a healthy, balanced diet. But not all snacks are created equal. All too often, we reach for the salty, sugary, prepackaged snacks like chips, cookies, and other sweets because they’re convenient and easy to grab and go. But be careful! Even if the portion size is small, these types of snacks can contain a lot of unnecessary calories. Even snacks marketed as healthy, such as trail mix, granola bars, and protein bars can contain added sugars and fats.
The Nutrition Facts label contains a wealth of information…if you know what you’re looking for. The number of total calories and calories from fat are listed at the top of the label. Ideally, snacks should contain less than 200 calories. Also, if the number of calories from fat is greater than 30 percent of the total calories, it may not be the best choice.
One of the biggest pitfalls when it comes to snacking is overeating. Snacks are meant to provide sustained energy to help keep blood sugar levels even throughout the day and to supplement calories and nutrients not provided by meals. They are not meant to be mini meals, so be careful of portion size. Check the label for what constitutes one serving and stick to it.
Prepare your own snacks instead of buying prepackaged convenience foods. Cut up fruits and vegetables and store them in snack bags that can be easily toted in your purse or bag. Keep small containers of nuts – preferably unsalted or lightly salted – in your desk or car for a high-protein on-the-go snack.
There are plenty of easy, delicious, and healthy snack choices from each food group. Here are a few examples:
Fruits: Bananas, melon chunks, apple slices, and orange wedges
Vegetables: Broccoli florets, carrot sticks, sugar snap peas, and zucchini sticks
Grains: Mini rice cakes, whole grain crackers, plain popcorn, and unsalted pretzels
Proteins: Nuts (e.g. walnuts, almonds, and pistachios), hard-boiled eggs, peanut butter, and pumpkin seeds
Dairy: Low-fat yogurt, string cheese, milk, and cottage cheese
Need more help with snacking healthy? Here are some terrific resources from the University of Florida IFAS:
“Healthy Eating: Sixteen Savory Snacks” – https://edis.ifas.ufl.edu/pdffiles/FY/FY70500.pdf
“Healthy Eating: Smart Snacking” – http://edis.ifas.ufl.edu/pdffiles/FY/FY70800.pdf
“Healthy Snacking” – http://edis.ifas.ufl.edu/pdffiles/FM/FM43900.pdf
“Raising Healthy Children: Promoting a Positive Feeding Experience” – http://edis.ifas.ufl.edu/pdffiles/FY/FY139700.pdf
by Samantha Kennedy | Nov 18, 2017

By adopting a few smart spending strategies, you can help avoid overspending and decrease holiday stress. (UF/IFAS File Photo)
It’s that time again – the most wonderful time of the year! For many of us, though, it can be a time of stress, frustration, and financial uncertainty as we drive ourselves past our limits to try to make everyone happy and everything perfect.
But it doesn’t have to be that way!
First of all, perfect – the type of perfect reserved for TV and movie holidays – is an unrealistic goal. Focus on what will make you happy while working within your means. One of the biggest seasonal stressors is spending too much on gifts, food, and home décor. While it may look beautiful and idyllic at the time, you may suffer buyer’s remorse in the New Year when the bills start rolling in.
The most important thing you can do to help curb holiday spending is to set a budget. Maybe you love to go all out for Christmas. Great! But if this is what you enjoy, you need to make a plan to save the money over the preceding months so it will be available to spend when the time comes. Spending money you cannot really afford to spend or overusing credit is a surefire way to increase debt and cause strife later.
The holidays should be about family, friends, and the joy of giving. It should not be a competition to see who can have the biggest, brightest, most fabulous home, gifts, etc. Retailers and the media may try to convince you – or more to the point, your kids – that you must have the latest this or the greatest that in order to make your holiday complete. But resist their messaging and stick to your financial guns!
Including children in any discussions about holiday spending is important. Let them know that you have only a certain amount of money to spend on gifts and help them understand the importance of sticking to your budget. While you may feel pressured to get everything on your child’s wish list, focusing on a few special items may help you stay within budget.
Cash and debit cards are the best ways to pay. If the money is coming directly out of your pocket, you may give each purchase a second thought. Use credit cards wisely. If you choose to purchase with credit in order to receive airline miles or rewards points, keep close track of your purchases and only charge as much as you can comfortably pay off in its entirety when the bill comes due. The last thing you need or want is to still be paying off this year’s holiday spending next year.
Some of the most meaningful and treasured gifts are those that come from the heart. Custom, handmade gifts really show a person you know them well and you care about them. One large gift for an entire family that everyone can enjoy can also save money over buying something for each individual. Many people also appreciate a donation in their name to a charity or cause that is near and dear to their hearts.
The holidays do not need to be stressful or break the bank. By adopting a few smart spending practices, you can enjoy the holidays without the added worry.
For more information about this topic, please read the UF/IFAS publication “Five Steps to Seasonal Savings” at http://edis.ifas.ufl.edu/pdffiles/FY/FY140500.pdf.
by Samantha Kennedy | Oct 26, 2017

Photo credit:
www.Pexels.com (Creative Commons License)
According to the National Turkey Federation, 88% of American families eat turkey on Thanksgiving. That’s over 46 million turkeys! Served as the main dish, it is complemented by a variety of sweet and savory side dishes, many of which are family traditions made from recipes passed down through the generations.
Why do we eat turkey on Thanksgiving, anyway? Well, it’s kind of a funny story. While historians generally agree that turkey wasn’t eaten at the First Thanksgiving in Plymouth in 1621, it was well-documented that settlers often hunted wild turkeys as a source of protein, and subsequent celebrations often included turkey. After President Lincoln declared Thanksgiving a national holiday in 1863, turkey became a staple on many Thanksgiving tables.
When choosing a turkey, there are a few decisions to make. How many people will be eating? Will it be roasted, smoked, or deep-fried? Is frozen or fresh preferred?
When it comes to the proper size, a pound per person is a great rule of thumb. This includes the total weight of the bird, not just the meat. Also, the ratio of white meat to dark meat is about 7:3 (70% white meat, 30% dark), so if there are a lot of dark meat lovers around the table, additional thighs and drumsticks may need to be purchased.
Roasting is the most common way to cook a turkey. This method involves placing the turkey in a large roasting pan and cooking it in the oven slowly over several hours. The turkey is usually placed breast-side up in the pan and basted periodically to prevent drying. The lid or foil is also removed the last 30 to 45 minutes of roasting time to brown the skin and give the turkey that gorgeous presentation.
Vegetables such as potatoes, carrots, or Brussels sprouts may be added to the roasting pan to cook concurrently. For best results, roast the turkey at 325˚F for 15 minutes per pound. For example, a 15 pound turkey would take 3 hours and 45 minutes.
Smoked turkeys are usually fully cooked (read the label to be sure) and just need to be reheated. Keep in mind, smoking is done to impart flavor and does not increase the turkey’s shelf life. Follow the instructions on the package to properly reheat the turkey.
Deep-fried turkeys are submerged in very hot oil and cook more quickly than roasted turkeys. Turkeys can be deep fried in a very large stockpot or in a designated turkey fryer. Only use enough oil to cover the turkey. Too much oil can cause a fire or overflow when the turkey is added to the cooker.
To determine the amount of oil, place the turkey in the cooker and add enough water to cover the bird. Then remove the bird. The water line will indicate the level of oil needed to adequately fry the turkey. For best results, let the turkey warm to room temperature before frying, and fry the turkey for 3 minutes per pound plus 5 minutes per bird.
Remember, the size of the cooker will dictate the size of the turkey. The turkey should fit easily without being forced. Wedging a turkey into a cooker that is too small could cause uneven cooking, or worse, a fire.
As for frozen versus fresh, there is no difference in flavor. However, frozen turkeys can be purchased months in advance and kept frozen until needed. Fresh turkeys should be purchased no more than two days in advance for maximum safety and freshness.
The safest way to thaw a frozen turkey is in the refrigerator. This will take pre-planning. The general rule of thumb is 24 hours of refrigerator thawing per 5 pounds. For example, a 15 pound turkey should take 3 full days (72 hours) to thaw completely.
However the turkey is cooked this year, have a Happy Thanksgiving!
by Samantha Kennedy | Aug 24, 2017
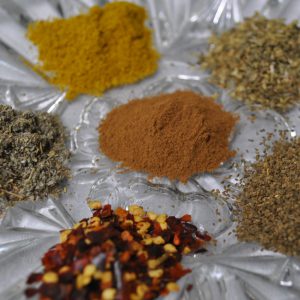 With today’s continued focus on healthy eating and the dangers of high blood pressure, seasoning and cooking with salt has decreased. Alternative seasonings such as herbs and spices are excellent additions to any dish without the dreaded sodium. Herbs and spices are easy to use and can add a variety of delicious flavor combinations to any family favorite.
The difference between an herb and a spice is the part of the plant used. Herbs come from the leaves and soft stems of the plant. Spices are taken from the roots, seeds, bark, fruit, or flowers of the plant. Spices tend to have a stronger flavor than herbs, and are usually used in smaller quantities.
Besides being a healthy substitute for salt, herbs and spices can also replace added fat and sugar without contributing extra calories. Instead of adding extra sugar to oatmeal, for example, try using cinnamon or allspice.
Add cumin or ground black pepper to more savory dishes instead of reaching for the salt shaker or butter. Try seasoning meats with herbs and spices instead of coating them in breading or gravy.
Not all herbs and spices pair well with all types of foods. Herbs and spices should be used to enhance and complement the flavor of food without taking it over completely.
A strong herb such as rosemary would completely overwhelm a mild-tasting food like peas or other vegetable. Conversely, a mild herb such as parsley would be completely overwhelmed by a strong-tasting food such as lamb or beef.
Dried herbs can be used instead of fresh herbs in recipes, and vice versa. Keep in mind the flavor of dried herbs is much more concentrated than that of fresh, so reduce the amount accordingly.
Use only a quarter to half as much dried as fresh. Start with a smaller amount, and then add as needed to achieve the desired taste.
Look for herbs with a bright green color and little or no wilting when choosing fresh ones. Avoid bunches showing signs of mold, slime, or pests.
Wash fresh herbs in clean, cool water to get rid of any sand. Fresh herbs need to be stored in the refrigerator, in an unsealed plastic bag, to maintain optimal freshness. They can last up to three weeks, though should be used within a week for the best flavor.
Dried herbs and spices, if stored correctly, do not spoil. However, they will lose their flavor and aroma over time.
Ideally, flaked or ground herbs and spices should be replaced every six months for maximum flavor, but can remain viable for up to three years. Whole spices such as cinnamon sticks and peppercorns can remain effective for up to five years.
Not all herbs and spices are created equal. When using them in cooking, it is important to remember the more delicate herbs such as basil and chives should be added right before serving to preserve their flavor.
Less delicate herbs such as thyme and oregano can be added earlier in the cooking process since they retain their flavor better. When creating herb blends, mix, match, and be creative. Add them to a cheese shaker for easy access during meals.
To learn more, sign up for the Extension Cooking Class series which starts September 7, 2017 at the UF/IFAS Wakulla County Extension Office at 84 Cedar Avenue in Crawfordville. Start time is 6:00 p.m. and the cost is $10.
For additional tips about cooking with herbs and spices, call Samantha at the UF/IFAS Wakulla County Extension office at (850) 926-3931.
by Samantha Kennedy | Aug 5, 2017
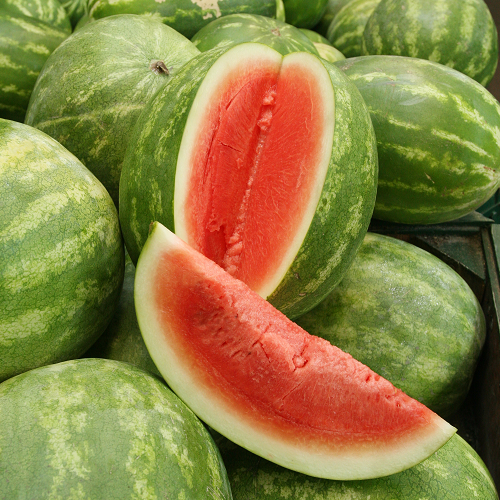
 Oh, watermelon. How do I love thee? Let me count the ways.
Watermelon is the perfect warm weather treat and a summer holiday essential. It’s a sweet, light, and delicious snack and its versatility lends itself to a wide variety of beverages, salads, meals, and desserts.
Watermelon is more than just water and sugar. It’s jam-packed with a number of vitamins and minerals that can help you stay healthy, including vitamin A, vitamin B6, vitamin C, potassium, and lycopene.
Vitamin A is vital to eye health and helps boost your immune system by supporting the functions of the infection-fighting white blood cells.
Vitamin B6 has many functions in the body, including aiding in immunity by supporting the creation of antibodies, which are needed to fight off infection. It also helps maintain proper nerve function and aids in the creation of red blood cells, which carry oxygen to all parts of the body. Vitamin B6 is also used to break down proteins into smaller parts that can be used to build and maintain muscle mass.
Vitamin C also helps boost immunity and overall cell health by helping to break down free radicals in the body, which can deteriorate cells over time.
Potassium is a mineral that is necessary for keeping a healthy water balance in the body, helping to maintain proper water balance and reducing the incidence of painful muscle cramps.
Lycopene is one of a family of vitamin precursors known as carotenoids. This substance is what helps give those bright red and pink fruits and vegetables – such as watermelon – their lovely color. Lycopene and other carotenoids function as antioxidants, which help eliminate those previously mentioned harmful free radicals. And preliminary studies have shown that lycopene may help reduce triglycerides and LDL cholesterol, which may lead to a reduction in cardiovascular disease risk.
Nearly every part of the watermelon can be eaten, from the sweet and juicy fruit to the rind, which is often pickled or used in stir frys. Even the fruit itself can be grilled and served as part of a savory dish. And watermelon is a sweet addition to many colorful summer salads.
One of my favorite watermelon recipes is a twist on a traditional favorite – Watermelon Lemonade – and is sure to be a great addition to any of your summertime picnics. Try it today!
Watermelon Lemonade
Ingredients
1/2 cup lemon juice
2 1/2 cups water
2/3 cups agave syrup*
2 cups watermelon chunks
*Other sweeteners may be used instead of agave syrup. However, be careful when adding them, as you may need to use less. Add to taste, mixing in a little at a time until you reach the desired sweetness.
Instructions
Place all the ingredients in a blender and blend until smooth. Serve over ice.
Servings
Makes about 5 cups.
Nutrition Facts
Serving size: 1 cup
Calories per serving: 163
Fat per serving: 0.3g
Saturated fat per serving: 0.0g
Fiber per serving: 0.3g
For more delicious recipes, please visit http://www.watermelon.org/Recipes.