by Pam Allen | Nov 25, 2016
 It is that time of year when we think about giving special gifts to the people in our lives that mean the most to us. Your list might include teachers, neighbors, friends and co-workers. Gifts don’t have to be expensive, it is the thought behind the gesture that means the most to your friends and family. Whoever is on your list this year, think about using your kitchen as grand central for gift making. Gifts of food are heart felt and send a message that you spent time making something special that looks good and tastes yummy. These gifts say thank you in a thoughtful way. Don’t forget to include your kids in the process of cooking and assembling gifts to teach them something about budgeting and enjoying the simple pleasure of gift giving.
The way the gift is presented can be just as important as the food itself. Try to pair up containers with the food gift that will be used after the food is gone. This can be a gift that keeps on giving. Examples are a decorative plate filled with cookies, pie plate filled with your favorite pie or a trifle bowl filled with goodies. You get the idea. Another thought is to put together items that say “sit and take a break” like a loaf of quick bread paired with a pound of coffee, homemade salsa with chips and a favorite beverage. The main goal is to show that you put thought in the gift and spent time preparing the presentation.
With everyone watching their budgets this year, plan ahead to get the creative juices working by purchasing ingredients on sale and found locally. Local products in December include pecans, sweet potatoes, honey, peanuts, persimmons, satsumas and jams and jellies sold at local farmers markets. So get going and unleash your creativity, and give a few gifts from your kitchen and your heart. Have fun making these gifts, and remember to enjoy the process.
One of my favorite festive cookie is the Chocolate Crinkle. The crackle on top with the chocolate and white sugar says it is holiday time. These cookies make a good food gift as they stay firm and will last up to a week. They also freeze well if you need to make ahead of time. Package the gift by placing on a nice festive plate and wrap with clear wrap and decorate with ribbon.
Chocolate Crinkle Cookie
½ cup of shortening
1 2/3 cup sugar
2 tsp vanilla
2 eggs
Two 1 ounce squares of unsweetened chocolate (melted)
2 cups sifted all-purpose flour
2 tsp baking powder
½ tsp salt
1/3 cup of milk
½ cup chopped walnuts or pecans (optional)
Cream together the shortening, sugar and vanilla. Beat in the two eggs then add the melted chocolate. In another bowl, sift together the flour, baking powder and salt. Add flour mixture slowly to creamed mixture alternating with the milk until thoroughly blended. Stir in walnuts. Chill for 3 hours. Form in 1 – inch balls and roll in confectioners’ sugar. Place on greased cookie sheet 2 to 3 inches apart. Bake in moderate oven at 350 degrees for 15 minutes. Cool slightly then remove from pan. Makes 48.
They are now ready to put in a container and give to friends. This cookie freezes well.
Prepare this nut bread then decorate with wrapping and ribbon. You might include the loaf pan as part of the gift. Include a brick of cream cheese along with a decorative butter knife for a complete package.
Cranberry Nut Bread
Ingredients
2 cups all-purpose flour
1 cup sugar
1 1/2 teaspoons baking powder
¾ teaspoon salt
1/2 teaspoon baking soda
3/4 cup orange juice
1 tablespoon grated orange peel
2 tablespoons shortening
1 egg, well beaten
1 tsp vanilla flavoring
1 1/2 cups Fresh Cranberries, coarsely chopped
1/2 cup chopped nuts (walnuts or pecans)
Directions
Preheat oven to 350 degrees. Grease a 9 x 5-inch loaf pan. Mix together flour, sugar, baking powder, salt and baking soda in a medium mixing bowl. Stir in orange juice, orange peel, shortening and egg and vanilla. Mix until well blended. Stir in cranberries and nuts. Spread evenly in loaf pan. Bake for 55 minutes or until a toothpick inserted in the center comes out clean. Cool on a rack for 15 minutes. Remove from pan; cool completely. Makes 1 loaf (16 slices). Bake loaf in decorative pan as part of the gift. Make sure you cool after cooking then replace in pan and wrap as part of the gift.
The Real Sweet Potato Pie
Use local sweet potatoes to promote locally grown produce. After baking, cool then give as a gift in a nice pie plate. Wrap, refrigerate with instructions on reheating for serving. For added effect, bundle with whipped cream and pie knife.
Pre Preparation
Prepare your sweet potatoes for the pie mix. Select 6 – 7 large sweet potatoes and cut in half or quarters. Boil potatoes slowly for about 30 minutes. Let cool. Peel potatoes after they cool. The peel should come off very easy. Measure six cups of sweet potato in a mixing bowl. Use a stand mixer to beat the sweet potatoes and do not scrape off any mixture from beaters. This will contain the stringy part and you do not want it in your pie. Discard the strings.
Ingredients
6 cups cooked mashed sweet potatoes
1 cup evaporated milk
½ cup butter
2 tsp vanilla flavoring
2 tsp nutmeg
1 tsp butter flavoring
4 eggs
1 cup sugar
Mix all ingredients in a stand mixer until well blended. The mixture should be smooth and free of lumps. The mixture will keep in the refrigerator up to a week and may be frozen for future use. Be sure to label with date and amount before placing in freezer.
For the Pie
Place mixture in unbaked pie shell and smooth to the edges. You will need about 2 ½ cups for each 9 inch deep dish pie shell. Mini tart shells may also be used for individual pies. This recipe makes about 3 pies or 12 individual mini pie tarts. Cook at 350 degrees until puffed and browned slightly on top. About 40 minutes.
Visit your local farmers market to purchase local nuts, honey, produce and jams and jellies. Be sure to look for locally grown and support our area growers. For additional information about local produce visit: http://wfrec.ifas.ufl.edu/panhandle-produce-pointers/
by Dorothy C. Lee | Nov 25, 2016
 During the holiday season nothing carries good cheer and holiday spirit across the miles like receiving a package full of homemade treats.
If you go to the effort of preparing food gifts, you want to be sure the contents arrive in the condition they were sent in. The first step is to pack it right.
- Select a strong sturdy cardboard, plastic, or metal container. Round oatmeal boxes or coffee cans with re-closable lids work well.
- On the bottom of the container place a generous layer of filler, such as crumped tissue paper, waxed paper, brown paper bags or plastic bubble wrap.
- Next, wrap baked goods individually or in pairs placed back to back. Begin with the sturdiest first. Moist, firm baked goods ship better than the brittle kind. Brownies, fudge and moist cookies pack well. Top with another layer of filler and repeat ending with a thick layer of filler.
- Fill the container full so the contents can’t shift when it is shaken.
- Be sure to pack several inches of cushioning material in the bottom of the shipping carton and enough material around, over and between items so that the contents cannot move easily. Brown paper bags and newspaper provide adequate cushioning for most packages. Save Styrofoam peanuts or foam packing pieces in packages for use when cushioning your packages.
- Place a card with the address of the sender and the receiver inside the carton, just in case.
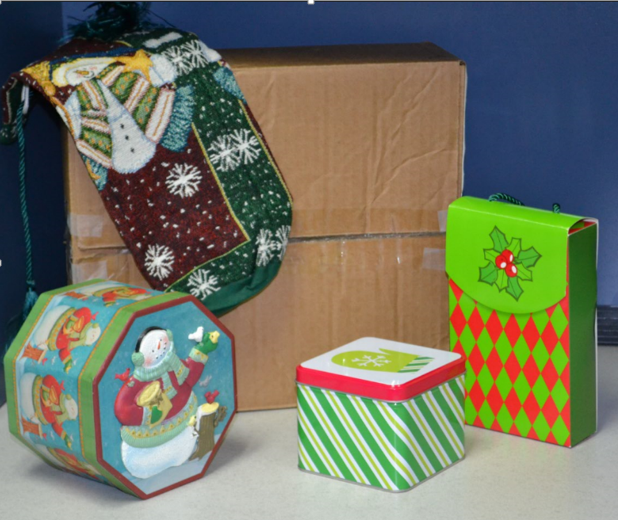
- Wrap the carton in heavy brown paper, if desired, and seal it securely with transparent packing tape. Clearly label the carton; put the transparent tape over the address to keep it from getting wet and smeared. Mark it “perishable” to encourage careful handling. One of the best ideas yet is to give a gift within a gift that serves as its own alternative wrapping. Great tasting recipes become even more special when attractively packaged for giving.
- Embellish small metal coffee tins for packaging tiny truffles or other candies. Replace plastic tops to seal.
- Consider using an empty potato chip canister for packaging. Cover it with Christmas wrapping paper, fill it with cookies, candies or salty snacks, and replace its plastic top to seal.
- Fill a Christmas stocking with a favorite snack mix or nut mix. Package the mix in a re-sealable plastic bag and tuck it and holiday napkins into the stocking.
- Top off decorative jars of homemade desert sauces or jelly with raffia or decorative ribbon. Attach a homemade gift tag and a spoon.
- Bake and transport homemade bread in light weight recyclable aluminum pans available at most supermarkets. Wrap pans of bread with a large linen napkin or place bread in gift bags and tie with holiday ribbon.
- When giving a variety of foods together, include items to be eaten with your goodies or utensils that might be needed for further preparation.
Remember it’s the thought behind the holiday package that counts; the link with loved ones and the knowledge that someone is thinking of you during the holiday season. A package filled with homemade treats says “love” with every bite.
by Shelley Swenson | Mar 29, 2015
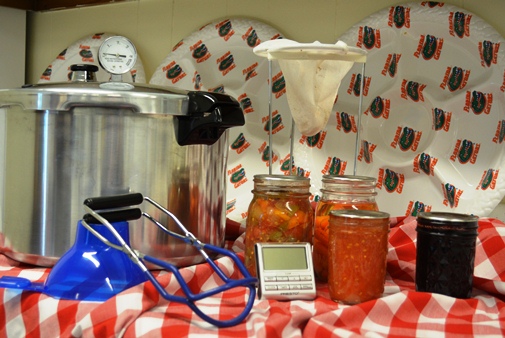
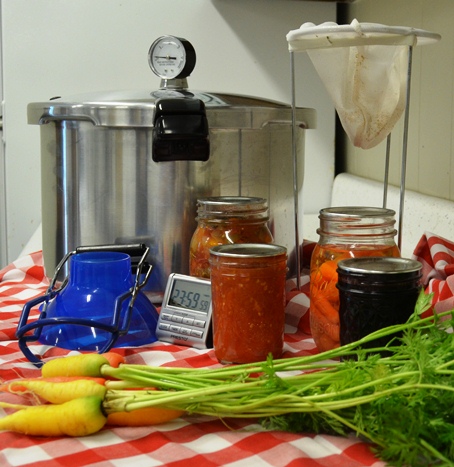
Get your pressure canner ready for the season.
Photo by Les Harrison, Wakulla County
In addition to planting your spring garden and reviewing the latest food safety materials, you should consider having your pressure canner gauge tested. Today’s pressure canner may have a dial gauge for indicating the pressure or a weighted gauge, for indicating and regulating the pressure.
Weighted gauges will either keep rocking gently or make a frequent jiggling noise to indicate that the correct pressure is being maintained. Read the manufacturer’s instructions to know how a particular weighted gauge should rock or jiggle. Weighted gauges do not require testing.
Check dial gauges for accuracy before use each year. Gauges that read high cause under-processing and may result in unsafe food. Low readings cause over-processing. Pressure adjustments can be made if the gauge reads up to 2 pounds high or low. Replace gauges that differ by more than 2 pounds.
Many UF/IFAS Extension Offices have pressure gauge testers and are willing to test yours for accuracy. It is always best to call for an appointment to insure that the FCS Agent is going to be in when you arrive. Don’t remove the gauge but bring the entire lid. If you prefer or if you find that your extension office does not offer this service, Presto will test gauges at no charge. For more information, phone Presto Customer Service: 1-800-877-0441 or contact@gopresto.com.
Handle canner lid gaskets carefully and clean them according to the manufacturer’s directions. Nicked or dried gaskets will allow stem leaks during pressurization of canners. Keep gaskets clean between uses. Gaskets on older model canners may require a light coat of vegetable oil once per year. Gaskets on newer model canners are pre-lubricated and do not benefit from oiling. Check you canner’s instructions if there is doubt that the particular gasket you use has been pre-lubricated.
Lid safety fuses are thin metal inserts or rubber plugs designed to relieve excessive pressure from the canner. Do not pick at or scratch fuses while cleaning. Use only canners that have the Underwriter’s Laboratory (UL) approval to ensure their safety.
Replacement gauges and other parts are often found at stores that sell food preservation equipment or from canner manufacturers. When ordering parts, be sure to provide your canner model number and describe the parts that you need.
Remember, pressure does not destroy microorganisms, but high temperatures applied for an adequate period of time do kill microorganisms. The success of destroying all microorganisms capable of growing in low-acid, canned food is based on the temperature obtained in pure steam, free of air, at sea level. At sea level, a canner operated at a gauge of 10.5 pounds provides an internal temperature of 240o.
For more information, contact your County Extension Family and Consumer Sciences Agent.
by Angela Hinkle | Mar 13, 2015
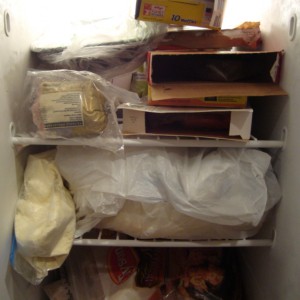
UFOs in Your Freezer
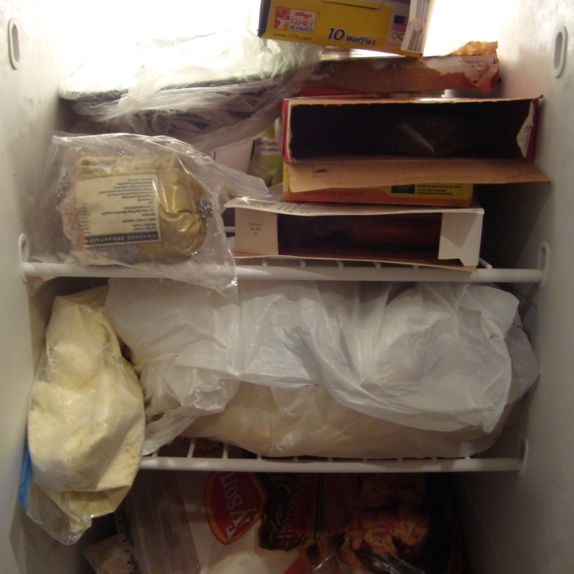
Does your kitchen freezer resemble an archaeological dig in an iceberg? Do you ever see what you think is what you’re looking for in the very back? As you reach for it, half of everything else falls out onto your kitchen floor? UFOs (Unidentified Frozen Objects) end up everywhere. Your reaction may be something like, “*#@&!”
This may be a sign that it’s time to organize your freezer. “Are you kidding me? Who has time for that?,”’ you may ask. You might even roll your eyes.
Here are a few tips that may help:
- Clean it out and when in doubt, throw it out.
Start with the hardest part first – trust me, it gets much easier after you’ve completed this step. Go through all the contents of your freezer and throw out what is freezer-burned or otherwise unusable. If you really have no idea if it’s animal, mineral, or vegetable, or how long it’s been in your freezer, it’s time to toss.
If you’ll take a quick moment to label and date the food before you put it in the freezer, you’ll save your sanity later by avoiding guess work. (A friend told me she pulled the plastic tub of fundraiser cookie dough out of the freezer as a treat for her kids. What a surprise to be treated instead to vegetable stew.) Label using wax crayons, pencil, or marker pens on stickers or tape that can stay put in freezing temperatures. And yes, if you are so inclined, there are apps for labeling. By the way, the sniff test is usually useless, since most frozen foods won’t have much of an aroma.
- Freeze in useable portions.
Congratulations! You saved money buying the chicken in that family-sized pack. Keep food safe and manageable by individually wrapping pieces, then freezing in a large, labeled, plastic zip-type bag. Then you only take out the amount you want. You may lose more money than the original savings if you have to thaw out and possibly throw out a gigantic clump of chicken because you only wanted enough for two. Smaller packages also freeze and thaw faster, which saves you time.
Pancakes, berries, broths, meats, nuts, chilies and stews, flour, shrimp, and fish are good choices for freezing. These foods are structurally sound enough to survive the freezer. On the other hand, you’ll want to avoid freezing high-moisture fruits and vegetables like lettuce and watermelon, yogurt, and fried foods. Their textures and appearance tend to turn to, well, yuck.
- Choose the best containers.
We need air to breath, not to circulate around our frozen foods. Air circulating around frozen food can lead to freezer burn – which often makes the food dry and tough. Find containers close to the size of the food you want to freeze. Also, freezing food flat in plastic zipper bags makes them easy to stack.
Remembering to use these tips should help de-stress your life … at least a little. So the next time you’re asked, “What’s for dinner?,” your reply won’t have to be, “We’re having the UFO that fell on my foot.”
For more information on freezing foods, contact your local UF/IFAS Extension Office at http://directory.ifas.ufl.edu/Dir/searchdir?pageID=3&pl=05 and check out these UF/IFAS publications on freezing fruits, http://edis.ifas.ufl.edu/pdffiles/FY/FY72000.pdf, and freezing vegetables, http://edis.ifas.ufl.edu/pdffiles/FY/FY71900.pdf
by Shelley Swenson | May 1, 2014
Low-Acid Canning requires a Pressure Canner Submitted by Shelley Swenson/Les Harrison
Home canning has changed greatly in the 170 years since it was introduced as a way to preserve food. Grandma may have cooked her green beans and poured them into hot jars but open kettle canning is not recommended today. Scientists have found ways to produce safe, higher quality products to replace outdated recipes and techniques.
For safety’s sake, pressure canning is the only recommended method for canning meat, poultry, seafood and vegetables. Only through the use of the proper equipment can bacteria be destroyed in low-acid foods when they are processed at the correct time and pressure. Using boiling water canners for these foods poses a real risk of botulism poisoning. If Clostridium botulinum bacteria survive and grow inside a sealed jar of food, they can produce a poisonous toxin. Even a taste of food containing this toxin can be fatal.
What are the secrets of a safe and quality end-product? Process low-acid foods in a pressure canner. Have your gauge checked for accuracy and your gasket for dryness; many county extension offices offer this service. Make sure that you are using up-to date, research-based processing times and pressures for the size of jar, style of pack and kind of food being canned. Utilize the proper processing time and pressure for sterilizing the food at your altitude. Look for jar lids that are firmly sealed and concave and with nothing leaking from the jar after storage. Upon opening the jar, no liquid should spurt out and no unnatural or “off” odors should be detected.
Research-based food preservation recipes and information are available at your county extension office or at the UF/IFAS website http://edis.ifas.ufl.edu/topic_canning_food. When preserving low-acid food there is no room for error. The safety and quality of the end product are factors to be considered.
by Kendra Hughson | Jan 8, 2014

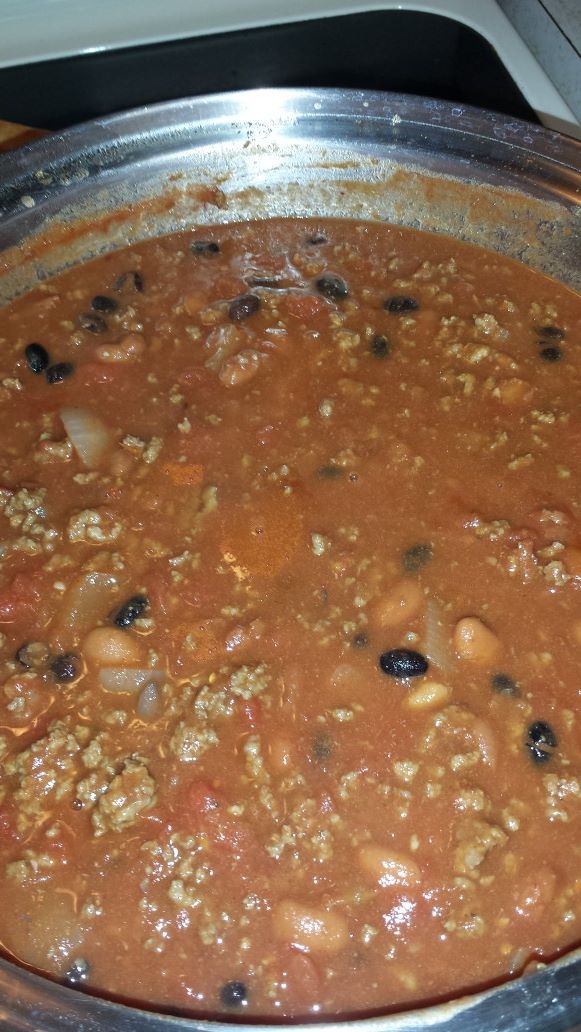
Soup is a great way to pack your diet with vegetables.
Nothing tastes as good on a cold, winter day as a nice hot bowl of soup. Soups are easy to make and economical. Homemade soups are healthy. They are a great way to pack more vegetables into your diet. You can control the amount of sodium by making your own broth or white sauce or by choosing canned broth and vegetables low in sodium. Use herbs and spices for flavor instead of salt. Be creative – there are endless possible combinations of ingredients that will make a delicious soup.
Soup is easy to freeze for later use: freeze your soup in zipper style freezer bags. You can use the large bags to freeze a family size portion of soup or you can use small bags to make handy individual servings of soup. Freeze bags of soup on a plate to prevent the bags from freezing around the rack making it difficult to remove later. Run the bag under cold water until thawed enough to slip into a bowl or pot for further heating on the stove or in the microwave. You can also freeze soup in plastic or glass food grade, freezer safe containers. Be sure to leave about a half-inch of space at the top to give the soup room to expand when it freezes. Thaw in the refrigerator or run the bottom of the container under cold water until you can pop it out and place in another bowl or pot for further heating.
Here are a few common types of soup for inspiration:
Chili – the origins of chili con carne, or chili with meat, are a little mysterious and highly debated. San Antonio made this spicy dish popular more than 100 years ago. Chili consists of thick meat (pork, chicken, beef, or wild game) and/or cooked dried beans in many variations. Chili with only beans is known as chili con frijoles.
Chowder is a seafood or vegetable stew originating from New England. A New England chowder is recognized by a creamy milk base, whereas a Manhattan chowder boasts a flavorful and less fattening tomato base.
Creams and Purees consist of milk, cream, broth, and/or vegetable purees. Puree vegetables using a food processor, blender, immersion blender, or food mill. Reduce the amount of fat and calories in cream based soups by choosing lower fat alternatives like 2% milk or by using pureed white beans to thicken the soup.
Gumbo originated in southern Louisiana in the 18th century. Highly seasoned and spicy, this stew like dish blends a variety of cultures including French, Spanish, Choctaw, and West African. Gumbo is thickened with okra, file´ powder(dried and ground sassafras leaves, pronounced fee-lay), or roux (a French base made of oil and flour).
Brunswick Stew
1 tablespoon vegetable oil
1 medium chopped onion
1/2 cup chopped pepper – red, green, or a combination (optional)
2 cups chicken broth, low sodium
1/2 teaspoon dried leaf thyme
1/4 teaspoon black pepper
2 cups cooked, diced, and boned chicken or turkey
2 cups tomatoes, canned or cooked
2 cups cooked dry beans OR 1 (15.5 ounce) can beans (drained), such as red beans or Great Northern beans, etc.
2 cups whole kernel corn, frozen or 1 (15.5 ounce) can corn, canned without salt (drained)
Directions:
- Heat oil in a large pan. Add onion and cook in oil until tender.
- Add all remaining ingredients, except salt and pepper. Bring to a simmer and cook, covered, for 30 minutes on medium-low heat.
- Season to taste with salt, if desired.
Recipe Source: Adapted from Virginia Cooperative Extension
For more information on soups, contact UF IFAS Extension Leon County at 850-606-5200 or hughson@ufl.edu.