by Dorothy C. Lee | Jul 17, 2013
 “It must be something I ate” often is the explanation people give for a bout of home-grown “Montezuma’s Revenge” or some other unwelcome gastrointestinal upset.
Despite the fact that America’s food supply is the safest in the world, the unappetizing truth is that what we eat can very well be the vehicle for food-borne illnesses. It is estimated that 76 million cases of food-borne illness occur in the United States every year.
The Food and Drug Administration has given high priority to combating microbial contamination of the food supply but part of the responsibility for preventing food-borne illness lies with the consumer. It is estimated that 35 to 40% of food-borne illness in the United States results from unsafe handling of food at home.
The prime causes of foodborne illness are a collection of bacteria with tongue-twisting names. These organisms can become unwelcome guests at potlucks, picnics, and the dinner table.
They are in a wide range of foods, including meat, eggs, milk and dairy products, coconut, chocolate, seafood, and even water.
Careless food handling sets the stage for the growth of disease-causing organisms. For example, hot or cold foods left standing too long at room temperature provide an ideal environment for bacteria to grow. Improper cooking also plays a role in foodborne illness.
Foods may be cross-contaminated when cutting boards and kitchen tools that have been used to prepare a contaminated food, such as raw chicken, are not cleaned before being used for another food, such as vegetables.
Symptoms
Common symptoms of food-borne illness include diarrhea, abdominal cramping, fever, and vomiting. However, symptoms will vary according to the type of bacteria and the amount of contaminants eaten. For most healthy people, food-borne illnesses are neither long-lasting nor life-threatening. However, they can be severe in the very young, the very old, and those whose immune systems are suppressed.
Prevention Tips
The idea that the food on the dinner table can make someone sick may be disturbing, but there are many steps you can take to protect your family and dinner guests. It is just a matter of following basic rules of food safety.
Prevention of food poisoning starts with your trip to the supermarket. Pick up your canned and packaged foods first. Don’t purchase food in cans that are bulging or dented, or in jars that are cracked. Look for expiration dates on the labels. Likewise, check the “use by” or “sell by” date on dairy products such as cottage cheese, cream cheese, yogurt, and sour cream. Pick the ones that will stay fresh longest in your refrigerator.
When choosing eggs, open the carton and make sure that none are cracked or leaking.
Place frozen foods and perishables such as meat, poultry, and fish in your cart last. Always put these products in separate plastic bags so that drippings don’t contaminate other foods in your shopping cart. Bag cold and frozen foods together, and if it will take more than an hour to get your groceries home, take along an ice chest to keep frozen and perishable foods cold.
Safe Storage
Be sure to refrigerate or freeze perishables as soon as you return from the grocery store. Refrigerator temperature should be 40°F or below and the freezer should be 0°F or below.
For foods that can be stored at room temperature, some precautions will ensure they remain safe.
Store potatoes in a cool dry place—not under the sink or in the refrigerator. Don’t store foods near household cleaning products and chemicals. When you are putting canned food items away, store the older canned items to the front and canned items with the longest-out dates of use in the back row so you’ll be sure to use the older ones first.
Keep It Clean
The first rule of safe food preparation is to keep everything clean. This rule applies to the areas where food is prepared and, most importantly, to the cook. Wash hands thoroughly before starting to prepare a meal and always after handling raw meat and poultry. Keep the work area clean. Wash fruits and vegetables thoroughly. Do not put cooked meat on an unwashed platter that has held raw meat.
The second rule of safe food preparation is keep hot foods hot and cold foods cold.
After the meal, leftovers should be refrigerated as soon as possible.
Here are a few more tips to keep your favorite dishes safe:
- Don’t thaw meat and other frozen foods at room temperature.
- Thaw in the refrigerator or microwave.
- Never taste food that looks or smells spoiled.
All these dos and don’ts may seem overwhelming, but remember: if you want to stay healthy, the old saying, “rules are made to be broken,” does not apply to food safety!
For further information regarding food safety and other related topics, go to the University of Florida’s Solutions for Your Life website: http://www.solutionsforyourlife.com.
Reference: Safe Food Handling Fact Sheets, United States Department of Agriculture, Food Safety and Inspection Service
by Amy Mullins, PhD, RDN | Jun 25, 2013

Keep hot foods hot and cold foods cold to reduce the risk of foodborne illness, especially in hot weather.
It’s time for all the fun things that summer brings, like picnics, potlucks, and outdoor gatherings. These are ways we all enjoy celebrating the summer sunshine with friends and family. As things heat up outside, don’t forget the basic rules of food safety to protect yourself and others from foodborne illness.
When transporting, preparing, and serving food outdoors, there are many critical things to consider. First, keep your hands clean. If soap and running water are not available, be prepared with disposable antibacterial wet wipes and hand sanitizer. Use it often and keep it available for everyone at your event.
Be sure to use an insulated cooler with plenty of frozen gel packs and ice for all foods that require refrigeration. Perishable foods, such as potato salads, burgers, hot dogs, chicken, and cheese, should be stored at 40 degrees or less to prevent the growth of harmful bacteria. Pack your cooler accordingly to prevent cross-contamination, securely wrapping and separating raw and ready-to-eat foods, putting raw foods on the bottom. Consider using a separate cooler for juice boxes, soda cans, and water bottles. This will help protect food items from the heat when guests are frequently opening and closing the cooler for drinks.
Cold foods should be kept in the cooler as long as possible before being taken out to serve. Once outside of the cooler, these foods should not set out any longer than 2 hours. If it is really warm (over 90 degrees), one hour should be the limit. Foods that are in the Danger Zone, which is in the range of 40-140 degrees F, for more than this length of time, will start to grow dangerous levels of bacteria. It’s a good idea to serve foods such as potato salad, cut fruit and vegetables, as well as dips and cheeses, in shallow dishes directly in contact with ice. This will help suppress the bacterial growth while it is out of the cooler.
Grilled meats and other hot foods should be kept at a minimum of 140 degrees until served. If prepared prior to the outdoor gathering, wrap foods in foil to retain heat and use a separate insulated cooler just for hot foods. These foods also should not sit out for more than one to two hours. Consider using Sterno cans to keep food hot in covered aluminum pans or chafing dishes. Always use a food thermometer to be sure meats are cooked to the proper minimum temperature (160 degrees F for burgers and 165 degrees F for chicken) before storing or serving. For additional information, check out www.fda.gov or www.foodsafety.gov.
by Kristin Jackson | Apr 3, 2013

Could this be one of the germiest places in your home?
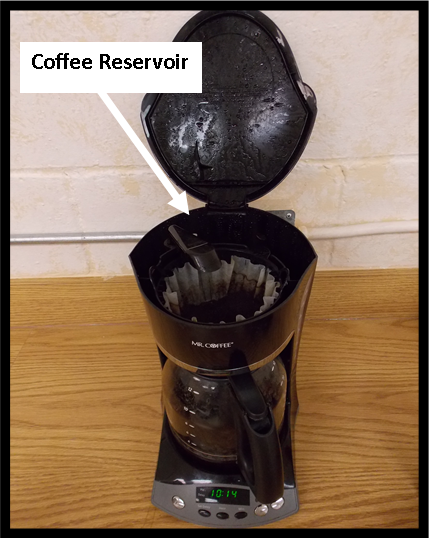
In 2011, NSF International, an independent, not-for-profit organization, conducted a study with 22 families and analyzed 30 items in their homes. One item that disappointingly made NSF International’s list of the “Top Ten Germiest Places in the Home” was the coffee reservoir. This could be sad news for the approximately 239 million individuals, or 83 percent of American adults, who drank coffee in the US in 2012 (National Coffee Association).
Perk up, coffee drinkers. The good news is the solution is easy: simply clean your coffee maker according to the manufacturer’s instructions and then sanitize. Cleaning will wash/wipe away many bacteria, but sanitizing, according to the National Restaurant Association, is the process of reducing the number of microorganisms that are on a properly cleaned surface to a safe level.
You can sanitize your coffee maker using vinegar. Vinegar can be an effective sanitizing agent for your coffee maker if:
- you use white distilled vinegar (at least 5% acidity).
- the vinegar remains undiluted.
- you heat the vinegar to 130 degrees Fahrenheit or 55 degrees Celsius.
- you leave the heated vinegar on the surface for at least one minute.
 Once the vinegar has remained in the coffee reservoir for at least one minute, you can run the vinegar through the coffee maker. In order to remove the vinegar odor and taste, you may want to follow with a few cycles of clean water. Remember, the water must be clean and you should air dry the reservoir or use a clean paper towel to dry.
Now that you know how simple the process is, you are probably wondering how frequently you should take on the task. According to the National Restaurant Association, you should you sanitize:
- after each use
- anytime as necessary
- after 4 hours in use
So now you see how simple it is to keep the coffee maker from being one of the germiest places in your home. To find out other ways to clean and sanitize your kitchen, visit http://edis.ifas.ufl.edu/pdffiles/FY/FY128000.pdf and read Cleaning and Sanitizing the Kitchen: Using Inexpensive Household Food-safe Products. If you have any additional questions or concerns, you can contact your local Family and Consumer Sciences Agent (http://solutionsforyourlife.ufl.edu/map/ ).
References:
NSF International (2004). Top Ten Germiest Places in the Home. Retrieved 26 March 2013 from http://www.nsf.org/consumer/newsroom/fact_top10_germiest_places.asp
ServSafe Essentials 6th Edition. 2011. ISBN-13: 978-0133075687
Janet Buffer, Lydia Medeiros, Mary Schroeder, Patricia Kendall, Jeff LeJeune, and John Sofos; adapted by Amy Simonne for use in Florida with permission. FCS8 OH 2010. Cleaning and Sanitizing the Kitchen: Using Inexpensive Household Food-safe Products. Retrieved 26 March 2013 from http://edis.ifas.ufl.edu/pdffiles/FY/FY128000.pdf
Yang, H., Kendall, P., Medeiros, L., Sofos, J. (2009) Inactivation of Listeria monocytogenes, Escherichia coli O157:H7, and Salmonella Typhimurium with compounds available in households. J. Food Prot. 72(6); 1201-1208
by Judy Corbus | Mar 25, 2013

Dye one set of eggs for hiding and another set for eating.
If an Easter egg hunt is on your calendar for the holiday weekend, follow these tips for safe, quality hard cooked eggs. Dr. Amy Simonne, University of Florida/IFAS Food Safety Specialist, recommends choosing Grade A or AA eggs with clean, uncracked shells. Store eggs in the carton in the main compartment of the refrigerator, not the door, to maintain freshness. It is not necessary to wash eggs before coloring but inspect and discard any that are unclean, cracked, broken, or leaking.
To prepare hard cooked eggs, place eggs in a single layer in a saucepan. Add enough tap water to cover eggs by at least one inch. Cover and quickly bring just to boiling. Turn off heat and, if necessary, remove the pan from the burner to prevent further boiling. Let eggs stand, covered, in the hot water about 18 minutes for extra-large eggs, 15 minutes for large eggs, and 12 minutes for medium eggs. Immediately run cold water over eggs or place them in iced water until completely cooked. To remove shell, crackle it by tapping gently all over. Roll egg between hands to loosen shell. Peel, starting at the large end. Hold egg under running cold water or dip in a bowl of water to help ease off the shell. Eggshells usually come off much more easily, without tearing the whites, when they are in small pieces rather than large chunks. Very fresh eggs may be difficult to peel. The fresher the egg, the more the shell membrane clings to the shell. For best results, buy and refrigerate eggs seven to ten days before hard cooking. This brief “breather” allows the eggs to take in air, which helps separate the membrane from the shell.
When coloring eggs, use only food-grade dyes or natural color from vegetables such as beets, cranberries, and blueberries. Hard-cooked eggs will keep in the refrigerator for one week. Like leftover turkey at Thanksgiving, colored eggs are great for sandwiches, either sliced or in egg salad.
Since eggs receive a lot of handling during a hunt, cracks are common. This allows bacteria from hands and the hiding places to seep through the shell, contaminating the inside. After the hunt, discard any with cracked shells. Discard also any eggs that have been out of the refrigerator for more than two hours. Re-refrigerate the “found” eggs until they are eaten. To reduce the risk of foodborne illness, consider coloring one batch for hunting and another for eating. An even safer option is to use plastic eggs for your hunt. For more fun, add a candy or trinket surprise inside each egg.
Be careful when preparing dishes calling for raw eggs. Many recipes for bunny-shaped cakes call for using a raw egg white in the frosting. However, this poses a risk for salmonella food poisoning. To be safe, use a frosting recipe that uses hot syrup and egg white. If the egg white mixture reaches 160 degrees F on a thermometer, it should be safe. You also may be able to use a pasteurized powdered meringue available where cake decorating supplies are sold.
Sources: FAR8702 Egg Safety, Dr. A. Simonne, University of Florida/IFAS Extension.
Traditional Spring Food: Its History and Safe Handling Today, L. Fox, USDA.
Egg Tips for Easter, Muriel Turner, University of Florida/IFAS Extension.

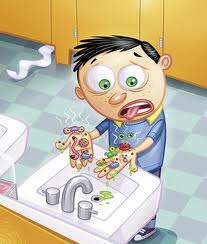 “It must be something I ate” often is the explanation people give for a bout of home-grown “Montezuma’s Revenge” or some other unwelcome gastrointestinal upset.