Blueberries were once known as star berries because of the pointy flower calyxes on top of the berries. Blueberries have grown in North America for thousands of years. Native Americans dried the berries in the sun and crushed them into a powder to be used as a rub on meats. Whole berries were added to soups, stews, and to other ingredients to make a pudding call sautauthig.
Blueberries from a Central Florida hobbiest farm. UF/IFAS Photo: Sally Lanigan.uthig.
Luscious, sweet blueberries have a nutrition profile. Blueberries are low in fat and a good source of fiber and vitamin C. Blueberries are very high in antioxidants.
Look for fresh blueberries that are firm, dry, plump, smooth skinned, and relatively free from leaves and stems. Color should be deep purple blue to blue-black; reddish berries are not ripe but may be used in cooking.
Blueberries will keep a day or two at room temperature. They will remain fresh in the refrigerator for up to 2 weeks. Cover berries to prevent dehydration. Reddish berries will be sour but will ripen if placed in a container with a few ripe berries and left uncovered at room temperature for a day or two.
Fresh berries should be stored covered in the refrigerator and washed just before using. Use berries within 10 days of picking or purchasing.
Blueberries are easily frozen for later use. Freeze unwashed blueberries in airtight, resealable plastic bags. If thawed, keep refrigerated and use within 3 days.
Next time you are shopping in the produce department, add fresh blueberries to your shopping cart and enjoy the delicious flavor of the berries.
BLUEBERRY PANCAKE STACKS
Vegetable oil for cooking
1 cup milk
1 tablespoon vegetable oil
1 egg
1 cup all-purpose flour
½ teaspoons baking powder
1 teaspoon salt
1 cup fresh blueberries
Dash of nutmeg
In a mixing bowl, stir together the milk, oil, and egg. In a separate bowl, combine the flour, sugar, baking powder, salt, and nutmeg. Add dry ingredients to the milk and stir just until mixed (batter should be slightly lumpy). Gently fold in the berries. Spoon the batter onto a griddle or pan greased with vegetable oil and heated to medium-hot (dollops should be about the size of a silver dollar). Let the batter cook until the tops of the pancakes begin to bubble, then flip and cook until done.
Stack and serve immediately with softened margarine and warm syrup.
Makes about eighteen 2 ½” pancakes.
BLUEBERRY SYRUP
Combine 1 pint of blueberries and 1 cup of maple syrup in a saucepan.
Heat to boiling, then lower the heat and simmer until most of the fruit has burst. Remove from heat and use a fork to smoosh the berries. The syrup will thicken as it cools. Store in the refrigerator for up to 2 days.
July is one of my favorite months of the year. Summer is in full swing, school is out, temperatures are soaring, and we celebrate Independence Day, as well as my birthday! While all those things are great, my favorite part about the month is celebrating National Ice Cream Month all month long! Who wouldn’t love a cold, sweet treat on a hot, summer day?
Did you know that one 1/2 cup serving of regular ice cream is considered a good source of calcium and phosphorous, containing 10% of the recommended daily value? While ice cream can be part of a balanced diet, its high calorie and fat content are something to consider. Ice cream is good in moderation, something I know I struggle with.
Cold, Delicious, and so many flavors! Photo source: Lyndsey B.
One of my favorite things about ice cream is the options are endless. Not only are there numerous flavors to choose from, but there are other options for how it can be made or served. “Add-ins” such as berries, chocolate sauce, sprinkles, and whipped cream can change how the base ice cream tastes. Some of the most popular flavors, such as vanilla, chocolate, cookie dough, strawberry, butter pecan, etc., do not need any add-ins though.
Types of ice cream also can be broken down into different categories:
Regular ice cream is a frozen food product made from dairy products with at least 10% milk fat.
Light ice cream contains at least 50% less fat or 33% fewer calories than regular ice cream.
Low-fat ice cream contains no more than 3 grams of fat per serving.
Nonfat ice cream contains less that 0.5 gram of fat per serving.
Frozen custard, also known as French ice cream, contains a minimum of 10% milk fat as well as 1.4% egg yolk solids.
Sherbets have a milk fat content only between 1-2%.
Sorbet, also known as water ices, are similar to sherbet, but do not contain dairy.
Frozen yogurt has a mixture of dairy ingredients such as milk or nonfat milk that has been cultured, as well as other ingredients for sweetening and flavoring.
Enjoy a scoop of ice cream in honor of National Ice Cream Month. Photo source: UF/IFAS Northwest District
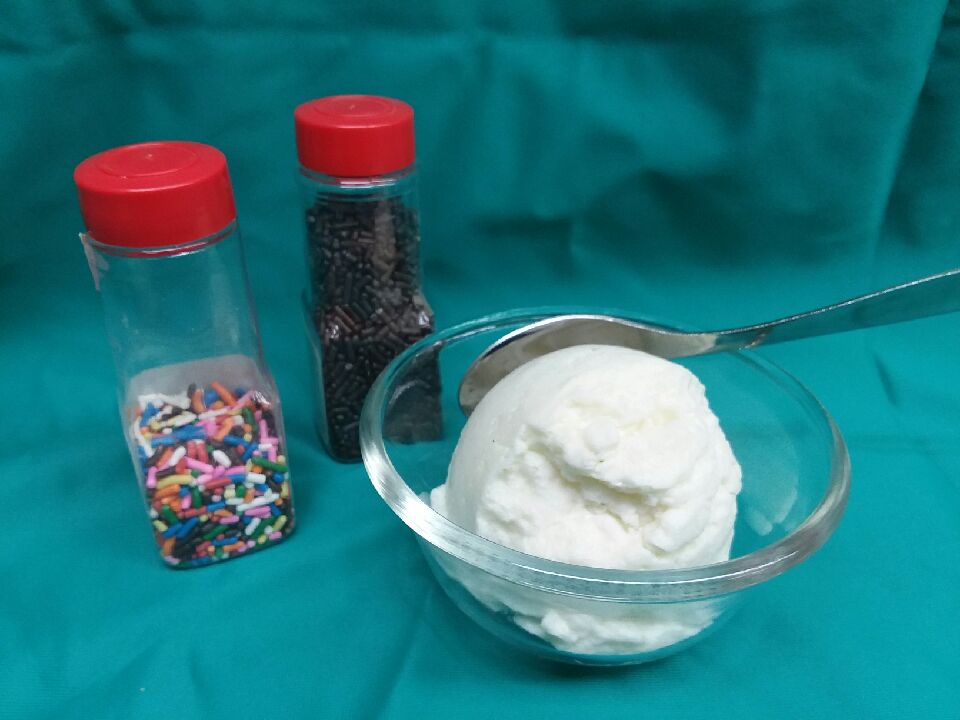
Since the kids are home from school, I am always looking for activities for them. Check out the recipe and instructions below for how to make your own ice cream in a bag at home!
Ingredients:
3 Zip-top bags: 2 quart-size and 1 gallon-size
¼ c. cream
¼ c. milk
1 Tbsp. sugar
3/4 tsp. vanilla extract
4-5 c. ice
1/3 c. salt (rock salt or large granules works the best)
Toppings of your choice (sprinkles, chocolate syrup, fruits, whipped cream, etc.)
Directions:
A cool and refreshing sweet treat Photo Source: Angela Hinkle
Bag it! In a quart Zip-top bag, combine cream, milk, sugar and vanilla. Push out excess air and seal. (Double bag it to avoid spillage)
Ice it! Add the ice and salt into the gallon zip-top bag. Then place the smaller, sealed bag into the ice.
Shake it! Seal the bag and shake vigorously, 7 to 10 minutes. Do this until the ice cream has hardened. The more you shake, the quicker it hardens.
Remove it! Remove the smaller bag from the big bag. Throw the big bag away.
Top it! Either eat the ice cream out of the bag or spoon it into a bowl. Add your favorite toppings and enjoy!
The holiday season is finally upon us. It’s a time for enjoying family, friends, and food!
You can make healthy habits this holiday season. It’s not only a single meal but rather an entire season of parties, events, gatherings festivities, and unhealthy choices that add up to that holiday weight gain we resolve to lose when January rolls around. As the holiday season begins its rapid approach, take time and consider those eating habits that set your new year off on the wrong foot. Why not make a resolution now to eat healthier this holiday season?
Just a few simple strategies can help make the difference and keep those unwanted pounds away. Here are some suggestions:
Don’t skip meals. Eating healthy on a regular basis will keep you from overindulging at holiday gatherings.
Use smaller plates for meals and gatherings and be mindful of portions
Choose more vegetables and smaller helpings of entrees and desserts
Drink more water and minimize alcoholic drinks and eggnog
Make healthier recipe ingredient substitutions when cooking and baking
Take a mindful approach to keeping your personal health goals in-check. We can all still experience the joy of the holiday season, without making food the focus. Make a resolution to be mindful and eat healthier this holiday season, and your waistline will thank you!
Since I can recall, I’ve liked to read cookbooks. Old cookbooks, famous cookbooks, church cookbooks, regional and seasonal cookbooks, and cookbooks hot off the press! I read the forward and the preface (… if there is one). I don’t just look at the pictures, but I read the recipe for yield (number of servings), ingredients and amounts, and the way the ingredients are combined. I read about the equipment required to prepare the recipe and the amount of time it takes to complete the task.
A narrative format is common with many older or handwritten recipes. Photo credit: Heidi Copeland
Generally, I have found that old cookbook recipes often seem different and that handwritten, handed-down recipes tend to be vague. I also have found that the product does not always turn out like the picture. Yields – the amount a recipe feeds – has certainly changed over time and recipe ingredients have become more and more varied, as has their use. Who knew toasting spices completely changes their flavor profile and that umami is important?
It used to be that people learned to cook by watching someone else. However, that seriously changed as more and more folks became literate. In fact, the first cookbook published in the United States, American Cookery (Hartford Connecticut 1796), has been designated by The Library of Congress as one of the 88 books that shaped America. This first cookbook used uniquely American ingredients of the time and provided American cooks with quite a litany of receipts, the old-world way of documenting what we now call a recipe.
Recently, I listened to a radio interview with Adrien Miller, a cookbook author who has been on a quest to document uniquely African American cooking histories.
I chuckled to hear Adrien Miller describe a handwritten recipe from a friend or a relative as a lesserpe… his terminology for the unexacting nature of a recipe given from someone who really doesn’t need an exact rendition because they know what they are doing and assume you do, too.
Recipes are a great way to hand down our own historical traditions. However, having been charged with giving out a lesserpe…, I find it is critically important to be as exacting as possible when sharing recipes with friends or family.
A good, standard format for a recipe includes:
Name of product
Yield of product (how many it serves)
Ingredients in exact amounts (in order of use is helpful)
Step-by-step instructions, in detail
Time and temperature specifics
Important information about pan size, etc.
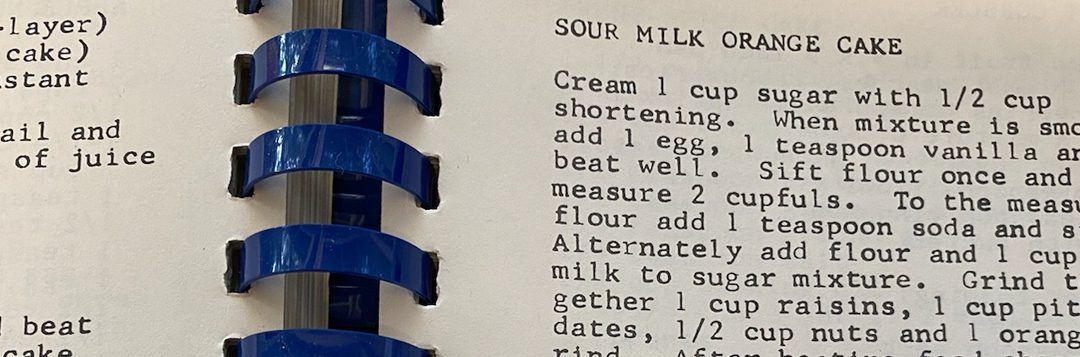
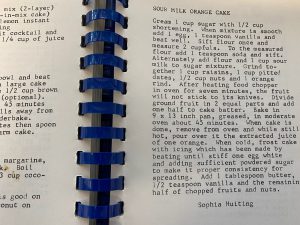
Remember, too, that a recipe is a history. History evolves. Aunt Margaret might have written a narrative format (paragraph) recipe but today that form might be seen as hard to follow.
Here is an example from Aunt Margaret:
Apple Pie (2 crust)
Preheat oven to 425 degrees. Line a 9-inch pie pan with your favorite crust. Combine and sift together 1/2 – 2/3 cup white sugar, 1 1/2 tablespoons cornstarch, 1/4 teaspoon nutmeg, 1/2 teaspoon cinnamon. Combine and sift over apples (about 3#, cut up). Stir apples gently until well coated. Place in pie shell and dot with butter. Cover pie, slit or prick crust. Bake at 425 degrees for about 15 minutes then reduce heat to 375 degrees. Bake until done.
The typically formatted recipe:
Apple Pie (Aunt Margaret)
Serves 8 to 10
2 pie crusts, purchased or homemade
3 pounds Granny Smith apples, approximately 8 large apples
1/2 cup white sugar, more if you like it sweeter
1 1/2 tablespoons cornstarch
1/4 teaspoon nutmeg
1/2 teaspoon cinnamon
2 tablespoons butter, firm, sliced thin
1 egg yolk
2 tablespoons cream
Preheat oven to 425°F.
Wash, peel, core, and slice the apples thinly.
In a large bowl, toss sliced apples with sugar, cornstarch, nutmeg, and cinnamon.
Line 9” pie pan with 1 piecrust
Mound the apple mixture in the center of the pie crust.
Dot the apple mixture with sliced butter.
Cover apples with 2nd pie crust.
Crimp edges of the pie crust. (Press the top and bottom dough rounds together as you flute edges using thumb and forefinger or press with a fork.)
Mix egg yolk and cream, brush all over the pie crust top.
Stick with fork tines in a dozen places or vent with small knife-made slits.
Bake 15 minutes in the preheated 425°oven.
Reduce the temperature to 375°. Continue baking for 35 to 45 minutes, until apples are soft and the crust is golden brown.
Transfer the apple pie to a rack to cool for at least 1 hour.
Serve warm or cold.
Notes:
Place the pie on a baking sheet to catch any drips before you bake it.
At any point during the baking, if the top of the pie begins to brown too much, just tent it with aluminum foil.
Your dad does not like nutmeg. I add a splash of vanilla, a bit more cinnamon, and omit the nutmeg.
Don’t forget the vanilla bean ice-cream. It adds a nice touch!
This holiday season, don’t be blamed for sharing less than the whole recipe. Recipes can be a valuable tool for passing on important family food traditions, now and into the distant future. Learn to write a good recipe with details. You might just be the talk of the table for eons.
If baking were a feature film, flour would be the lead actor. While there are a lot of important supporting castmates, flour is the star. It serves as the foundation upon which baking masterpieces are built, providing structure, texture, and mouthfeel (the physical sensations food provides in the mouth) to the final product.
But here is the thing: Not all flours are created equal. There are many types of flour out there, but not all of them will provide the same results. Different types of flour have different levels of protein, gluten, and fiber, and react differently with their companion ingredients. Need all-purpose flour but only have rye flour? Expect a nuttier, grainier outcome – or even possibly a disaster!
Depending on the type of flour used, different quantities of other ingredients may be called for, such as water or oil, salt, butter, sugar, baking soda, or baking powder. Not all flours are easily interchangeable, and some flours can only be partially substituted for others, or the final product may be dramatically different.
For example, want to substitute whole wheat flour for all-purpose flour? Sure, it’s possible, and is much easier to pull off in quick (non-yeast) breads such as muffins, pancakes, and biscuits. However, in yeast breads, switching out 100% of white flour for whole wheat without adjusting other ingredients will inevitably result in a final product that is less airy and more dense (less rise), which may adversely affect the flavor and texture.
What to do? Since whole wheat flour absorbs more liquid than white flour, for every 1 cup of whole wheat flour substituted, increase the liquid by 2 teaspoons, and then let the dough rest for 30 minutes before kneading to allow the liquid to be absorbed. This will result in a softer, more malleable dough that will yield more favorable final results.
There are many more substitution tips out there – more than could possibly be covered in one article. But here are a few common types of flour that may be called for in baking:
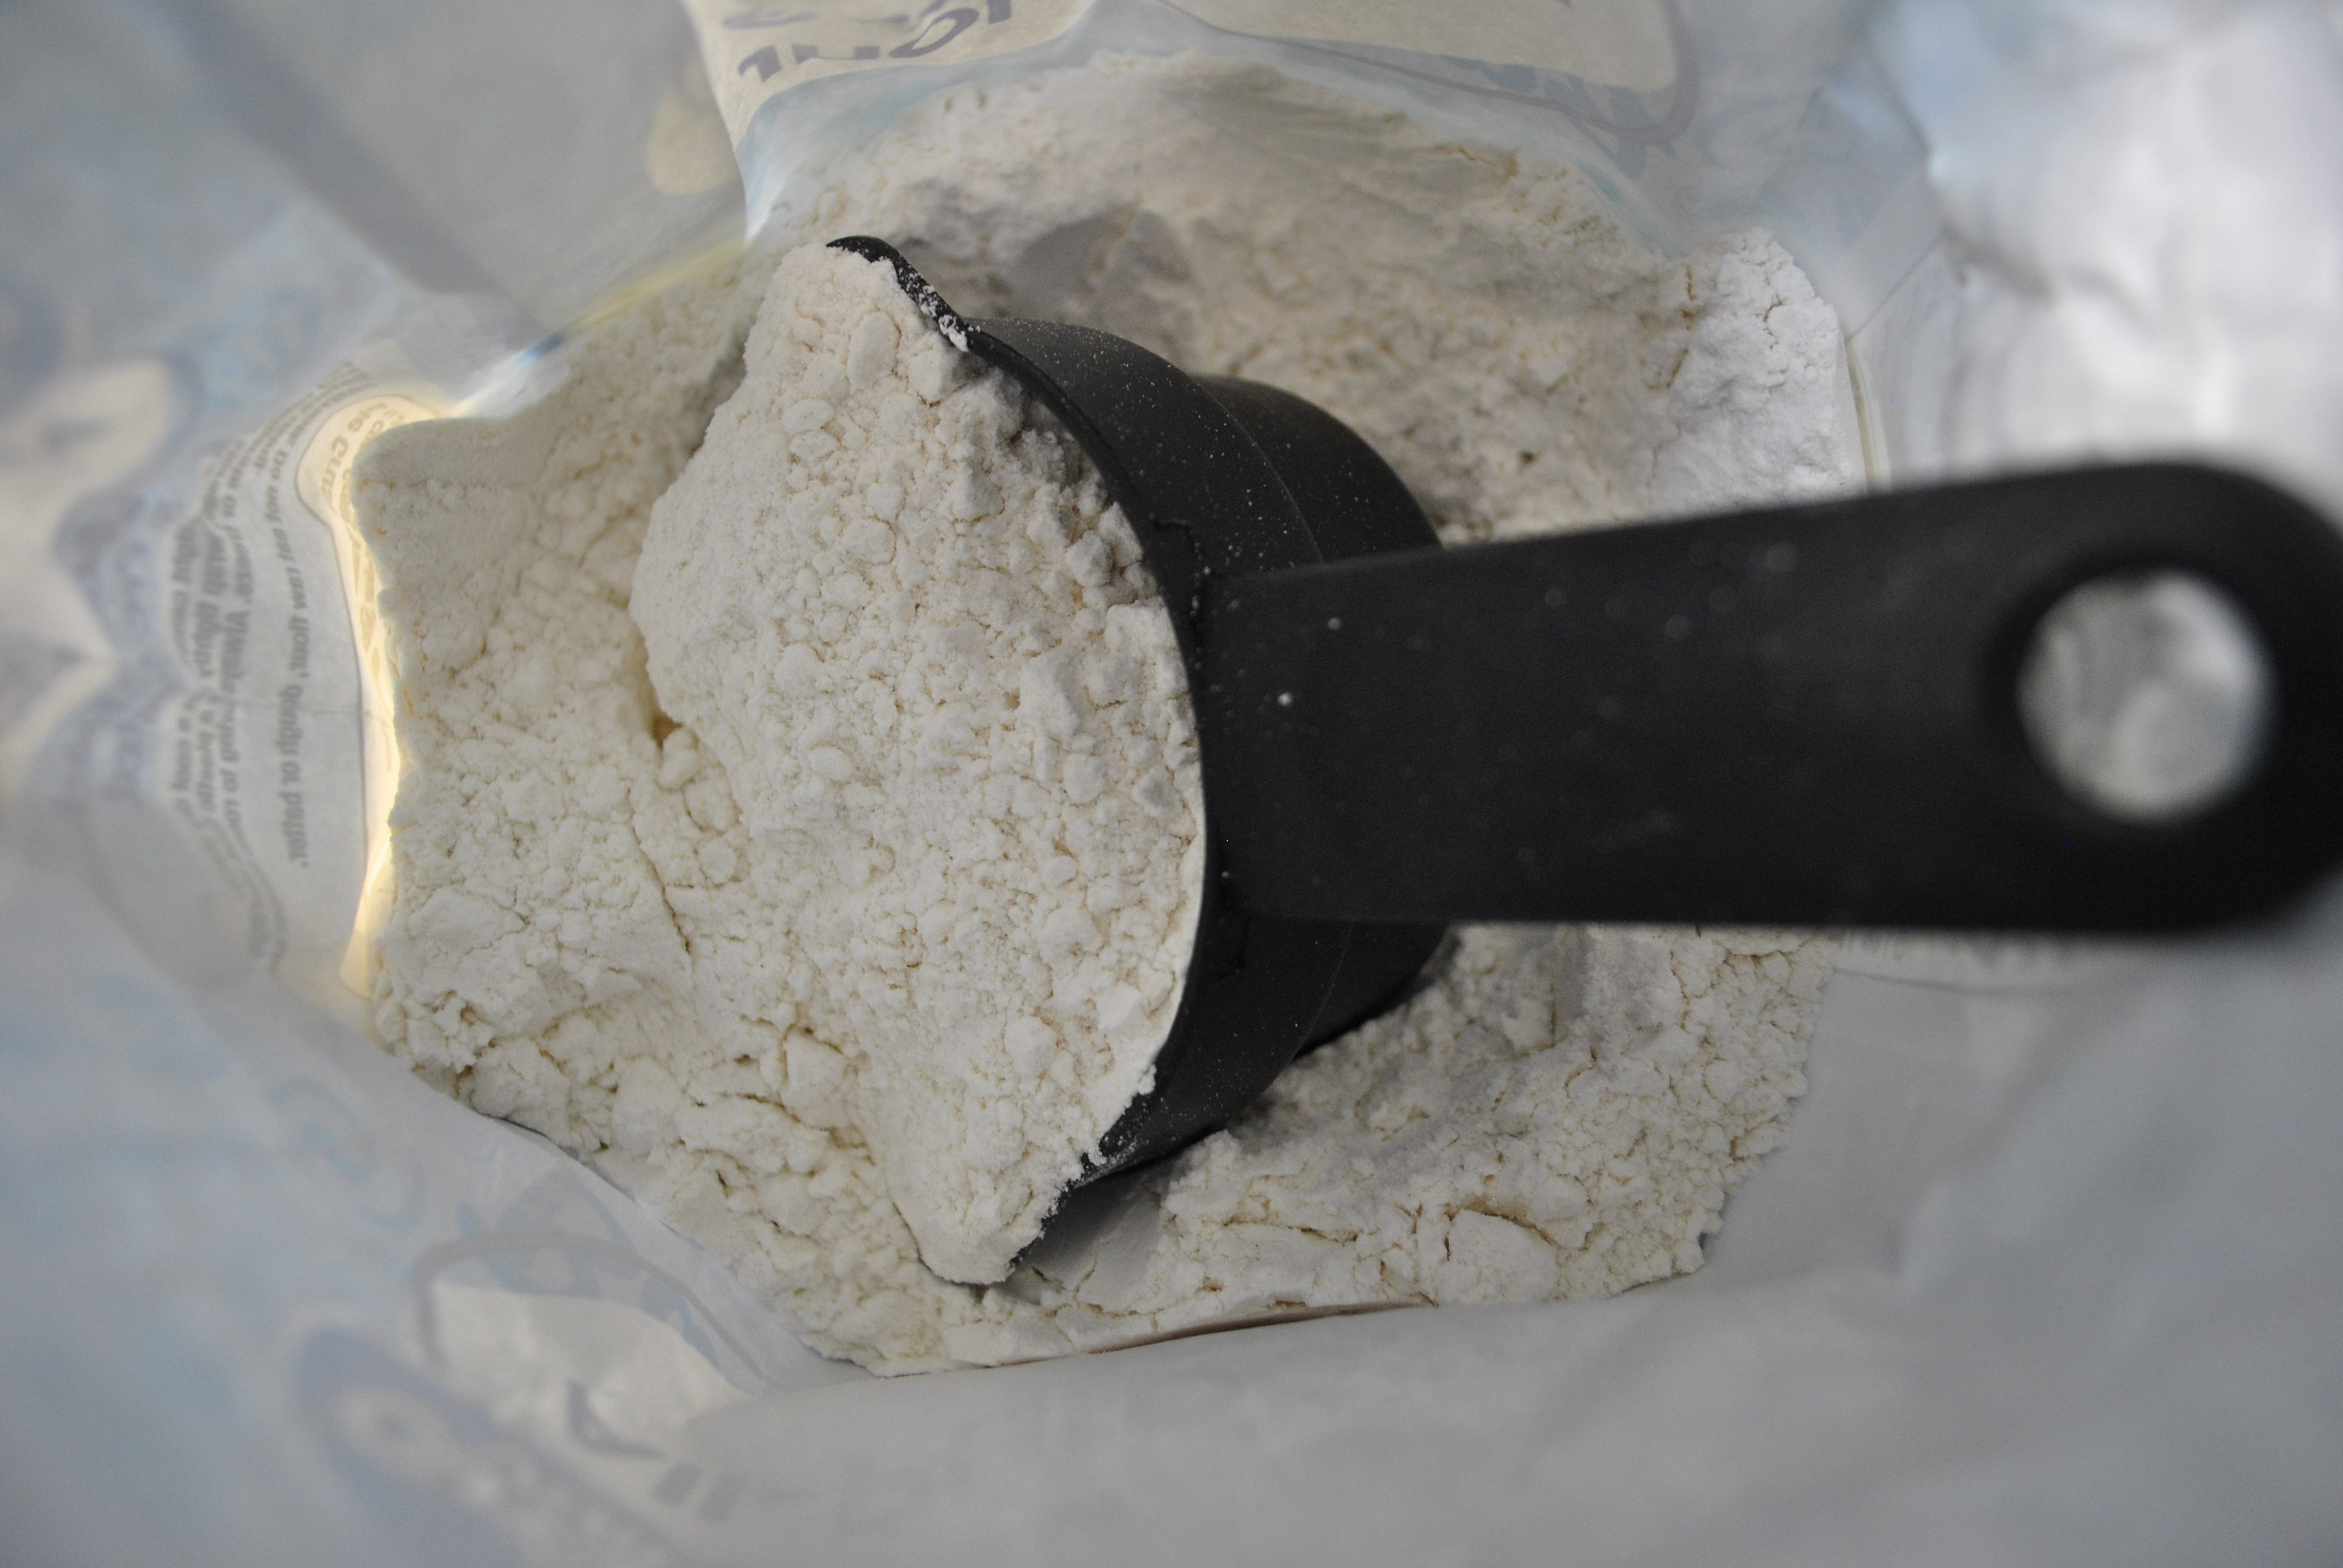
All-purpose flour is a common, highly versatile type of flour that can be used successfully in many baking recipes. (Source: Samantha Kennedy)
All-purpose flour: Made from the soft, chewy internal part of the wheat kernel – the endosperm – it is a highly versatile type of flour that can be used in just about any baking recipe. This type of flour generally contains about 10-11% protein.
Self-rising flour: I like to think of this as all-purpose flour with a kick. Why? Because it already contains the salt and baking powder that would otherwise need to be added to all-purpose flour to make the final product rise. While it can be substituted for all-purpose flour, it is important to remember to leave out the additional salt and baking powder called for in the recipe.
Bread flour: This type of flour has a higher protein content than all-purpose flour – about 12% – and produces a dough with more gluten, resulting in a light, airy loaf with good volume. All-purpose flour can be used instead with positive results.
Cake flour: This type of flour contains about 7.5% protein and results in a final product that is crumblier than bread, which is desirable in a cake or cupcake. If using all-purpose flour instead, substitute 1 cup minus 2 tablespoons of all-purpose flour for every 1 cup of cake flour called for in the recipe.
Flour is a vital ingredient in nearly all baked goods. Using too much, too little, or a different kind than called for can result in an unsatisfactory final product. Learning the differences between common types of flour and how they can be interchanged with one another will go a long way towards achieving baking success.
For more information about this or other baking topics, please call Samantha Kennedy at (850) 926-3931.
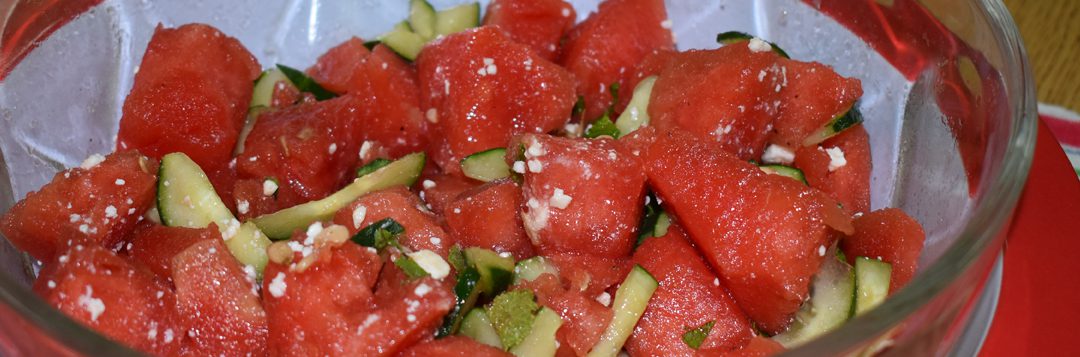
July in National Watermelon Month. Watermelon is a sweet, low-calorie summer treat. The taste and fragrance of a cool, juicy slice of watermelon can’t be beat. Celebrate by trying this different recipe using nutritious, delicious watermelon.