by Marie Arick | Apr 20, 2021
 According to the American Diabetes Association, “the national cost of diabetes in the U.S. in 2017 was more than $327 billion, up from $245 billion in 2012.” Additionally, the National Institutes of Health (NIH) estimates 7.3 million adults ages 18 and up are undiagnosed diabetics.
Metabolic syndrome is a group of medical conditions that include high triglycerides (a fat in the blood stream), low HDL cholesterol (high density lipoprotein) also known as good cholesterol, high blood pressure, high blood sugar, and abdominal obesity defined as a waist circumference of 35 inches of more for women and 40 inches or more for men. A person with three or more of these conditions constitutes metabolic syndrome and increases one’s chances for developing cardiovascular disease.
By being proactive with one’s health and knowing your numbers, one can better maintain a higher quality of life. Managing just one of the above in a healthy manner can aid greatly with improving one’s overall health.
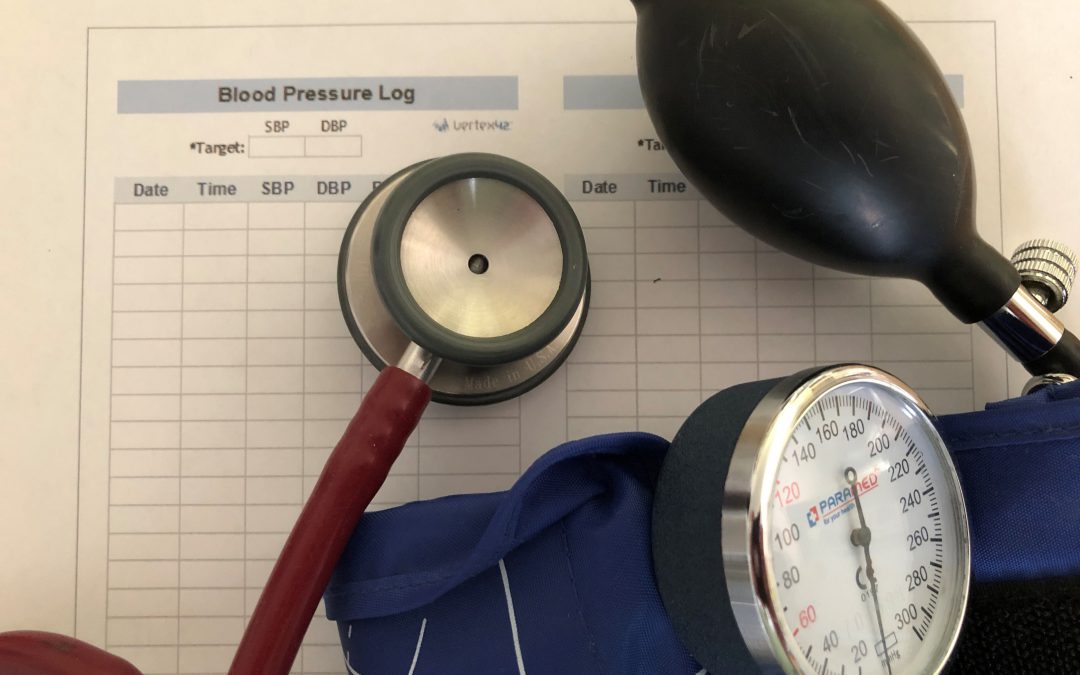
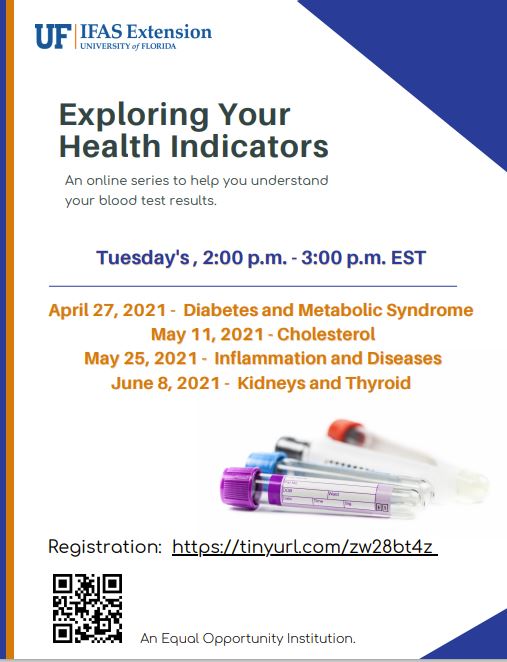
Join us for the upcoming Exploring Your Health Indicators Webinar Series to gain knowledge of your blood test results. April 27 will cover diabetes and metabolic syndrome; May 11 will explore cholesterol; May 25 dives into inflammation and diseases; and June 8 will wrap up the series with kidney and thyroid. Register once for all the sessions and if you miss a session, a recording of the program will be emailed to you. Invest an hour to gain knowledge that can greatly benefit your health.

by Heidi Copeland | Apr 7, 2021

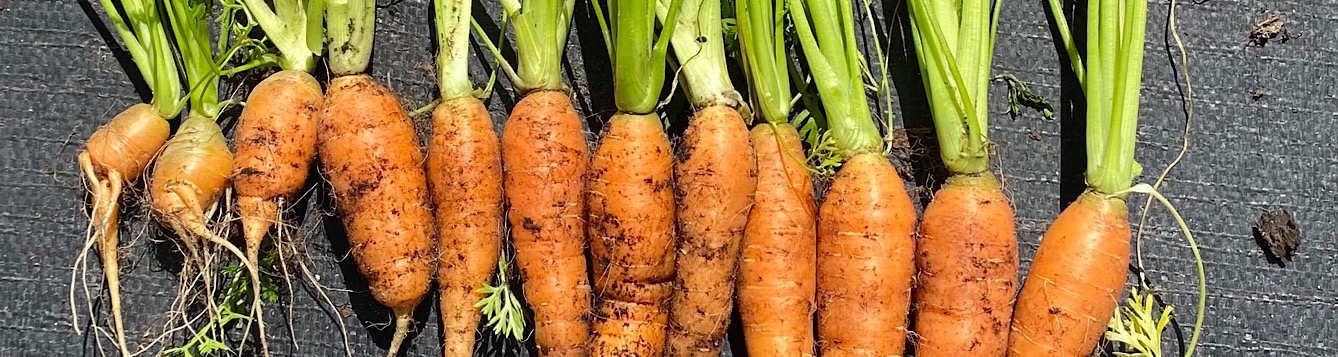
Carrots
Photo source: Heidi Copeland
According to industry standards, some of these carrots could not be sold because of “Serious damage” or any defect which seriously affects the general appearance of the
carrots in the container.
Waste less, save money is a great creed to live by. Really, it is that simple. One excellent example of this is food. Research indicates that 40% of all food in America is wasted yet, one in eight Americans does not have enough access to affordable, nutritious food. In other words, they are “food insecure.”
Wasted food is a MASSIVE problem at the commercial, institutional and residential levels. In fact, the Environmental Protection Agency (EPA) estimates there is more food than any other single material in our everyday trash and that approximately one-third of all food produced for human consumption worldwide is lost or wasted. In fact, in 2015, the USDA joined with the U.S. Environmental Protection Agency to set a goal to cut our nation’s food waste by 50 percent by the year 2030.
The sad fact is, most people do not realize how much impact food and food waste has on the earth and its issues of sustainability. Food waste occurs at every level of involvement. Examples of food waste include growing, processing (by-products too), transporting, point of sale, plate waste and uneaten prepared foods, and kitchen trimmings and their eventual disposal. Preventing food waste at all these levels can make a difference in addressing this issue.
However, preventing food waste it is not as easy as it seems. Many consumer factors also contribute to the problem.
- Food date labels confuse people. Use by/sell by dates are not always about food safety but about peak quality. Many foods are still safe to eat after their dates. Inspect “expired” foods closely via sight and smell before consuming – find ways to use up food past its prime.
- Households overbuy – do you really need super sizes? Buying in bulk is not always less expensive if much of it is discarded. Only purchase what you know you will use and do not get lured in by the “more for less” deals.
- Massive portions are often served – share or learn to love leftovers. Split enormous portions into multiple meals.
- Grocery stores overstock their shelves to maintain an image of abundance.
- People demand “perfect” produce. Farmers have a hard time selling less than stellar items. “Ugly” fruits and vegetables are just as delicious and nutritious as their more photogenic counterparts. Places such as farmers’ markets and community gardens are good places to find imperfect produce that would otherwise go to waste.
This Earth Day, (an event first celebrated on April 22, 1970 in the United States and is now a globally coordinated event in more than 193 countries) commit yourself to taking an action. As the late Neil Armstrong famously quoted as he stepped on to the moon… “This is one small step for a man, one giant leap for mankind!” If each of us considered and implemented our own practical or creative approaches to preventing food from going to waste what would our collective actions mean for mankind?

Fresh Carrots
Photo Source: Heidi Copeland
The best way to reduce food loss at home is not to create it in the first place. Not only would we individually save money, our collective efforts could conserve resources for future generations. The best method is the one you use.
- Reduce wasted food – shop smart, plan what you purchase, and use it, ALL of it!
- Maximize the efficiency of your refrigerator based on science. Read your refrigerator manual to learn where the coldest spots in the refrigerator are and what foods benefit from refrigerator location.
- Maximize the efficacy of canned products… use the FIFO (first in first out) method of rotation to use the oldest product before the newest on the shelf.
- Donate what you cannot use to others.
- Divert food scraps to animal food (chickens anyone?)
- Compost
- Landfill as the last resort.
Common causes of personal food waste include overbuying, over preparing and spoilage. The basic tenets of sustainability – reduce, reuse, recycle and refuse, work to reduce food waste too! Pay attention to purchases, eat what is prepared, store food properly, and refuse to waste. We can all do our part! Let’s start today.
https://savethefood.com/recipes/

by Laurie Osgood | Apr 1, 2021
 April is designated as National Financial Literacy Month to increase awareness about financial literacy, especially with the Coronavirus (COVID-19) causing economic worry for families across the United States. When it comes to financial literacy, knowledge is power!
Consumer debt has become a major challenge for families. If you owe money to multiple creditors, managing this debt can be overwhelming. Many Americans have more debt than they can afford to pay. Developing strategies for overcoming this challenge is essential. These strategies should include building financial knowledge, developing a budget, and setting savings goals to improve your financial outlook.
Financial literacy means understanding how to save, borrow, invest, and care for your money, leading to greater financial well-being. Research has shown that our physical health and well-being are directly linked to our financial health and well-being.
Florida Saves is a statewide initiative that helps inspire Florida families to set savings goals, lower debt, and build personal wealth. The Florida Saves pledge, located on the Florida Saves website, can help us establish personal financial goals. With this pledge, you’re making a commitment to work toward a savings goal, such as college tuition, an emergency fund, or down payment on your first home. Visit the Florida Saves Initiative website to learn more about financial literacy.
Whatever your savings goals are, becoming financially literate can help you achieve those goals. For more information about financial literacy and management, please contact your local UF/IFAS Extension Agent.
Extension classes are open to everyone regardless of race, creed, color, religion, age, disability, sex, sexual orientation, marital status, national origin, political opinions, or affiliations.

by Julie McMillian | Apr 1, 2021
Have you thought about your mental and emotional health lately? If you haven’t, it’s a great time to take some time to invest in you. Emotional wellness is the ability to handle and overcome challenges and obstacles that we often must deal with in everyday life. It doesn’t mean you will always be happy, but you are aware of and in control of your thoughts, behaviors, and actions when you have negative feelings or setbacks. Research shows that emotional health is a skill. There are many ways to improve and maintain your emotional health so you can adapt to changes as they happen.
Tips for Emotional Wellness:

Spend time with loved ones to strengthen your relationship.
Photo credit: UF/IFAS
- Stay positive. Purposely develop a positive mindset and hold on to the positive emotions and appreciate the good times as long as you can. Focus on your outlook. Ask yourself: What gives me inner peace? What gives me purpose? Remember to forgive yourself and others for making mistakes.
- Reduce stress. Stress can push you to your limits. It can also motivate you with a rush of energy when needed. It is important to eliminate long-term stress, if possible, and strive for balance. Learn what relaxation techniques work best for you. Deep breathing, meditation, and exercise are healthy ways that could provide release. Set priorities and don’t be afraid to ask for help when needed.
- Take care of your physical health. Plan to eat healthy meals, get enough rest, and exercise. Your physical health directly relates to your mental health. There are so many things we want to fit into a day but there’s not always enough time. Establish set times to help keep you on track. Avoid too much caffeine, alcohol, and stimulants, especially late in day when it could affect your nighttime routine.
- Strengthen your relationships. Build strong connections with your partner, family, friends, neighbors, and co-workers. These social relationships help us to find purpose and meaning. Join a group focused on a favorite activity or hobby. Take a class and learn something new. Volunteer in your community and share positive habits with others. Others can have powerful effects on our health and link us to opportunity.
- Think before you act. Be aware of your emotions and reactions so you can harness them when you are triggered, or something is bothering you. Notice what makes you happy, sad, or mad, and take a few minutes to think before you address or try to change a situation. It’s okay to express your feelings to others and not keep everything within. We must be mindful of how it comes across or affects the other person. Take a walk or some deep breaths and allow yourself to process during a difficult time.
How you feel can affect your daily activities and relationships. People who have good mental health can still have mental illness, so remember to consult your doctor for ongoing concerns. There could be chemical imbalances that need the right kind of treatment. There are also counseling and support groups that can help when you need extra support. It’s up to you to start making healthy choices and taking control of your overall wellness. I hope you feel encouraged and take steps to develop resilience in the face of adversity. For more information on healthy living or other Extension-related topics, you can contact your Family and Consumer Sciences Extension Agent at your local UF/IFAS Extension Office.
Sources:
https://www.nih.gov/health-information/emotional-wellness-toolkit
https://edis.ifas.ufl.edu/topic_mental_health

by Angela Hinkle | Mar 31, 2021

No sleep at night, tired at work.
Photo Source: E. Mudge
Experiencing sleeplessness? You’re not alone. Keep reading for things you can do to help you sleep well.
On average, Americans get less than seven hours of sleep a night. The hormone melatonin regulates the rhythms of our daily biological “clock,” which includes an optimum 7-9 hours of sleep per night. Unfortunately, there are oh so many, many things that inhibit that melatonin from doing its job correctly.
And when this rhythm breaks down, our overall health is at risk. Lack of proper sleep has been shown to increase risk for illnesses like heart disease and diabetes, as well as learning disabilities and mental illnesses like dementia.
So, what is keeping us from sleeping well?
Who has time to sleep?
There is so much work and fun to be done in a 24-hour day, that we often shelve sleep to lowest priority. “If I can get another hour’s worth of work done, I’ll catch up on sleep later” seems to be the modern mantra.
All those lights are great, but…
The bluer the light, the more it messes with our bodies’ cues to sleep. A candle flame with no blue light – no problem. Tablets and smart phones and televisions with lots of blue light can disrupt our sleep by about 60-95 minutes.
To sleep well, try some or all of these tips:
- Make sleep a priority. Schedule it as part of your regular routine. Try to go to sleep at the same time every night.
- Sleep with a night light that has a red light bulb. (Don’t put a red scarf over your lamp shade. This is a fire hazard.)
- No caffeine after noon (from coffee, tea, chocolate, etc.).
- Take a warm, soothing bath or shower within an hour of going to bed.
- Try Epsom salts in the bath and calming lavender, sandalwood, or juniper scents in the bedroom.
- Drink a cup of warm tea with valerian extract (a common ingredient in “sleepy” teas).
- Set your thermostat to a cool 62° to 69° during sleep time.
- Sleep on freshly laundered sheets.
- Turn off electronic devices at least one hour prior to bedtime.
- Stop eating at least two hours before bedtime.
Though it may seem like we need to go full speed ahead 24-7, we just can’t. And we should stop trying. We need good rest and sleep to help our body recuperate from the day.
So, try some or all of the techniques above to sleep well. Let me know how it goes. Zzzzzz.
For more information on sleep and your health, see what the CDC has to share Are You Getting Enough Sleep?

by Melanie Taylor | Mar 26, 2021
Did you know that over the past ten years, the National Institutes of Health (NIH) has been a partner in research to determine the physical and mental benefits of having a pet? It turns out that pets not only steal our hearts, but they can contribute to better cardiovascular health. Studies have shown that the bond between people and their pets can increase fitness, lower stress and bring happiness to their owners. Regular walking or playing with pets can decrease blood pressure, cholesterol, and triglyceride levels. Pets can also help manage loneliness and depression by giving us companionship. This was helpful to many people suffering from loneliness during the pandemic. In fact, between March and July of 2020, there was a surge in pet adoptions and some shelters could not meet the demand. Since people had more free time, less socializing, and lots of alone time, many people found a pet was just what they needed to fill that void.

Cali, a tortoiseshell cat, posing to get attention.
Photo Source: Melanie Taylor
Although many of us are slowly returning to the normal stresses of daily life, a pet can still give us those same health benefits. Just think about it: on those stressful days with busy work schedules, running kids around town to their activities, etc., what’s better than being greeted at your door in the evening by a dog with a wagging tail or a cat’s purr as they snuggle with you? Of course, do not forget those unique pets, such as birds, bunnies, hedgehogs, reptiles, fish, and lots of other furry and scaly friends of ours.They all greet you in their own special way.
On a safety note, always remember pets can carry harmful germs that can make us sick even when the pet appears healthy. People with compromised immune systems and pregnant women should always take extra precautions when interacting with pets. Some tips on staying safe and healthy around your pets are to always wash your hands after handling your pets and be sure to maintain your pet’s health by regular visits to the veterinarian. Also, practice good pet hygiene by keeping pets out of the kitchen, cleaning their toys, beds, food, water/food bowls, etc., regularly sanitizing areas the pets frequent, and, of course, cleaning a cat’s litter box daily and picking up dog poop outside and disposing of it properly. When pets are added to your family, always teach your children how to properly interact with the animal(s). Small children should always be supervised when interacting with any pets.

Sonny, a tabby cat, enjoying play time with his mouse toy.
Photo Source: Melanie Taylor
On a fun note, if you are a pet owner, you already celebrate your pet(s) everyday, but there is an annual day of celebration for our pets. National Pet Day is April 11, 2021. This is an extra special day to give your pet extra snuggles and maybe even an extra treat. Be sure to use this day to remember why your pet is so special to you and your family. Reminisce about your pet memories while giving him/her extra attention and maybe even share your special memories on social media. People love seeing pictures of pets. It makes everyone’s day brighter. Here are the top four ways people report making National Pet Day special for their pet, 1) I give my pet a special treat, 2) I tell my pet “I love you”, 3) I buy or make a special gift for my pet, and 4) I let my pet sleep in my bed with me. (https://nationaltoday.com/national-pet-day/)
So, be sure to remember your pet this National Pet Day in April.
To see the importance of pets in our lives and families be sure to check out the interesting insights below from surveys about people and their pets.
Interesting Insights about People and their Pets:
- 95% of pet owners say their pets are part of the family.
- 94% of families with an autistic child benefited from having a pet.
- 67% of households in the United States have a pet. Americans spend approximately $75 billion a year on pet care and products.
- 44% of people reported they would rather cuddle with their pet than their partner.
- 22% of Americans are attracted to people who treat their pet like a family member.
- 11% of Americans hang out with their pets (ex. watch TV, read books, etc.).
- 10% of owners are allergic to their pets.
- 10% of Americans consider their pet to be their best friend.
- 10% of Americans talk to their pet in a special voice.
- 10% of Americans carry on conversations with their pet.
As April approaches and spring weather arrives, be sure to get outside with your pets and enjoy some stress relief, feel the sunshine on your face, smell the fresh blooms, and take in the beauty of nature around you. It will provide positive health benefits for you and your pet as you take a long, relaxing walk together. If your pet is an indoor only pet, be sure to sit in the floor and play with your pet like you did when they were kittens, etc. They will love the extra time and closeness with you. No matter what type of pet you have, be sure to let them bring you happiness and relaxation, and you, in turn, can help them live their best pet lives possible.
Sources:
Center for Disease and Prevention (CDC):
https://www.cdc.gov/healthypets/health-benefits/index.html
National Today:
https://nationaltoday.com/national-pet-day/
The Washington Post:
https://www.washingtonpost.com/nation/2020/08/12/adoptions-dogs-coronavirus/

 According to the American Diabetes Association, “the national cost of diabetes in the U.S. in 2017 was more than $327 billion, up from $245 billion in 2012.” Additionally, the National Institutes of Health (NIH) estimates 7.3 million adults ages 18 and up are undiagnosed diabetics.