As farmers in the Florida Panhandle continue to seek ways to improve soil health, manage weeds, and increase crop yields, the use of cover crops has become an increasingly popular practice. Cover crops, typically planted during the off-season, offer a range of benefits for row crop production, including reduced soil erosion, improved soil fertility, and better moisture retention. However, choosing the right cover crop and understanding its specific impact on row crops is crucial for maximizing these benefits.
Here are several important considerations for selecting and managing cover crops in row crop systems:
–
1. Start Small
When introducing cover crops into a row crop system, starting with a small area is a practical way to test their impact (especially if you are first time cover crop user). This allows you to observe how specific cover crops perform under local conditions without risking larger crop areas. A small plot can provide valuable insights into how well a particular cover crop integrates with existing practices, responds to soil conditions, and influences pest and weed populations. Starting small reduces potential risk and offers a manageable way to evaluate the cover crop’s benefits and any necessary adjustments for larger-scale application.
–
2. Easy Entry Points
For farmers new to cover cropping, starting with easy-to-manage options can simplify the transition. Some low-maintenance options, like cereal rye or oats, are ideal for first-time cover croppers. These crops are hardy, require minimal input, and have a quick establishment time. Another easy entry point is to use single-species cover crops rather than more complex multi-species blends, as single-species crops are easier to manage and terminate. Planting in a small section of the field as a trial or testing cover crops on the field margins can also help farmers gradually incorporate cover crops without committing large areas right away.
Additionally, if possible, choose a field that provides a bit of “extra time” for planting and managing your cover crop. This could be an area where you harvest early or plant later, giving you more flexibility during the transition between crops and allowing you to identify any adjustments needed for future cycles.
–
3. Selecting Cover Crop Species According to Goals
Choosing the right cover crop depends on the specific goal/needs of your soil and row crop rotation. Legumes, like clover and vetch, are excellent nitrogen fixers and can help improve soil fertility for nitrogen-demanding crops like corn or cotton. Grasses, such as rye and oats, are great for controlling erosion and adding organic matter to the soil. Brassicas, including radishes and turnips, can help break up compacted soil and improve water infiltration.
Different cover crops also serve various purposes: some suppress weeds more effectively, while others are better at managing soil compaction. Consider your primary goals, whether they are weed control, soil health improvement, or moisture conservation—and select a cover crop accordingly.

Fig. 1: Different types of cover crops at UF/IFAS West Florida Research & Education Center, Jay, FL; (A) White clover (Trifolium repens L.); (B) Cereal rye (Secale cereale) (C) Crimson clover (Trifolium incarnatum) and (D) Mixture of cereal rye and crimson clover (Credit: Nkem Nwosu)
–
4. Understanding Agronomic Practices
After choosing your cover crop species, adjust seeding rates according to your planting method, whether broadcast or drilled. Monitor weather conditions and wait to plant until soil moisture levels are sufficient. You can also overseed into a standing cash crop before harvest, though this adds complexity, as cash crop maturity and seed-to-soil contact must be considered. Drilling the cover crop after the cash crop harvest will provide the best seed-to-soil contact.
–
5. Timing and Termination
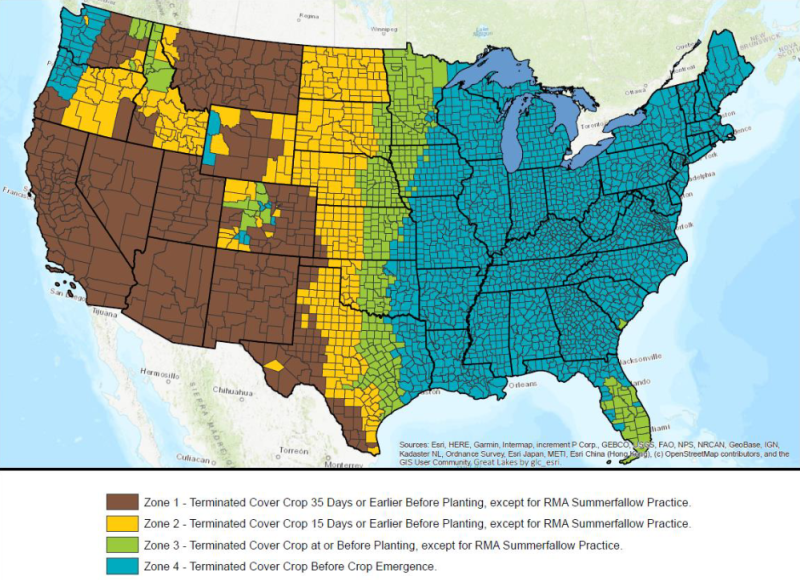
Proper timing of both planting and terminating cover crops is critical. Planting cover crops too late may reduce their effectiveness, while terminating them at the right time is essential to prevent them from competing with row crops for water and nutrients. Cover crop termination date is often determined by the target planting date of the cash crop. It is noteworthy that termination of cover crops should be planned in a way that allows the terminated CCs to dry out and become somewhat “brittle”. This is essential especially for CCs that tend to be rolled after termination and for the cash crop planter. Further, it is suggested that winter cover crops should be terminated between two to four weeks prior to the succeeding cash crop. However, the USDA in 2019 provided a CC termination guideline for states in the US to consider, based on the variability in climatic factors of rainfall, temperature, humidity, and soil conditions (Figure 2). From the guideline, CCs termination in Florida are classed into two distinct zones – Zone 2 which covers most of South and Central Florida, and Zone 4 which covers most part of Northwest and Northeast Florida. As such, farmers in Northwest and Northeast Florida can terminate their CCs up until the cash crop emerges, while farmers in South and Central Florida can terminate their Ccs at least 15 days prior to the seeding cash crop. Table 1 below summarizes the various termination zones.
–
- Potential Winter Cover Crops and Best Management Practices - November 7, 2025
- Managing Peanut Vine Growth with Plant Growth Regulators - May 2, 2025
- Join the 2025 STEP Cotton Competition! - March 28, 2025


