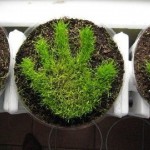
Grow a Grass Handprint
It’s summer time finally, and our kids are glad to be out of school, but it won’t be long before they are bored and itching for some fun. I’ve put together a boredom buster that you can use at home, in 4-H club meetings, 4-H school enrichment programs, or in 4-H day camps based on this great picture I found. Creating a grass hand print is very simple and doesn’t require any special equipment:
Materials
- Container to plant in (Make sure that the top of the container is large enough for your hand print. Pie plates work great and are super cheap!)
- Potting soil
- Grass seed
- Writing utensil (pen, pencil, marker, etc)
- Scissors (preferable safety scissors)
- Construction paper or card stock
- Water
Instructions
- Using your writing utensil, trace your hand on a piece of construction paper.
- Use the scissors to cut out the image you just traced of your hand.
- Fill your container nearly to the top with potting soil. You will want to leave at least an inch of space.
- Immerse your paper hand print in the water.
- Remove your paper hand print from the water quickly and lay it out on a flat surface.
- Sprinkle grass seed over the paper hand print until it is covered.
- Lay the seed covered hand print on top of the dirt in the container and cover it with about a quarter inch of soil.
- Make sure that the pot receives adequate sunlight and water as directed on the seed packet your seeds came from. In a few days you should have a grassy hand print!
So that’s it! This is a great introductory lesson to gardening or plant sciences, and it’s just plain cool. For more information on 4-H gardening projects, resources, and competitions visit: http://florida4h.org/programs/Plantscience.pdf

