by pmdavis | Oct 24, 2024
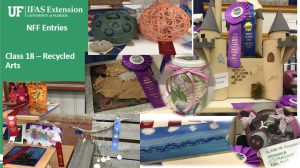
Recycled Art Ideas
I have the privilege of writing about our last class in the 4-H Division-CLASS 18: Recycled Arts for North Florida Fair. For this class you will create an original piece using recycled or natural products. The art can be 2-dimensional, 3-dimensional. At least half of the final piece should be from recycled (something that is used differently than its original purpose like: plastics, aluminum cans newspapers, cardboard, etc) or a natural environmental material, such as pinecones, dried flowers, leaves, or sticks. All materials used must be clean, sanitary, and safe.
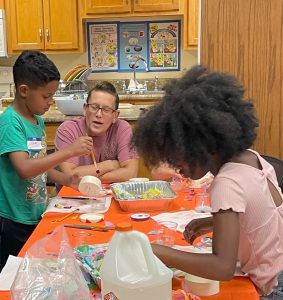
Learning by doing
So, if you use something that previously contained food it must be washed. If the item is from the environment remove excess dirt from the natural materials. Finally, all sharp edges on the artwork should be removed or covered for safety.
Preparing your Entry Form & Exhibitor’s Tag
You will need to have their entry forms to your 4-H Office by the 1st of October. 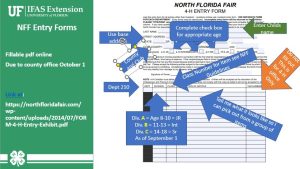
When you turn in your entry form, your 4-H agent will assign exhibit tags, which you will need to fill out and attach to your plant when it is time to submit for judging. Here is the information you need to correctly complete your entry tag:
- Section – 210
- Class- 18
- Lot- This will be your age division; write “A” for juniors (8-10 years old), “B” for intermediates (11-13 years old), or “C” for seniors (14-18 years old).
- Exhibit- a short description of the item you are entering (example: recycled pop bottle to piggy bank)
- Exhibitor- Your name
- Address- Name of your county
You can have up to 6 recycled art entries for the North Florida Fair. Youth will need to attach a label with a description of recycled material to their exhibit. The fantastic thing about this class is everyone can be creative, and this is a relatively inexpensive hobby that helps the environment by lowering the amount of items going into landfills. Take some time relax and be creative to create your recycled art fair exhibits.
Scoring
You can download the judges’ scoring rubric for more information on how recycled art entries are judged. These entries are evaluated on:
Materials
- 50% made from recycled or natural materials.
- Description identifying recycled materials attached to item.
- Item is a two- or three-dimensional piece of art from previously used materials.
- The completed art piece is different from its original use.
Designs and Creativity
- Workmanship/technique/materials – overall composition was planned filling space adequately.
- Neatness/appearance – care was taken in the creation of the item.
- Appropriate combination or use of materials.
- Recycled items are clean, sanitary, and safe.
- Creativity – item is unique or original.
- Creative use of color, pattern, or material.
After judging, a ribbon will be attached to your plant, and the ribbon color will be recorded for the fair office so they can issue you your premium money. 4-H Day at the Fair (November 16) is a great time to check to see what placings your exhibits earned!
Take a little time today to relax and create your own recycled art project for the fair. If you have questions, reach out to your local UF IFAS Extension Office.
Resources:
North Florida Fair 4-H Club Department 210 Rules
4-H Entry Form (for non-animal exhibits such as Recycled Arts)
Class 18 Recycled Arts
4-H Mall Visual and Creative Arts Curriculum
by Prudence Caskey | Oct 16, 2024
 Do you love to get creative and capture special memories? Show off your talents in the scrapbook (Class 14) or poetry (class 15) at the North Florida Fair!
How to Enter a Scrapbook for Class 14: Scrapbooking
If you enjoy taking pictures and scrapbooking, you can submit a scrapbook page about a 4-H project or activity to the fair. Follow these guidelines to make sure your page meets all the requirements and stands out in craftsmanship, creativity, journaling, and originality.
Size Requirements:
Your scrapbook page must be between 8” x 10” and 12” x 12”. Pages outside these sizes won’t be accepted, so double-check your measurements before submitting.
Theme:
Choose a theme related to a 4-H project or activity. The page should show a project you worked on or an event you attended, like an agricultural project, a craft workshop, community service, or camp.
Captions and Journaling:
Each photo needs a caption that explains what’s in the picture and why it’s important. Include some journaling to tell the story behind the photos. This helps the judges understand your page better, so share details about the people, the activity, and why it’s special.
Focal Point:
Every page should have a standout element, like a main photo or a special decoration. This is called the focal point, and it should grab the viewer’s attention right away.
Judging Criteria:
Your page will be judged on:
- Craftsmanship: Keep your page neat, clean, and well-organized.
- Creativity: Use creative layouts and decorations.
- Journaling: Make sure your writing adds a personal touch and tells the story behind the photos.
- Originality: Judges are looking for something unique and personal.
Tips for Success:
- Plan Your Layout: Arrange everything before gluing anything down.
- Use Good Photos: Choose clear, high-quality photos.
- Stick to Your Theme: Make sure every part of your page connects to your 4-H project or activity.
- Tell a Story: Share more than just facts—describe your feelings and experiences.
Make sure your scrapbook page meets the size and theme rules before submitting. Good luck with your 4-H Class 14 entry!
The link to the rules for category 14 can be found here: https://northfloridafair.com/4-h-club-department-210/
Poetry
How to Submit a Poem for Class 15:
Are you ready to submit your rhyme,
And show your poem’s worth the time?
Here are the rules you need to know,
To help you get your creativity to flow!
Submission Guidelines
Typed and tidy on one side, please
Your verse should be typed with ease.
Font and size: how to proceed
Make your font easy to read.
Times New Roman or Courier bold,
In 12-point size, your yarn is told.
Original work – all yours to show
The poem must be yours—you know!
No copying words from anywhere,
All original work is yours to share.
Don’t forget to add the date
Mark the day—don’t be late!
Use a piece of paper that’s 8½ x 11 sized
Protective it with a plastic sleeve; it is prized.
Give it your all, make it your very best,
Just one per rhymester, no more, no less!
Judging Criteria: The poetry entries will be evaluated based on the following four criteria: use of language, mood, originality, and content.
- Effective Use of Language:
- How well does the poem make use of language? Are the words chosen carefully, and do they create a vivid, engaging picture in the reader’s mind?
- Focus on strong, descriptive words that make an impact on the reader.
- Mood Intensity:
- Does the poem effectively create a mood or feeling? Whether it’s joy, sorrow, excitement, or nostalgia, your poem should evoke a strong emotional response from the reader.
- The way you build intensity can be through rhythm, pacing, or word choice.
- Originality in Approach and Theme/Creativity:
- Judges are looking for poems that take a unique approach to a theme. Think outside the box and avoid using clichés or overly familiar topics.
- Creativity is key here—use your own voice and perspective to express something in a fresh, interesting way.
- Meaningful Content:
- Is the poem meaningful? Does it convey a deep or important message? Whether you’re telling a story, sharing a personal experience, or commenting on a broader issue, make sure your poem has substance.
- The content should reflect thoughtful consideration and an intention to communicate something significant.
Tips for Success
- Edit your poem: after you’ve written your poem, take time to review and edit it. Look for areas where you can improve the flow, tighten up language, or add stronger imagery.
- Use imagery and metaphor: strong poems often include vivid imagery or metaphors that help paint a picture or convey emotions in a unique way.
- Practice reading aloud: poetry often has a rhythm or sound to it. Reading your poem aloud can help you catch any awkward phrasing or areas where the flow could be improved.
- Be personal and authentic: the most memorable poems are those that feel real and come from a personal place. Don’t be afraid to write about topics that are meaningful to you.
Final Submission
Once it’s ready and meets the guide,
Present your work with 4-H pride!
Put your poem in a sleeve so clear,
Your expression and flair will soon appear!
The link to the rules for category 15 can be found here: https://northfloridafair.com/4-h-club-department-210/
by Heather Kent | Sep 23, 2024
4-H baked goods handbook  Participating in the North Florida Fair’s 4-H baked goods division offers young bakers a chance to showcase their culinary skills. With various divisions and classes, participants can submit items such as yeast breads, cakes, cookies, pies, and more. This article is an overview of the rules, and includes a checklist and resources to help you prepare your baked goods exhibit for the North Florida Fair.
Understanding Divisions and Classes
Bakers are categorized into three divisions based on age:
- Junior Division (8-10 years old)
- Intermediate Division (11-13 years old)
- Senior Division (14-18 years old)
Classes range from yeast breads to decorated cakes and cookies, giving participants plenty of flexibility to enter their best work. Here’s a breakdown of the categories:
- Classes 1-5: Yeast Breads and Rolls
- Classes 6-9: Quick Breads
- Classes 10-18: Cakes (including layered, pound, and fruit/vegetable cakes)
- Classes 19-20: Decorated Cakes (non-professional)
- Classes 21-24: Cookies
- Class 25: Candies and Confections
- Classes 26-30: Pies
- Class 31: Tarts
- Class 32: Healthy Alternatives
Entry Rules
- No refrigerated or highly perishable items are accepted.
- Exhibitors may submit only one entry per class, and all entries must include a recipe.
- Judging will evaluate appearance, texture, and flavor.
- No commercially prepared mixes allowed.
- Entries must be in disposable containers covered with plastic wrap, and recipes should be attached to the bottom.
Checklist for Preparing Your Exhibit
- Ensure your baked item fits within the appropriate class and meets quantity requirements (e.g., six cookies or one whole cake).
- Attach the complete recipe (without your name) to the bottom of your exhibit container.
- Cut pies or cakes as instructed, leaving cut surfaces exposed.
- Cover all exhibits with clear plastic wrap, avoiding perishable fillings or frostings.
- Drop off your entry on time at the UF/IFAS Leon County Extension office.
Filling Out the Entry Form and Tag
- Entry Form: List your exhibit under Department 201 and select the appropriate class (e.g., Class 10 for cakes). Download and complete the 4-H entry form, and submit it to your local UF/IFAS Extension office on or before October 1st.
- Tag Information:
- Section: 201
- Class: Based on your item (e.g., cookies, pies, etc.)
- Lot: Your age division
- Description: Short description of the entry (e.g., “chocolate chip cookies”)
- Exhibitor: Your name
- Address: Your county
Resources for Baked Goods Entries
- 4-H Entry Form for the North Florida Fair
- 4-H Baked Goods Exhibit Rules
- Baked Goods Competition Handbook
By following these steps, you can confidently prepare a baked goods exhibit that reflects your skills and creativity. Good luck with your North Florida Fair entry!
by Heather Kent | Sep 21, 2024
 Participating in the North Florida Fair provides 4-H youth with the opportunity to showcase their creativity and skills through photography and poster exhibits. As part of Department 201, Classes 10 and 11, these exhibits can express a wide range of interests while demonstrating the effort and knowledge gained through 4-H projects. Whether you’re entering a photo that captures a moment or designing a poster that tells a story, this article will help you prepare your exhibit to meet fair standards, enhance your presentation, and have fun in the process!
Understanding the Guidelines
Before creating your exhibit, it’s essential to understand the specific rules and expectations for photography and poster entries.
- Class 10 – Photography: This category includes original photographs taken by the exhibitor. Photos can be color or black-and-white, and subjects can vary (nature, people, animals, etc.). The photos must be mounted on mat board, with no frames allowed. The maximum size is 11×14 inches, including the mat.
- Class 11 – Posters: Posters must communicate a clear message about a 4-H project or activity. They should be designed on poster board no larger than 14×22 inches. Posters can include drawings, photos, or other forms of graphic design, but they must be original work created by the exhibitor.
Both classes require that all work be completed within the current 4-H year and must reflect what the youth has learned from a 4-H project or activity.
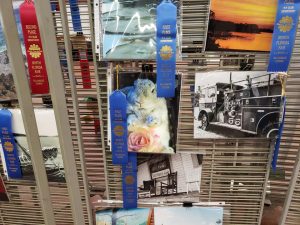
4-H youth enter photography to be judged.
Steps to Prepare Your Photography Exhibit
- Choose a Subject: Think about what inspires you. Popular subjects include landscapes, animals, or everyday objects seen in a new light. The photograph should tell a story or capture a feeling.
- Composition and Lighting: Good composition is essential. Follow basic photography rules like the rule of thirds, symmetry, and framing. Pay attention to lighting, ensuring your subject is well-lit but not overexposed.
- Editing and Printing: Minor adjustments in exposure, contrast, and cropping can make a big difference. However, the photo should remain natural and not heavily altered. Once satisfied, print the photo on high-quality paper.
- Mounting the Photo: Mount your photo on mat board, ensuring the total size (photo and mat) does not exceed 11×14 inches. The mat should complement the photo but not overpower it. Be sure there are no frames or glass covering.
Steps to Prepare Your Poster Exhibit
- Select a Topic: Choose a 4-H project or activity that you want to share with others. It could be related to an animal project, science experiment, or community service.
- Create a Layout: Plan your poster by sketching out where text and images will go. Make sure the poster is easy to read from a distance, with bold titles and clear visuals.
- Design Elements: Use a combination of images, drawings, or graphics to illustrate your message. Colors should be vibrant but not overwhelming. Keep your text minimal and focused on key points.
- Materials: Use sturdy poster board, markers, paints, or printed graphics. Avoid using glitter or anything that could fall off or damage other entries. Posters should be neat and easy to handle.
Check List for Preparing Your Exhibit
Here’s a checklist to make sure you’re ready to submit your entry:
- Photography Exhibit:
- Photo fits within the 11×14-inch size limit (including mat).
- Photo is mounted on a sturdy mat board (no frames or glass).
- Title or brief description attached (optional but recommended).
- Original work completed within the current 4-H year.
- Poster Exhibit:
- Poster is no larger than 14×22 inches.
- Clearly communicates a 4-H project or activity.
- Text is large and easy to read.
- Includes original drawings, photos, or graphics.
- Neat, with no loose materials or glitter.
Filling Out the Entry Form and Tag
Once your exhibit is ready, you’ll need to complete an entry form and tag for the North Florida Fair. Here’s what you’ll need to do:
- Download the 4-H Entry Form:
- List the exhibit under Department 201, and choose Class 10 (Photography) or Class 11 (Posters).
- Include your name, age division, and county.
- Turn in your completed entry form to your local UF/IFAS Extension office on or before October 1st. They will assign tag numbers for each of your exhibits.
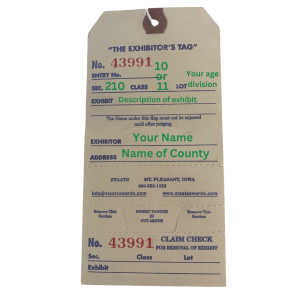 Exhibit Tag:
- Section: 201
- Class: 10 for Photography or 11 for Posters
- Lot: Your age division
- Exhibit: Brief description of your entry (e.g., “black-and-white photo of dog” or “poster about dairy project”)
- Exhibitor: Your name
- Address: Your county
Make sure the tag is securely attached to your exhibit. Keep the claim check so you can retrieve your entry after the fair.
Additional Resources
To help you prepare your photography or poster exhibit, check out these useful resources:
By following the rules, paying attention to detail, and letting your creativity shine, your photography and poster exhibits will be ready to impress at the North Florida Fair. Good luck!
by Marie Arick | Sep 21, 2024
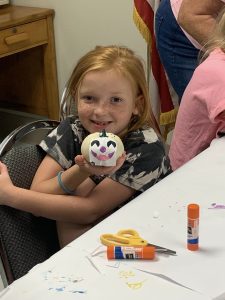 The North Florida Fair is a wonderful opportunity for 4-H youth to showcase their hard work, and that includes Cloverbuds! Youth aged 5 to 7 as of September 1 in the current 4-H year are eligible to participate in Florida 4-H and submit entries to the fair. This article covers the how and why of helping Cloverbuds prepare exhibits for the North Florida Fair.
Cloverbud clubs provide a great introduction to 4-H, offering younger members a chance to engage on a smaller scale. While Cloverbuds cannot compete in many 4-H events, they are invited to submit up to three entries to the North Florida Fair. Every Cloverbud who enters will receive a participation ribbon, which is a source of excitement and pride for them. Seeing their own work displayed alongside a variety of other entries can inspire new interests and creativity. Cloverbud entries should reflect what the youth have learned during a 4-H meeting, project, or activity from the past year. The North Florida Fair embraces our 4-H youth and encourages all of them to submit entries in the youth fair, this includes Cloverbuds! Youth ages 5 to 7 as of September 1 of the current 4-H year are eligible to participate in Florida 4-H. The entry rules are listed under Department 210, 4-H Clubs, and Class 16.
Why Cloverbuds Receive Recognition Instead of Placings
Cloverbuds, ages 5 to 7, are in an early stage of youth development where the focus is on exploration, learning, and participation. At this age, children are still developing important social and cognitive skills, and competitive events can sometimes lead to unnecessary pressure. Instead of rankings or placings, Cloverbuds receive participation ribbons to encourage them to engage without the stress of competition. This approach ensures that young children are motivated by fun and personal growth, rather than comparison to others, which is more appropriate for their developmental stage.
Step 1- Fill out your entry form
Download and complete the entry form and turn it in to your local UF IFAS Extension Office on or before October 1st. Your local 4-H Agent will assign tag numbers to your exhibit and ensure that your form is turned in to the North Florida Fair Office. Your local 4-H agent will also let you know when and where to bring your exhibits.
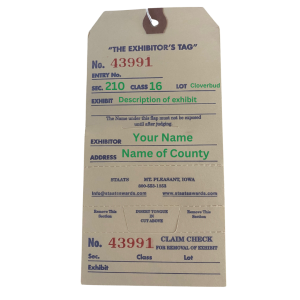 Step 1- Preparing your entry tag– You will want to fill out your exhibitor’s form with all the items you plan to enter in the North Florida Fair. When filling out your exhibit tag, be sure to write the red tag number on your Fair Entry Form. Here is the information you need to correctly complete your entry tag:
- Section – 210
- Class- 16
- Lot- This will be your age division; write Cloverbud
- Exhibit- a short description of the item you are entering (example: painted pumpkin)
- Exhibitor- Your name
- Address- Name of your county
Once your tag is filled out, you will want to make sure that it is securely attached to your exhibit. Use the perforations at the bottom to remove your claim check- this has your exhibit number on it. You will want to keep track of your claim check to find your exhibit once the fair is over.
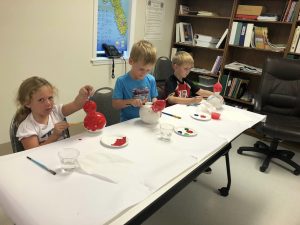
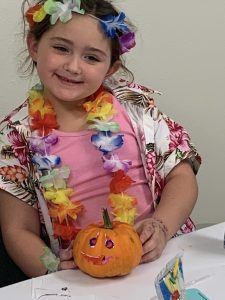
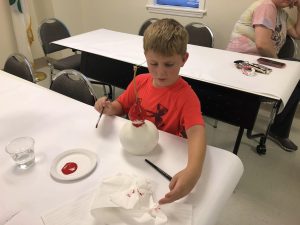
For more information about 4-H, contact your local UF/IFAS Extension Office.
Resources for Cloverbud Fair Entries:
- 4-H Cloverbuds: A guide to help Cloverbuds and their parents understand 4-H activities and projects.
- North Florida Fair 4-H Rules and Guidelines: A detailed guide on fair entry requirements, including Department 210 and Class 16 for Cloverbuds.
- Creative Cloverbud Projects: A list of simple project ideas that can be used as fair entries, such as painted crafts, small posters, and beginner gardening projects.
- North Florida Fair Entry Form (for non-animal exhibits)
by Rachel Pienta | Sep 10, 2024
Planning your North Florida Fair entry is a great way to begin the new 4-H program year. Whether you are a new or returning 4-H member, the decisions about what to enter and which category to choose for your entry may seem like big challenges. For new and returning members, Class 13 may be a great option! Class 13 is the Tabletop Exhibits entry category.
What is a Tabletop Exhibit?

This winning board explained elements of the 4-H skateboarding club.
A tabletop exhibit is either a tri-fold board or diorama that showcases your 4-H project interests. A diorama may be flat or vertical. Dioramas may be created in a shoebox or larger box or on a flat surface such as a tray. You can find ideas for your project in the Florida 4-H Events and Activities Handbook, which you can get from your club leader or local 4-H Extension office.
Tabletop Exhibit Rules
- Your exhibit must stand on its own and be no bigger than 36 inches wide by 36 inches high.
- You don’t have to buy a special display board, but a tri-fold board from an office supply store is easy to use. You can also make your own board from cardboard, but foam core or plastic boards work better because they don’t bend in humidity.
- Your tabletop exhibit should explain a part of your project, just like a science or history fair board.
Ideas for Tabletop Exhibits
- Past exhibits have featured projects like the Chick Chain and how to set up a brooder box.
- In 2023, the top prize went to a board about skateboarding safety!
- You can also make a diorama—either flat or vertical—using a shoebox or tray.
5 Steps to Create Your Exhibit
- Plan: Decide what your project will teach and what supplies you’ll need.
- Research: Learn more about your topic so you can share accurate information.
- Sketch: Draw a plan of your board to figure out where everything will go.
- Gather: Collect your materials and supplies.
- Create: Put your exhibit together!
 Preparing your Entry Form and Tag
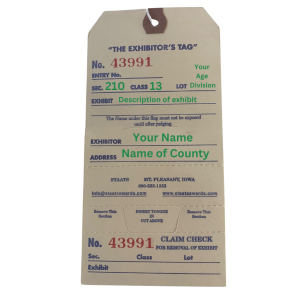
Entry forms are due to your local 4-H Extension Office by the 1st of October – check with your 4-H agent to confirm local dates. When you turn in your entry form, your 4-H agent will assign exhibit tags, which you will need to fill out and attach to your plant when it is time to submit for judging. Here is the information you need to correctly complete your entry tag:
- Section: 210
- Class: 13
- Lot: Write “A” for juniors (8-10), “B” for intermediates (11-13), or “C” for seniors (14-18).
- Exhibit: A short description of your project (e.g., “How to set up a brooder box”).
- Exhibitor: Your name
- Address: Your county
How Your Exhibit is Judged
Your exhibit will be judged on these things:
- How well it communicates your message
- Quality and appearance
- Accuracy and creativity
Judges will use this rubric to judge your tabletop exhibit. Judging happens the Wednesday before the Fair opens. You’ll get a ribbon based on your score, and you can see how you did on 4-H Day at the Fair (November 16). If you have any questions, contact your local UF IFAS Extension Office.
Resources
North Florida Fair Department 210
4-H Entry Form for Non-Animal Exhibits
Judges’ Scoring Rubric
Florida 4-H Events & Activities Handbook ‘


