by Heather Kent | Nov 14, 2014
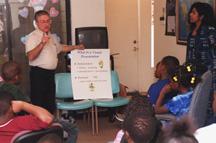
Did you know that you do not have to own an animal to participate in 4-H Day at the North Florida Fair? Many youth look forward to competing in judging contests. The North Florida fair provides opportunities for youth to compete in agriculture judging, horticulture judging, and consumer judging. In addition to the judging contests, youth can also participate in North Florida’s only Junk Drawer Robotics Contest, where teams design and build a simple robot out of everyday objects.
Just like any other competitive event, preparation is key. Here are some resources to help you prepare for your event:
- Agriculture Judging Rules and Guide
- Horticulture Judging Rules and Guide
- Consumer Choices Rules
- Fitness Apps
- Buying a SMART Phone– Oral Reasons Class
- Skin Cleanser/Acne Products
- After-school Snacks
- Junk Drawer Robotics Rules– to prepare, review the 4-H Junk Drawer Robotics Project Guide
Some general tips include:
- Make sure your registration is turned in on-time.
- Work with your club leader to coordinate car pools to and from the event. Counties further away may also need to arrange overnight accommodations (this needs to be done well in advance, as Tallahassee hotels fill up on home game weekends).
- Dress neatly. Wear a 4-H polo or club t-shirt if you have one. Some youth simply wear a white button down shirt with a 4-H patch sewn on. Wear denim, khaki, or dark colored pants, and be sure to layer your clothing. During this time of year, weather is unpredictable- mornings and evenings are cool, but mid-day can be quite warm. Wear closed toed shoes. Tennis shoes or boots are good choices; avoid flip flops or sandals.
- Bring a clipboard and 2-3 sharpened #2 pencils (mechanical pencils are even better).
- Work with your club leader or 4-H agent to purchase discount ride tickets. Armbands for unlimited rides can be purchased in advance for $15.00/person (this is a good savings).
- Bring extra money for food and beverages, or plan to pack a sack lunch.
- Visit the North Florida Fair’s website for show times- there are many shows that are free of charge and fun for the entire family.
- Make sure that you have a buddy at all times. Do not go anywhere without your buddy. Your 4-H Leader or Chaperone will want you to check in with them throughout the day. Decide in advance where, when, and how often you will meet.
- Don’t forget to attend the awards ceremony at 2PM!
by Heather Kent | Sep 26, 2014
 4-H Volunteers are busy people. Most volunteers volunteer for other organizations outside of 4-H and they are active in their communities. Many volunteers also have children or grandchildren that they care for. Leading a 4-H club should be a fun and rewarding experience. Earlier this month, during our Make a Difference Monday Volunteer Leader Series, Julie Dillard shared some great tips to help club leaders stay organized, and most importantly, save time and enjoy being a 4-H Volunteer!
Create a Sense of Belonging– one of the basic things that will help your club is to make sure everyone feels welcome and that they belong. This task is an easy one to delegate to a club parent or even your club officers.
- Names – know and use the names of your 4-H’ers. Use name tags if needed until you get to know all of their names
- Designate a member of parent each month to welcome 4-H’ers as they arrive
- Ask a 4-Her or officer to plan an icebreaker each month
- Create opportunities for 4-H’ers to work together on simple projects such as a team club demonstration or committee work
- Keep meetings fun! Look for some really creative ideas to make meetings fun (and less work for you) next week…
Utilize the Club Leader Notebook- Meet with your 4-H agent to pick up your club leader notebook. This notebook has been designed to make it easy for club leaders to keep track of meeting information, club dues, and other club and county events. In your notebook, you will find:
- Club summary worksheet– This basically answers who, when and what. The top box is a record of what kind of event or activity whether it’s a club meeting, an educational workshop or some other event like an end of the year party or a field trip. At every 4-H event, both youth and adults should sign in. The notes section is a handy way to jot down reminders.
- Monies Received Form– Using a monies received form allows you to see quickly who has given you money and what it is for and also allows it to be quickly entered in our accounting software. This creates a paper trail, which makes handling funds much easier and also protects the club and club leader.
- Check Request Form– This form is for purchases that are planned ahead of time to a specific place of business or a person. It’s also for those times when you didn’t have time to go to the 4-H Office to pick up a check, so you picked it up and paid for it yourself. Just use this form and attached a copy of your receipt.
- Fundraising Permission Form– This purpose of this form is not only to inform the club about a fundraiser, but also to identify the purpose of the funds. Funds should have a planned purpose to benefit the club members. Not only that, but your 4-H Agent should be kept in the loop on all fundraisers so he or she can approve it as well as be able to tell others what the funds are being used for. Most importantly, this helps youth learn about goal setting and planning to achieve those goals.
- Accident and Injury Form- No matter how long we have been a volunteer, or how organized we are, there is always a chance that the unexpected will happen. When it does, we need to document it. Any time there is an accident or injury that occurs to a youth or volunteer during a 4-H event, we need to complete this report as soon as possible (after the injured person is cared for).
How to reduce risk and what to do when an accident does happen is the topic for next month’s Make a Difference Monday. On October 20th, at 7/6 central, Dr. Dale Pracht will be sharing how to create safe environments in our 4-H clubs. If you cannot make our live presentation, it will be archived along with this month’s presentation at http://florida4h.org/madmondays.
by Heather Kent | Aug 22, 2014
 Maybe your child is too picky to eat school lunches on a regular basis, maybe they have food allergies, or you just want them to eat a little healthier. It could be that your family does not qualify for free or reduced lunch, but you would rather not spend $400-$500/year on school lunches. Whatever your reason for sending a school lunch, keeping it fun, fresh, and delicious can be a challenge.
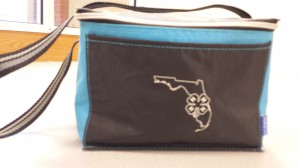
It’s all about the box- Allow your child to select a lunch box that they like, and preferably one that is insulated. You might also want to invest in plastic containers in a variety of sizes. A thermos is also handy for hot soups and pastas. When selecting bottles for beverages, make sure they are easy to clean and if you plan on packing milk to drink, an insulated bottle or a bottle with a built in ice pack is a must.
Many children are obsessed with pre-packaged lunchables, but not only are they expensive, they are not really filling for most children and often high in sodium. Making your own lunchables at home is easy. All you need are some dishwasher safe plastic containers with individual compartments (readily available at grocery and big box stores) and some creativity. Involving your child in planning and packing their lunch will encourage them to try new things and also teach them responsibility.
10 Home-made Lunchables to Try:
- Basic- assortment of whole wheat crackers, cheese, and deli meats
- Sandwich bar- whole wheat slider roll, cheese, deli meats, and condiments (try hummus or pesto for something different). Children LOVE to create their own sandwiches!
- Sandwich on a stick- skewer cubed cheese, meat, bread, cherry tomatoes, and pickles onto a coffee stirrer.
- DIY Pizza- ½ English muffin, sauce, cheese, and mini turkey pepperoni
- Chicken Parm Sandwich- whole wheat roll, chicken tender, mozzarella slice, and marinara
- Mac and cheese muffins- add ham and broccoli to your favorite mac and cheese recipe. Spoon into greased muffin tins and bake at 350 degrees for 12-15 minutes. These freeze well.
- Sushi sandwich- whole wheat tortilla, layered with pesto, hummus, or other favorite condiment, and cheese and deli meat or left over rotisserie chicken. Roll up and slice into sushi rolls.
- Snack tray- pack an assortment of fruit, nuts, cheese, veggies, and crackers.
- Rice cakes with individual packs of cream cheese, hummus, or nut butters.
- Pizza calzones- flatten a canned biscuit, and spread marinara and cheese. Fold in half, and use a fork to crimp the edges shut. Bake at 350 on a baking sheet covered with parchment paper for 12-15 minutes. Serve with additional marinara for dipping.
More tips:
- Place purchased or homemade fruit cups in the freezer the night before. By lunch time, your child will have a frozen fruit slushy.
- Dip sliced apples in pineapple juice to prevent browning- pineapple juice will not leave a bitter or sour aftertaste.
- Spread a very light layer of whipped cream cheese on bread before making a mayonnaise based salad sandwich (such as tuna or chicken salad). The whipped cream cheese will prevent the sandwich from becoming soggy- a great tip if you make lunches the night before.
- Substitute low fat vanilla yogurt for pudding. Add fresh fruit and granola for a “dessert” parfait.
- Use cookie cutters to cut fruit and veggies into fun shapes for dipping.
- Buy yogurt, canned fruit, pudding, and applesauce in larger containers, and then portion them out in re-useable ½ plastic containers. This can save you about 50% on individual size snack items and also will help reduce waste.
- Have a theme for each day of the week:
o Monday- Sandwich day
o Tuesday- Wrap day
o Wednesday- Dip day (hummus and veggies, salsa, bean dip, fruit dip)
o Thursday- Salad day (fruit, pasta, chicken, or veggie salad)
o Friday- Thermos day (hot soup, mini pasta with marinara, mac and cheese)
Lunch Box Pantry Staples (buy extra when on sale to keep in your pantry or freezer):
Carbohydrates: whole wheat crackers, tortillas, slider rolls, loaf bread, bagel thins, rice cakes, pretzels, and pasta in fun shapes
Protein– nut butters, ham, turkey, chicken, boiled eggs
Dairy– yogurt, cottage cheese, deli cheeses such as mozzarella, cheddar, and Muenster
Fruit– fresh, dried, and canned fruit for fruit cups, parfaits, trail mix, and granola. Purchase canned fruit in light syrups if possible.
Veggies– keep a variety of your child’s favorite veggies on hand. Don’t be afraid to sneak in new ones every now and then for them to try such as a slice of avocado or roasted red bell pepper on a sandwich or wrap.
Condiments– stock up on condiments such as mayo, mustard, ketchup, marinara, hummus, pesto, and tapenade.
Sweets– it’s okay to sneak in some sweets every now and then. Animal and graham crackers, mini marshmallows, puddings, and homemade cookies are all good alternatives.
We hope that these ideas will help you live a healthier life this coming school (and 4-H) year. As your family prepares for back to school, don’t forget that the 4-H year will be coming to a close at the end of this month. Enrollment in Florida 4-H beings August 23rd. To re-enroll, visit: http://florida.4honline.com or contact your local UF/IFAS County Extension Office.
by Heather Kent | Aug 15, 2014
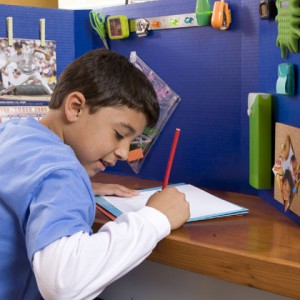
Photo courtesy of Family Fun Magazine
These days, children as young as kindergarten age can have homework. Getting your child to do homework during the hectic evening hours is frustrating for many busy parents, but setting up a simple homework center can make it easier.
- Select a location for your child to do homework- an eating nook in the kitchen or at the dining room table are good ideas. Try to keep your homework center location clutter free, and well lit. If you have younger children, they may need a booster seat in order for them to sit at the proper height for writing. Remember that children (even teens) need supervision and assistance with homework, so planning a homework area in a common location is more convenient so that parents can also work on other tasks such as preparing dinner. If the homework center is set up in a bedroom or loft space, you will need to plan on checking in from time to time to monitor their progress. Younger children or children with learning disabilities will need additional, or more frequent help.
- Gather Supplies– it is helpful to have a plastic cleaning caddy, tub, or recycled shoe box filled with supplies that your child might need for completing his homework, so that you don’t waste time looking for supplies each day. Recommended supplies include: pencils/pencil sharpener or mechanical pencils, erasers, colored pencils/markers, crayons, stapler/extra staples, index cards, highlighters, scotch tape, glue stick, dictionary, thesaurus, atlas or globe. Have your child decorate the caddy or box with stickers, paint, glitter glue, or other decorations.
- Limit Distractions– it is best to limit television and stereo/iPod during homework time. If you have more than one child, or a child with ADD/ADHD, you might also want to consider a study carrel. Study carrels limit distractions and help children focus on their work. Your child can help create a study carrel and customize it to his own needs with a tri-fold display board (readily available for less than $5.00 at office supply and big box stores). One display board will make two study carrels. Step by step instructions for creating one can be found online at: http://spoonful.com/crafts/homework-central courtesy of Family Fun Magazine.
- Set up a Reward System– reward your child for getting their homework completed in a timely and neat manner. You can set up a sticker system for earning small prizes, TV or video game time, or even to see an upcoming animated movie or for a family bowling night.
As your family prepares for back to school, don’t forget that the 4-H year will be coming to a close at the end of this month. Enrollment in Florida 4-H beings August 23rd. To re-enroll, visit: http://florida.4honline.com or contact your local UF/IFAS County Extension Office.
Next Week: School Lunch and Snack Ideas that are “Out of the Box”
by Heather Kent | Aug 8, 2014
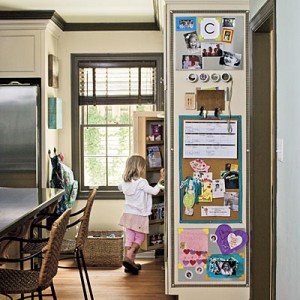
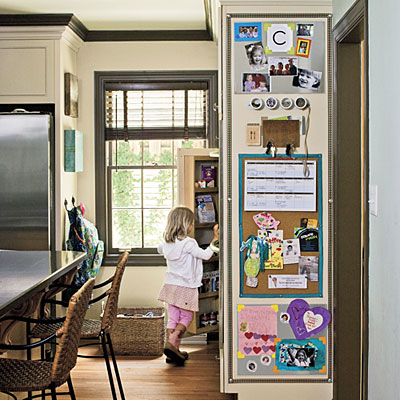
Home Command Center idea from SouthernLiving.com
As summer comes to a close, many parents are overwhelmed getting ready for “back to school” let alone the new 4-H club year! Over the next few weeks, we will share some timely tips for busy 4-H parents so that you are less likely to miss a school event, practice, 4-H meeting, or deadline. One of the best ways to stay organized and on track is to have a home communication center.
The first thing you will need to decide is where to place your command center. It should be located in a well-traveled area of your home, such as a kitchen, entry way, den, or family room. You can use a blank wall space that you walk by several times a day, a corner of your kitchen countertop, or even a cabinet. There are lots of ideas on Pinterest and organizing blogs that can inspire you.
Once you have determined a location, consider which elements you want to include in your command center. Every command center needs at least three items:
- Calendar– Some families have a calendar for each member of the family, but for smaller families, it is recommended to use one calendar and assign each family member a color, and write their activities in that color on the calendar. You can use a traditional paper calendar or a dry erase calendar. Remember that if you use a one-month dry erase calendar, you will need another calendar or space to put important future appointments.
- Folders or cubbies– You can use wall mounted folders/magazine holders, or file folder holders that sit on a counter or desk. One folder per family member to contain important homework assignments, 4-H project information, receipts, bills, and so forth. Folders are not a permanent filing solution- they are only to contain information that is not ready to be filed, or information that that you need to access frequently such as a school lunch menu, or soccer practice schedule.
- Message Board– Bulletin boards, dry erase boards, chalk boards, or magnetic boards work well for reminders, important phone numbers, directions to a birthday party, grocery lists, and other bits of information that you do not want to put in a folder or on a calendar. If you are limited on wall space, consider installing self-adhesive cork board to the inside of a kitchen cabinet located above or next to your command center.
Other items that you might want to include in your command center: chore charts, weekly/monthly menu plans, a hook for keys, backpacks, jackets, and a charging station for cell phones.
Last but not least, think about how you want your center to look. You can keep it very basic and functional, or you can design it to coordinate with the rest of the room’s décor/color palette. Much of the look and feel of your command center will depend on your budget. Many companies sell coordinating command center components in a variety of finishes that you can mix and match, but they are more expensive. A less expensive alternative is to purchase the individual elements that you need from your local office supply or big box store, and then paint them to match, or cover them with contact paper in a fun print or color. Your command center can be as simple or elaborate as you prefer- you are only limited by your creativity!
As your family prepares for back to school, don’t forget that the 4-H year will be coming to a close at the end of this month. Enrollment in Florida 4-H begins August 23rd. To re-enroll, visit: http://florida.4honline.com or contact your local UF/IFAS County Extension Office.
Next Week: Setting up a Homework Center