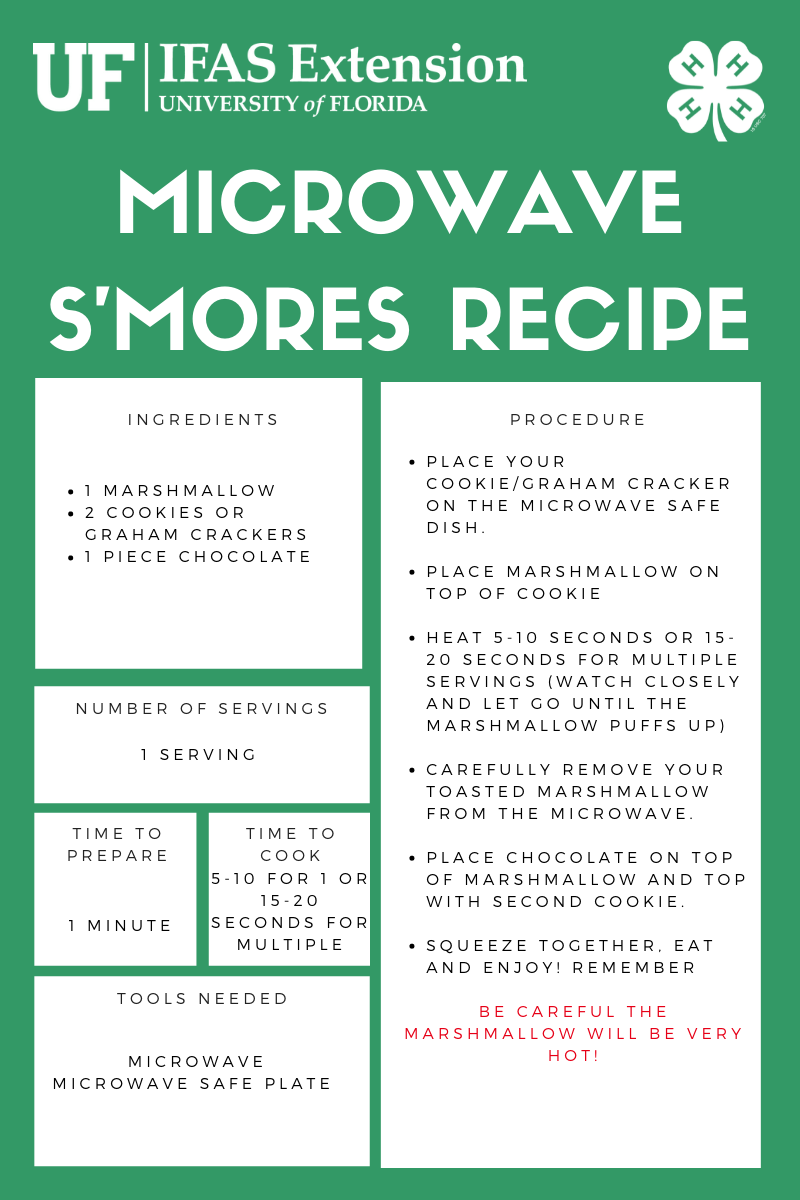
Nothing says summer better than a gooey, yummy s’more! They are the ultimate summer campfire dessert. In celebration of National S’mores Day, we are sharing a history of the s’more, a how-to video, and recipe card with our readers. You can make s’mores the traditional way over a campfire, but you can also make them in a microwave or also turn them into a science lesson by making them in a solar oven!
While you are hanging around the campfire with friends and family, here’s a little history of the s’more:
Marshmallows were invented by the ancient Greeks and Romans for medicinal purposes (specifically to relieve inflammation and constipation). The first marshmallows were made from the plant Althaea officinalis.
The French added egg whites and sugar, and marketed marshmallows as a treat with healing properties.
In the 19th century, confectioners began substituting gelatin for the plant juices, which made it much easier to produce marshmallows in mass.
The graham cracker was invented by a Presbyterian minister, Sylvester Graham, who believed eating plain, simple food prevented immoral behavior.
Marshmallow roasting parties became fashionable during the Victorian era.
We have the Girl Scouts to thank for bringing together chocolate, marshmallows and graham crackers! The first recipe for s’mores appeared in the 1927 Girls Scout Handbook, and was called S’mores because they were so good, everyone would ask for “some more”
Nearly 100 years later, s’mores continue to be a favorite treat at 4-H camps. If it’s too hot for a campfire this summer, you can also make this yummy treat in the microwave:
You can also download and share this recipe card:
Making solar s’mores can be a fun 4-H club activity- National 4-H Council turned our previous solar s’mores post into a “4-H At Home” activity that you can also download and share.
Summer is upon us and so is the heat in the Florida Panhandle. Schools are out and the kids are at home needing activities to do together. Homemade Freezer Pops are an excellent source of fun! These popsicles can be secretly healthy and taste absolutely delicious. They don’t have to just be for the kids either, adults of all shapes and sizes can enjoy them too. In this article we will discuss what freezer pops are, how to make them, and a few tips for maximum enjoyment!
What are Freezer Pops?
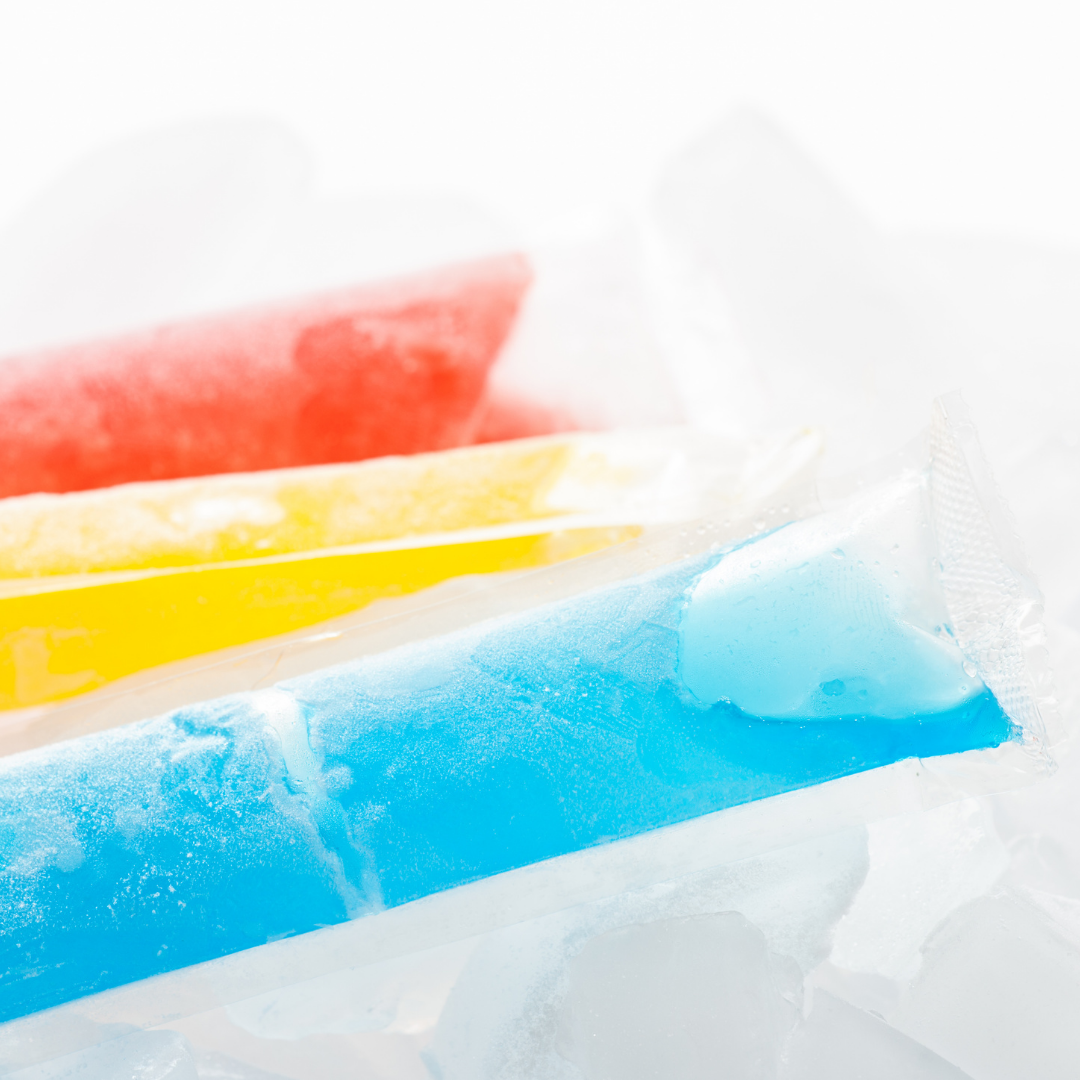
A freezer pop is a frozen treat that generally comes in a clear, plastic tube. Freezer pops, not to be confused with popsicles which are typically consumed off a wooden popsicle stick, are found in grocery stores in unfrozen liquid form, ready for the consumer to pop them into their freezer at home! Once frozen solid, the consumer picks their flavor of choice, cuts open an end of the plastic tube, and simply squeezes or pushes the sweet ice out of the packaging.
Many of us know these sweet and fruity slushy pops as Otter Pops or Fla-Vor-Ice. These nostalgic treats are simply made from sweetened, colored, and flavored water. With little nutritional value coming from the store-bought version, homemade freezer pops can be much more nutritious. Keep following along to find out how to make these tasty treats!
How to make Homemade Freezer Pops
Freezer pops are super easy to make and are a healthier alternative to the nostalgic treat. Before you get started, you will need all the necessary supplies. Supplies commonly found at home would include a freezer and a blender. Supplies that can be bought at the store are Zipzicles (a freezer pop reusable plastic bag) or silicone ice pop molds, fruit of your choice, and a natural sweetener like honey.
Step 1: Wash your hands! Handwashing is one of the best ways to protect yourself and others from spreading germs. You should wash hands before, during, and after preparing your food. To wash your hands the right way, first wet your hands with warm, clean, running water. Then turn off the tap and apply your soap. Lather your hands (make lots of white foams/bubbles) by rubbing them together with the soap. Make sure you lather the back of your hands, between your fingers, under your nails, and palm of your hands. Scrub for about twenty seconds. (Don’t know how long 20 seconds is? Hum the “Happy Birthday” song from the beginning to the end twice!) Finally, rinse your hands well under warm, clean, running water and either dry with a clean towel or air dry. (1)
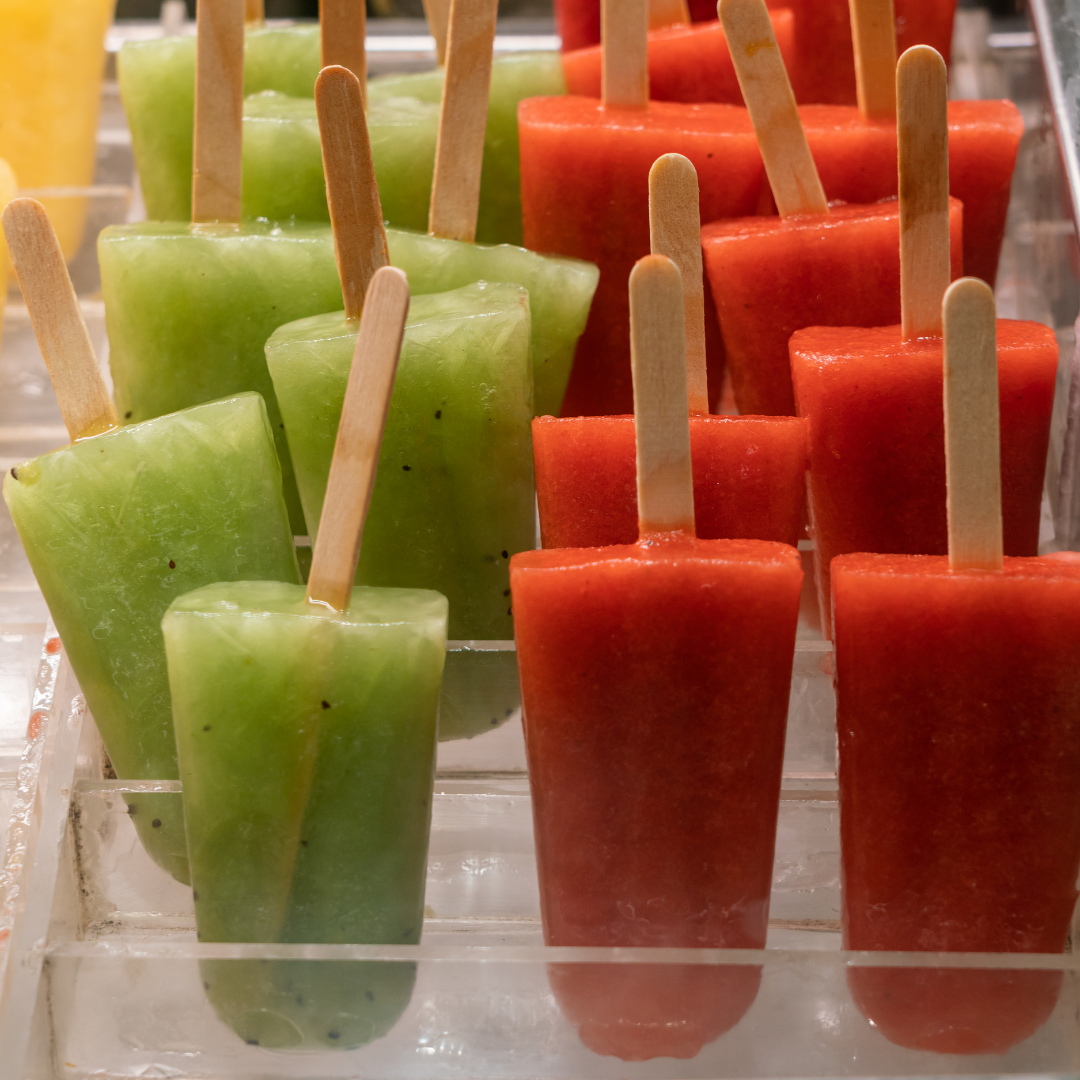
Step 2: Gather your ingredients to be blended. There are lots of fruits that make great homemade ice pops: watermelon, orange, pineapple, mango, raspberry, honeydew, cantaloupe, and strawberry! (3)
One of my favorite recipes for freezer pops uses 10 ounces of ripe berries, ~½ a cup of water, and 1-2 tablespoons of honey. If the fruit you use is very juicy, you may not have to use as much water but remember, the more water that you use, the icier the pop will become in the freezer. You can also use either lemon or lime juice to add a little flavor boost!. (3) The amount of sweetener needed varies as the sugar content of the berries can vary. If the berries are ripe and sweet, use a little less sweetener. If the berries are not as ripe, simply use a little more sweetener. Then blend all the ingredients together completely, until smooth!
Step 3: Fill individual baggies of your choosing. Make sure to not over fill the bags.
Step 4: Freeze the freezer pops for ~ 2 to 4 hours before enjoying. If you consume them around 2 hours, they may not be as solid as they will be at the 4-hour mark.
Step 5: Enjoy a refreshing treat!
Tips for Homemade Freezer Pops
The sweetness of the chosen fruit will be muted once frozen. Make sure to use over ripe fruit or added sweetener to keep the treat sweet.
Use a funnel to fill your freezer pop bags. Using a funnel will keep you from making too much of a mess, and will also help you mind the “maximum fill line” on the bag. If you keep the contents you are pouring into the bag under the line, it will be easier to seal! \
Just about anything that can be blended or pureed can be used for a freezer pop! Leftover smoothies, various fruit juices, and even sodas make for easy treats! Check out the image below to see flavors others have created! (4)
For National Freezer Pop Day, July 8th, 2021, enjoy making homemade freezer pops with your family! With a snip of the scissors, you’ll produce smiles with every sip. (2)
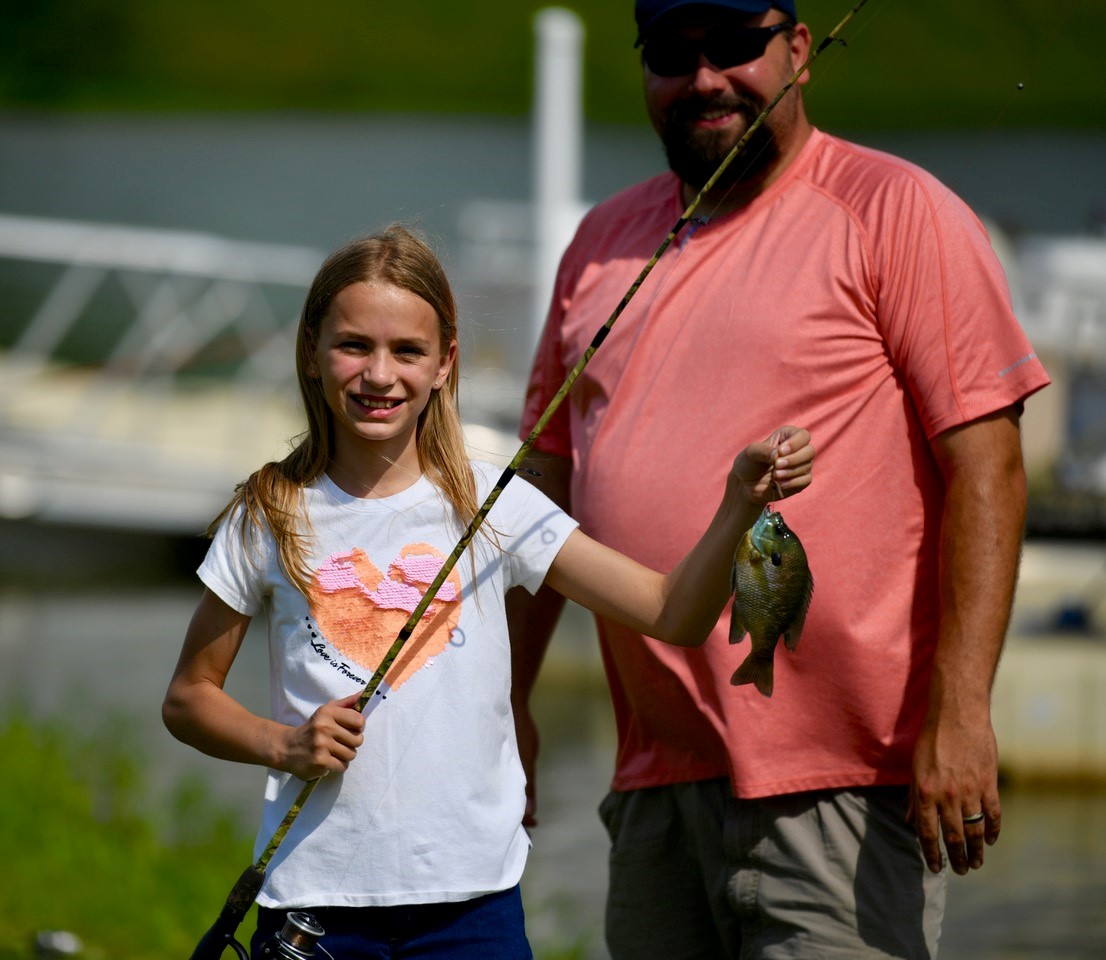
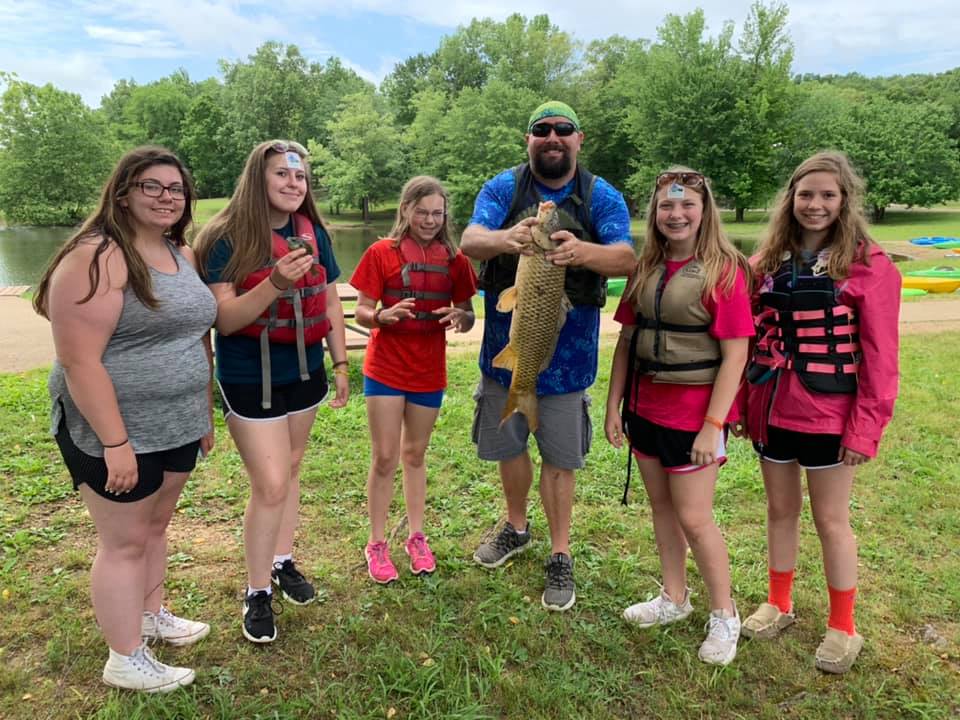
If you need a good reason to go fishing, we’ve got you! Today is National Take a Kid Fishing Day, and we can’t think of a better reason to promote our 4-H fishing project. Our 4-H fishing project connects youth to the great outdoors and is an opportunity for youth to learn about:
Important angling skills, like casting and retrieving your line.
Different types of tackle and how they are used to catch fish.
How to take proper care of your rod and reel.
Cleaning and cooking your fish.
Ecology of aquatic and marine environments.
How to identify the different types of sportfish and how to catch them.
What it means to be a responsible angler.
Youth also learn about careers related to fisheries and wildlife, and their importance to the Florida economy. Florida is often called the fishing capitol of the world because the state holds more record fish catches than any other state or country! Fishing is important for many different reasons. Recreational fishing is a major economical driver in the state of Florida. The sunshine state has approximately 4 million anglers that contribute $13.8 billion to Florida’s economy supporting over 120,000 local jobs.
If you have a passion for fishing and the environment, please consider sharing your skills and knowledge with youth. 4-H can customize volunteer roles to fit your interest and
Group of 4-H youth, volunteers, and agent enjoying the wonders of the outdoors
schedule so you can inspire the next generation of anglers. Contact your local UF IFAS Extension office to discuss how you can contribute to “making the best better” in your community.
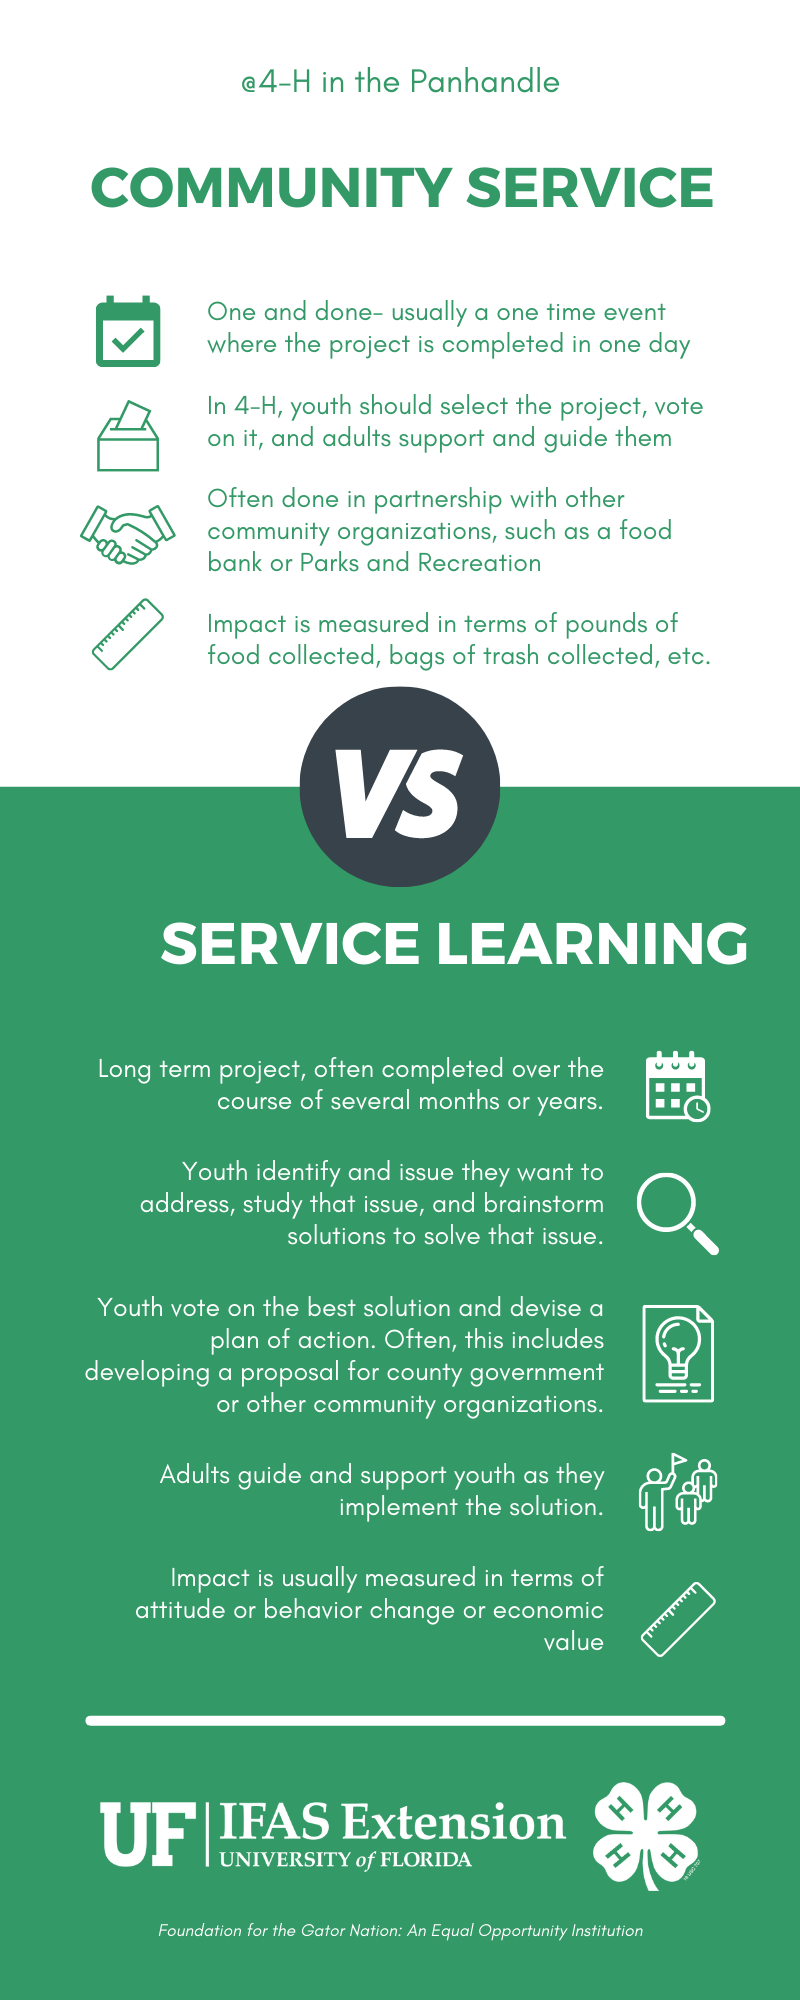
One of the requirements for 4-H clubs to be chartered is annual participation in a service project because it helps youth develop compassion and empathy for others. This is an important step to help youth live our pledge “my heart to greater loyalty” and “my hands to greater service.” Recently, the terms community service and service learning are being used interchangeably, but they are not the same. This post will explain the difference between the two and provide additional resources for 4-H parents, volunteers and club officers.
What is community service?
Community service is usually a “one and done” activity. It is often associated with short term volunteerism, and sometimes can be associated with court-mandated sentences. Community service includes things like a food drive, clothing drive, or litter pick up. These types of activities help youth apply the “heart” and “hands” parts of our pledge, but youth typically do not organize the activities; they are often done in collaboration with another organization, such as Toys for Tots, a local food pantry, or Adopt a Highway. Community service is a great way to introduce the concepts of giving back to the community and helping others. It is very appropriate for our younger 4-H members, who don’t yet have the critical thinking, decision making, and leadership skills to execute a service-learning project.
What is service learning?
Service learning engages not only the “heart” and “hands” but also the “head.” Service learning is a process in which youth identify a need, develop solutions to address that need, implement a plan to put their solution into action, and reflect on the results of their action. Service learning should be planned and implemented by youth, with parents and volunteers supporting and guiding the process. Service learning is more appropriate for older youth who are ready to take on more responsibility. Service learning not only helps youth develop a sense of compassion, but it also helps them develop more independence.
So What’s the Difference?
For example, when a 4-H club decides to lead a food drive for the local pantry, they are contributing to the issue of food insecurity. Food drives are an effective way to meet the immediate need for more food, or more nutritious food. Our annual Peanut Butter Drive is a great way for 4-Hers to get involved with food insecurity; the Florida Peanut Producers match what is collected and everything is donated to a local food pantry. However, if youth want to address the issue of food insecurity in a more systemic way, they might choose to apply GPS technology to map the food deserts in their community or county. Next, they might present their findings to county commissioners or the chamber of commerce. Together, they brainstorm solutions on how to address food insecurity issues in those food deserts, but increasing awareness, or finding partners to provide sources of nutritious food. After implementing solutions, they look back and reflect on what they did, what worked, and what could be improved for next time.
Download this one-page document to help explain the difference between community service and service learning. This is a great resource for volunteers, parents and club officers. Next week, we will share ideas for service learning and community service related to a variety of issues, that can be a great discussion starter for your club meetings this fall!
If you have a passion for civic engagement and making a difference in your community, consider sharing your passion and skills with youth. We need volunteers to help youth understand what it means to be engaged in their community, and volunteers to empower youth to make a difference locally. We match volunteers’ skills and schedules with our program. Contact your local UF IFAS Extension Office for more information.
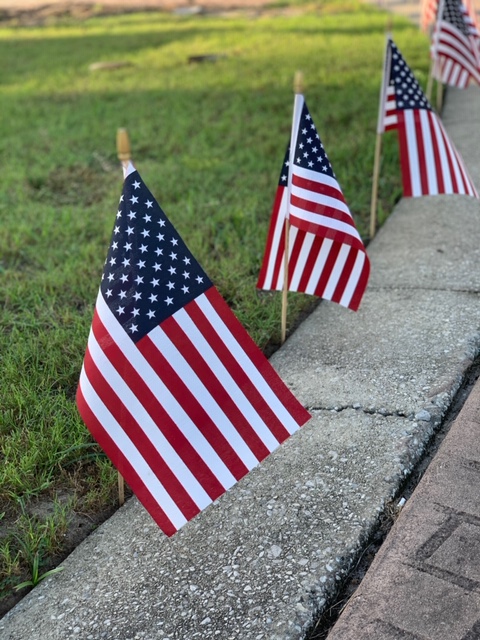
Get your red, white and blue decorations out to celebrate Flag Day 2021. According to History.com Flag day began in 1885 when Bernard Cigrand, a Wisconsin teacher, who led his school in the first formal observance of the holiday. Both President Wilson, in 1916, and President Coolidge, in 1927 issued a presidential proclamation asking for June 14 to be observed as National Flag Day. In 1949 congress approved the nationals observance for the United States Flag to be honored in commemoration of the flag’s adoption June 14, 1777. Since that adoption there have been 27 different versions of the flag.
Celebrate our Freedom
Why is flag day important? The American flag serves as a symbol of our nation and tells the story of America. It represents the freedom, perseverance, and growth of the United States. As a national symbol, it has rules that go along with the display and use of the flag. These rules are part of the U.S. Flag Code. The flag code is a set of rules and regulations that defines ways in which we give respect to the American flag. It includes how we should display, handle, care for, and dispose of the American flag. Our observance of this code is considered flag etiquette. Knowing these rules and the history of the American flag will help you demonstrate your patriotism and respect toward the sacrifices made for our country and freedom.
Displaying the flag
We would like to take this opportunity to share some important tips for displaying the American flag, and help you be a responsible citizen by knowing how to properly fly the stars and stripes. In inclement weather, the flag should not fly unless it is an all-weather flag. At night, lighting requirements are necessary, or the flag can only be displayed from sunrise to sunset. If the American flag flies with other flags, they cannot be larger or raised higher than the American flag. Additionally, the American flag should always be the first raised and the last lowered and should never touch the ground. Also the flag should never be carried horizontally, but always aloft and free.
In a time of national mourning, the flag flies at half-mast. Half-mast is when you position the flag below the top of the staff – the exact measurement determined by the position of the flagpole. Doing so is a mark of respect for those who have lost their lives. Times when you fly a flag at half-mast include days like Memorial Day, Patriot’s Day, Veterans’ Day, and in the event of a death of a member or former member of the government. There are sites to receive alerts of when to fly half mast. The U.S. Defense Department says the flag should only be flown upside down “to convey a sign of distress or great danger.”
Presenting, folding, & storing the flag
Presentation of the American flag at an event also has requirements. One of the requirements includes removal of your hat during the flag presentation, raising, or lowering as a sign of respect. The same is true for reciting the Pledge of Allegiance. If an American flag is present on a stage or during a speech, correct placement is ahead of the audience on the stage and to the speaker’s right as he/she faces the audience. There are rules how to properly store the American flag. The proper folding of the American flag is in the shape of a triangle with the union (blue spangled section) visible. Folding the flag is tricky, but Indiana 4-H has a great flag folding activity that helps youth and adults gain practice. This activity teaches the step-by-step process on how to properly fold the American flag. There are some tips that you want to keep in mind while learning or teaching how to fold the flag. It takes two people to fold the flag, and each person should start by holding the short sides of the flag, helping make sure that the flag is tight. When folding, you want to fold the flag in half lengthwise two times before you start “cornering.” Cornering is when you start to fold the flag into triangles, beginning at the striped end of the flag. Once you have it properly folded triangularly you will want to store it in a well-ventilated area to keep it dry in order to prevent mildew. Remember, When storing the flag, it is important to keep it dry, folded properly and on an elevated shelf or surface so it will not touch the ground.
Caring for the flag
You may want to consider ways to make your flag last longer. Often, the flag might just need a good cleaning or a minor repair. Ways to increase the longevity of your flag include getting it cleaned, taking it down during bad weather, and making minor repairs as soon as you see damage. The American Legion says you can wash your flag at home or take it to the dry cleaners. If you choose to wash at home, mollymaid recommends using a mild detergent and either hand washing or on the delicate cycle with cold water. Dry the flag by hanging it on a clothesline or letting it lay on a flat surface.
You need to retire a flag or remove it from service when it is in a condition of being worn beyond repair, has large rips or tears and is no longer a fitting emblem for display. It is important to retire the American flag a respectful manner. There is a protocol for flag retirement, providing a dignified way of destroying American flags no longer fit for display. The preferred method of disposal is a flag retirement ceremony. There are several organizations within local communities who collect and perform these ceremonies, such as American Legion, Veterans of Foreign Wars, 4-H Camps, Boy Scouts and more.
Flag retirement
If you want to dispose of the flag yourself, you can do a retirement ceremony by burning the flag or by recycling it. The protocol for a burning ceremony is to have a fire that is large and intense enough to burn the flag completely. The steps include placing the flag on the fire while observers salute the flag, recite the Pledge of Allegiance, and have a moment of silence. Upon completion, safely extinguish the fire. Beware of burning synthetic flags, such as nylon, can produce dangerous fumes. If you have a synthetic flag consider a different method of retirement like recycling your flag. To do this, cut apart your flag by separating the 13 stripes and leaving the union (blue spangled section) intact. Once cut off, the flag is no longer the official flag allowed for disposal of the parts. Upon the completion of the recycling, you can do a brief ceremony paying tribute to the stars and stripes before sending it off. We encourage you to take the fabric scraps to any local textile recycling drop-off.
Flag etiquette is not a typical classroom lesson, but it only takes a moment to learn the various regulations under the U.S. Flag Code. We encourage you to take time yourself to find more information to help further your knowledge and understanding of the flag etiquette. There are many great resources that are available online:
From this article, we hope that you learned of the importance of the life cycle of the American flag. When and how to properly display, store, care, and dispose of this national symbol. Enjoy Flag Day in 2021 and show your pride in our county by showing proper respect for the American flag and displaying it proudly or by displaying the Red, White and Blue in front of your house!
May 26th is National Paper Airplane Day, and what better way to celebrate than learn to fold the perfect paper airplane? Paper airplanes are a fun way to teach young people about physics and spark their interest in science, technology, engineering and math (STEM). You can also use this activity to promote teambuilding or as a recreational activity for your next club meeting.
To fold the perfect paper airplane, you need a basic understanding of the four forces of flight: lift, drag, thrust, and weight.
Thrust is the force that moves the airplane in the direction of motion. Thrust is created when air is pulled in and then pushed out in an opposite direction. In a real aircraft, thrust is created by a propeller, engine, or rocket. In the case of the paper airplane, thrust is created when you release the airplane from your hand.
Drag is the force that is the opposite of thrust. It slows the airplane down. Drag is created by friction. The more aerodynamic your design, the less drag your plane will experience.
Weight is the force caused by gravity. It pulls your paper airplane down.
Lift is the opposite force to weight. Lift helps hold your paper airplane up in the air. The wings of your airplane help generate lift.
This video provides a short and easy to understand explanation of how these four forces affect a paper airplane.
There are many different ways to fold a paper airplane, but this post will cover three basic folds that can be customized for different flight effects. The first fold is the dart. Like he name implies, the dart fold will result in an airplane that will fly longer distances at faster speeds. If you want to have a contest for which plane can go the fastest and farthest, then the dart fold is your best option. Watch this short video to master the dart fold:
The second fold to learn is the glider. The glider fold will result in an airplane that is slower than the dart, but will stay in the air for a longer period of time. The glider has wider wings that help keep the plane lifted in the air and make the plane more stable. Watch this video to master the glider fold:
Finally, it is always fun to learn how to fold a plane that will loop the loop! This is the most difficult of the three folds to master, but will result in a paper airplane that will do fun aerobatic tricks. You will have better results with this fold after you have mastered both the dart and glider folds. Watch this video to learn how to fold the stunt plane.
If you enjoyed this activity at home, consider participating in a summer day camp or join a 4-H club for year long learning and fun with a purpose! Contact your local UF IFAS Extension Office to find out about opportunities available in your community.