by Julie McConnell | May 26, 2017

Blue Morpho Butterfly feeding on banana. Photo: J_McConnell, UF/IFAS
Have you been thinking about creating a butterfly garden but don’t know where to start?
Afraid it’s too much upkeep or has to look wild and untamed?
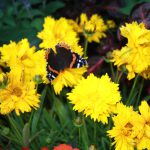
Red Admiral Butterfly. Photo: J_McConnell, UF/IFAS
Spend a Saturday morning with the UF/IFAS Master Gardeners of Bay County to see how to design, install, and maintain a colorful low maintenance butterfly garden.
Next Saturday, June 3rd, is the free Butterfly Gardening Workshop in Panama City at the UF/IFAS Extension Office at 2728 E. 14th Street. Come learn about butterfly gardening and see our vibrant garden.
Please register ahead of time so that we can supply enough materials for all attendees by calling 850-784-6105 or sign up online.
by Julie McConnell | May 1, 2017
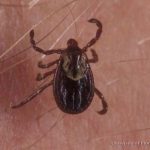
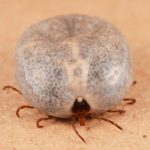
American Dog Tick. Photo: L. Buss, UF/IFAS
You’ve probably heard some tips to prevent picking up ticks in the past, but did you ever wonder why some work and others don’t? Understanding the life cycle and behavior of common ticks can help you succeed with your prevention measures.
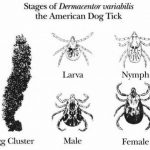
Life Cycle of American Dog Tick. Credit: Centers for Disease Control
A general life cycle for ticks includes four life stages: egg, larva, nymph, and adult. The egg hatches into larva which require a blood meal to molt into a nymph which again requires a blood meal before molting to an adult.
The adult female also requires blood feeding in order to produce eggs, which she lays in high numbers – some species lay up to 6,500 eggs!
Because blood is required for development, ticks have to be resourceful in finding hosts. Knowing this can help you understand why some tips work better than others.
Tick Tips
-
Wear clothing that covers skin and avoid sitting on the ground or logs in brushy areas. Adult ticks exhibit a behavior called “questing” where they climb to the top of grasses and vegetation with their forelegs extended and wait for a host to come by. The American Dog Tick‘s primary host are dogs, but they will also target cattle, horses, and humans.
-
Apply repellents to exposed skin and clothing (different products are labeled for where they are applied, follow all directions). These chemicals repel ticks and can reduce likelihood of tick attachment, but ticks have been known to crawl over treated areas to access untreated body parts.
-
Keep grass and vegetation maintained and clean up debris that may harbor small mammals and rodents. Early in the tick life cycle it targets smaller animals for blood and they can
hide or shelter in debris piles and vegetation.
-
Always shower and check yourself for ticks after being in areas where ticks may live, especially when temperatures are warm. Nymphs can be less than 1 mm long, so check carefully!
For instructions on how to properly remove a tick that has embedded, visit UF Health Tick Removal.
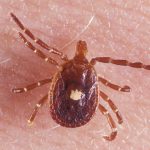
Female Lone Star tick that has not fed. Photo: L. Buss, UF/IFAS
Lone Star Tick female engorged on blood. Photo: L. Buss, UF/IFAS
by Julie McConnell | Apr 7, 2017
It’s really tempting to buy a tree and plant it in the middle of your lawn or directly in front of your picture window, but instead take some time to choose the best spot first. Several considerations such as maintenance and mature size should be taken into account before the site is selected.
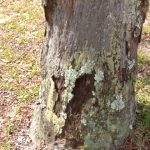
Mowing close to the trunk of this Pindo palm has caused repeated injury to the trunk. Photo: JMcConnell, UF/IFAS
Placing a tree in a lawn area without creating a bed can lead to maintenance issues for both the tree and the turfgrass. It is easy to simply cut out a small patch of turf the size of the rootball and install a tree, however, as the grass grows up towards the trunk over time maintaining that grass will become difficult. It is common to see mechanical injuries to tree trunks because weed eaters or mowers have chipped away at the bark when trying to cut the grass. Other potential problems are irrigation zones calibrated for turf delivering the wrong amount of water to trees and herbicides used on grass that may cause injury to trees.
Over time, as the tree canopy grows, it will create shade and any grass trying to grow in that area will thin and be more susceptible to disease and insect pressure. By creating a large ornamental bed for your tree, you will prevent some pitfalls associated with placing the tree in the lawn.
Another common mistake is planting a tree too close to a house or other structure. It can be difficult to imagine how large a tree will grow at maturity because it is not a quick process. Trees placed close to houses may grow into eaves and shed leaves onto roofs and into gutters. This adds to maintenance and can provide mosquito breeding grounds. Also, some tree roots may interfere with walkways or septic systems and should be sited far enough away to avoid these issues.
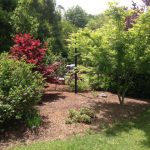
These Japanese Maples are planted in a bed separate from the lawn making care for both plant types easier. Photo: JMcConnell, UF/IFAS
Be sure to research any tree you plan to install to find out ideal growing conditions and mature size. If you plan ahead and use good maintenance practices, a tree can become an valuable part of your home landscape to be enjoyed for years to come.
by Julie McConnell | Feb 23, 2017
Regardless of what the tag says one size does not fit all. As with clothing, a piece will undoubtedly be too large for some and too small for others. Trying to go with a “one size fits all” approach to lawn care will lead to the same kind of frustration and disappointment as an ill-fitting garment.
All turfgrass is not created equal. Thus management of our various turf species requires different methods. It is common for a homeowner to be unaware of what type of turfgrass they have – it’s all grass after all – what difference does it make? Misidentification leads to problems because proper management for one type may be counterproductive to another type. In order to create a practical turf management plan, it is critical that the species of grass is properly identified.

Although many grasses look similar it is important to know exactly what kind you have to maintain it properly. This photo shows Empire Zoysia. Photo credit: Julie McConnell, UF/IFAS
Why is it important to know the species of turf in a lawn?
Two of the most common mistakes extension agents observe is excessively low mowing height of St. Augustinegrass and over-fertilizing Centipedegrass. Both of these errors can reduce turfgrass vigor and decrease its tolerance to pest issues. Another potential maintenance pitfall is using a herbicide that is not labeled for use on a given type of turfgrass. Several popular herbicides available on the market can cause damage to St. Augustinegrass and/or Centipedegrass. Thus turf can be inadvertently killed by herbicides when they are applied to the wrong species.
Before a lawn maintenance plan is developed, be sure to know what type of grass is present and then follow UF/IFAS recommendations for proper care. If assistance is needed with identification, contact your local extension office.
To learn more about lawn care, visit this site or plan to attend “Caring for Your Florida Lawn” at the UF/IFAS Extension Bay County office on April 8th. For more details call 850-784-6105.
by Julie McConnell | Jan 17, 2017
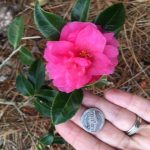
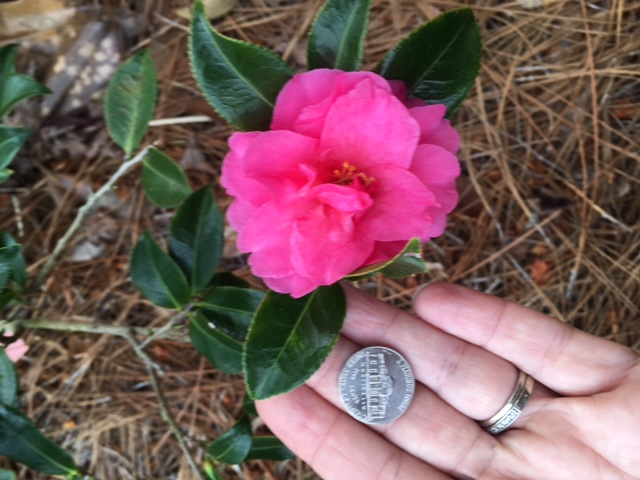
Winter flowers and small leaves with serrated edges lead to identification as Camellia sasanqua. Photo: J_McConnell, UF/IFAS
A common diagnostic service offered at your local UF/IFAS Extension office is plant identification. Whether you need a persistent weed identified so you can implement a management program or you need to identify an ornamental plant and get care recommendations, we can help!
In the past, we were reliant on people to bring a sample to the office or schedule a site visit, neither of which is very practical in today’s busy world. With the recent widespread availability of digital photography, even the least technology savvy person can usually email photos themselves or they have a friend or family member who can assist.
If you need to send pictures to a volunteer or extension agent it’s important that you are able to capture the features that are key to proper identification. Here are some guidelines you can use to ensure you gather the information we need to help you.
Entire plant – seeing the size, shape, and growth habit (upright, trailing, vining, etc.) is a great place to begin. This will help us eliminate whole categories of plants and know where to start.
Stems/trunks – to many observers stems all look the same, but to someone familiar with plant anatomy telltale features such as raised lenticels, thorns, wings, or exfoliating bark can be very useful. Even if it doesn’t look unique to you, please be sure to send a picture of stems and the trunk.
Leaves – leaf color, size and shape is important, but also how the leaves are attached to the stem is a critical identification feature. There are many plants that have ½ inch long dark green leaves, but the way they are arranged, leaf margin (edges), and vein patterns are all used to confirm identification. Take several leaf photos including at least one with some type of item for scale such as a small ruler or a common object like a coin or ballpoint pen; this helps us determine size. Take a picture that shows how leaves are attached to stems – being able to see if leaves are in pairs, staggered, or whorled around a stem is also important. Flip the leaf over and take a picture of the underside, some plants have distinctive veins or hairs on the bottom surface that may not be visible in a picture taken from above.
Flowers – if flowers are present, include overall picture so the viewer can see where it is located within the plant canopy along with a picture close enough to show structure.
Fruit – fruit are also good identification pictures and these should accompany something for scale to help estimate size.
Any additional information you are able to provide can help – if the plant is not flowering but you remember that it has white, fragrant flowers in June, make sure to include that in your description.
Learning what plants you have in your landscape will help you use your time and resources more efficiently in caring for you yard. Contact your local UF/IFAS Extension office to find out who to send requests for plant id.
