Fall is here – peanuts are being picked and football season is in full swing. With fall being synonymous with the end of the growing season, it is a surprisingly good time of year to start many vegetation management operations. Fall is a particularly good time of year for a land manager to chemically control unwanted perennial vegetation.
–
General Comments & Caveats
I know plants can’t read calendars and to my knowledge they don’t watch football, so how would they even “know” it’s fall? Why does the season matter? In very general terms, perennial plants (those that live for many years) respond to shortening day length; the decreasing amount of sunlight stimulates the plants to begin storing more energy for the winter ahead. This process increases the downward flow (from leaves, towards roots and rhizomes, etc.) inside the plant. This phenomenon pairs very well with how systemic herbicides need to move within the plant to be effective. Put another way, again in very simplified terms, fall applications of systemic herbicides to perennial plants build on the plants’ natural processes associated with transitioning to winter dormancy and provide the herbicide with excellent access and opportunity to affect the plant.
While fall can be an excellent time to control perennial vegetation, taking advantage of this opportunity does require some additional attention to detail, as compared to mid-summer herbicide applications. For herbicides to work properly the chemical must be able to enter the plant and the plant must then be able to move herbicide though its xylem and phloem cells.
In the fall it is not uncommon for it to become very dry. Drought stress can impede both necessary processes described above. Fall herbicide applications only work when adequate moisture is available. –
Foliar herbicides, like glyphosate, must enter a plant through a functional green leaf. At some point in the fall, the leaves of deciduous plants lose their functionality and thus their ability to convey herbicide to the rest of the plant. Chinese Tallow (popcorn tree) comes to mind here – if the leaves have changed color, they have been cut off from the rest of the plant making them useless for receiving herbicide. –
Cold temperatures (particularly below freezing) can cause plants to go dormant. Dormant plants do not circulate herbicide effectively. Plants vary greatly as to what temperature induces dormancy and how quickly they regain functionality after temperatures increase. When controlling perennial grasses, it is generally recommended to make fall applications before first frost and the browning of leaves that closely follows. For plants that retain green leaves after frost (privet, for example), make sure temperatures are well above freezing at the time of herbicide application.
NOW is the time to treat cogongrass – fall, with good soil moisture. Don’t miss this ideal window for herbicide application. Photo Credit: Mark Mauldin
–
Specific Vegetation Management Practices to Consider this Fall
Kill Cogongrass. Almost every year, about this time I write an article reminding folks that now is the best time of year to kill cogongrass. I won’t rewrite the article this year, I’ll just include links to previous iterations – see below. Cogongrass is bad, if it’s on your property kill it now. In my opinion, it is the most troublesome weed we have here in Northwest Florida. It is very difficult to control; so, you need to do everything you can to improve your chances of success. Spraying in the fall (not mid-summer) really helps. –
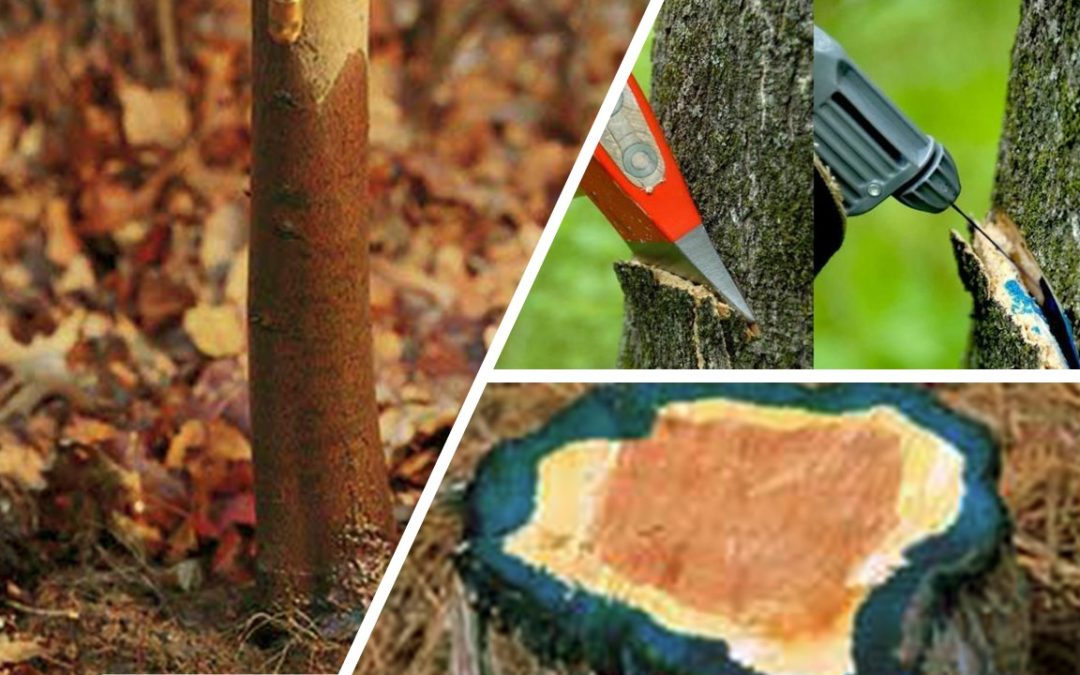
Control Trees and Brush. Fall and winter are excellent times of year to employ several different methods which allow you to apply herbicide directly to induvial woody plants with relatively little risk to surrounding desirable vegetation. While very effective, all these individual plant techniques are quite labor intensive, making the cooler temperatures associated with the fall perhaps more important to the applicator than the plant physiology and herbicide efficacy discussed earlier. Use these links to access videos that discuss each technique in detail. –
Foliar applications (to the leaves) of herbicide to small trees and woody brush can be very effective in the fall, for the reasons mentioned earlier and provided all of the caveats mentioned earlier are accounted for. That said, foliar applications have their limitations and generally shouldn’t be used on trees over 8ft tall. Foliar applications also generally carry more risk of damage to surrounding desirable vegetation. All that said, there are times when there is no surrounding desirable vegetation – think about doing site prep for a silviculture planting or clearing an opening for a wildlife food plot planting. In these kinds of situations fall timed, broadcast, foliar applications of systemic herbicides can be highly effective.
During the fall and winter trees and woody brush can be controlled via a variety of highly selective techniques, including basal bark, hack-and-squirt, and cut stump treatments. Image Credit: IFAS CAIP
–
Mow??? I very infrequently recommend mowing for weed control but if weeds have not already made seed (many already have), fall mowing can clean up open spaces while helping to lessen the seed bank available for next year’s crop of weeds. Granted, mowing is great for quick aesthetic benefit, but it must be timed correctly to provide any long term, meaningful vegetation management. Most perennial plants can and will recover after being mowed, so mowing them after they have made seed provides little lasting benefit. Along the same lines, annual plants naturally die after making seed making timing very important to providing any meaningful weed management. –
Fall is always a busy time year, but between tailgate parties and trips to the pumpkin patch be sure to take advantage of the opportunities the season provides for the highly effective management of some otherwise very hard to control vegetation. If you have any questions or would like to discuss any of these concepts in more detail, please don’t hesitate to reach out to me directly at mdm83@ufl.edu or 850-638-6180.
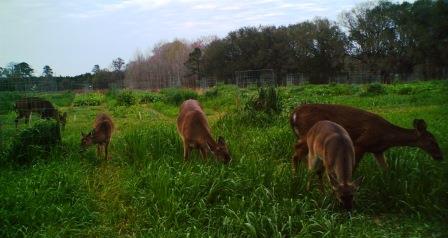
Deer grazing test plots at the NFREC in Quincy. Quality food plots take effort and planning.
The during the blistering heat of the last week of a Florida July is generally not a time when people think a lot about planting crops, but maybe it should be. Late summer can be a surprisingly active time in the world of wildlife food plots.
For those land managers who already have well established food plots, this time frame represents the end of the window for planting summer annual forages. Of the summer annuals that are particularly appealing to deer, cowpeas standout as the best option for late summer plantings. There are also several grass crops that can be planted late summer in food plots focusing on birds. While earlier plantings allow crops time to grow before pest and disease pressure peak in late summer, they also mean the crops will have matured and stopped growing before hunting season begins. Late planted forages may face some challenges and likely will not be the most beautiful crops you have ever grown but they will still be growing when archery season begins. Cowpeas take approximately 100 days to mature; this means that most years August 1st plantings will have time to mature before being killed by frost. Even if we get an early (mid-October) frost the cowpeas will have provided high quality forage right up to the beginning of archery season (October 25 in the Panhandle).
For those who are looking to establish new food plots or those whose past management may have been somewhat lacking, late summer is really when the process of preparing cool-season food plots needs to begin.
Finding the Right Spot Can Take A While
For the creation of a new food plot identifying the location is the first step. Edges, transitions between habitat types, are often a good place to start looking. Utilizing locations where deer (or whatever wildlife you are focusing on) already frequent is preferential to the “if I build it, they will” come mindset. Additional factors that cannot be overlooked are the drainage and workability of any potential site. Suitable planting options for both poorly (stands water, even occasionally) and excessively drained (deep sands) sites will be severely limited. Sites with drainage issues often have less natural vegetation making them appealing for use as a food plot since less clearing is needed. However, these sites generally do not work out well. Don’t forget, successful food plot establishment and maintenance necessitates easy access with farm equipment and ground level enough to safely operate said equipment.
A final consideration when identifying possible food plot locations is the amount of space available to work with. When it comes to food plots, size really does matter. Food plots need to be no less than ½ acre in size, preferably between 1 and 5 acres. The kinds of plants in food plots are, by design, ones that wildlife find highly desirable (because they are highly nutritious). Considering this, it is easy to understand why plantings smaller than ½ acre struggle to establish – the plants simply do not get a chance grow past the seedling stage before being eaten. Given all these considerations, finding the right spot really can take a while – get started soon because selecting the spot is just the first step.
Start Early with Pre-Plant Land Prep
After a location is identified, it is crucial to manage unwanted vegetation prior to preparing the soil and planting the food plot. If it is not eliminated, existing vegetation will compete tremendously with food plot plantings. Even if mechanical disturbance (disking, tilling, root raking, etc.) appears to remove the existing vegetation, much of it will regrow. This regrowth from established root systems will be more than a match for new seedlings. Apply herbicide before you begin soil preparation. Equally as important, give the herbicide sufficient time to do its work before mechanically disturbing the site (weeks, not days). Specific herbicide recommendations will vary depending on what vegetation you are trying to manage, but most food plot site prep applications will involve fairly high rates of glyphosate. Please don’t hesitate to call me (850-638-6180) – we can discuss your site and dial in an herbicide recommendation. You do not want to skip this step; get in front of weed pressure before you plant.
If you want a food plot to be productive and successful, you must also effectively address soil fertility issues prior to planting. First and foremost, soil pH must be corrected. Any needed applications of lime/dolomite need to take place first, well before any other fertilizer is applied (ag lime can take months to go into soil solution and alter soil pH). If fertilizers are applied before the soil pH is corrected the nutrients may still be unavailable to the plants. Once a food plot site is determined, collect a representative sample of the rooting zone soil and submit it to a lab for analysis. This is the best way to get the information needed to make informed choices regarding lime and fertilizer applications. Talk with the folks at your local Extension Office for more info on how to collect and submit soil samples. Take and submit soil samples now. Apply any need lime soon, during land preparation. Apply recommended fertilizer (N, P, K, and micros) at planting or soon after emergence. Fertilizer applied when there are no plant roots present to adsorb it is wasted.
Recap – Assuming the goal is to plant a cool-season food plot prior to the beginning of hunting season you need to pick and clear a spot, kill weeds, and soil sample very soon. After weeds have had time to die (30 days +/-), apply any needed lime/dolomite and till/disc under dead weeds and lime.
Ideally, you’d get all this done several weeks before the fall planting window (10/1-11/15) gets here. In that event, let the plot rest; let the tilled soil settle and rain-pack and let the next flush of weeds germinate. Many of our fall planted food plot crops, clovers in particular, do better when planted into a very firm seed bed making the resting period very beneficial. Additionally, another herbicide application, to take out the most recent flush of weeds, can be made at planting time ensuring your plot gets started clean and free from competition.
I know it’s hot, but as a land manager there is always something to do. Fall will be here before you know it, and now is the time to start getting ready.
Without question, Cogongrass is the most troublesome invasive plant that I (and my clients) deal with. Here in Northwest Florida, we have a lot of it, and it is very difficult to manage. With that in mind, I write about cogongrass control with some frequency. If you follow Panhandle Ag e-Newsand/or Panhandle Outdoors you’ve probably seen much of what’s included below before. That’s ok, a refresher never hurt anyone and, unfortunately, there are plenty of folks out there who are just realizing that they have a cogongrass problem.
It has been my observation that the difficulty of management and the corresponding limited early success often led to frustration and ultimately a loss of interest in control efforts on the part of landowners/managers. This is the absolute worst-case scenario, as diligence over time is paramount to successfully managing cogongrass. With all this in mind, optimizing the impact of the initial control effort is crucial both in terms of biology (efficacy on the plants) and psychology (keeping the landowner encouraged and motivated). If you have cogongrass to fight, take every step you can to get the absolute best results out of every treatment, especially the first one.
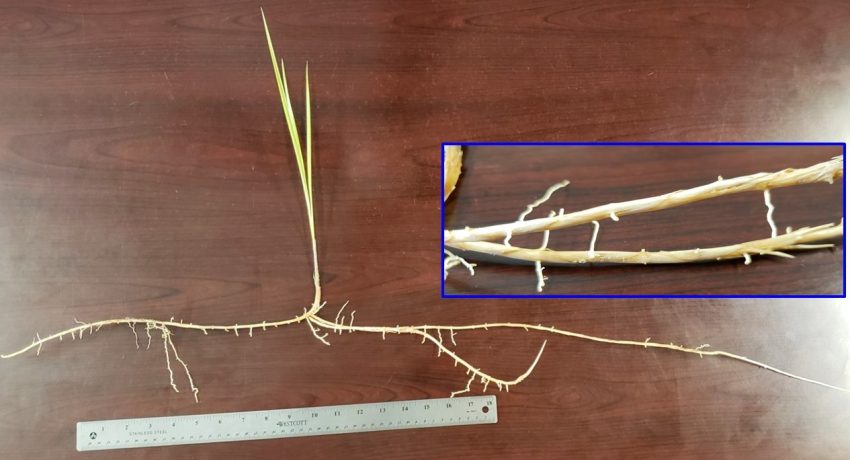
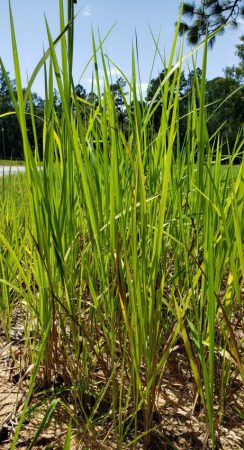
Cogongrass has no visible jointing, segmentation, or branching above ground. However, in the top 3-6 of the soil it forms a dense mat of white, fleshy, clearly segmented rhizomes which are a key identifying feature. Photo Credit: Mark Mauldin
The following is a discussion of some of the steps you can take to maximize the efficacy of your control efforts.
1) Timing Matters
Cogongrass is best treated with a fall-spring, one-two punch. Mid-summer and mid-winter treatments are not advisable. Based on my experience, the ideal time to treat cogongrass is October through November, before first frost, with good soil moisture. Spray now, during the fall window, and be prepared to spray again in the spring when you have at least 12 inches of green leaf and good soil moisture. I have mentioned “good soil moisture” twice… what exactly does that mean? It means there is sufficient moisture in the soil that the cogongrass is not experiencing any level of drought stress. Herbicide applications made to stressed plant are generally less effective than are applications to made to “happy plants”. It is very hard to see symptoms of drought stress in cogongrass. Generally, you need to look at the plants around the infestation for clues. If any of the plants in the surrounding landscape look wilted or crispy during the heat of the day, it’s probably best to delay herbicide applications. This concept is worth noting primarily because here in the central panhandle we tend to be dry during both the fall and spring application windows. I am writing this article on 10/9/24. At my house we’ve not had a drop of rain since Hurricane Helene came through on 9/27 and my trusty weather app say not to expect any for the next 10 days. While it will vary greatly by location and soil type, it loos to me like we are running out of hurricane moisture, and it is rapidly becoming too dry to spray. All this boils down to the fact that you need to be ready take advantage of the situation and spray when soil moisture is adequate.
With that one-two punch successfully delivered, you should see significant reduction in the size of the infestation by this time next year. Keep repeating the fall-spring process until you can no longer find any cogongrass. Be sure to look carefully, as the infestation retreats it can be easy to miss the less robust and more scattered remnants mixed in with other vegetation. These remnants need to be sprayed, if not rapid regrowth will occur.
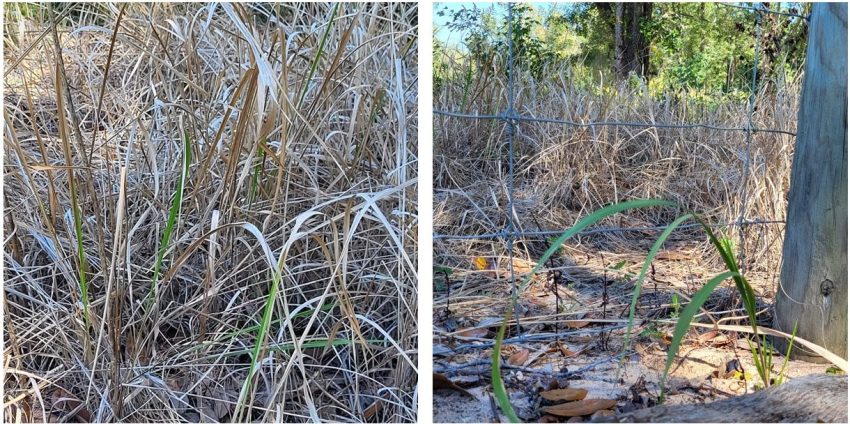
Close examination of this cogongrass patch shows regrowth occurring in the patch and growth that was apparently missed by the prior herbicide application. Both of these scenarios are common and help to illustrate why it is important to scout diligently and be prepared for re-treatments. Photo credit: Mark Mauldin
2) Coverage & Leaf Area are Crucial
To make the most out of each treatment you must maximize the amount of chemical you get into the plant. This is done by getting thorough coverage on as much green leaf area as possible. Make sure you have plenty of green leaves (at least 12inches) and spray them like you’re painting a wall. You don’t want runoff, but you want every square inch of leaf covered with spray. Don’t mow or burn for at least 30 days after you spray. Cogongrass can be hard to spot when it is growing mixed with other grasses/green foliage. Look diligently to find the edge of the patch and then spray 10ft past the known edge on all sides of the patch.
3) Get the Spray Mixture Right
Notice, I didn’t say pick the right chemical. There’s more to it than that. The following recommendations will be based on managing cogongrass with the active ingredient glyphosate. (Imazapyr is also very effective on cogongrass, but due to its soil activity it is inherently more complicated to use and ensure the safety of desirable plants near the treatment area. I am not comfortable recommending imazapyr without first seeing the site where it is to be applied and discussing the risk to other vegetation with the landowner. Glyphosate must enter a plant through a green leaf making it much easier for applicators to ensure the safety of desirable vegetation.)
Generally speaking, the efficacy of glyphosate will increase if a water conditioner and surfactant are included in the spray solution. To clarify, this means there would be three separate products going into the spray tank – one herbicide and two adjuvants. The preferred water conditioner would be a 34% liquid Ammonium Sulfate (AMS) product and the surfactant would be an 80/20 Non-ionic surfactant (NIS). These products should be available anywhere ag chemicals are sold (not the garden center at a big box store) under many different name brands. Selecting a glyphosate product can be somewhat confusing, simply because there are so many different products on the market. The product amounts listed below are based on a 41%, 3lbs acid equivalent (ae) per gallon glyphosate product. This is a relatively common formulation, but there are many others available. All can be effective; it is just a matter of value and correctly adjusting the rate to match the formulation you are using.
For a broadcast application using a tractor mounted sprayer or other similar equipment, mix a spray solution such that 1 gallon of 41%, 3lbae glyphosate herbicide is applied per acre. Ideally this would be delivered in 10-20 gallons of water (be sure spray equipment is properly calibrated). Add a liquid AMS water conditioning product at 2% v/v before adding herbicide to the tank. Add a non-ionic surfactant (80/20 NIS) at 1qt per 50-100 gallons of spray solution after the herbicide has been added.
I understand that nobody likes to have to deal with all the numbers, especially the various formulations of glyphosate. Unfortunately, that’s just part of it… There are so many different products out there that the numbers are necessary to communicate the recommendations in a way that is widely applicable. Please don’t hesitate to contact me (850-638-6180) or your local UF/IFAS Extension Agent for assistance sourcing vegetation management products or tailoring the recommendations to match the specific products you have on hand. The most important thing is to get the mixture right and make the application be as effective as possible.
More than any other weed I manage, Cogongrass penalizes the applicator for not paying attention to the details. It is a very difficult plant to control; partial efforts are essentially a waste of time. I encourage you to take the extra time, effort, and expense and make the most of every application.
All graphics and information included are courtesy ofmyfwc.com.
Here in the Panhandle (FWC Zone D), we are just under 3 months away from the October 26 opening day of archery season. As we move through summer and into the home stretch of hunting season preparations it is important to be sure all hunters understand the current regulations related to deer hunting in our area – it’s more complicated than it used to be.
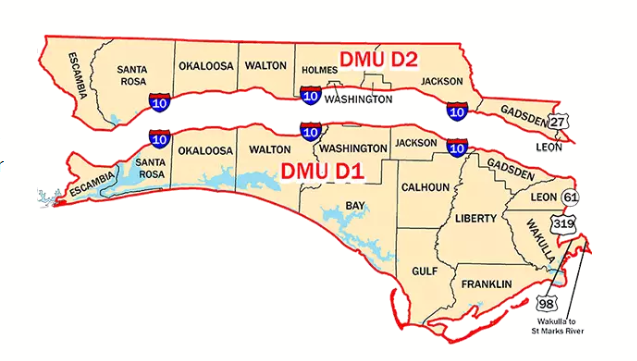
Deer Management Unit map. From: https://myfwc.com/hunting/season-dates/dmu-d/ Click on image to make larger.
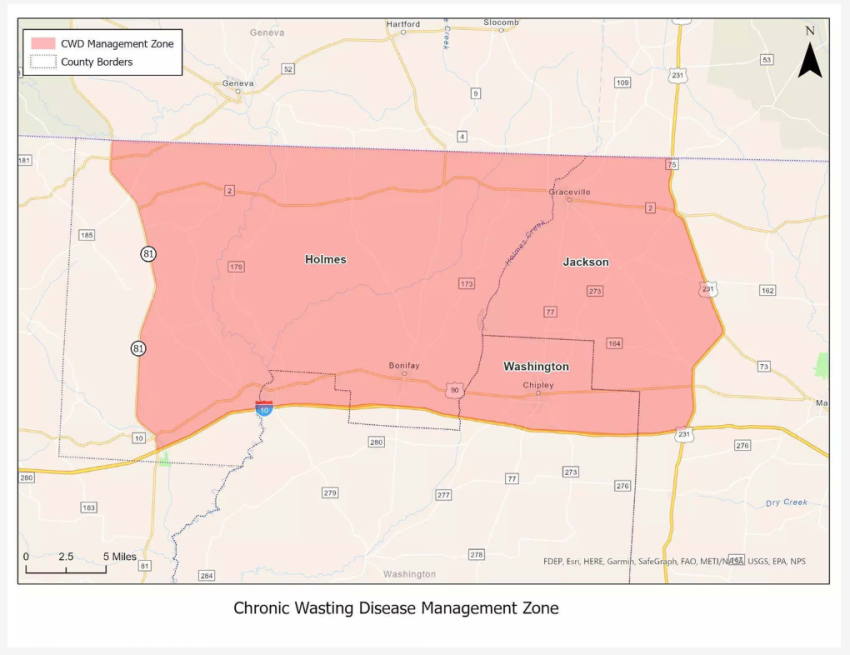
Following last summer’s discovery of Chronic Wasting Diseasein Holmes County, the Chronic Wasting Disease Management Zone and its modified regulations will remain in place for the 2024-25 hunting season, but with some notable changes. The entirety of the Chronic Wasting Disease Management Zone lies within Deer Management Unit (DMU) D2. DMU-D2 is the portion of Zone D which lies north of I-10. As such, there are now some considerable differences in the hunting regulations north and south of I-10. For those of us who live along the I-10 corridor and who have opportunities to hunt on both sides of the interstate this could prove a bit confusing. The following is a discussion of the new regulations and how they differ by DMU.
New for the 2024-25 Hunting Season
The feeding of deer within the CWD Management Zone shall be allowed only during the deer hunting season (October 26, 2024 – March 2, 2025). This regulation is specific to the CWD Management Zone, not all of DMU-D2. Anywhere in Florida outside of the CWD Management Zone feeding stations must be continuously maintained with feed for at least 6 months before they are hunted over. So, unless you are hunting inside the CWD Management Zone, I hope your feeders have already been up and running for quite a while.
Chronic Wasting Disease Management Zone From: https://myfwc.com/research/wildlife/health/white-tail-deer/cwd/ Click on image to make larger.
The take of antlerless deer shall be allowed during the entire deer season in Deer Management Unit D2 on lands outside of the WMA system. For all of DMU-D2 there are no “doe days”. If it is hunting season (October 26, 2024 – March 2, 2025), it is legal to harvest antlerless deer in DMU-D2. This is quite different south of I-10, in DMU-D1, where antlerless deer may only be harvested during archery /crossbow season (Oct. 26 – Nov. 27), youth deer hunt weekend* (Dec. 7–8), and specific dates during general gun season (Nov. 30 – Dec. 1, Dec. 28–29).
Up to three antlerless deer, as part of the statewide annual bag limit of five, may be taken in DMU D2 on lands outside of the WMA system. Outside of DMU-D2, there can be no more than 2 antlerless deer included in the annual bag limit of five deer. Event if you hunt outside of DMU-D2 you still have the opportunity to harvest 3 antlerless deer in the 2024-25 season, but at least one of them must be harvested in DMU-D2. The bag limit of 5 total deer remains in place for all DMUs.
All CWD management related regulations can be found here.
Antler Regulations
While it is not new this hunting season, it should be noted that there are different antler regulations north and south of I-10.
DMU-D1 (south of the intestate)– To be legal to take, all antlered deer (deer with at least one antler 5 inches or longer) must have an antler with at least 2 points with each point measuring one inch or more. Hunters 16 years of age and older may not take during any season or by any method an antlered deer not meeting this criteria.
DMU-D2 (north of the interstate) – To be legal to take, all antlered deer (deer with at least one antler 5 inches or longer) must have an antler with 1) at least 3 points with each point measuring one inch or more OR 2) a main beam length of 10 inches or more. Hunters 16 years of age and older may not take during any season or by any method an antlered deer not meeting this criteria.
In both DMU-D1 & D2 as part of their annual statewide antlered deer bag limit, youth 15-years-old and younger may harvest 1 deer annually not meeting antler criteria but having at least 1 antler 5 inches or more in length.
Another somewhat new concept that some hunters still might not be accustomed to is Logging and Reporting Harvested Deer and Turkeys. All hunters must (Step 1) log their harvested deer and wild turkey prior to moving it from the point where the hunter located the harvested animal, and (Step 2) reporttheir harvested deer and wild turkey within 24 hours.**
**Hunters must report harvested deer and wild turkey: 1) within 24 hours of harvest, or 2) prior to final processing, or 3) prior to the deer or wild turkey or any parts thereof being transferred to a meat processor or taxidermist, or 4) prior to the deer or wild turkey leaving the state, whichever occurs first.
Hunters have the following user-friendly options for logging and reporting their harvested deer and wild turkey:
Option A – Log and Report (Steps 1 and 2) on a mobile device with the FWC Fish|Hunt Florida App or at GoOutdoorsFlorida.com prior to moving the deer or wild turkey.
Option B – Log (Step 1) on a paper harvest log prior to moving the deer or wild turkey and then report (Step 2) at GoOutdoorsFlorida.com or Fish|Hunt Florida App or calling 888-HUNT-FLORIDA (888-486-8356) within 24 hours.
Without question, Cogongrass is the most troublesome invasive plant that I (and my clients) deal with. Here in Northwest Florida, we have a lot of it, and it is very difficult to manage. It has been my observation that the difficulty of management and limited early success often lead to frustration and ultimately a loss of interest in control efforts on the part of landowners/managers. This is the absolute worst-case scenario, as diligence over time is paramount to successfully managing cogongrass. With all this in mind, optimizing the impact of the initial control effort is crucial both in terms of biology (efficacy on the plants) and psychology (keeping the landowner encouraged and motivated). If you have cogongrass to fight, take every step you can to get the absolute best results you can, out of every treatment, especially the first one.
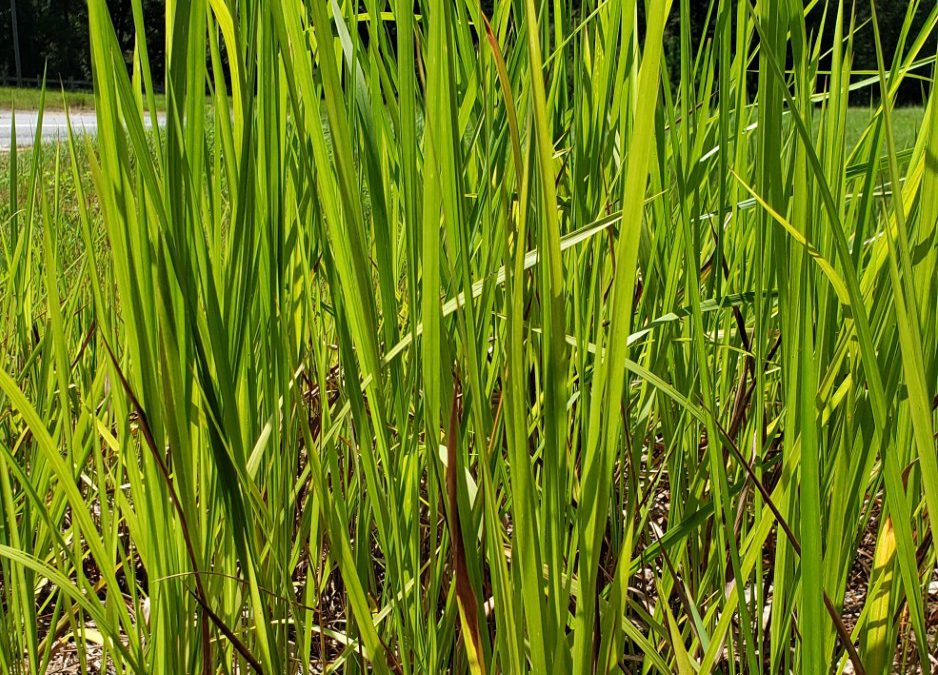
Cogongrass is highly invasive, difficult to control and widespread in Northwest Florida.
Phot Credit: Mark Mauldin
The following is a discussion of some of the steps you can take to maximize the efficacy of your control efforts.
1) Timing Matters
Cogongrass is best treated with a fall-spring, one-two punch. Mid-summer and mid-winter treatments are not advisable. NOW is the time to treat. As I write this it is mid-October with rain on the way – by the time this is published the front will have passed and the timing will be perfect. If you ask me the absolute best time of year to treat cogongrass, I will tell you, without hesitation, “October through November, before first frost, with good soil moisture”. Spray now and be prepared to spray again in the spring when you have at least 12 inches of green leaf and good soil moisture. With that one-two successfully delivered you should see significant reduction in the size of the infestation by this time next year. Keep repeating the spring-fall process until you can no longer find any cogongrass.
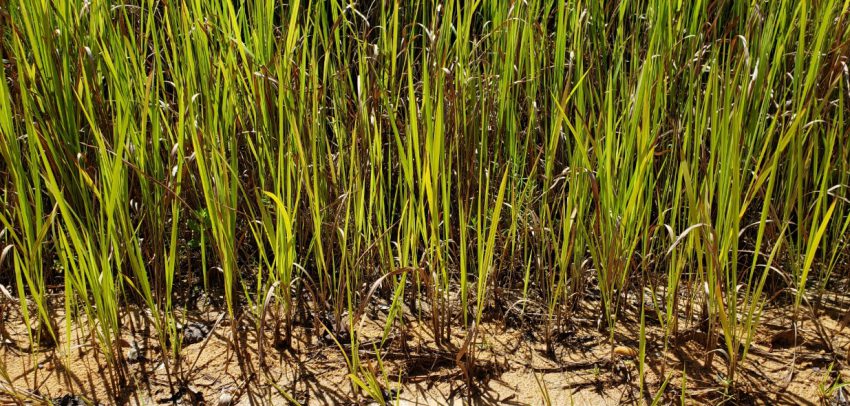
Getting good herbicide coverage over all of the characteristically lime green foliage of cogongrass is essential for good control.
Photo Credit: Mark Mauldin
2) Coverage & Leaf Area are Crucial
To make the most out of each treatment you must maximize the amount of chemical you get into the plant. This is done by getting thorough coverage on as much green leaf area as possible. Make sure you have plenty of green leaves (at least 12inches) and spray them like you’re painting a wall. You don’t want runoff, but you want every square inch of leaf covered with spray. Don’t mow or burn for at least 30 days after you spray. Cogongrass can be hard to spot, especially if it is growing mixed with other grasses/green foliage. Look diligently to find the edge of the patch and then spray 10ft past the known edge on all sides of the patch.
3) Get the Spray Mixture Right
Notice, I didn’t say pick the right chemical. There’s more to it than that. The following recommendations will be based on using the active ingredient glyphosate. (Imazapyr is also very effective on cogongrass, but due to its soil activity it is inherently more complicated to use and ensure the safety of desirable plants near the treatment area. I am not comfortable recommending imazapyr without first seeing the site where it is to be applied and discussing the risk to other vegetation with the landowner. Glyphosate must enter a plant through a green leaf making it much easier for applicators to ensure the safety of desirable vegetation.)
Generally speaking, the efficacy of glyphosate will increase if a water conditioner and surfactant are included in the spray solution. To clarify, this would be 3 separate products going into the spray tank – one herbicide and two adjuvants. The preferred water conditioner would be a 34% liquid Ammonium Sulfate (AMS) product and the surfactant would be an 80/20 Non-ionic surfactant (NIS). These products should be available anywhere ag chemicals are sold (not the garden center at a big box store) under many different name brands. Selecting a glyphosate product can be somewhat confusing, simply because there are so many different products on the market. The product amounts listed below are based on a 41%, 3lbs acid equivalent (ae) per gallon glyphosate product. This is a relatively common formulation, but there are many others available. All can be effective; it is just a matter of value and correctly adjusting the rate to match the formulation you are using.
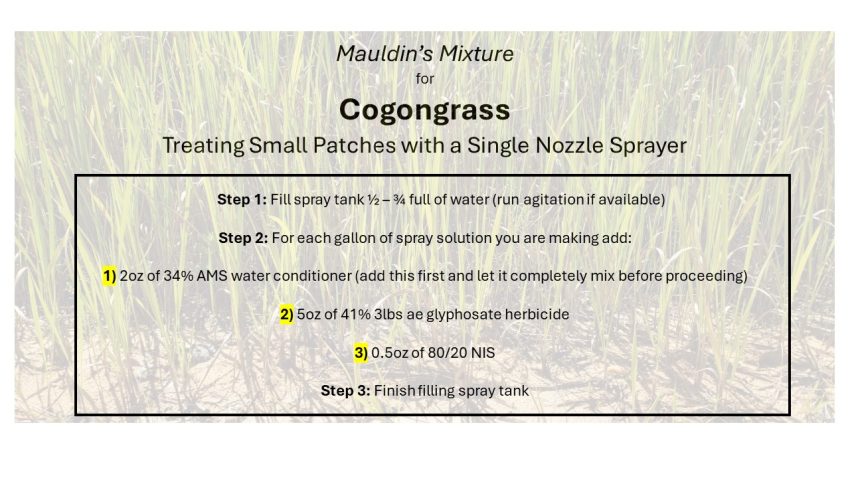
An example mixture for treating a small patch with a hand-held single nozzle sprayer:
Fill spray tank ½ – ¾ full of water (run agitation if available)
For each gallon of spray solution you are making add:
3.2oz of 34% AMS water conditioner (add this first and let it completely mix before proceeding)
5oz of 41% 3lbs ae glyphosate herbicide
0.5oz of 80/20 NIS
Finish filling spray tank
For a broadcast application using a tractor mounted sprayer or other similar equipment, mix a spray solution such that 1 gallon of 41%, 3lbae glyphosate herbicide is applied per acre. Ideally this would be delivered in 10-20 gallons of water (be sure spray equipment is properly calibrated). Add a liquid AMS water conditioning product at 2% v/v before adding herbicide to the tank. Add a non-ionic surfactant (80/20 NIS) at 1qt per 50-100 gallons of spray solution after the herbicide has been added.
I understand that nobody likes to have to deal with all the numbers, especially the various formulations of glyphosate. Unfortunately, that’s just part of it… There are so many different products out there that the numbers are necessary to communicate the recommendations in a way that is widely applicable. Please don’t hesitate to contact me or your local UF/IFAS Extension Agent for assistance sourcing vegetation management products or tailoring the recommendations to match the specific products you have on hand. The most important thing is to get the mixture right and make the application be as effective as possible.