by | Jul 16, 2012
Robert Trawick
County Agent – Horticulture
Jackson County
rob.trawick@ufl.edu
When it comes to vegetable gardening in Northern Florida, gardeners should take advantage of our year-round growing season. Yes, even in the torrid depths of summer there are delicious, heat-tolerant vegetables you can plant now to keep your garden productive.
Popular vegetables such as tomatoes, beans, cucumbers and squash generally need warm-but-mild daytime temperatures – in the 70s and 80s – to produce well. The scorching heat we experience in midsummer seriously reduces the numbers of flowers these plants produce, and always remember that it is the flowers that ultimately become the fruit (vegetable). In addition, high populations of many pests, such as spider mites, leaf miners, beetles and caterpillars, are present now and will cause increasing amounts of damage through the summer.
Once they are past their prime and production dwindles, remove early summer vegetables and replant your garden with a wonderful selection of vegetables that thrive in midsummer heat.
The University of Florida – IFAS recommends a wide variety of vegetables that can be planted now. Most of these vegetables are near and dear to Southerners and form an important part of our regional cuisine. Among them are okra, eggplant, Southern peas, hot peppers, sweet peppers and more. It’s also a good time to start growing your own transplants for fall tomato production.
I’ve pulled out a few gardening vegetables that do well here but this is just the tip of the iceburg:
Okra
Native to tropical Africa, it never gets too hot for okra to thrive here. Direct-seeded into the garden now, okra will come into production in late August or early September (even sooner if you plant transplants) and produce until the weather cools down in late October or early November.
Reliable okra varieties include Clemson Spineless, Cajun Delight, Emerald and Burgundy.
A common mistake gardeners make is growing okra plants too close together. Once the okra seedlings are a few inches tall they should be thinned to provide 12 inches of space between plants.
When the plants are about knee high to waist high they begin to produce their pale yellow, hibiscus-like flowers. Harvest okra pods frequently when they reach a length of about 3 inches for best quality, although some varieties stay tender if harvested when the pods are larger.
Eggplant
Unlike their relatives, the tomatoes, eggplants thrive in the heat of mid- to late summer, and you can purchase transplants to plant into the garden now.
I generally have found the oriental types, such as Ichiban or Tycoon with long, narrow fruit are especially productive during stressful summer weather. Large-fruited cultivars such as Blackbell, Classic, Midnight and Florida Hi Bush, as well as green, white, lavender and pink cultivars also are recommended.
Plant eggplant transplants 18 inches to 24 inches apart in well-prepared beds. Production should begin in early September and increase through late October or early November.
Do not go by the size of the fruit when harvesting eggplants. Eggplants are eaten immature and should not be allowed to become old and bitter before harvest. The skin should be shiny and tender. Once the skin starts to dull you should harvest the eggplant immediately – no matter what the size – because that indicates it is getting past its prime.
Legumes
Although it is too hot for reliable production from legumes like snap beans and lima beans, Southern peas such as purple hulls, crowders, cream peas and blackeye peas produce abundant crops during the summer.
Direct-seed these peas in rows about 18 inches apart, and thin young seedlings to stand 4 inches to 6 inches apart. Most cultivars produce short, somewhat bushy vines and do not require a trellis to grow on. Other legumes that could be planted now include yard-long beans, winged peas (these need trellises to grow on) and edible soybeans.
Peppers
Bell peppers often produce poorly during high temperatures, but hot peppers and sweet peppers such as Sweet Banana, Gypsy and Pimento produce very well despite the heat.
Plant transplants now spaced about 18 inches apart. Bell pepper transplants also can be planted now through August for production this fall when the weather cools down.
Tomatoes
Spring-planted tomatoes are about finished with their main crop, and if the plants are in poor condition, they should be removed to make way for heat-tolerant crops. On the other hand, cherry and Roma types may still be producing well and could be left in place.
If you want to grow your own transplants for fall tomatoes, seeds should be planted now. Transplants for fall tomatoes will be available at area nurseries in late July and August and should be purchased and planted into the garden then. Good cultivars for fall production include Hawaiian Hybrid, Solar Set, Heatwave, Bingo, Celebrity and Pelican.
Others
Other heat-tolerant vegetables that may planted now include cantaloupe, pumpkin, watermelon (these three are a bit of a challenge in the home garden), peanuts (easy to grow and a great crop for kids) and sweet potatoes (plant rooted cuttings or “slips” as soon as possible for harvest in November).
by | Jul 16, 2012
Rob Trawick
County Agent – Horticulture
Jackson County
rob.trawick@ufl.edu
The heat is on, and we can expect daytime highs around 90 or above and nighttime lows in the 70s from now until September. As the days get longer and the sunlight grows more intense, our home air conditioning systems work harder and harder to keep the inside of our homes comfortable.
Trees that shade the house during the summer can lower air-conditioning bills by blocking the sun from the windows, exterior walls and roof.
Air conditioners cooling a fully shaded house have been shown to work only half as much as those in a house that has its walls and roof exposed to the sun. Other research reports show shade trees will reduce heat gains by 40 percent to 80 percent, depending upon their placement and density.
A shade tree is a much better energy saver than an interior blind or curtain, and now is a good time to evaluate where you need to plant trees to create much-needed shade.
Deciduous trees that drop their leaves during the winter generally are the best choice. These trees let the sun shine on the house during the winter, when the sun’s added warmth is welcome, and then provide shade during the summer when it is needed.
Evergreen trees would be desirable, however, where screening for privacy is needed or if you’re looking for them to serve as a windbreak on the north side of the yard to block cold winter winds.
The location of your shade trees is very important when it comes to how well they will help reduce energy consumption. Trees should be planted on the southwestern and western side of the house to be most effective. Trees in those locations will shade the house from the most intense sun during the hottest part of the day. Planting trees to the south also will help shade the house. But trees located to the north of the house are not very effective in terms of reducing the heat in the summer.
This doesn’t mean that you should completely surround your home in a forest of trees. People frequently plant too many trees on their property – not realizing how large the trees will become later on.
Trees also need to be the desired size and planted the proper distance away from the house and concrete-surfaced areas, such as sidewalks and driveways. Although house slabs generally are not affected by tree roots, thinner concrete surfaces, such as patios, driveways and sidewalks, can be damaged by roots from trees planted too close.
The recommended distances generally relate to the mature size of the tree. Large trees (those that may grow taller than 60 feet) and medium-sized trees (around 45 feet) should be planted at least 15 feet away from sidewalks, driveways and the house. Smaller trees (which only reach about 20 feet tall) should be no closer than about 5 feet.
Always watch for power or utility lines when planting trees. Locate tall-growing trees away from overhead utility lines, or choose smaller-growing trees.
The size tree you plant depends on the size of your house, the size of your lot and how large an area you want to shade. You should choose a tree large enough to provide the needed shade but not so large that it causes problems.
In addition to shading the home, decide on other areas where shade is necessary or desirable. Outdoor living areas such as patios are unusable here in the summer without some sort of shade. Properly placed trees could provide that shade. Choose small-growing trees (about 15 to 20 feet tall) for planting close to patios, since those are more in scale with the surroundings and are less likely to damage surfacing materials.
When landscaping for energy conservation, deciding on the right placement, number and type of trees requires careful planning, but you have plenty of time to think about it. Although summer is the time to make decisions on where shade is needed and where to plant the trees, remember the ideal tree-planting season here runs from November through March.
So use the next few of months to study your landscape carefully and decide where shade is needed. Then determine what size trees are needed to do the job. Keep these basic points in mind:
–Generally, medium-size trees (those that grow 30 to 55 feet tall) are suitable as primary shade trees on the average urban lot. These are large enough to shade your house.
–Avoid large trees (which have a height of 60 feet or more or a spread over 40 feet) such as sycamore, pecan and live oak unless you have property large enough to accommodate them.
–Small trees (which grow 15 to 20 feet tall) are suitable for planting closer to the house and are particularly useful for shading smaller situations, such as a patio or deck area.
In addition to size and being evergreen or deciduous, think of any other important characteristics you might want the tree to have. Other characteristics you might want to consider are wind tolerance, attractive flowers, rate of growth, interesting bark, the overall form of the tree (more upright or spreading), trees that produce berries or nuts that help feed wildlife, attractive fall color and so on.
Selecting a tree is a very important decision, but with some careful thought and research, you will know just the right trees for your landscape when it comes time to plant them later this fall or winter.
by | Jul 16, 2012

Alex Bolques
County Agent
Gadsden County
abol@ufl.edu
Plants can become nutrient deficient if they do not receive adequate chemical elements for plant growth and development. These may arise from inadequate essential nutrient levels in the soil or growing media, whether the plant is outside in the landscape or indoor in a pot. However many factors such as inadequate light conditions, plant stress, incidence of pest, and inadequate soil conditions can prevent plant root uptake of nutrients and can be mistaken for a nutrient deficiency condition. It may be difficult to determine if your plant has a nutrient deficiency problem without analyzing the plant foliage for nutrient content.
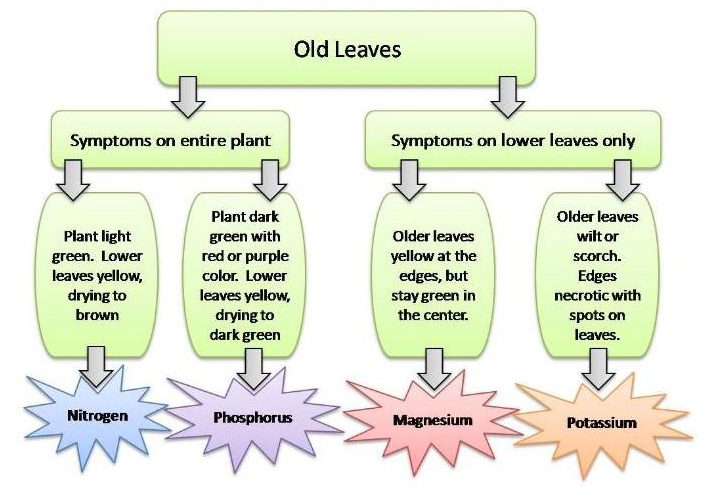
You can get an idea if your plant is experience a nutrient deficiency condition by conducting a visual diagnosis for common essential nutrient deficiencies symptoms. For this, you will need to identify if the abnormal condition or nutrient deficiency symptom, which could be yellowing, necrosis, spottiness, etc., is occurring on the old leaves (schematic 1) verses the new leaves (schematic 2).
Using the visual diagnosis schematic for symptoms on old leaves, if the deficiency is occurring on old leaves but also exhibiting symptoms on the entire plant with the plant having a light green appearance or lower leaves yellowing that are drying and turning brown, it is usually an indication of nitrogen deficiency. Nutrients deficiencies for phosphorus, magnesium and potassium are usually expressed in old plant leaves as seen in the old leaves schematic.
Symptoms that appear on new plant leaves that are differentiated by distorted leaves that maybe showing necrosis and depending on whether terminal buds dies would lead to a visual diagnosis of either boron, calcium or copper. On the other hand, symptoms that appears on new leaves that are differentiated by chlorotic leaves that maybe spreading to entire plant or exhibiting intervenial chlorosis, depending on shortening of the plant stem and the presence of necrotic spots would lead to a visual diagnosis for sulfur, zinc, iron, or manganese.
Amy L. Shober and Geoffrey C. Denny with the UF/IFAS Department of Soil and Water Science, Center for Landscape Conservation and Ecology, Gulf Coast Research and Education Center (REC)—Balm have more detailed information in their publication on Identifying Nutrient Deficiencies in Ornamental Plants.
by Carrie Stevenson | Jul 14, 2012
As the hot weather abates just a bit, gardeners find themselves back in the landscape only to find an outbreak of spots on their plants. Hot, humid and rainy weather are perfect conditions for the development of fungal diseases.
One of the most common leaf spot diseases seen in the landscape during late summer is Cercospora leaf spot. While it affects many different landscape plants, it is most commonly seen on hydrangeas. It affects smooth, panicle, oakleaf and bigleaf types of hydrangea. However, this year, there have been numerous occurrences on crape myrtles.
Symptoms
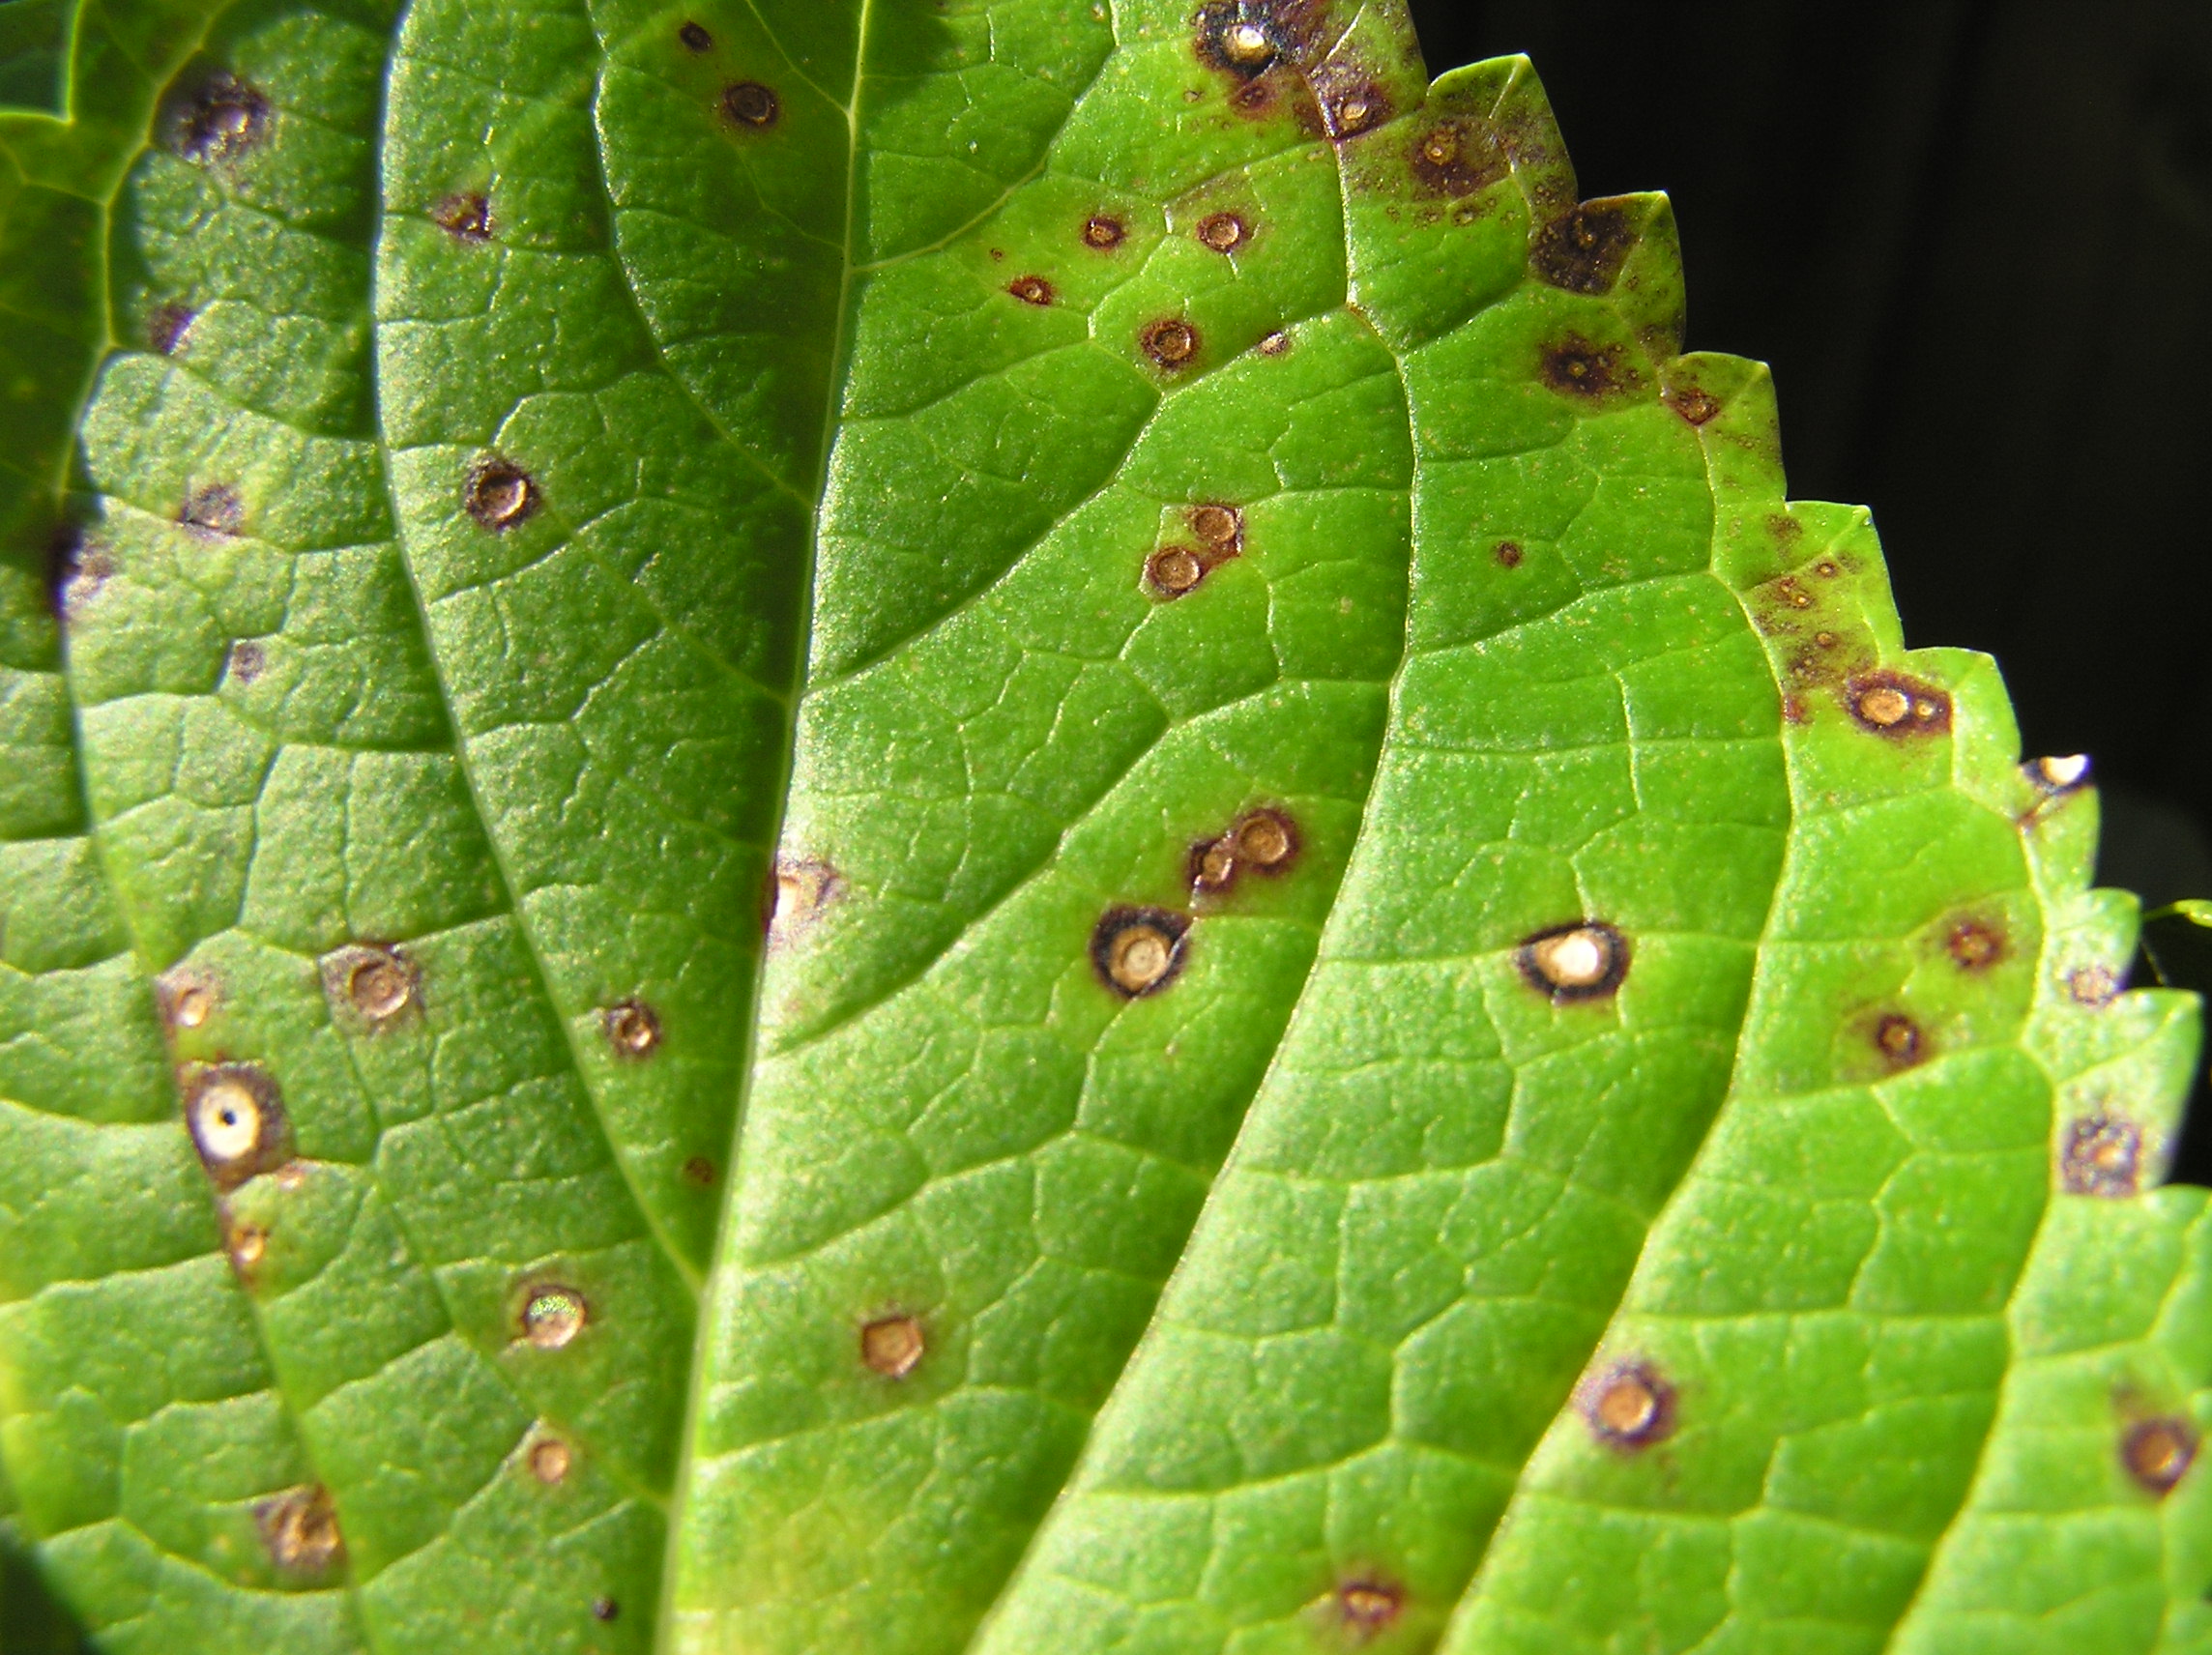
On bigleaf hydrangea, the spots are small, circular and have a purplish halo surrounding them. The centers of these spots eventually turns tan to light gray in color. In contrast, the leaf spots on oakleaf hydrangea appear angular in shape and are dark brown in color. Leaves that are severely affected often become a yellow-green color.
Initial symptoms on crape myrtles are the appearance of dark brown spots that develop first on the lower leaves and progress upward in the canopy from mid-summer through fall. Infected leaves develop a yellowish to orangey-red coloration because of the production of a toxin by the pathogen. These leaves then fall prematurely, particularly in highly susceptible varieties.
Numerous infectious spores are produced in the center of each fungal spot. These spores can be spread by wind, splashing water and can hitch a ride on pruning tools. Frequent late summer rain showers will not only greatly increase the rate of disease spread, but also intensify the level of leaf spotting and defoliation. Extended periods of drought will usually suppress disease development and spread.
Although this disease can be visually alarming, it is generally an aesthetic problem for homeowners because the disease rarely kills the plant. However, if this disease is severe, it can reduce the overall plant vigor by repeated defoliation.
Control strategies
There are some fungicides available to help manage Cercospora leaf spot, but for the homeowner, disease management with fungicides is often not warranted because symptoms usually occur so late in the season. This does not mean, however, that you should ignore the problem. Once this disease is found in a planting, yearly outbreaks are likely to occur.
The fungus easily survives on fallen leaves. Sanitation is perhaps the most important tool in disease management. Be sure to remove and destroy these leaves to help prevent future infections and disease outbreaks.
Another important cultural practice includes surface watering. Because moisture on the leaves allow disease spores to germinate, avoid getting the leaves wet with overhead irrigation. Also be sure to apply enough nitrogen to maintain a moderate growth rate. It is also helpful if your plants are not crowded. Good air circulation permits the leaves to dry quickly after a rain, which helps prevent leaf spot diseases.

This fungal disease creates circular leaf spots. The spot’s center will turn tan or light gray.
However, the use of fungicides may be justified for high-value landscape plantings that develop severe cases of the disease each year. Products containing chlorothalonil, myclobutanil or thiophanate-methyl are recommended. For effective control of Cercospora leaf spot with a fungicide, begin applications when spotting of the leaves is first seen and continue applying that treatment as needed. Be sure to follow label directions!
by | May 10, 2012

Robert C Trawick
Extension Horticulturist II
Jackson County
rob.trawick@ufl.edu
In May we move from the warm days and cool nights of spring and early summer to the hot days and warm nights that will be with us until, at the very least, September.
With the increasing heat, you’ll inevitably notice the decline of your cool-season bedding plants. After months of outstanding bloom, plants such as pansies, dianthus, alyssum, snapdragons and petunias are growing tired and unattractive.
But that’s OK. This change brings the opportunity to redesign and replant flower beds with bedding plants that will thrive during the hot summer season.
Don’t allow plantings of cool-season bedding plants to go too far down the road to oblivion before you decide to pull them out and replace them. Beds of colorful flowers are meant to be noticed and appreciated, and they generally are located in prominent spots in the landscape. A few lingering flowers in an otherwise disheveled bed will not contribute anything positive to your landscape’s appearance.
Once you have decided the time is right to replant, there are a few decisions you should make before you head out to the nursery.
Note the amount of light the bed receives; this is critical in selecting the right bedding plants for the area. The terms full sun (8 hours or more of direct sun), part sun (about 6 hours of direct sun), part shade (about 4 hours of direct sun), shade (about 2 hours of direct sun) and full shade (little or no direct sun) are used to distinguish various light conditions. Even bedding plants for shade generally will not do well in full shade, but fortunately areas of full shade are not terribly common in most landscapes.
Look at the size of the area to be planted, and try to estimate how many plants will need to be purchased. On average, bedding plants are spaced about 8 inches apart. Keep a record of how many plants are used in a bed from one season to the next to make this process simpler. Also, consider desired heights of the plants you will use.
Decide on a color scheme. It’s crazy that gardeners who take the time to choose which colors to combine when they get dressed will grab anything in bloom at the nursery and plant those things together in a flower bed. No one can tell you what colors you should use in your flowerbeds – you know what you like. The point is to think about it and consider which colors you think will look good together. Generally, avoid purchasing bedding plants in cell packs of mixed colors so you have control over which colors you will combine.
Prepare your beds carefully before putting in the summer bedding plants. A common mistake is to remove the faded plants, half-heartedly turn the soil and then plant the new plants. We must give back to the soil if we expect each new planting of bedding plants to do their best.
To prepare the bed, first remove any weeds or other unwanted plants from the bed. Use a herbicide, such as glyphosate, or dig them out by hand. Turn the soil to a depth of at least 8 inches. Spread a 2-inch to 4-inch layer of compost, rotted leaves, aged manure, finely ground pine bark or peat moss over the bed. Then evenly sprinkle a light application of a granular all-purpose fertilizer. Or use your favorite organic fertilizers. Thoroughly blend the organic matter and fertilizer into the bed, rake smooth and you’re ready to plant.
Of course, make sure you plant the transplants into the bed no deeper than they were growing in their original container.
Bedding plants are commonly purchased in cell packs and 4-inch pots, but these days you can even find them offered in gallon containers (for those who have the budget to indulge in instant gratification).
Transplants in cell packs are the most economical and if planted this early in the season, they have plenty of time to grow and produce spectacular results. For larger transplants, choose 4-inch pots, but expect to pay several times more per plant. Sometimes it’s worth it, especially for tender perennials grown as annuals, such as pentas, blue daze and lantana, which generally are offered only in 4-inch or larger pots.
Tender perennials grown as annuals are especially good for the summer flower garden. They have the stamina to last reliably from now until October or November – when you can replace them with cool-season bedding plants.
Warm-season bedding plants, as well as tender perennials that can be used as warm-season bedding plants, for sun to part sun include abelmoschus, ageratum, amaranthus, balsam, blue daze, celosia, cleome, coleus (sun-tolerant types), coreopsis, cosmos, dahlberg daisy, Dusty Miller, gaillardia, gomphrena, lantana, lisianthus, marigold, melampodium, narrow-leaf zinnia, ornamental pepper, periwinkle, pentas, portulaca, purslane, rudbeckia, salvia, scaevola, sunflower, tithonia, torenia, verbena (hardy perennial) and zinnia.
Some of the warm-season bedding plants and tender perennials for part-shade to shade are balsam, begonia, browallia, caladium (perennial tuber), cleome, coleus, impatiens, pentas, salvia and torenia.


