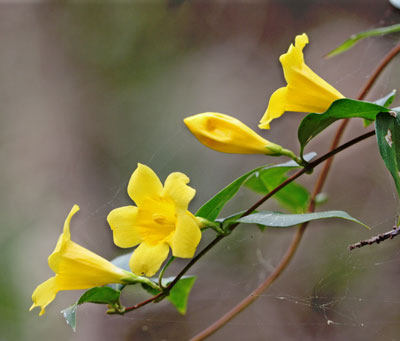
The sweetly scented, golden yellow, trumpet-shaped flowers on the cascading, fine textured foliage of Carolina jessamine (Gelsemium sempervirens) covering fences and trees in open woodlands and along roadsides from late January to early April makes it one of the most beautiful vines throughout the Southeast. Carolina jessamine’s growth rate is moderate, reaching 20 feet or more when maintained as a vine. It can also be grown as a ground cover by cutting yearly in the late spring after flowering.
Carolina Jessamine – Photo credit: Mary Keim (Flickr ID Mary Keim).
This vine is very adaptable and will grow in a variety of conditions. Carolina jessamine tolerates either full sun or partial shade. Flowering is more prolific and foliage growth is denser in full sun. It grows best in rich, well-drained soil. But, it can grow very quickly up into the canopy of young trees. You may want to limit how many vines are allowed to establish around the trees that are being raised for future shade or harvesting.
Yellow jessamine has been used by herbalists to treat eye ailments and as natural, perfumed hair oil. The essential oils of the plant are extracted for use in the perfume industry, since the pleasant odor is difficult to reproduce synthetically.
Insects or diseases rarely trouble Carolina jessamine. All parts of this plant are extremely poisonous, especially to livestock, if eaten; however, the bright yellow spring blossoms are a source of nectar for butterflies and deer often browse on the vegetation for food and fiber. The sap may cause skin irritation in sensitive individuals. People, especially children, can be poisoned by sucking the nectar from the flowers. This should be considered when choosing a location to allow the Carolina jessamine to grow.
Call 811 before you dig. No one wants a weekend project to be the cause of Internet, phone and cable outages. Worse yet, what if someone gets hurt from contact with natural gas or electrical lines? That’s why it is so important to have buried utilities in the yard located and marked before digging. Sunshine 811 coordinates each individual company to clearly mark where the service lines are located. Homeowners are required by law to contact 811 three days before any soil removal is done. The service is free.
Have information prepared before making the request. Describe the work to be performed (e.g. fence install, landscaping, irrigation install), including the type of equipment that will be used. Specify the exact location on the property and how long the work will continue. Finally, provide all the contact information (e.g. name, phone number, e-mail), should there be any additional questions.
Call 811 or request a single address ticket online. Receive a ticket number and wait two full business days, not counting weekends or holidays. Then contact 811 again. Make sure that all the utilities have responded in the Positive Response System (PRS). Sometimes that may mean that the company doesn’t have anything to make in the area.
If there are utility lines running through the yard, they will be marked with specifically colored paints or flags. Red is used for electrical lines, orange indicates communication lines, yellow means gas, blue is used for potable water, purple is reclaimed water, and green indicates sewer lines. White lines may be used to outline digging areas and pink are temporary survey marks. This is the APWA Uniform Color Code.
Every effort is made to locate the lines as accurately as possible. But, the safest thing to do is hand dig to expose the utility line before using any mechanized equipment. Lines can vary up to 24” from the marked line and depths can be less than 5”. Remember there may be access lines running through the property even if that service isn’t utilized at that address.
According to Druid lore, hanging the plant in homes would bring good luck and protection. Holly was considered sacred because it remained green and strong with brightly colored red berries no matter how harsh the winter. Most other plants would wilt and die.
Later, Christians adopted the holly tradition from Druid practices and developed symbolism to reflect Christian beliefs. Today, the red berries are said to represent the blood that Jesus shed on the cross when he was crucified. Additionally, the pointed leaves of the holly symbolize the crown of thorns Jesus wore on his head.
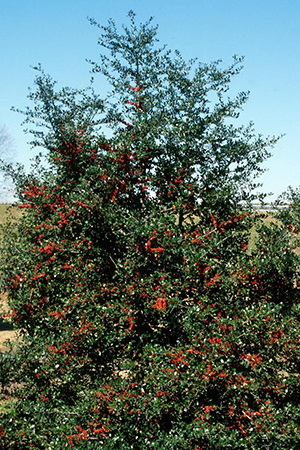
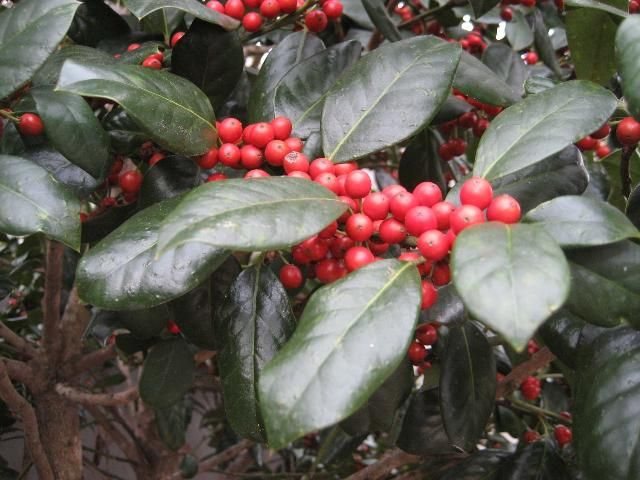
Several hollies are native to Florida. Many more are cultivated varieties commonly used as landscape plants. Hollies (Ilex spp.) are generally low maintenance plants that come in a diversity of sizes, forms and textures, ranging from large trees to dwarf shrubs.
The berries provide a valuable winter food source for migratory birds. However, the berries only form on female plants. Hollies are dioecious plants, meaning male and female flowers are located on separate plants. Both male and female hollies produce small white blooms in the spring. Bees are the primary pollinators, carrying pollen from the male hollies 1.5 to 2 miles, so it is not necessary to have a male plant in the same landscape.
A holly tree with berries – Sheila Dunning
Several male hollies are grown for their compact formal shape and interesting new foliage color. Dwarf Yaupon Hollies (Ilex vomitoria ‘Shillings’ and ‘Bordeaux’) form symmetrical spheres without extensive pruning. ‘Bordeaux’ Yaupon has maroon-colored new growth. Neither cultivar has berries.
Hollies prefer to grow in partial shade but will do well in full sun if provided adequate irrigation. Most species prefer well-drained, slightly acidic soils. However, Dahoon holly (Ilex cassine) and Gallberry (Ilex glabra) naturally occurs in wetland areas and can be planted on wetter sites.
Evergreen trees retain leaves throughout the year and provide wind protection. The choice of one type of holly or another will largely depend on prevailing environmental conditions and windbreak purposes. If, for example, winds associated with storms or natural climatic variability occur in winter, then a larger leaved plant might be required. Several cultivars have been created by cross pollination with native species or propagation from sports of natives. Check out ‘East Palatka’, ‘Savannah’, ‘Nellie Stevens’, ‘Robin’, and ‘Screen Play’.
‘Roundleaf’ Yaupon Holly – Sheila Dunning
The natives are likely to be better adapted to local climate, soil, pest and disease conditions and over a broader range of conditions. Nevertheless, cultivars may be desirable for many attributes such as height, growth rate and texture but should not reproduce and spread beyond the area planted. When introducing a new plant to the landscape it is always important to consider any negative impacts.
There is increasing awareness of invasiveness, i.e., the potential for an introduced species to establish itself or become “established” in an ecological community and even become a dominant plant that replaces native species. Tree and shrub species can become invasive if they aggressively proliferate beyond the windbreak. At first glance, Brazilian pepper (Schinus terebinthifolius), a fast-growing, non-native shrub that has a dense crown, might be considered an appropriate red berry producing species. However, it readily spreads by seed disbursed by birds and has invaded many natural ecosystems. Therefore, the Florida Department of Environmental Protection has declared it illegal to plant this tree in Florida without a special permit. Consult the Florida Invasive Species Council (FISP) https://www.floridainvasives.org/ for a list of prohibited species in Florida.
For a more comprehensive (though not total) list of holly varieties and their individual growth habits refer to ENH42 Hollies at a Glance: http://edis.ifas.ufl.edu/mg021
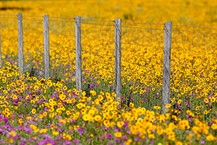
A Florida native wildflower is a flowering herbaceous species that had grown wild in the state’s natural ecosystems in the 1560s when Florida’s first botanical records were created. Planting native wildflowers in Florida benefits natural resources, native pollinators, and other beneficial insects. By planting wildflowers, one is providing shelter for pollinators and increasing wild be & natural enemies of insect pests population. When protecting, enhancing, or restoring habitat to benefit pollinators, choose a mix of native plant species that will bloom throughout the year and provide a continuous source of pollen and nectar for many pollinator species. Site planting and preparation are crucial to establishing new pollinator habitats. The site should be manageable, benefit wildlife, and support the overall management practices of the property.
Wildflowers.
Photo: UF IFAS
Wildflower selection
Diversify your selection of seeds. Flowering species native to Florida and suited to specific site conditions are the best choice for attracting and supporting diverse pollinator populations. Try to use seeds that are not native and are produced in Florida. Florida-produced seeds will be better adapted to Florida’s growing conditions. Planting a mixed species that bloom at different times will benefit pollinators throughout the year. Different flower sizes, shapes, colors, and plant heights will attract more pollinators and other insects.
Site Planning & Preparation
Wildflower plots that are planted in full sun provide the most pollen and nectar and are more attractive to pollinators. Bees can start working on flowers early in the day. However, flowers wet with dew may be ignored until they are dry. Plant along field edges on farms, cleared from pesticide drift and areas that will not disturb farming practices. Wildflowers should be planted in areas where the ground is not disturbed regularly. Most bee species do not live in communal colonies or collaborate in rearing offspring; 70% of these solitary bees nest in the ground. Plant in multiple locations that have well-drained. An available water source for irrigation benefits the planting, mainly during seed germination and early seedling establishment. Once plants have been established, additional watering is usually only necessary in drought.
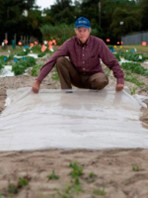
Proper site preparation is needed to minimize weeds throughout plot establishment and growth. At least an entire season of weed eradication before planting is necessary. At least two months before planting, mow the area and remove any thatch. Allow new weed growth to begin, and then treat the site with a non-persistent, post-emergent herbicide. Repeat the herbicide treatment at least twice, two weeks between applications, allowing for more weed growth between treatments. This process can start as soon as weeds grow in early spring. Some herbicides have a residual activity that can kill or prevent the germination of wildflower species typically included in pollinator planting. Herbicide labels list species that are tolerant depending on the rate applied. It is crucial always to follow label instructions. As organic weed management, sites can be prepared using solarization. This technique uses greenhouse plastic to raise high soil temperatures to kill weedy plants and seeds in the top four to six inches of soil. Solarization can be done using large sheets of plastic to control weeds. After either solarization or chemical treatment and mowing, the aim is to have at least 90% of the soil free of plant material to ensure proper seed-to-soil contact during planting.
Photo; Tyler Jones, UF IFAS
Seed the plot
Depending on the region, plots should be planted between September and January in Florida after an entire season of site preparation. No-till planting is recommended. Years of weed seeds are stored within the soil, waiting to be exposed to sunlight and begin germinating. Tilling an area will disturb the seed bank and promote weed growth rather than wildflower growth. When the plot is ready, mix seeds based on size and weight. Annual and perennial seeds can be mixed and planted together. Alternatively, annuals and perennials can be planted in separate blocks to allow each type to be managed individually. Multiple techniques and equipment are used to spread seeds along the soil surface. Using tractor-pulled equipment is the most efficient option for larger plots but is less successful in evenly spreading lightweight seeds. Be cautious of using a too-heavy roller in very sandy soil. Excessive weight will force the seeds too far under the sand, where they will not germinate. A no-till seed drill is an alternative to spreading seed on the plot surface. Equipment costs of renting or purchasing a seed drill can be expensive for small wildflower plots; however, seed drills can be very efficient for larger wildflower establishments.
Crop Management
Undesirable weeds may establish quickly within the wildflower plot in the first year, especially if the site is not thoroughly prepared. Monitor the plants and try to control weeds sooner rather than later. Fertilization generally is not necessary. If competing weedy grasses start establishing in the plot, use a grass-specific herbicide to achieve control as quickly as possible, preferably while the grass weeds are small. However, if you have included native grasses in your planting, consider using a mechanical control method. The herbicide used will depend on the species you are trying to control. Spray using a coarse/large droplet size to avoid overspray onto desired species. Whenever possible, spray at night to prevent times when pollinating species will be present on the flowers. Always follow the product label when applying herbicides of any type. Hand-pull small patches of competing weeds. Cut or use a weed trimmer on larger patches of weeds. Mowing your planting can reduce weed competition. In perennial-only plots, mow throughout the first year to inhibit the growth of annual weeds. Mow plots were planted with annual and perennial wildflowers in the late fall of the first year after planting. Mow at a low enough level to hit and distribute the seed heads but high enough to avoid disturbing the bases of overwintering perennial plants. The actual timing of this mowing will depend on region, soil type, and weather.
The colder part of the year is the best time to install hardy trees and shrubs. All their energy is in the root zone. They will establish much faster than if you wait until they are actively growing leaves.
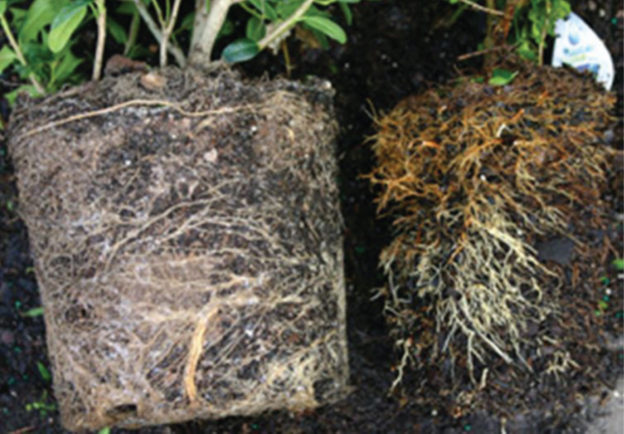
The shaved rootball (right) is smaller than the rootball before shaving (left).
Photo: Shelia Dunning
However, planting them correctly is critical to their survival. The top three mistakes that people make are: (1) installing too deeply, (2) leaving the rootball undisturbed, and (3) not applying enough water all the way through establishment of the root system. Unfortunately, it may be years before the mistakes are noticed.
Here are the ten steps for successful planting:
1. Call 811 and have all underground utilities marked before digging the hole.
Hitting a line can be costly and life threatening.
2. Loosen all surrounding compacted soil within the potential root zone of the tree.
Tree roots are close to the surface and need to be able to push through the soil.
3. If the soil is extremely dry and sandy, amend with the entire area with organic material.
This is only needed in coastal regions.
4. Remove the container from the tree and find the top-most root.
All media covering the root flare must be removed.
5. Prepare the rootball by removing encircling roots and shaving the edges of the rootball.
The rootball should no longer be shaped like the container when complete.
6. Dig the hole slightly less shallow than the rootball.
Make sure the bottom of the hole is firm soil, so sinking will not occur.
7. Place the rootball in the ground with the main root showing just above the soil grade.
Oxygen must reach the roots for new roots to develop.
8. Back fill around the rootball with the surrounding loose soil.
Take care to not cover the root flare.
9. Mulch around the outside of the rootball without covering the rootball.
Apply at least 2-3 inches of organic mulch. No more than 4″.
10. Water immediately to settle soil and then on a regular schedule until established.
Minimum of 1 gal per 3 gal plant, every 2-4 days, for 20-28 weeks. Larger plants will require more water at each event.
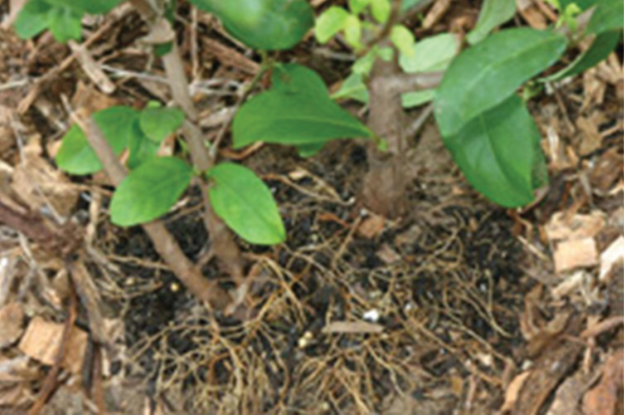
Mulch should be spread about 3 inches thick around the rootball. No mulch should be spread over the rootball.
Photo: Shelia Dunning
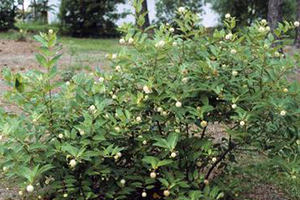
Beginning in 2007 the US Senate, in support of the North American Pollinator Protection Campaign, declared the last week of June as “National Pollinator Week.” As humans, we depend on pollen-moving animals for one out of every three bites of food. Without birds, bees, bats, beetles, butterflies, and various other animals, many flowers would fail to reproduce. In Florida there are numerous native plants that serve as hosts for these pollinators.
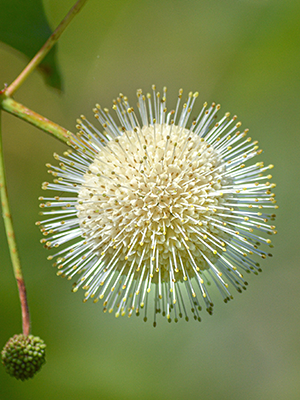
One of the favorites, due to its heavy flowering over the summer, is Buttonbush (Cephalanthusoccidentalis).It is a semi-aquatic woody shrub to small tree that develops white golf-ball-sized clusters of fragrant flowers, attracting various pollinating animals. Bees of various species, several different wasps, assorted moths and butterflies, flies and even hummingbirds scramble for the flowers’ sweet treat within each of the trumpet shaped flowers. The pincushion-like flower balls stand on two inch stalks in clusters arising from stem tips and leaf axils. They are produced over a long period in late spring and summer. The flowers give way to little reddish-brown nutlets which persist on the through the winter. Buttonbush seeds are important wildlife food, especially for ducks; and the dense, impenetrable tickets provide nesting and escape cover for many wetland birds and herptiles. Buttonbush is a fast-growing wetland plant that can be grown in a naturalized landscape if given supplemental water during dry spells. It is at its best, through, in an area where the soil is frequently wet and can tolerate soggy soils. Buttonbush is not drought or salt tolerant. The deciduous shrub grows well in full sun to partial shade on soils that are acidic to slightly alkaline. The leaves of Buttonbush turn yellow in the fall before dropping off. While short-lived, requiring rejuvenation pruning to improve its longevity, Buttonbush (Cephalanthus occidentalis) serves a critical role to wildlife in the wetland habitat. Deer browse the foliage and twigs. Ducks, especially the mallard, eat the seeds. And, the summer flowers attract bees, butterflies and moths; our wonderful pollinators.