by Daniel J. Leonard | Apr 8, 2021
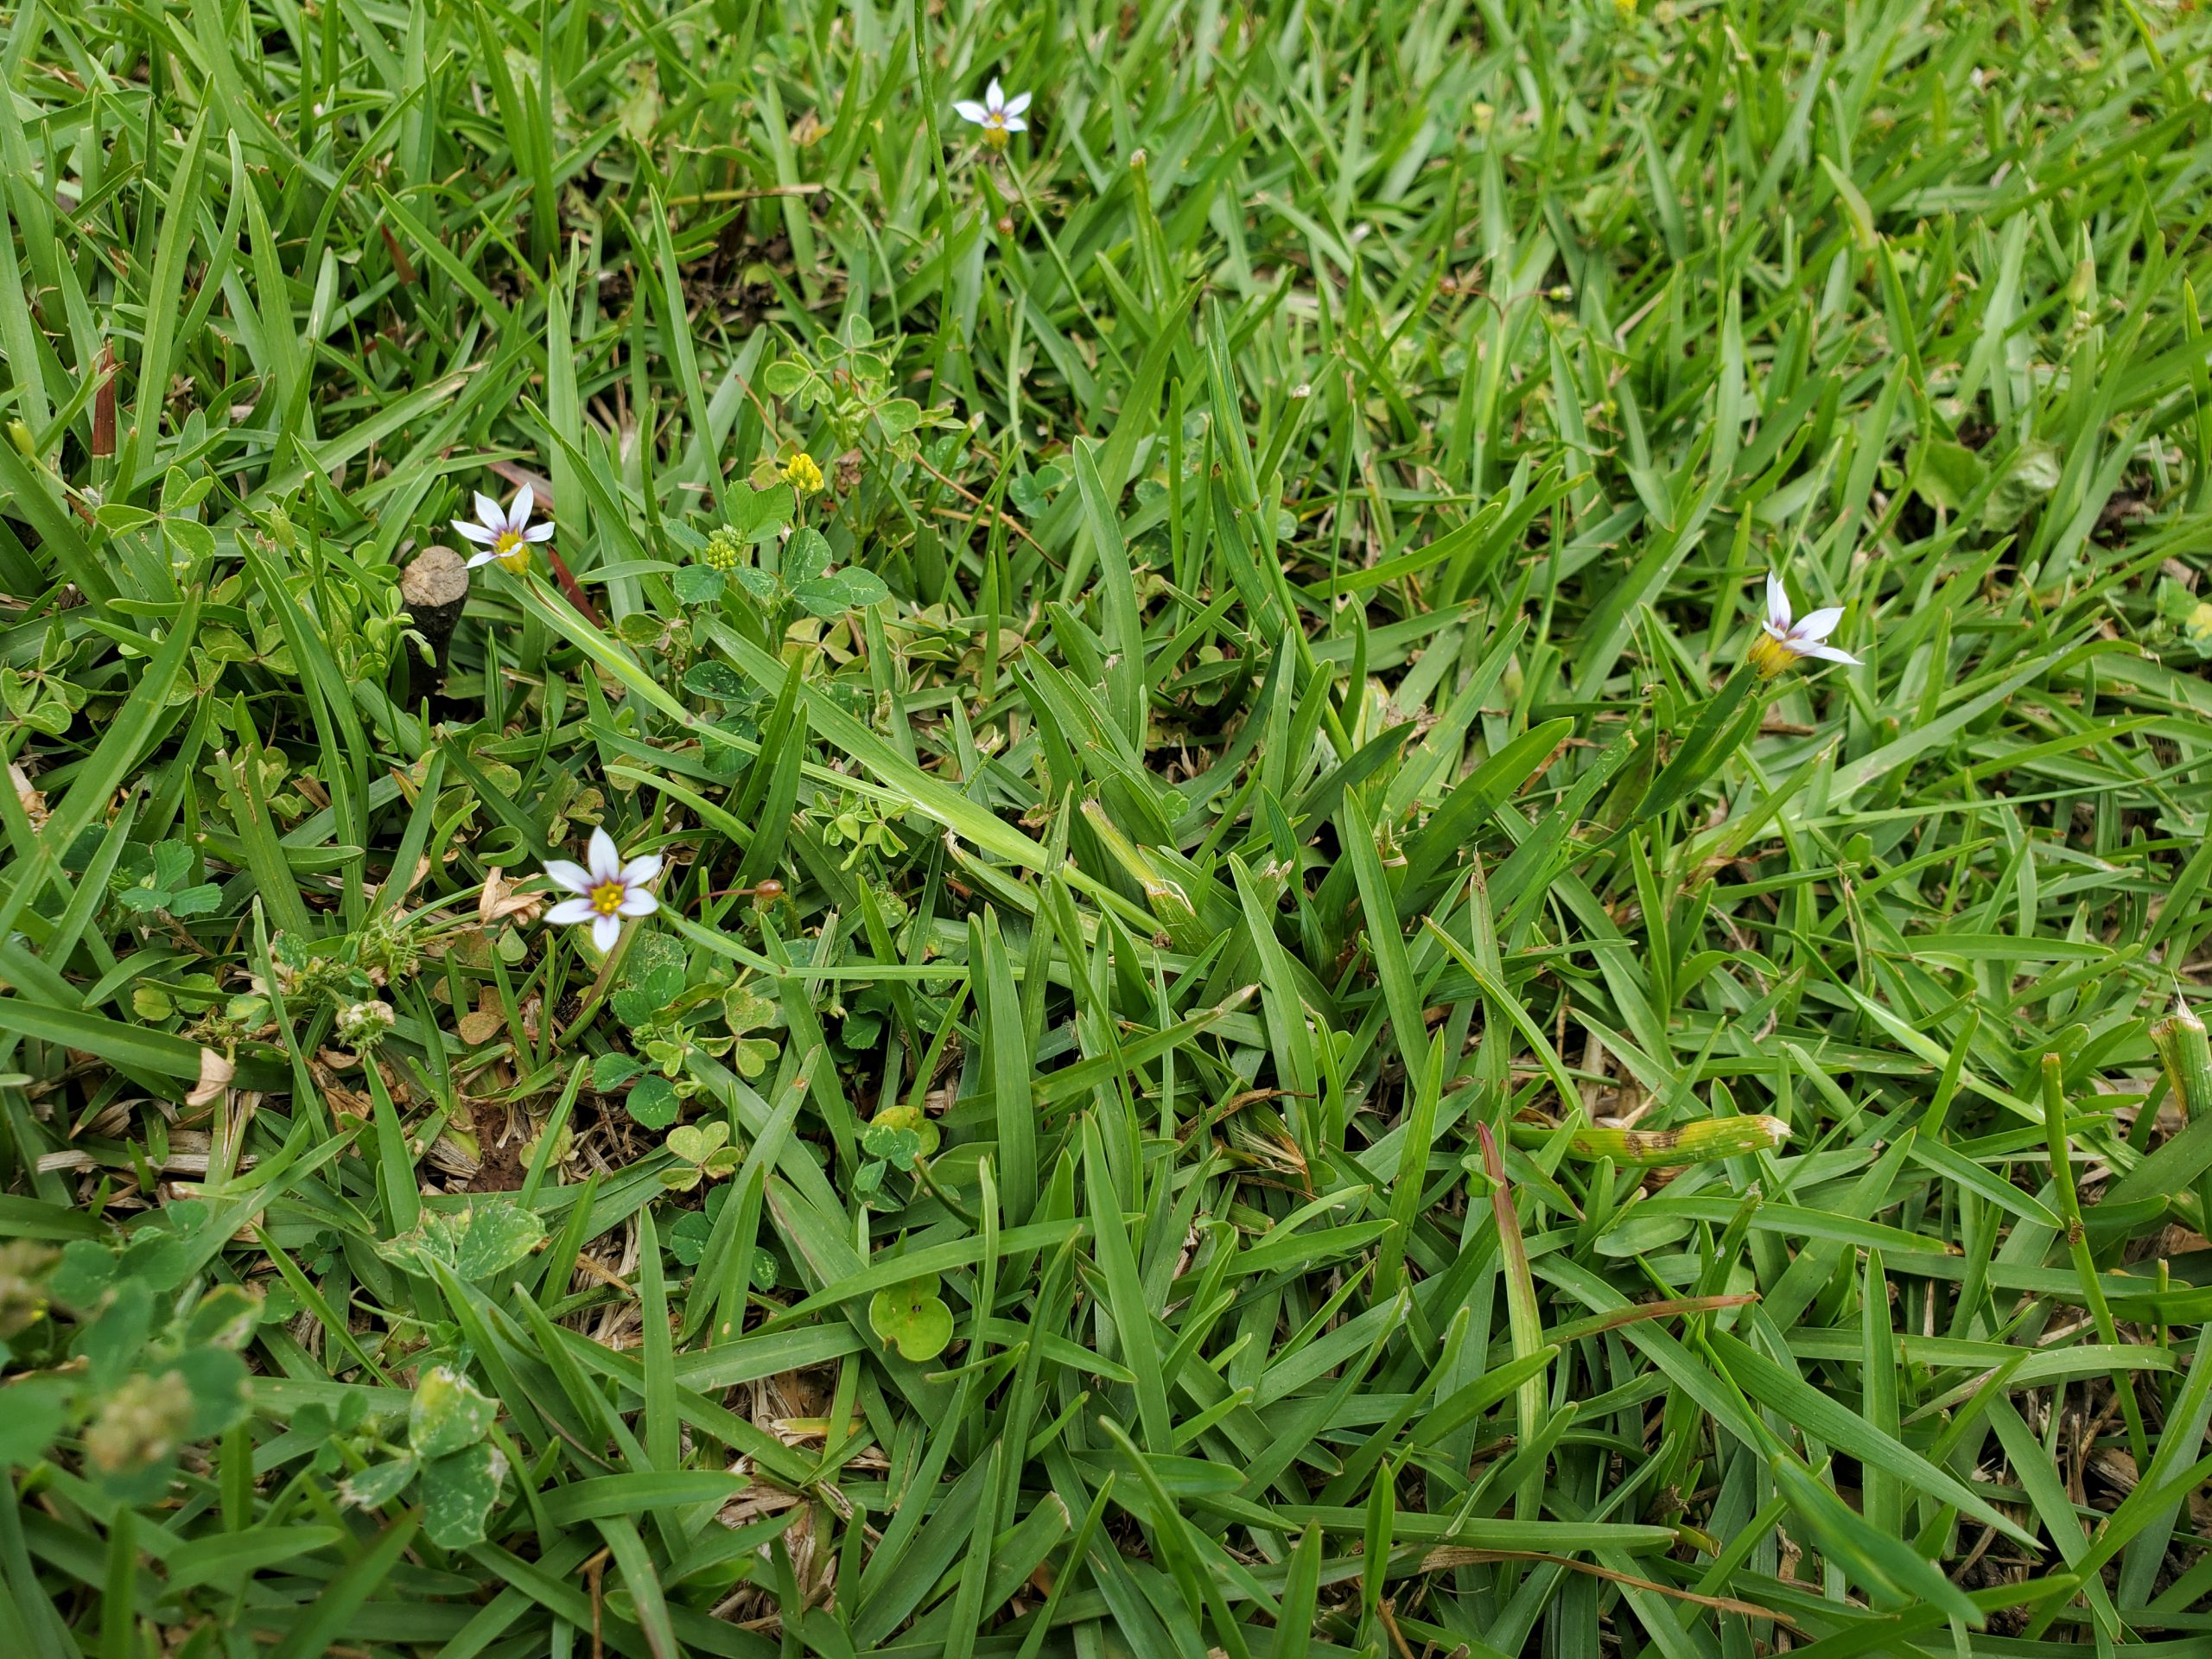
The line separating what is a weed and what isn’t often comes down to where the “weed” is growing and who is managing the area it’s growing in. Blue Eyed Grass (Sisyrinchium rosulatum), one of the most complained about lawn weeds this winter/spring falls squarely in that category! Native plant enthusiasts and homeowners looking to add native wildflowers to their landscape value the plant for its low maintenance, star-shaped blue blossoms in spring. Professional and home turfgrass managers, however, loathe the plant as it masquerades as grass to the untrained eye, looks messy in the cool months, and can displace turf during spring green up. While Blue Eyed Grass can be a pretty landscape plant, our focus today is on learning why it is such an annoying weed in turfgrass areas and exploring control options if it becomes a problem!

Blue Eyed Grass (Sisyrinchium rosulatum) in a Centipedegrass lawn in late March. Photo courtesy of Daniel Leonard.
For starters, Blue Eyed Grass (BEG) is not even a grass, though it does look an awful lot like one! It is actually a member of the Iris family and is more closely related to spring beauties like Gladiolus, Iris, and Crocus than any turfgrasses. The flowers, appearing late March through April, are a dead giveaway that we aren’t dealing with a grass, as are the flat leaves arranged in bunched fan-shaped rosettes. BEG is considered a winter annual plant in Florida, meaning it sprouts from seed in the fall, grows through the winter, then flowers and sets seed in the spring. Because it grows while lawn grass is dormant, it is very noticeable during its entire lifespan. Though BEG can tolerate a range of soil types, it prefers to grow in moist areas, making it right at home in Panhandle lawns and landscapes in the winter as we experience regular to excessive rainfall throughout our cool season.
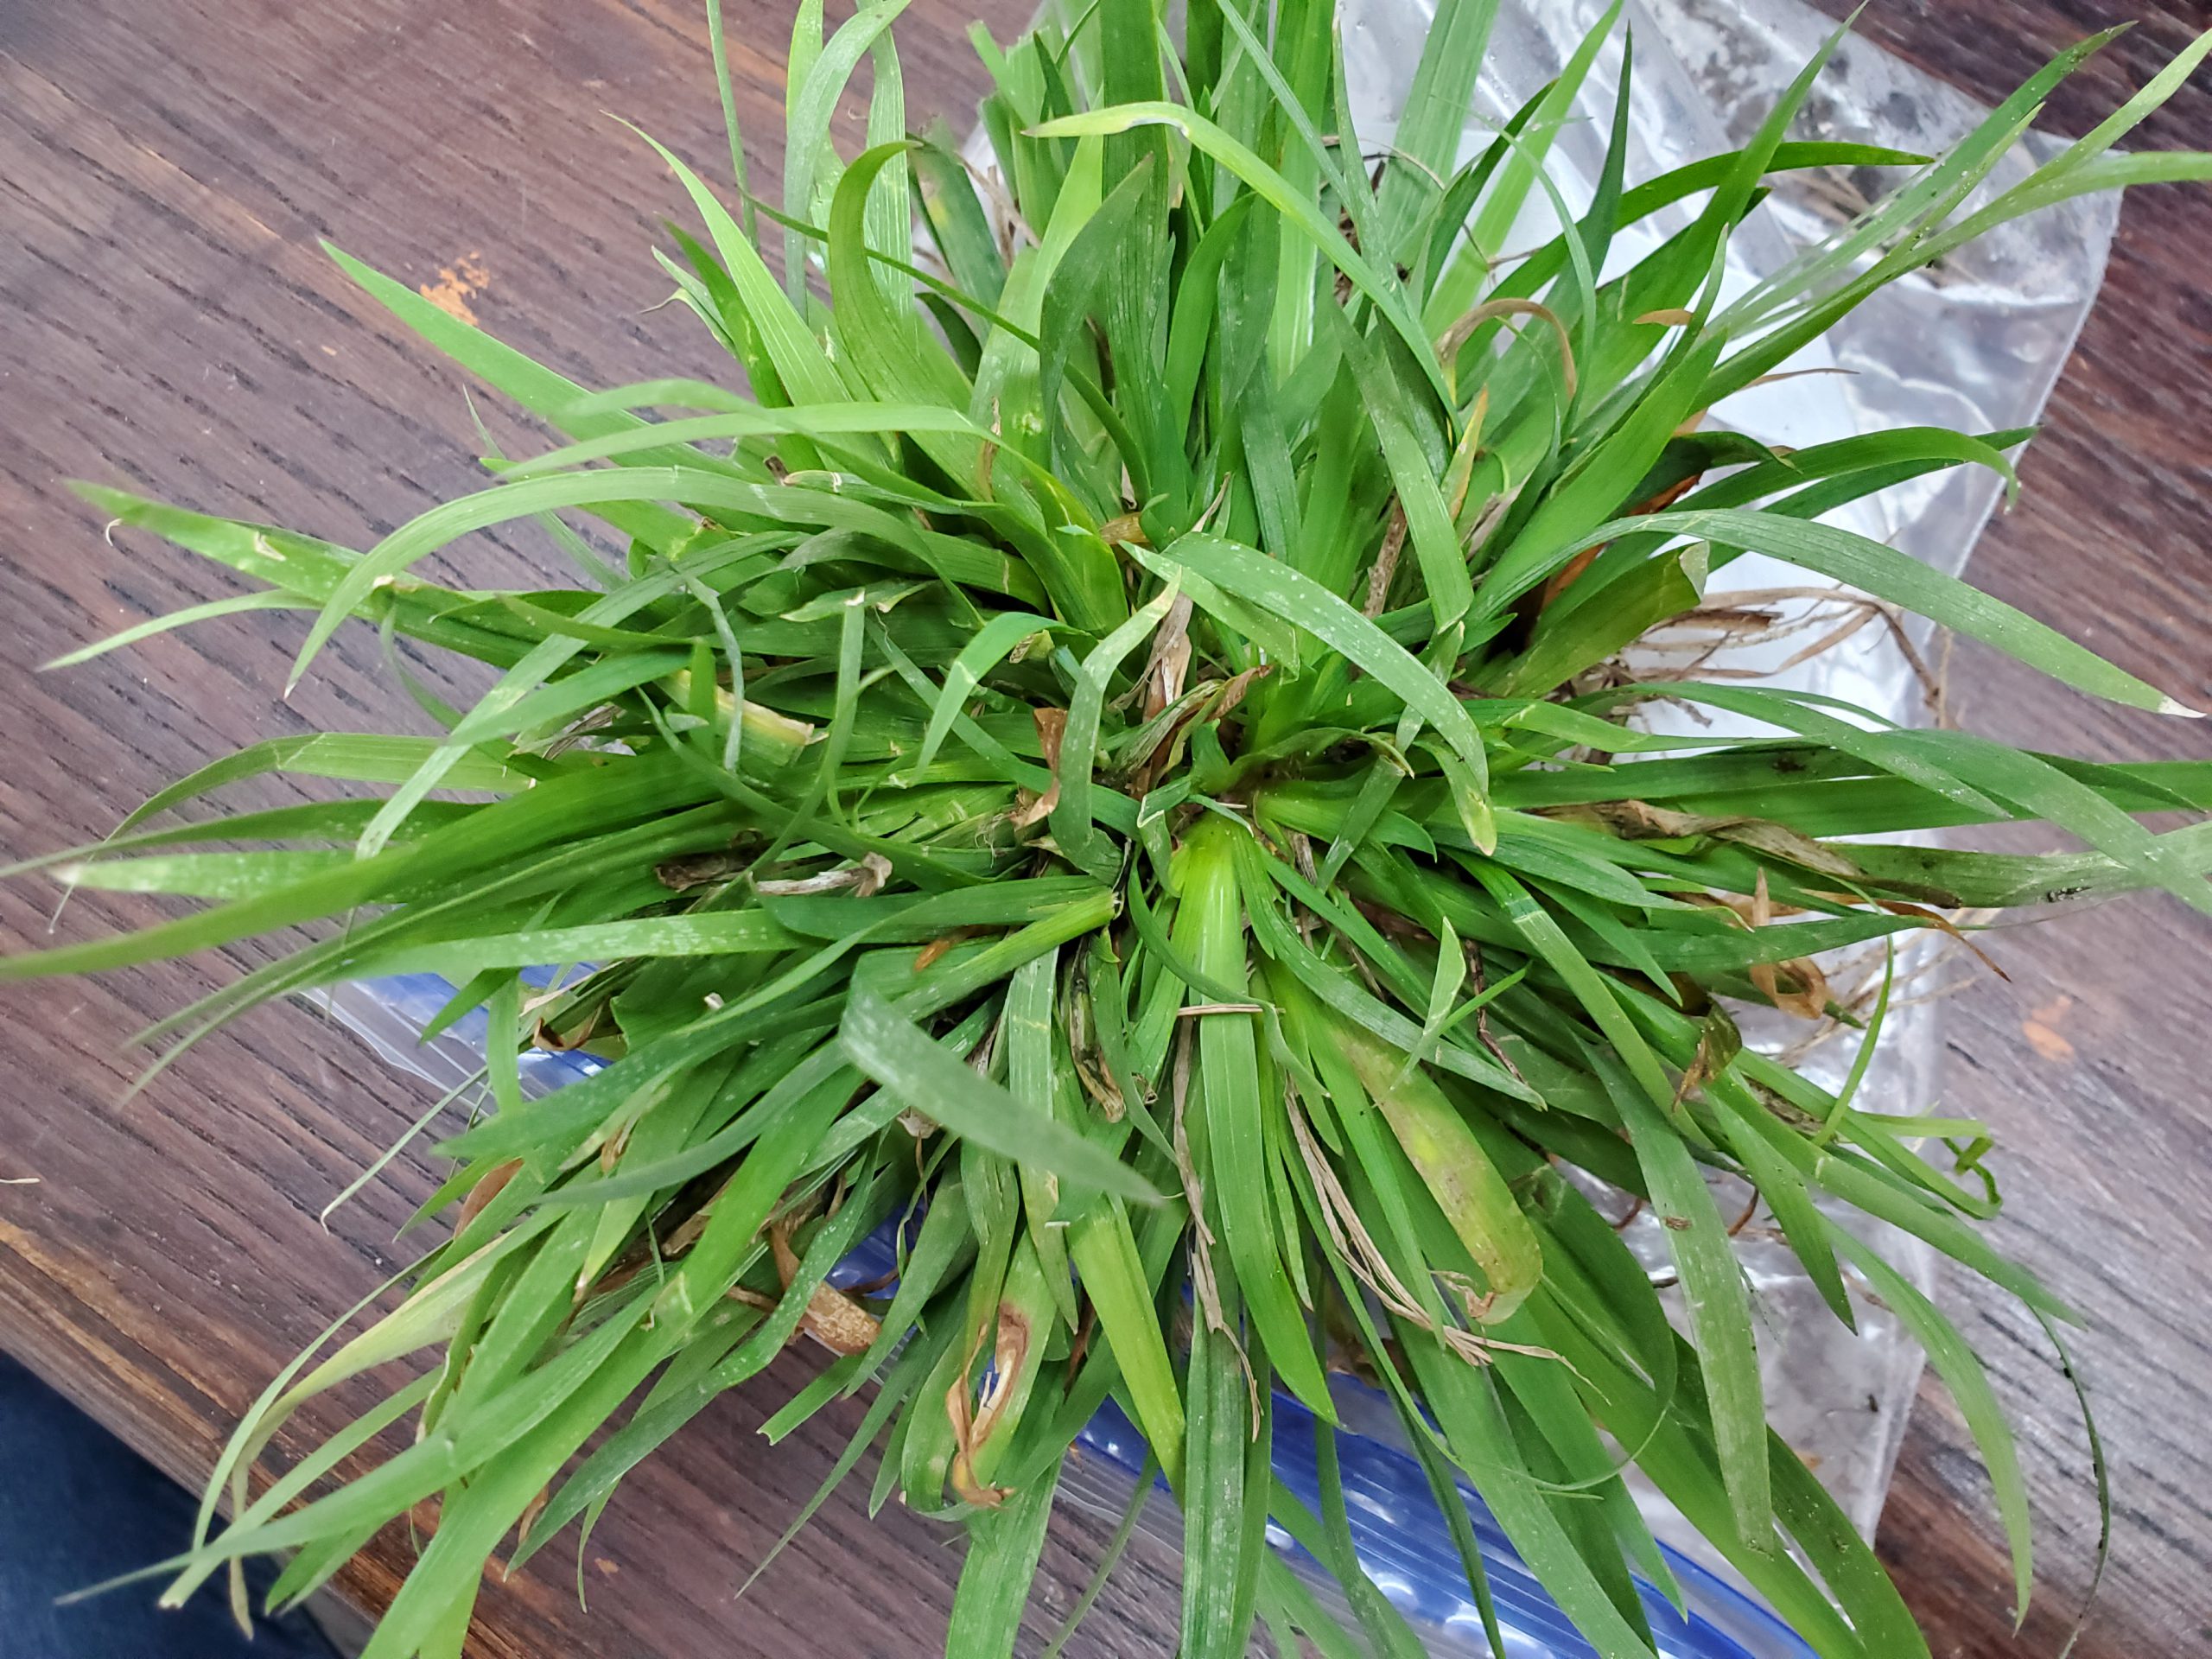
All the above characteristics make BEG an annoying weed in lawns. It hides in turfgrass very well until the turf goes dormant in the dead of winter, leading most homeowners to ignore it until it becomes a problem in the spring. At this point, BEG is nearing maturity and is more difficult to control without damaging the turfgrass. BEG also thrives in our climate and can outcompete poorly managed turfgrass, especially if the lawn exhibits the soggy, compacted conditions that heavy lawn foot traffic and winter/spring rainfall cause. So, what is a homeowner to do?
The first step in controlling BEG is maintaining a healthy turf. Ensure you’re treating your turf well during the growing season by fertilizing appropriately, mowing frequently at the correct height, and irrigating properly. Sending turf into the dormant season stressed by poor growing season management is an invitation to winter weeds. Other cultural practices that can help mitigate troublesome winter weeds like BEG are periodic mowing during the cool season to prevent weeds from going to seed and being diligent about not frequently driving on, parking cars on, or otherwise excessively compacting the soil, a common cause of unhealthy turfgrass.

Blue Eyed Grass clump brought into the Calhoun County Extension office for identification and control recommendations in February 2021. Photo courtesy of Daniel Leonard.
After implementing the above cultural practices in your lawn management regime, you may also need chemical herbicides to achieve a clean cool season lawn. There are two basic options for BEG control. First, a fall (mid-late October) application of a pre-emergent herbicide like dithiopyr, prodiamine, or pendimethalin can be very effective at preventing winter weeds from occurring at all. If you happen to miss this fall pre-emergent application, a timely post-emergent application of 2,4-D or other general broadleaf herbicides works nicely as well. (BEG and other cool season weeds are best controlled with post-emergent herbicides in December and January before they mature and begin to set seed. Plan applications accordingly!)
While Blue Eyed Grass can be an attractive addition to the landscape, it is never welcome in turfgrass! To prevent this and weeds from becoming a problem, use smart cultural practices to maintain a healthy turf and make timely herbicide applications when needed. For more information on controlling Blue Eyed Grass and other winter weeds, contact your local UF/IFAS Extension office!

by Daniel J. Leonard | Feb 25, 2021
Carrots are synonymous with a few things: Bugs Bunny, old wives’ tales about improving eyesight, and the color orange. For centuries, orange colored carrot varieties have been the industry standard and still dominate store shelves. These days though, choices for consumers are ever expanding and thankfully home garden carrot variety selection has participated in this phenomenon! With a little searching, gardeners can now source and plant any color and/or type of carrot they desire. For instance, this winter, I planted carrots of various types in various shades of orange, purple, and red. Through this experience, I also found that not all colored carrots look, cook, or perform the same. The following is a quick primer on carrot types followed by my review of the four varieties ‘Bolero’, ‘Red Sun’, ‘Deep Purple’, and ‘Malbec’ after a season of growing.
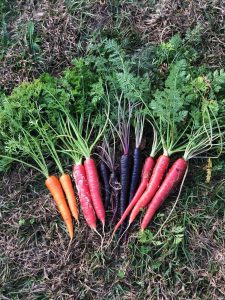
Carrot varieties (left to right): ‘Bolero’, ‘Red Sun’, ‘Deep Purple’, ‘Malbec’.
There are three main types of carrots regardless of color: Imperator, Nantes, and Chantenay. Imperator types are the extra-long, durable, sweet tasting carrots most often found in stores and are suited best to deep, loose soils. Nantes type carrots are medium length and cylindrically shaped, often with a blunt tip. Sometimes called “storage” carrots, Nantes types are easy to grow and tend to store well for long periods of time after harvest and retain their flavor well. Finally, Chantenay type carrots are excellent performers in shallower beds or soils as they are a bit shorter, possessing a conical shape with roots wider at the top and tapering to the tip, making a deep soil bed a bit less critical. I primarily grow Imperator and Nantes types as I find they give you a little more bang for the buck if you have a deeper (>6”) raised bed. Now, on to the variety reviews.
‘Bolero’ – I always have this carrot in my garden. An extremely versatile Nantes type carrot that has been a consistently high yielder for me whether I grow it in pots or in a traditional raised bed. Typical for a Nantes type, ‘Bolero’ stores very well in the refrigerator and will change your culinary life if you’ve only ever eaten carrots purchased from a store. They are excellent either fresh or cooked, with a complex, sweet taste. If I could only grow one carrot, it would be this one.
‘Malbec’ – Colored carrots have a poor reputation as far as flavor is concerned. ‘Malbec’ is the first non-orange carrot that changed my mind. This Imperator type is as flavorful as they come, deep red throughout, and is easy to grow. For some reason, ‘Malbec’ has been hard to come by the last two years, but if you spot seeds in a catalogue, online, or on a store shelf, it is well worth a purchase!
‘Red Sun’ – Winter 2020 was my first experience with ‘Red Sun’, a brand-new Nantes type carrot from Bejo Seeds. I only planted this variety because I initially could not source ‘Malbec’. Having said that, I was very pleased with ‘Red Sun’. The carrots were extremely vigorous, had excellent top and root growth and mostly held their own with ‘Malbec’ flavor-wise in the kitchen also. I would purchase ‘Red Sun’ again!
‘Deep Purple’ – Wow, they weren’t kidding when they named this variety! Most purple carrots are colored on the exterior but fade to a “normal” orange at their core. Not ‘Deep Purple’! This Imperator type is strikingly dark purple, almost black. Even the tops have a purple hue to them! Cooking them was also an interesting experience. Most colored veggies, peppers, carrots, and others lose their hue when cooked. Not this variety. Not only did ‘Deep Purple’ retain its color after cooking, my hands and cutting board turned a shade of indigo when preparing and, once put in a pan to sautee with other veggies, the juice from ‘Deep Purple’ dyed all the other veggies a deep violet! While I wouldn’t grow ‘Deep Purple’ as my main crop carrot, it definitely has a place in the garden as a tasty novelty.
Carrots are among the easiest to grow, most rewarding vegetables in the winter garden. Next fall, plant a variety of carrots in your home garden and enjoy the many types, colors and flavors that this tasty veggie has to offer! For more information on the above mentioned varieties, home carrot gardening in general, or any other horticultural topic, contact your local UF/IFAS County Extension office. Happy Gardening!
by Daniel J. Leonard | Feb 2, 2021
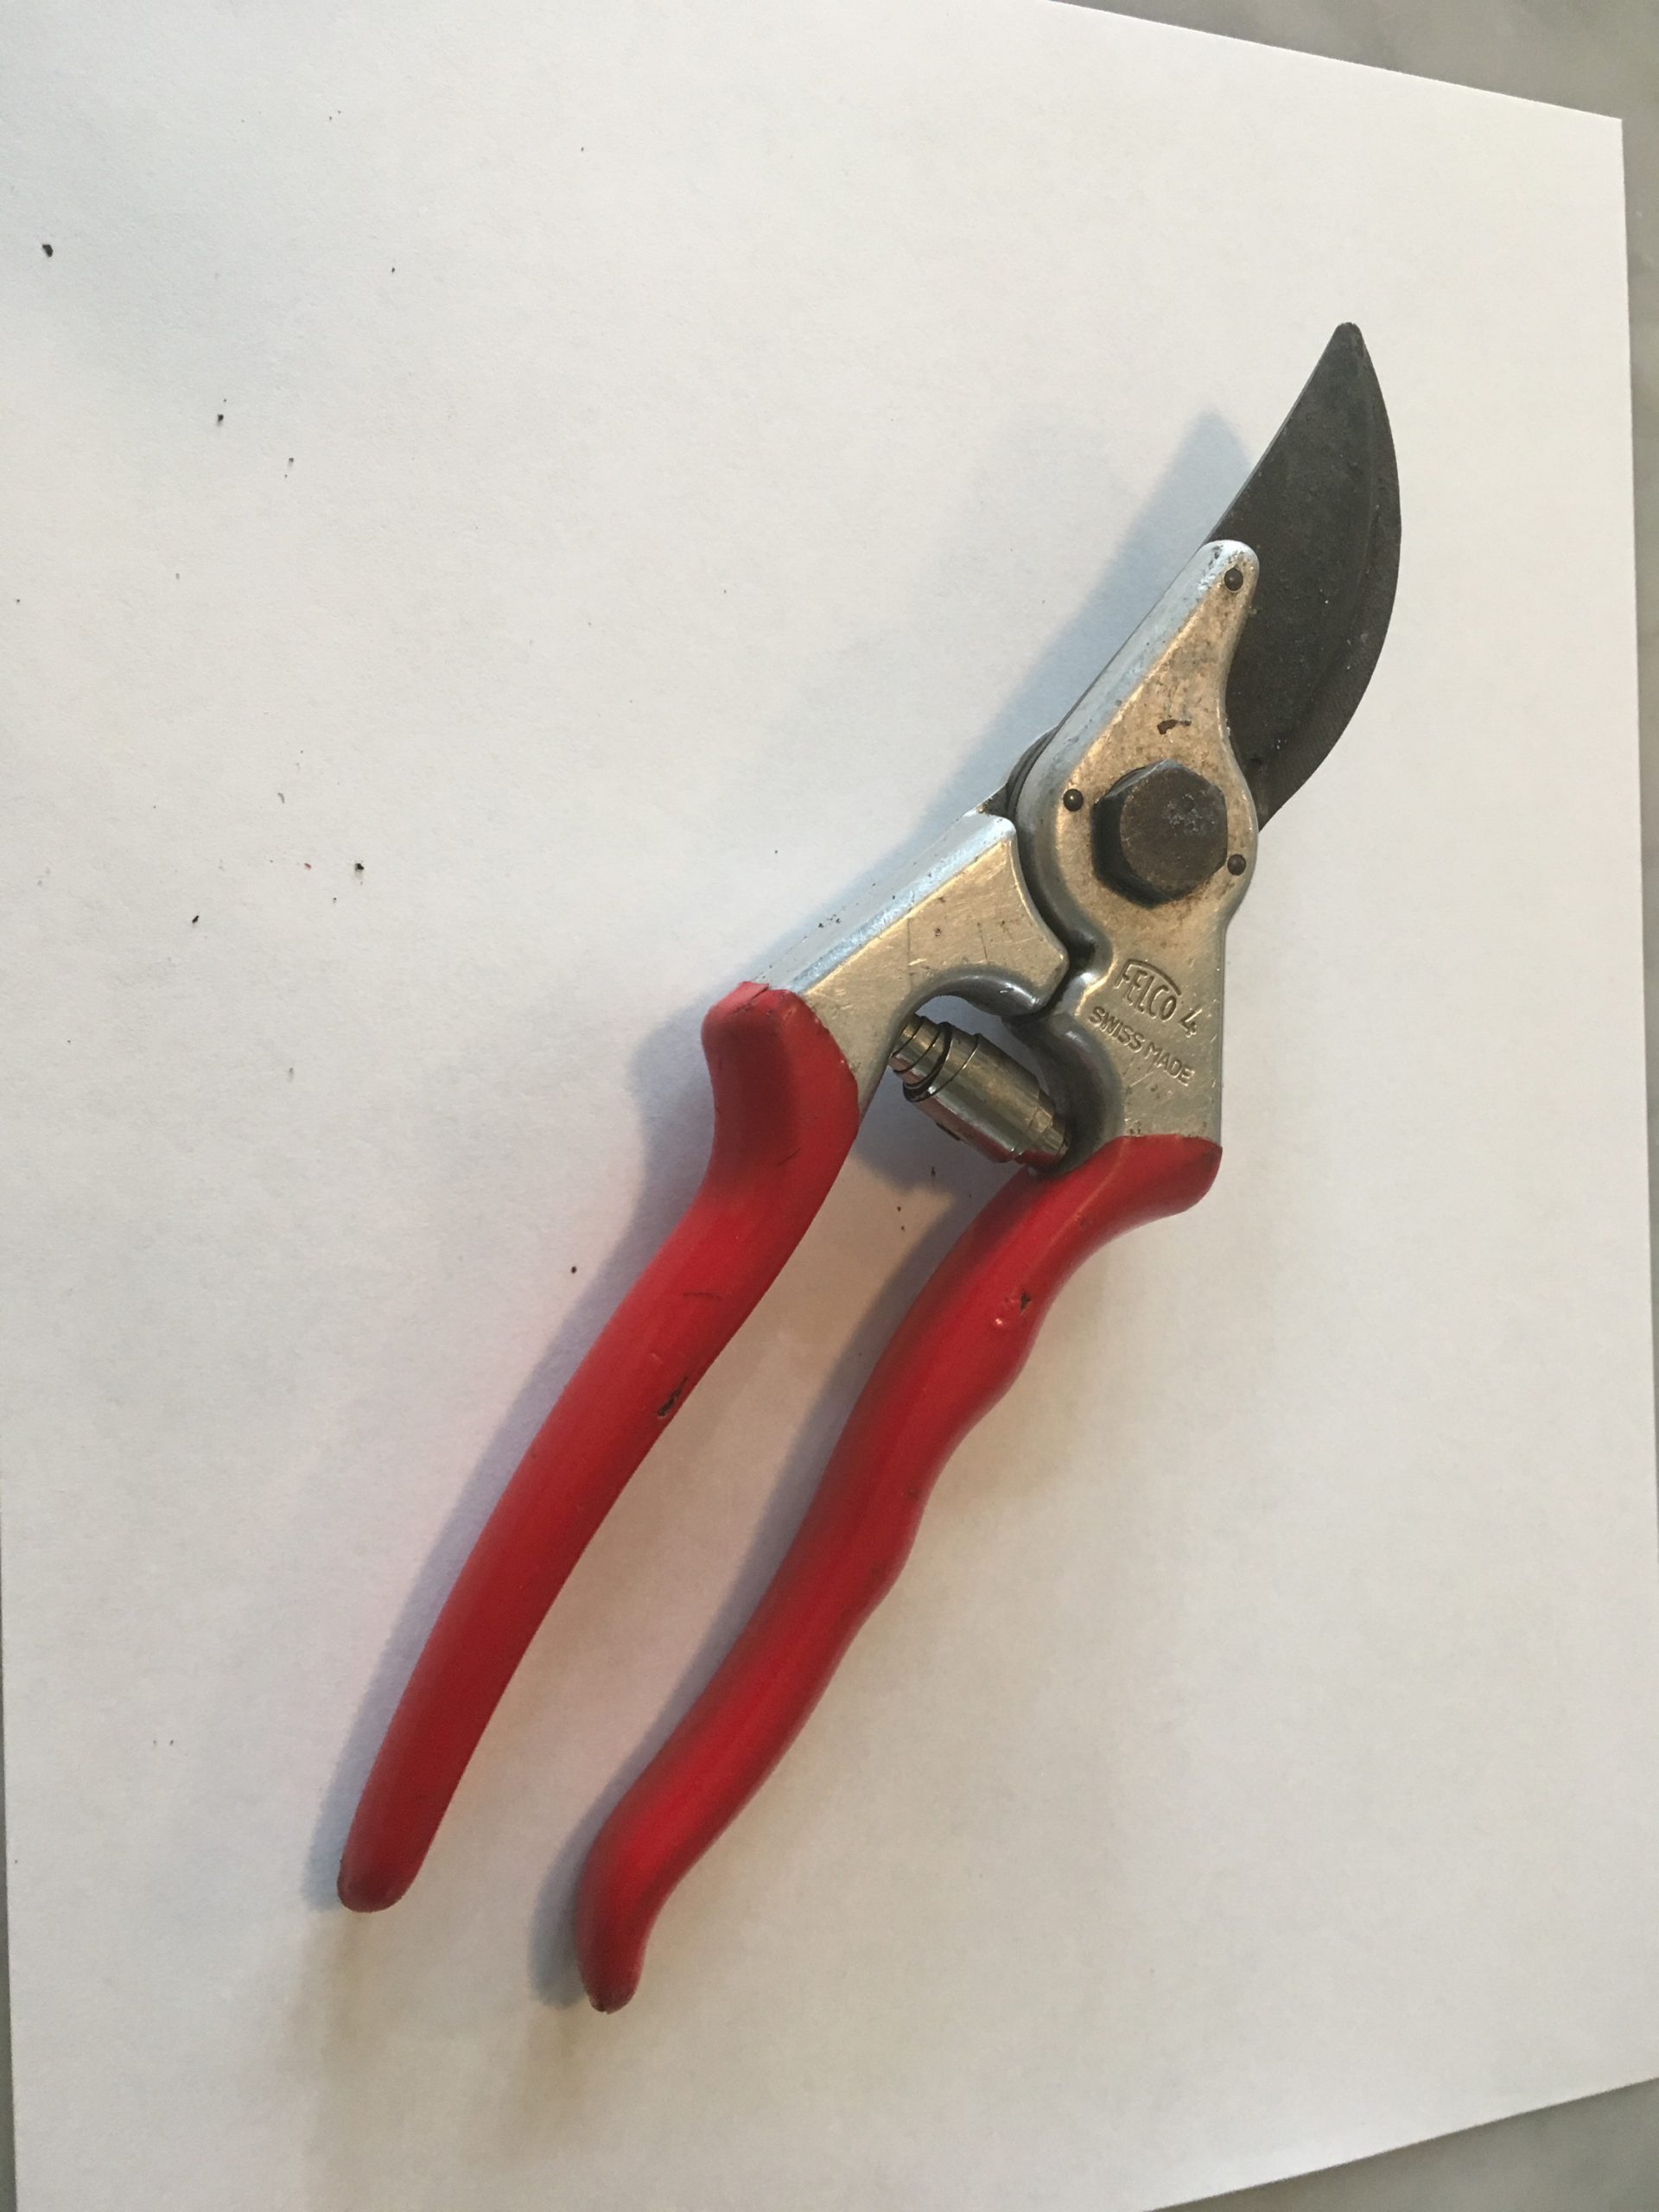
There is an old saying that rings true in pretty much any situation – “You get what you pay for.” Gardening tools, especially pruners, are no exception. We’ve all been there, fumbling around with a pair of rusty, dull, cheap garden pruners that just barely get the job done. Unfortunately, they can also do considerable harm to the plants you’re trying to improve, as anything short of a nice, sharp, clean cut introduces the potential for insect/disease infestation and will produce a wound that takes much longer to heal, if it ever heals properly at all. You wouldn’t want your doctor to start hacking away at you with a dirty, second-rate scalpel. Don’t subject your plants to the same treatment! While I’m not advocating blowing hundreds or thousands of dollars outfitting your garden tool shed with top of the line everything, investing in a pair of quality bypass hand pruners will pay dividends many years into the future and make your gardening experience much more enjoyable!

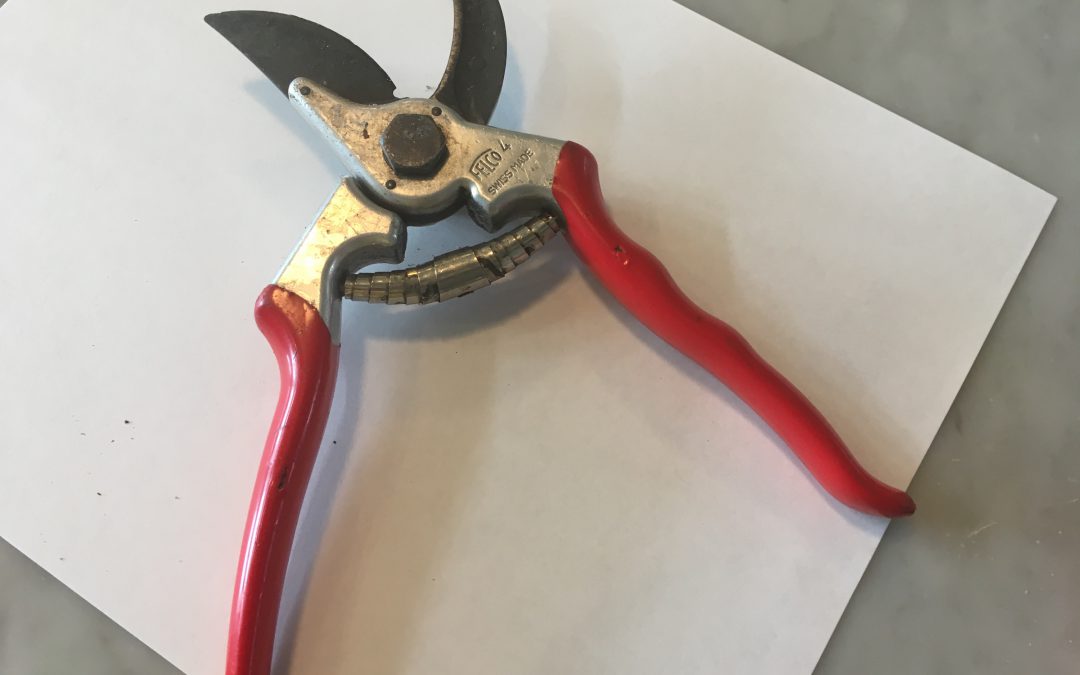
The classic Felco #4 bypass hand pruners. Photo courtesy of Walton County Master Gardener Andrea Schnapp.
Found in three designs, from old-fashioned anvil pruners that smush and smash their way to a cut, to ratcheting pruners that make short work of larger branches but tend to be cumbersome and complicated, to bypass pruners that produce clean cuts in a scissor-like manner, hand pruners accomplish many tasks in the landscape. From cutting small limbs, to harvesting vegetables, to deadheading annual flowers and everything in between, there isn’t a more frequently used, versatile tool. Therefore, it makes sense to buy a quality pair that will perform excellently, still be snipping long after your pruning days are over (if you take care of them), and that are comfortable enough you will enjoy using them. When shopping for your pair of “forever” pruners, there are a few things to look for.
- Only use bypass style pruners. Your plants will appreciate it.
- Look for heavy duty pruners with frames made from quality aluminum or stainless steel; they won’t rust and won’t easily bend or break.
- Buy pruners with replaceable parts. This is especially key because springs eventually rust and gum up and blades break and will eventually lose their ability to hold an edge over time (though you can and should resharpen them).
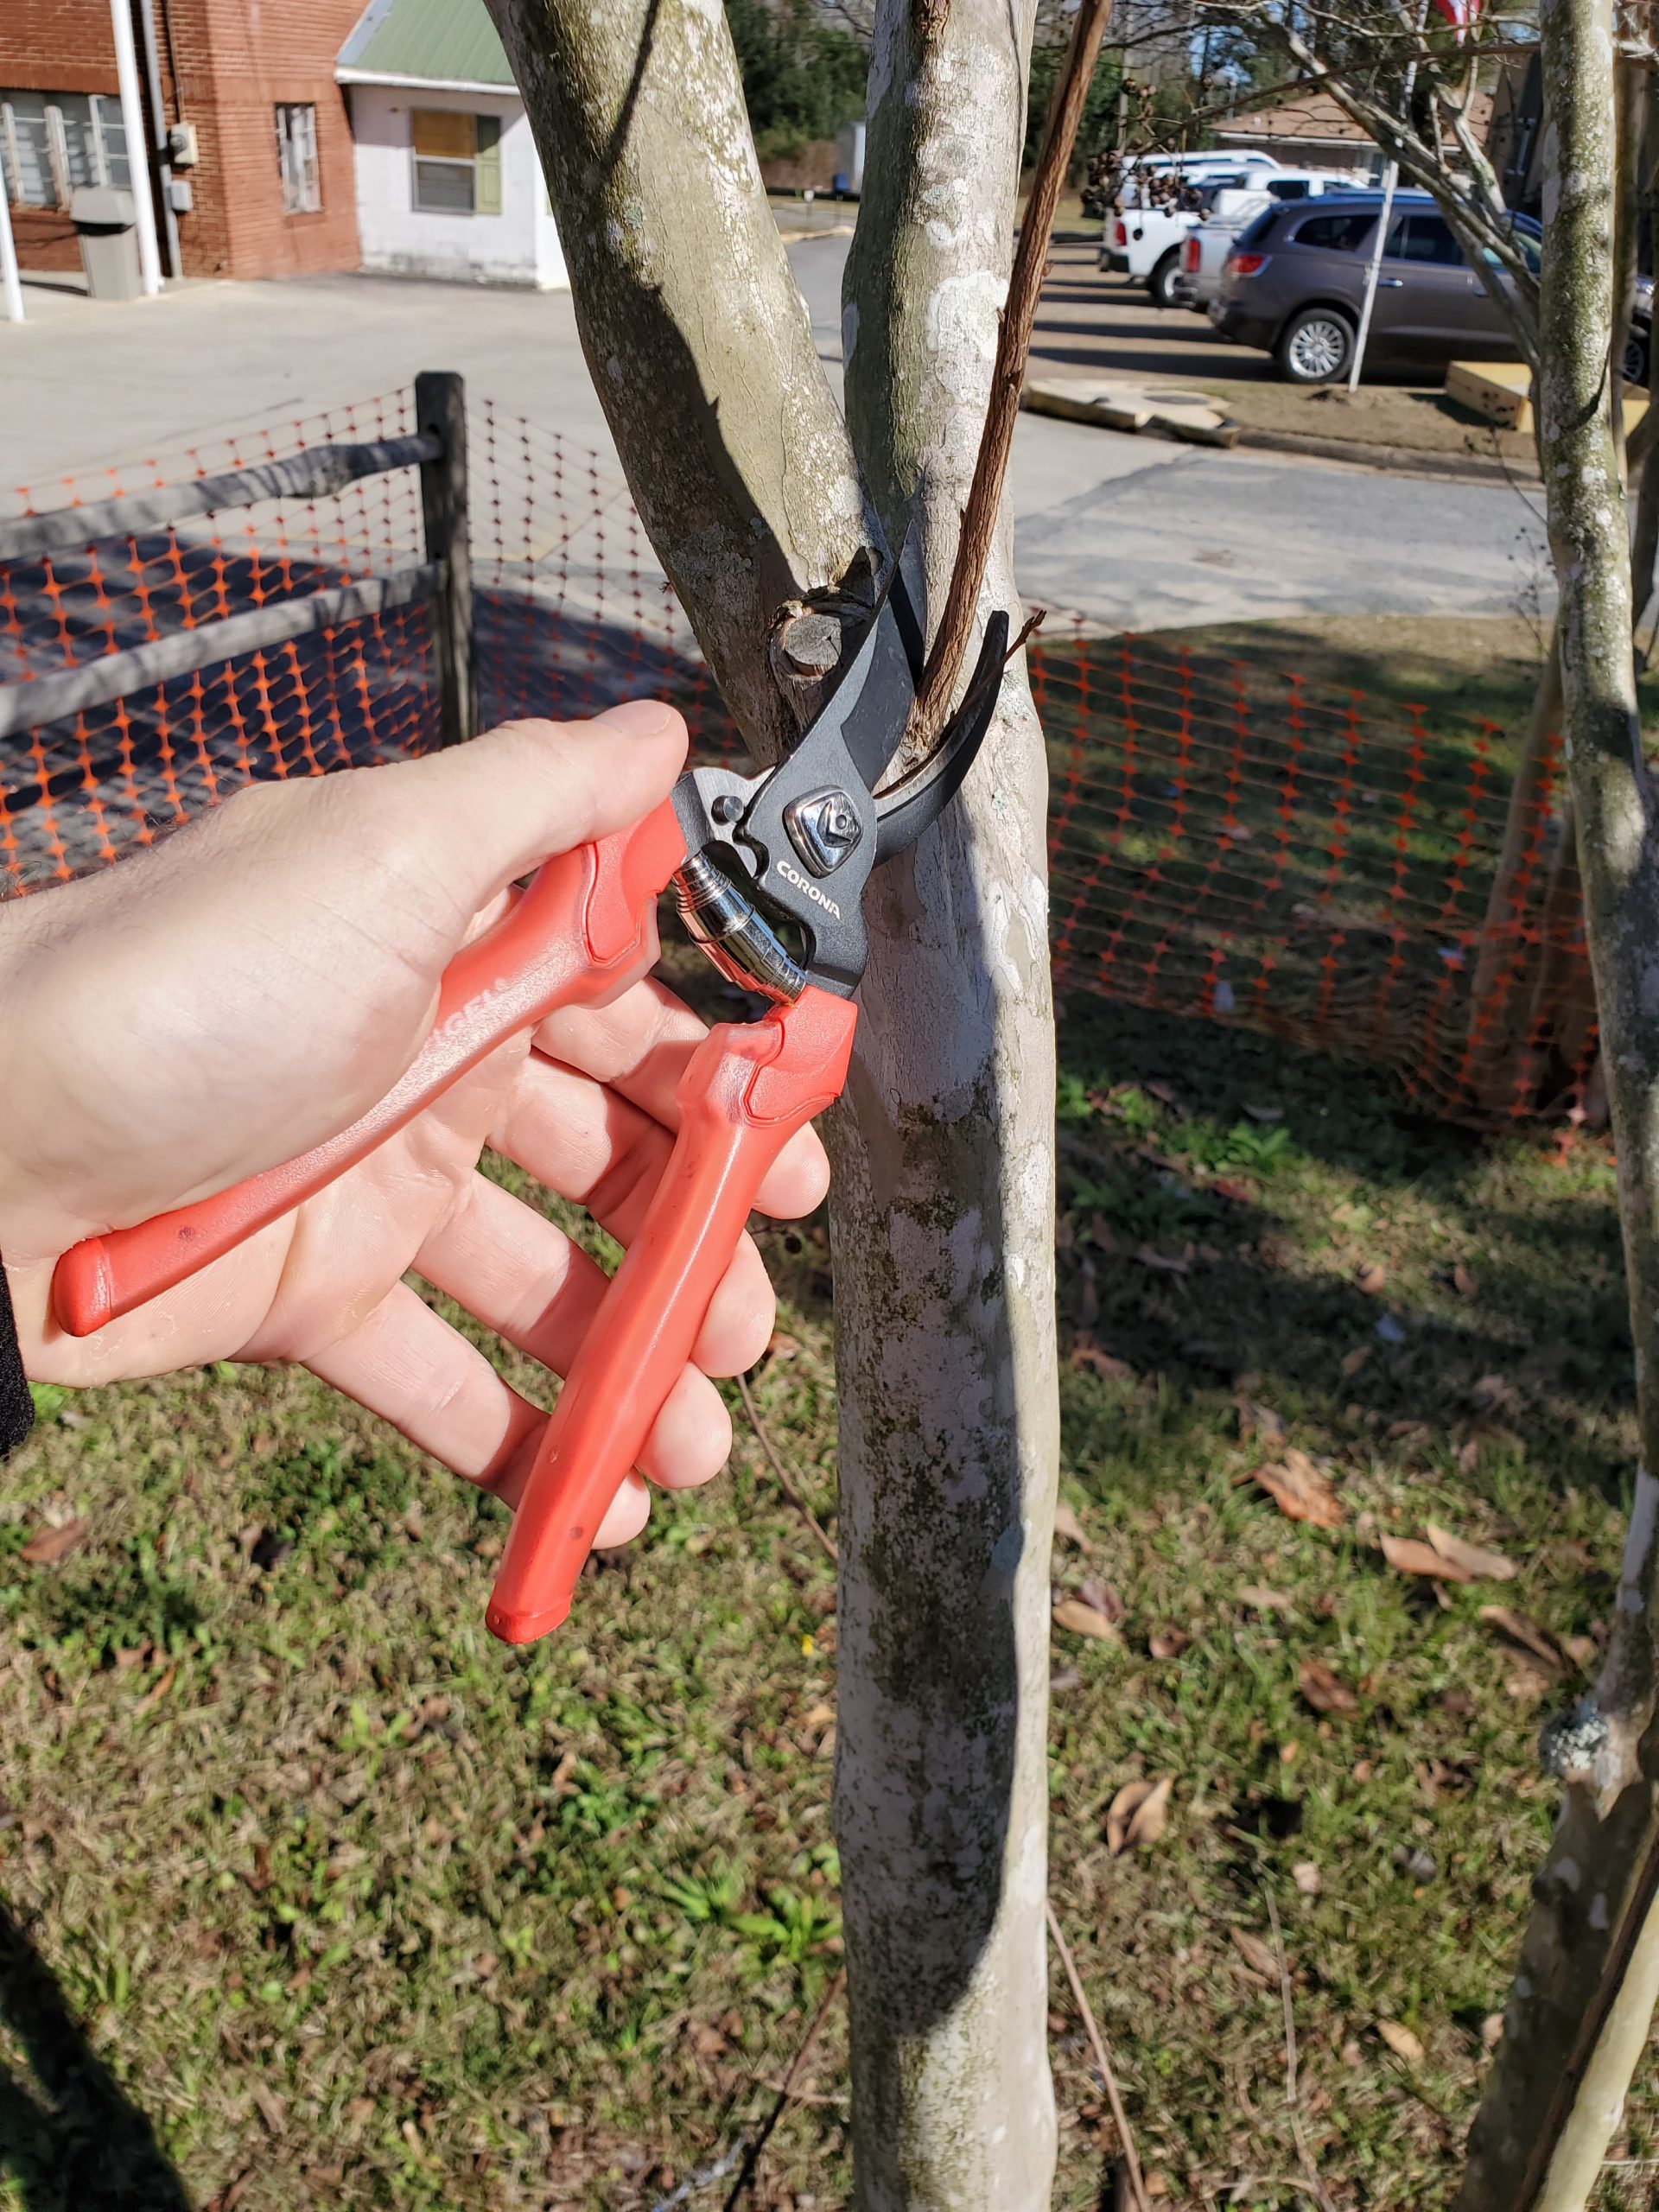
There are two commonly found brands that fit all three above criteria, albeit at different price points. For a high quality “budget” blade, various models from Corona do an excellent job for the money ($20-30) and won’t hurt your feelings too badly if you happen to lose a pair. Should you decide to splurge a little, Felco makes sharp, indestructible pruners, in multiple models around $50 to fit all size hands. Felco has become the horticulture industry standard and you’d be hard pressed to find a nursery owner or landscaper that didn’t own a pair (or two).

Corona ComfortGel bypass hand pruner. Photo courtesy of Daniel Leonard.
Regardless of which brand you buy (and there are many more than the two above listed) a pair of well-made pruners, if taken care of, should last a lifetime and make your gardening experience much more enjoyable for you and your plants! If you have any questions about gardening tools or equipment or any other horticulture or agronomic topic, feel free to contact your local UF/IFAS Extension Office. Happy Gardening!
by Daniel J. Leonard | Jan 22, 2021
Lately, to survive in Panhandle landscapes, plants must be able to tolerate extremes. Summertime temperatures over 100 degrees F, hurricane force winds up to 150 mph, deluges of 1’ of rain in a single day, spring and fall month-long droughts, and the wild winter weather swings we’re experiencing right now. That’s quite a tall order for most plants to bear, however one of our best native trees handles all of the above conditions with relative ease, the stately Bald Cypress (Taxodium distichum). Though Bald Cypress primarily inhabits flatwood “dome” swamps and areas along the periodically flooded edges of waterways and other wetlands and most folks think of it as just “water tree”, the species is more than capable of handling anything Florida’s climate can throw at it, including thriving in home landscapes.
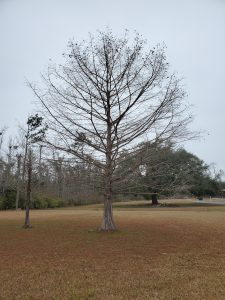
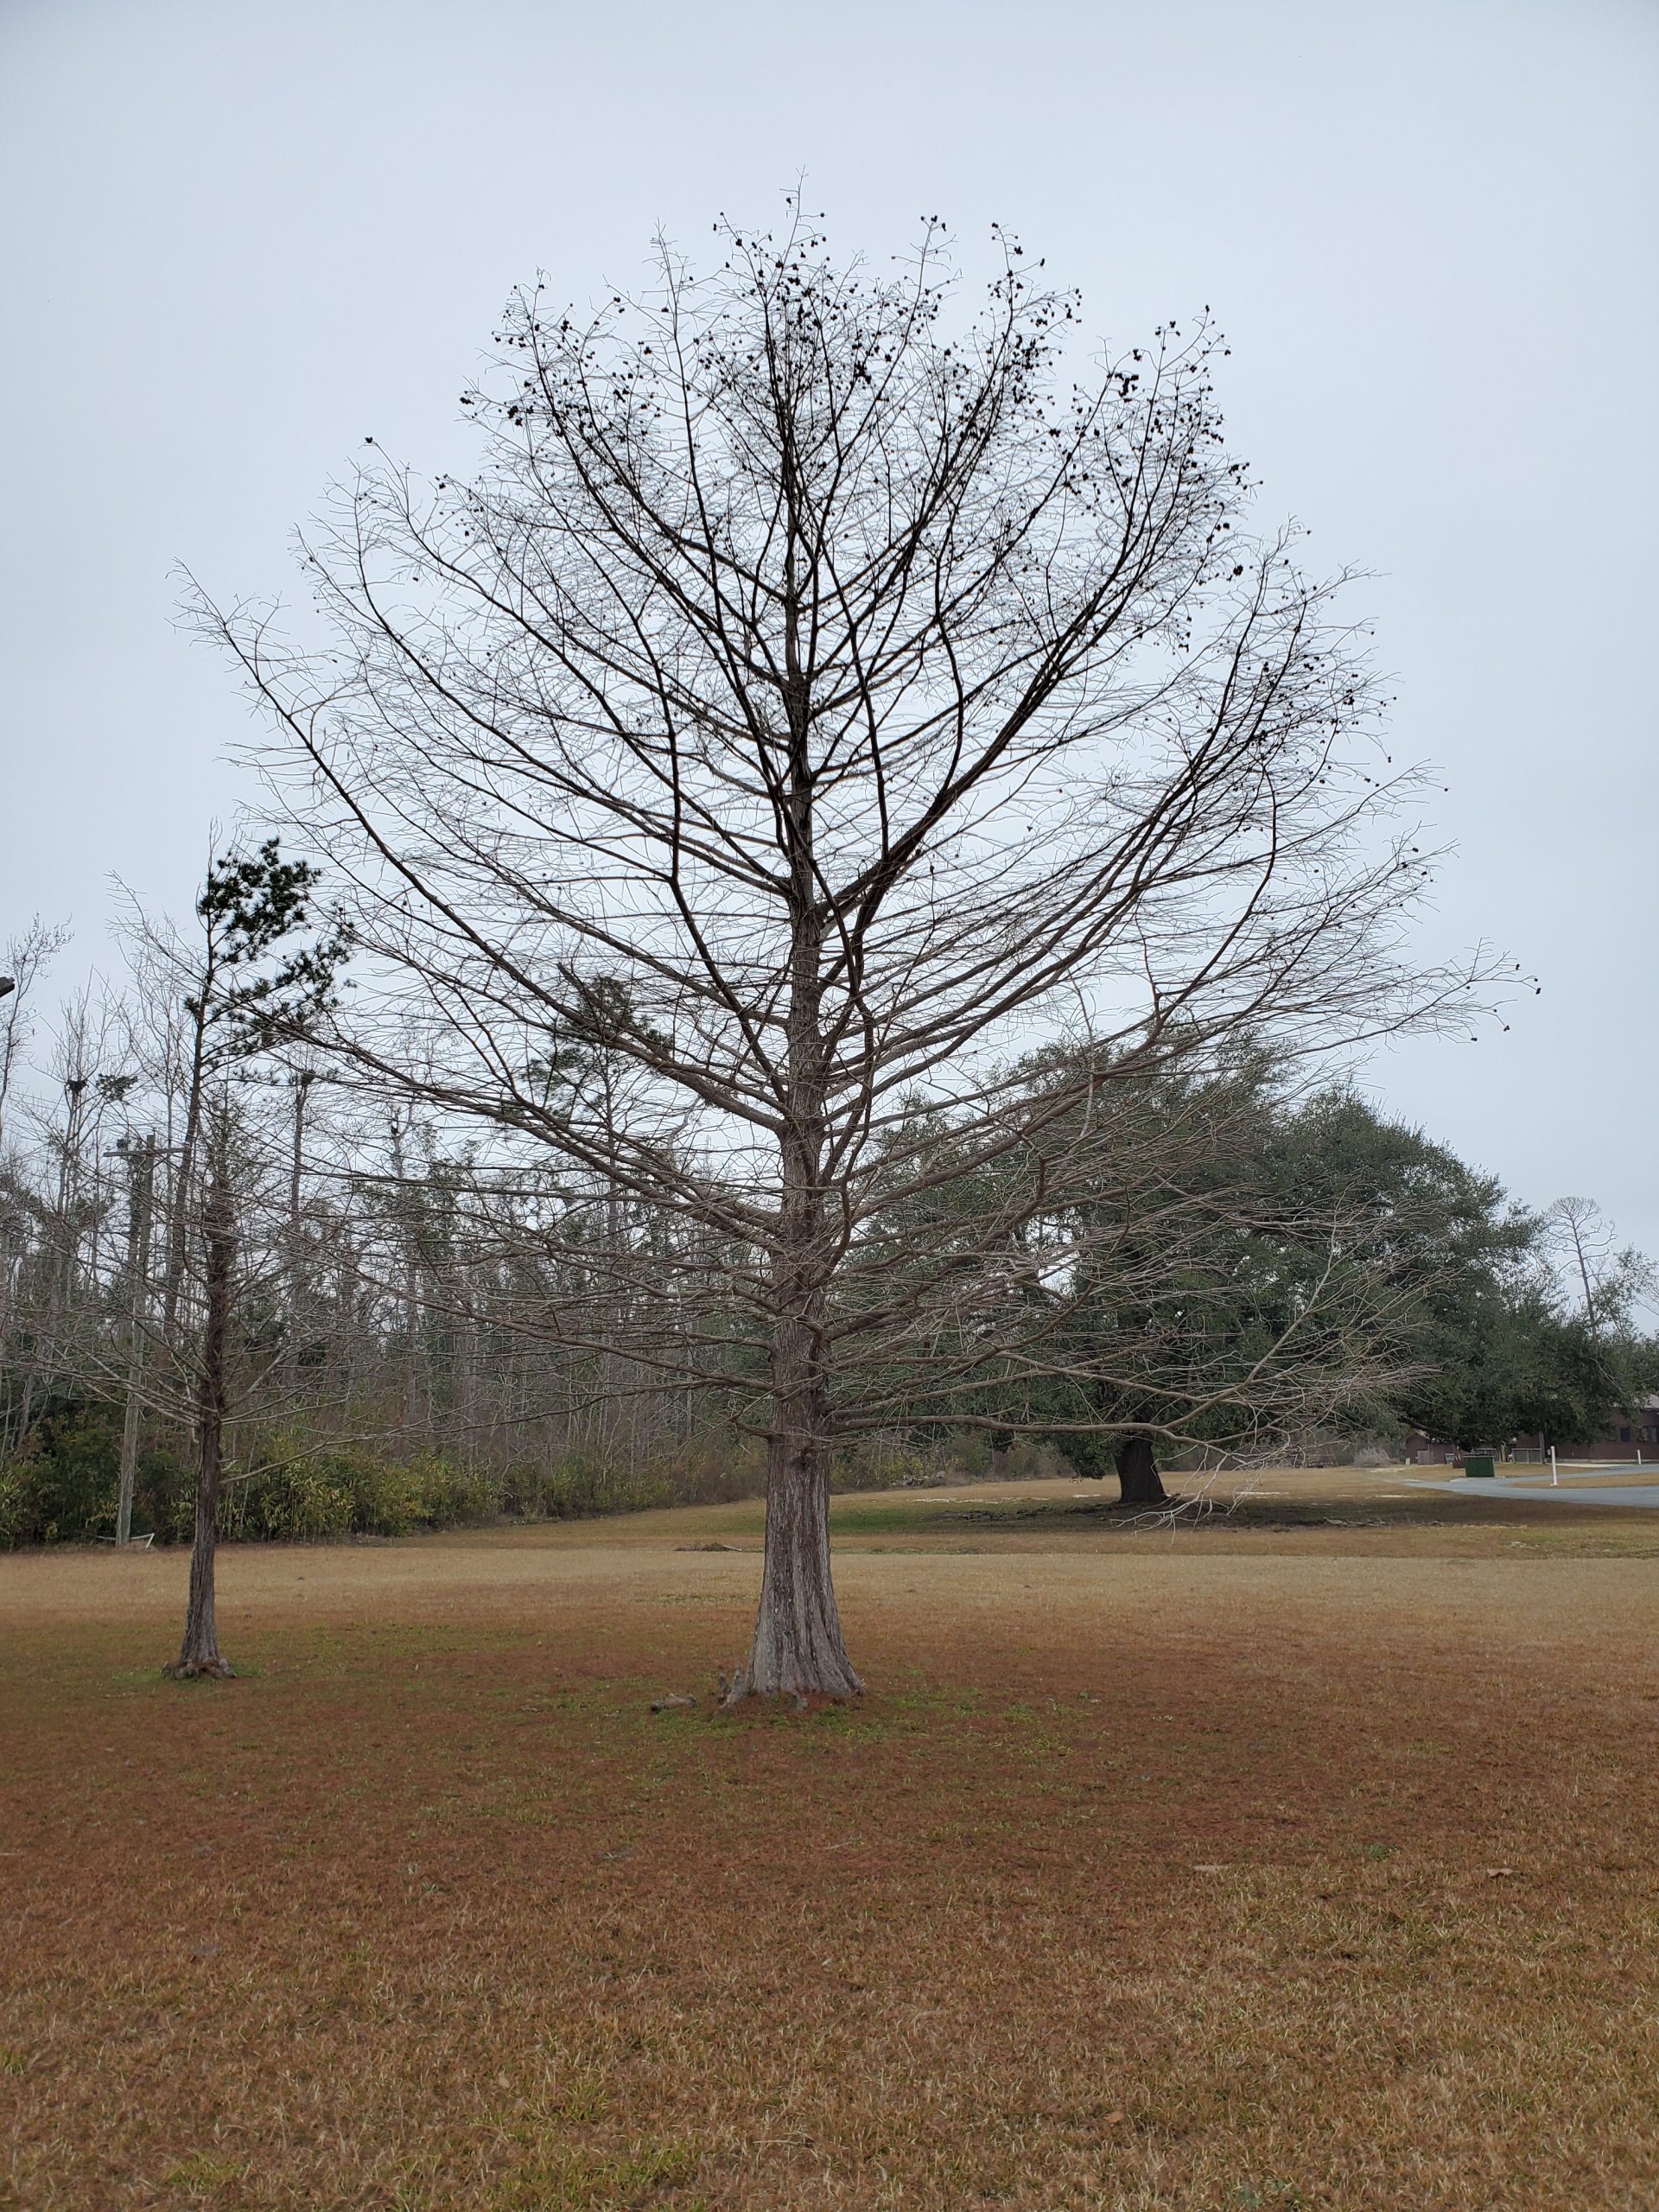
Bald Cypress in mid-January. Notice the excellent branching structure and the buttressed lower trunk. Photo courtesy Daniel Leonard.
While there are lots of pretty trees in the Panhandle’s natural areas, not many of them possess the longevity, adaptability and well-behaved nature that makes Bald Cypress a great landscape tree. Bald Cypress are capable of living for hundreds of years and grow steadily to a normal landscape height of 50-60’, truly perfect for a specimen shade tree. The species also possesses a strong, wide spreading root system and a special above ground root adaptation, known colloquially as “knees”, that enable Cypress to reach deep to outlast droughts, grow unfazed even when the water rises, inhabit many different soil types, and resist hurricane force winds. While some homeowners object to the presence of Cypress knees in their yard, as the above ground structures can damage mower blades and make for uneven terrain, I’ve found an easy solution is to simply keep the area under the tree’s canopy mulched and forgo mowing there altogether. It looks nice and means less grass to cut!
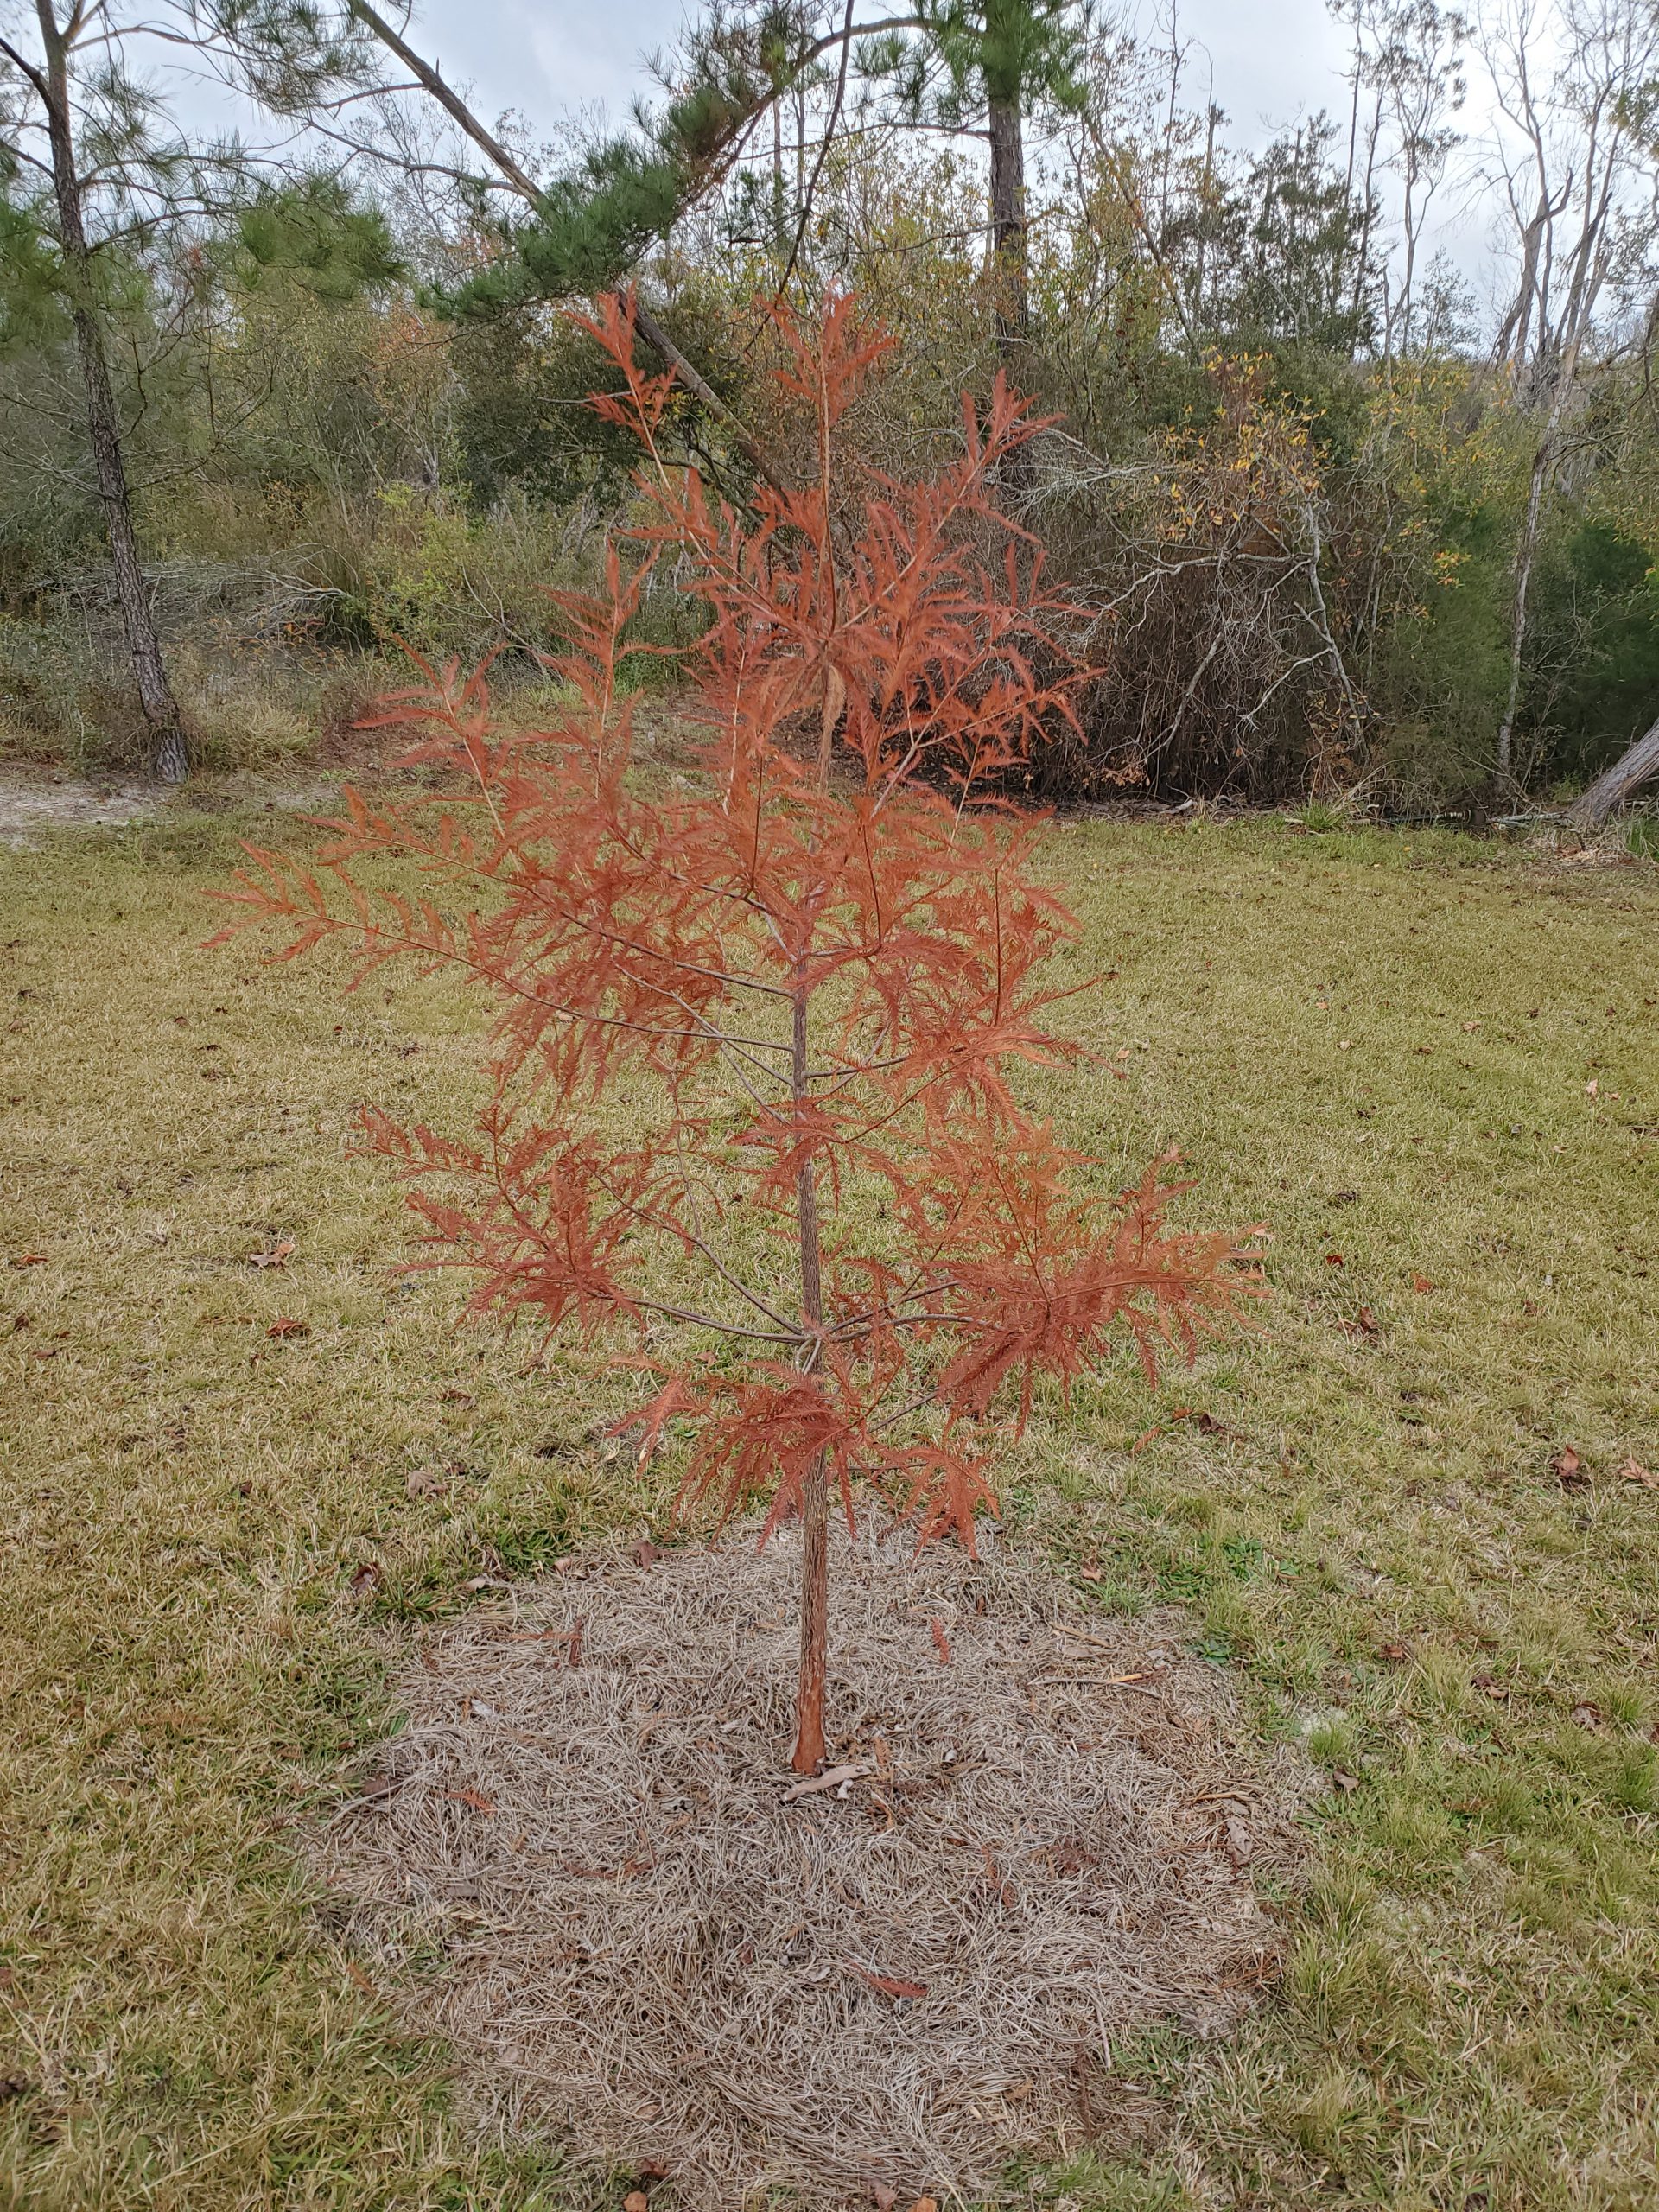
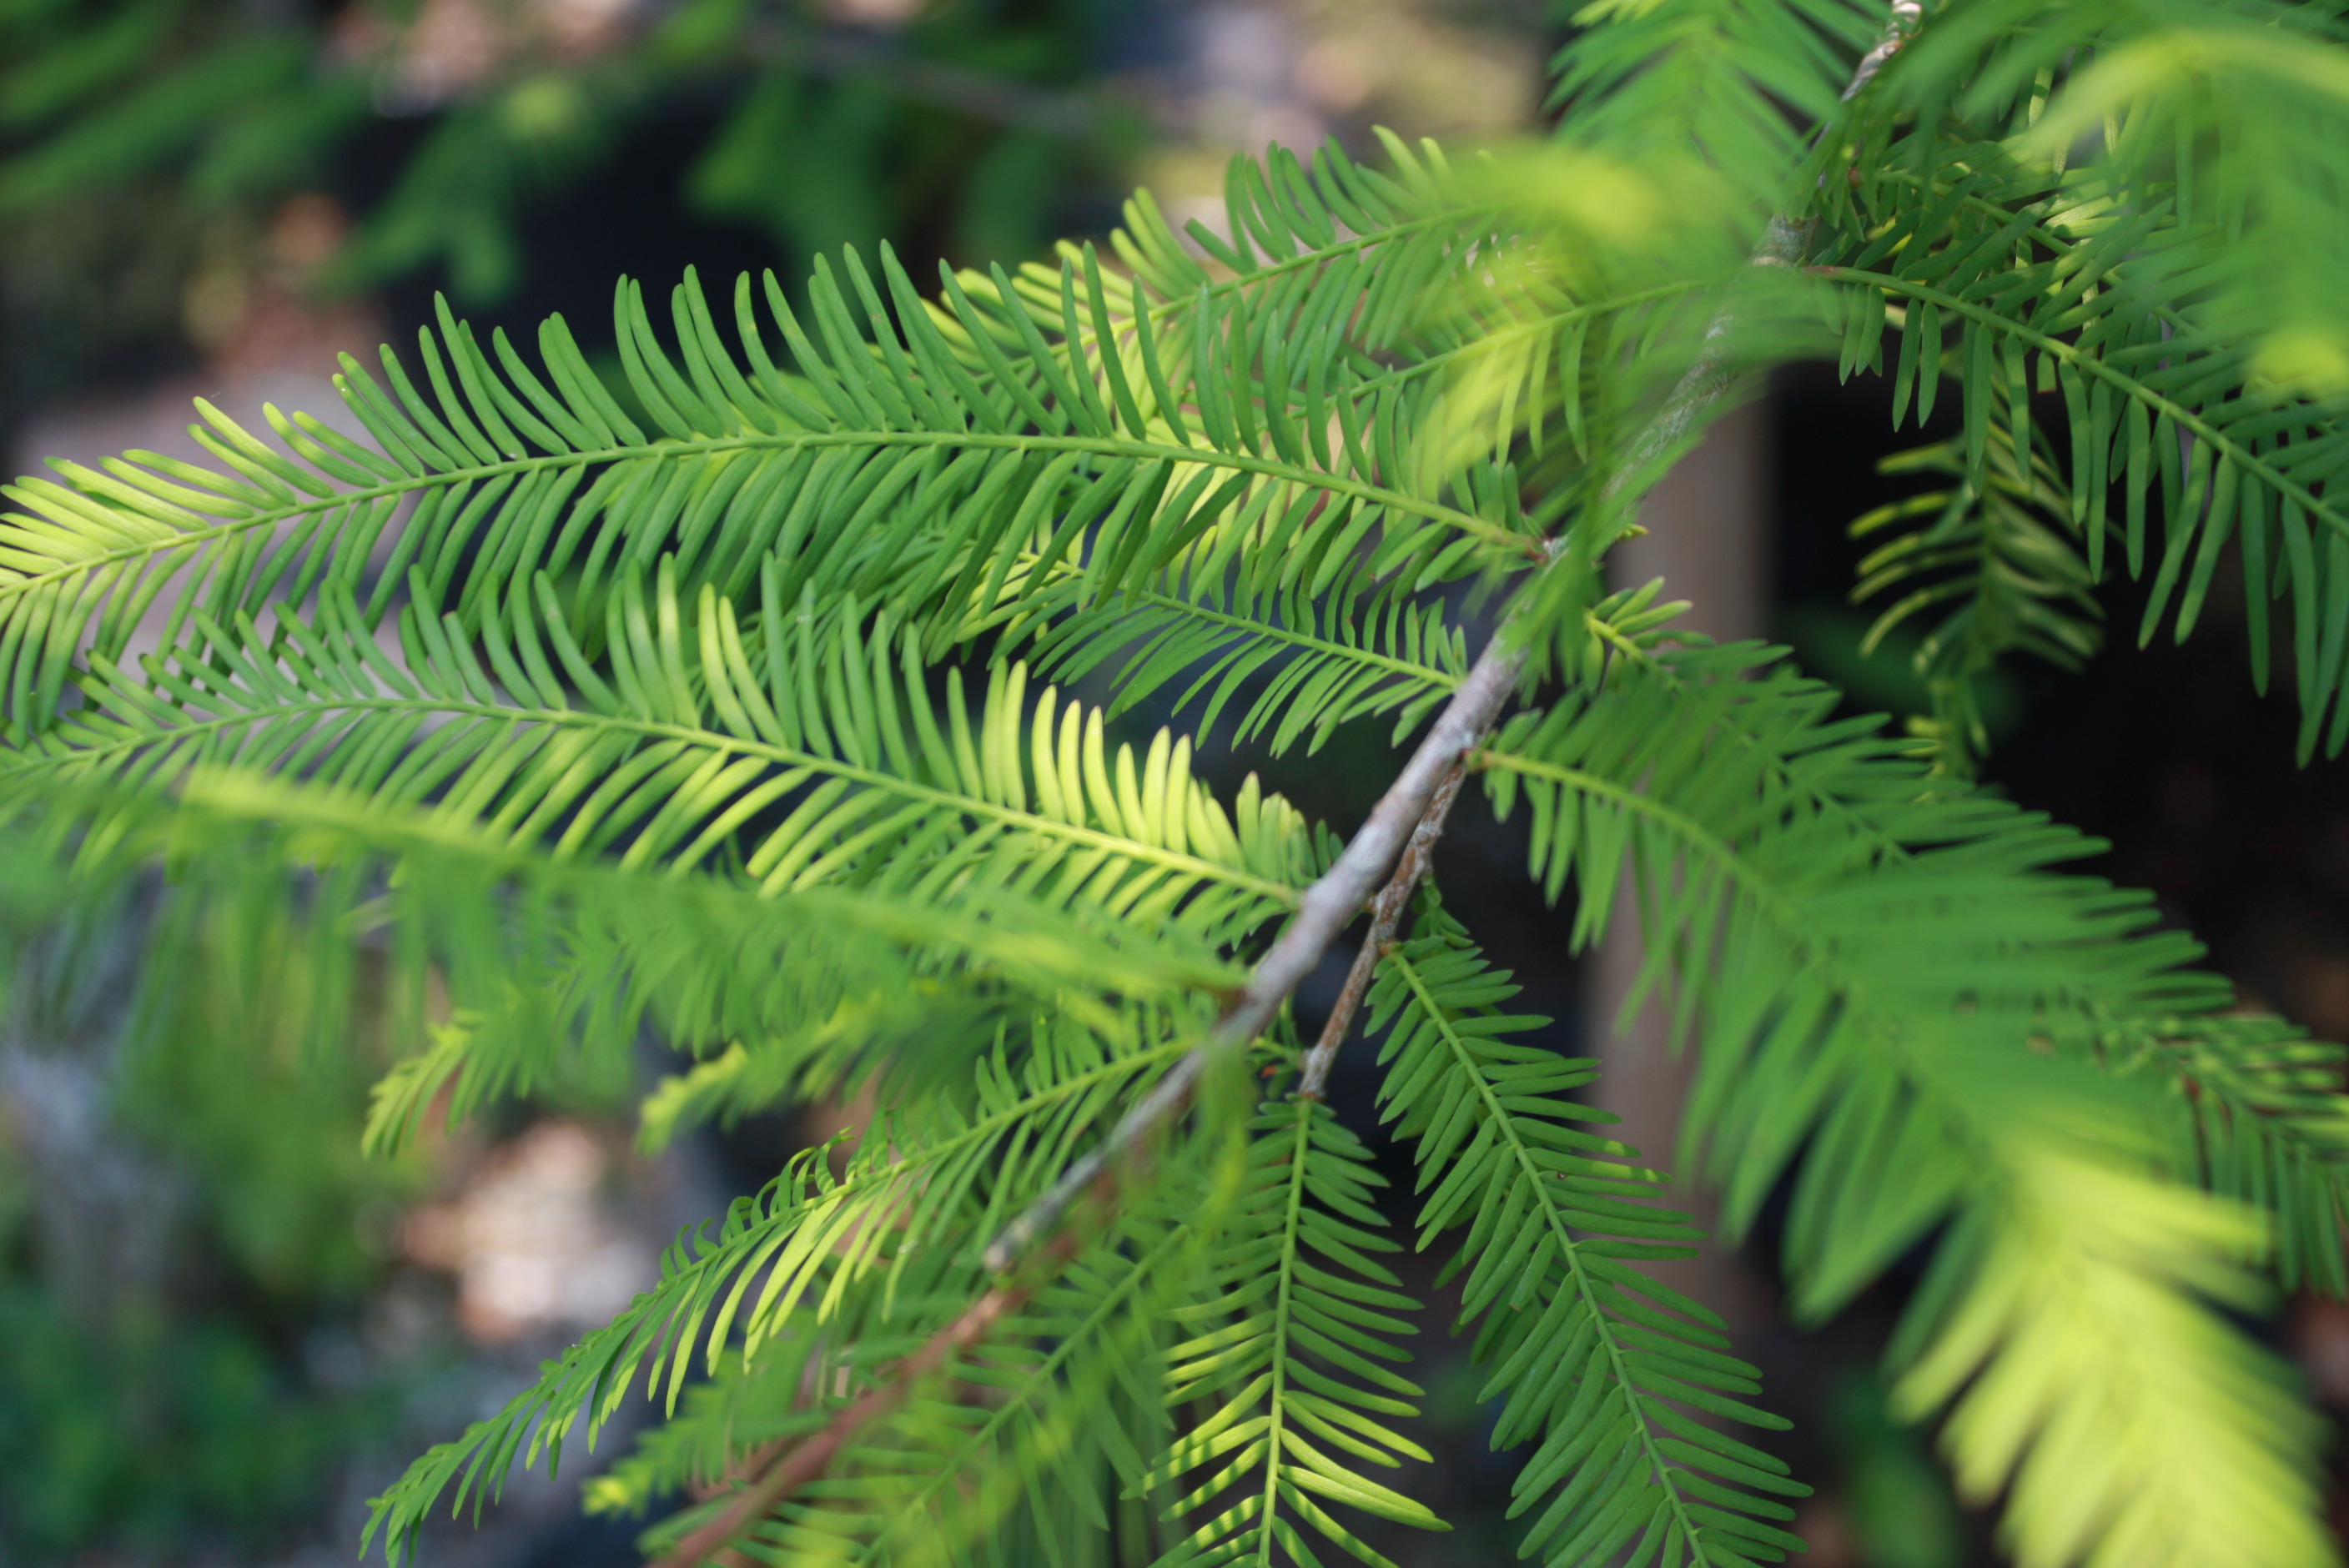
Bald Cypress isn’t just a big, tough, adaptable tree, it’s also gorgeous. The bright green, finely cut, featherlike leaves give the trees an airy appearance in the spring and summer, nicely offsetting common coarse textured yard trees like Magnolia, Sycamore, Red Maple, and others. However, it is in the fall and winter when Bald Cypress really shines. Though Florida is not known for its fall foliage, Cypress is a notable exception! When the weather gets cool, Bald Cypress leaves transition from green to a yellowish orange before finally arriving at a beautifully unique, rusty, orange-brown color. There isn’t another species out there with a similar show. The foliage holds deep into winter before finally falling to reveal the attractive branching structure, sweeping buttressed lower trunk, and peely gray bark underneath, completing the four-season show.

Bald Cypress foliage on December 31, 2020. Photo courtesy Daniel Leonard.
In addition to being a near perfect landscape tree, Bald Cypress embodies much of what folks admire about life in the South, living the slow life near the water and enduring everything that’s thrown at it with grace and strength. Other than possibly the Live Oak, Bald Cypress is the tree that comes to mind first when I think about the tree that most represents where we come from. From their majestic, buttressed trunks, to the Spanish Moss that hangs loose from their limbs, to the slow, dark water than meanders nearby, the species is iconically Southern. When looking for an impossibly tough, adaptable, and attractive tree, one could do a whole lot worse than Bald Cypress.
If you have any questions about Bald Cypress, other landscape tree options, or any horticultural topic, please reach out to your local UF/IFAS County Extension Office. Happy gardening!
by Daniel J. Leonard | Dec 9, 2020
The last several weeks have brought consistently cool weather to the Panhandle, with a few downright cold nights dipping well below freezing. Though winter isn’t officially here, that won’t happen until December 21st, grass mowing season is definitely over and, if you’re like me and didn’t cover your raised bed garden on those nippy nights, vegetable growing has also slowed significantly. So, what are us horticulturally minded folks with cold-weather cabin fever to do? It’s time to take advantage of sweat-free temperatures, break out the shovels and pruners, and get to work in the landscape!

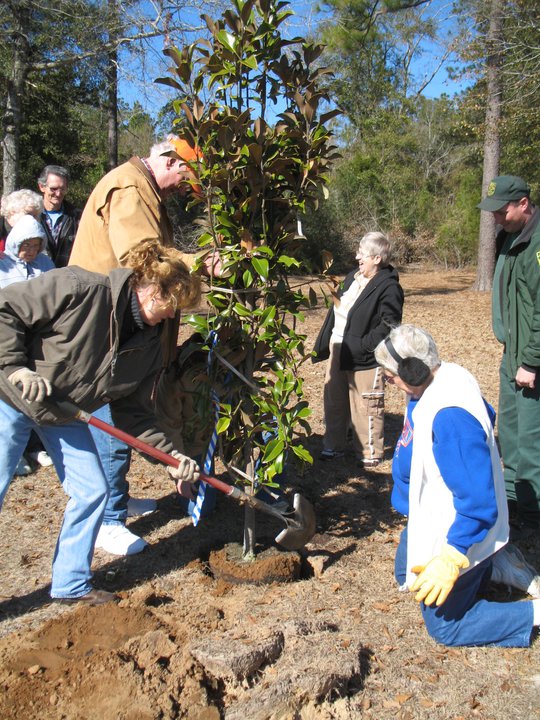
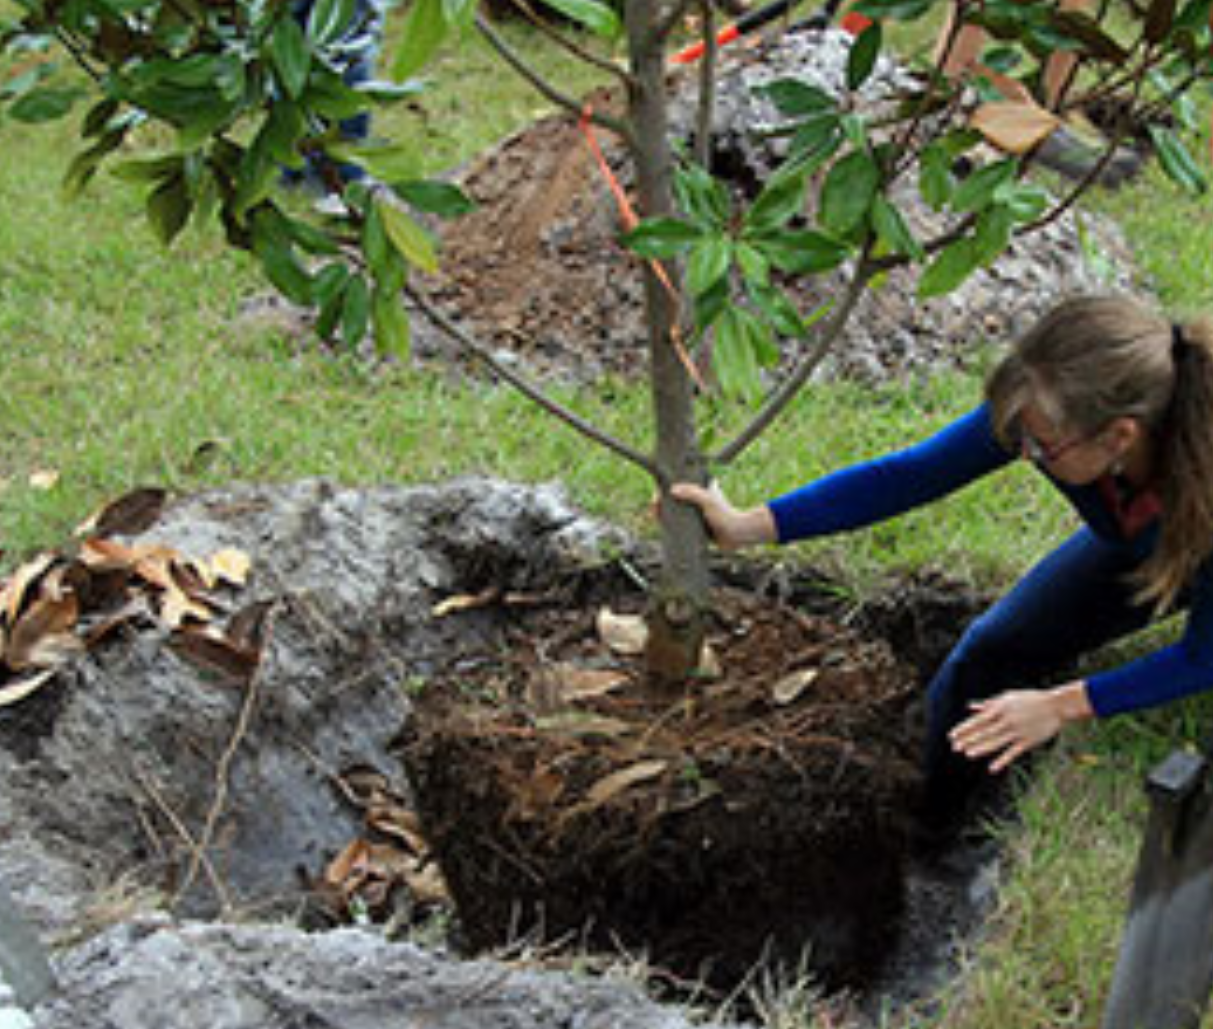
Master Gardeners demonstrate correct tree planting techniques.
The months of December through February are ideal times for planting new trees and shrubs. The reasons for this are simple. Days are short, rain tends to be plentiful, temperatures are cool, and plants are mostly dormant. While newly installed plants need water to become established regardless of when they are planted, demand for supplemental irrigation is significantly less in winter (one of our rainiest seasons) and the chances of a new planting dying from thirst is slim relative to warmer months. Also, planting in winter gives trees and shrubs several months of above ground dormancy to focus their resources below ground, recover from the shock of transitioning from a nursery container into your native soil, and produce valuable roots that will help it get through its first summer. Think about it. Would it be easier for you to start and finish a major outdoor project in July with one bottle of water to drink or in December with an ice chest full? Plants prefer the same!
Not only is winter perfect for planting, tis the season for pruning many species too, deciduous trees (those that lose their leaves in the fall) in particular! The first reason to prune these species in the winter is to give the plants several months to begin healing before growth resumes in spring and insect and disease pressure ramps up again. Many serious pests and diseases of trees are most active during warm, wet weather and all of them have easier access to attack trees through open wounds. Prune in winter to help avoid unwanted pest and disease infestations. Also, dormancy has conveniently knocked the leaves off deciduous species’ branches, allowing us a clear view of the tree’s crown and giving us the ability to make clear, clean, strategic pruning cuts. Proper pruning can help maintain a strong central leader that produces a stately, straight tree and remove dead and diseased branches that could cause problems in the future.
While planting in the winter is always ideal and we just outlined several reasons pruning now can be good, not all plants should be pruned when dormant. For instance, old-fashioned hydrangeas and azaleas that produce blooms from the previous season’s growth. Pruning these in the winter removes all the flower buds that would have bloomed the next summer and what’s the point of an azalea or hydrangea that doesn’t bloom? Also, many small trees and shrubs, like Crape Myrtle and Vitex, may never need pruning if you site them where they will have room to mature without encroaching on other plants or structures.
If you have any questions about planting trees and shrubs, what, when, and how to prune, or any other horticultural topic, please contact your local UF/IFAS Extension Office! Enjoy the weather and happy gardening!