by Larry Williams | May 14, 2020
When we go through dry periods in North Florida some residents become interested in drought-tolerant plants to include in their landscapes. The need for irrigation can be reduced when drought-tolerant plants are used. But don’t overuse these plants. Remember we have periods of rainy weather, too.
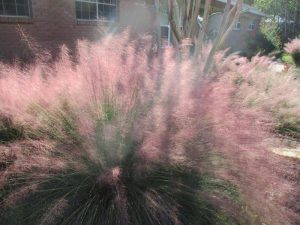
Gulf Muhly Grass in Flower. Photo credit: Larry Williams
Some drought-tolerant plants have poor tolerance to the other extreme – too much water. There are a few plants that can tolerate both extremes but they are the exception. Avoid using drought-tolerant plants on naturally wet or poorly drained sites. But if you have the typical deep sandy well drained soil Florida is famous for, you’d do well to include some drought-tolerant plants on your site.
Drought-tolerant plants are especially well suited for areas that receive little to no irrigation.
Some plants are genetically better able to withstand drought. They have a built-in tolerance of drought. Many of our Florida native plants are designed to grow in our poor water holding sandy soils. Many of the plants native to arid areas of the world possess high drought-tolerance. These plants have characteristics that allow them to better survive dry weather. These features include thicker or waxier leaves, large surface root areas or deep roots and the ability to drop leaves in drought and regain them when moisture is adequate.
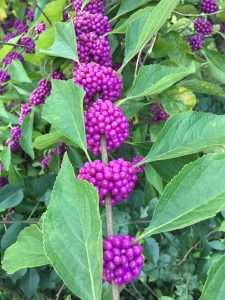
Beautyberry with fruit. Photo credit: Larry Williams
It’s important to realize that these plants must first establish a root system before they can cope with severe dry weather. Plan to irrigate during dry periods for the first season to allow them to become established.
Some outstanding trees to consider include crape myrtle, redbud, Chinese pistache, cedar (Cedrus species), hawthorn (Crataegus species), American holly, yaupon holly, Southern red cedar (Juniperus species), Live oak, Sand live oak, winged elm, pond cypress and bald cypress. Some people are surprised to learn that pond cypress and bald cypress have high drought-tolerance because these trees are associated with swamps, many times growing in standing water. But once established on a dry site, they exhibit very good drought-tolerance.
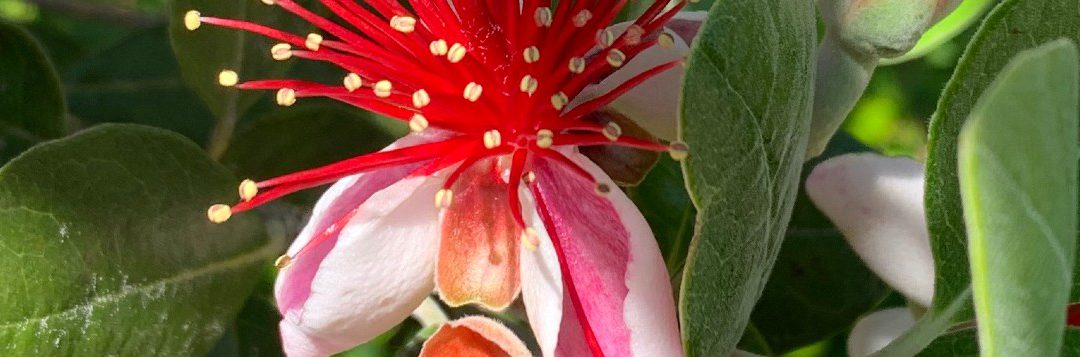
Some outstanding shrubs with drought-tolerance include glossy abelia, dwarf yaupon holly, Indian hawthorn (Rhaphiolepis species), beauty berry (Callicarpa americana), pineapple guava, junipers, oleander, spiraea, blueberry or sparkleberry (Vaccinium species), viburnum, Chaste tree (Vitex agnus-castus) and coontie (Zamia pumila).
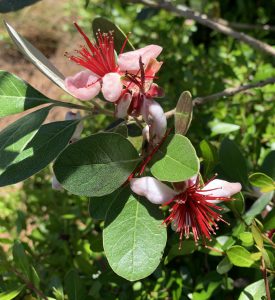
Pineapple guava in bloom. Photo credit: Larry Williams
Some outstanding drought-tolerant groundcovers to consider include beach sunflower (Helianthus debilis), daylily, juniper, lantana, liriope, rosemary (Ceratiola ericoides), Asiatic jasmine and society garlic. Many of the ornamental grasses such as Gulf muhly are good choices as well.
For more ideas on developing a Florida-friendly, water wise landscape, contact the UF/IFAS Extension Office in your County or visit the below website. https://ffl.ifas.ufl.edu/index.html
by Larry Williams | Apr 29, 2020
In times like these, it seems that our own perceived “problems” pale in comparison to the “big picture.” In my day-to-day work, I have the opportunity to help people solve problems with their landscapes, lawns and gardens. I enjoy the problem solving part of my job as an extension agent.

Winter annual weeds in lawn in early spring. Photo credit: Larry Williams
You’d be surprised how upset some people can be about a few weeds, a dying petunia or a tomato with a crack in it. They’ll let small things like this upset their entire world. It’s as if they think we live in a perfect world when it comes to expectations for the plants in their own landscape.
It has become apparent to me that too many people spend too much time letting too many small things bother them too much.
When my twin sister, Linda, and I were growing up in a small town in middle Georgia, an elderly couple (Mr. and Mrs. Hunt) would crack pecans and give the shelled halves to us to eat. They’d hand the shelled pecans to us over the fence that separated our yards. At five or six years old this was a treat for my sister and me.
I remember their landscape. I remember Mrs. Hunt sweeping their dirt driveway lined with coconut sized rocks. She used handmade brooms. I remember their pink flowering dogwoods in spring. I remember their old-fashioned yellow and orange daylilies during summer. I remember the fascination of seeing red spider lilies seemingly come from nowhere in the fall underneath deciduous trees as they displayed their autumn colors. I remember Mrs. Hunt letting me smell a flower from a sweetshrub plant, which reminded me of sweet apples. The deep red blooms and dark green leaves of this shrub complemented the white wooden wall on the east side of their home.
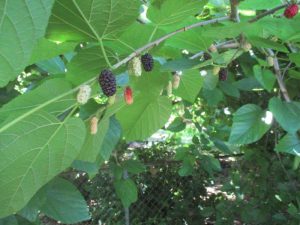
Mulberry tree with fruit. Photo credit: Larry Williams
I remember climbing a large mulberry tree in their backyard and picking and eating the berries. I remember watching Mr. Hunt prune grapevines growing on an overhead trellis. I remember learning about the history of a ginkgo tree planted just outside a chicken pin in their side yard. I remember watching hummingbirds flying in and out of the reddish orange funnel-shaped blooms of a large trumpet vine growing on an old metal frame of a water tank.
I don’t remember the weeds, even though I know there must have been weeds in the Hunt’s landscape. I know there was the occasional pecan that didn’t fill out or that was worm infested. And I’m sure an occasional plant had to be replaced. But these are not the things that made lasting impressions for me.
The big picture is not the weeds, the dying petunia plant or the pecan with a worm in it. Sure you will have weeds in your yard and certain plants that don’t survive. Just don’t let these things become the source of worry. In my opinion, a landscape should be a source of pleasure, a place to learn and a place to pass along lasting memories. Besides, with all the things there are to worry about in this world (as recent days have revealed), why let your own backyard be one of them?
by Larry Williams | Apr 23, 2020
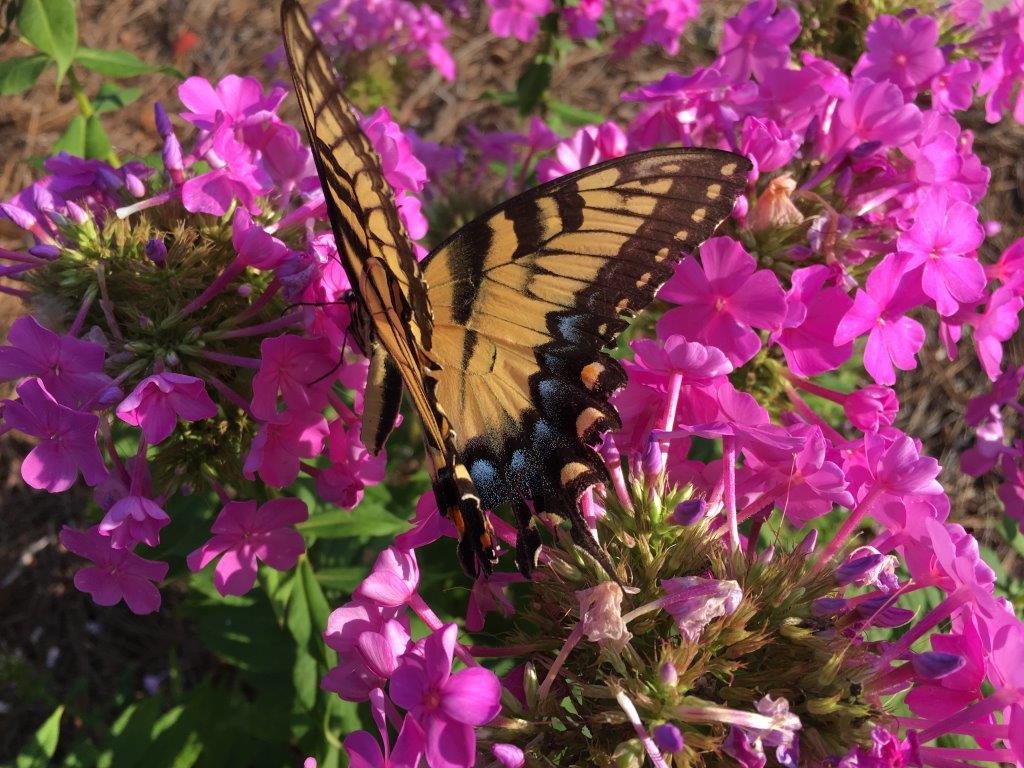
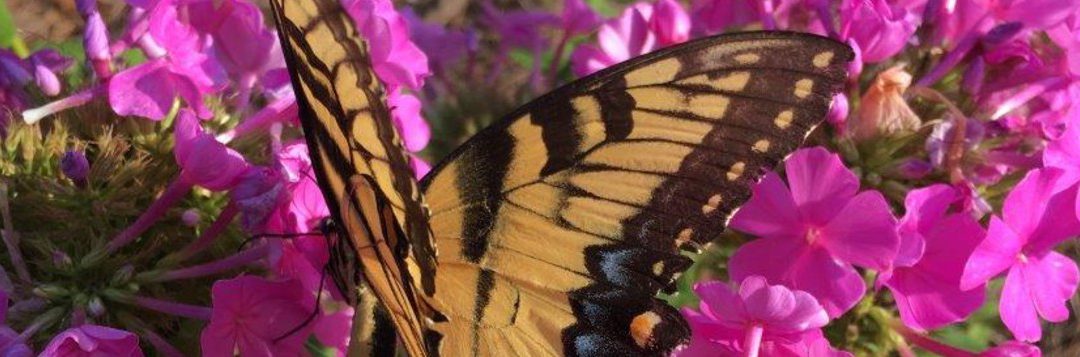
One of the things to do while stuck at home due to COVID-19 restrictions, is to look for caterpillars and butterflies in your landscape. I’ve noticed giant swallowtail butterflies (Papilio cresphontes) a little early this year. The giant swallowtail is one of the largest and most beautiful butterflies in our area. Its larval stage is known as the orangedog caterpillar. This unusual name comes from the fact that it feeds on young foliage of citrus trees.

Orangedog caterpillar. Photo credit: Donald Hall, University of Florida
The orangedog caterpillar is mostly brown with some white blotches, resembling bird droppings more than a caterpillar. When disturbed, it may try to scare you off by extruding two orange horns that produce a pungent odor hard to wash off.
I’ve had some minor feeding on citrus trees in my landscape from orangedog caterpillars. But I tolerate them. I’m not growing the citrus to sell. Sure the caterpillars eat a few leaves but my citrus trees have thousands of leaves. New leaves eventually replace the eaten ones. I leave the caterpillars alone. They eat a few leaves, develop into chrysalises and then emerge as beautiful giant swallowtail butterflies. The whole experience is a great life lesson for my two teenagers. And, we get to enjoy beautiful giant swallowtail butterflies flying around in our landscape and still get plenty of fruit from the citrus trees. It is a win, win, win.
In some cases, the caterpillars can cause widespread defoliation of citrus. A few orangedog caterpillars can defoliate small, potted citrus trees. Where you cannot tolerate their feeding habits, remove them from the plant. But consider relocating the caterpillars to another area. In addition to citrus, the orangedog caterpillars will use the herb fennel (Foeniculum vulgare) and rue (Ruta graveolens) as a food source. Some butterfly gardens plant citrus trees to provide food for orangedog caterpillars so that they will have giant swallowtail butterflies. So you could plan ahead and grow some fennel, rue or find a butterfly garden in your area for the purpose of relocating the larvae.
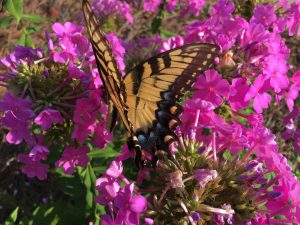
Yellow giant swallowtail butterfly on pink garden phlox flowers. Photo credit: Larry Williams
The adult butterflies feed on nectar from many flowers, including azalea, bougainvillea, Japanese honeysuckle, goldenrod, dame’s rocket, bouncing Bet and swamp milkweed. Some plants in this list might be invasive.
Keep in mind that mature citrus trees can easily withstand the loss of a few leaves. If you find and allow a few orangedog caterpillars to feed on a few leaves of a mature citrus tree in your landscape, you and your neighbors might get to enjoy the spectacular giant swallowtail butterfly.
More information on the giant swallowtail butterfly is available online at http://edis.ifas.ufl.edu/in134.
by Larry Williams | Apr 15, 2020
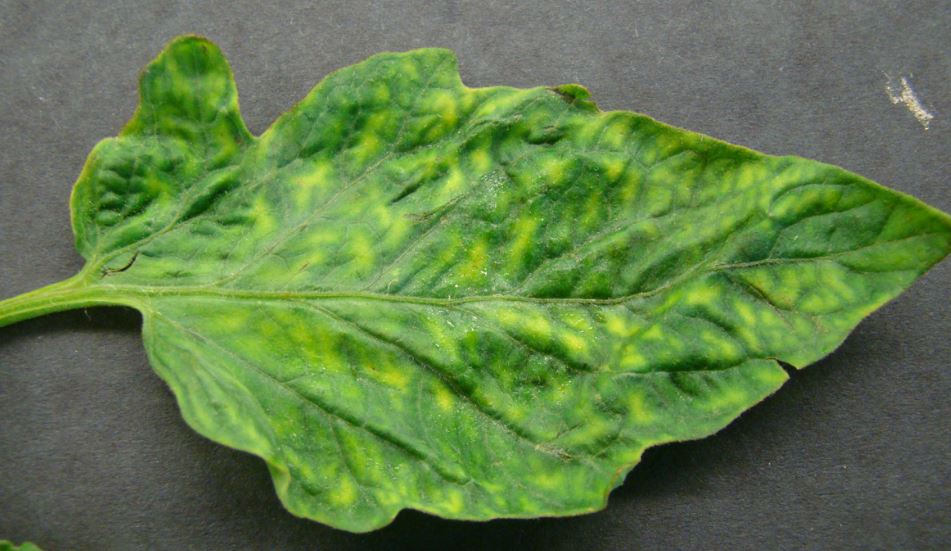
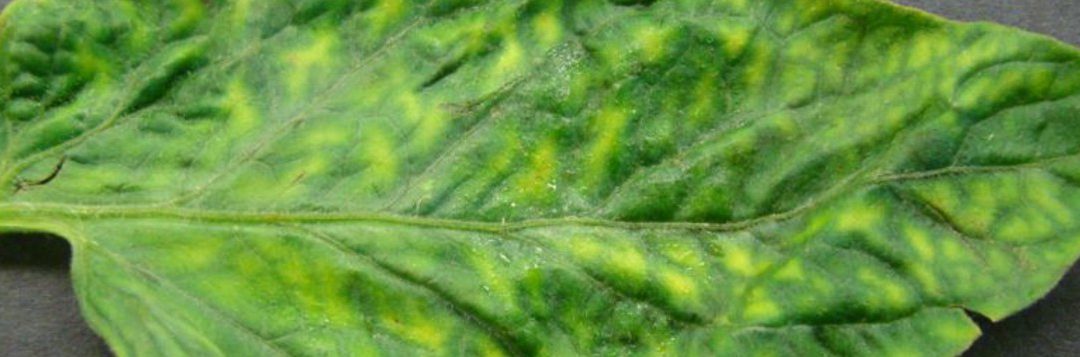
Did you know that the first virus discovered was in plants, not in humans? As early as 1857, tobacco farmers in the Netherlands recognized a new disease of tobacco. It wasn’t called a virus at the time as the causal agent was unknown. In 1886, Adolph Mayer, a German agricultural chemist, determined that the “tobacco mosaic” disease could be transmitted to healthy plants by rubbing them with infected leaf sap.
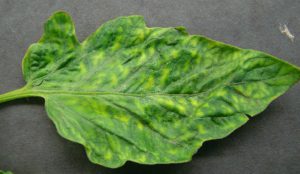
Tomato leaf with tobacco mosaic virus. Photo credit: UF Plant Pathology Department
When taking a plant pathology course in college, it amazed me that viral organisms were ever discovered. They are extremely small. So small that it was not until the development of the electron microscope in the late 1930s that scientists were able to see the structure of the tobacco mosaic virus. Viruses are 20 – 250 nanometers in diameter, about 100 times smaller than bacteria.
The discovery of fungi and bacteria came before the discovery of viruses as the cause for plant diseases. In most cases, we have many chemical options for control of fungal and bacterial diseases in plants. But there are few to no chemical options to control viral organisms in plants. By the nature of how a virus operates in a plant cell, chemical control results in death of the host cell, surrounding tissue and possibly the whole plant.
Control of viruses in plants involves eliminating the source of the virus such as nearby weeds, control of insect vectors that transmit the disease such as aphids and thrips and use of resistant plants.
Historically, plant diseases have caused major impacts on humans. In 1845, the Potato Famine in Ireland was caused by the fungus Phytophthora infestans. This disease was responsible for the death of more than 1 million people as it devastated the production of the potato as a major food source at the time and is credited for the beginning of plant pathology as a science. Cryphonectria parasitica, an introduced fungus, essentially wiped out the American chestnut as the dominant tree in the eastern U.S. forests during the early 1900s. The excellent wood was used to build homes and the nutritious nuts were eaten by humans and fed to livestock. Currently, UF/IFAS plant pathologists are working to solve Citrus Greening, a bacterial disease that has severely damaged the citrus industry and has the potential to completely eliminate citrus production in Florida.
If it were not for the land-grant university system, of which Extension Agents are a part, there would be few to no plant pathologists in the United States. It is these land-grant universities, like the University of Florida and others, that provide plant pathology courses, training, research, development and ultimately that graduate with degrees those who go on to careers in the field of plant pathology, discovering new diseases and developing controls for these diseases.
by Larry Williams | Mar 20, 2020
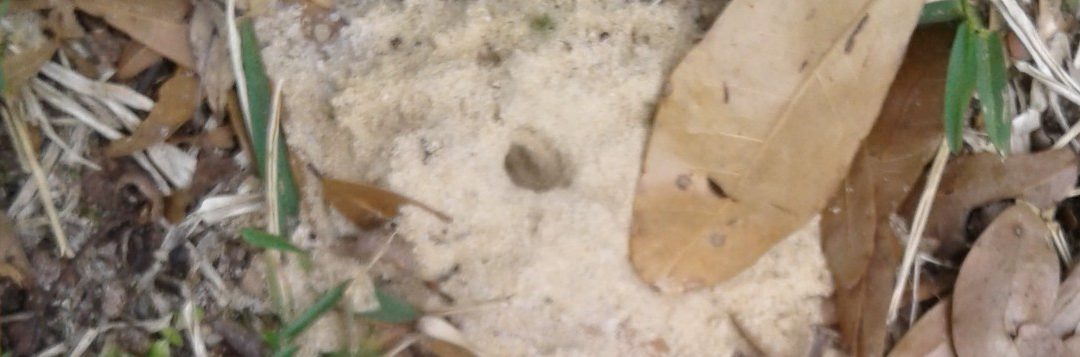
Ground-dwelling bees get a lot of attention in late winter and spring as they create large numbers of small mounds in local lawns and landscapes.
Many people become concerned as they see these bees hovering close to the ground out in their lawns and landscapes. But these bees are interesting, docile, beneficial and are unlikely to sting.
These bees are known as andrenid bees or mining bees. Andrenid bees are solitary. As the name implies, they live alone. However, they may nest in close proximity to one another but they do not form a colony or hive. They produce individual mounds with a small entrance hole. The bees are approximately ½ inch in length with a black body.
 Richard Sprenkel, retired UF/IFAS Entomologist, explains their biology in today’s article.
“After mating in late winter and early spring, the female selects a site that has dry, loose soil with sparse vegetation. She excavates a vertical shaft in the soil that is approximately the diameter of a pencil and up to eighteen inches deep. Off of the main shaft, the female will construct several brood chambers that she lines with a waterproof material. The female bee provisions each brood chamber with pollen and nectar on which she lays an egg. The pollen and nectar sustain the larva until fall when the overwintering adult is formed. Early the following spring, adult bees emerge from the ground to begin the cycle again. There is one generation per year.”
The small mound of soil that is excavated from each burrow brings additional attention to the activity of the bees. As males continue to hover in the area of the burrows looking for unmated females, the bees appear more menacing than they actually are. Andrenid bees have a tendency to concentrate their nests in a relatively small area. The openings to the underground burrows may be no more than three to four inches apart.
The threat of being stung by these bees is usually highly overrated. The males cannot sting and the females are docile and not likely to sting unless stepped on, handled or threatened. While entrances to the tunnels and excavated soil may appear disruptive to the lawn, they usually are not damaging. It may appear that the grass is thin because of the bees but it is more likely that the bees are in the area because the grass was already thin. Control is usually not necessary. Because the andrenid bees forage to gather pollen and nectar, they are actually beneficial. They serve as pollinators this time of the year.
**** Photo Credited to UF / IFAS Extension Jackson County courtesy of Josh Thompson****