by Molly Jameson | Sep 25, 2018
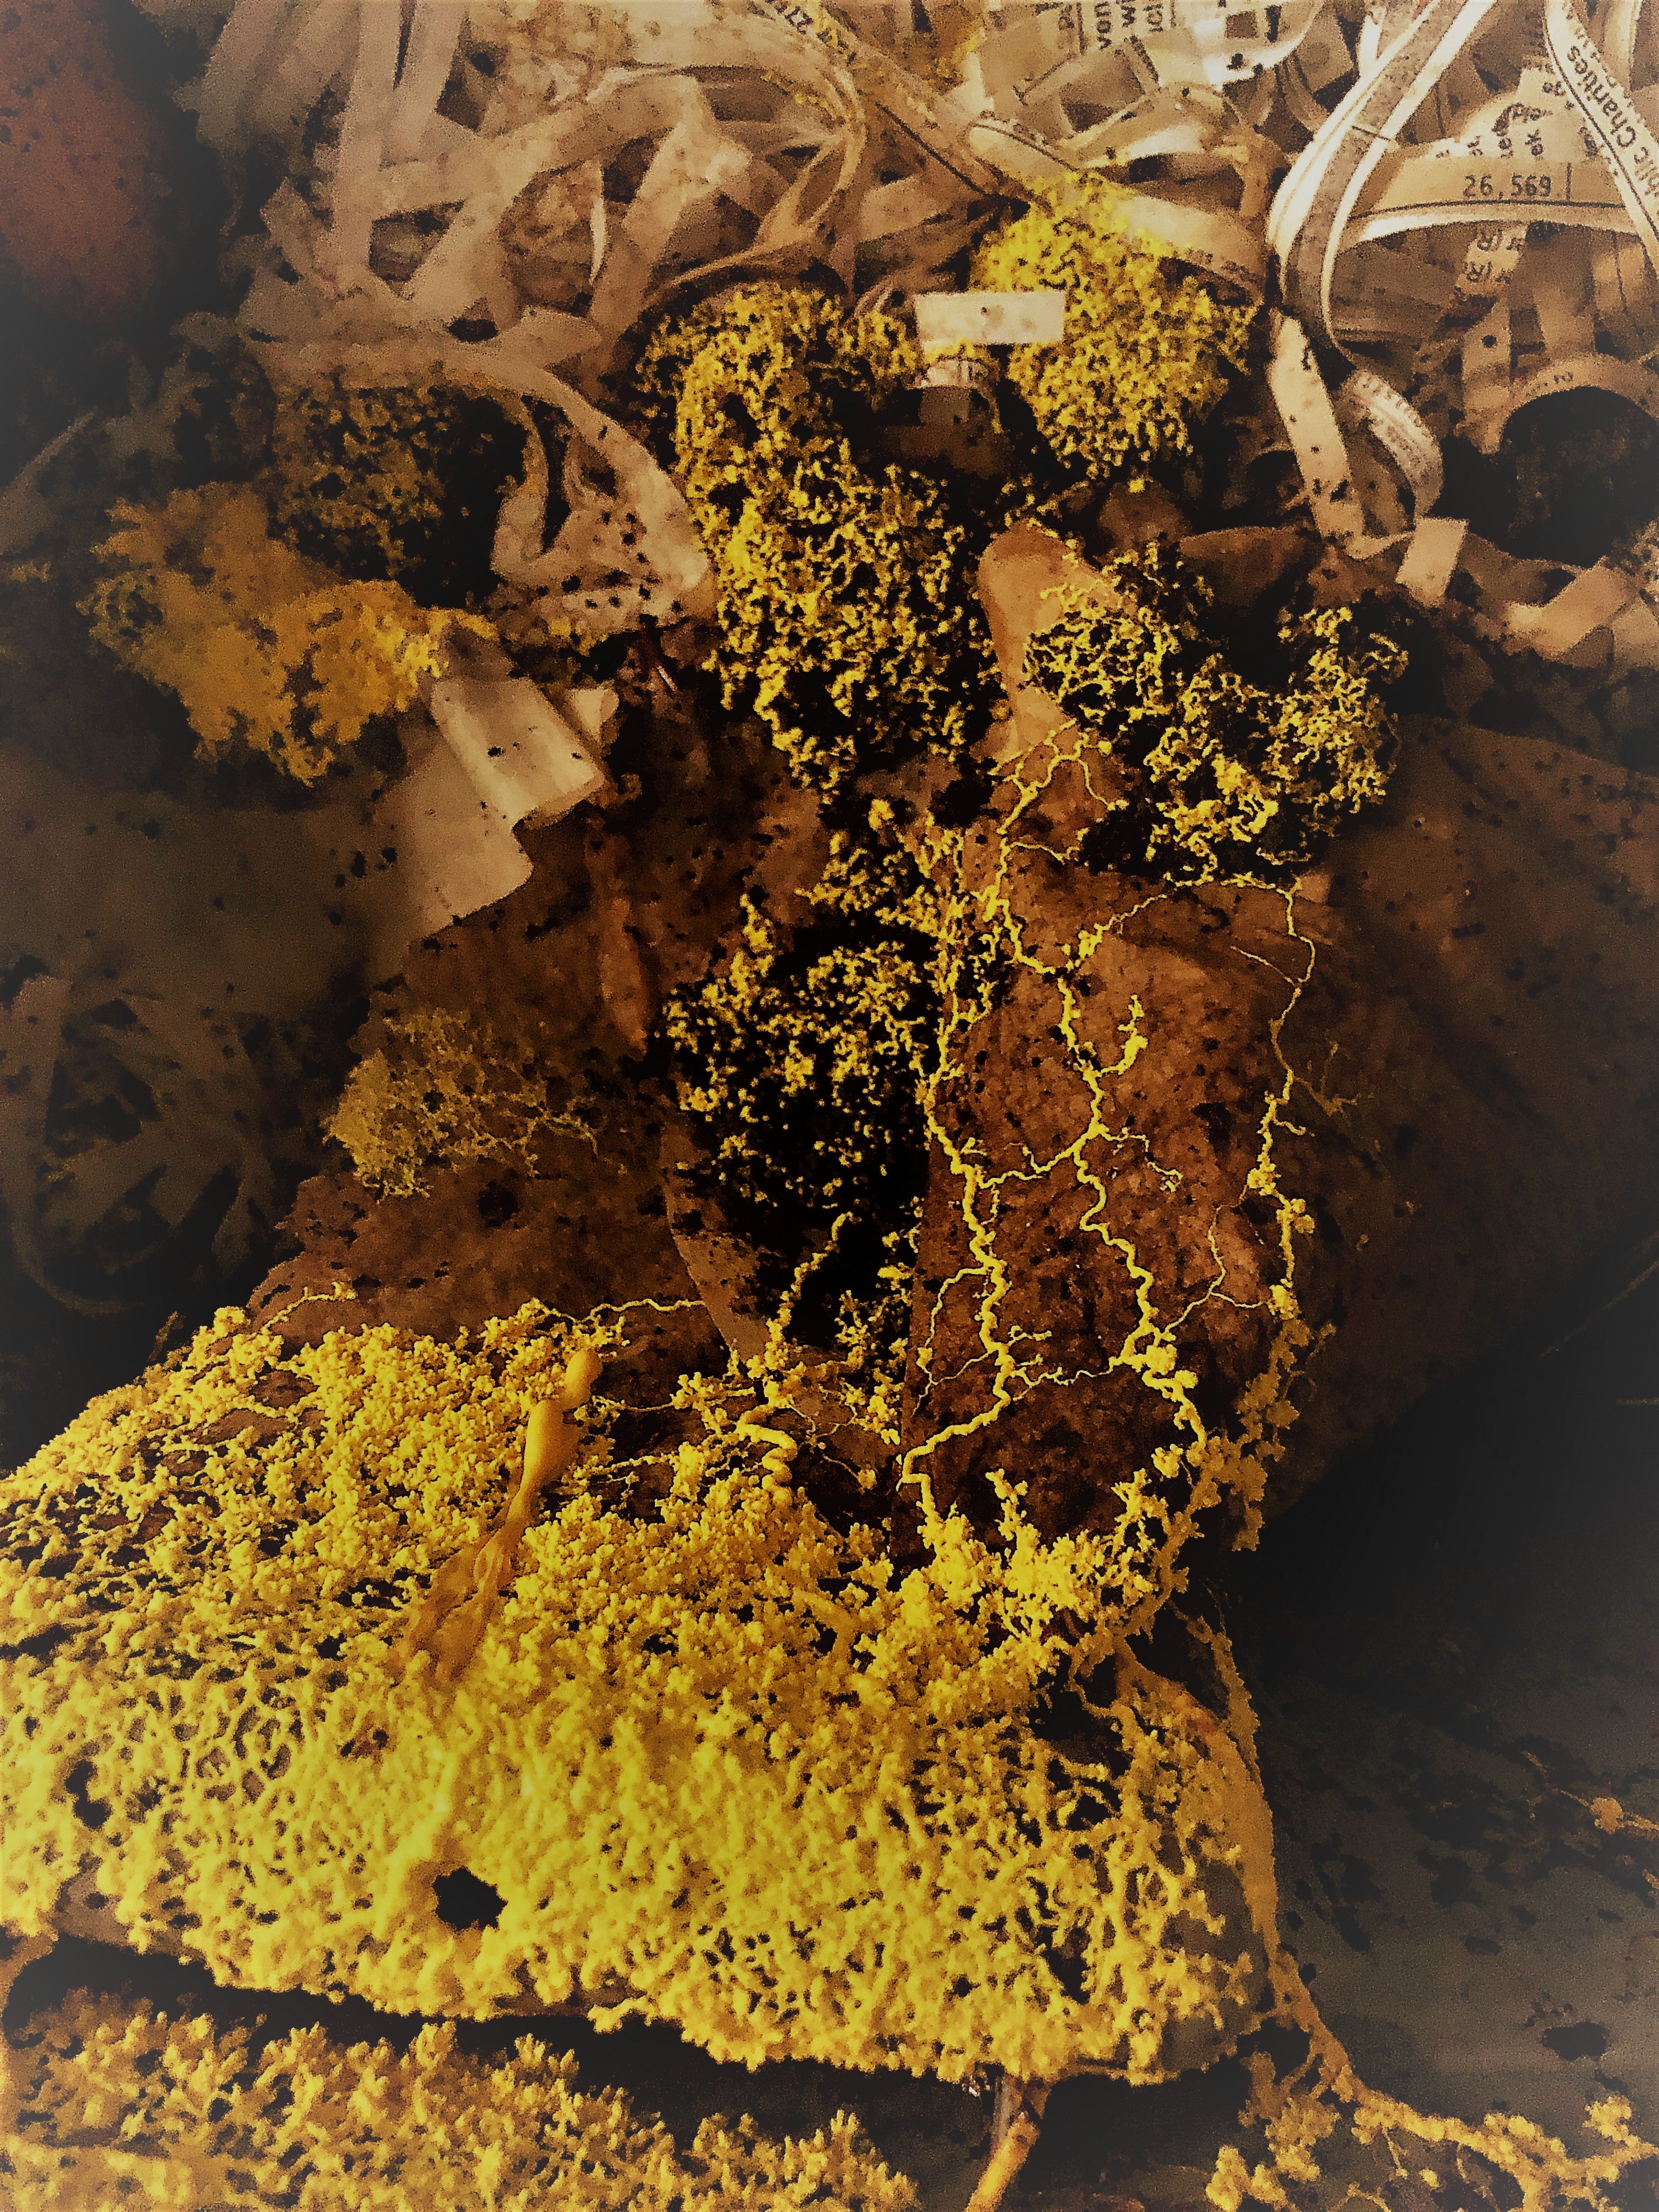
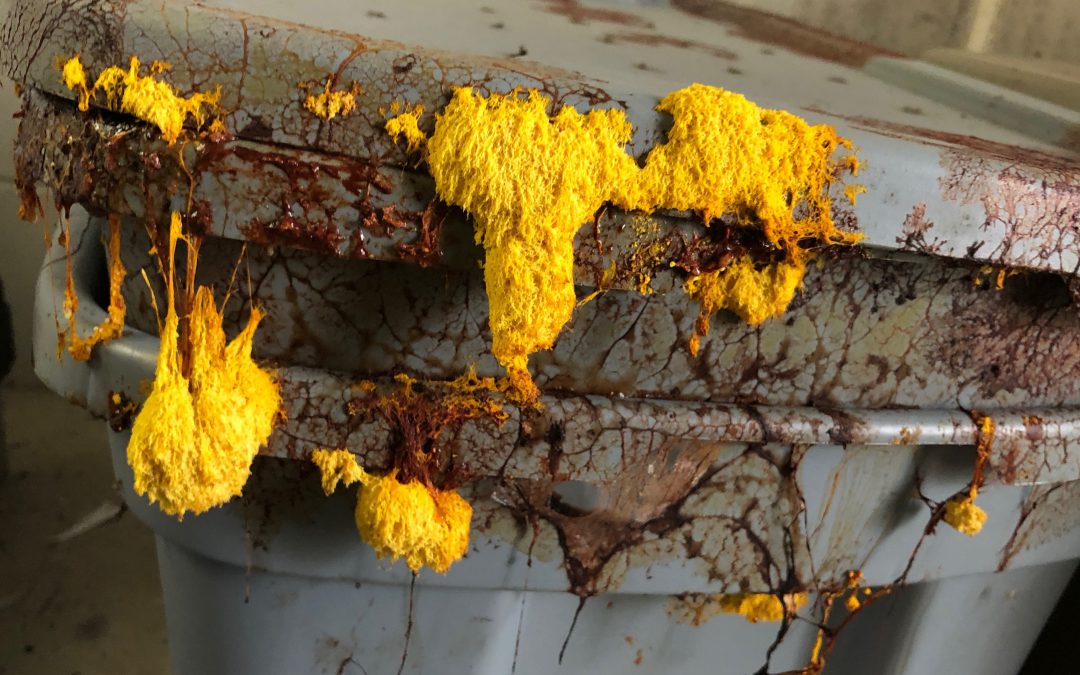
The plasmodium of Fuligo septica slime mold consuming bacteria and fungi inside the office worm bin. Photo by Molly Jameson.
Just when we thought we had our Leon County Extension vermicompost bins all figured out for recycling office food waste with the aid of worms…aliens invaded. I instinctively started looking all over for my “Ghostbusters” proton gun and backpack – but when they didn’t turn up, I decided to retreat and do a little research.
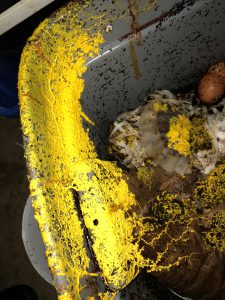
Fuligo septica moves as a mass of protoplasm about a millimeter an hour. Photo by Molly Jameson.
A mesmerizing bright yellow substance had taken over the entire top of the office worm bin, and when the lid was lifted, the yellow ooze was streaming down the inside of the lid and into the bin. Long, squiggly zig zags seemed to be engulfing nearly all the contents within the worm bin.
Unlike Ray Stantz’s reaction when he first meets Slimer devouring the room-service leftovers in the hotel hallway in the original “Ghostbusters,” we were all a little taken aback by our surprise intruder.
“Oh my! Will it kill our worms? Is it toxic? Where did it come from?”
Turns out our slimy yellow visitor was Fuligo septica; a species otherwise known as – and here’s hoping you’re not eating – dog vomit slime mold. A fitting name, indeed. To our amazement, Fuligo septica is not actually a mold (aka: fungus). Nor is it a plant, animal, or bacteria. It is actually a plastid, in the kingdom Protista and class Myxogastria, whose wind- or insect-spread spores converge and divide into a singular giant cell containing millions of nuclei, known as a plasmodium. These individuals come together to form a larger plasmodium and move as a mass of protoplasm, about a millimeter per hour, to feed on microorganisms living in decaying plant material.
I know what you’re thinking…this smattering of scientific terms has you right back in high school science class, and you’re feeling a bit woozy. But really – who needs science fiction movies like “Ghostbusters” when we have scientifically-explained neon slime molds all around us?
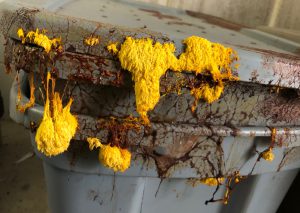
After a few days, Fuligo septica transforms into a pillow-like fruiting body in preparation for spore dispersal. Photo by Molly Jameson.
Besides the potential of Fuligo septica spores to be an allergen to those who are susceptible, this surprisingly common slime mold is not toxic to people, plants, or animals. It can be found on rotting bark and forest floors in nature – or on wood mulch in urban areas – normally when conditions are moist. The microorganisms the slime mold consumes are mainly bacteria and fungi, which are also very much present in the decaying food scraps and coffee grounds within a worm bin. And although Fuligo septica is harmless to people, it needs to watch out for us, as it is actually edible! Appropriately, another name for dog vomit slime mold is scrambled egg slime, as indigenous people in some areas of Mexico have collected the mold and scrambled it like eggs. Breakfast anyone?
Although real-life slime molds give Slimer a run for his money, the plasmodium blob of Fuligo septica will not stay its striking yellow amorphous shape for long. After a few days, it transforms into a pillow-like aethalium – a spore-bearing fruiting body like that of a mushroom – then degrades, darkens to a pinkish tan color, and finally releases its spores to start anew when conditions are right.
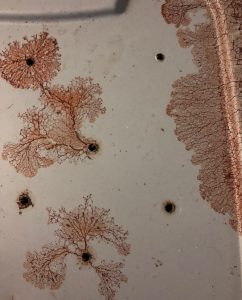
As the slime mold degrades, it darkens to a pinkish tan color, and releases its spores into the air. Photo by Molly Jameson.
Slime molds have stood the test of time, as analyses of their DNA has revealed they’ve been on Earth approximately a billion years! For reference, that’s hundreds of millions of years before plants or animals. And it’s a good thing Fuligo septica is here, because some of its characteristics has shown a lot of potential to be helpful, including as antibiotics, an ability to fight cancer cells, as antimicrobials, and environmental site remediation due to its ability to hyper-accumulate toxic heavy metals, such as zinc, and convert them to inactive forms. Scientists have discovered it’s the same yellow pigment that gives Fuligo septica its striking color that also forms a chelate with the heavy metals.
So, if you’re walking through a forest, down a path of mulch, or tending to your worm bin and come across this eye-catching, bright-yellow blobby creature, let this plasmodium do its thing. Probably better to scramble some actual eggs, lest your guests be squeamish.
by Molly Jameson | Aug 20, 2018
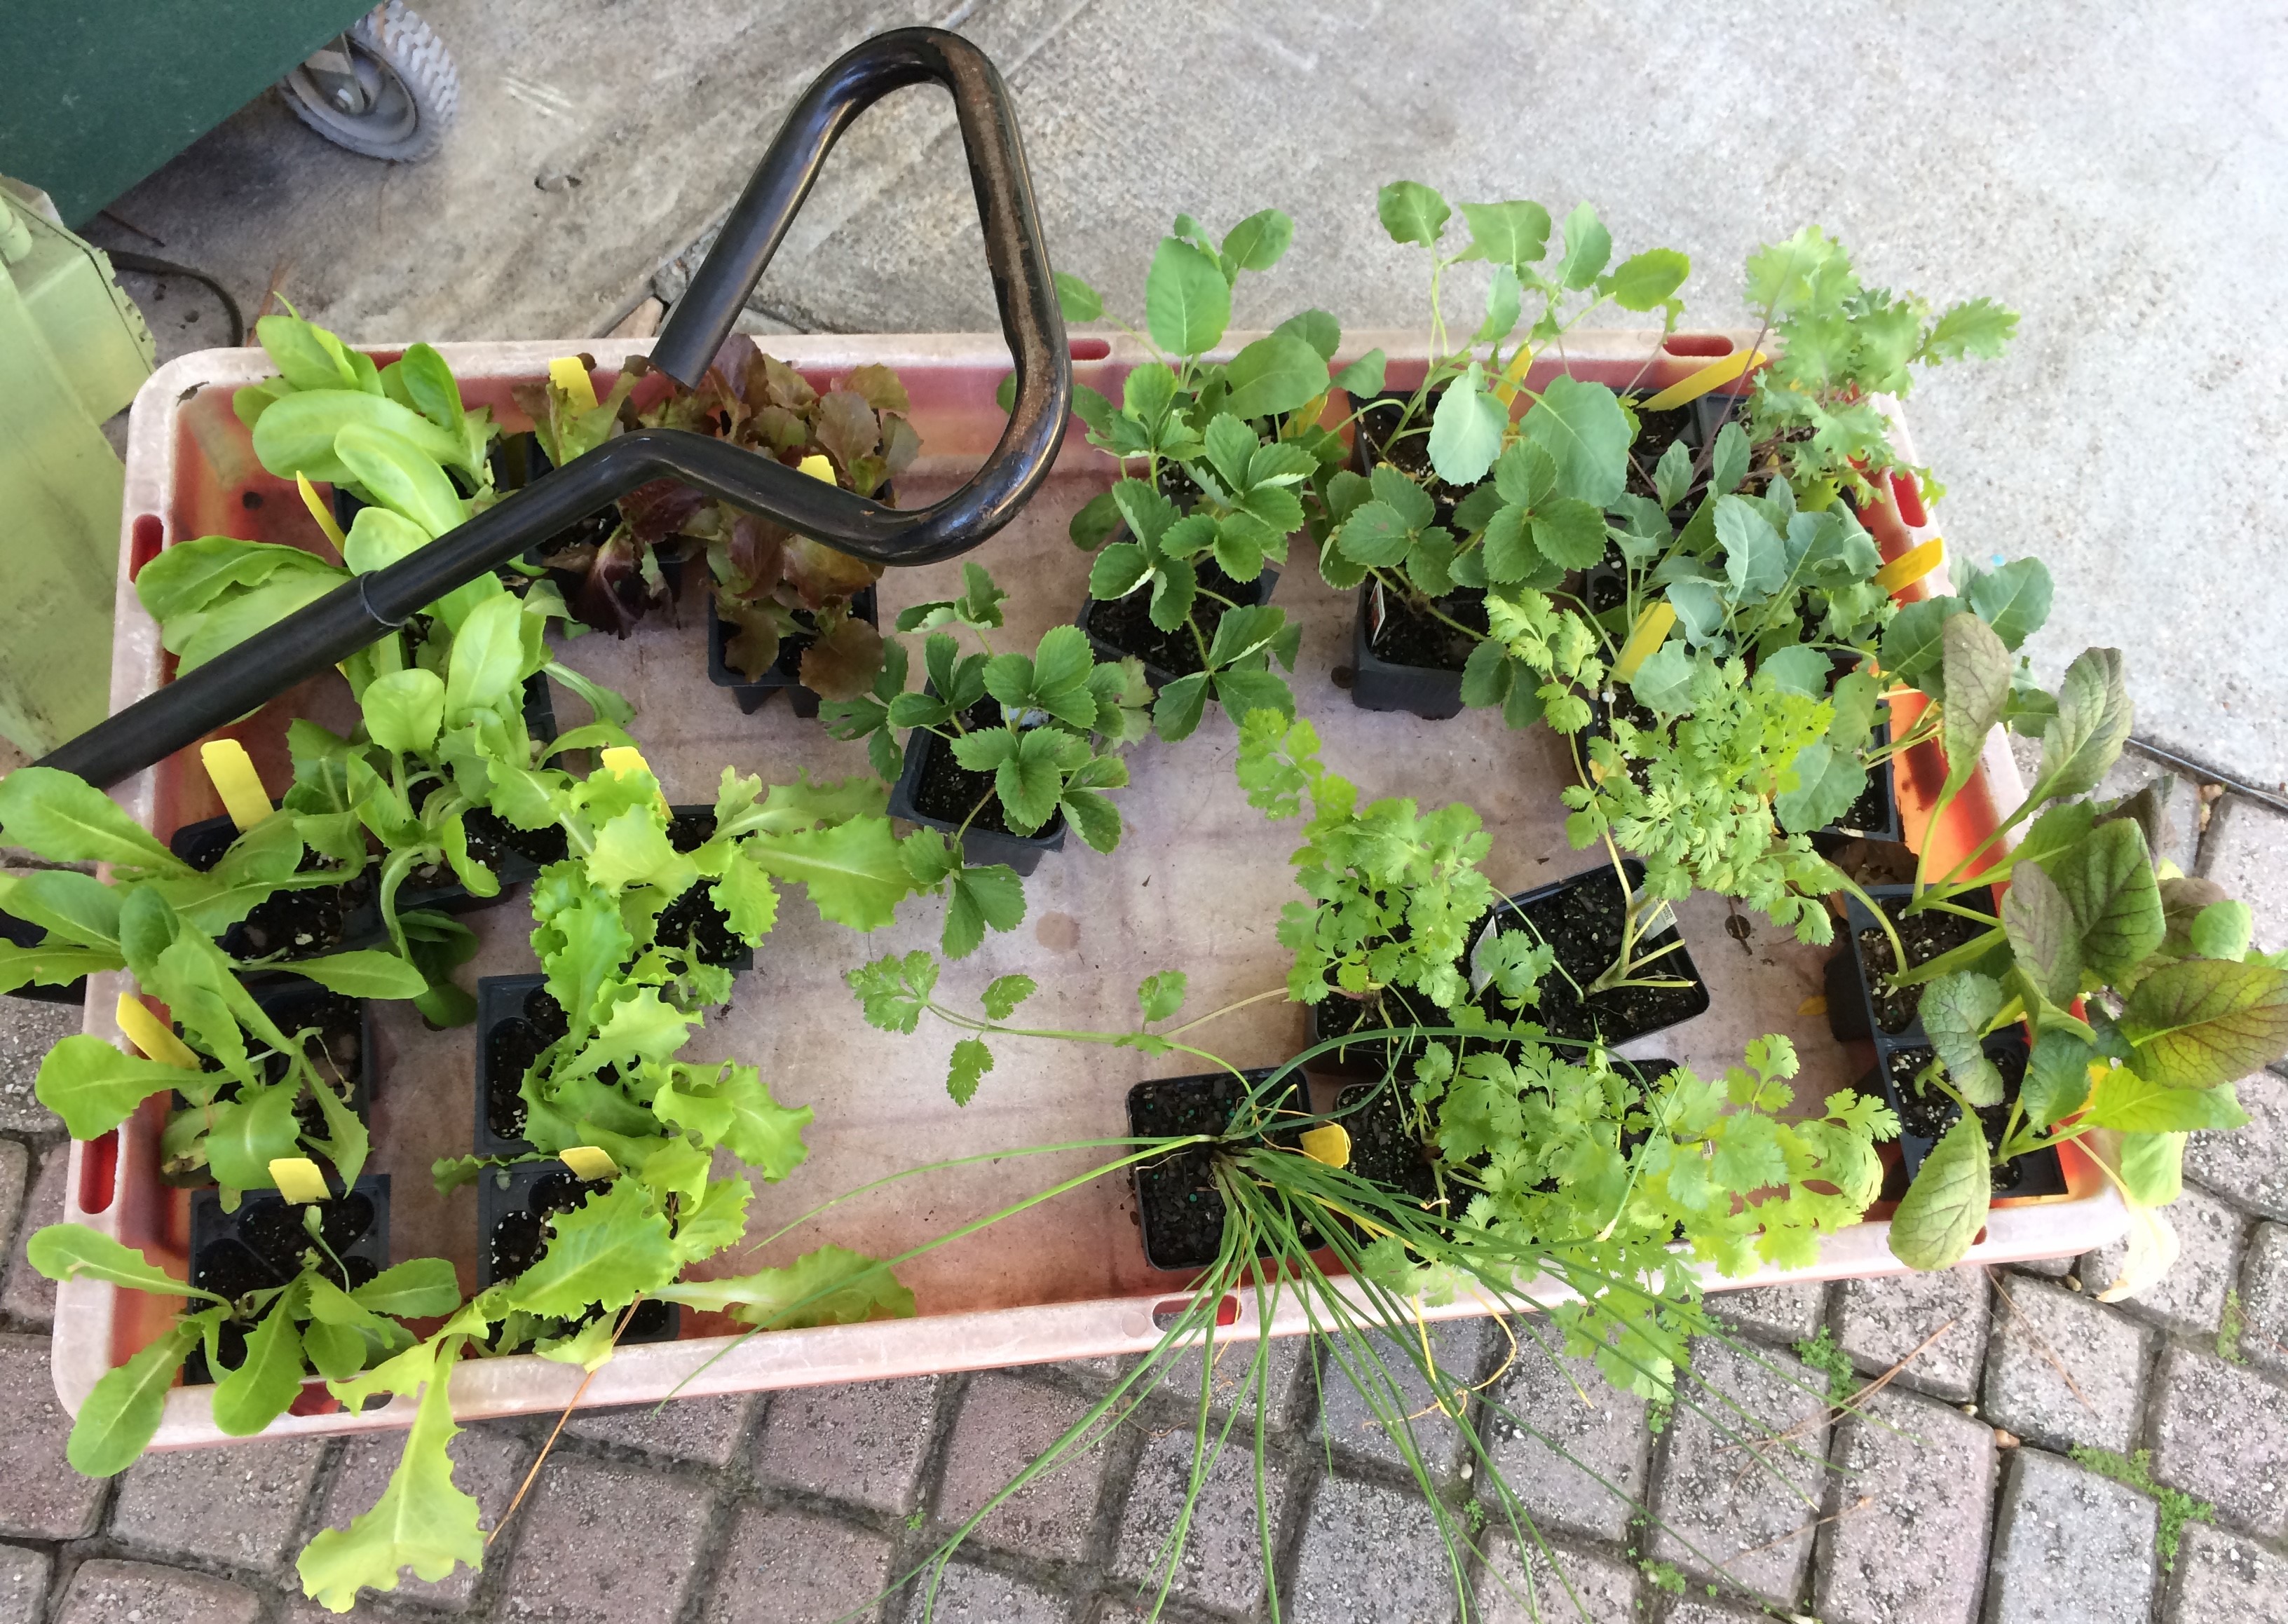
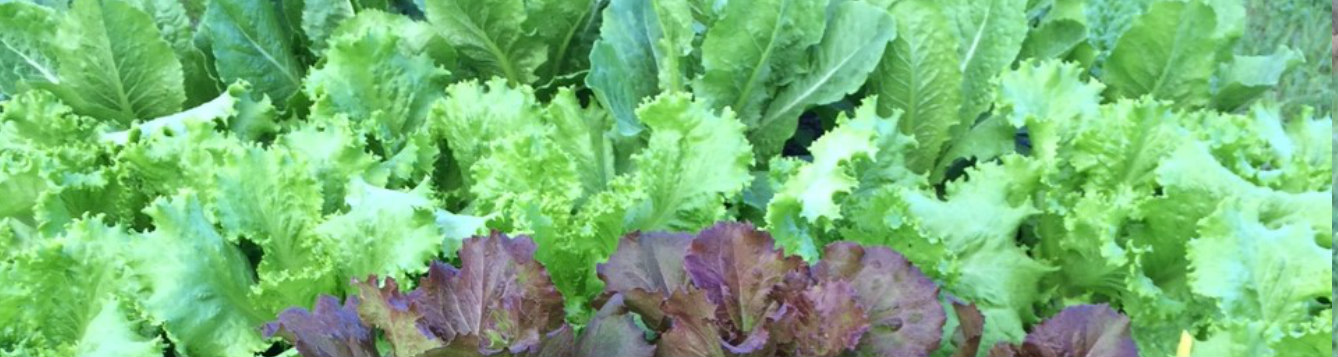
Start preparing now so your fall garden will be full of dark leafy greens, multi-colored lettuces, and root vegetables of all shapes and sizes. Photo by Molly Jameson.
August is a double-edged sword. The oppressive heat is at its pinnacle – where even the thought of spending time in the garden makes you break into a sweat – but it is also the time of year that visions of fall start coming into focus, and you can’t help but peek at the weekly forecast for signs of declining temperatures.
If your garden looks anything like mine, there are sweet potato vines weaving in and out of every corner of sunlight they can find. The sweet peppers you let fully ripen are bright red and sweeter than ever. You may have already reaped the reward of your watermelons, but you’re still hoping you can get the harvest timing right for the late season bloomers. Your okra is as tall as you – maybe even taller – and you’re grateful, for their big oblong heart-shaped leaves are shading out at least some of those warm-season weeds.
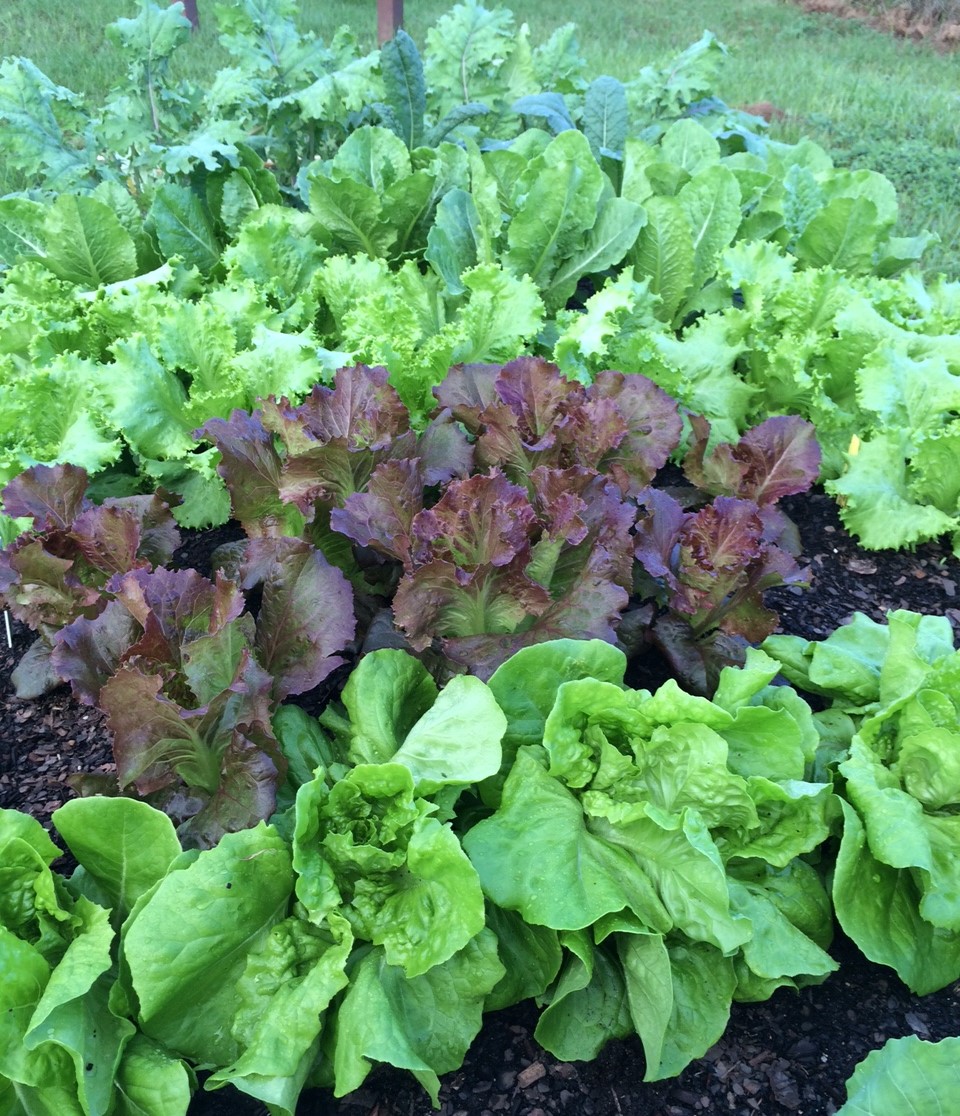
Fall is the time to start growing kale, lettuce, onions, parsley, mustard greens, and much more. Photo by Molly Jameson.
But the seasons are-a-changing, and soon you’ll be pulling up the last of your summer garden to make room for dark leafy greens, a cornucopia of roots, and a rainbow of lettuce varieties.
If this is making you want to rush to your nearest plant nursery and unearth all your half-used fall seed packets, then come on down to the Leon County Extension Office in Tallahassee to join us for our annual Fall Backyard Gardening Series!
This is a two-part series, running from 6:00 to 8:00 p.m. on September 4 and 6:00 to 8:00 p.m. on September 11, 2018, at 615 Paul Russell Road. I, along with Extension Agents Mark Tancig and Trevor Hylton, will discuss garden site selection, soil and fertilization, and fall planting and gardening techniques. As a bonus, you’ll leave with freshly planted vegetable seeds to take home to later transplant into your garden.
Please register on Eventbrite. The cost for both evenings is $10, and light refreshments will be provided. For more information, contact Molly Jameson at mjameson@ufl.edu or by phone at 850-606-5219.
And if you’re not in the Tallahassee area, check with your local extension office to see what fall gardening events they may have available. Tending a fall garden in Florida can be one of the most rewarding outdoor endeavors you can experience!
by Molly Jameson | Jun 21, 2018

Mrs. Henry C. Mills in 1966 with her African violets at the North Florida Fair
flower show. Photo by Dan Stainer/State Archives of Florida.
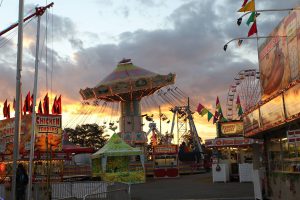
Growing up, as soon as I entered the fair gates, I always headed straight for the rides. If I was lucky, I was able to get an unlimited pass strapped around my wrist and didn’t need to worry about rationing any tickets. Although I usually didn’t remember the names of particular rides – they were clear in my imagination. The spaceship, the circular mini roller coaster, the alien arms… and of course, the Ferris wheel. It wasn’t until I was about a dozen rides in – and starting to feel a little queasy – that the fun houses and win-a-goldfish-by-throwing-a-ring or shoot-a-basketball-for-a-giant-stuffed-tiger games drew my attention. After that, I was ready for funnel cake. Maybe even a corn dog and an assortment of fried cheese, pickles, and the like. Inevitably, I would eat too much and be out of commission for any more rides I was hoping to squeeze in – or squeeze into! This is when I might finally make my rounds through one or two of the giant warehouse-looking buildings that lined the way to the exits, where I knew there was at least a llama or a goat to be fed at the petting zoo.
Instead of simply attending the North Florida Fair this year, submit your garden’s best for competition. Photo by North Florida Fair.
But when I started volunteering at the Leon County Animal Shelter as part of the 4-H Pet Partners at age 12, I was introduced to these buildings in a whole new light. We were assigned the task of creating papier-mâché cats and dogs to display at the fair to help build awareness of pet overpopulation. I remember my dog well – he was beagle-like, with long droopy paper ears and stiff pointy legs that I struggled to keep balanced. The day we went to set up our display, my adrenaline soared, as I knew our creations were to be judged and ribbons to be bestowed. Ever since, I no longer view the fair buildings as a last stop – rather, I relish my stroll through each of them, as they contain so many handmade treasures, many of which are adorned with blue rosettes of triumph.
The tradition of displaying and competing for the best quality handiworks at the fair goes all the way back to the Middle Ages and Renaissance, where merchants sold and traded agricultural goods that had been grown over the summer and freshly harvested in the fall. Naturally, competitions arose during these times, as they strove for the finest products.
Today, fairs reflect the personality of an area, and nearly universally include judges who inspect home grown fruits and vegetables, flowers, preserved foods, and baked goods entered into competition by the community. The North Florida Fair awards about $80,000 in cash prizes to citizens who create and grow various items. Anyone living within the 24 counties that comprise North Florida – from the Suwannee, west to the Alabama line – is eligible to enter as many of the exhibit categories as they would like.

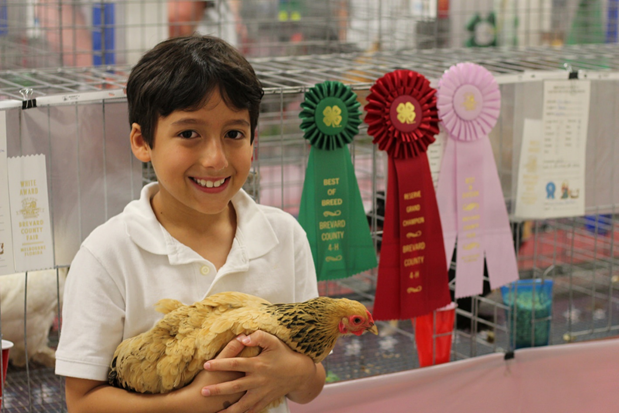
A youth showcasing his prize winning chicken at the North Florida Fair. Photo by Aly Donovan.
The exhibits are arranged into various departments, such as Home Agriculture, Capital City Garden Club Flower Show, Poultry, Baked Goods, and Fine Arts and Crafts. Within each department, there are various classes that are split into certain age divisions (i.e., youth only) or experience levels (i.e., amateur vs. professional). Under the Home Agriculture department there are 42 classes, including 13 classes covering fresh vegetables. The Capital City Garden Club Flower Show department has 13 classes, including annuals, perennials, hanging baskets, fruiting shrubs, trees, and vines, succulents, and much more. If you would like to submit something you’ve grown, now is the time to begin planning, as this year’s fair is set for November 8-18.
All of the details for each department and class can be found on the North Florida Fair website (http://northfloridafair.com/), under the Exhibitors tab. Pay close attention to the application and submittal deadlines for each specific category, as most items are due for judging the week prior to the fair opening.
So, let nostalgia win you over as you prepare your home-grown vegetables and flowers for submittal to the North Florida Fair. You might just earn a blue ribbon to be displayed for all fair attendees to admire, either as they walk off a full stomach in preparation for more rides, on their way to the exits, or just as they get started creating their own fond fair memories.
by Molly Jameson | May 23, 2018
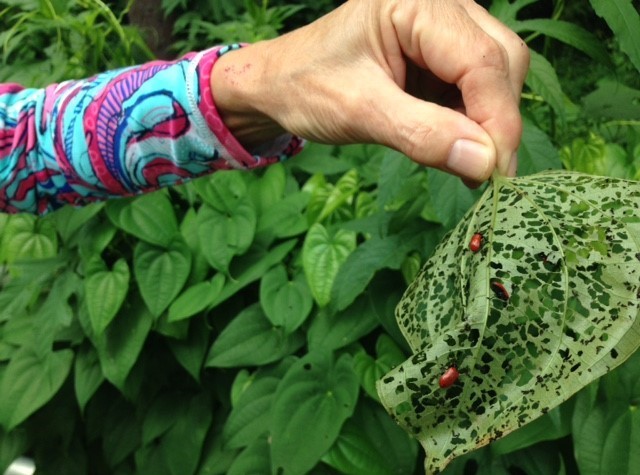
Air potato leaf beetle attacking the invasive air potato plant.
Air potatoes got you down? Have no fear, for the Air Potato Challenge is coming to Leon County!
Register now to attend the Air Potato Challenge event on May 18, 9 a.m. to 12 p.m. at the FAMU Center for Viticulture and Small Fruit Research (6361 Mahan Drive, Tallahassee, FL) and receive a supply of air potato beetles to use on your property.
After years of testing, air potato beetles became available as a biological control in 2012 to help combat the invasive herbaceous perennial air potato vine (Dioscorea bulbifera). Air potatoes arrived in south Florida from China in the early 1900s and have steadily crept north until they are now invading the Panhandle Region. Fortunately, air potato beetles have dietary requirements that are very specific, relying strictly upon air potatoes to complete their life cycles.
This is why a team of researchers and Extension agents have come together to help spread air potato beetles as a biological control strategy. Many agencies and counties are involved in this effort, including UF/IFAS Extension St. Lucie County, UF/IFAS Indian River Research and Education Center, the Florida Department of Agriculture Division of Plant Industry, the USDA, Florida Fish and Wildlife, UF/IFAS Extension Leon County, and Florida A&M University.
From 9 a.m. to noon on May 18, Florida residents and public land managers are invited to come out to the FAMU Center for Viticulture and Small Fruit Research to get more information about the invasive air potato and its biological controller, the air potato beetle, and receive a supply of beetles to use on their properties. Please pre-register on the Eventbrite page (https://www.eventbrite.com/e/may-18-2018-air-potato-challenge-leaf-beetles-available-for-the-public-leon-county-fl-tickets-44793035174).
You can find more information about air potatoes and air potato beetles on the UF/IFAS Solutions for Your Life Air Potato Biological Control page (http://bcrcl.ifas.ufl.edu/airpotatobiologicalcontrol.shtml).
What: Air Potato Challenge
Where: FAMU Center for Viticulture and Small Fruit Research, 6361 Mahan Drive, Tallahassee, FL
When: May 18, 2018, 9 a.m. to 12:00 p.m.
Cost: Free of charge, but please pre-register
Registration: https://www.eventbrite.com/e/may-18-2018-air-potato-challenge-leaf-beetles-available-for-the-public-leon-county-fl-tickets-44793035174
by Molly Jameson | Mar 26, 2018
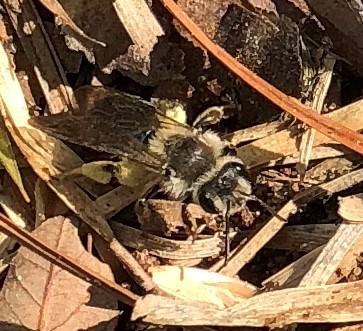
Digger bees resemble honey bees, although they do not sting, and would only bite if mistreated. Photo by Molly Jameson.
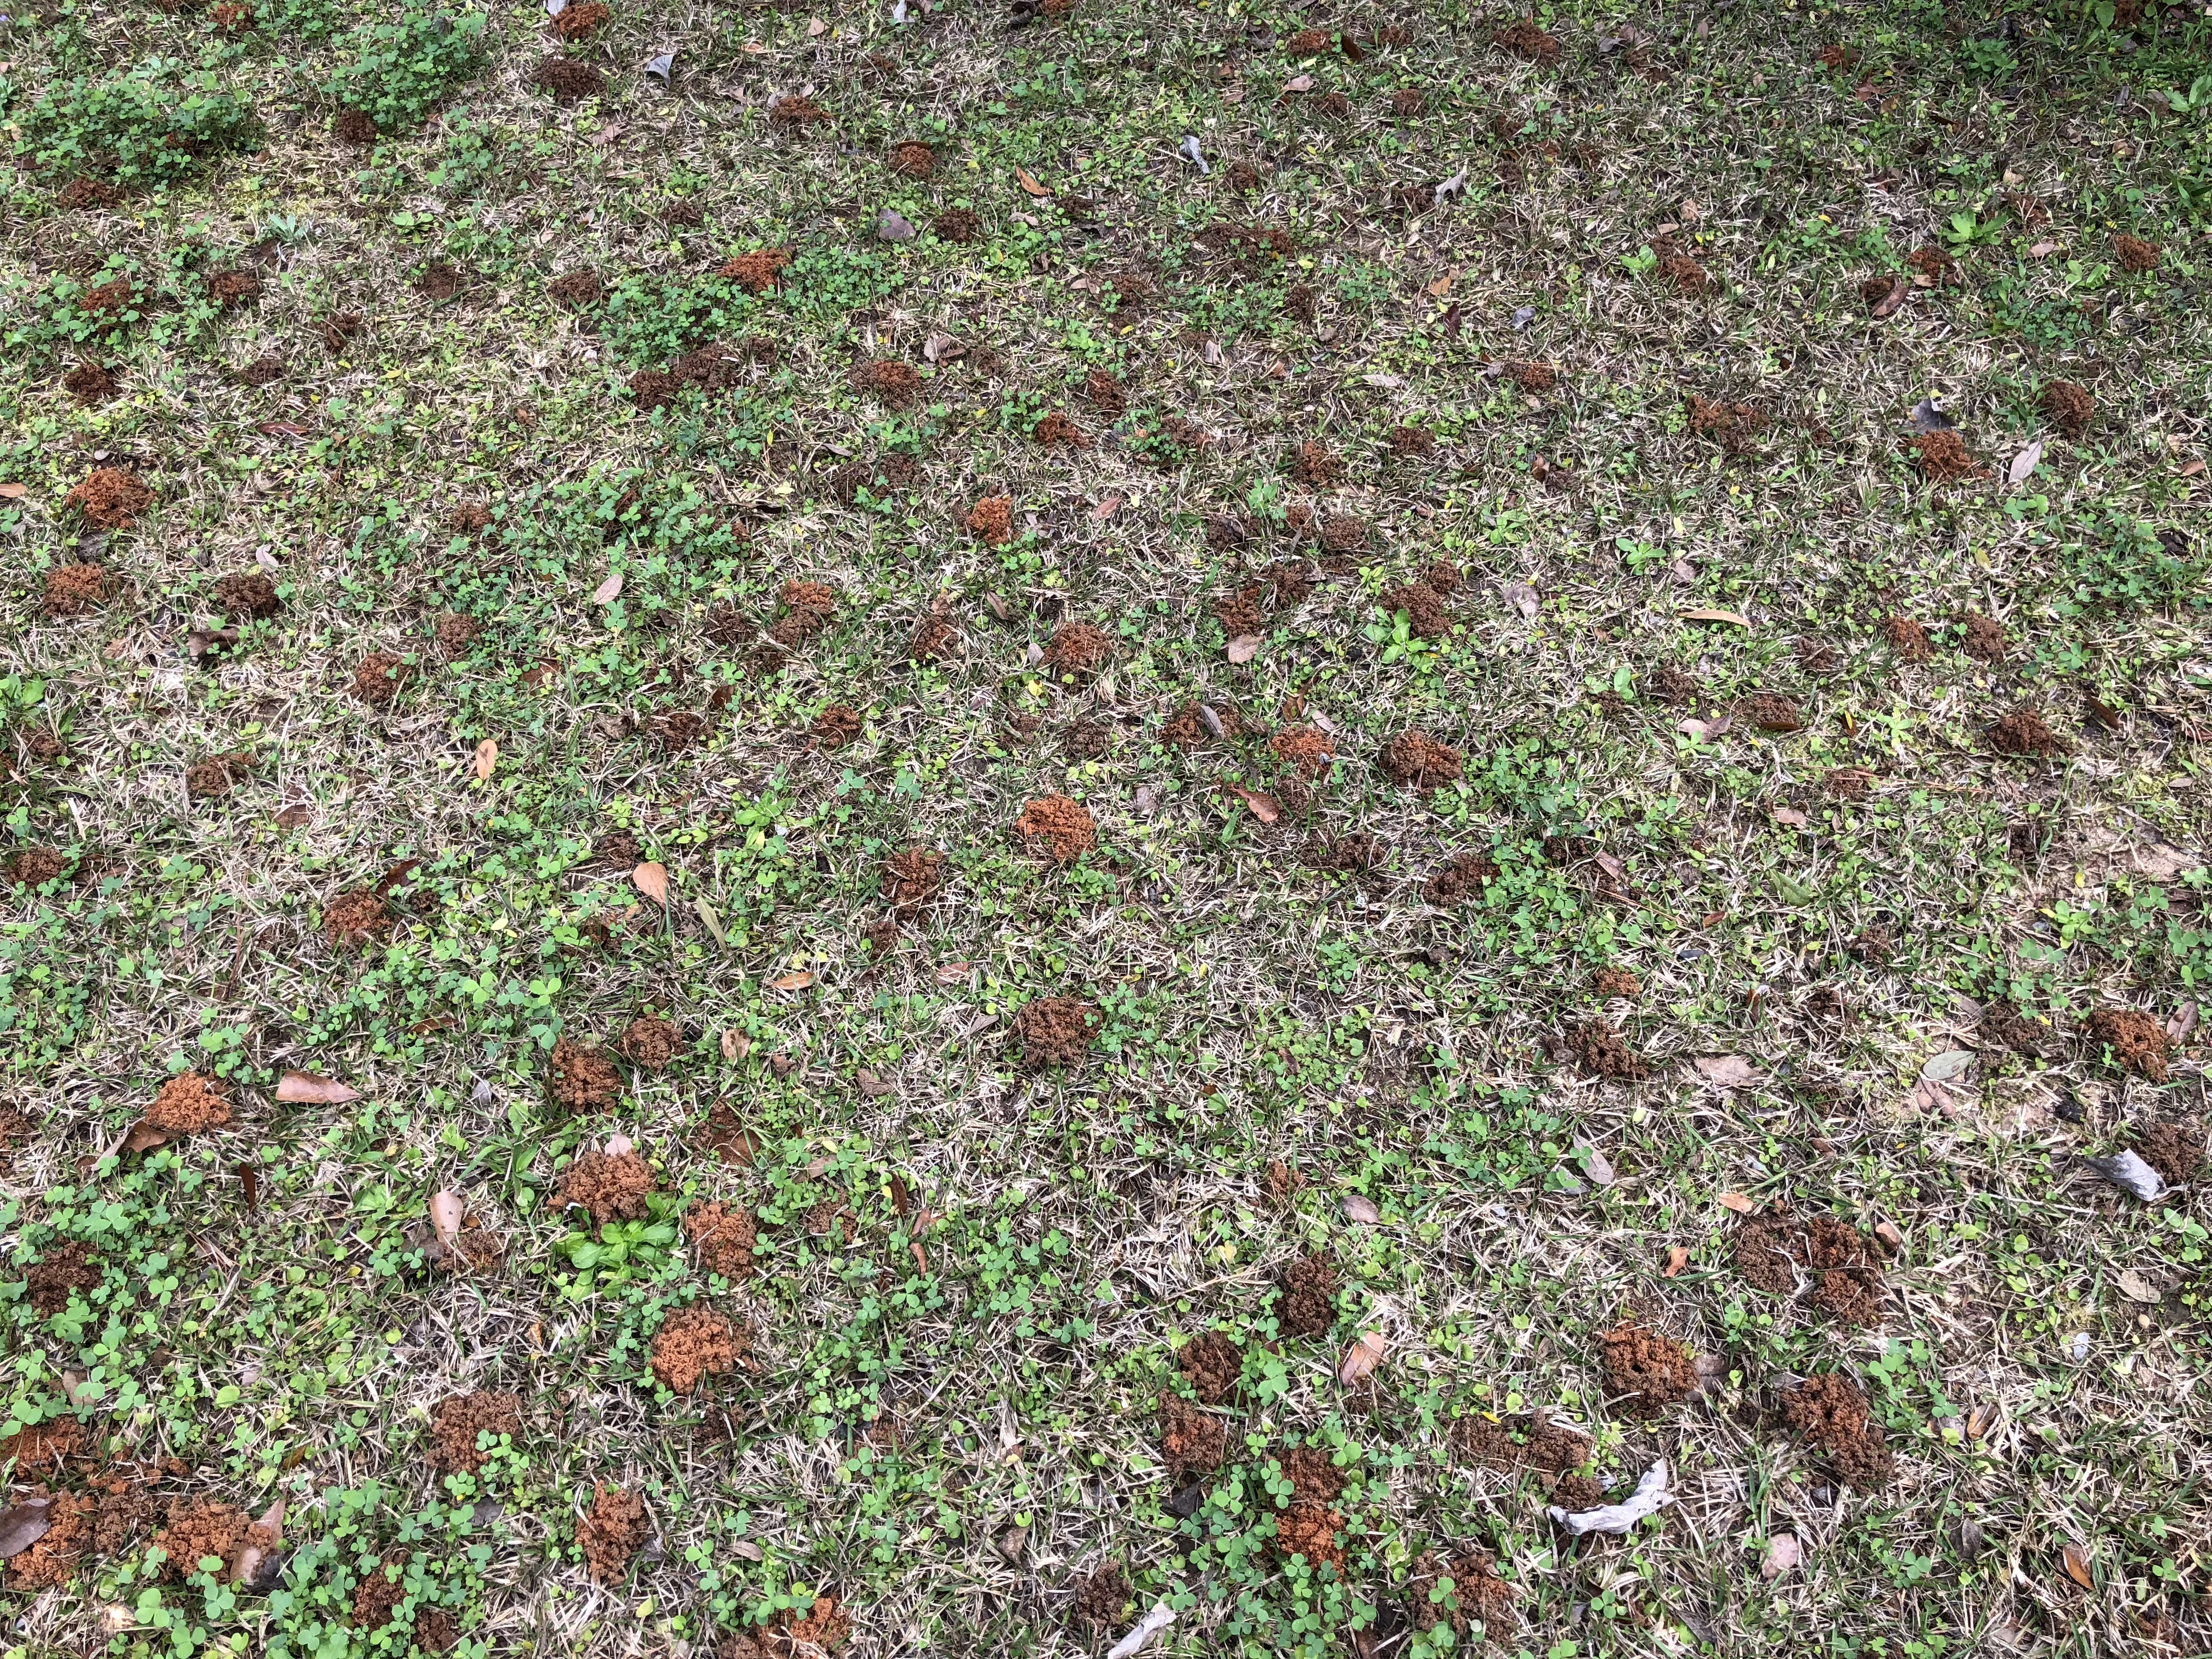
Have you noticed many little dirt piles that resemble mini ant mounds around your yard? Well, fear not, for these mini mounds are made by digger bees who are excellent, yet ephemeral, early-spring pollinators.
These solitary ground-nesters are native to our area and only appear for four to six weeks to raise their offspring. Although they do not produce honey, they resemble honey bees in size and shape. They also do not sting and would only bite if they were handled roughly.
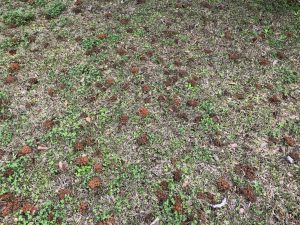
Female digger bees build their nests close together, creating clusters of many small mounds. Photo by Molly Jameson.
Otherwise known as miner bees, females create their underground cylinder-shaped nests in dry, well-drained soils, often right next to each other, creating patches of many mounds in a small area.
These bees will pollinate many early-spring blooming flowers – a bonus for gardeners – as they collect pollen to add to each cell that they excavate. They then lay their eggs on these pollen masses, cap the cells with clay, and complete their life cycles. The eggs hatch about five days later and emerge from the chamber created by their mothers.
While digger bee mounds may detract from an otherwise tidy lawn, they will do no harm, and can actually be beneficial, in that they improve air, water, and nutrient percolation. If you feel you must discourage their presence, simply run a sprinkler over the area as their season approaches. They prefer dry soil rather than wet soil and will look elsewhere to build their nests.
But better yet, take a seat on your front or back porch, pour yourself some lemonade, and take in the soothing hums of their wings as they do their work.