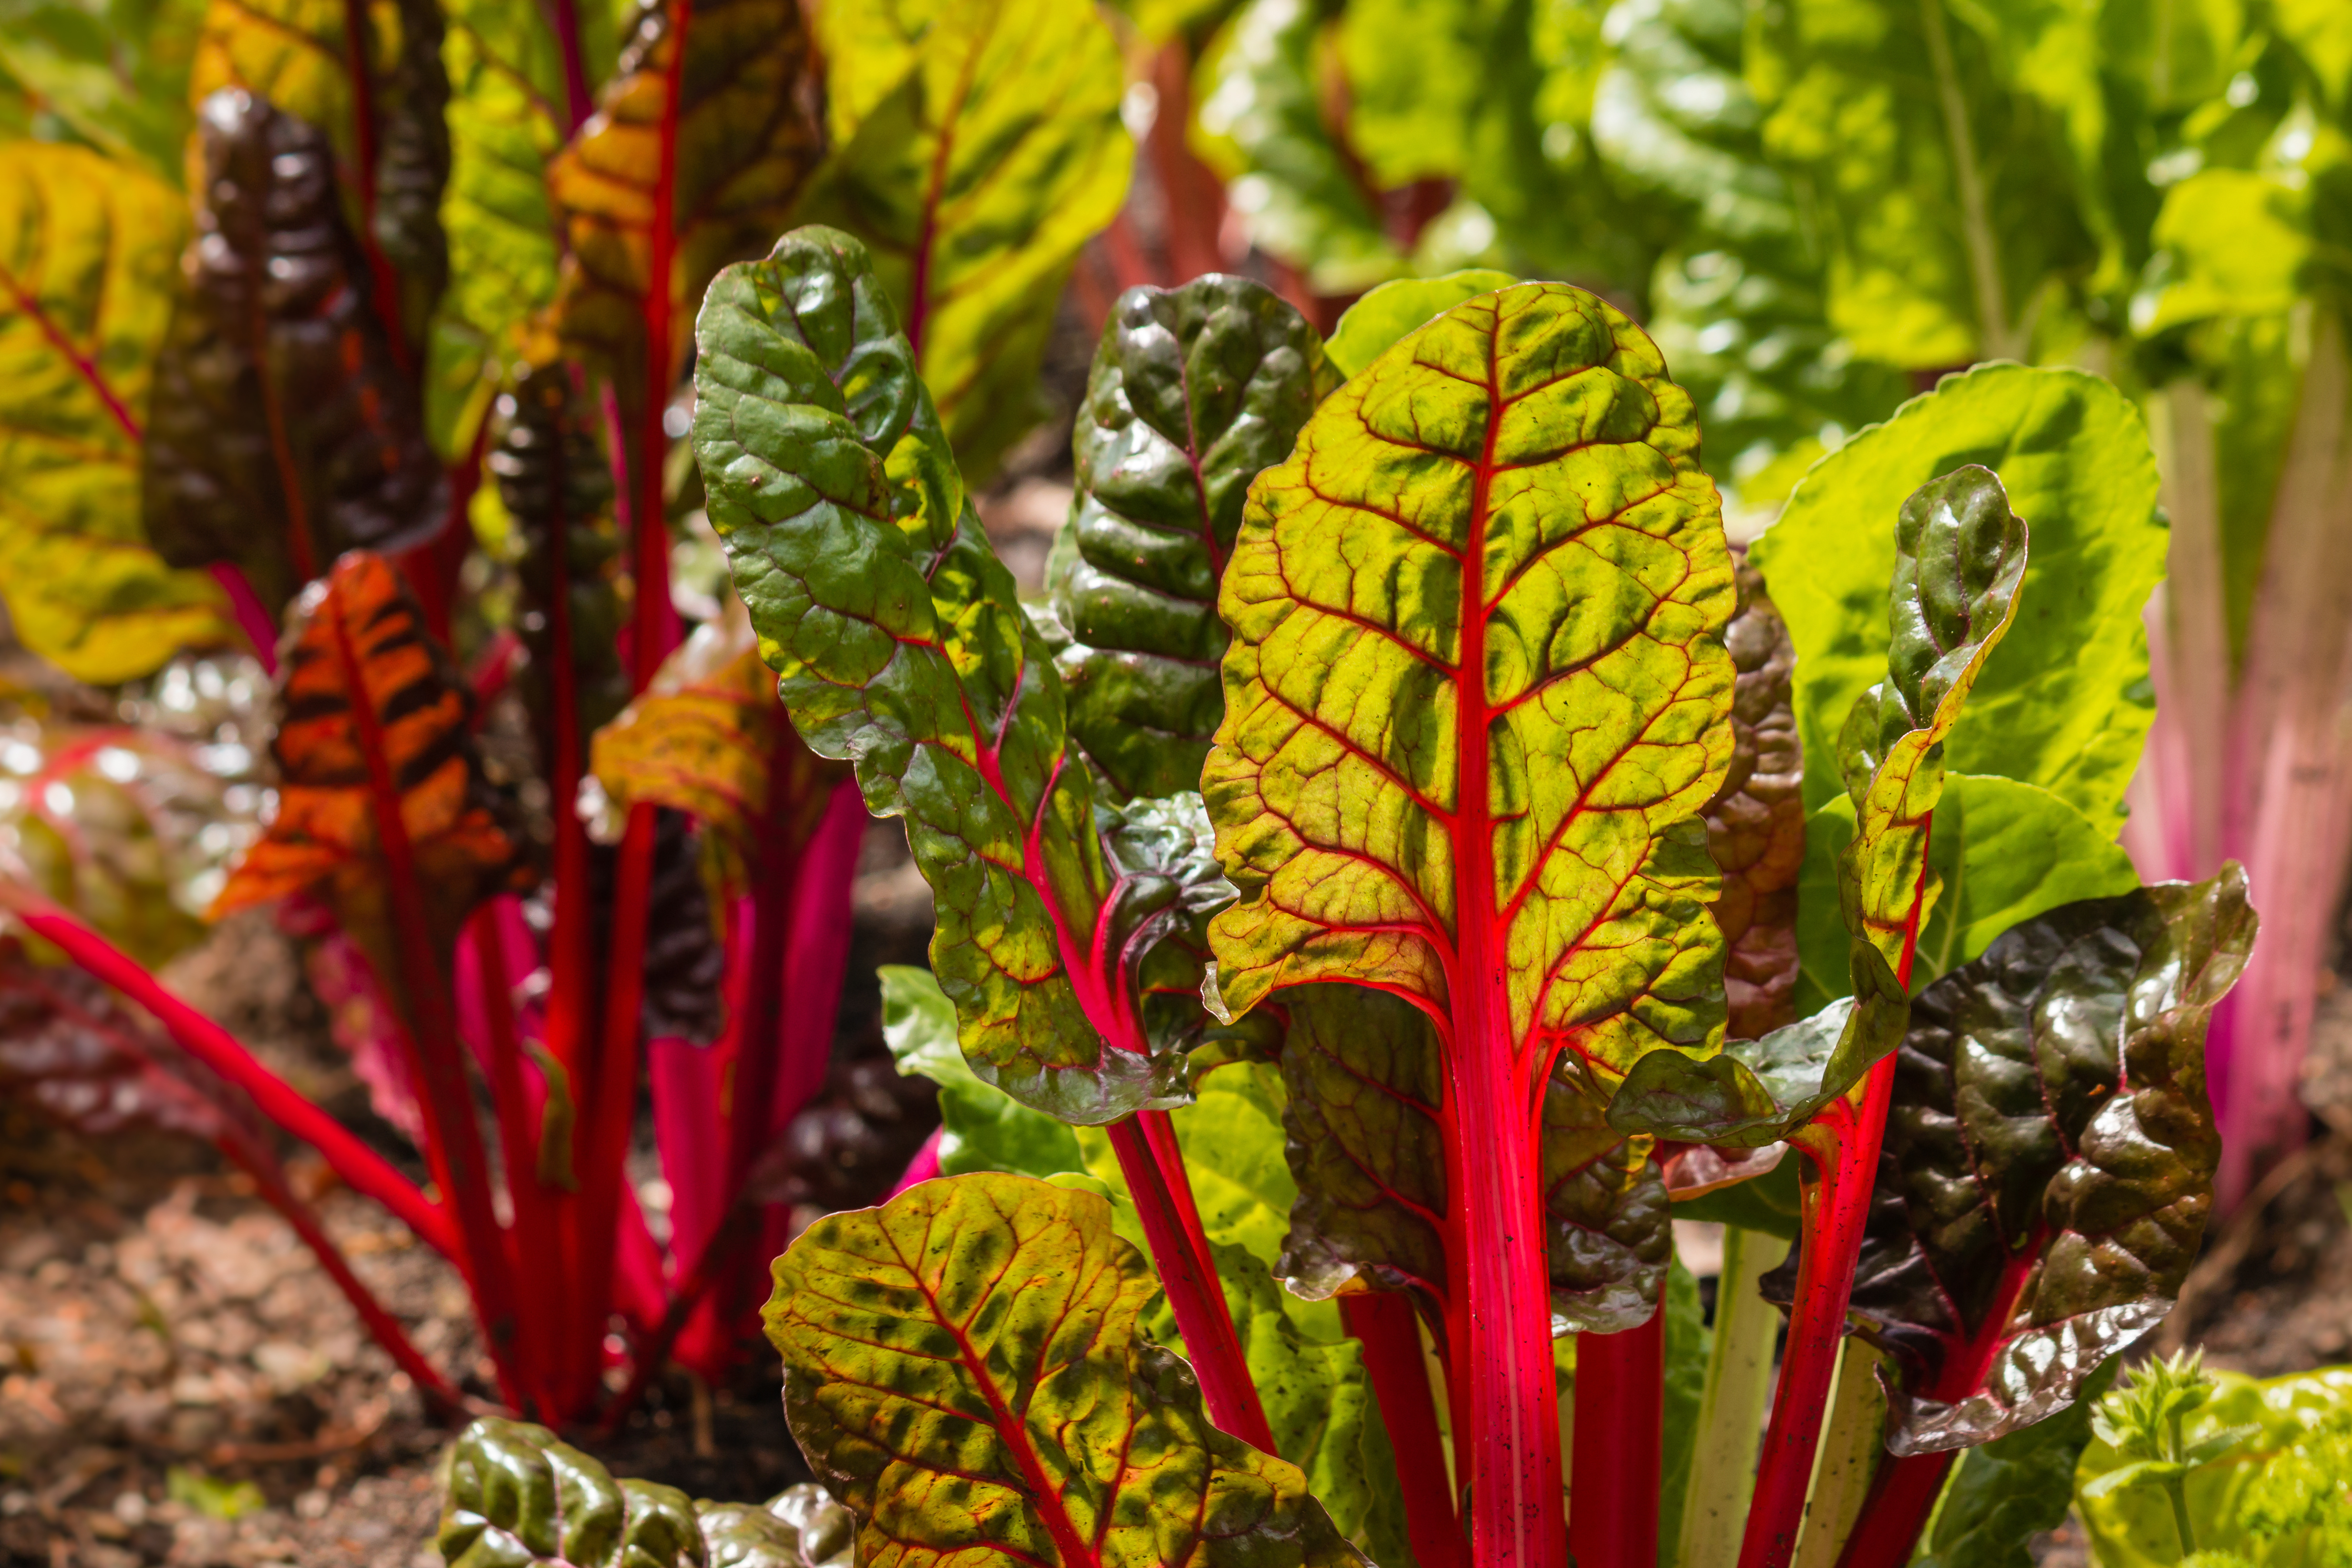
Swiss chard thrives in cooler weather, producing a continuous harvest of large, glossy, deep green leaves with colorful stems in shades of white, red, and yellow. Photo by Patrik Stedrak, Adobe Stock.
At first glance, beets and Swiss chard might seem like entirely different plants. Beets are known for their edible, bulbous root, while Swiss chard is grown for its large, leafy greens and colorful stems. However, both belong to the same species, Beta vulgaris, in the Amaranthaceae family, and their differences are the result of selective breeding over time.
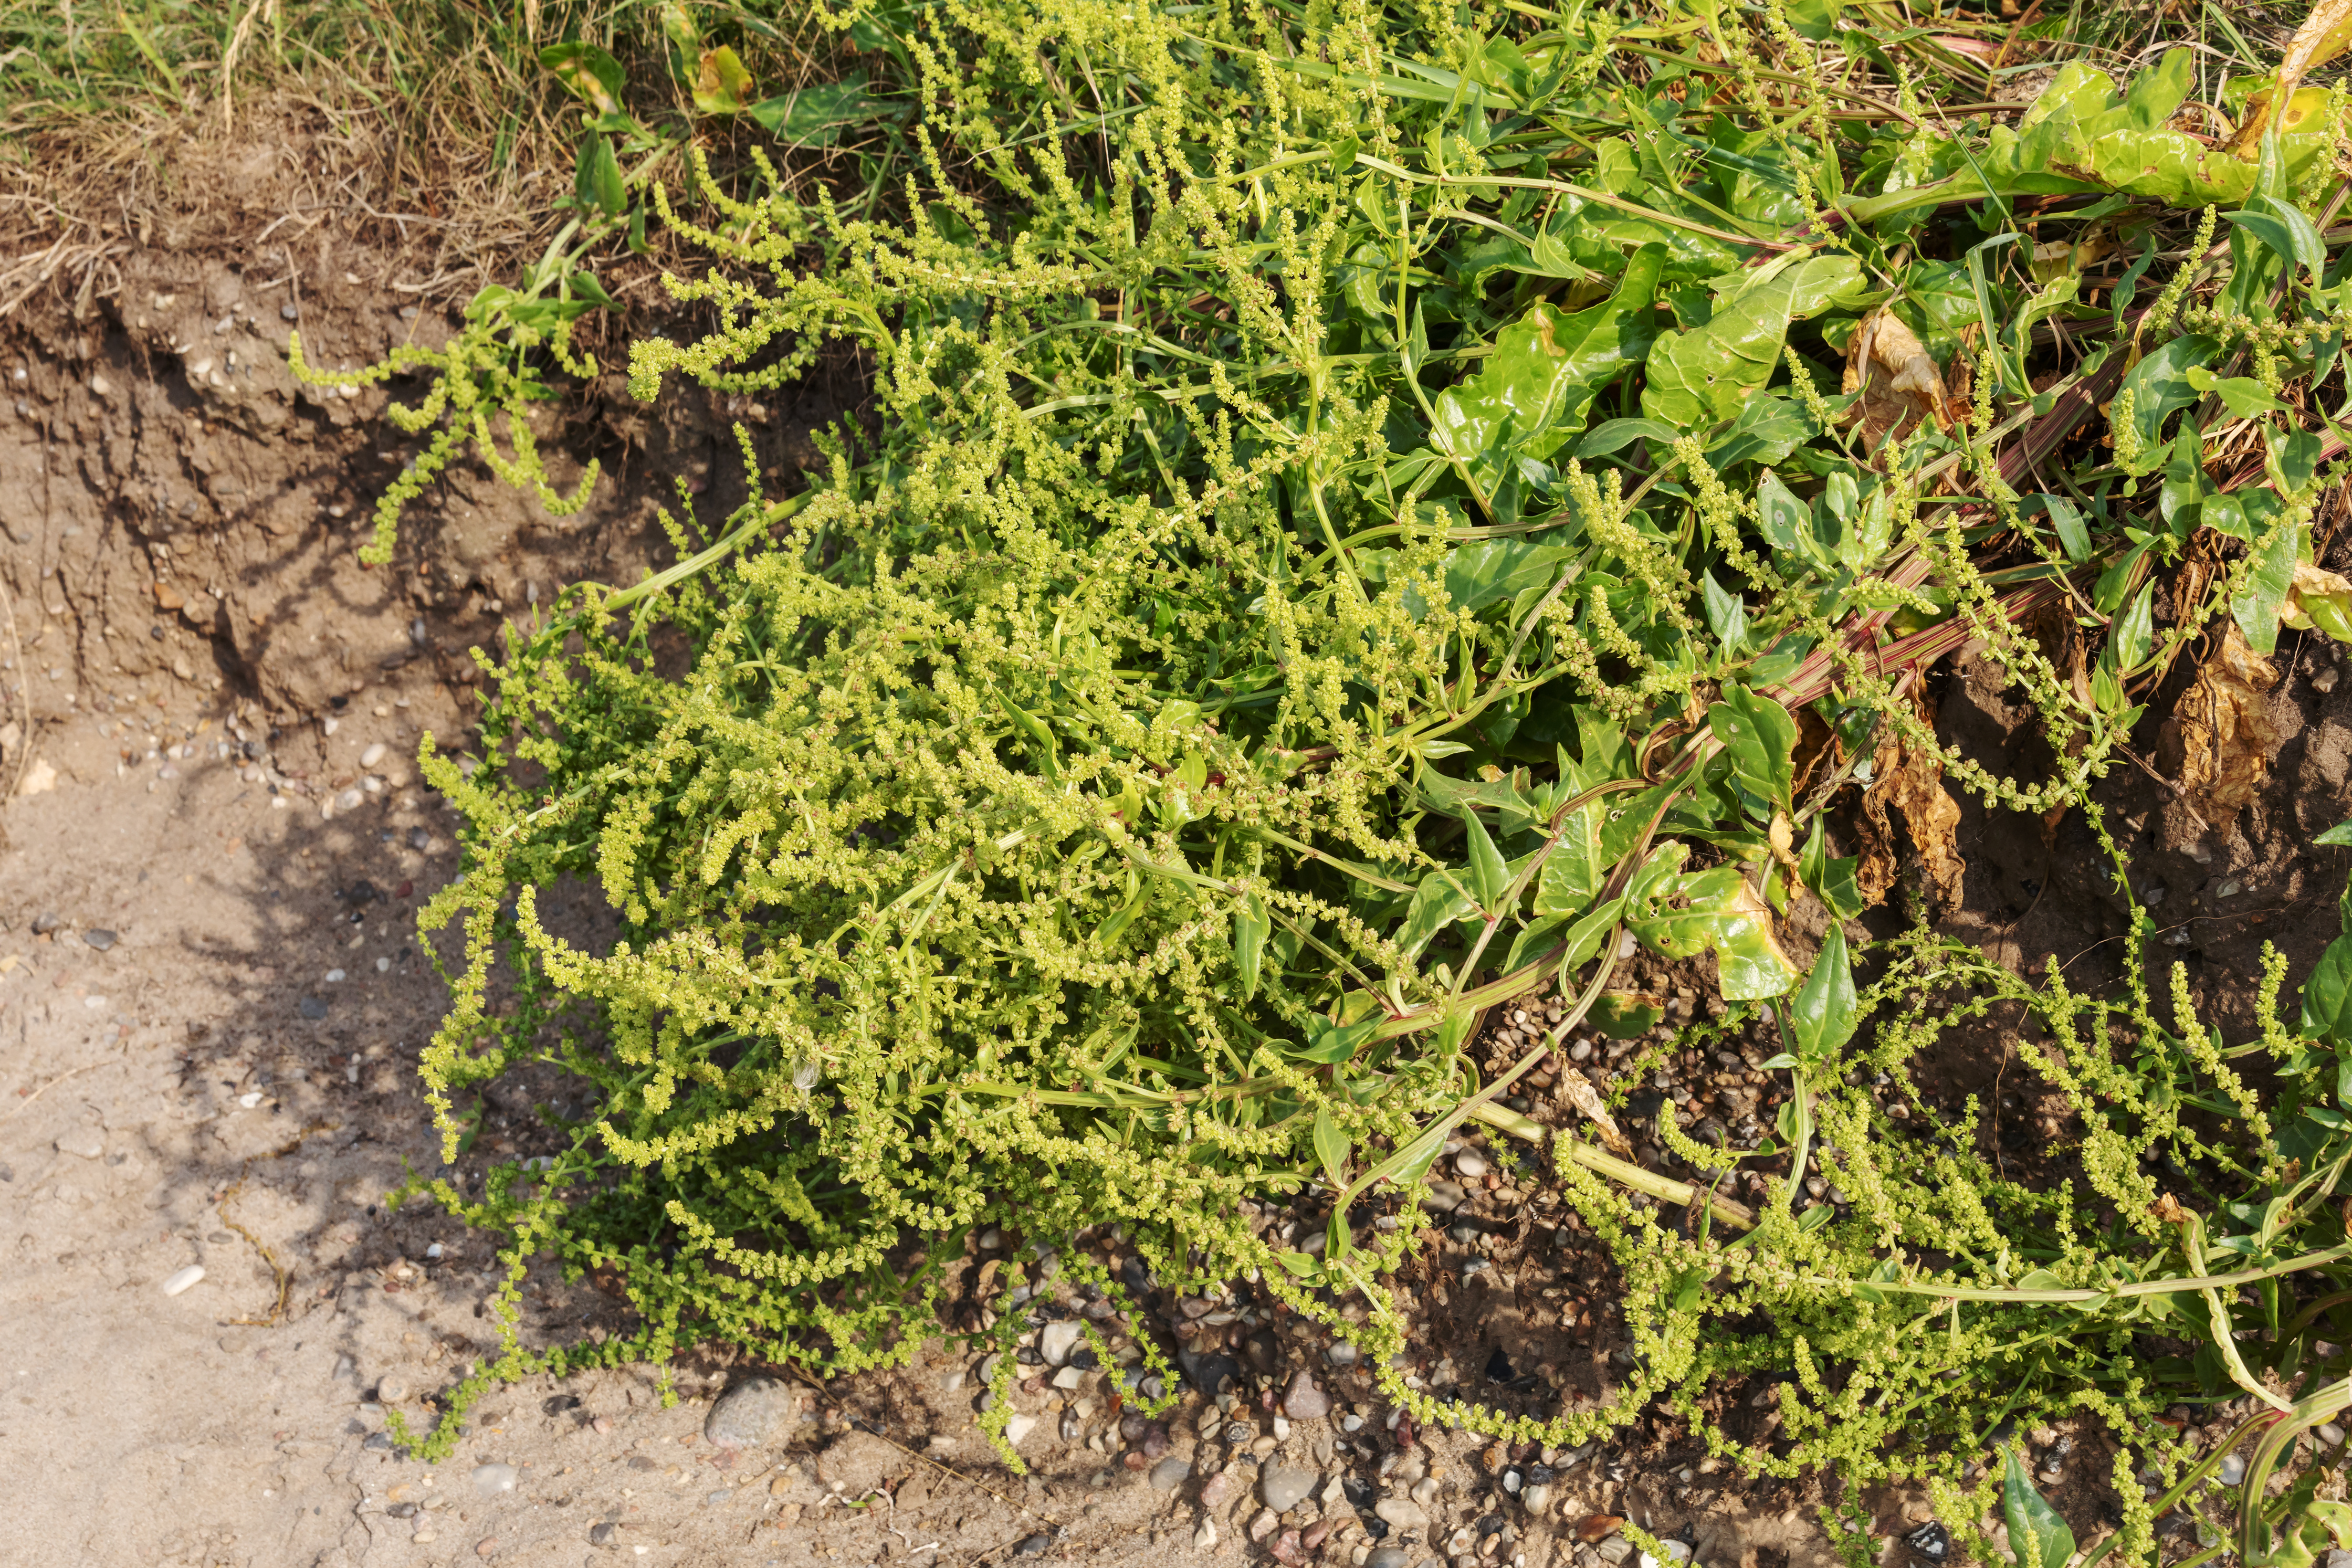
Wild sea beet (Beta vulgaris subsp. maritima), native to Mediterranean and coastal European regions, is the ancestor of cultivated beets and Swiss chard. Photo by Thorsten Schier, Adobe Stock.
Both beets and Swiss chard originate from the wild sea beet (Beta vulgaris subsp. maritima), a plant native to Mediterranean and coastal European regions. Ancient civilizations, such as the Greeks and Romans, bred beets for their enlarged roots, which eventually became the garden beets we know today. Despite its name, Swiss chard isn’t from Switzerland – it was also cultivated in the Mediterranean, bred for its nutritious leaves and stems. The “Swiss” name was added in the 19th century by seed catalog publishers to distinguish it from French spinach varieties.
Both beets and Swiss chard are highly nutritious. Beets, which range in color from deep red to golden yellow, are rich in vitamin C, folate (B9), and essential minerals like manganese, potassium, magnesium, and iron. They contain betalains, antioxidants with strong anti-inflammatory properties, and are a great source of fiber and nitrates, supporting digestion and heart health. Beets can be cooked in a variety of ways, offering a sweet, earthy flavor that intensifies when roasted. They can also be boiled, steamed, or eaten raw in salads, pairing well with tangy ingredients like citrus and goat cheese.
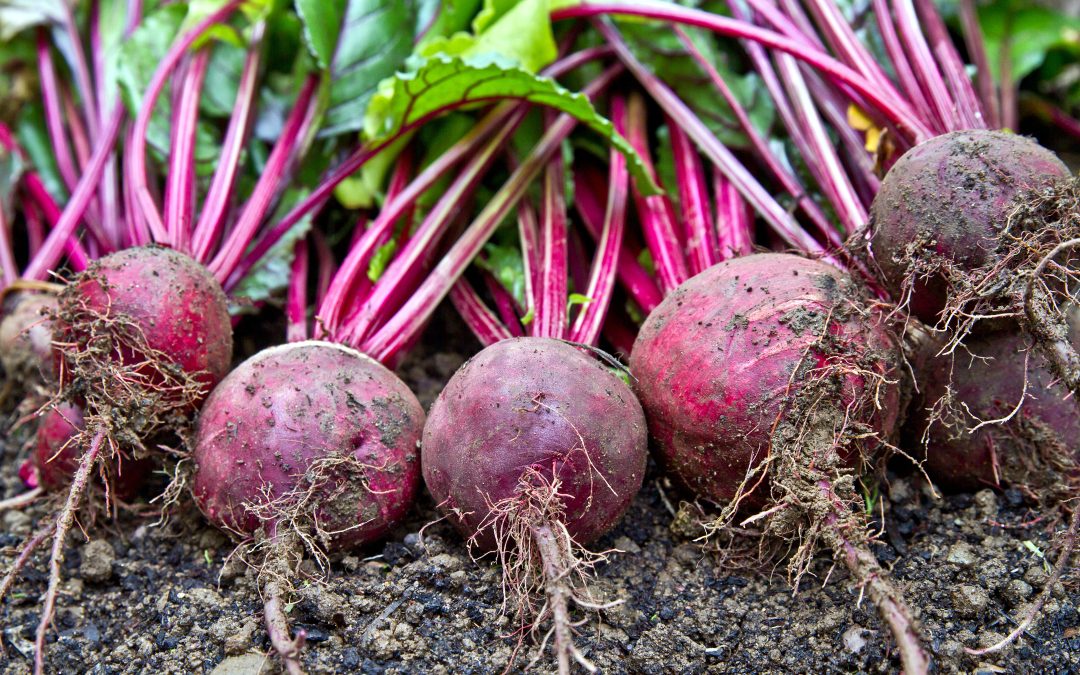
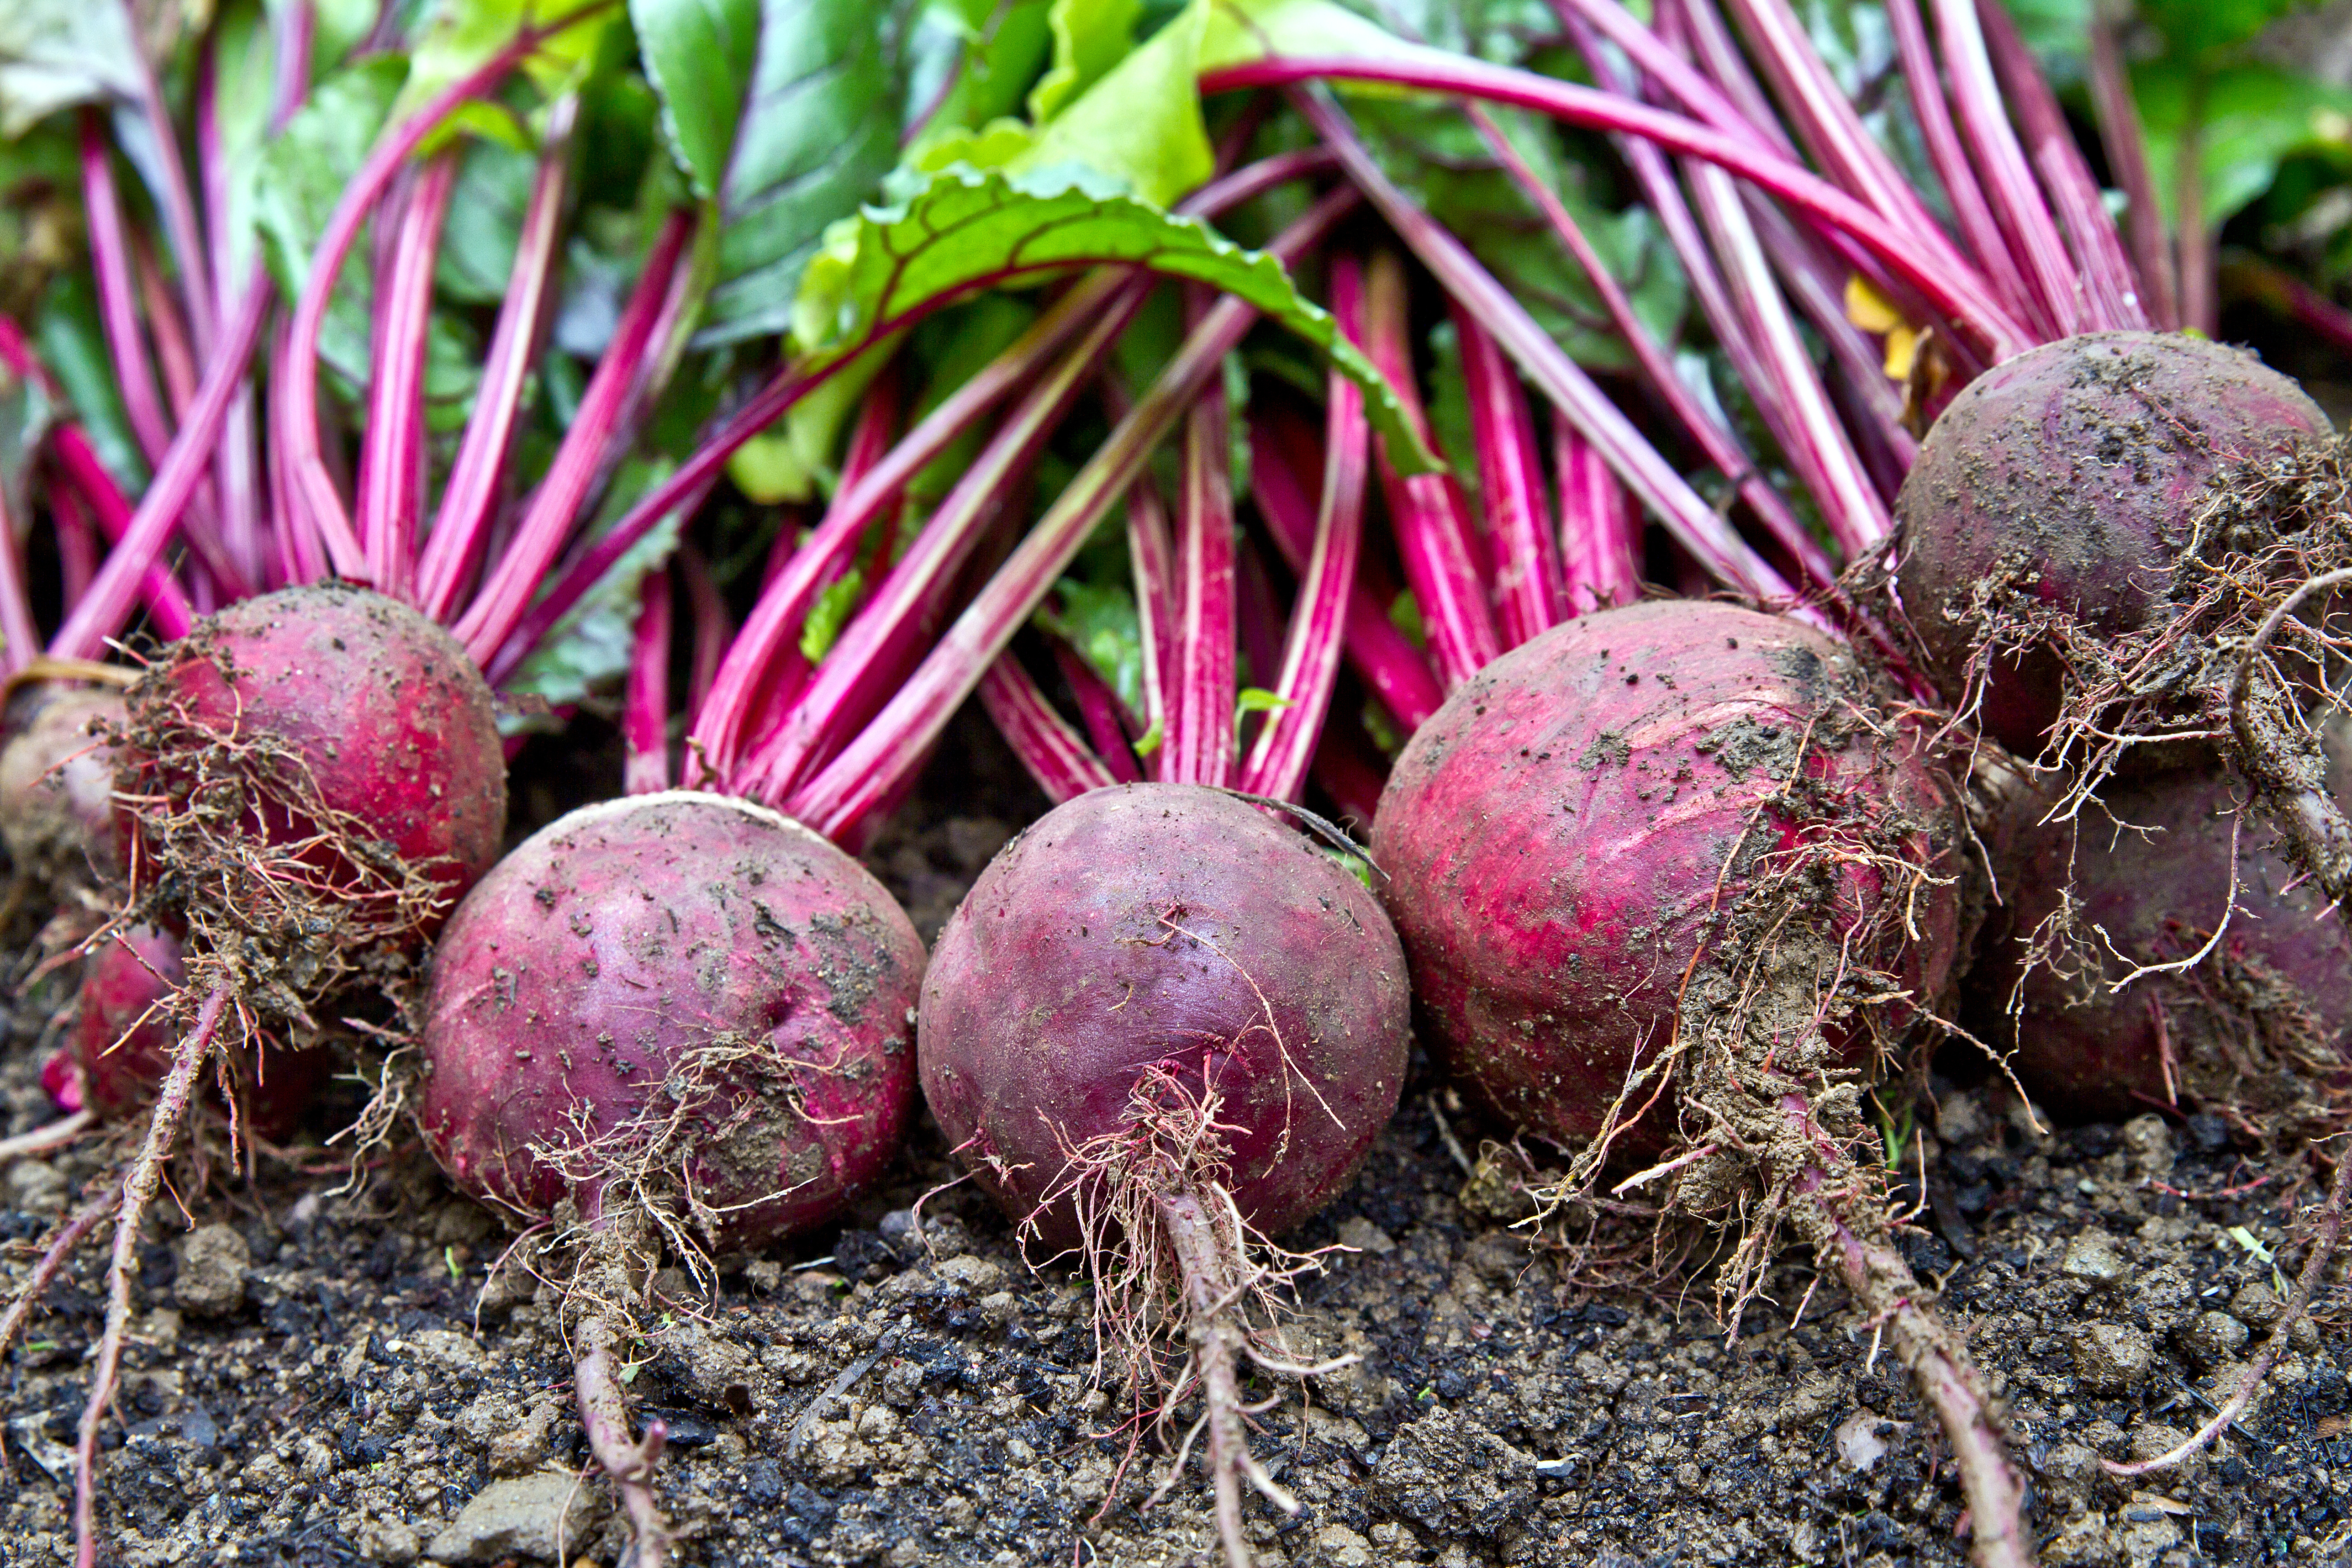
Beets can be grown in the fall and winter in the Panhandle, yielding round, bulbous roots with a sweet flavor and earthy aroma. Photo by Clickmanis, Adobe Stock.
Swiss chard, with its large, flavorful leaves and vibrant stalks in red, yellow, and white, is packed with vitamins A, C, and K, as well as minerals like magnesium, potassium, iron, and calcium. It also contains antioxidants like beta-carotene, lutein, and zeaxanthin, which support eye health and combat oxidative stress. Its high levels of potassium aid in electrolyte balance and heart health, while vitamin K and calcium contribute to strong bones. Swiss chard can be sautéed, added to soups, or eaten raw in salads, with both the leaves and stems being edible.
Essentially, beets and Swiss chard are different forms of the same plant, bred for either the root or the leaves. This explains why beet greens are similar in flavor and texture to Swiss chard, though beet greens are usually smaller and more delicate. Beets provide the advantage of both edible roots and greens, while Swiss chard offers vibrant, nutritious leaves that can be harvested throughout the season. Both crops thrive in cooler weather, making them ideal for fall and winter planting in the Florida Panhandle.
If you are planting a purple muscadine cultivar, ‘Noble’ is an ideal choice due to its productivity, disease resistance, and high-quality juice. Photo by Leonard, Adobe Stock.
Discover the Charm of Muscadines
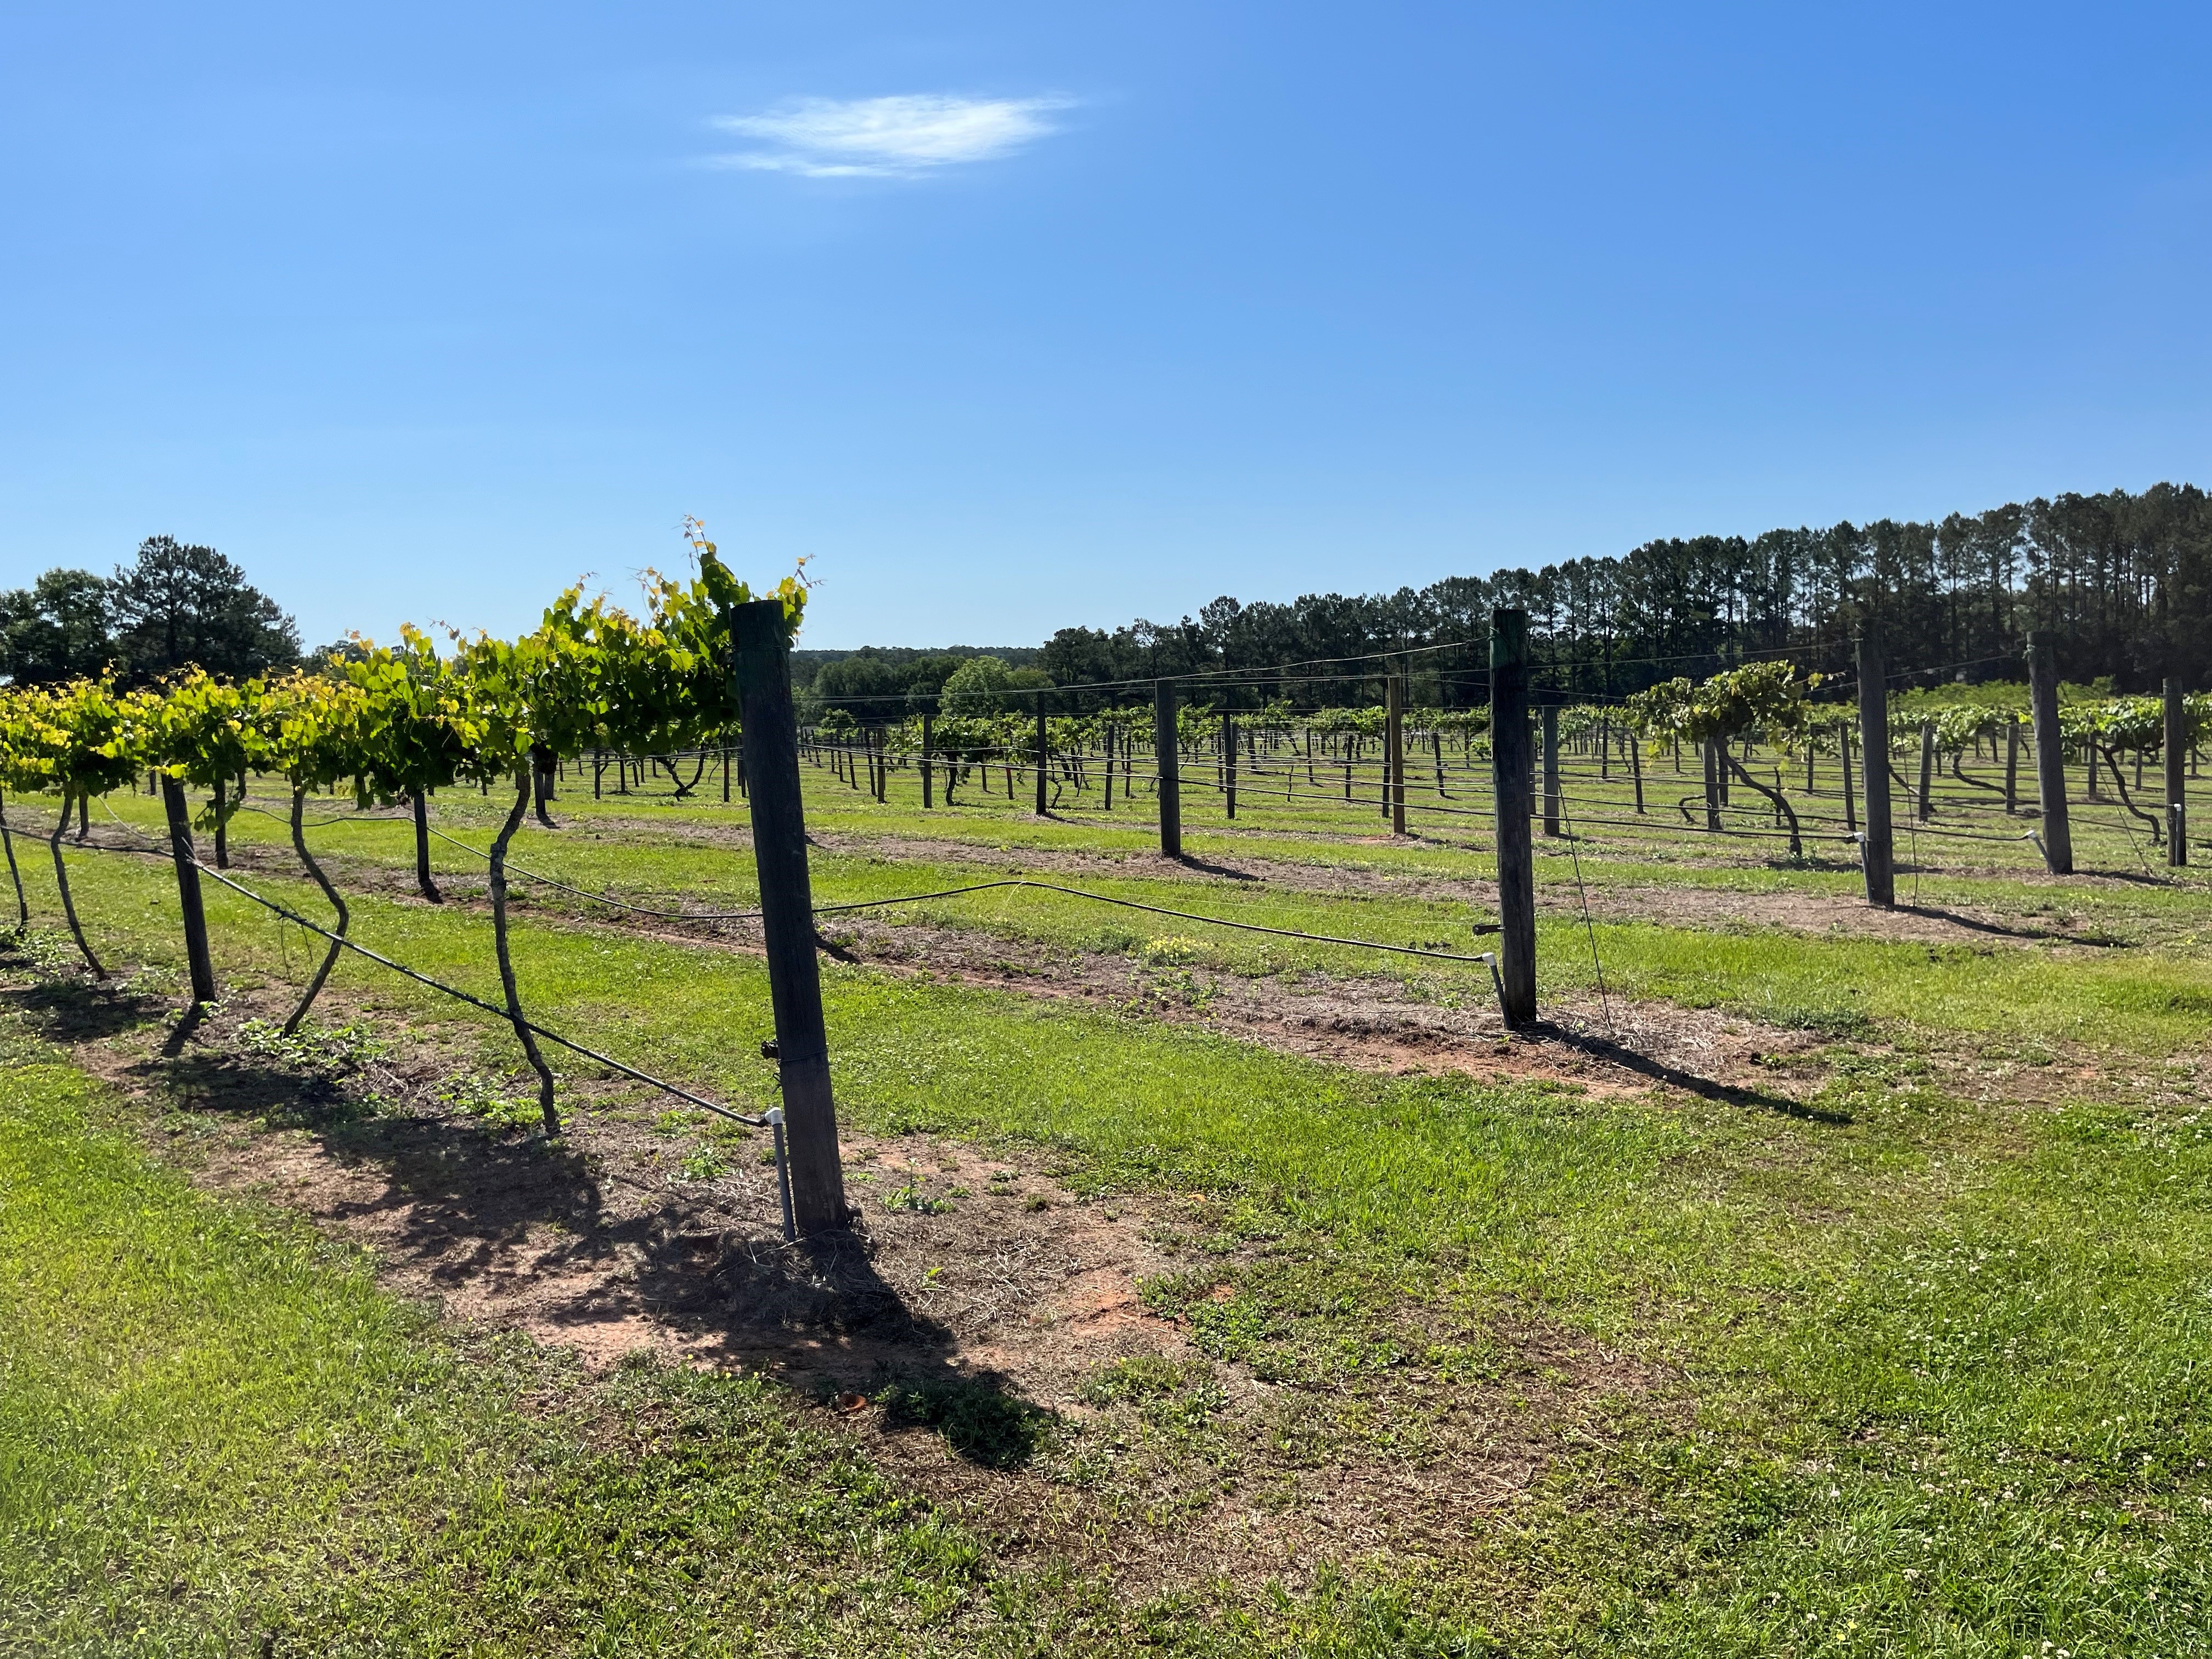
Imagine walking through endless rows of lush grapevines, each brimming with clusters of plump, juicy muscadines. Scientifically known as Vitis rotundifolia, muscadine grapes are a species native to the southeastern US, with a range extending northward from Florida to Delaware and westward to east Texas and Oklahoma.
The FAMU Center for Viticulture and Small Fruit Research serves as a hub for studying and developing new cultivation techniques, aiming to enhance muscadine grape quality and resilience to various pests and diseases. Photo by Molly Jameson.
Unlike their traditional grape cousins, muscadines have a unique, robust flavor profile that is often described as rich, sweet, and pleasantly tart. For those who grew up enjoying muscadines, their taste often brings back fond memories of languid, late summer days. Here in the Panhandle, muscadines thrive in our long, hot summers and flourish in our sandy, well-drained soils.
Muscadine grapes are not only a delight for our taste buds, but they are also packed with antioxidants, vitamins, and minerals, making them a powerhouse of nutrition. The high levels of the polyphenol resveratrol, a potent antioxidant, have been linked to numerous health benefits.
In the culinary world, muscadine grapes, with their thick skins and rich colors, spark creativity and exploration. Their unique flavor makes them perfect for everything from fresh fruit to preserves, pies, tarts, and juice. And naturally, muscadine grapes are ideal for winemaking, bringing a distinct twist to the wine market.
While muscadine grapes may not possess the storied history of their European counterparts, they have a rich history of their own in the southeastern US, where they are native and have been a significant part of the region’s agricultural and cultural landscape for centuries. Native American tribes in the southeast, including the Cherokee and Seminole, were the first humans to utilize muscadine grapes. They used the grapes for food and medicinal purposes, appreciating their nutritional value and distinct flavor. In the 1500s, early European settlers, including the English explorer Sir Walter Raleigh, documented the abundance of muscadines growing wild. Seeing their potential, settlers began cultivating muscadine grapes for winemaking and other purposes.
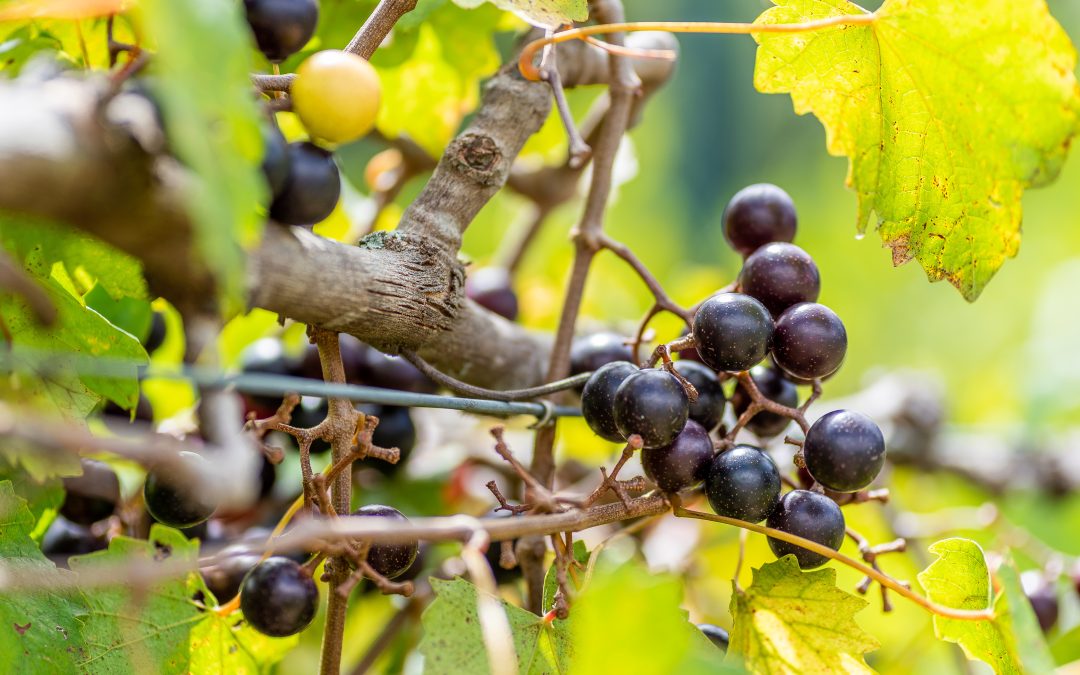
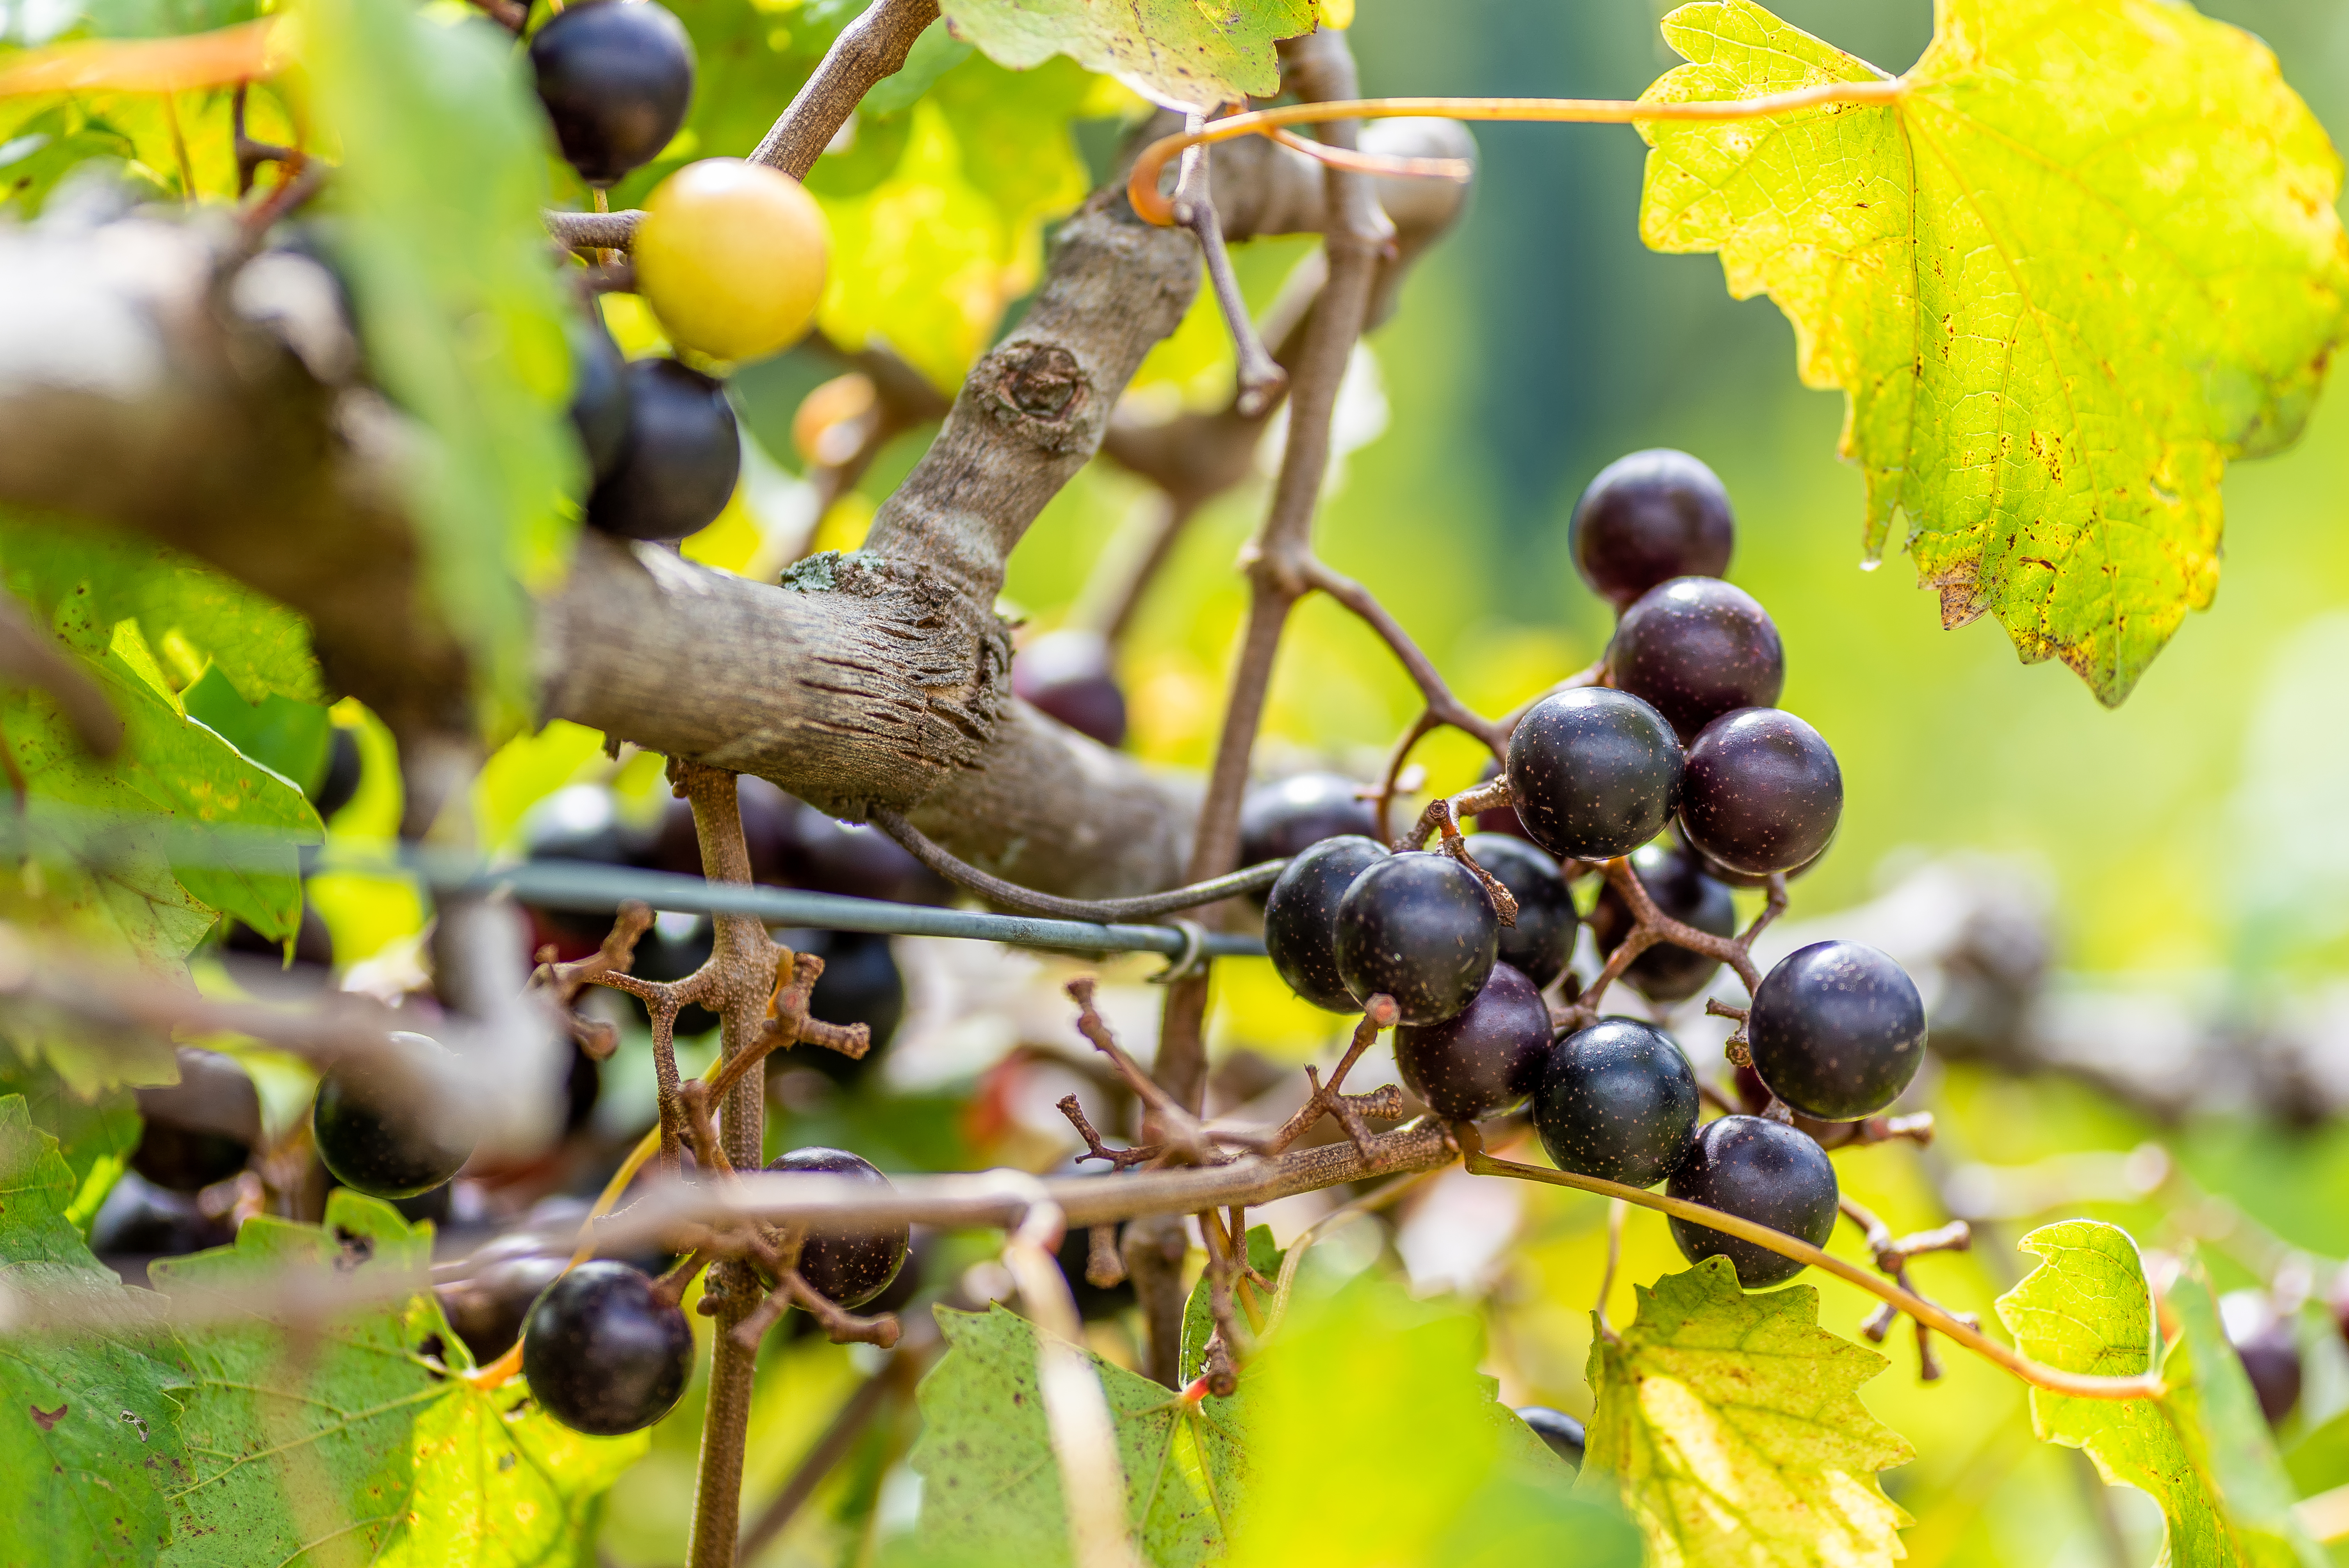
Muscadine grapes come in a variety of colors, including deep purple, black, bronze, and green, each offering its unique flavor profile and appeal. Photo by Tanya, Adobe Stock.
Unlike European grapes, muscadines are naturally more resistant to many common grape diseases, such as anthracnose and Pierce’s disease, and are less susceptible to pests due to their thick skins and natural antifungal compounds. However, they can still be affected by diseases such as angular leaf spot and other fungal rots, and pests such as grape vine borer, birds, raccoons, and deer. In contrast, European grapes are highly susceptible to a range of fungal and bacterial diseases, including powdery mildew and botrytis bunch rot, and are more vulnerable to pests, such as grape berry moths. European grapes also require specific chilling hours which cannot be achieved in the southeast US, and they are more sensitive to both drought and excessive moisture, requiring careful irrigation management and more intensive fertilization.
Today, muscadine grapes are cultivated extensively in the southeast, catering to niche markets. In Florida, there are many muscadine cultivars that thrive, each known for its unique characteristics and adaptability. Cultivars such as the purple ‘Alachua’ and ‘Noble’ and the bronze ‘Carlos’ are popular choices among growers for their high yields and suitability for winemaking, producing wines noted for their fruity flavors and distinct aroma. Muscadines like the purple ‘Supreme’ and the bronze ‘Fry’ and ‘Summit’ are renowned for their sweet taste and are often enjoyed fresh or used in jams and desserts. The muscadine harvest season typically starts in early August and goes through early October, depending on the cultivar, so it pays to grow a variety to extend the season. For more information about muscadine grape cultivars, check out the UF/IFAS Extension EDIS publication The Muscadine Grape.
The wine produced at the FAMU Center for Viticulture and Small Fruit Research in Tallahassee showcases the region’s rich muscadine flavors with a focus on innovation and quality. Photo by Molly Jameson.
With ongoing research and cultivation efforts, Florida is broadening its range of muscadine cultivars, ensuring a diverse and thriving grape industry. This research is actively enhancing muscadine varieties, including at the Florida A&M University (FAMU) Center for Viticulture and Small Fruit Research located in Tallahassee.
Efforts at the Center focus on improving grape and small fruit cultivars, particularly those adapted to Florida’s unique climate. Their research includes enhancing disease resistance, boosting fruit quality, increasing yields, releasing new cultivars, and emphasizing sustainable agricultural practices.
Be sure to visit the FAMU Center for Viticulture and Small Fruit Research during the annual Grape Harvest Festival. This year, the festival will be held Saturday, September 14, 2024, from 8 a.m. to 3 p.m., featuring activities such as a vineyard run and walk-a-thon, insect demonstrations and computer simulations, grape varietals tasting, guided vineyard trailer rides, grape throwing and stomping competitions, a wine making workshop, grape picking, and more. Learn more and register to attend the festival at https://my.famu.edu/event/ghf24.
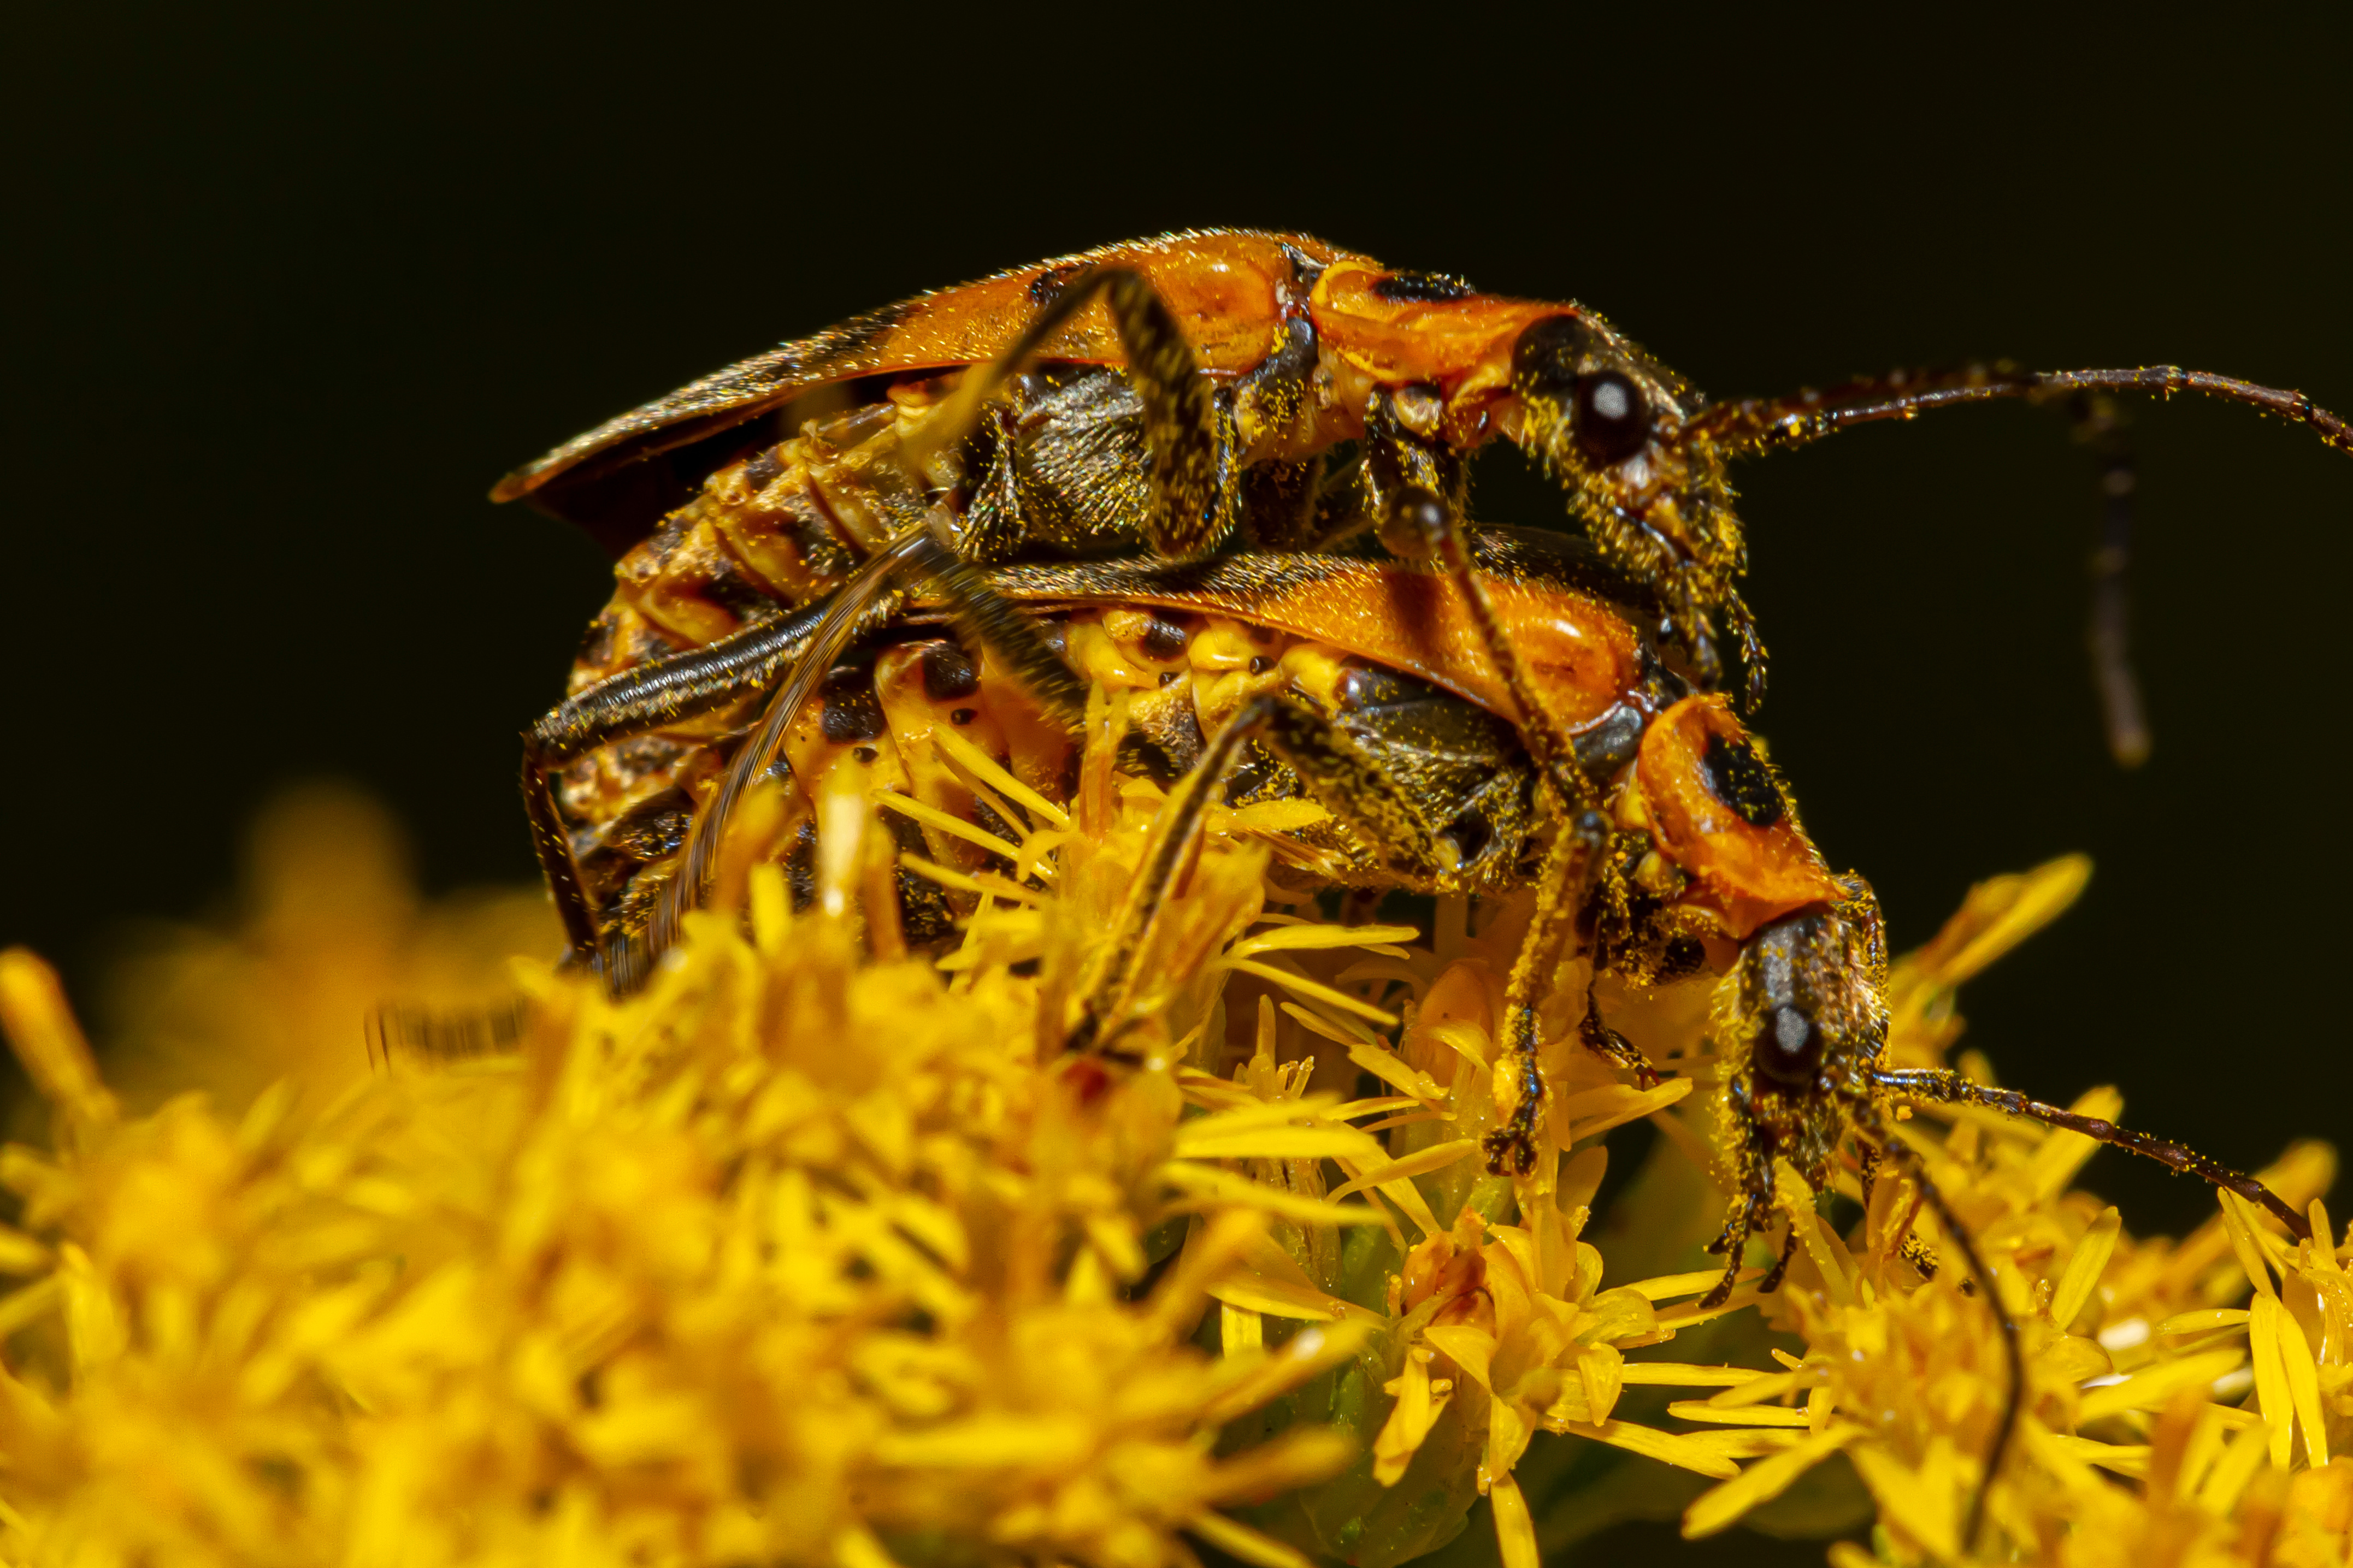
Goldenrod soldier beetles inadvertently transferring pollen while feeding on nectar and pollen grains. Photo by Grandbrothers, Adobe Stock.
Pollinators contribute to the reproduction of over 87 percent of the world’s flowering plants and are crucial for agriculture, with 75 percent of the different types of crops we grow for food relying on pollinators to some extent to achieve their yields. Perhaps most importantly, one-third of global food production is dependent on pollination.
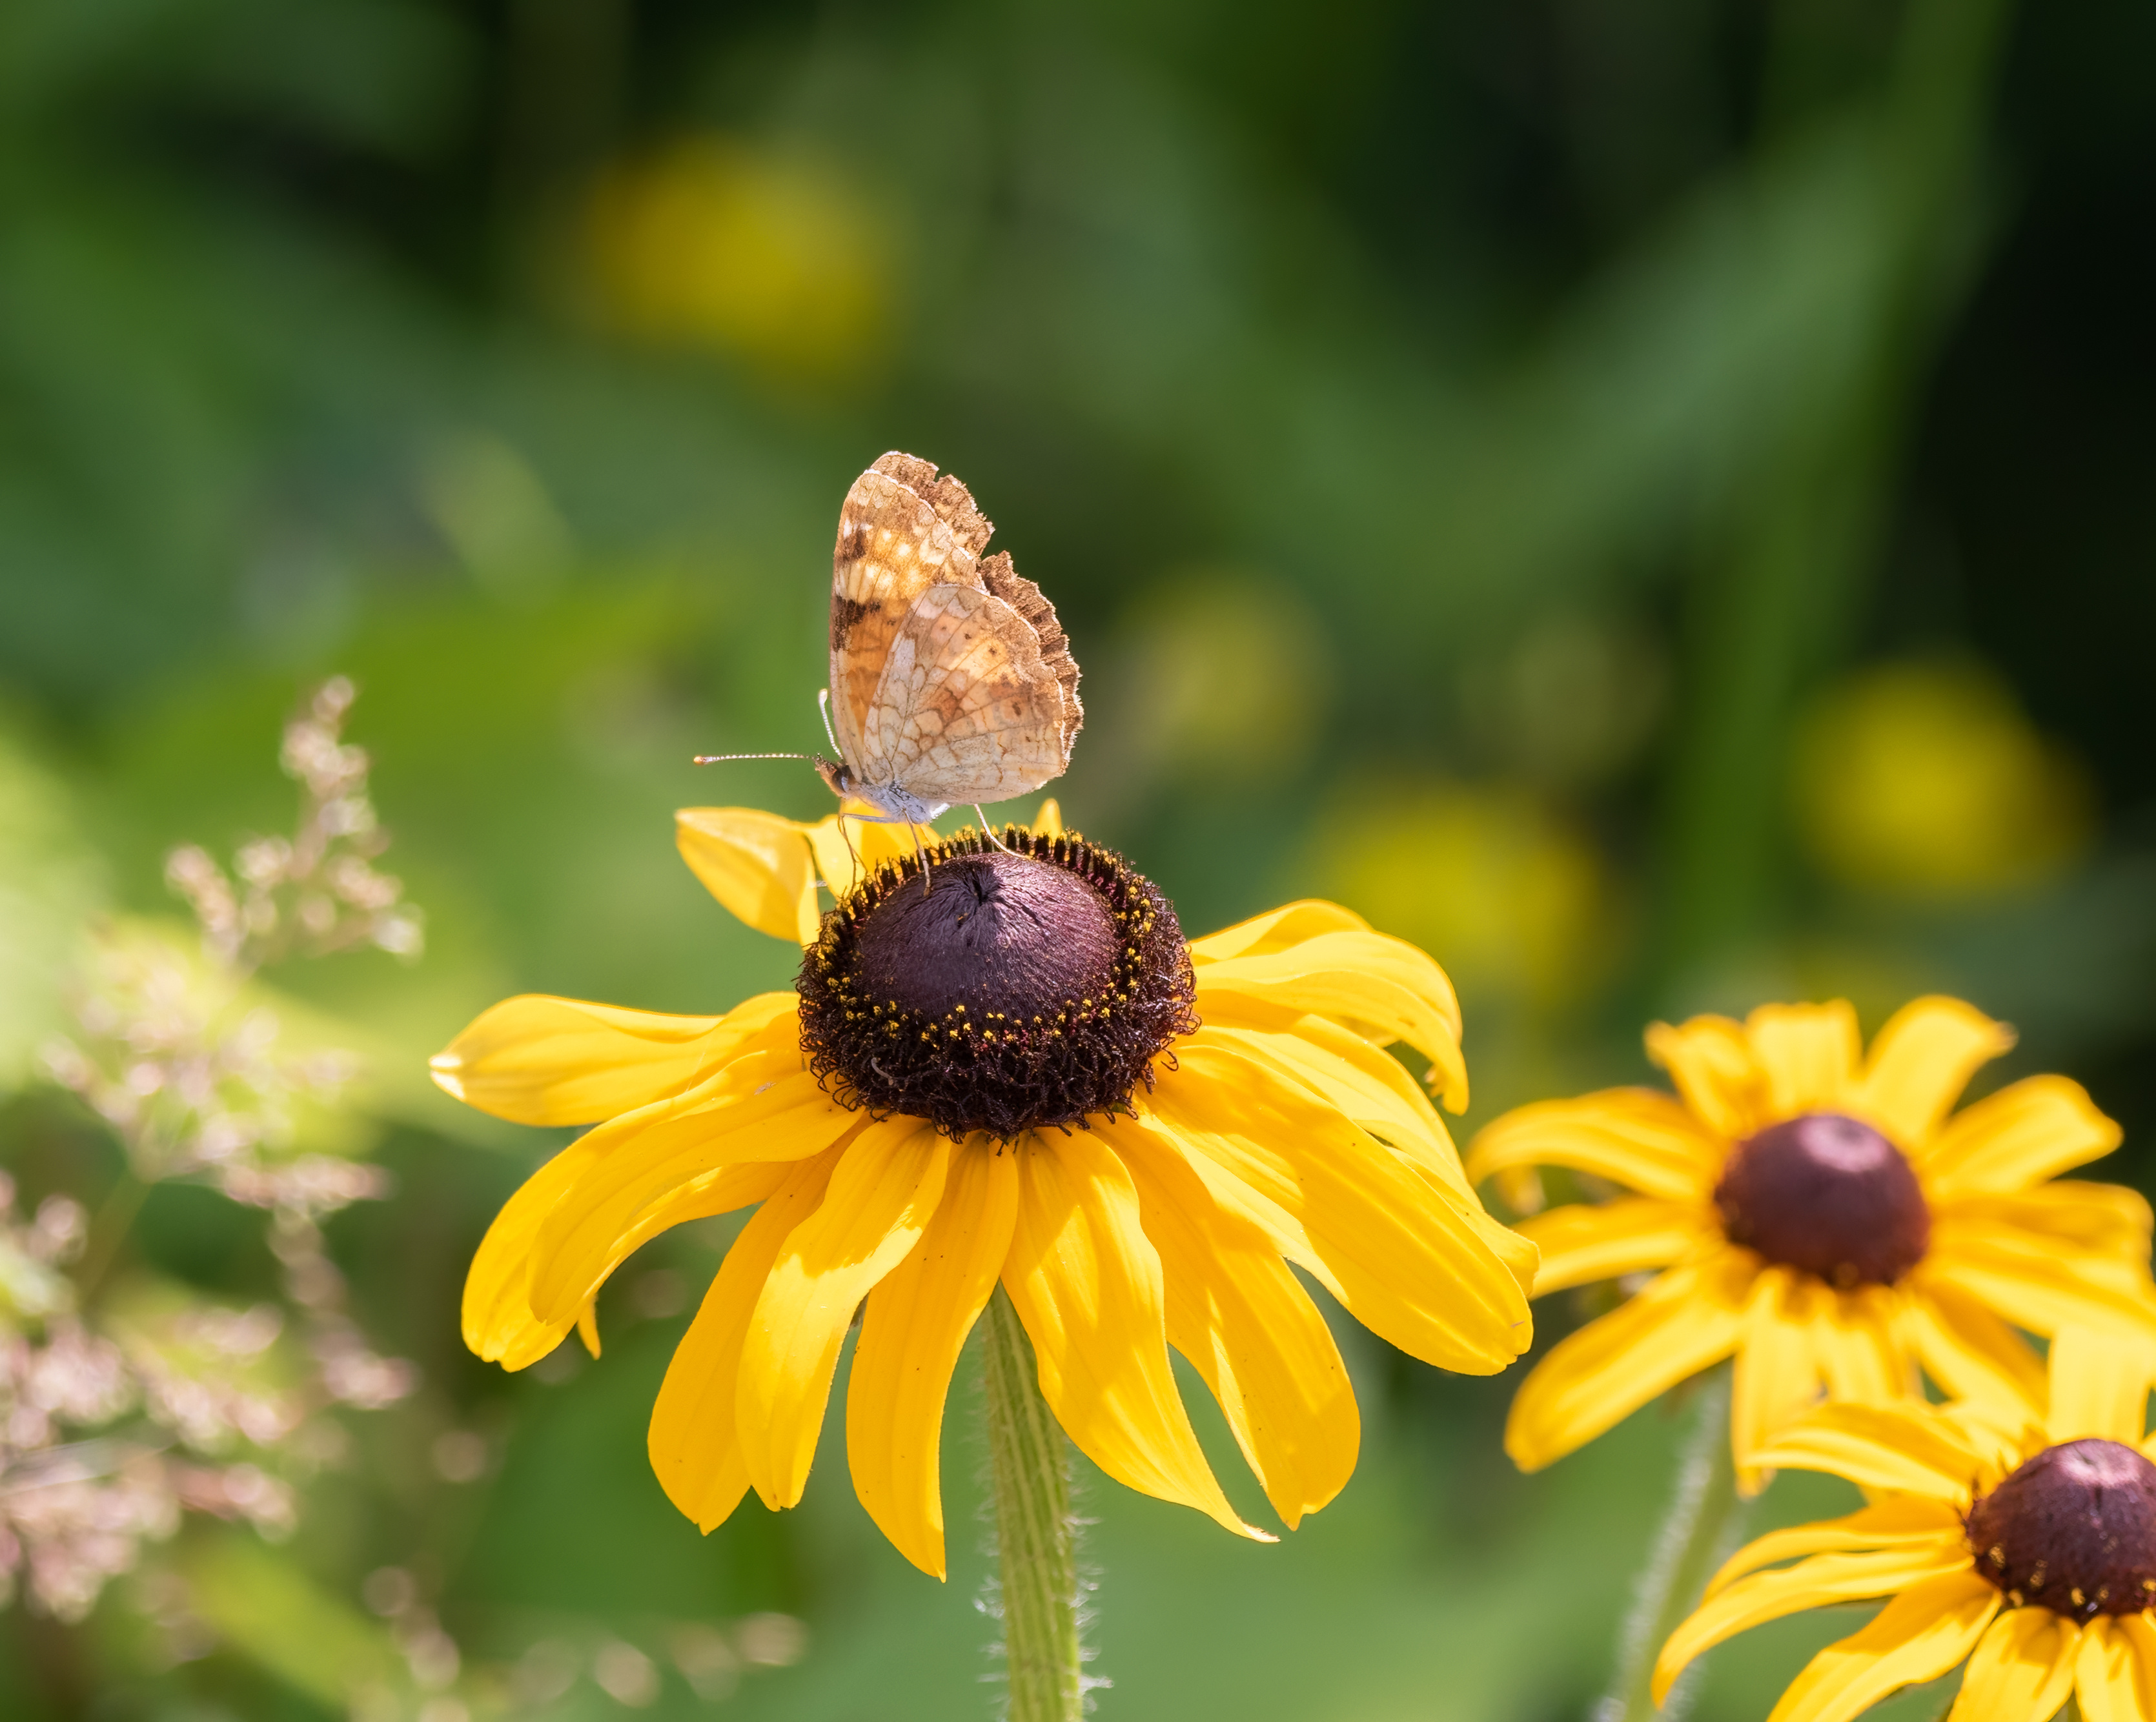
While bees often take the spotlight in discussions about pollination, there’s a whole cast of lesser-known characters playing vital roles. From beetles, flies, ants, moths, and even birds and bats, a diverse array of creatures quietly ensures the fertility of our crops and the stability of our ecosystems.
Beetles as Pollinators
Beetles, often overlooked in the pollination process, play a crucial role as one of nature’s primary pollinators, especially for ancient flowering plants like magnolias and spicebush. These insects, which were among the first to visit flowers, are known as “mess and soil” pollinators due to their less-than-delicate approach. As they feast on petals and other floral parts, beetles inadvertently collect pollen on their bodies. They lack specialized structures for transporting pollen; instead, pollen grains adhere to their bodies as they move from flower to flower. The flowers that attract beetles tend to be large, bowl-shaped, and emit strong, fruity, or spicy scents to lure the beetles in. Despite their seemingly destructive behavior, beetles are essential for the reproduction of the plants they visit.
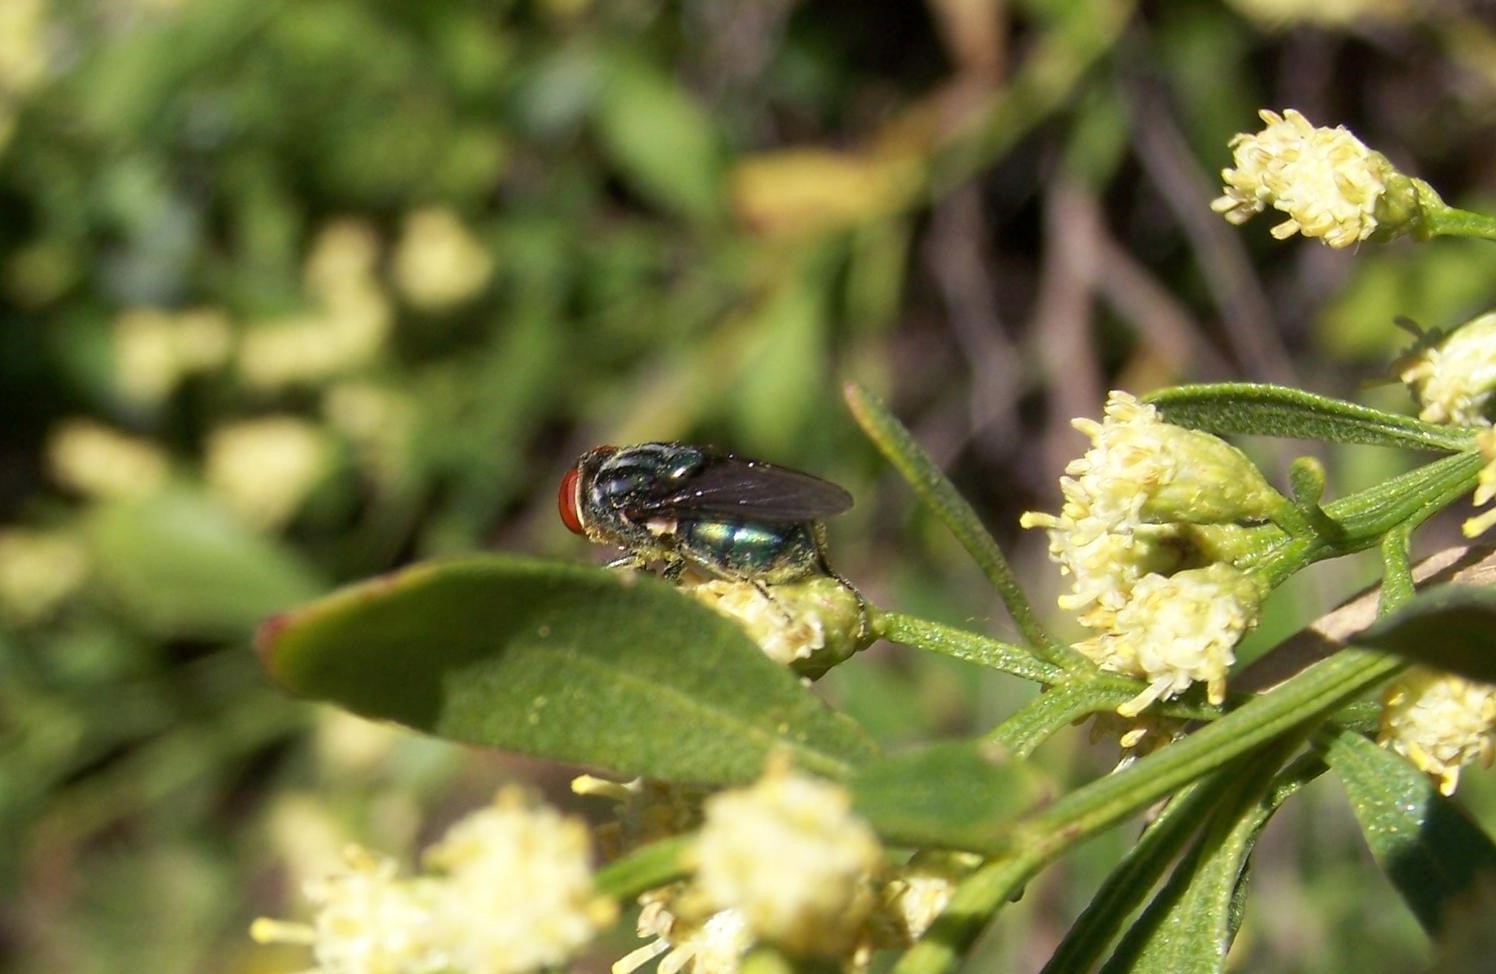
A fly lands on a saltbush, unintentionally aiding in pollination. Photo by Karan A. Rawlins, University of Georgia, Bugwood.org.
Flies as Pollinators
Flies, often dismissed as mere nuisances, are crucial pollinators. With their bustling activity around flowers, flies inadvertently transfer pollen from one flower to another as they search for nectar and other food sources.
Flies are particularly attracted to flowers with strong odors and dull colors, characteristics often overlooked by other pollinators. While they may not be as efficient or specialized as bees, flies make up for it in sheer numbers and ubiquity, contributing significantly to the pollination of a wide variety of plant species, including many crops essential for humans.
Moths as Pollinators
And then there are moths, the nocturnal counterparts of butterflies, silently pollinating flowers under the cover of darkness. Drawn to flowers with pale or white petals and strong fragrances, such as apple, pear, and cherry blossoms, moths play a role in pollinating various plant species, contributing to overall yield and quality of the harvest. Their long proboscis allows them to reach deep into flowers, accessing nectar sources that may be out of reach for other pollinators.
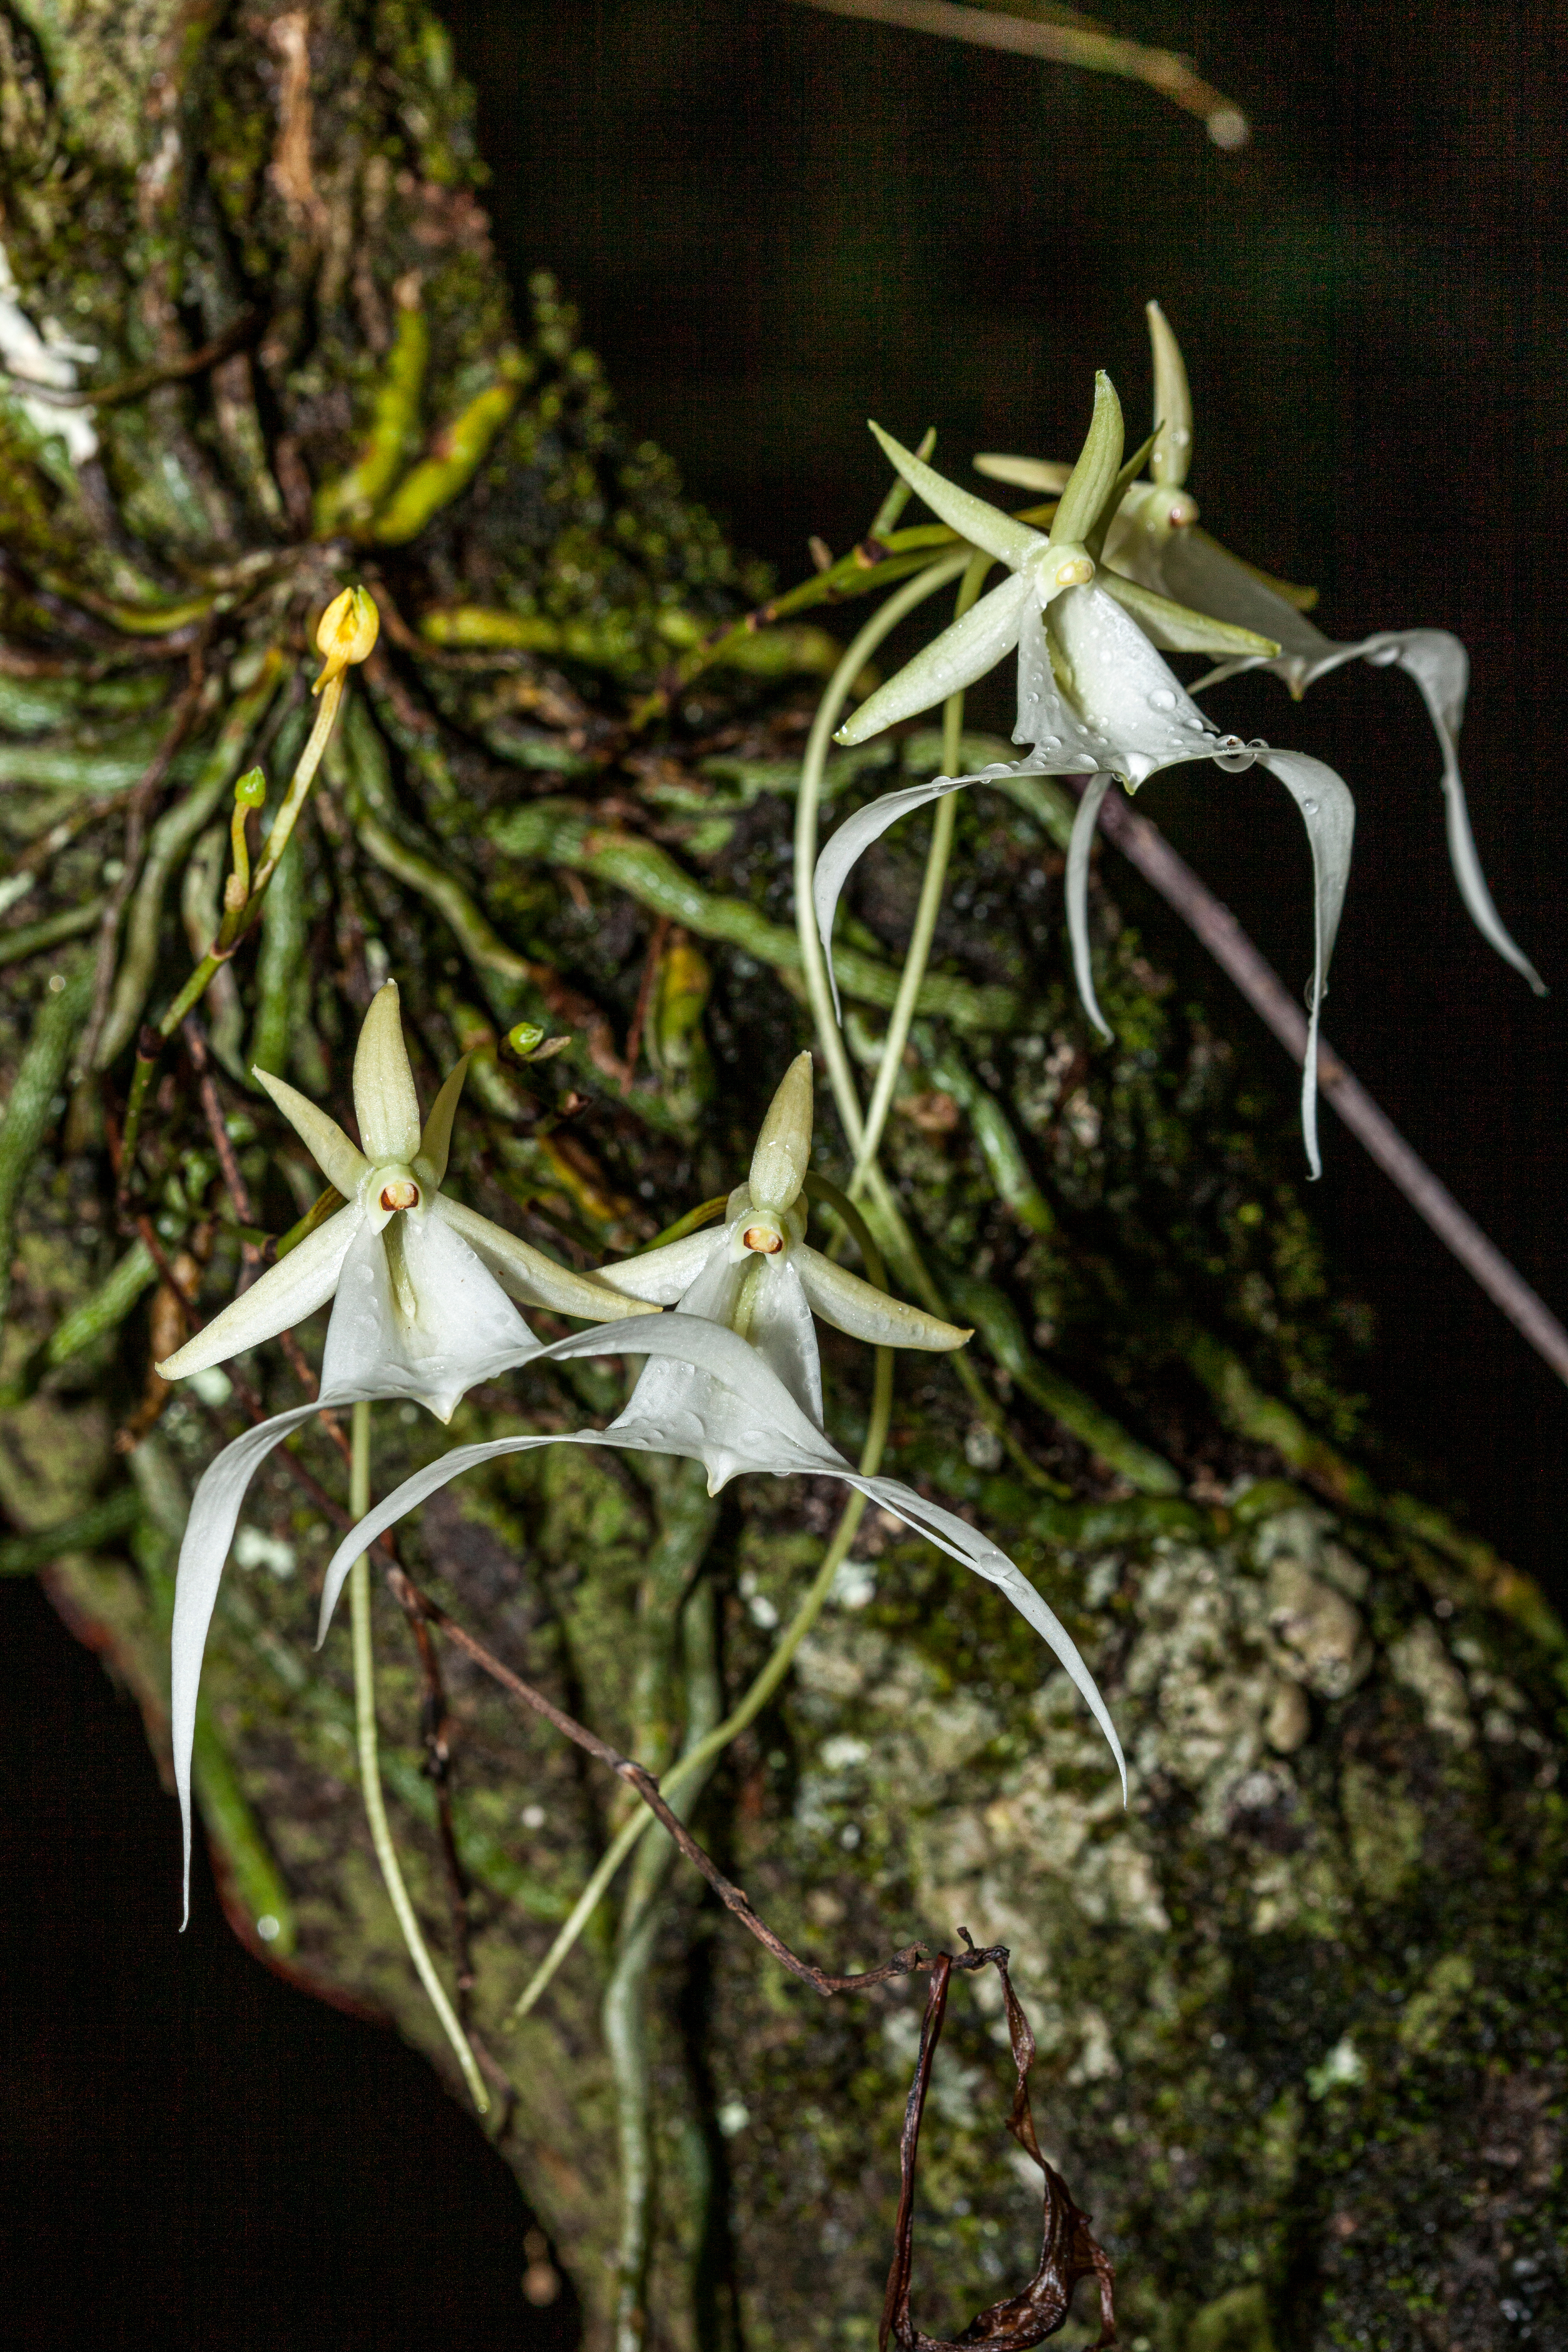
Ghost orchids (Dendrophylax lindenii) can provide shelter and nesting sites for arboreal ants, which in turn, may aid in pollination.
Ants as Pollinators
While ants are primarily known for their role as scavengers and defenders of their colonies, they also contribute supplementary to pollination of some plants in surprising ways.
In tropical forests, certain plants referred to as ant-plants or myrmecophytes, form close, sometimes obligatory partnerships with ants. These plants feature specialized hollow structures known as domatia, which serve as homes for ant colonies in exchange for protection and pollination services for the plant. Domatia vary by species, but can include stems, thorns, roots, stipules, petioles, or leaves. Some orchid species, such as the ghost orchid (Dendrophylax lindenii), which are native to Cuba and southwest Florida, provide shelter and nesting sites for an arboreal ant species called acrobat ants (Crematogaster ashmeadi). The ants, in turn, protect the orchids from herbivores and may aid in pollination.
Another strategy of some flowers is to develop nectaries on their exterior to entice ants, deterring other insects from stealing the nectar by accessing it from the side, thus compelling them to enter the flower in a manner more favorable for pollination. While ants can clearly contribute to pollination, researchers have also found that some ants secrete a natural antibiotic, which protects them from infections but harms pollen grains.
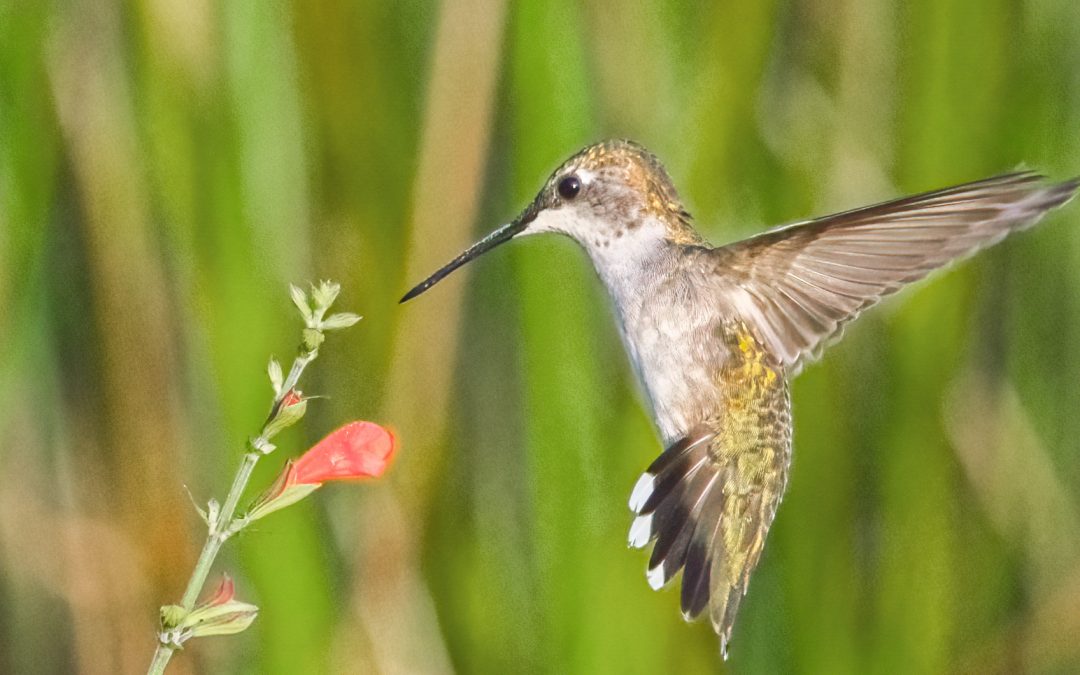
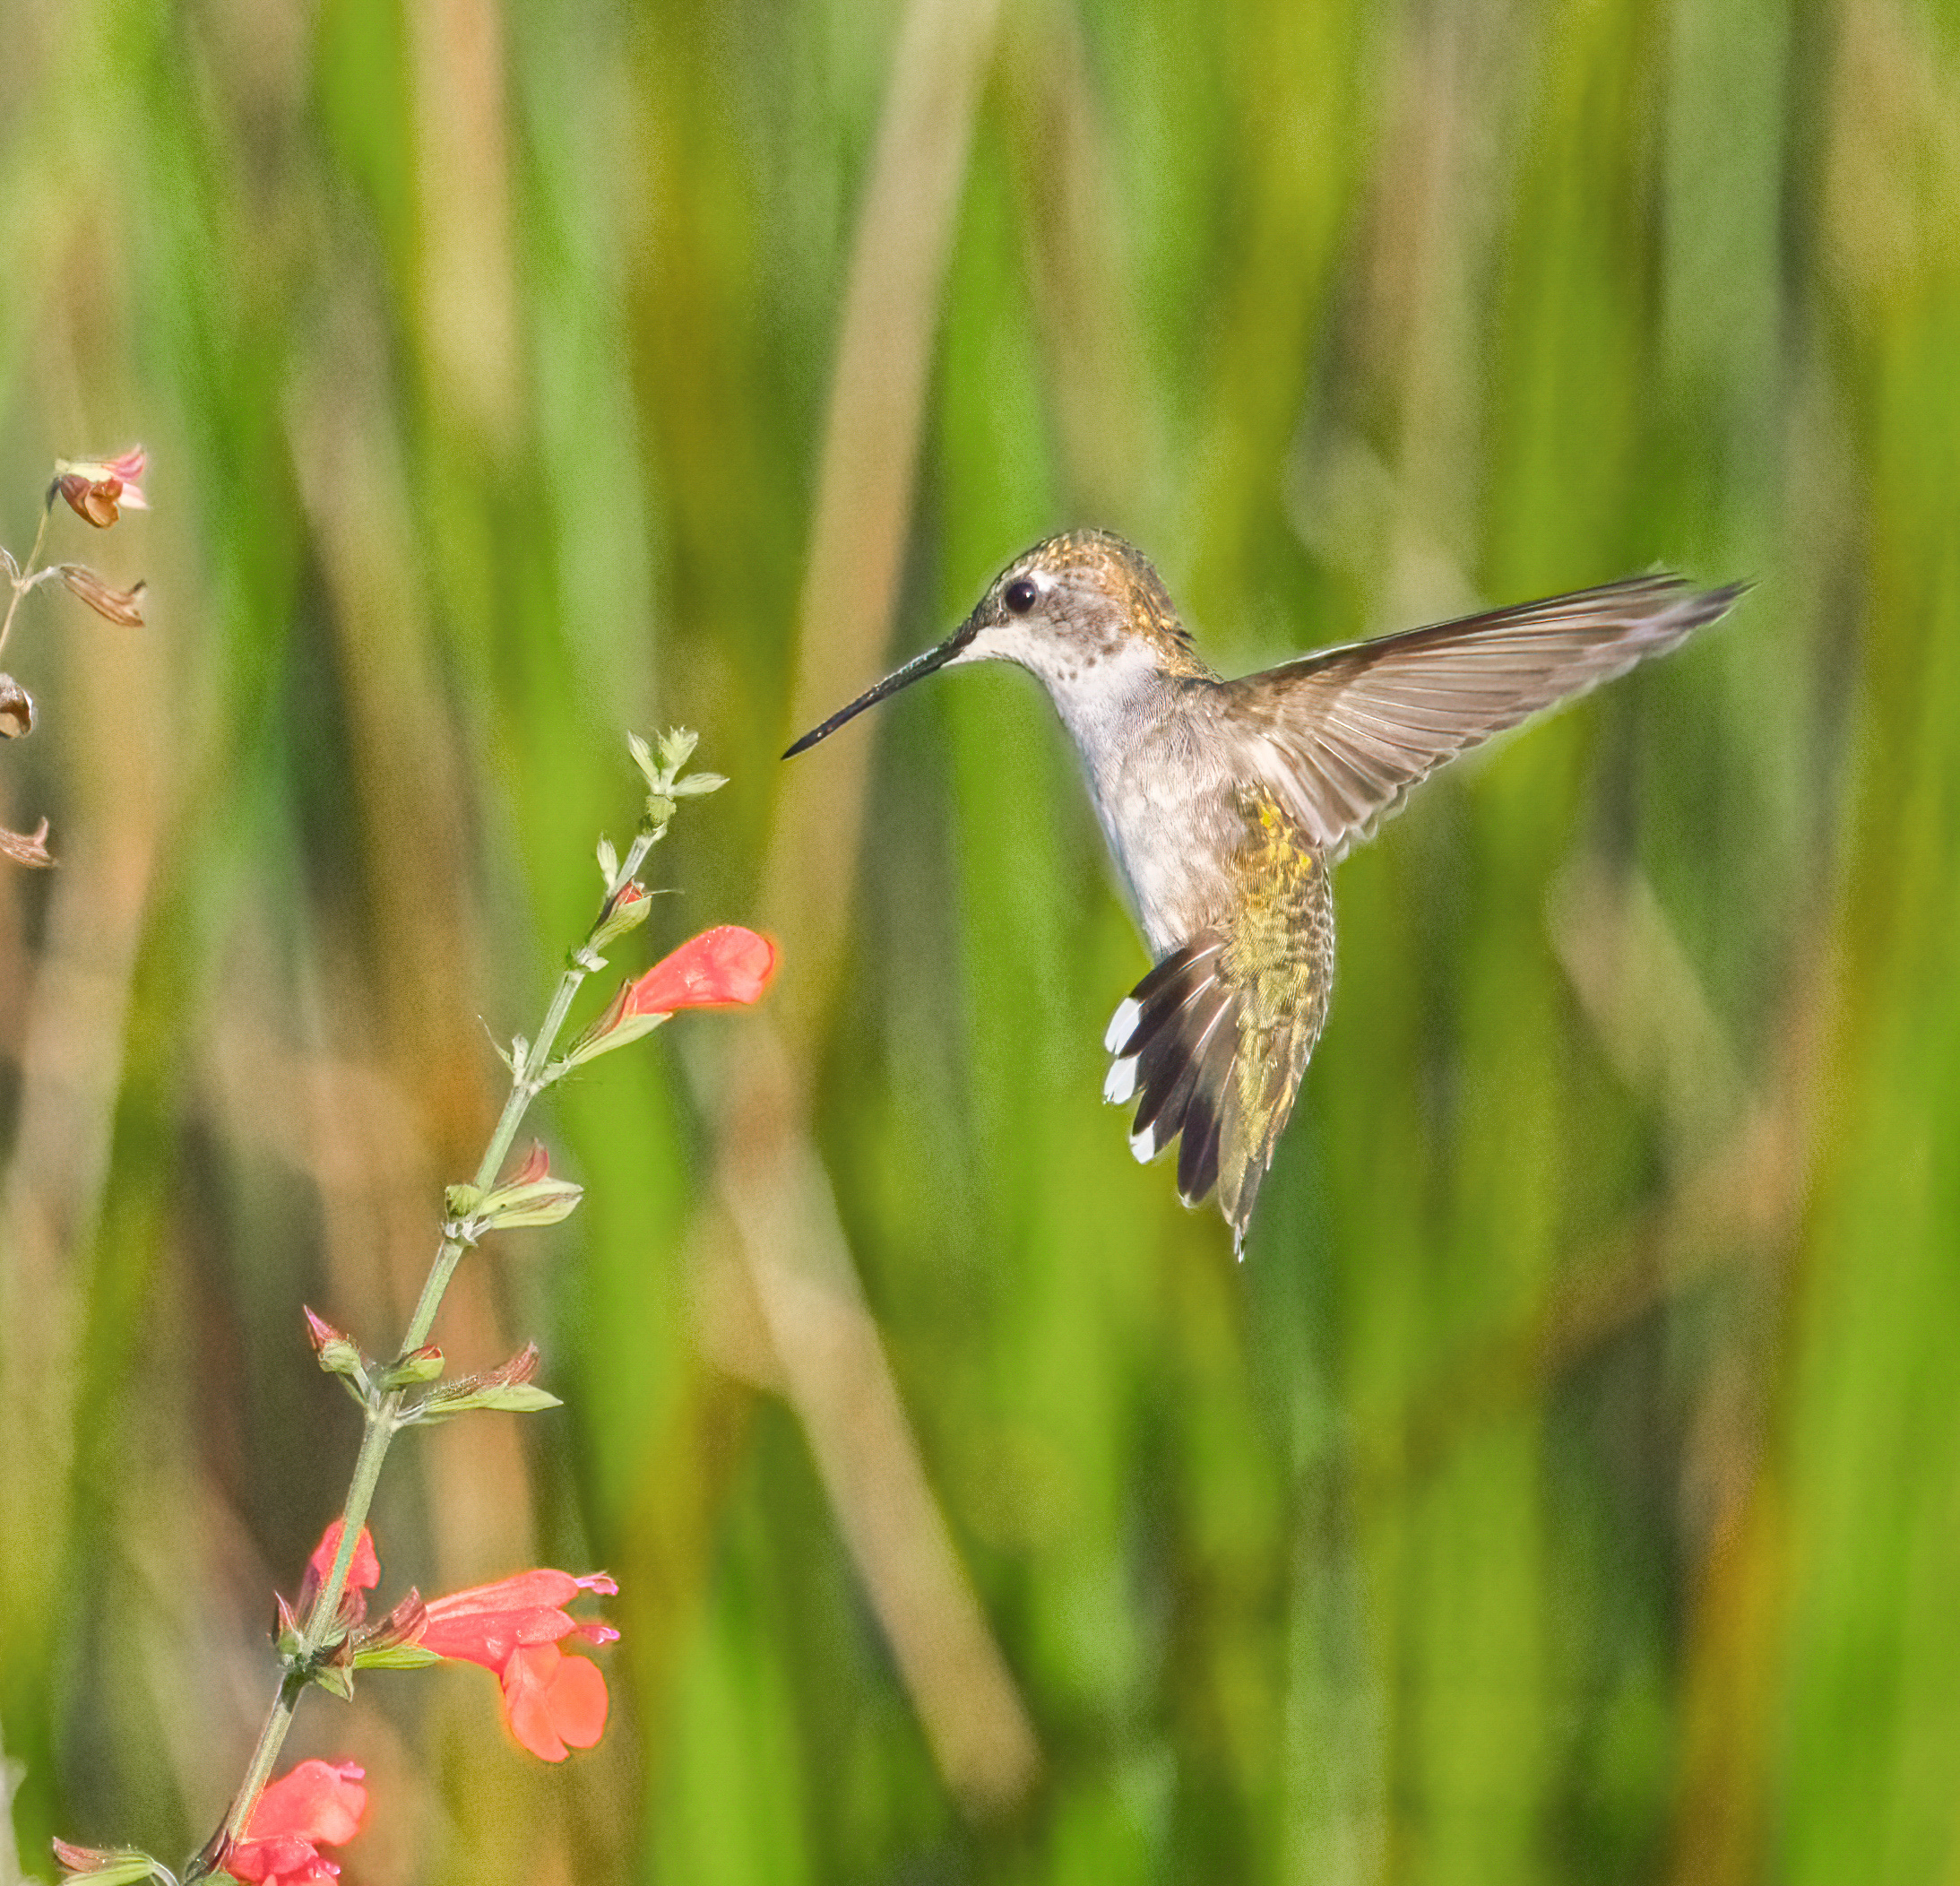
Birds as Pollinators
A juvenile male ruby-throated hummingbird serving as a pollinator as it flits from flower to flower, sipping nectar. Photo by Chase D’Animulls, Adobe Stock.
When we imagine pollinators, birds might not be the first creatures that come to mind. However, birds, comprising around 2,000 nectar-feeding species, play a significant role as pollinators among vertebrates.
Hummingbirds, with their tiny size and lightning-fast wings, are nature’s dynamos of pollination. Their slender bills and long tongues are perfectly adapted to extract the sugary nectar from flowers, inadvertently transferring pollen that adheres to their head and neck as they feed on other flowers. The ruby-throated hummingbird stands out as Florida’s prominent native bird engaged in plant pollination.
But it’s not just hummingbirds; other bird species, from sunbirds to honeyeaters, play their part in pollination too. Their behaviors, such as perching on flowers or probing deep into blossoms, can facilitate the transfer of pollen.
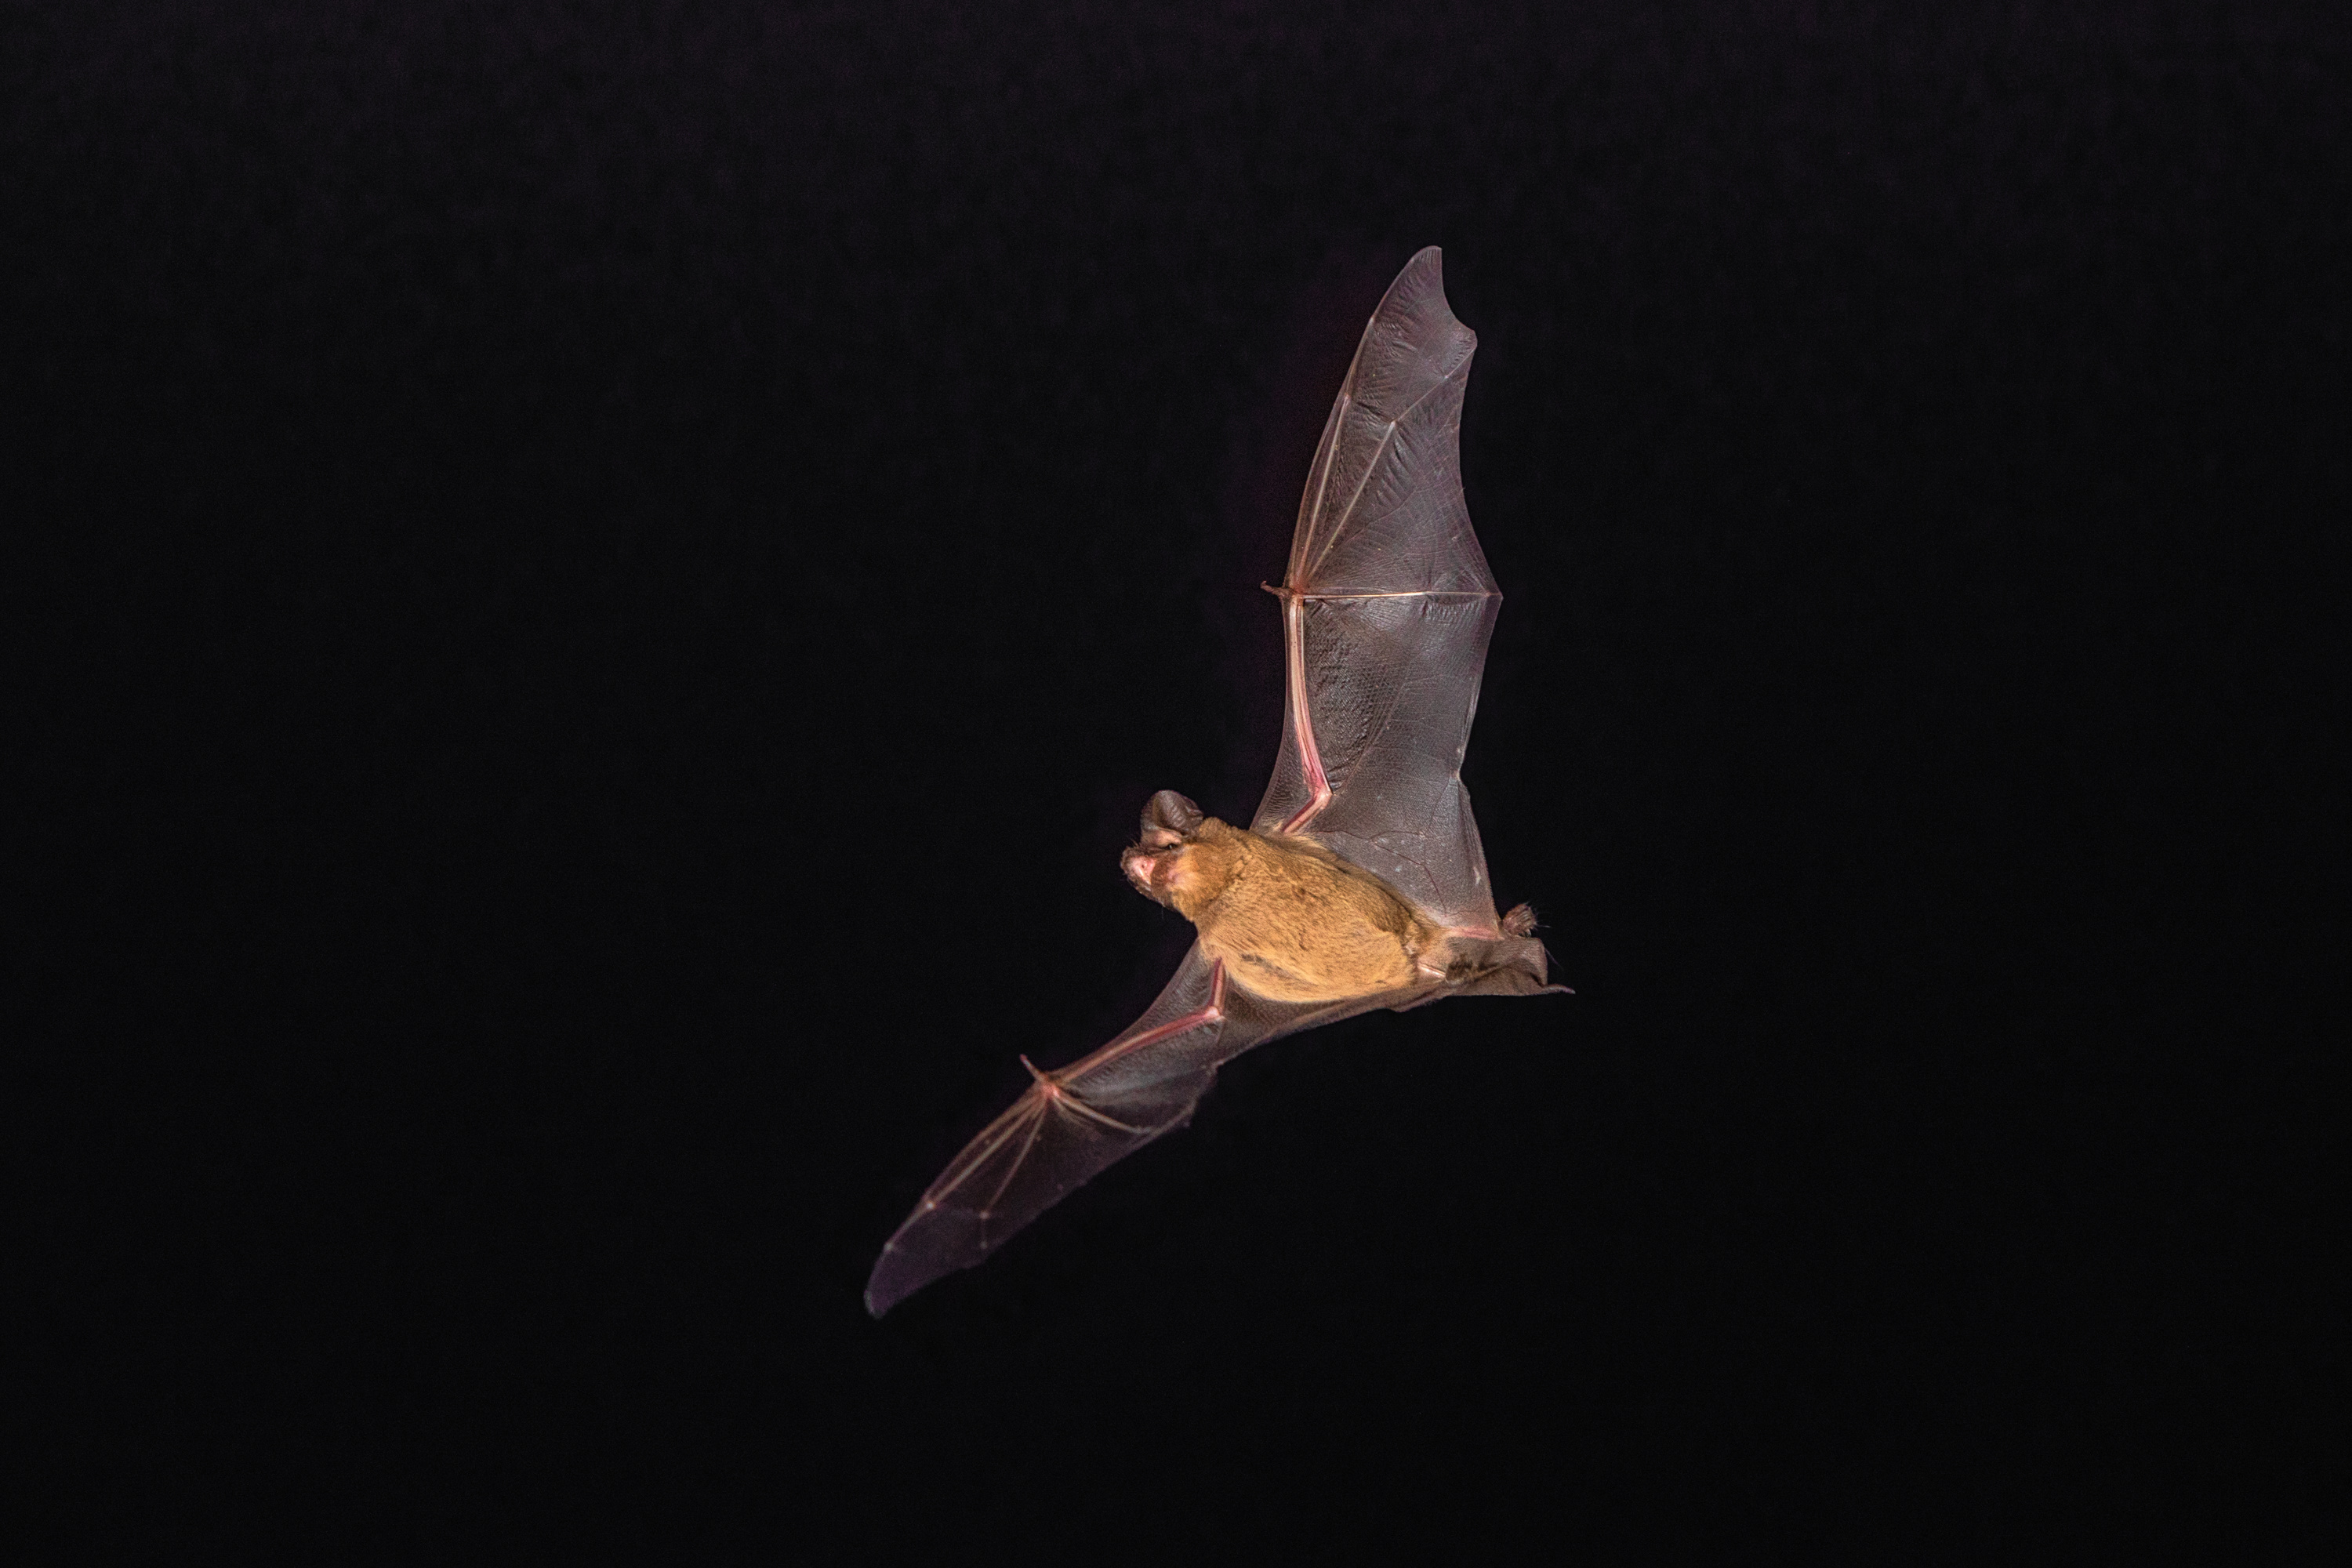
Bats as Pollinators
In the darkness of night, bats perform a vital ecological service: pollination. Particularly in tropical regions, bats have co-evolved with certain plant species, forming intricate mutualistic relationships. Surprisingly, over 500 plant species worldwide rely on bats for pollination, including important crops like agave, banana, cacao, guava, and mango.
Even insect-eating bats, such as this Brazilian free-tailed bat, can inadvertently contribute to pollination as it feeds on insects within flowers. Photo by Phil, Adobe Stock.
In Florida, all native bats are insectivores, primarily preying on insects such as mosquitoes, moths, and beetles. However, recent research suggests that insect-eating bats may even outperform their nectar-feeding counterparts in certain cases when it comes to pollination efficiency. As these bats feed on insects inhabiting flowers, they inadvertently spread pollen during the process, highlighting the diverse and sometimes unexpected roles bats play in ecosystems.
Recognizing and conserving all pollinator species, from birds and beetles to bats and ants, is crucial for maintaining ecosystem balance and ensuring food security. By promoting pollinator-friendly practices and habitat conservation, we can safeguard the intricate web of life that sustains us all.
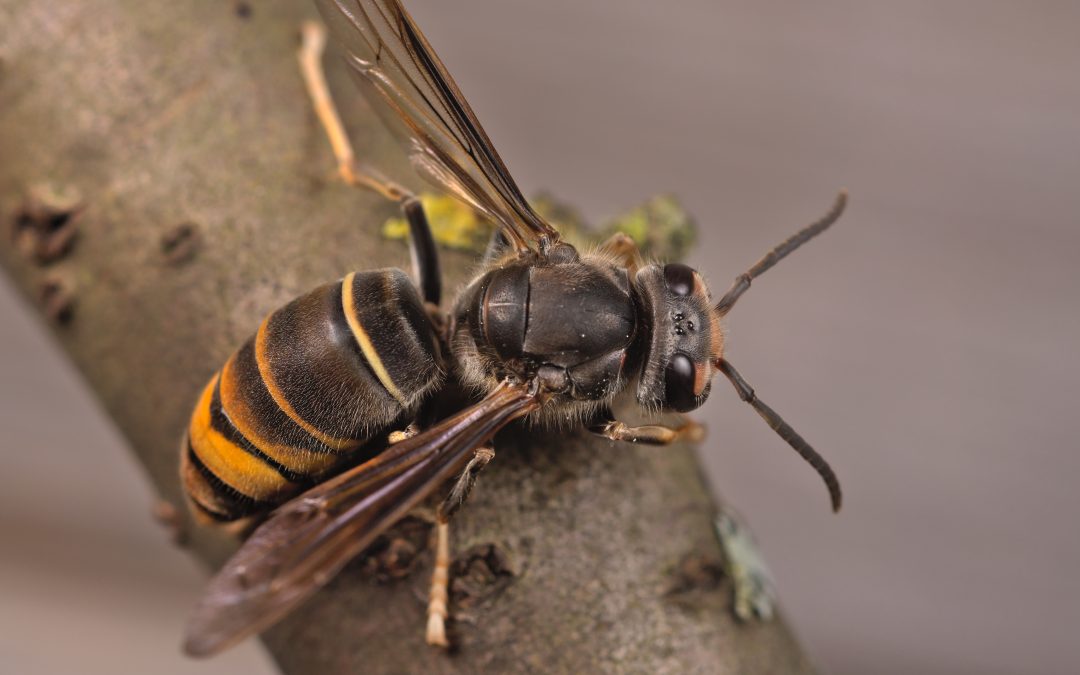
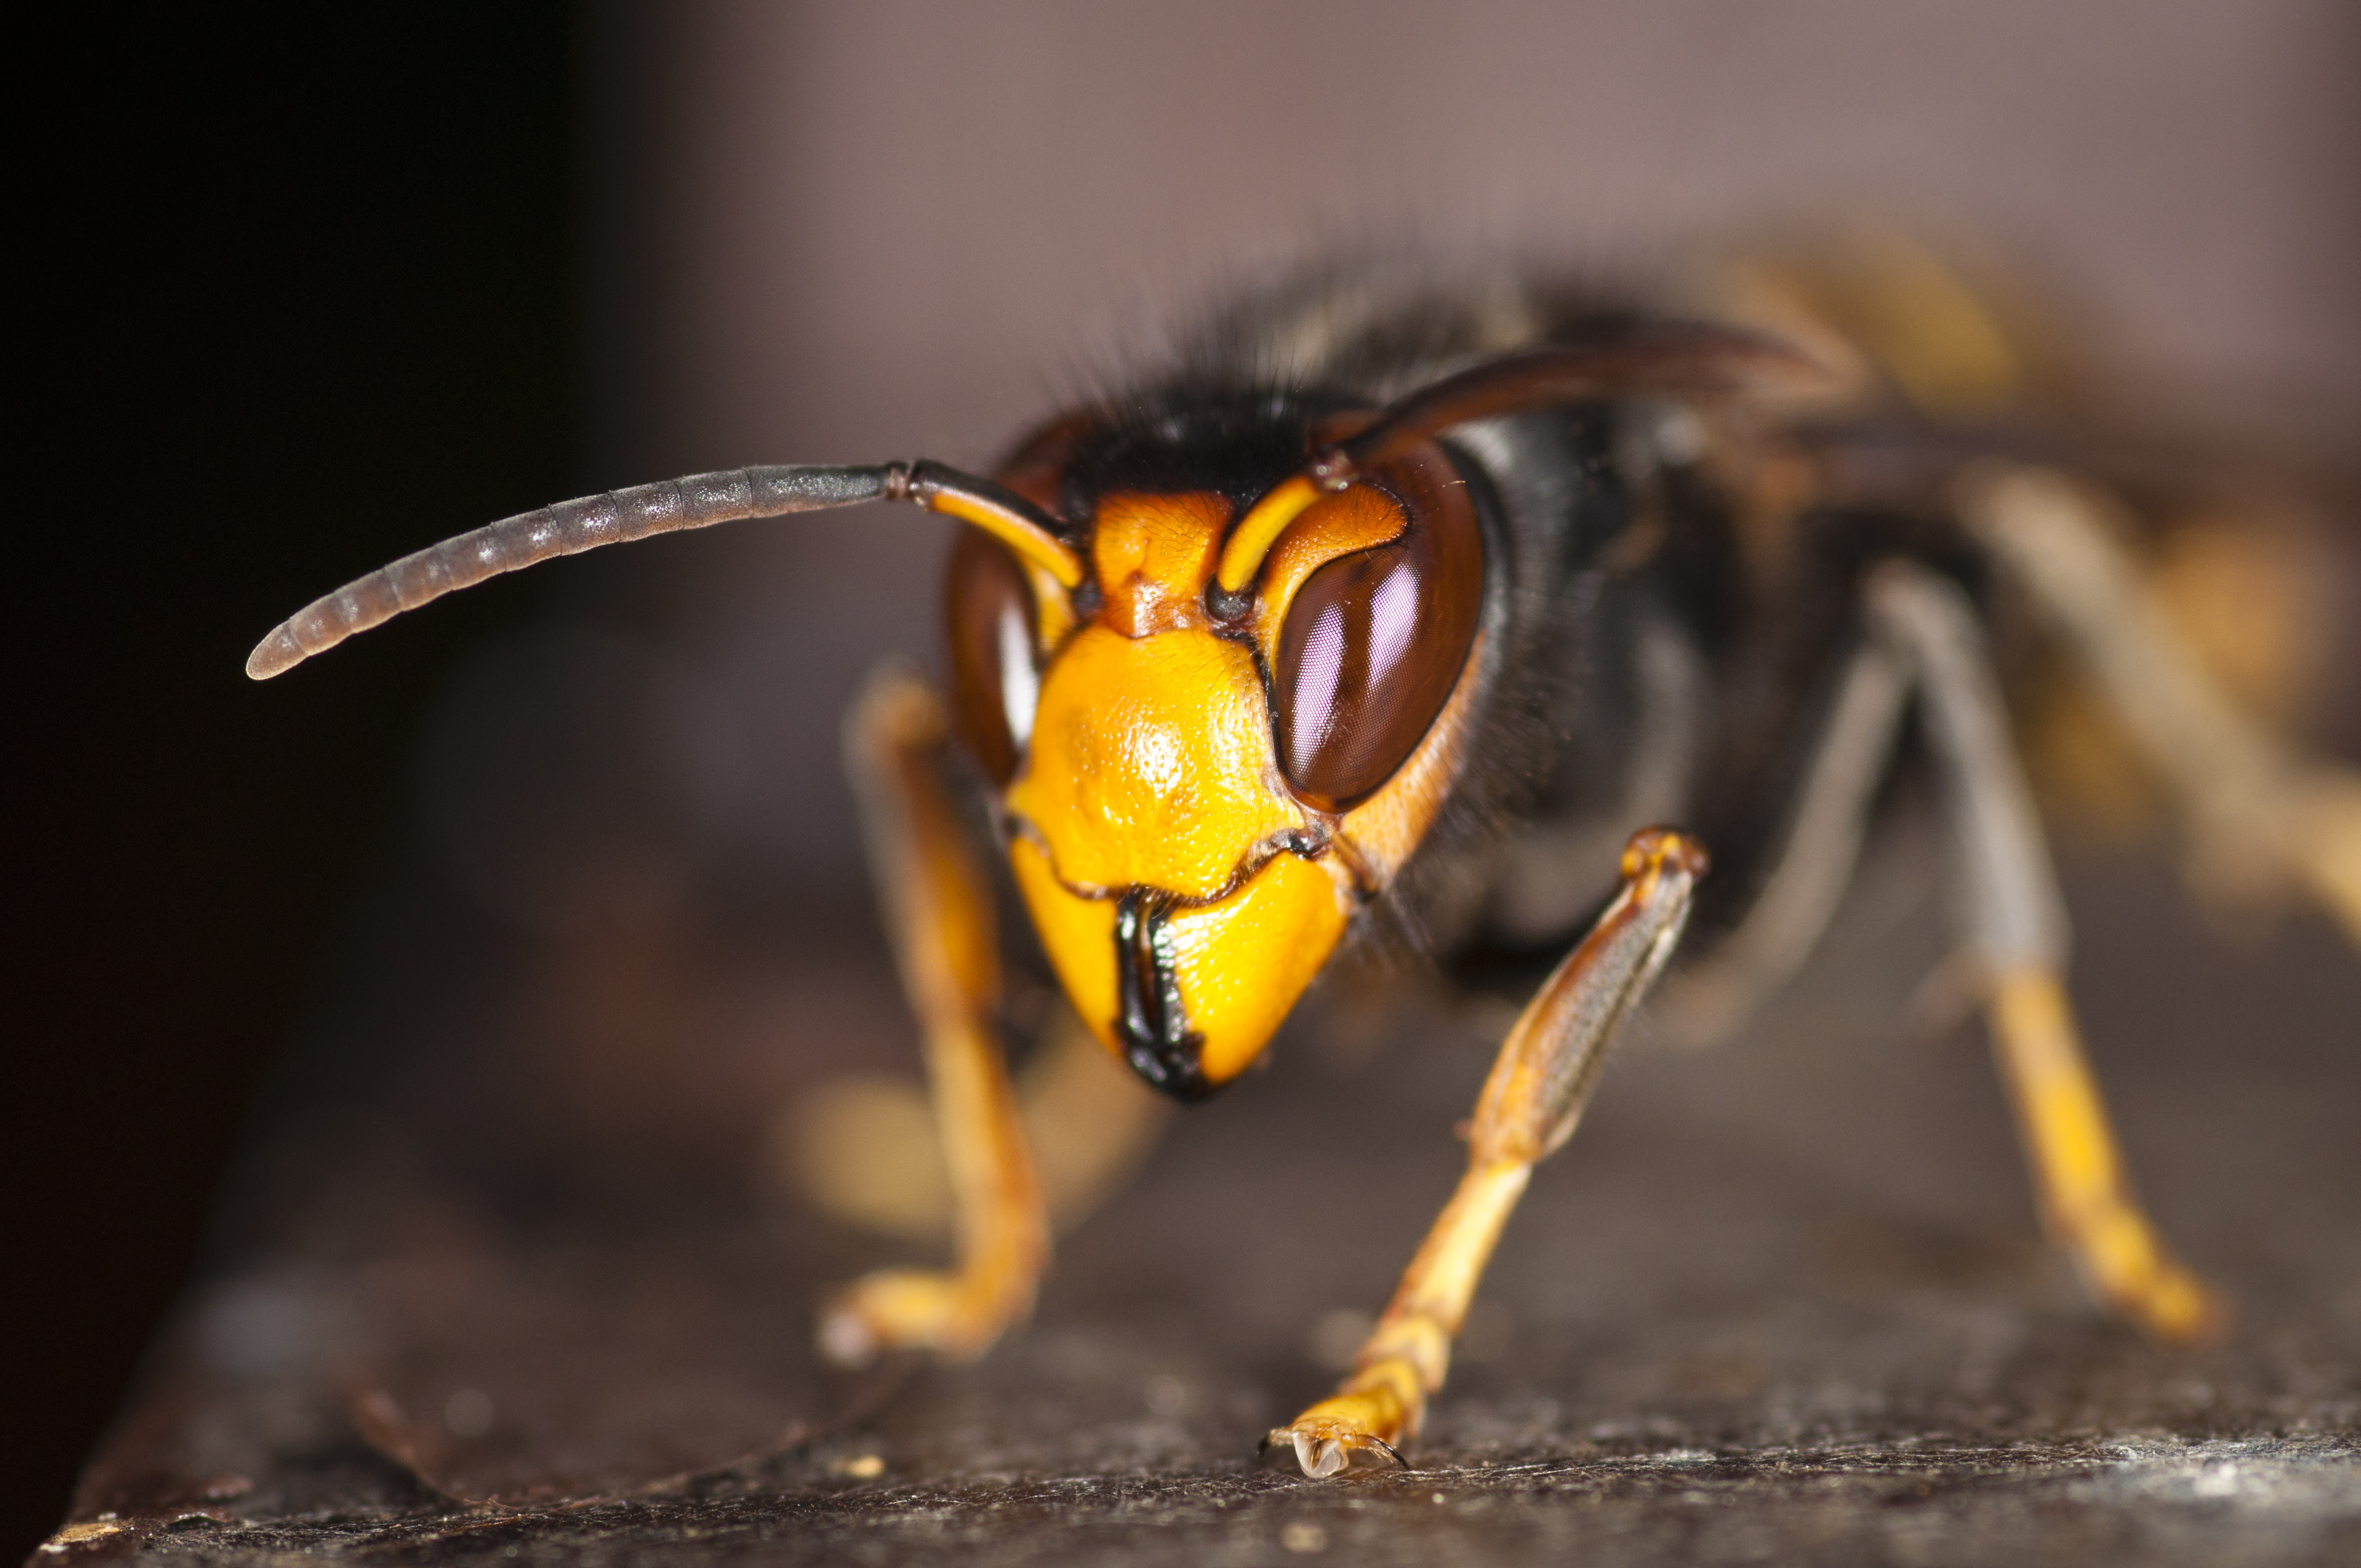
Florida beekeepers are on high alert as the invasive Vespa velutina hornet poses a threat to honey bees, prompting vigilant monitoring to safeguard against potential impacts. Photo by Danel Solabarrieta, licensed under CC BY-SA 2.0.
A concerning discovery has emerged in Savannah, Georgia, regarding the yellow-legged hornet, commonly known as the “murder hornet’s cousin.” Officially identified as Vespa velutina by the Georgia Department of Agriculture in August 2023, it was first encountered by a beekeeper in the area.
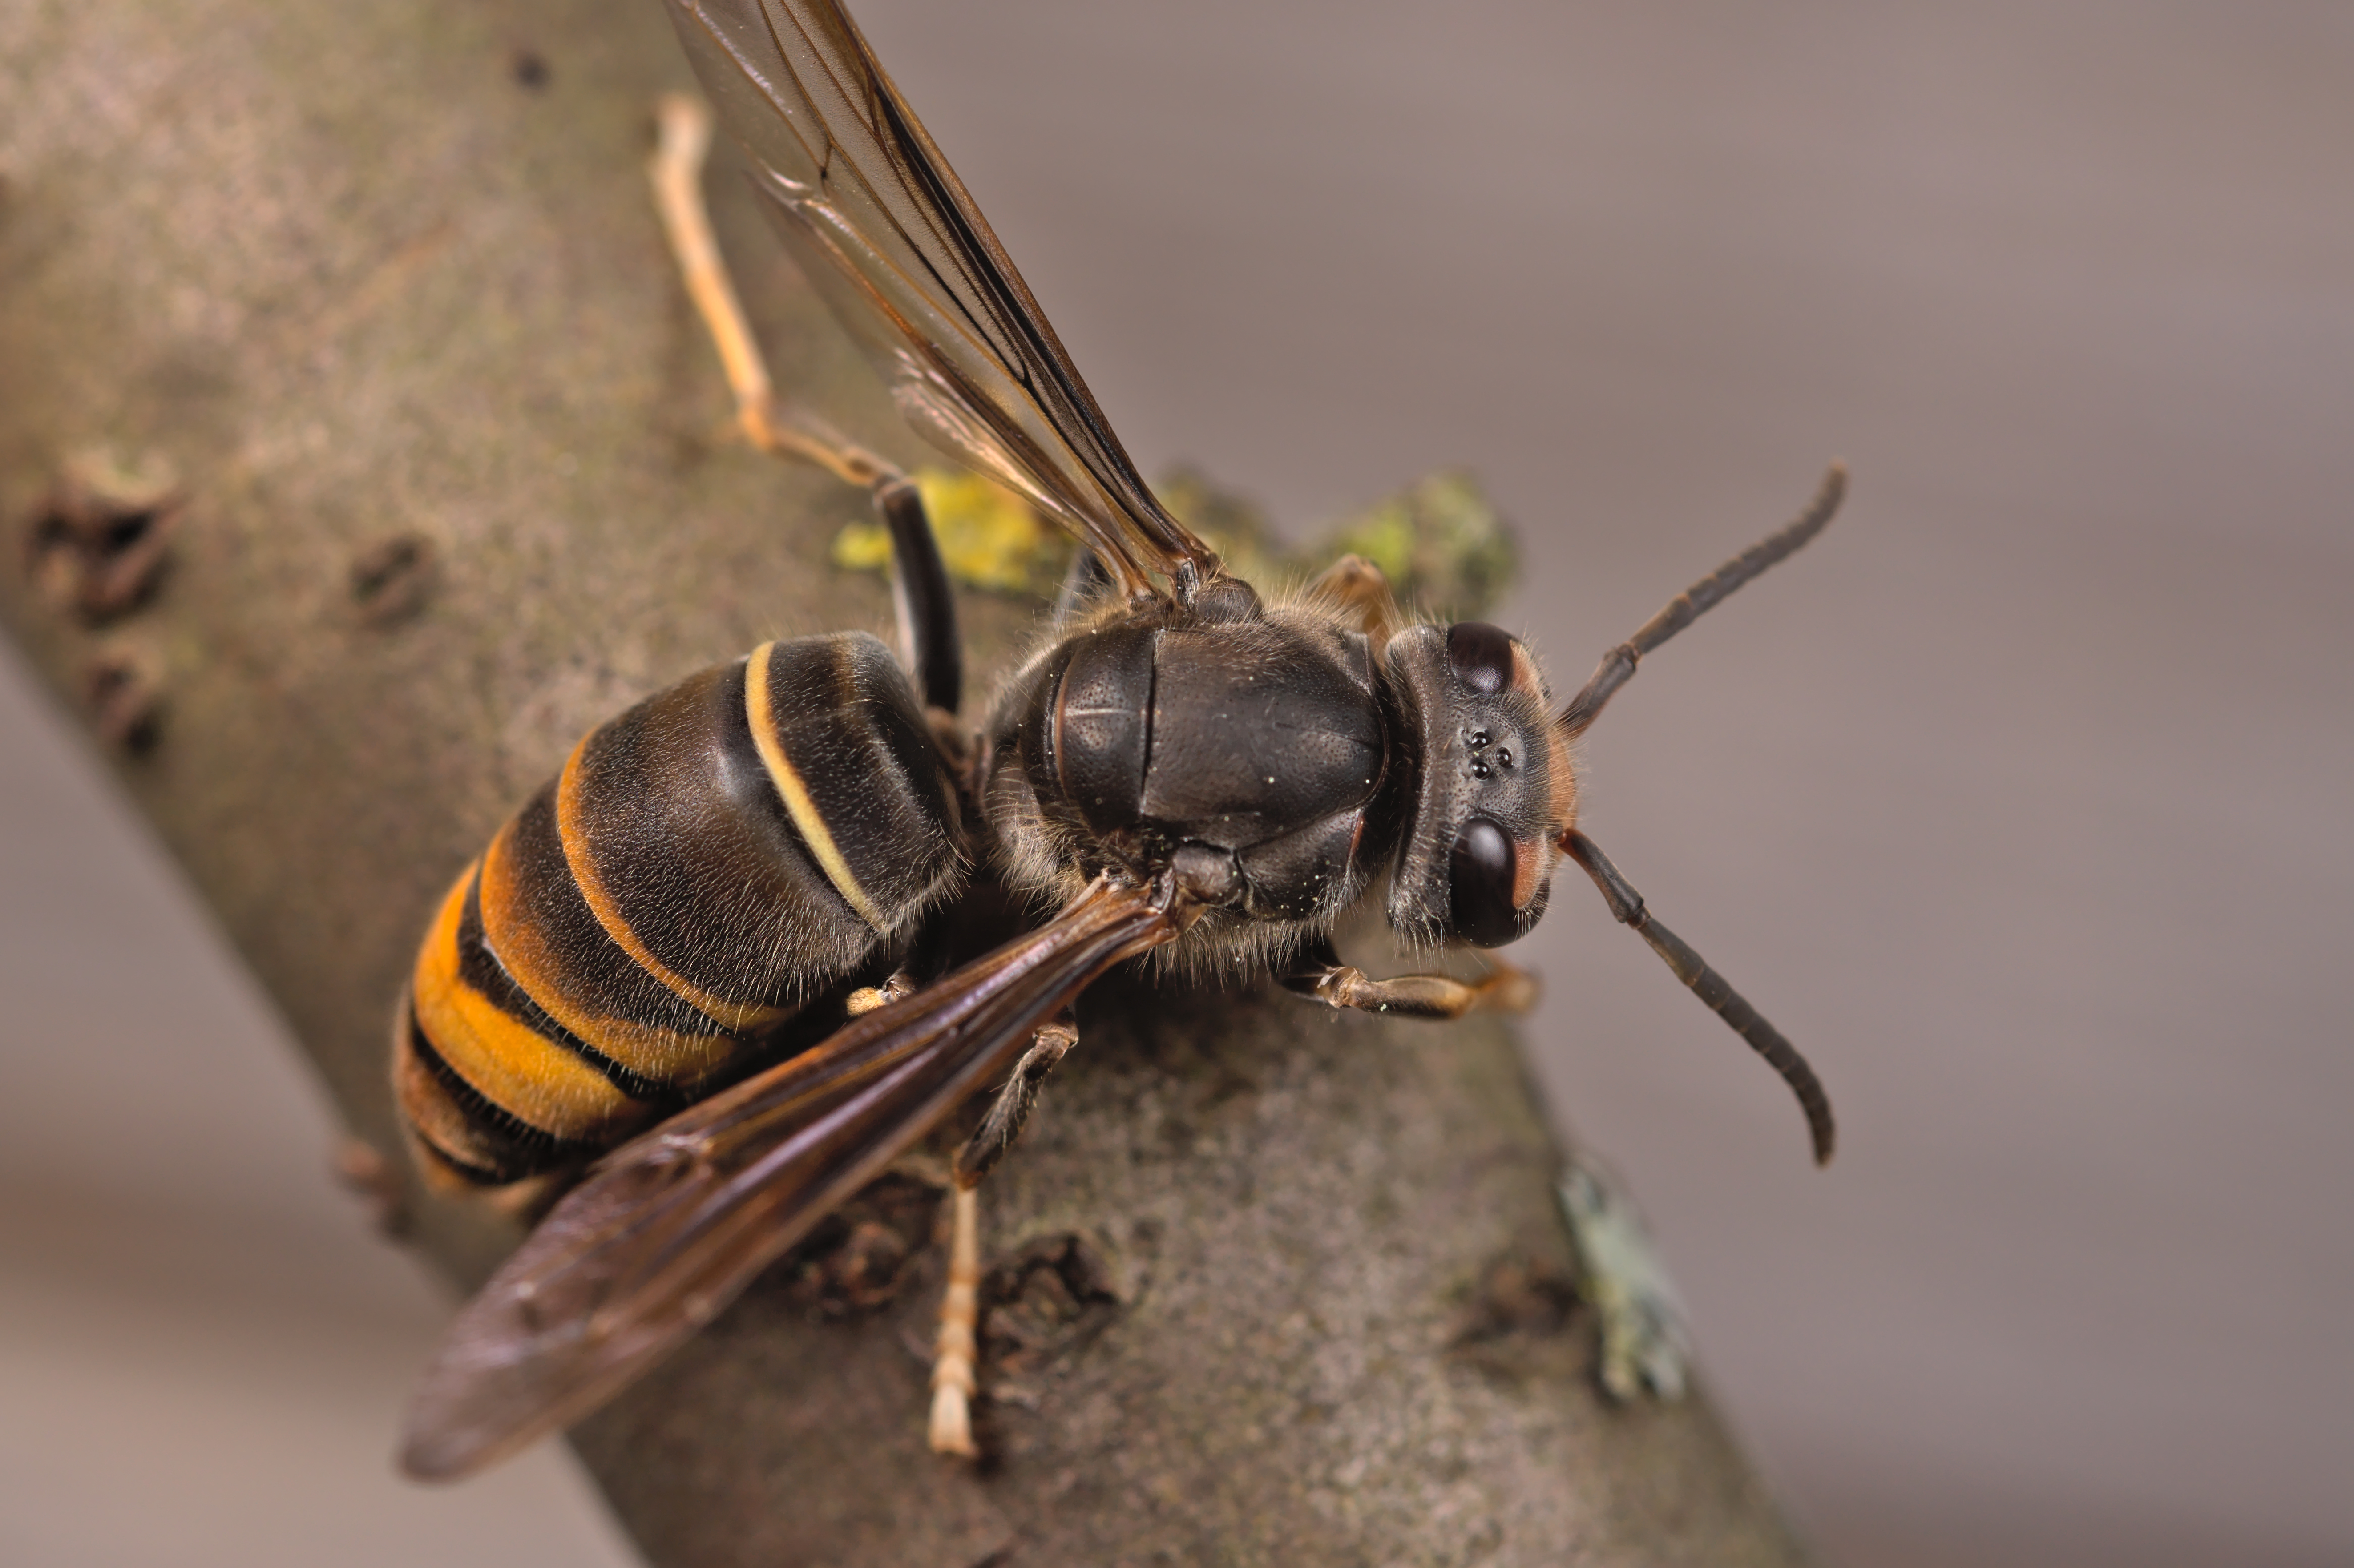
The size of a nickel, Vespa velutina has distinctive black and yellow coloring with yellow/white legs. Photo by Gilles San Martin, licensed under CC BY-SA 2.0.
Although distinctive from the infamous “murder hornet,” the yellow-legged hornet, initially confirmed in Vancouver and the neighboring Whatcom County in Washington state, both hornet species pose threats to honey bee larvae and adults.
Approximately the size of a nickel, Vespa velutina features distinctive black and yellow coloring with yellow/white legs, earning it the nickname “yellow-legged hornet.” The discovery of the yellow-legged hornet has therefore spurred proactive measures to prevent its establishment in Florida and the rest of the United States.
The invasive nature of the yellow-legged hornet, originating from Southeast Asia and first appearing in Europe in 2004, poses a significant threat to beekeepers. This is due to its status as a generalist predator with honey bees as a primary target, intensifying concerns within the beekeeping industry.
The life cycle of the yellow-legged hornet begins with a single queen establishing a nest, laying eggs, and awaiting the emergence of workers. Nests can be found in various locations, growing to an average of 6,000 individuals. Predation on honey bee colonies increases during the summer months, with the hornets mating later in the year. The annual life cycle concludes with the death of all workers and males, and new nests are constructed in the following year.
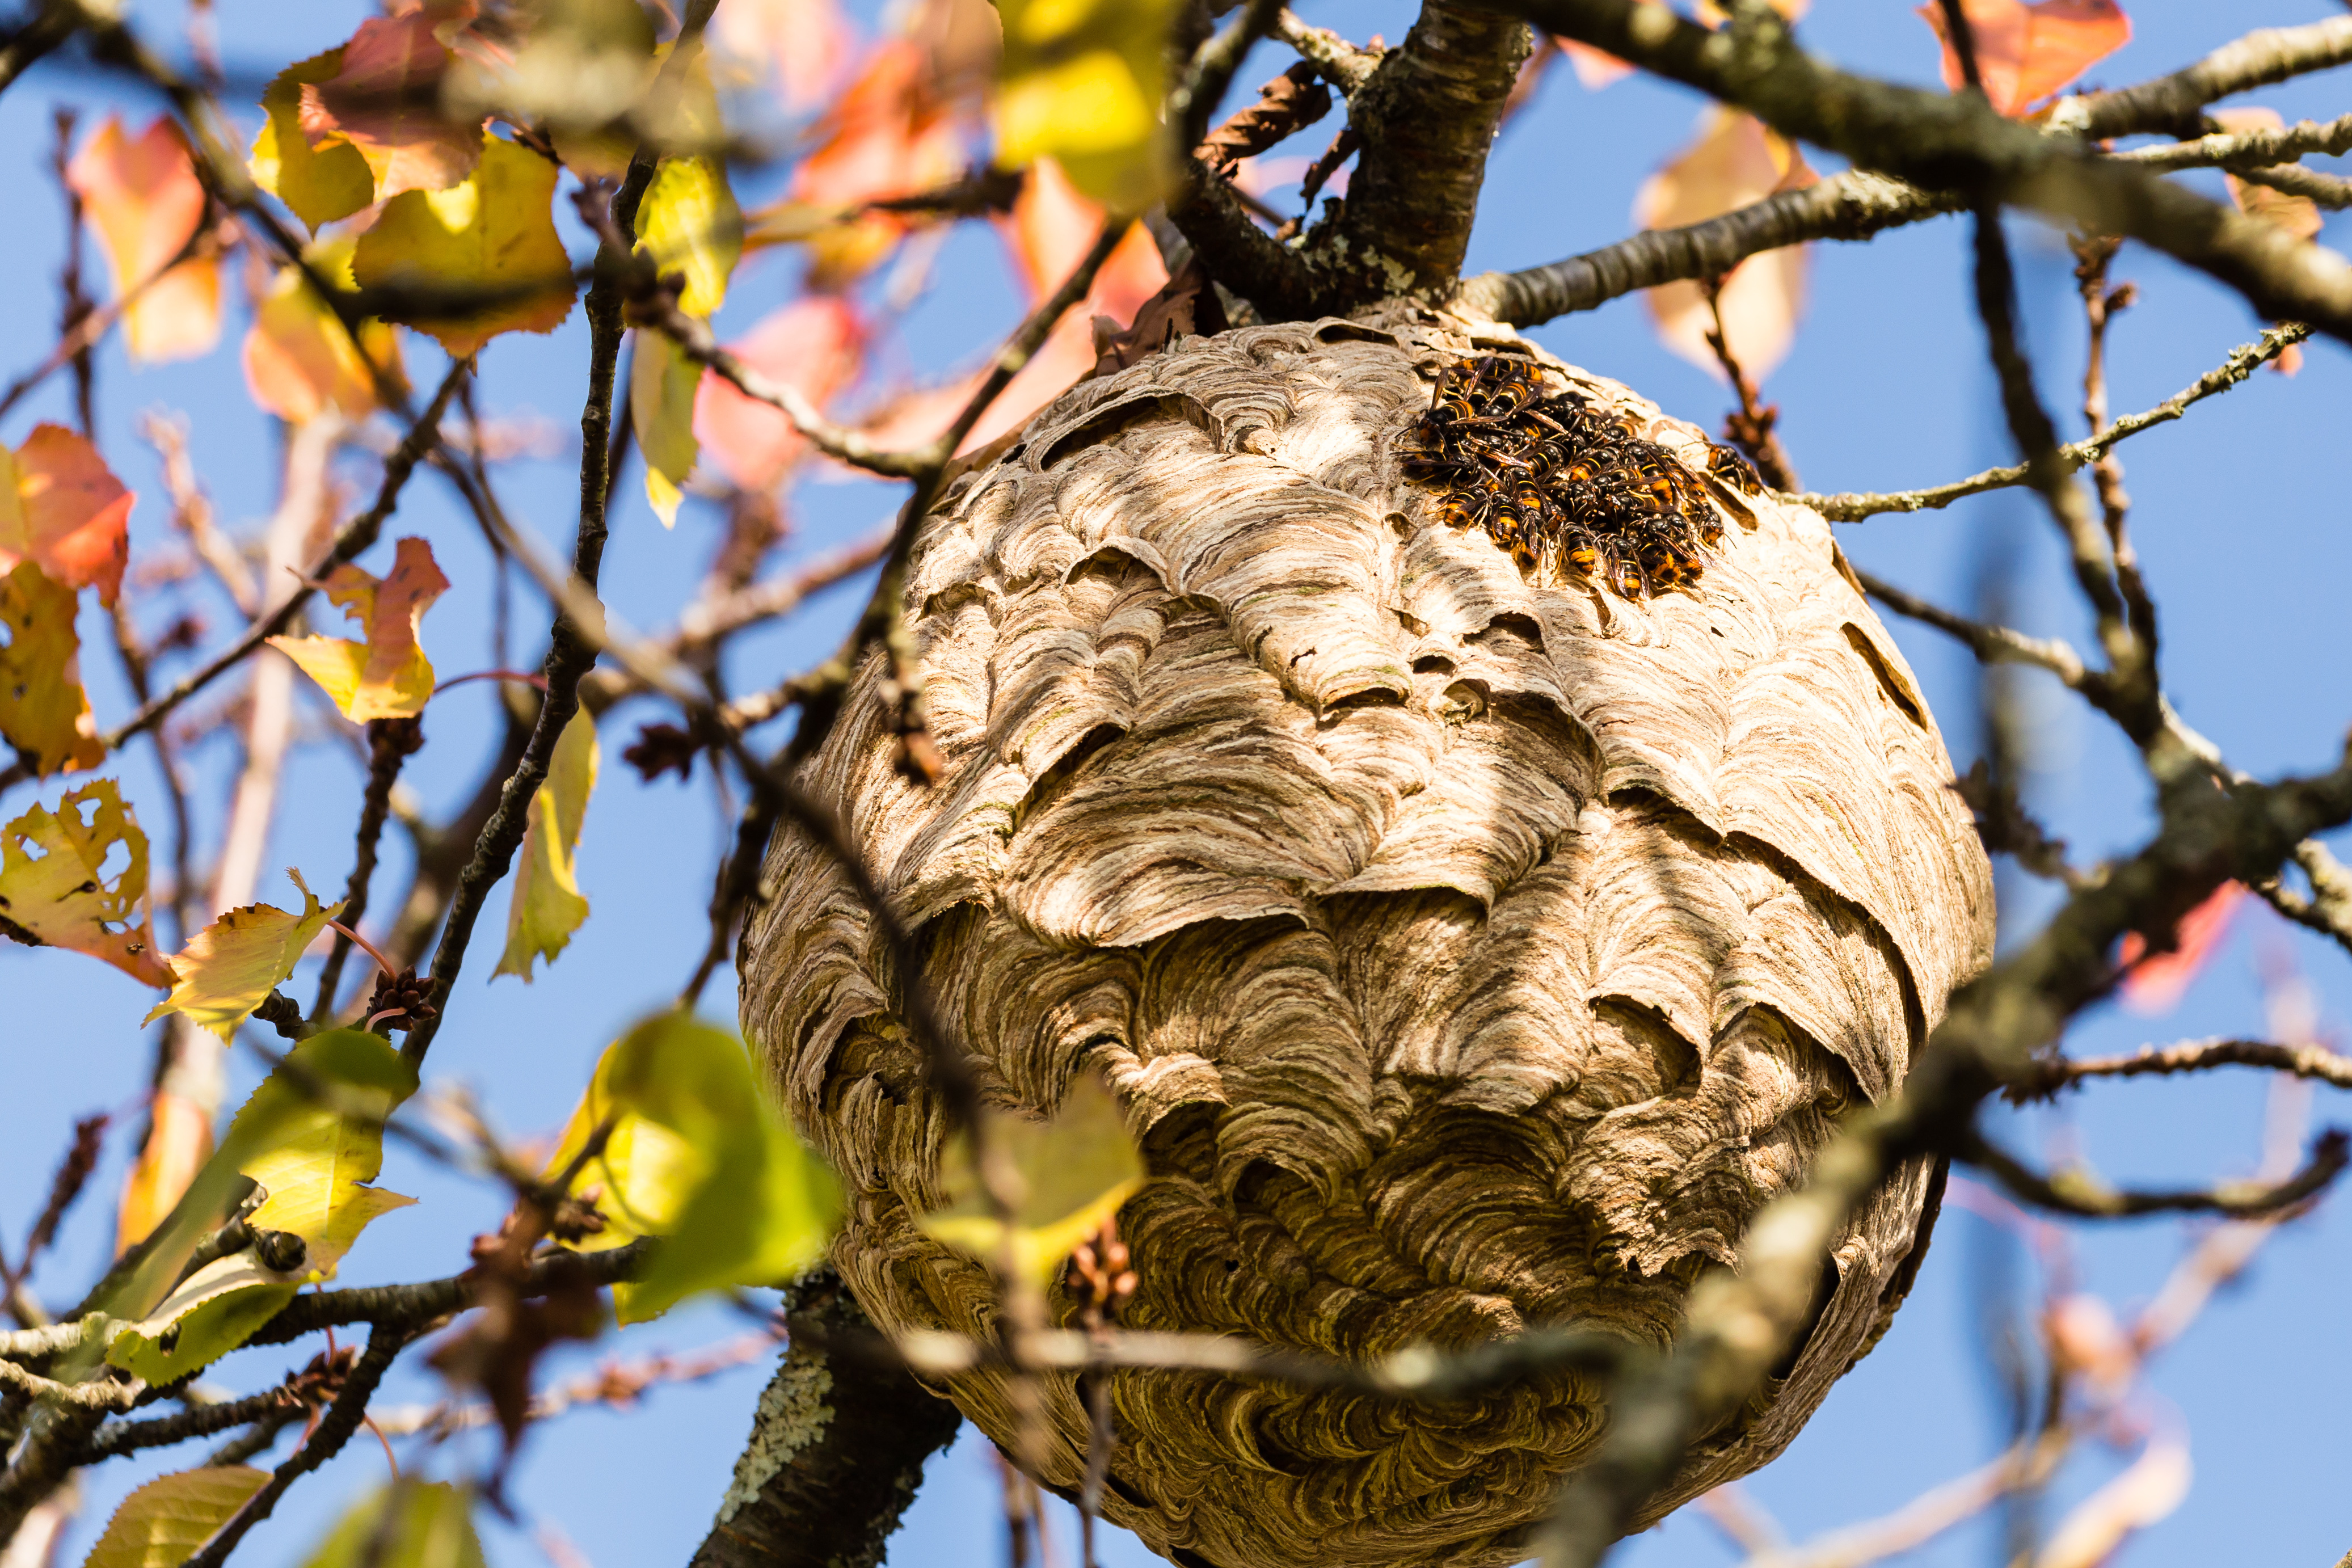
Vespa velutina secondary nest, with adult hornets huddled together warming up in the sun. Photo by YVO-Photos, Adobe Stock.
Remarkably, a single mated female has the potential to initiate a new colony. Primary nests, starting as small as a tennis ball, undergo significant expansion. Secondary nests, reaching heights of up to one meter and containing over 17,000 cells, are typically situated at altitudes of 60 to 70 feet, making them challenging to access. A single hornet nest has a voracious appetite, as it can consume up to 25 pounds of insect biomass in a single season, underscoring the ecological impact of yellow-legged hornet colonies.
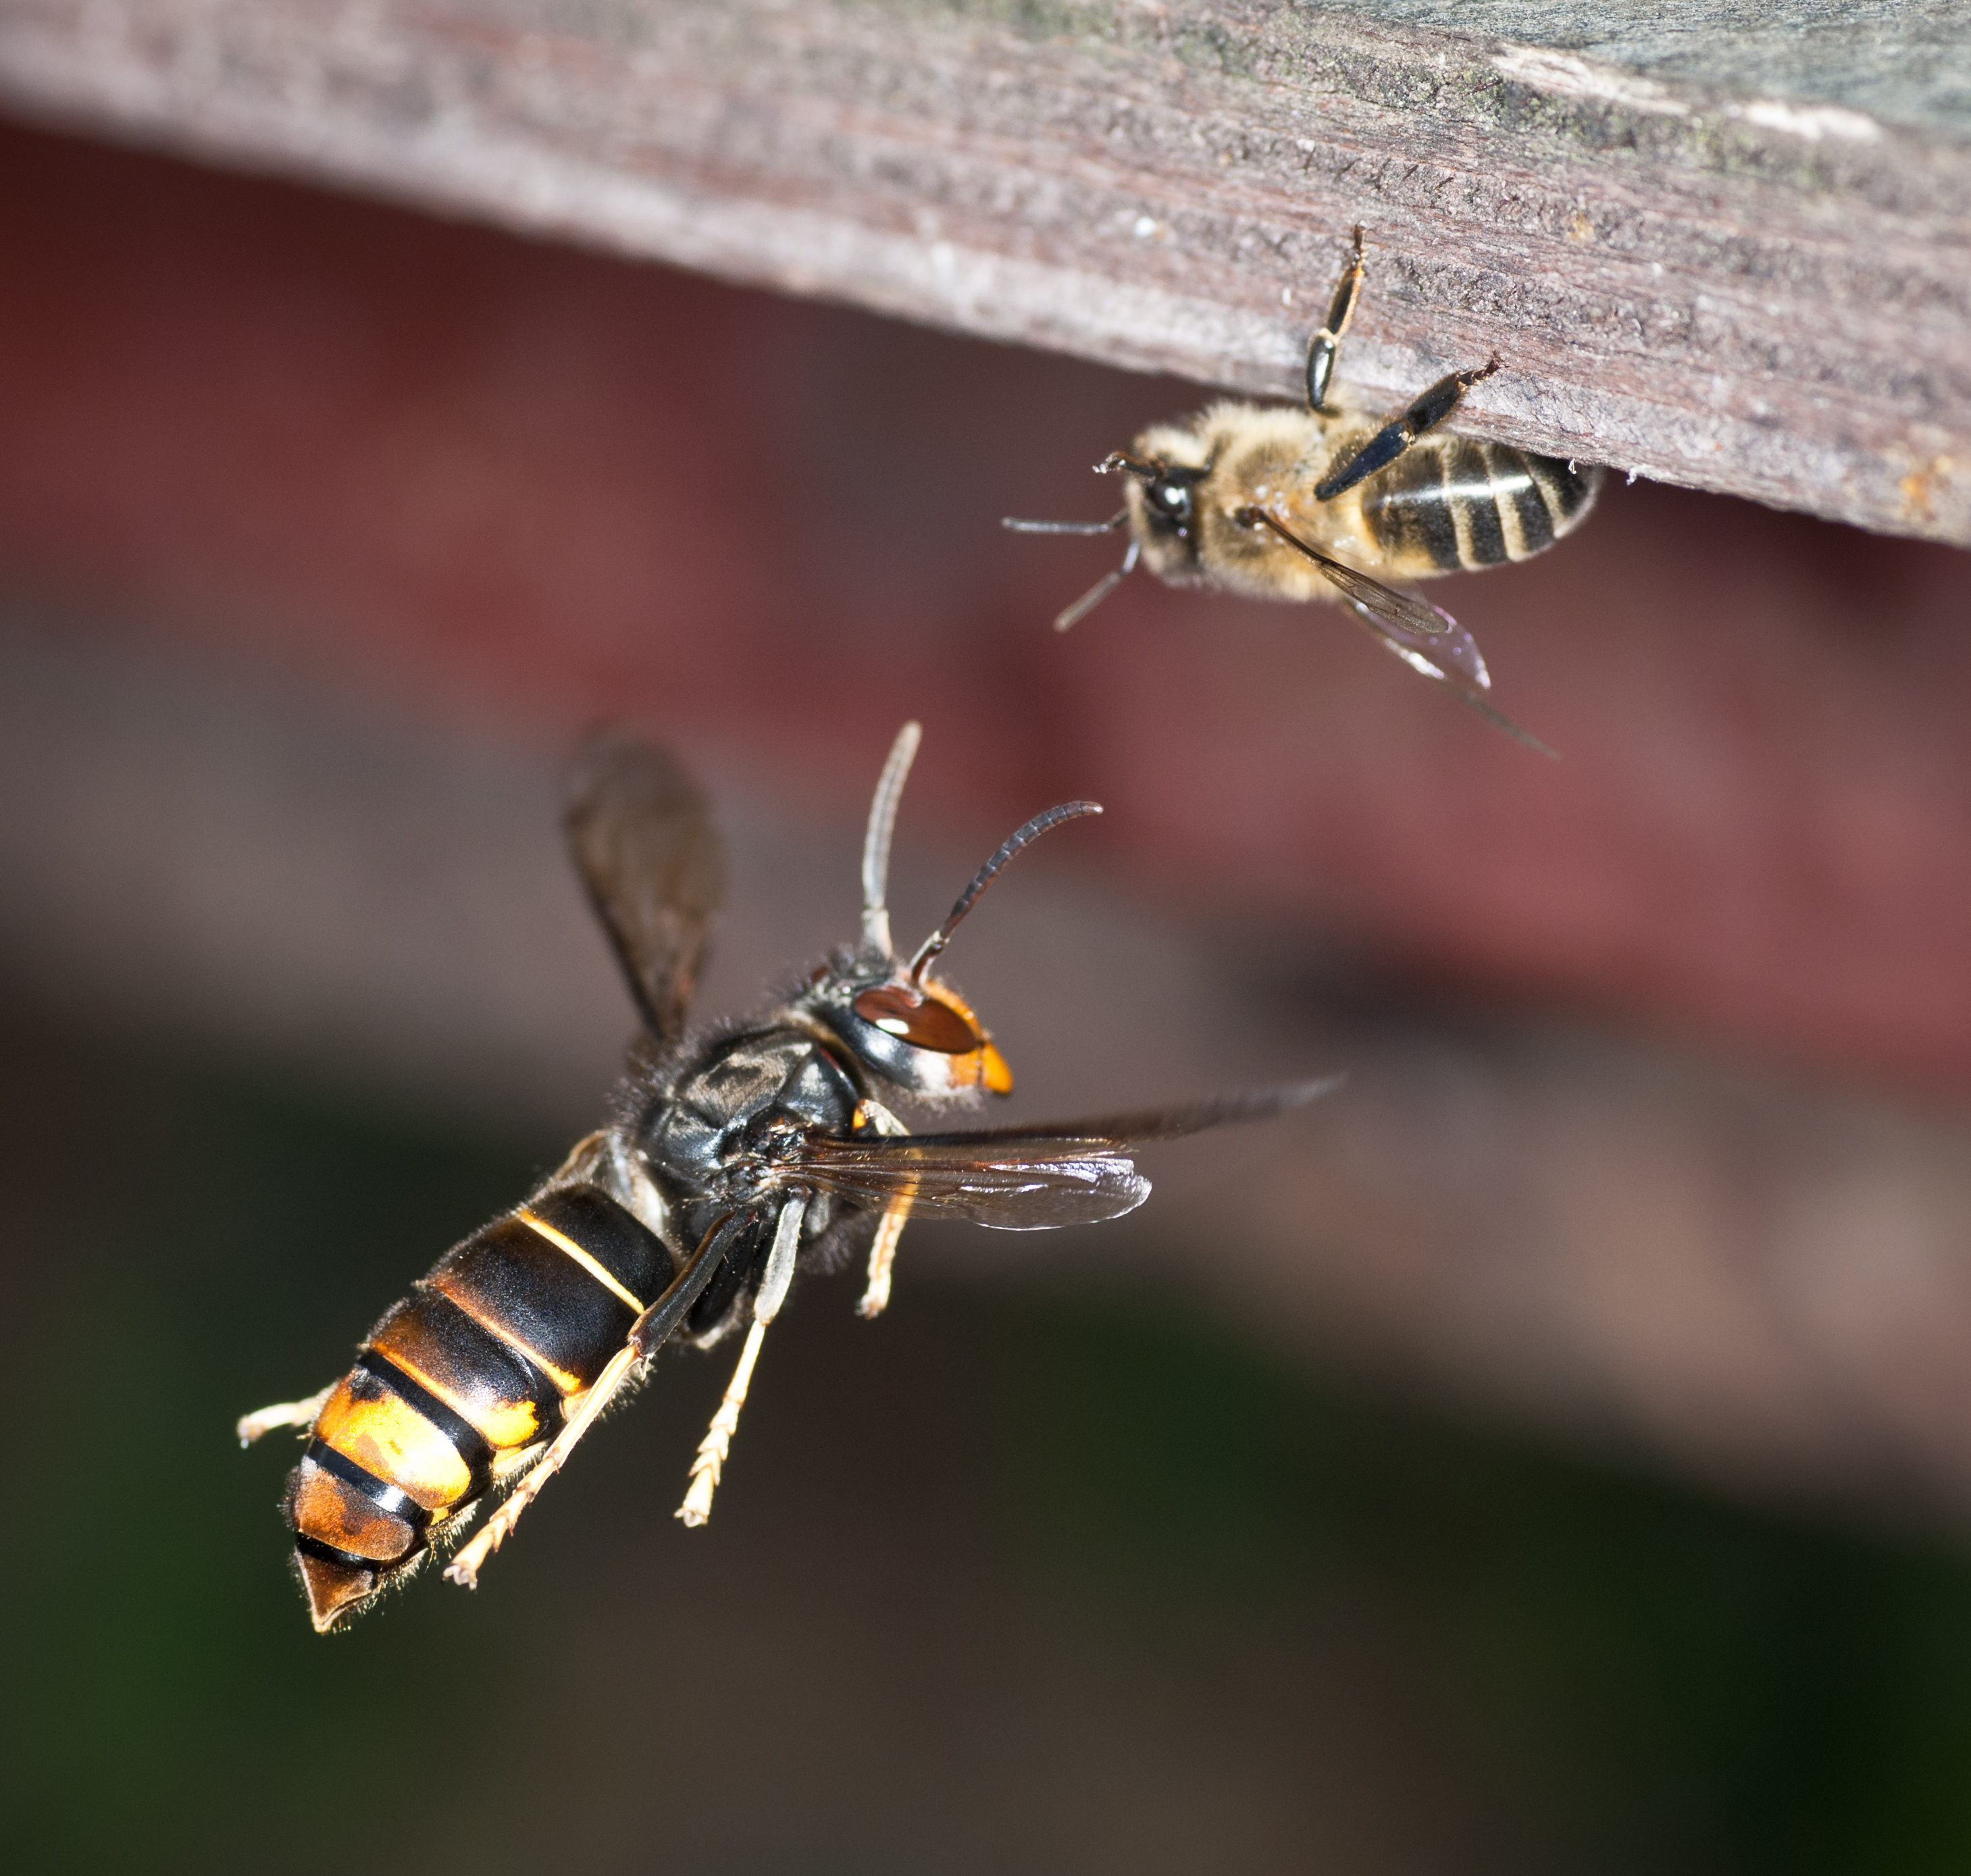
As a predatory wasp, the yellow-legged hornet feeds on a variety of arthropods, displaying opportunistic behavior, including feeding on decaying animals. While the ecological impact is not fully understood, DNA in the gut of hornets shows that they feed on other wasps, bees, butterflies, moths, and spiders. However, honey bees, particularly Apis mellifera, are preferred targets, posing a significant threat to the beekeeping industry. Reports from Europe suggest that up to 30 percent of honey bee hives are weakened by attacks, with approximately five percent facing complete destruction.
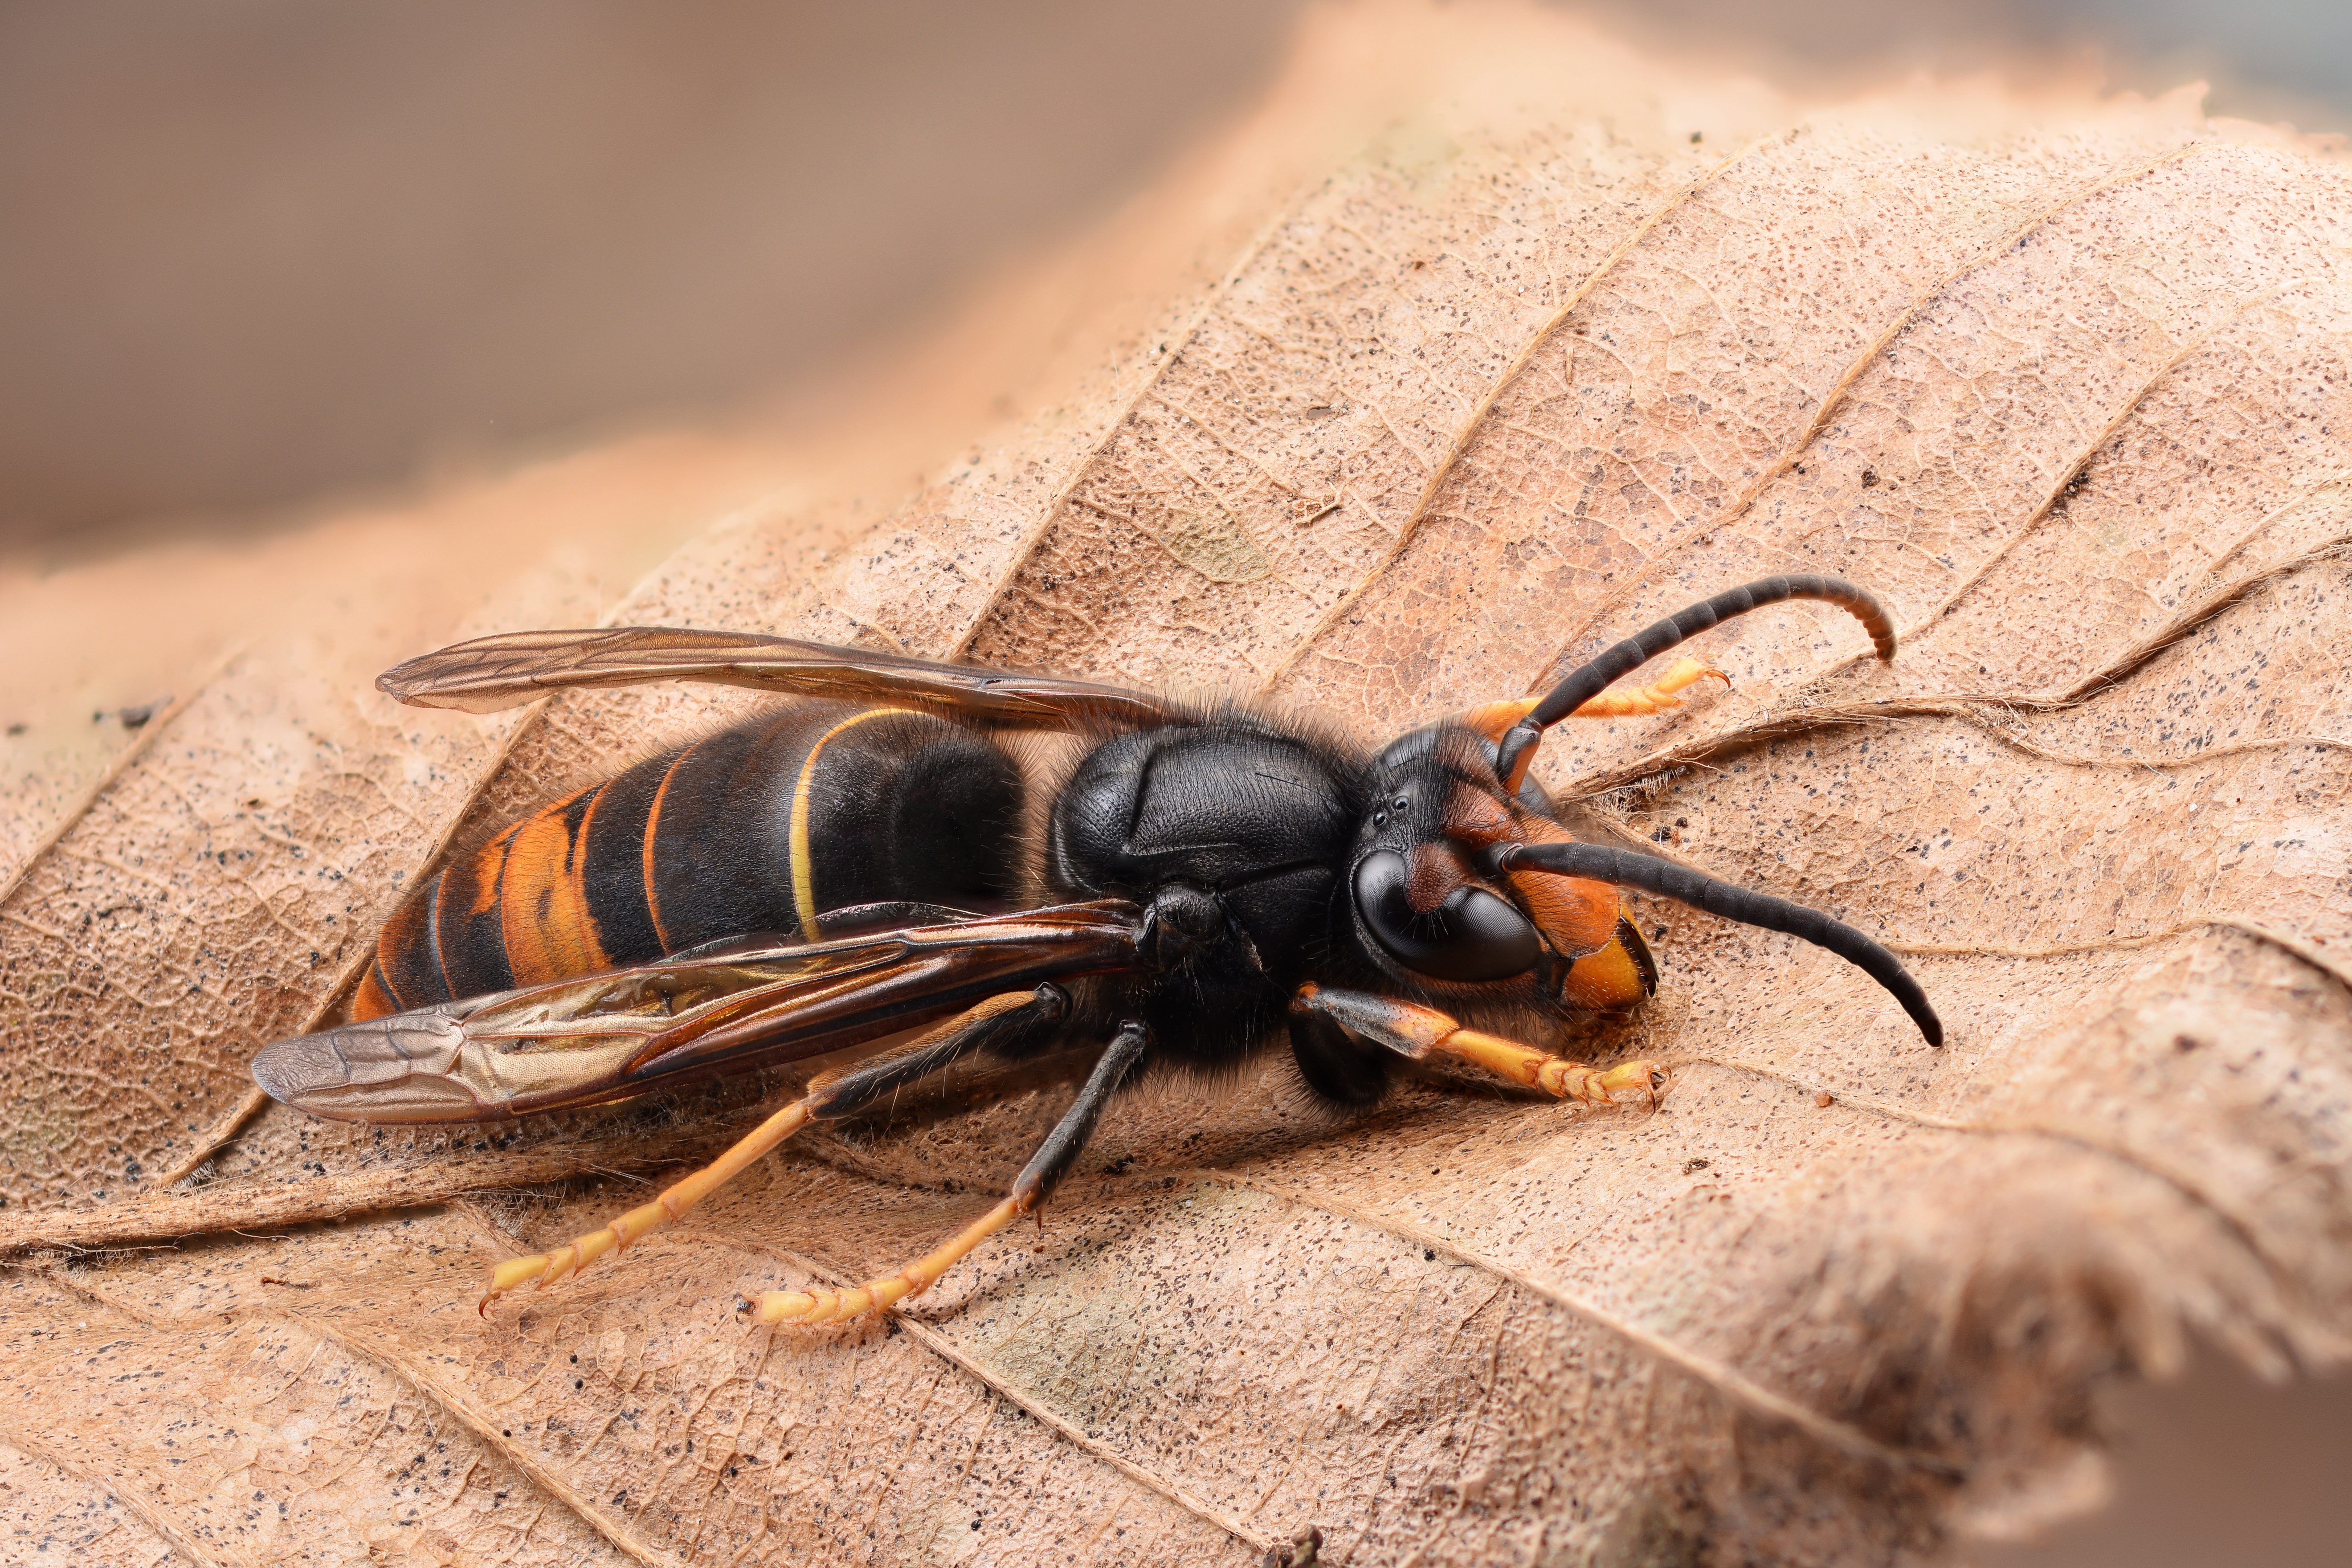
A male Vespa velutina, which exhibits longer, thicker antennae compared to females and, in line with all Hymenoptera males, lacks a stinger. Photo by Gilles San Martin, licensed under CC BY-SA 2.0.
Initially attracted to the honey bee hive by hive pheromones, yellow-legged hornets position themselves away from hive entrances, waiting for returning foragers, resulting in a “carpeting” of workers at the entrance. This term refers to the clustering or accumulation of honey bee workers near the hive entrance as they attempt to defend against the invading hornets. This behavior unfortunately leads to decreased colony production.
It’s essential to note that there are many domestic species, native to the United States, that closely resemble the invasive hornet but do not pose a threat to honey bees; in fact, many of them are valuable pollinators. The USDA has a photo gallery of these lookalikes, which can be accessed by visiting www.aphis.usda.gov and searching for ‘yellow-legged hornet.’
Vigilance from the public is crucial in minimizing the potential impact of Vespa velutina on honey bee populations in Florida and beyond. Photo by Danel Solabarrieta, licensed under CC BY-SA 2.0.
While the yellow-legged hornet can easily be confused with other hornets that are not problematic to honey bees, residents who believe they have identified Vespa velutina are encouraged to call the FDACS hotline at 1-888-397-1517.
If a sample is collected or a clear photo of the suspected hornet is available, please email dpihelpline@fdacs.gov along with location information to facilitate monitoring efforts. Vigilance and cooperation from the public are crucial in minimizing the potential impact of the yellow-legged hornet on honey bee populations in Florida and beyond.
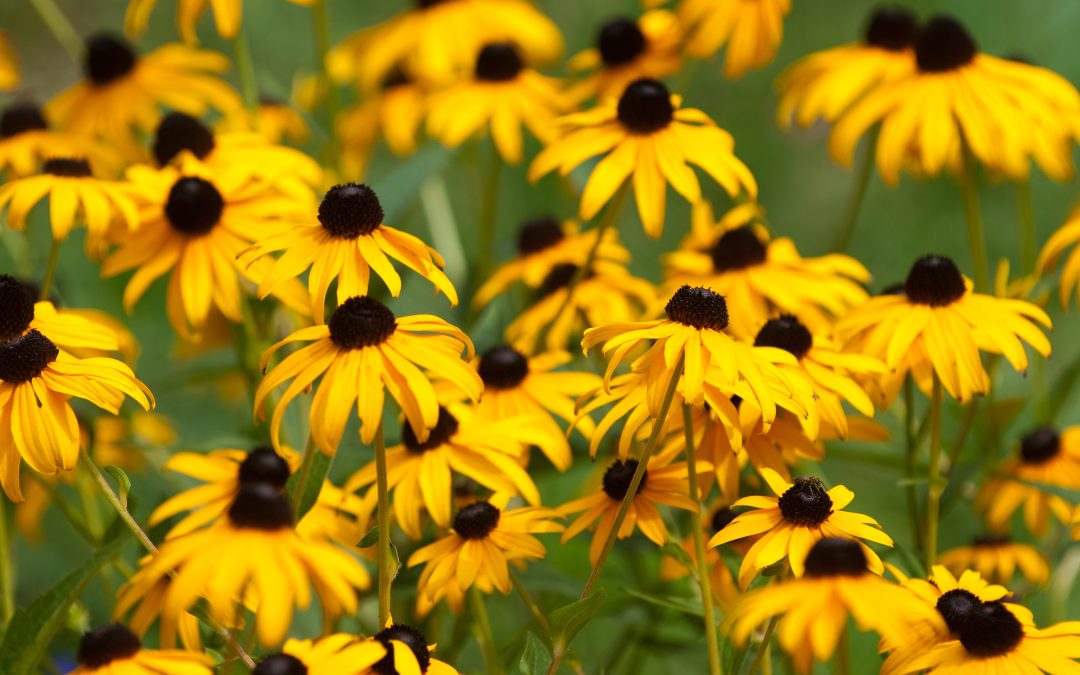
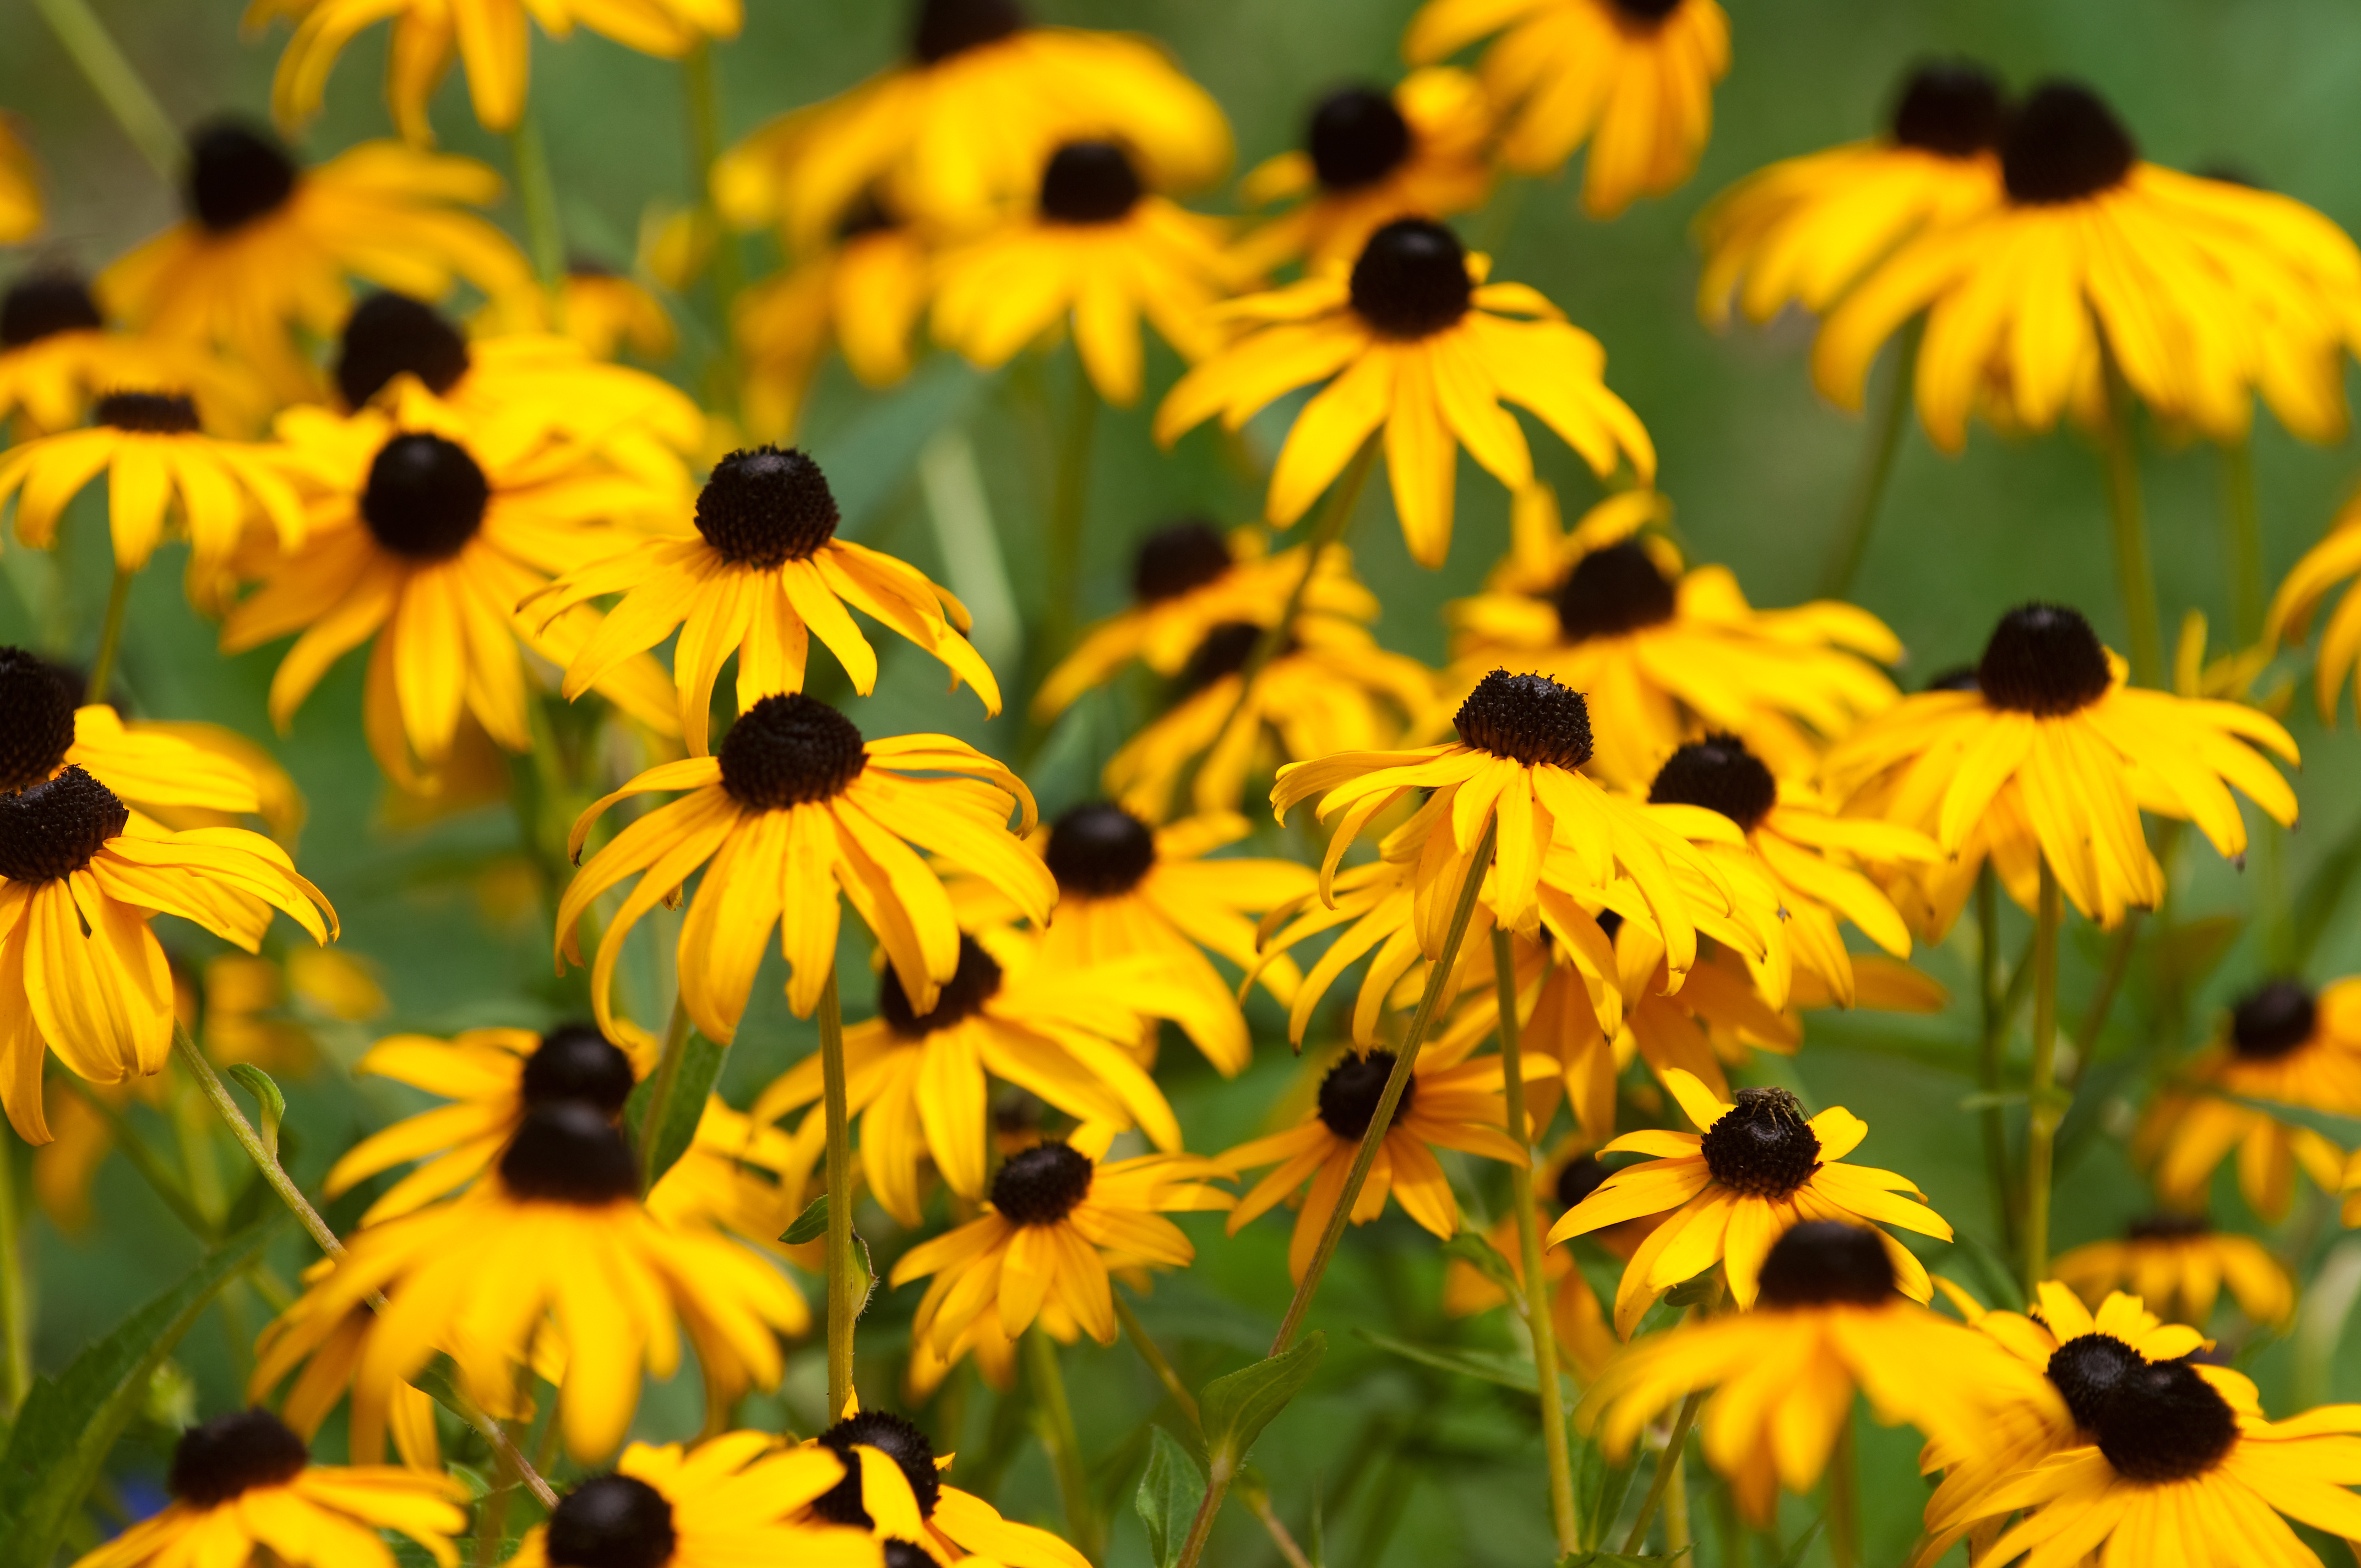
Rudbeckia hirta, commonly known as black-eyed Susan, is a vibrant and hardy wildflower with golden-yellow petals and a dark brown central cone. Photo by kburgess, Adobe Stock.
Florida’s diverse ecosystem showcases a remarkable array of native wildflowers that burst into vibrant colors, particularly during the spring season. Cultivating these indigenous blooms not only enhances the beauty of your lawn but also fosters biodiversity. Florida’s spring landscape comes alive with a vibrant tapestry of native wildflowers, each species contributing its unique charm to the natural scenery.
Yellow, a color that beckons pollinators, especially bees and butterflies, is a prevalent hue among these wildflowers. Many have evolved to showcase bright yellow tones, attracting pollinators, and ensuring the vital transfer of pollen for the continued existence of the plant species. In this spotlight, we’ll explore a selection of my favorite yellow-blooming wildflowers: Leavenworth’s tickseed, dune sunflower, and black-eyed Susan.
Leavenworth’s Tickseed
Leavenworth’s tickseed showcases brilliant yellow flowers with distinct maroon markings, contributing to its charm as a cheerful and attractive wildflower in gardens and meadows. Photo by Sunshower Shots, Adobe Stock.
Coreopsis, Florida’s state wildflower, boasts 14 native species flourishing in North Florida. Among these, Leavenworth’s tickseed (Coreopsis leavenworthii), predominantly found in Florida, graces the Panhandle region with its distinctive yellow, daisy-like flowers adorned with dark centers and scalloped yellow ray florets.
Thriving in open areas, flatwoods, and prairies, this annual or short-lived perennial becomes a beacon of color in the spring landscape. Ideal for wildflower gardens, Leavenworth’s tickseed requires adequate space for reseeding, best achieved by planting one to two feet apart in the spring for optimal flowering. The plant quickly establishes itself in moist soils, benefiting from occasional pruning or mowing to encourage a second flush of flowers.
Preferably rooted in sandy, well-drained soil, Leavenworth’s tickseed demands full sun exposure for maximum flower production, with moist soils playing a pivotal role in reseeding and maintaining this distinctive species.
Beach Sunflower
Adapting well to both coastal and inland environments, the beach sunflower attracts butterflies and other pollinators with its vibrant blooms. Photo by Nahhan, Adobe Stock.
The beach sunflower (Helianthus debilis), also recognized as the dune sunflower, is renowned for its coastal charm and nearly year-round blossoms. Adapting gracefully to both coastal regions and inland landscapes, this sunflower showcases two-inch flowers resembling daisies or sunflowers, boasting yellow petals and brown centers. A captivating trait is its tendency to follow the sun throughout the day.
When cultivating beach sunflowers, it is essential to allocate ample space for their spreading nature. To maximize visual impact, consider planting them in masses, maintaining distances of three to four feet between each plant. As beach sunflowers may become unruly over time, periodic removal of old stems is advisable. Encouraging new plants to sprout from seeds contributes to a healthier growth pattern. Light trims every three months can further enhance the foliage’s vibrancy and overall maintenance. While acting as an annual in freezing temperatures, the beach sunflower generally reseeds itself and displays admirable tolerance to coastal elements, including salt and wind.
For optimal growth conditions, planting in full sun encourages abundant flowering, although the plant can tolerate light shade for part of the day. Preferably, choose well-drained sandy soils, avoiding persistently moist conditions to ensure the overall health and vitality of the beach sunflower.
Black-eyed Susan
Black-eyed Susans are not only visually appealing but also serve as valuable nectar sources for pollinators, attracting butterflies, bees, and other beneficial insects to the garden or natural habitat. Photo by Green Stock Creative, Adobe Stock.
Black-eyed Susan (Rudbeckia hirta), a classic native bloom, captivates with its widespread availability and versatile nature as an annual, biennial, or perennial. This resilient plant grows to a height of one to two feet, showcasing rough-textured leaves and deep-yellow aster-like flowers with dark brown disk flowers forming a central dome.
When incorporating black-eyed Susans into your landscape, consider their suitability for mixed wildflower beds, where they effortlessly self-seed in open or lightly mulched areas. Maintaining proper spacing of 14 to 18 inches between plants, vigilant monitoring during extended dry periods, and providing deep watering, when necessary, contribute to the overall health and vitality of these iconic blooms.
Thriving in well-drained soils, black-eyed Susan showcases adaptability to various soil types. Whether exposed to full sun or partial shade, the plant optimizes its blooming potential, enhancing the visual appeal of any landscape.
Encourage Wildflowers in Your Landscape
Selecting native wildflowers adapted to your landscape’s specific soil, light, and drainage conditions is crucial for success. If initial attempts fail, try different species until you find the perfect match, emphasizing the importance of using the right plant in the right place. Thorough watering aids in establishment, but once native wildflowers are established, they generally require minimal irrigation. Avoid overwatering to prevent fungal and rot issues.
Native wildflowers in Florida typically do not need additional fertilization, as it can lead to rapid growth and increased susceptibility to pests and diseases. Embrace the natural resilience of these plants by avoiding unnecessary fertilization. Encourage the persistence of wildflowers by embracing self-seeding, maintaining open, lightly mulched areas for natural germination, and being vigilant when weeding.
Florida’s spring blooming wildflowers, including Leavenworth’s tickseed, beach sunflower, and black-eyed Susan, contribute to the state’s biodiversity. Selecting the right species and providing proper care allows us to cultivate these native blooms and actively participate in conserving Florida’s precious ecosystem.