by Ray Bodrey | Nov 20, 2017
Do you want to add a little something different to your landscape? How about something edible, as well as a focal point in your garden? Backyard sugarcane may be just what you are looking for.
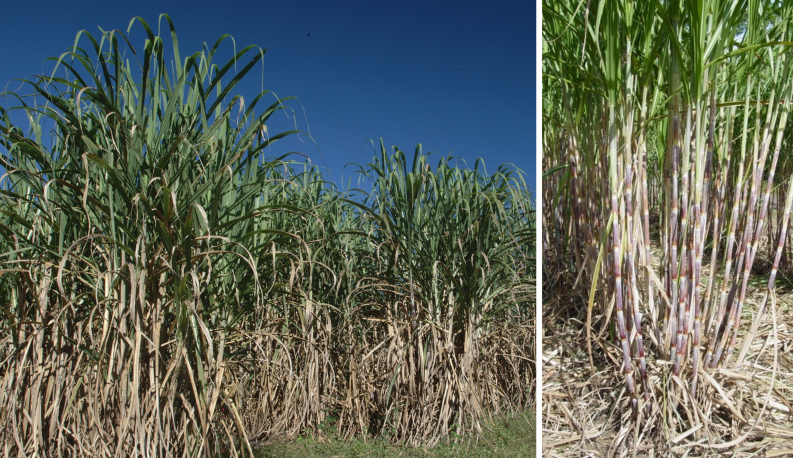
Sugarcane, genus Saccharum, is a tropical perennial grass that thrives in humid environments across the southern United States. Based on physical and chemical characteristics, there are 3 types of sugarcane. Chewing canes (Yellow Gal, Georgia Red varieties) are soft, with fibers that stick together when chewed. Many of these canes are also used for syrup production. Crystal canes, used mainly for commercial purposes, contain a high percentage of sucrose. This is the molecule that crystalizes into granular sugar. Syrup canes (Louisiana Ribbon, Green German varieties) contain less sucrose, therefore less crystallization, making for a more fluid product. Some varieties of each type are interchangeable. For example, some crystal canes are satisfactory for chewing cane.
Figure 1: Sugarcane Harvest. Credit: UF/IFAS Communications.
How does one plant sugarcane? Sugarcane is propagated by “seed cane”. Mature cane stalks have nodes, about every 6 inches, that produce buds. The stalks are cut into 2-3 foot segments and then planted. After the following harvest, the sugarcane sprouts from the buds of the old stalks, through a process known as “ratooning”. Be patient when growing sugarcane. It takes approximately 12-14 months for the original planting (seed cane) to produce mature cane, while another year to produce cane from the ratoon.
Seed cane should be planted from mid-August through November. Growth will occur in the spring. Sugarcane can be planted, 4 -10 feet apart, as a single row or multiple rows. A 3-7-inch furrow depth is optimum. Common practice regarding fertilizer is to apply 1 pound of 8-8-8 fertilizer per 10 feet of furrow. Plan ahead, as this crop makes a great windbreak for your vegetable garden.
Avoid planting sugarcane in areas of high traffic. The leaves of the cane are very sharp and some sugarcane varieties can fall and obstruct areas. Well drained soils in a sunny area is the perfect environment. Times of stress, such as lower temperatures for long periods of time, poor soil fertility and pH extremes (best range 5.5-6.5) will cause lower yields. Heavy watering with poor drainage conditions of newly planted seed cane can also disrupt bud germination.
Overtime, many varieties will succumb to disease and other environmental factors. To manage sugarcane against weeds, hand weeding and mulching are the best options. Soil inhabiting worms and grubs, stalk borers, termites and aphids are the biggest threats regarding insect pests. Sugarcane is rapidly growing plant and can tolerate most insect infestations and be productive.
Sugarcane is unique as many of the heirloom varieties are still available. So, where does one find seed cane? The classified ads section of the “Market Bulletin” published by the Florida Department of Agriculture and Consumer Services is a good start:
The Panhandle provides a favorable growing environment for this delightful backyard gardening focal point plant. Contact your local county extension office for more information.
Information for this article is from the UF/IFAS EDIS publication: “Backyard Sugarcane” by L. Baucum, R.W. Rice, and L. Muralles.
UF/IFAS Extension is an Equal Opportunity Institution.
by Ray Bodrey | Sep 8, 2017
Summer annual weeds are taking their last stand against Panhandle lawns before fall arrives. Rain and humid temperatures of late have boosted their growth spurts. Chamberbitter is a prime example.
Chamberbitter (Phyllanthus urinaria) is found as north as Illinois and as west as Texas, but thrives in lower southeastern states. It’s a headache for homeowners as well as pasture managers. This is an annual broadleaf weed that emerges in summer months. The foliage resembles that of the mimosa tree (Albizia julibrissin) and can be confused with the native mimosa groundcover, known as powderpuff mimosa (Mimosa strigillosa). This plant grows upright and develops a long taproot. Wart-like seeds can be found on the underside of the branch.
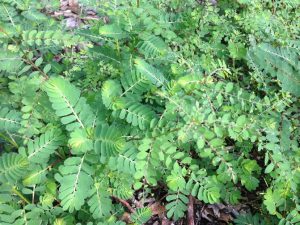
Figure 1: Chamberbitter, a common annual weed.
Credit: Mary Derrick, UF/IFAS Extension Santa Rosa County.
To control Chamberbitter in a lawn, one must not allow the seed to disperse. This plant germinates in warm soil temperatures. Therefore, it’s best to treat your lawn by applying a pre-emergent herbicide around April. An atrazine herbicide has an 80% effective rate. However, once weeds have germinated, a post-emergent herbicide would need to be applied. Turfgrass herbicides with 2,4-D (with dicamba & mecoprop or MCPP) or atrazine have good results. These are common chemicals and are represented by many brand names. However, both products need to be applied in cooler temperatures. Consecutive days of temperatures of less than 90 degrees are sufficient; otherwise the chemical will harm the turfgrass. Be aware, some formulations will injure or kill centipede and St. Augustine, but are safe to use on bermuda, bahia and zoysia. Be sure to read the label and follow the directions and precautions.
Non-selective, post-emergent herbicides, like glyphosate (Roundup) can be used in thick patches or for spot treatment. When using a non-selective herbicide, remember to protect turfgrass and other plants from spray drift or any contact, especially regarding ornamental plants and trees. Hand pulling of these weeds is an option, especially in flower beds. Do not shake the soil from the roots. In doing so, you may inadvertently spread seeds.
Soon, temperatures will be low enough to use a post-emergent herbicide for a control method. If you are having issues with chamberbitter or other summer annual broadleaf weeds, remember to plan to apply a pre-emergent herbicide this coming spring. Contact Gulf County Extension at 639-3200 for more information.
Information for this article is from the Clemson Cooperative Extension publication: “Chamberbitter”, Bulletin HCIC 2314: http://www.clemson.edu/extension/hgic/pests/pdf/hgic2314.pdf
UF/IFAS Extension is an Equal Opportunity Institution.
by Ray Bodrey | Aug 1, 2017
Many folks may not realize it at first, but everyone is using pesticides. Have you recently used a mold or mildew removal cleaner in your bathroom? Do you apply flea & tick powder to your pet? It is a misconception that only farmers, ranchers and lawn and garden enthusiasts are pesticide users. So, let’s all keep safety in mind, as any of these household and outdoor chemicals can be dangerous.
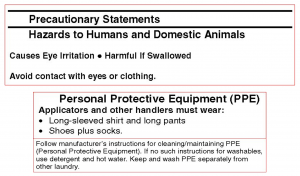
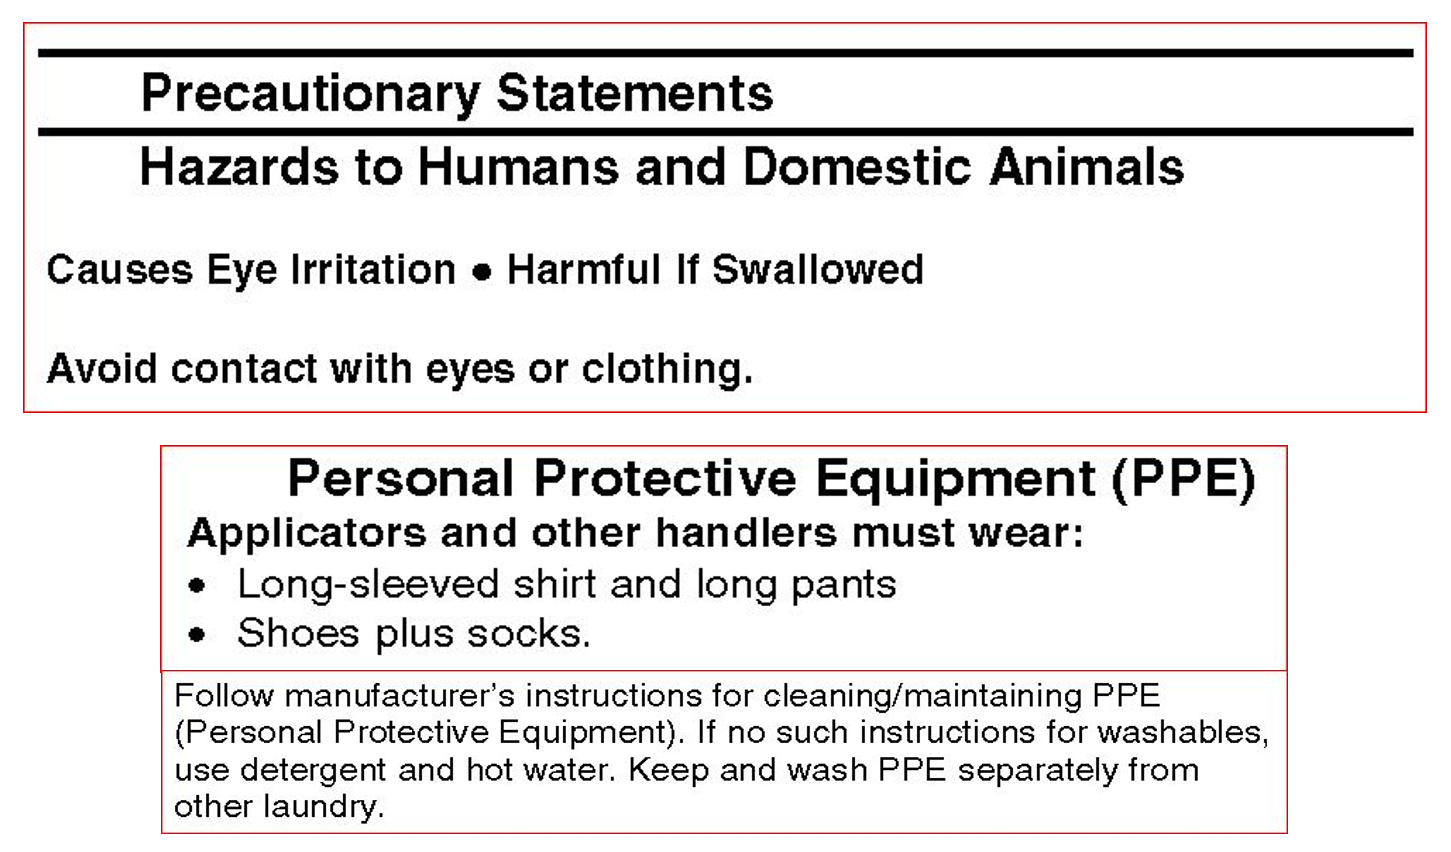
Example of Precautionary Statement and Personal Protective Equipment Instruction. Credit: UF/IFAS Extension
Pesticides include a wide range of products that either kill or repel pests. These pests can be insects, nuisance animals, weeds, plant pathogens, molds and other undesirables. Are pesticides necessary? Maybe not. Pesticides should be considered as a last resort. Using an integrated pest management (IPM) approach is an environmentally safe, and often, economical way to reduce pests. Usually, there are four steps involved in IPM, starting with the practice with the least environmental impact, until a solution to the pest problem has been found. For example, say that you are having issues with aphids in your garden. The IPM approach may begin with cultural measures (ex. avoiding high nitrogen fertilizer as it promotes lush growth that creates a favorable environment for aphids). This may be followed by mechanical measures (ex. use of insect netting) and if problem still exists, biological measures (ex. release of parasitic wasps). As stated earlier, the last resort would be chemical measures (ex. applying pesticide). There are varying IPM strategies for different pests. Please visit the UF/IFAS IPM website for more information: http://ipm.ifas.ufl.edu/
When pesticide usage is necessary, it’s important to select the right chemical(s). Once the pest has been identified, check pesticide labels under the section “pests controlled”. Never assume a pesticide will control a pest not listed under this section. Often, there are numerous products that list a common pest. Always consider five factors when determining the right pesticide: environmental friendliness, effects on beneficial organisms, ease of use, available application equipment and cost.
Once a pesticide has been chosen, be sure to follow the directions. It is critical to mix a concentrated pesticide accurately, therefore follow the product label. Diluting concentrated pesticides by mixing with water is necessary to achieve the correct concentration. Increasing the concentration is dangerous and will have a negative response. The response can be environmental harm, damage to desirable plants and beneficial organisms and above all, it’s illegal to apply rates greater than the specified label.
Remember, pesticide exposure can be life threating under certain circumstances. Pesticides can enter the body in several ways. The most common entries are mouth, inhalation, eyes or skin. Always wear personal protective equipment (PPE) when mixing and applying pesticides. Precautionary statements for humans and domesticated animals will be supplied on the product label. Examples of safety information are: causes eye irritation, harmful if swallowed or avoid contact with eyes or clothing. Dress accordingly based on the safety information supplied by the product label. Some types of PPE are long rubber gloves, goggles, respirators, waterproof apparel and rubber boots.
All pesticides should be stored out of the reach of children. Pesticides stored in any container not deemed pesticide compatible (ex. canning jars and food or soft drink containers) is illegal. For more information on pesticide safety and best management practices, contact your local county extension office.
Supporting information for this article can be found in the UF/IFAS EDIS publication: “Homeowner’s Guide to Pesticide Safety” by Frederick M. Fishel: http://edis.ifas.ufl.edu/pdffiles/PI/PI05100.pdf
UF/IFAS Extension is an Equal Opportunity Institution.

by Ray Bodrey | Jun 29, 2017
 Although we’ve received much-needed rainfall of late, it’s still a struggle to manage moisture levels in our Panhandle landscapes this summer. During wet summer seasons, one recurring issue is that watering plants too much can have as much of an ill effect as not watering enough.
Shallow rooted plants, as well as newly set plants can easily become water stressed. Some people lightly water their plants each day. With this practice, one is only watering an inch or less of the topsoil. Most roots are deeper than this. Instead of a light watering every day, soaking the plant a few times a week works better. A soil that has been soaked will retain moisture for several days. This is a very good practice for young plants. In contrast, some people soak their plants to often. This essential drowns the roots by eliminating vital oxygen in the root zone. This can also cause root rot. Leaves that turn brown at the tips or edges, as well as leaf drop, are displaying signs of overwatering.
The following are tips from the UF/IFAS Florida-Friendly Landscape Program. These tips will help conserve water by providing best management practices for your landscape:
- Choose the right plant for the right place: Be sure to place plants in your landscape that match existing environmental conditions.
- Water Thoughtfully: Water early in the morning and water when plants and turfgrass start to wilt. Refrain from watering in the late afternoon or evening. This is when insects and diseases are most active.
- Perform regular irrigation maintenance: Remember, an irrigation system is only effective if it is maintained regularly. Check for and repair leaks. If using a pop-up heads for turfgrass, point heads away from driveways and sidewalks.
- Calibrate turfgrass irrigation system: Ideal amount of water to apply to turfgrass is ½”- ¾”. A simple test can be done to calibrate. Place a coffee or tuna cans throughout the landscape. Run the irrigation system for 30 minutes. Average the depth of the water containers. Adjust running time to apply the ½”- ¾” rate.
- Use micro-irrigation in gardens and individual plants: Drip, or microspray irrigation systems apply water directly to the root system with limited surface evaporation.
- Make a rain barrel: Rain barrels are an inexpensive way to capture rainwater from your roof. This can translate into a big impact on your water bill as well.
- Mulch plants: Mulch helps keep moisture in the root zone. Two to three inches in-depth, for a few feet in diameter will work well for trees, shrubs, flowers and vegetables.
- Mow correctly: Mowing your grass at the highest recommended length is key. Be sure to cut no more than 1/3 of the leaf blade each time you mow. Keep mowing blades sharp as dull cuts often cause grass to be prone to disease.
- Be a weather watcher: Wait at least 24 hours after a rainfall event to water. If rain is in the forecast, wait 48 hours until irrigating. Use a rain gauge or install a rain shut-off device to monitor irrigation scheduling.
For more information on water conservation principles contact your local county extension office.
Supporting information can be found at the UF/IFAS Center for Landscape Conservation & Ecology’s Drought Toolkit: http://clce.ifas.ufl.edu/drought_toolkit/
by Ray Bodrey | May 25, 2017
This time of year, people flock to nurseries and garden centers to purchase trees or shrubs that will enhance their landscapes. However, there are certain management measures to keep in mind to ensure plant establishment. Depending on the season, newly planted trees and shrubs need varying degrees of watering, mulching, pruning and trunk staking.
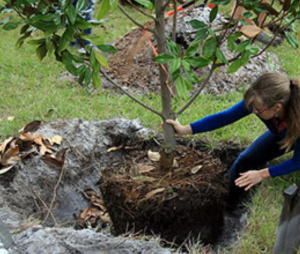
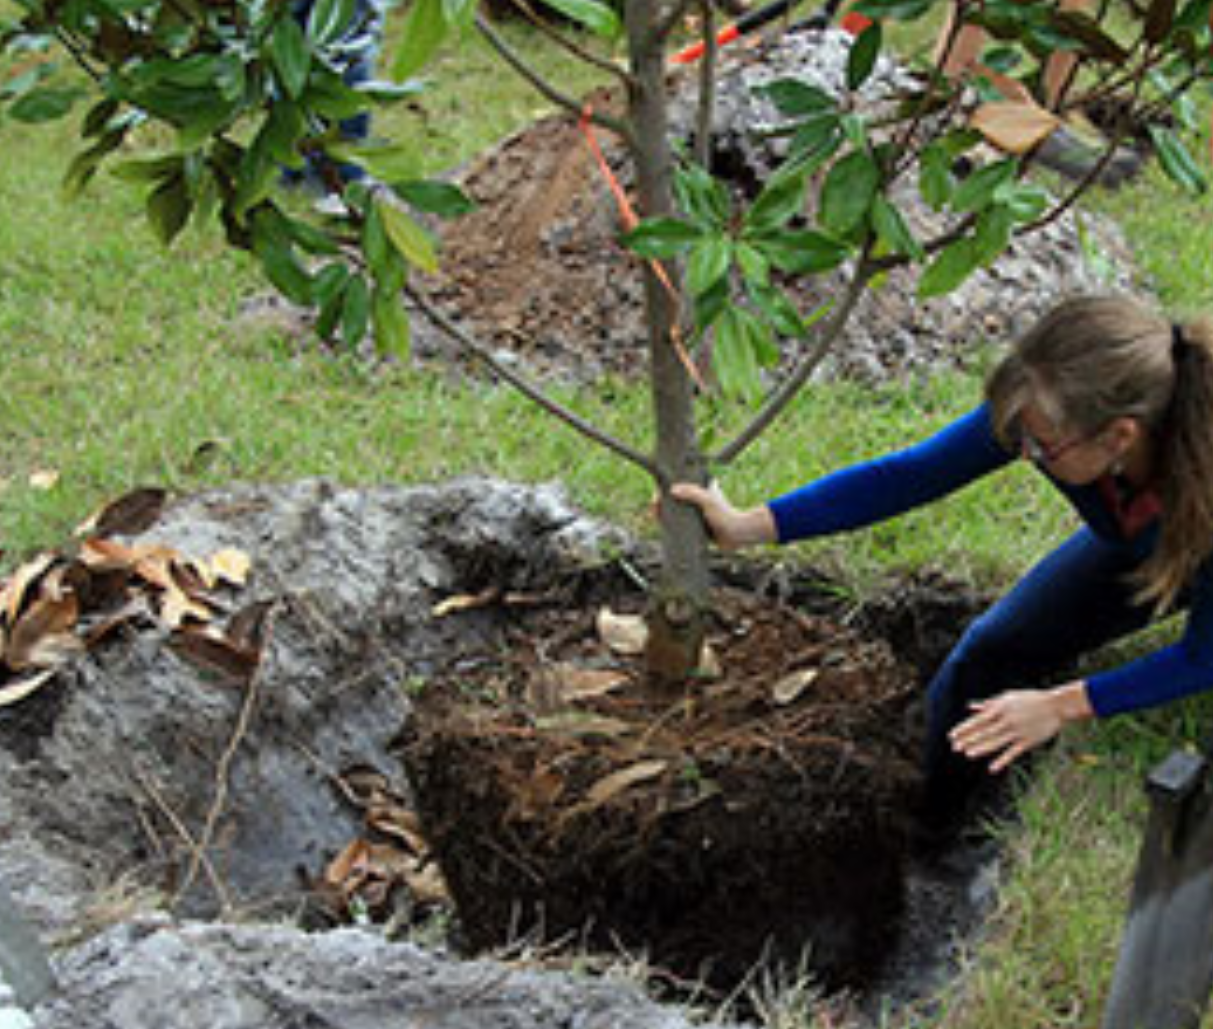
Figure 1: Tree Planting.
Credit: UF/IFAS Communications.
The primary focus in care of your newly planted tree or shrub is root development. It takes several months for roots to establish, and newly planted trees and shrubs do not have a very strong root system. Start by digging the hole in a popcorn bowl shape. Once planted, backfill around the root system, but be careful not to compact the soil. Compaction will hinder root growth. Be sure to keep the topmost area of the root ball exposed, about two inches. A layer of mulch will be applied here.
Frequent watering is much needed, especially if you are planting in the warmer months. Water thoroughly, so that water percolates below the root system. Shallow watering promotes surface root growth, which will make the plant more susceptible to stress during a drought. Concentrate some of the water in a diameter pattern of a few feet from the trunk. This will cause the root system to grow towards the water, and thus better establish the root system and anchor the tree.
Mulch is important in the conservation of soil moisture. Pine needles, bark and wood chips make a great mulch for ornamental shrubs. A two to three inch layer of mulch will usually suffice. It’s important to keep the mulch at least a few inches from the trunk. Mulching too close to the tree trunk can cause trunk rot.
You should always prune the bare roots of trees and shrubs during planting. Exposed roots in containers can be damaged in shipping. Removing some of the roots will also help trigger growth. In addition, pruning some of the top foliage can reduce the amount of water needed for the plant to establish.
Newly planted trees and shrubs often have a difficult time establishing if the root system cannot be held in place. Strong winds and rain can cause the plant to tip over. Avoid this by staking the plant for temporary support. A good rule of thumb for plant staking is if the trunk diameter measures three inches or less. Tie the stake to the plant at every six inches from the top. However, only tie the trunk at one spot. Don’t tie too tightly, so that the tree has no flexibility. This will stunt the growth of the plant.
Larger trees and shrubs will need diameter staking with wire support. Four stakes evenly spaced at six feet around the trunk is a good arrangement. Each stake can be attached to the tree just above the mid-point using cable or wire. Be sure to cover the wire around the trunk with a short piece of hose to prevent any scarring of the bark. The wire should be snug, but not tight. After one year, the staking can be removed.
Following these tips will help ensure your tree or shrub becomes well established in your landscape. For more information please contact your local county extension office.
Supporting information for this article can be found in the UF/IFAS EDIS publication: “Specification for Planting Trees and Shrubs in the Southeastern U.S.” by Edward F. Gilman: http://edis.ifas.ufl.edu/pdffiles/EP/EP11200.pdf
Supporting information also provided by UF/IFAS Extension Forestry Specialist Dr. Patrick Minogue, of the North Florida Research Education Center in Quincy, Florida.
UF/IFAS Extension is an Equal Opportunity Institution.