by Beth Bolles | Oct 24, 2024
If you love wildflowers, the Fall season has so many plants for you to enjoy. We often think of wildflowers as those in natural settings, on roadsides, or in drainage spots. Here are a few wildflowers that make excellent landscape additions.
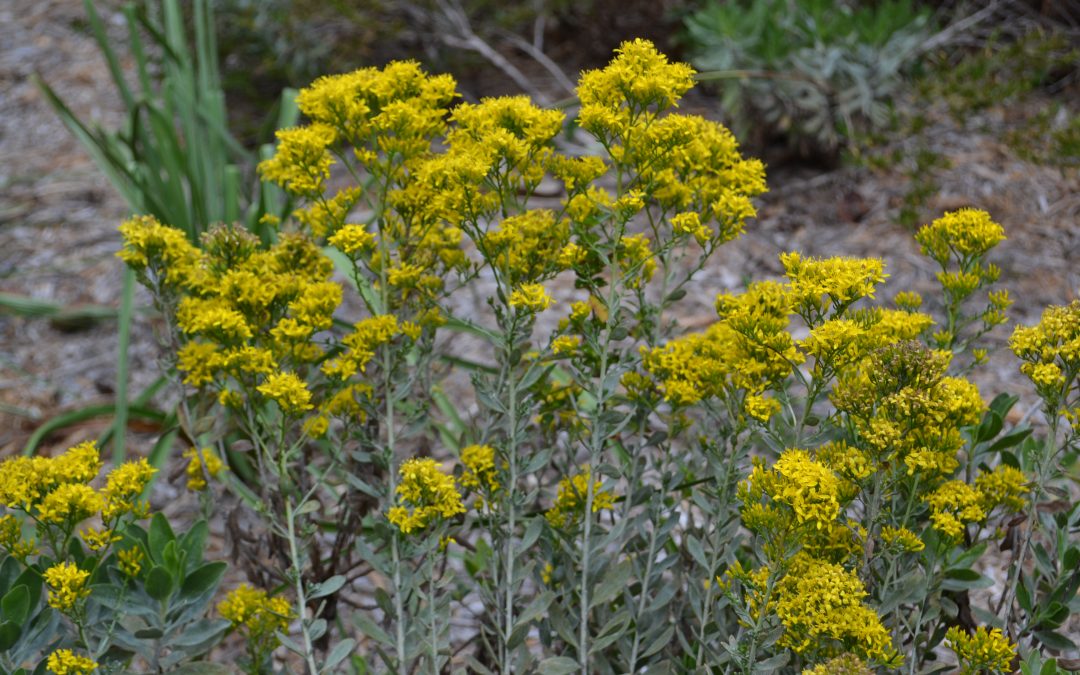
Goldenrods (Solidago spp.) are everywhere and the yellow blooms are stunning. If all the incorrect information about goldenrod as an allergy causing plant never existed (ragweed is the main culprit), we would see selections of goldenrod available in every commercial outlet. Many selections have an upright growth so add goldenrod against fences, in back of borders, or large clumps in sunny areas of your landscape.
Goldenrod as a landscape feature at Escambia Demonstration Garden. Photo by Beth Bolles, UF IFAS Extension Escambia County
If you have a moist area and love purple, Mistflower (Conoclinium coelestinum) makes a wonderful fall blooming feature. Plants will colonize an area with running stems so it tends to form a large clump in moist soils. You may notice this in ditches on a drive around your county. The clusters of flowers look fluffy and will be present for many weeks in both full sun or partial shade.

A clump of mistflower in a moist plant bed. Photo by Beth Bolles, UF IFAS Extension Escambia County
For dry and well drained spots of your landscape, the Woody goldenrod (Chrysoma pauciflosculosa) is a good choice. The small shrub offers bright yellow fall flowers that extend above a 2 foot tall plant. Plants tend to be evergreen when in the right location and additional new seedlings will emerge each spring if your landscape is suited for this plant.
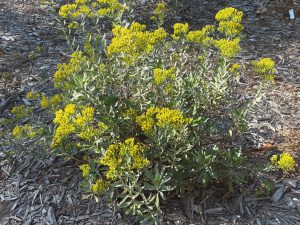
Woody goldenrod in a home landscape. Photo by Beth Bolles, UF IFAS Extension Escambia County
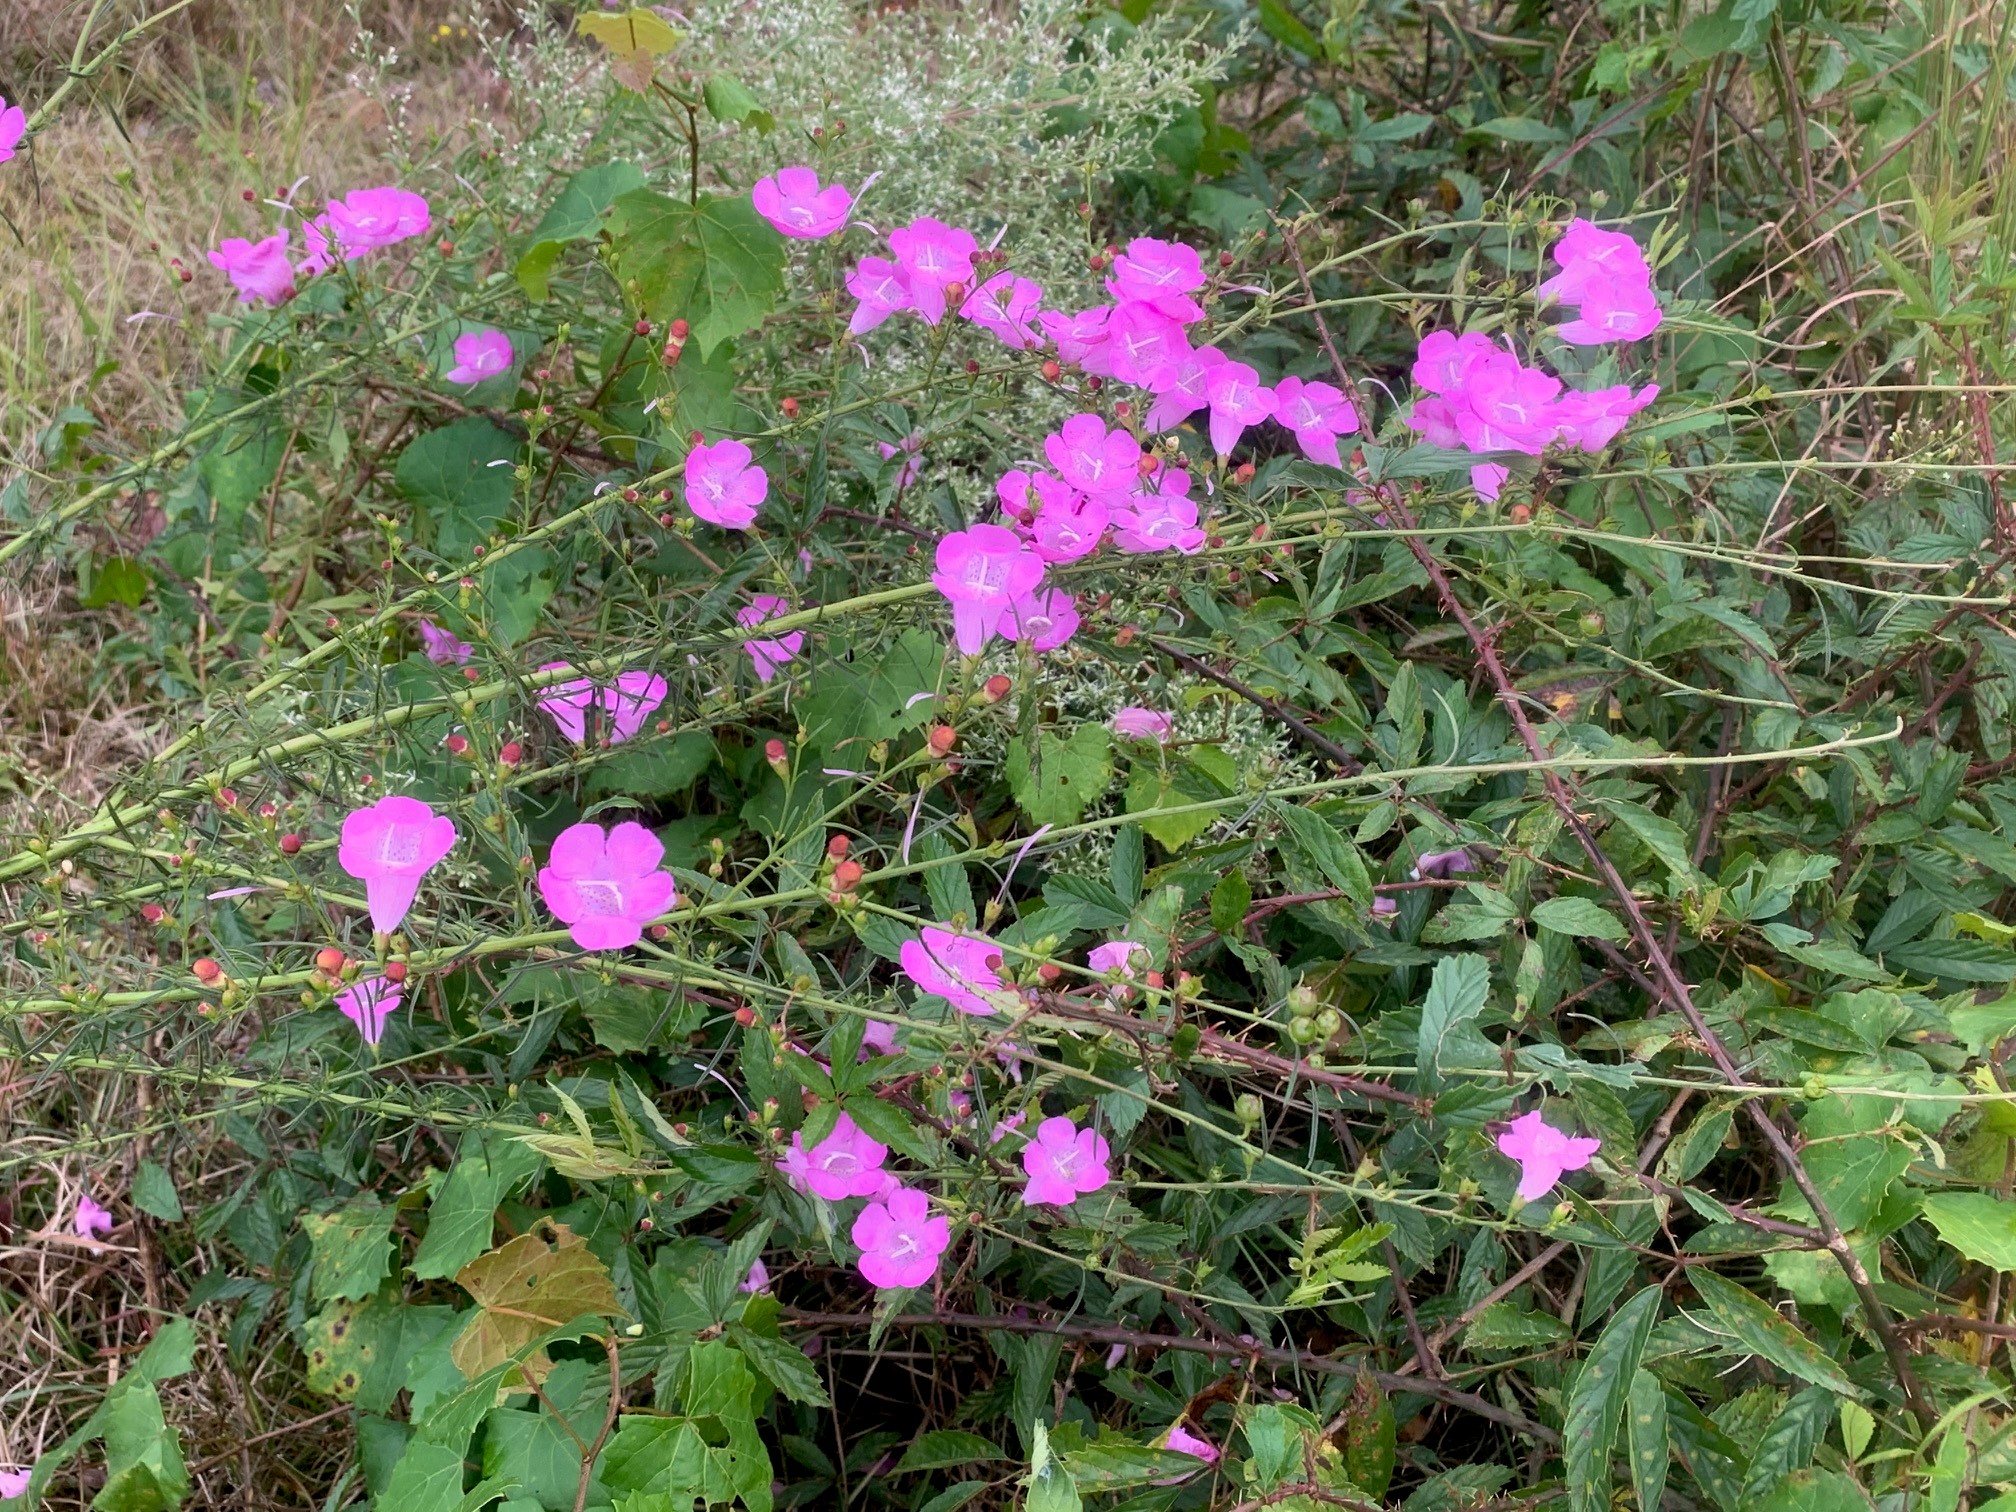
For those enhancing a butterfly garden, add Purple false foxglove (Agalinis purpurea), a host plant to the Buckeye butterfly. Plants grow well in our acidic well drained soils with a little moisture. Numerous tubular pink flowers occur in the Fall until a frost. Plants reseed well.

The Purple False Foxglove with vivid pink blooms in a natural setting. Photo by Beth Bolles, UF IFAS Extension Escambia County
If you love all the colors and variety of wildflowers, it is a good time for finding seeds and plants to grow your own. Native nurseries and online retailers carry a wide selection for all seasons and many are low maintenance enhancements for our home landscapes. Like any other ornamental or grass, be sure to match the wildflower with your specific growing conditions.
by Muhammad Shahid | Oct 17, 2024
Persimmon harvesting, ripening, and preservation strategies
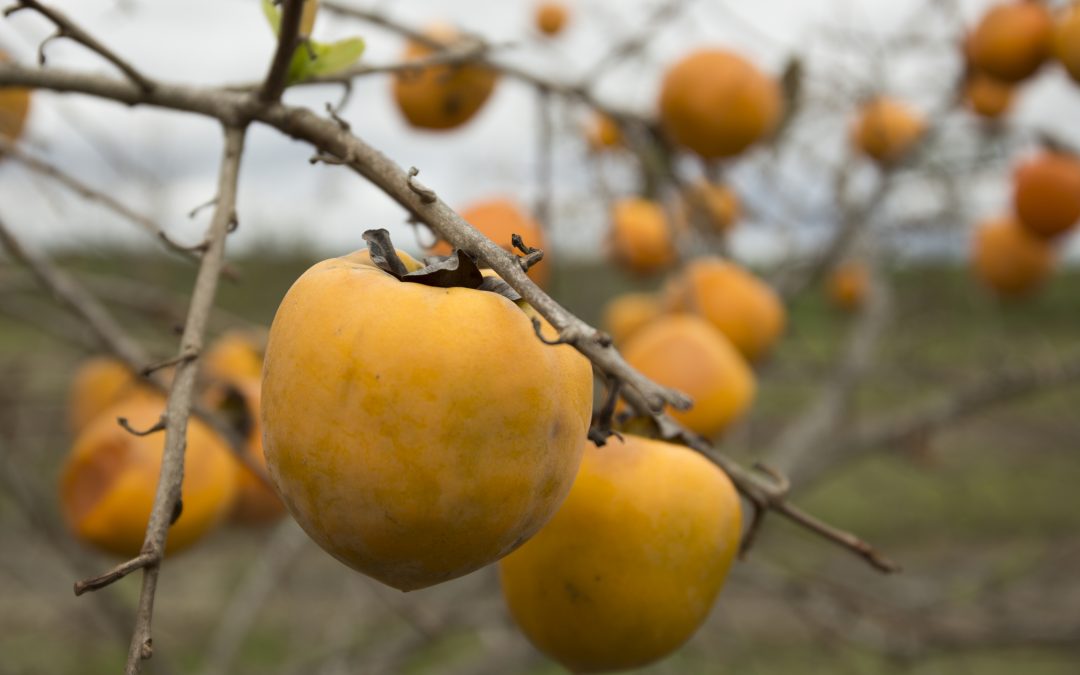
Persimmons fruits are renowned for their delicious, sweet taste, making them incredibly tasty and nutritious. They are native to China but have spread worldwide, especially in temperate and subtropical climates. These fruits have been cultivated for thousands of years, primarily for their sweet flesh, which varies in texture from firm to custard-like, depending on the variety and level of ripeness. Persimmons are a rich source of vitamins, particularly vitamins A, C, and E. They also contain dietary fiber, which is beneficial for digestive health. They also have anti-inflammatory properties and reduce the risk of chronic diseases like heart disease and cancer.
Astringent vs non-astringent varieties
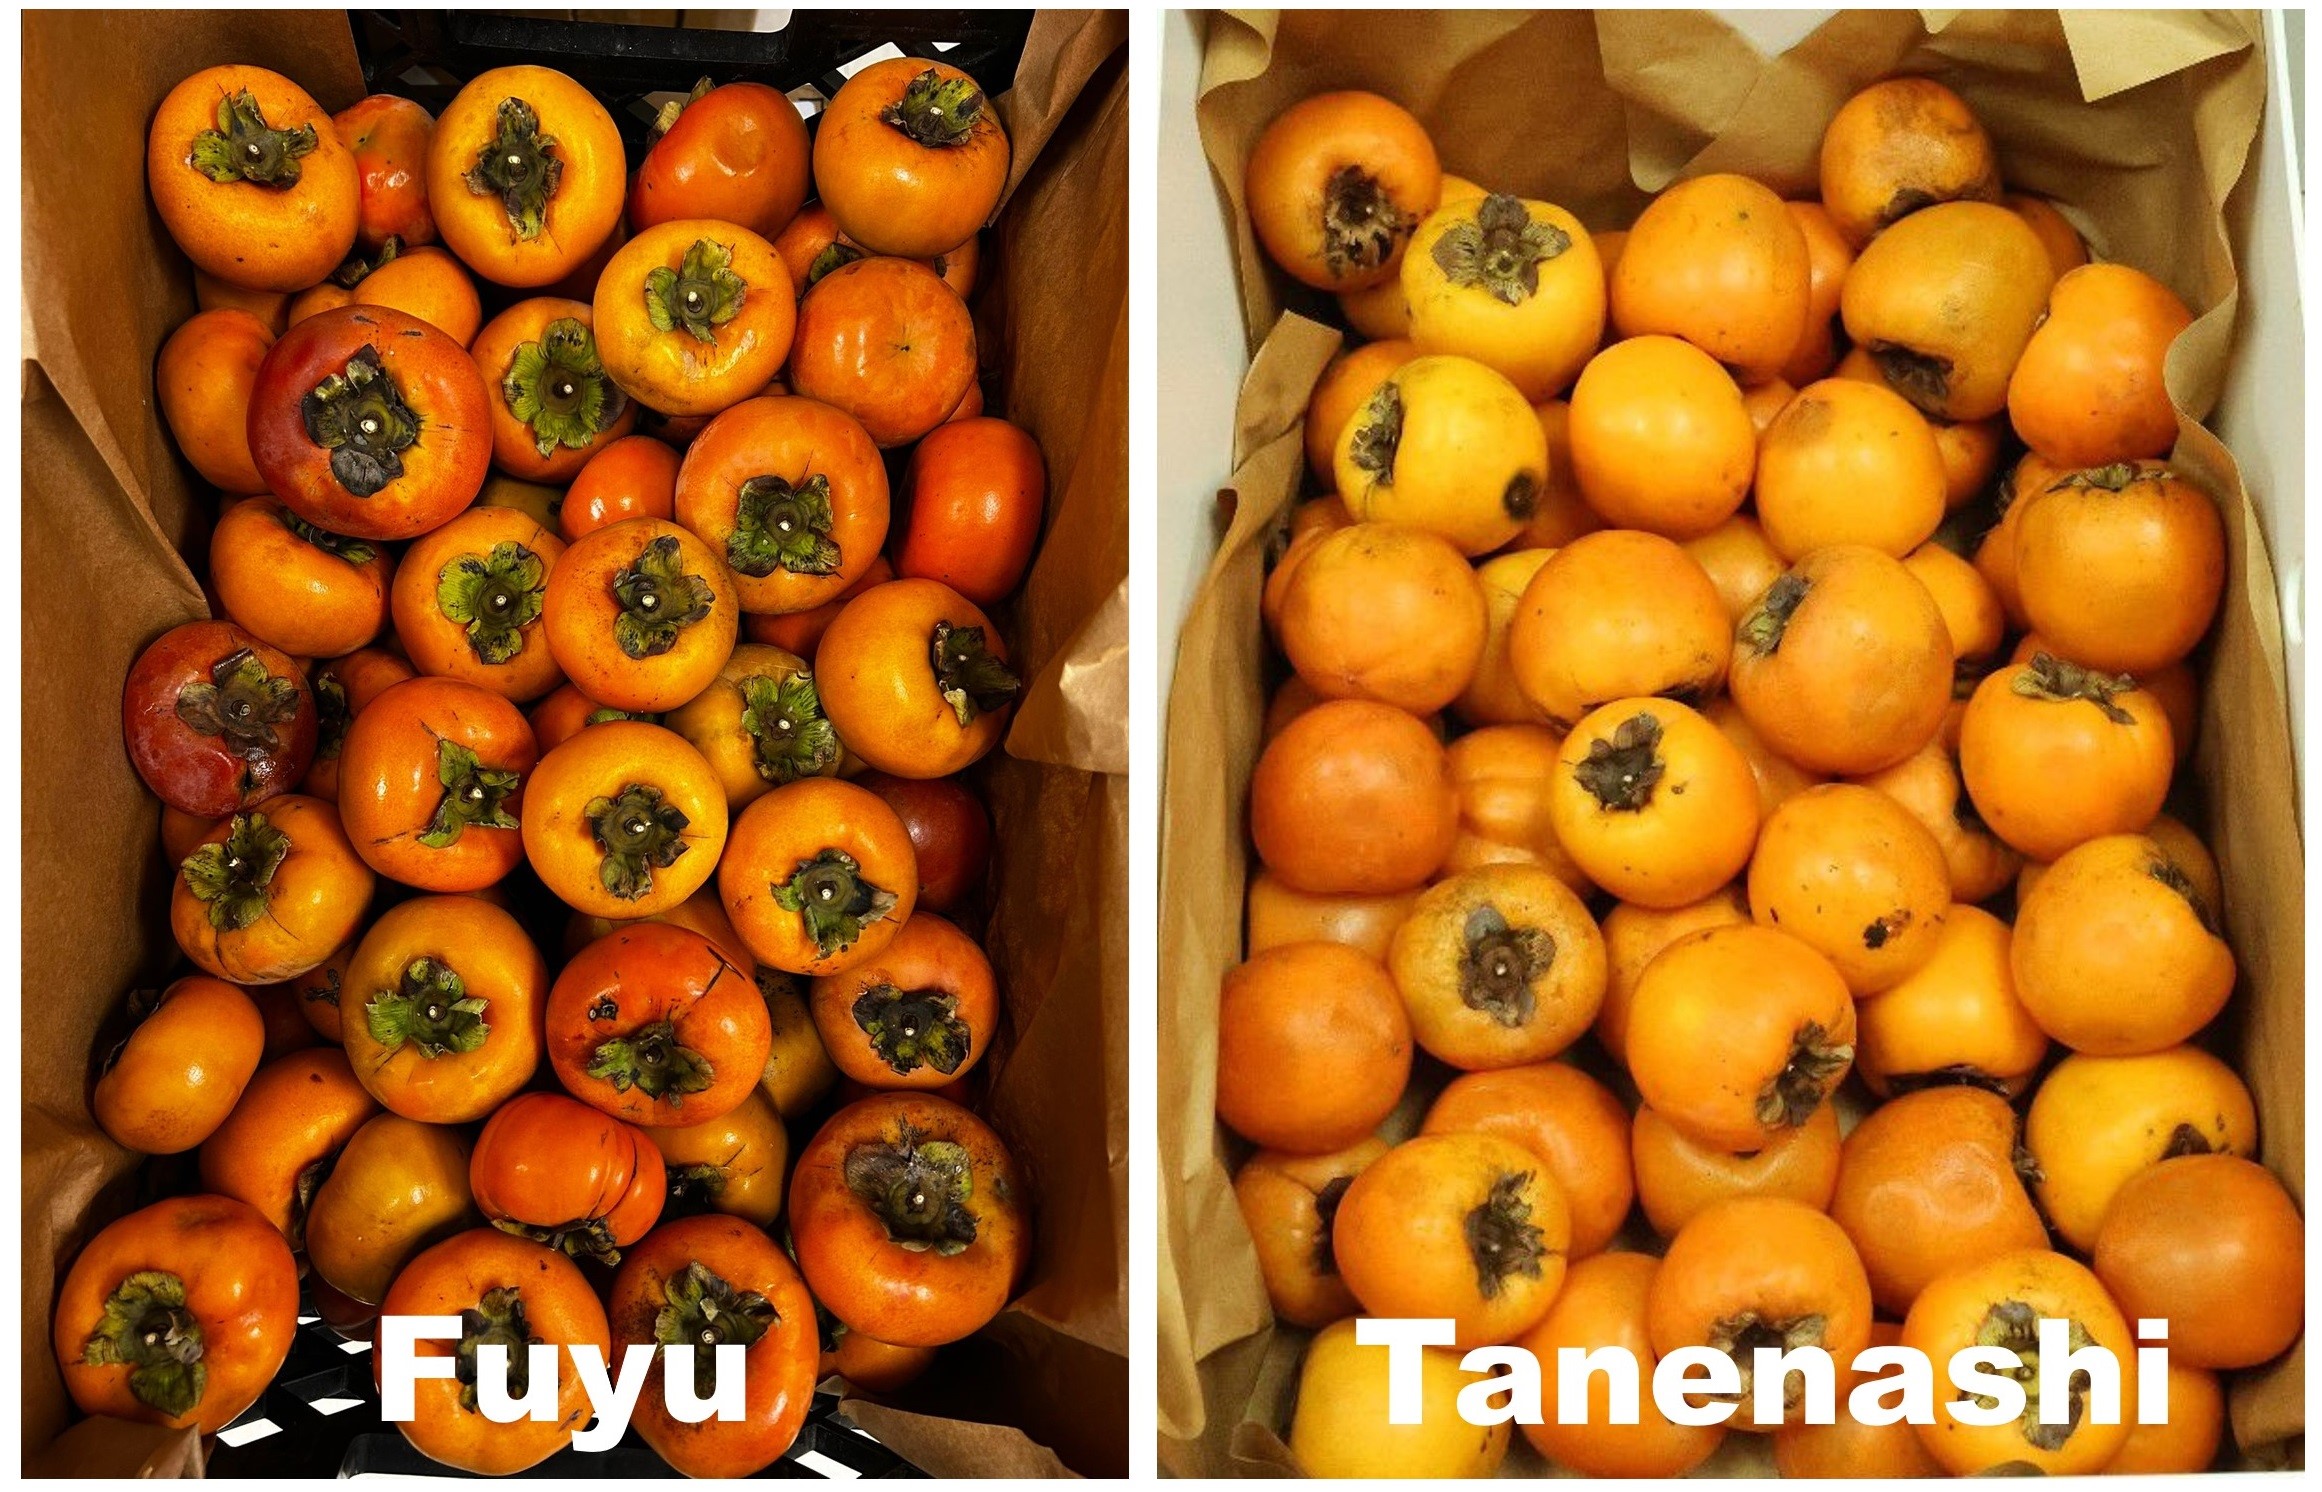
There are two main types of persimmons: the astringent and non-astringent varieties. Astringent persimmons, like Hachiya and Tanenashi, are high in tannins and must be fully ripened before consumption to avoid an unpleasant taste. The water-soluble tannins give the fruit astringency, making it inedible until it grows soft and ripe. Therefore, ripening for these varieties is essential to enable the tannins to disintegrate, allowing the fruit to taste as sweet and rich as it deserves. On the other hand, non-astringent persimmons, such as Fuyu and Jiro, are sweeter and can be consumed even when they are still firm. These varieties have low or no tannin content, and hence, they can be consumed raw and crispy without the dry mouth effect of other more stringent types (Figure 1).
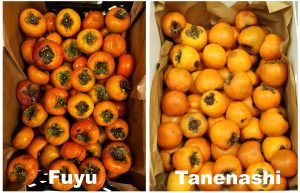
Japanese persimmon fruit: non-astringent variety ‘Fuyu’ (left) and astringent variety ‘Tanenashi’ (right).
Ripening and harvesting the persimmon
Determining the ripening of persimmons depends on the variety. Astringent varieties should be completely soft and jelly-like before they are harvested, while non-astringent varieties can be picked when they are still firm but have reached their full orange color. Persimmons are typically harvested by hand to avoid damaging the delicate fruit. Using pruning shears or scissors, cut the fruit off the tree, retaining a small part of the stem to prevent skin tearing. This method helps in prolonging the shelf life of the fruit.
Methods to speed up the ripening process
Cool temperatures: Keep persimmons cool and leave them in one layer on the countertop. They will ripen in several days to a week and become ready for consumption. The indicators include changes in skin color to deep orange, and the fruit feels almost like jelly when pressed on; it is prepared to eat. If parts of the fruit are slightly bruised or get spots, the fruit is still in the ripening process.
Keep persimmon fruit stored with high ethylene fruits: Ethylene is a natural plant hormone used to promote fruit ripening. You can quicken the ripening process, especially for astringent varieties, by harnessing the power of ethylene by placing the fruit in a brown bag with other fruits like apples or bananas that produce more ethylene. The enclosed space inside the bag retains the ethylene gas, enhancing the tannin deterioration in the persimmons. Use the following steps: Use a clean paper bag, place 3-4 persimmons with one apple or banana inside the bag, then close it and let it stay warm. The persimmons should be checked daily in order not to over ripen. They should soften in 2-3 days, depending on how hard they were.
Freezing: Freezing is another method to reduce astringency. Freeze the unripe astringent persimmons for about one day or until you feel they are already sufficiently chilled. When the fruit thaws, it will have softened greatly and will not be as astringent because the freezing helped eliminate tannins. This method does not allow the fruit to ripen in the usual sense of the word but can quickly turn the persimmons into a palatable state. When frozen, the fruit becomes soft, slightly brown, and tender, so this method would be better served if one wanted to use the persimmon for baking or making purees.
Preservation and storage
Preserving persimmons is key to enjoying their unique flavor and texture long after the harvest season. Persimmons, particularly astringent varieties, have a short shelf life once they ripen, so proper preservation strategies are essential for extending their usability and minimizing waste. Here are some practical methods for preserving persimmons:
- Persimmons should be stored at 50 degrees F (10 degrees C) for optimal preservation
- Use a transparent plastic bag with holes in it or a container with some holes on its surface. This will help prevent moisture accumulation, which, if left for some time, leads to mold growth on the container walls.
- Do not place persimmons in a tight, covered container, as they require ventilation to prevent mold growth.
- Use a mesh bag or a basket with a clean cloth that will allow air to circulate while at the same time keeping the fruit from developing bruises.
- The refrigerated persimmons can last up to 2 months. Examine them often for signs of spoilage, such as softness and mold formation.
- Frozen persimmons can be kept for up to 6 months.
Dr. Muhmmad A. Shahid, UF/IFAS NFREC, Assistant Professor of Horticulture
Dr. Shahid Iqbal, UF/IFAS NFREC, Postdoc Scholar, Horticulture Sciences
Dr. Muhammad Nadeem, UF/IFAS NFREC, Postdoc Scholar, Horticulture Sciences
by Daniel J. Leonard | Oct 4, 2024
It’s hard to have a great yard full of Centipedegrass isn’t it? All the fertilizer, watering, aerating, weed spraying, fungicide spraying, insect spraying, the list is never-ending and wallet draining. Except, it’s not hard and doesn’t have to be expensive. It’s easy. In fact, it’s so easy that people even make it hard because they think it should be. The list of basic tips to achieve a great yard of Centipedegrass is very short, let’s get into it.
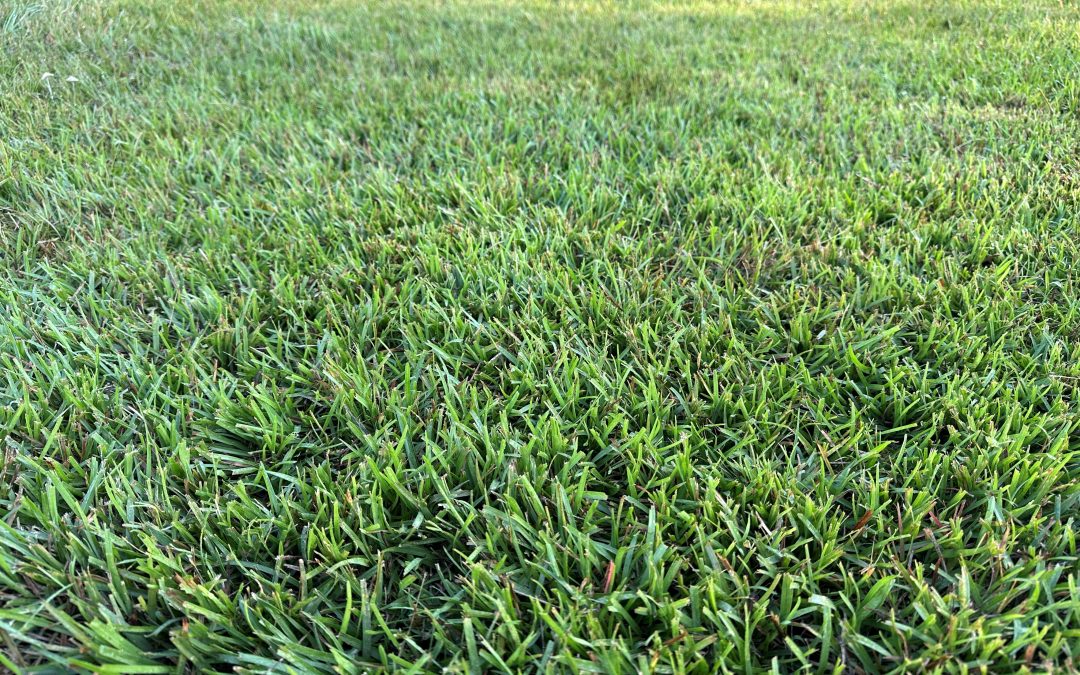
Fertilizing Properly – Keep it to a minimum! Centipedegrass has a very low Nitrogen (N) requirement for optimum growth and development (0.4 lbs – 2 lbs/1000 ft 2 per year). Centipede is naturally light green in color and trying to force the deep green of Kentucky Bluegrass upon it will almost certainly do it harm. There are many excellent quality Centipedegrass lawns in the Panhandle that have never received a single prill of fertilizer. Don’t take my word for it though, the UF/IFAS publication Centipedegrass for Florida Lawns says, “Established centipedegrass lawns require about 50% less nitrogen fertilizer than other lawn grasses grown in Florida. Centipedegrass is a low maintenance turfgrass and does not respond well to excessive use of fertilizer, especially nitrogen.”
Centipedegrass lawn that has never been fertilized and mowed regularly when it reaches 3″ to achieve a 2.5″ cut height. Photo courtesy Daniel Leonard.
Timely Mowing – Other than overfertilizing, the next easiest way to cause significant damage to a Centipedegrass lawn is to mow it incorrectly. Centipede prefers a mowing height of around 2.5” and actively growing grass should be mowed every 7-14 days, removing no more than 1/3 of the grass blade. In my experience, this is much higher and often less frequent than many people mow their lawns. All too often, I see Centipede lawns that are allowed to grow tall and unkempt and then mowed to near golf course fairway height with the occasional bare “scalped” spot where the mower ran across an unlevel area of lawn. Mowing short and infrequently is harmful because mowing is inherently a major stress to the grass. You’re asking a lot of a plant by removing a large chunk of photosynthetic leaf tissue and then repeatedly asking the plant to regrow. Be kind to your grass and mow correctly. *Additionally, try to not mow your lawn in droughty conditions as this can exacerbate mowing stress and cause serious lawn issues.
Right Plant, Right Place – Much of the bad rap turfgrass receives comes from people trying to force it to grow where it shouldn’t be. If your yard has areas of significant shade or receives significant foot or vehicle traffic, Centipedegrass (or most any grass for that matter) may not be for you, in those areas at least. Like all turfgrasses (though some are more shade and traffic tolerant than others), Centipedegrass does best in full sun and detests having the soil its roots are going in repeatedly trampled and compacted. In areas with those conditions, maybe having a mulched landscaped bed with shade tolerant plants or a rocked walking path would be more appropriate. You and the grass will certainly be happier working with those options than fighting against your site conditions.
Though maintaining a Centipedegrass lawn is simple, that isn’t to say that if you follow all these tips that your yard will be perfect all the time. There will still be the occasional dieback, weed ingression, mole cricket infestation and the like, however, following the above tips will make your grass much more resilient and equipped to handle those stresses. For more information about Centipedegrass or other horticultural topics, contact your local UF/IFAS Extension office. Happy gardening!
by Beth Bolles | Sep 4, 2024
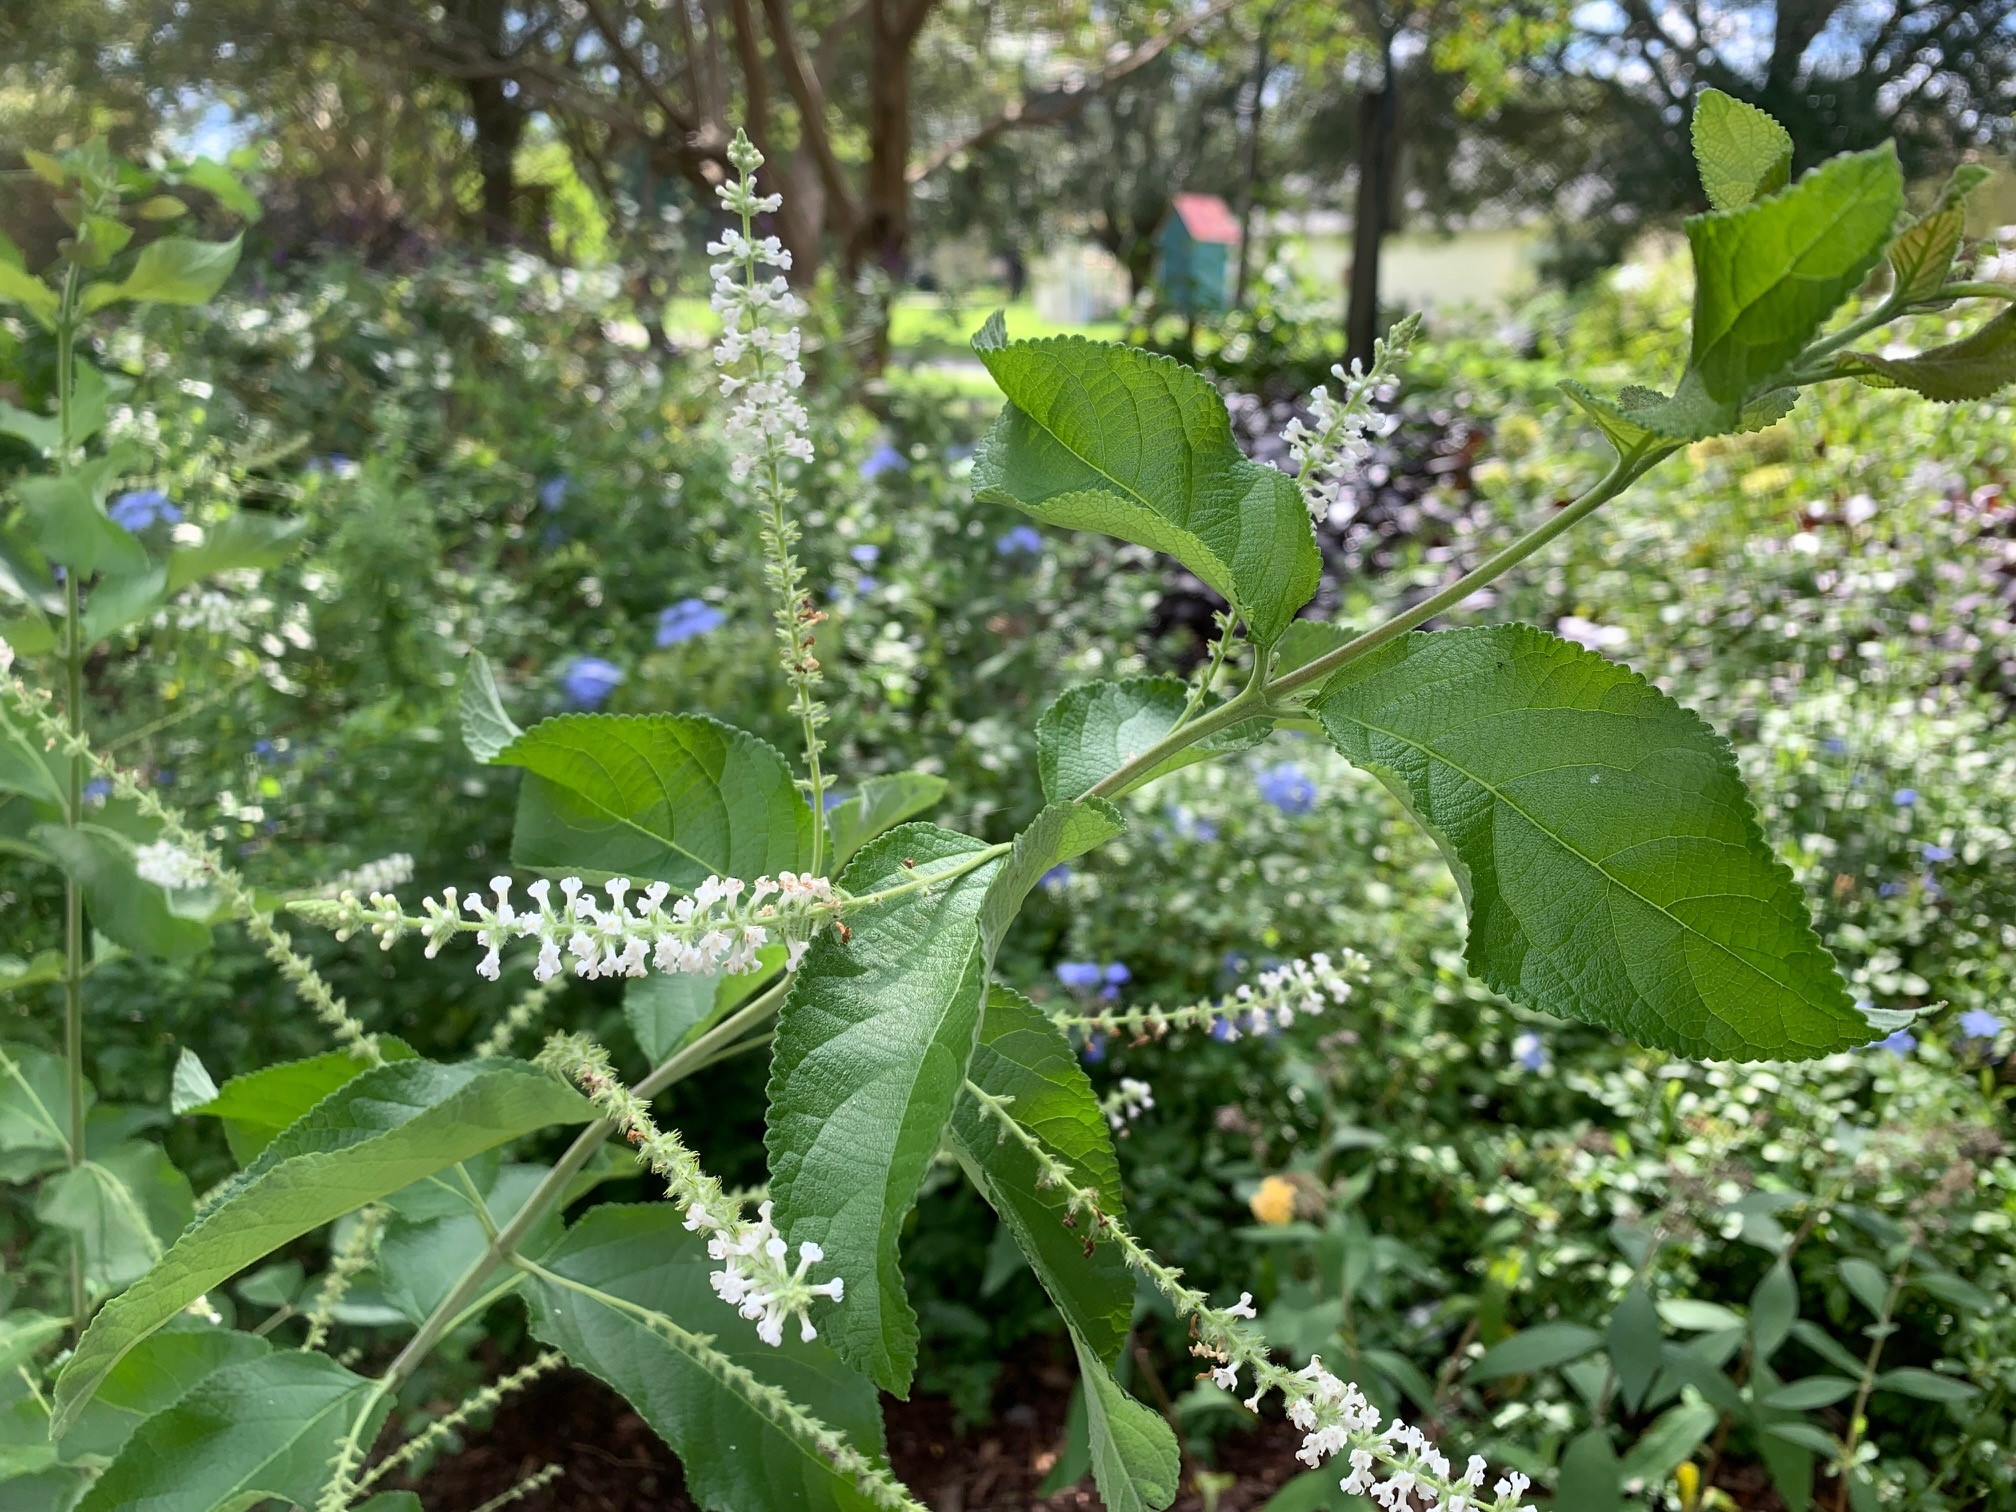
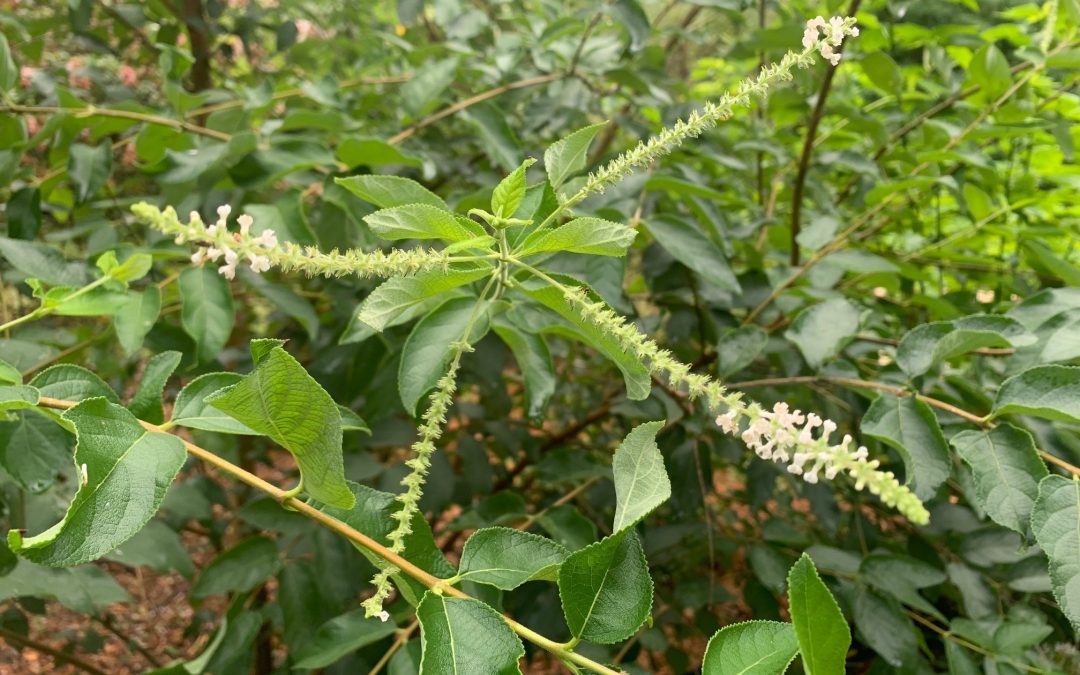
Two years ago, the Escambia Master Gardener Volunteers were gifted with the flowering perennial Sweet Almond bush (Aloysia virgata). It has quickly become a favorite plant of volunteers and garden visitors due to its many attractive features.
Although, Sweet almond bush is not a Florida native, it is Florida-friendly plant for zones 8b -10b. Plants grow very large, from 6-10 feet with branching that can spread out in all directions. In North Florida, plants can be damaged by a freeze but either return from the base or from growing points higher on branches.
One of the best features are the fragrant white flowers spikes that will be present late spring through fall. Many types of pollinating insects will be attracted to the flowers, although sometimes flowers are too high on the plant for many of us to get a good look at pollinator details.
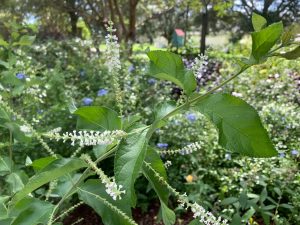
Sweet almond bush blooms. Photo by Beth Bolles, UF IFAS Extension Escambia County
We have plants both in full sun and partial shade that are performing well in the Escambia Demonstration Gardens. Plants do receive water when rainfall is lacking for about 5-7 days (or all of August this year in the Northwest Panhandle). You can shape your plant with a little light pruning during the growing season to keep branches a little more in bounds. Don’t forget to start a few new plants from these cuttings and then share a low maintenance plant with your neighbors.
by Beth Bolles | Aug 20, 2024
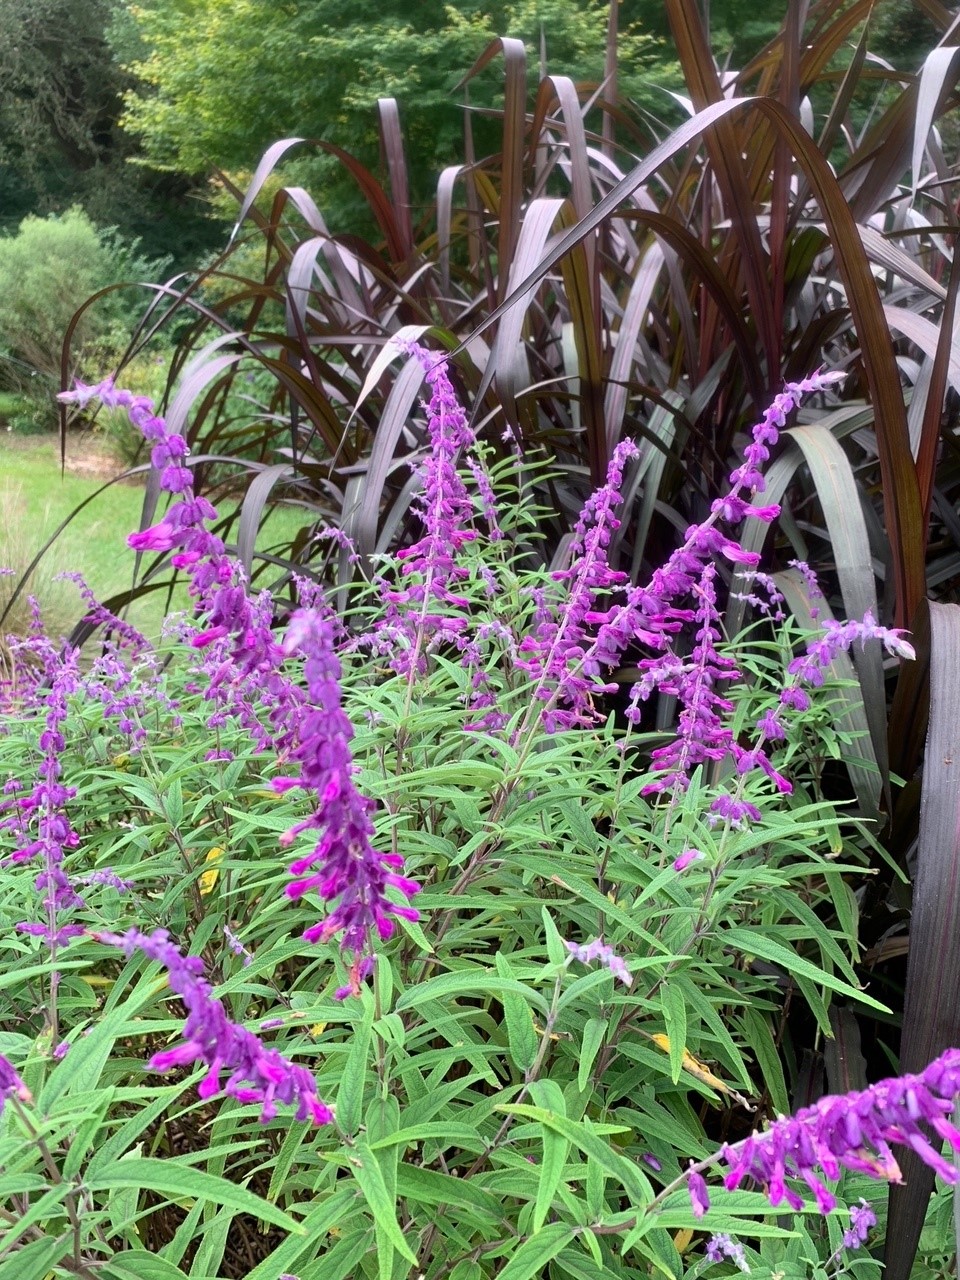
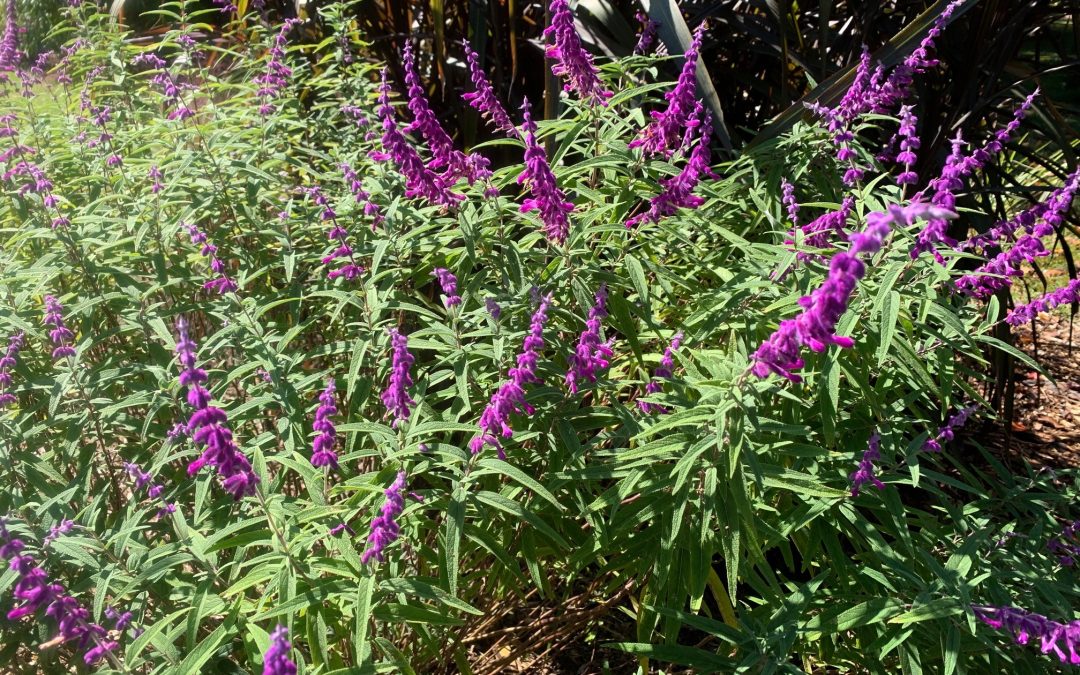
Salvias are a popular group of plants for attracting pollinators and adding lots of color to the landscape. A unique salvia that offers velvety flowers is the Mexican bush sage, Salvia leucantha.
In our heat, Mexican bush sage can tolerate partial shade and likes average water with well drained soils. Plants will not overtake a spot only growing 2-4 feet. The velvety portion of the flower is a purple calyx with the flower petals emerging white or purple. Flower stalks will extend above the foliage to be available to many bees, butterflies, and hummingbirds.
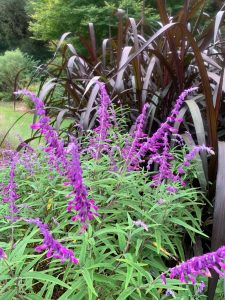
Mexican bush sage planted with ‘First Knight’ pennisetum. Photo by Bolles, UF IFAS Extension Escambia County.
During cold winters, plants can die back to the ground but often return each spring. It is always good to take a few cuttings for new plant starts just in case your plant dies back from heavy rains or drought conditions.
Mexican bush sage can be an accent plant in your garden or used in a small mass of 2-3 plants. Consider adding it with contrasting textures and colors so later summer flowers are easily visible.
by Daniel J. Leonard | May 9, 2024
In the last couple of weeks, I’ve had multiple questions regarding trees and shrubs that aren’t looking too hot. These types of calls are common this time of year – it has gotten hot and dry, and plants have fully emerged from winter, causing issues that have been hiding under the surface during the dormant season to manifest as crown or branch dieback. While there are a wide variety of things that can cause dieback, in most cases a little detective work can help pinpoint the issue. Let’s look at a few of the most common causes of dieback and some corrective measures that may help restore the plants to health.
The first thing to do when you notice a plant in decline is nothing. Don’t try and oversaturate it with water. Don’t run out and dump a bunch of fertilizer around it. Many times, these panic measures exacerbate the stress the plant is already under. Instead, I encourage you to give us a call at your local UF/IFAS County Extension Office. We can likely help identify the cause of the problem through a site visit to your property or by you sending us diagnostic photos of the plant with a description of what’s been going on with it – the more information you can provide about the plant and the management practices it has experienced, the better (you can email diagnostic images/information to d.leonard@ufl.edu).
The most common cause of tree/shrub dieback that I see arises from improper planting practices. Most landscape plants should be planted at or just above the surrounding soil level, preferably where the topmost root arises from the trunk. To accomplish this, planting holes should be dug slightly shallower than the rootball’s height and about twice as wide. Planting any deeper than that is probably too deep and can cause problems like trunk and root decay, which lead to crown dieback. Unfortunately, once a plant is planted too deep, it cannot be corrected other than digging up and replanting at the proper depth, which may or may not be possible depending on the size of the tree. Another common issue that can arise after planting is girdling roots. This occurs when plants are grown in plastic containers and develop a root system that circles the inner wall of the pot. If not trimmed, the plant’s root system will continue to grow in this manner, eventually encircling the plant’s trunk, cutting off water and nutrient flow, and leading to crown dieback. Fortunately, this condition can be prevented by cutting, removing, or redirecting these roots at planting.
The next most common cause of plant dieback occurs due to soil disturbance by people. It’s easy to forget but the root zone of trees and shrubs can reach out several times farther than the plant is tall and is easily damaged. Disturbances to the root zone from digging or trenching near trees or compaction from prolonged vehicle travel over the area cause damage that might be slow to appear but can lead to plant decline. If you are doing construction or building near a shrub or tree, try to keep digging machinery as far out of the root zone as possible and avoid repeatedly parking or driving vehicles over the root zone area. Like below ground root damage, trunk damage that occurs from injury by string trimmers, mowers, or animal feeding activity can all disrupt the flow of water and nutrients in plants and prove deadly. There is no cure for this type of damage, so employing physical barriers to prevent damage is key.
The last major stress is environmental in nature and is caused by a water imbalance – either too much or not enough. Dry soil conditions during the planting and establishment phases (first several years after planting) should obviously be avoided if possible – keeping the developing rootzone moist and allowing plant roots to establish in their native soil is critical. Too much water can also cause problems for trees planted in poorly drained soil. Excessive moisture leads to root diseases, which ultimately presents as dieback in the canopy. If planting in an area that tends to stay wet, select a species of plant adapted for that sort of site – some species are more tolerant of “wet feet” than others. While many people expect disease and insect damage to be the cause of an unhealthy plant, they’re often not the biggest culprit and, if they occur at all, are generally secondary to one of the above issues.
For more information about crown dieback or declining landscape plants, contact your local UF/IFAS County Extension office. Happy gardening!