by Sheila Dunning | Jul 28, 2014
The “Dog Days” are the hottest, muggiest days of summer. In the northern hemisphere, they usually fall between early July and early September. The actual dates vary greatly from region to region, depending on latitude and climate.
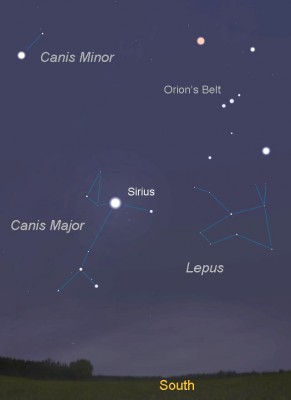
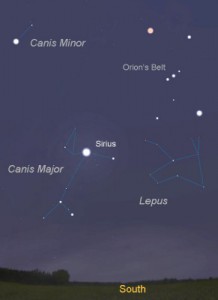
In ancient times, when the night sky was un-obscured by artificial lights, the Romans used the stars to keep track of the seasons. The brightest constellation, Canis Major (Large Dog), includes the “dog star”, Sirius. In the summer, Sirius used to rise and set with the sun, leading the ancient Romans to believe that it added heat to the sun. Although the period between July 3 and August 11 is typically the warmest period of the summer, the heat is not due to the added radiation from a far-away star, regardless of its brightness. The heat of summer is a direct result of the earth’s tilt.
Spending time outdoors this time of year is uncomfortable, potentially dangerous, due to the intense heat. However, the chinch bugs are very active in St. Augustine grass, and the summer flowers need water. So, take care of those tasks early in the day and then retreat to the air conditioning to plan your fall planting.
Plant tomato plants in August for tomatoes in October. Varieties such as Phoenix, Florida 91, Solar Set and Heat Wave II are good selections for setting fruit in high temperatures, should summer temperatures continue. Otherwise, try some of the newer UF/IFAS recommended varieties for fall planting in North Florida such as Bella Rosa, Tribute or Finishline. For more information on tomato selection refer to Tomato Cultivars for Production in Florida. For information on other vegetables for fall gardening refer to the Florida Vegetable Gardening Guide. Plan to attend the Fall Gardening program at the Extension office this September.
 Many bedding plants flower quickly and can add color to the fall landscape. These include pentas, African marigolds, torenia, zinnias, melampodium and scaevola. Other can be planted in October for blooms all winter-long. Plan spaces and color themes for calendulas, pansies, snapdragons and violas. Add in ornamental cabbage or kale and some dusty miller to accent the garden. They too will perform through the cold. For more information on Annuals for the Florida Garden refer to Gardening with Annuals in Florida.
Dependable fall blooming perennials include lion’s ear (Leonotis leonurus), pineapple sage (Salvia elegans), firebush (Hamelia patens), cigar plant (Cuphea micropetala), yellowbells (Tecoma stans) and firespike (Odontonema strictum). Also, garden mums (Chrysanthemum sp.) and many different Irises will add color again in the spring. To gain information on perennials for Florida refer to Gardening with Perennials in Florida.
Webster’s second definition of “dog days” is a period of stagnation or inactivity. But, even when the heat forces you to slow down on the labor-intensive work, there is plenty of gardening “activity” to do. Stay in the air conditioning and plan that spectacular fall and winter yard.
by Gary Knox | Jul 21, 2014
Burgundy-leaved crapemyrtle is one of the most exciting breeding accomplishments in years. Unlike previous selections, many new crapemyrtle cultivars have leaves that retain dark burgundy coloration from spring budbreak through fall leaf drop. These plants add bold leaf color to a plant already known for its flower power.
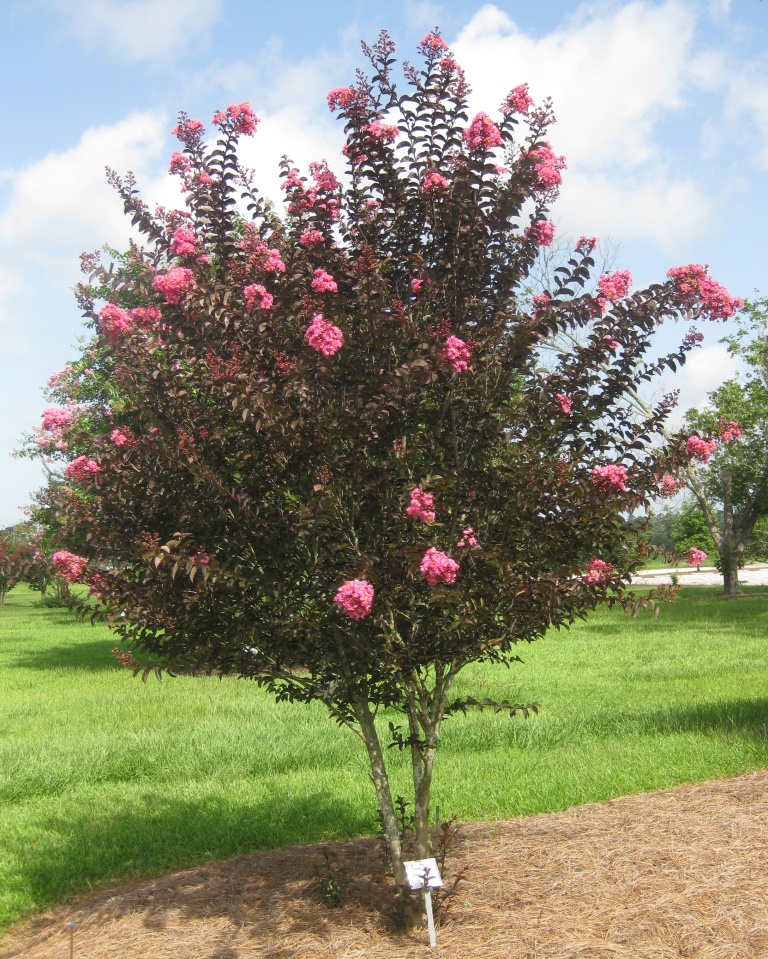
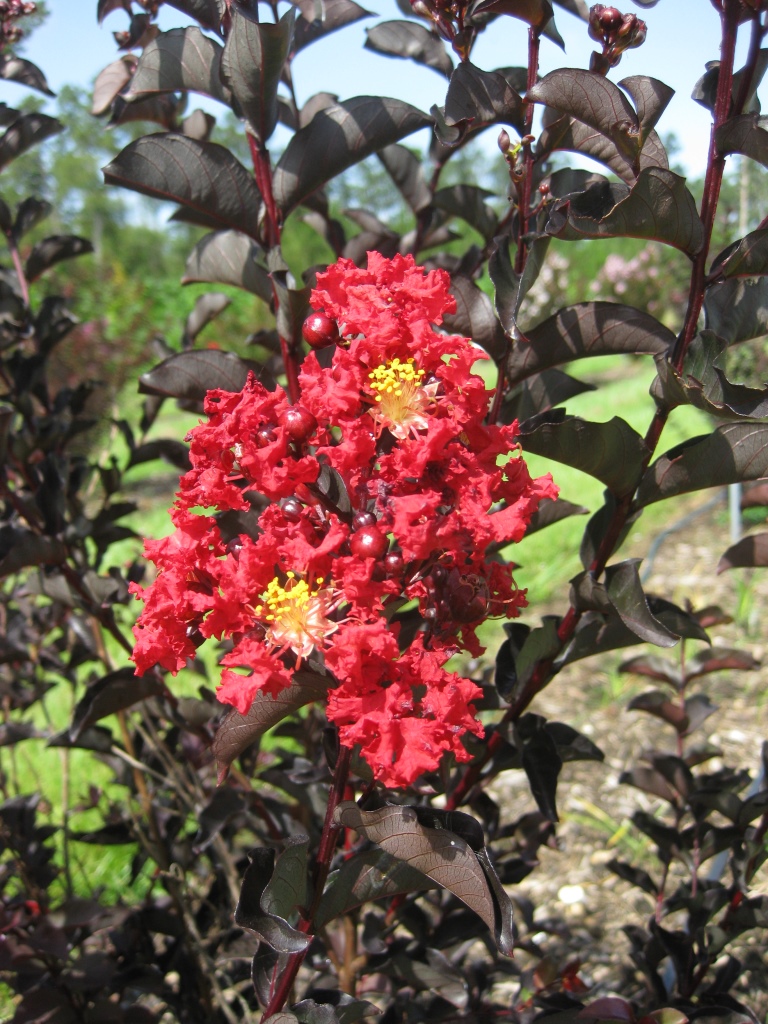
Delta Jazz™ was the first crapemyrtle with burgundy-bronze leaves all summer long. Photo by Gary Knox
As is typical of many new plant introductions, the new crapemyrtles are grouped and sold in series, most of which are patented and/or trademarked. Delta Jazz™ was the first crapemyrtle with burgundy-bronze leaves all summer long. This year Delta Jazz™, with pink flowers, is being joined by Delta Eclipse™ (purple flowers). Future years will see Delta Breeze™ (lavender flowers) and Delta Flame™ (red). All have burgundy to bronze leaves from spring through fall and are expected to be mid-size, maturing at heights of 8 to 12 feet.
Another new series with burgundy leaves confusingly is being sold under two names: the Ebony series and the Black Diamond™ series. ‘Ebony & Ivory’ features white flowers that contrast nicely with dark burgundy leaves on red stems. ‘Ebony Embers’ has red flowers on plants with dark burgundy leaves on purple stems. ‘Ebony Fire’ has flowers that are bright red and its leaves are medium burgundy. ‘Ebony Flame’ has dark red flowers and dark burgundy leaves. Finally, ‘Ebony Glow’ is named for its blush white flowers on dark red stems with dark burgundy leaves. These selections are also sold as Black Diamond™ Pure White, Black Diamond™ Red Hot, Black Diamond™ Crimson Red, Black Diamond™ Best Red and Black Diamond™ Blush, respectively. All are expected to grow 8 feet or more in height (regardless of the name!).

‘Ebony Fire’ is a new crapemyrtle with burgundy leaves and bright red flowers. Photo by Gary Knox
The First Editions® Magic™ series of crapemyrtles includes two new selections with burgundy leaves. Moonlight Magic™ has the darkest burgundy leaves I’ve seen so far. Flowers are white and the burgundy leaves are glossy and narrow on a plant expected to grow to a height of 8 to 10 feet. Maturing at 4 to 6 feet, Midnight Magic™ has leaves that are a dull burgundy while flowers are dark pink. Note that other cultivars in the First Editions® Magic™ series (‘Coral Magic’, ‘Plum Magic’, and ‘Purple Magic’) have green leaves.
These cultivars are too new to know how well they will perform in north Florida and the Gulf Coast. The best place to view these cultivars side by side is at the LSU AgCenter, Hammond Research Station, in Hammond, LA. There, Dr. Allen Owings has developed a beautiful garden where he is evaluating crapemyrtles and many other plants. For more information and to read Dr. Owing’s comments on new crapemyrtles, visit http://www.lsuagcenter.com/en/our_offices/research_stations/Hammond/.
All these new cultivars will have the brightest burgundy leaf color when plants are grown in full sun (at least 6 hours of direct sun each day). Any amount of shade will likely result in pale burgundy or burgundy-green leaves, as well as reduced flowering and growth. As with other crapemyrtles, these new cultivars are tolerant of drought, heat, rain, humidity and all but wet soils. When buying crapemyrtle, place the plant in a location where it can grow to its full height without the need to prune it regularly. After planting, sit back and enjoy these crapemyrtles’ bold burgundy foliage as well as the abundance of colorful flowers!
1Extension Specialist and Professor of Environmental Horticulture, University of Florida/IFAS, North Florida Research and Education Center, Quincy, Florida. gwknox@ufl.edu.

by Mary Salinas | Jul 15, 2014
We all seem to have this dilemma: A desire to re-landscape or just add a few plants to an area, but not knowing what would be the best choice. Plants need to be compatible with their location. The right plant should be chosen for the right place. Many have particular light, moisture and zone requirements in order to do their best. The ultimate size of the plant is also an important consideration; if you want to avoid constant pruning, choose plants that only grow to size you would like to ultimately have. Some great resources are provided below to get you the information you need.
UF IFAS Extension has a brand new app for your mobile device or web! The app contains a database of over 400 Florida-friendly plants is searchable by plant name, type, shape, native status, light requirements and more. The yearly subscription is only $1.99 to have great info on the go.
The downloadable 104-page Florida-friendly Landscaping Guide to Landscape Design and Plant Selection not only has photos and detailed information about plants by category, it also has great ideas on how to improve your landscape design! 
UF’s Florida Yards & Neighborhoods maintains a searchable Florida-friendly Plant Database. Make choices based on region, plant type, light and moisture quantity, soil texture salt tolerance.
For native plants, the Florida Association of Native Nurseries has two websites where you can find plants for your particular zone, plant community (like at the beach or in pine flatwoods), plant type and by wildlife usage. There is a site designed for nursery professionals that lets you find local wholesale growers and also a similar site for homeowners that has resources on where to find desired plants at local nurseries.
Speaking of native plants, the Florida Native Plant Society also has a searchable list of plants appropriate for your particular needs.
Gardening Solutions has lots of great information for lawn, landscape and garden by category, and it is easily accessed.
Happy Gardening!
by Taylor Vandiver | Jul 1, 2014
The summertime often reminds us of our uninhibited spirit. With Independence Day not far off, Floridians will be celebrating the freedom of our nation while battling the oppressive climate you can’t seem to escape this time of year. As we approach the apex of heat and humidity here in Florida, we would do well to remember the tenacity of our native wildflowers and their “spirited” survival of Florida’s extreme conditions.
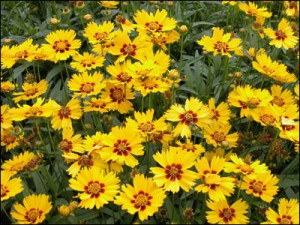
Coreopsis flowers. Photo courtesy UF/IFAS.
Historically, Florida’s landscape was alive with color throughout the seasons. Through urbanization and cultivation we’ve lost a large part of that legacy; however, we can reestablish some of Florida’s colorful past in our own yards and neighborhoods.
In order to ensure successful planting of wildflowers it is important to properly select and prepare your site. You will want to choose a sunny-well drained area and cut any existing vegetation to the ground. It may be beneficial to put down sheets of cardboard to smother what’s left of the vegetation. This is best done in the summer in advance of fall planting.
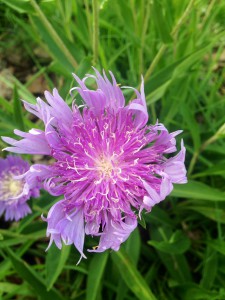
Stokes’ Aster in bloom.
Planting is best done late August to early September in North Florida. Soil-to-seed contact is critical so 1 day before seeding, or just prior to seeding, firmer soils need to be lightly scratched with a rake. Sandy soils might have to be made more firm to ensure that seed do not sink too deep. Broadcast the wildflower seeds at the recommended rate then press them into the soil by walking around on the planting site.
Wildflower seeds require adequate moisture during germination. After planting irrigate the site with about 1/4 to 1/2 inch of water daily for the first few weeks. After that, irrigate with about 1/2 inch water only if the wildflowers show signs of drought stress. Once established though, the meadow needs very little, if any, irrigation. Fertilizers should be avoided altogether as they promote the growth of aggressive weeds. Many of Florida’s native wildflower species are adapted to and perform well in soils with low fertility. Your wildflowers will re-send themselves if given the opportunity so wait until seed have matured before deadheading or mowing. Cut no lower than six to eight inches to avoid damaging the crowns of grasses and wildflowers.

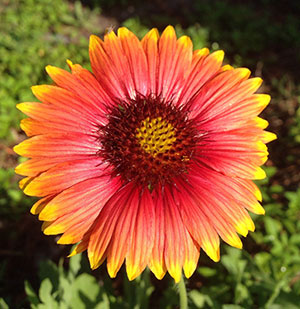
Native Gaillardia. Photo courtesy UF/IFAS.
To successfully cultivate a wildflower meadow in your home landscape, it’s helpful to select plants with the qualities to fit the conditions at your site. Also, consider blooming dates of flowers in order to provide color and interest for your landscape spring through fall. While not always possible, it’s best to purchase seeds and plants known to be Florida ecotypes. Consult with local nurseries and garden centers for more information on plant and seed availability and seeding rates. You can always contact your local Extension Office for more information. Other good sources of information are the Wildflower Seed And Plant Growers Association, Inc. (www.floridawildflowers.com); Association of Florida Native Nurseries (www.afnn.org); and the Florida Wildflower Foundation (www.floridawildflowerfoundation.org).
Growing wildflowers can restore a special sense of natural history close to home. So if you are looking for an “explosion” of color that will stand the test of time, Florida’s native wildflowers will not disappoint.

by Taylor Vandiver | Jun 3, 2014
In a world of limited time and space, container gardens seem to make more and more sense. Poor soil and no place to put plants in the ground are no longer good excuses for not being able to enjoy the simple pleasures of gardening. Container gardening allows the individual to create gardens to fit any situation. Gardening in containers can be just as rewarding as having a full-size garden.
There are a few items to consider when you are planning your container garden. The first is the plants you intend to use. If you are planting more than one plant in the same pot be sure that all your plants meet the same requirements. The requirements you should consider are amount of light, amount of water, climate and fertilizing needs. Some other things you might want to think about when planning your container garden are height, color, and texture. A nice variation of these elements will make your container gardens more attractive and increasingly more interesting to look at.
The next step in container gardening is choosing your container. A good rule of thumb is: “Anything that holds soil and has drainage holes in the bottom may be transformed into a container garden.” It can be a pot you purchased from the local gardening center or an old bathtub you picked up off the side of the road. However, be sure that the size of the container matches the current and potential size of your plant. For vibrant plant growth, the containers must provide adequate space for roots and soil media, allowing the plant to thrive.

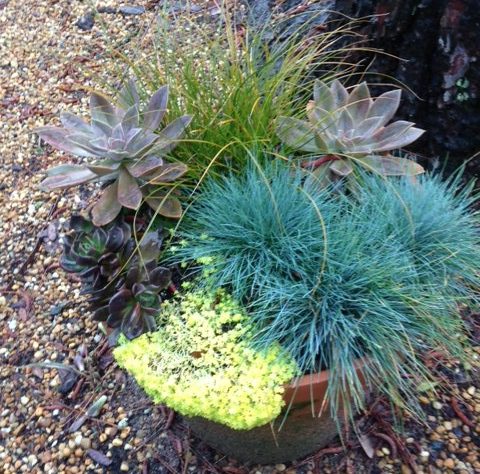
Colorful containers bring life to your small spaces.
Next on your list is choosing a soil for your container. Container soils need have good aeration and decent drainage, while still being able to retain enough moisture and nutrients for plant growth. When choosing what to use in containers, never use garden soil by itself. When garden soil is added to a container, both drainage and aeration are severely impeded, and the results are plants that grow poorly or not at all.
Container soils are often referred to as soilless or artificial media, because they literally contain no soil. They are commonly composed of various media such as peat moss, perlite, vermiculite, bark and coir fiber (ground coconut hulls) in a variety of mixes. When using soilless media remember t0 moisten it slightly before planting. Fill a tub with the media, add water and lightly fluff the media to dampen it. This will keep the mixture from becoming hydrophobic (unable to take up water) throughout its life in the container. When adding media to your containers, never fill the pot to the top. You should leave about a one-inch space between the top of the soil and rim of the pot. This will make watering the pot easier as it provides a place to “put water” and not have it run over the edge.
When watering your container gardens, the best time to do so is in the morning. Watering in the morning allows the leaves of your plants and soil to dry out, preventing diseases and viruses. Remember that overwatering is the most common reason for fatalities in container gardens. Check your soil by pushing your finger into the media; if the media is moist don’t water it. When it comes to fertilizing your container gardens, fertilize only as needed. Over-fertilization will result in a buildup of salts and may burn the roots of your plants. Try to fertilize your plants during the growing season, and only if needed during the dormant seasons.
The most important objective when container gardening is to be creative. Maybe, try a variety of plants in one container garden. While an nicely put together individual container can be quite impressive, think what might happen if you put several containers together in a group. Also, don’t limit your container gardens to flowers–many vegetables can be grown in a container and actually do quite well. There really is no limit to what can be done in a container!
by Julie McConnell | Apr 1, 2014

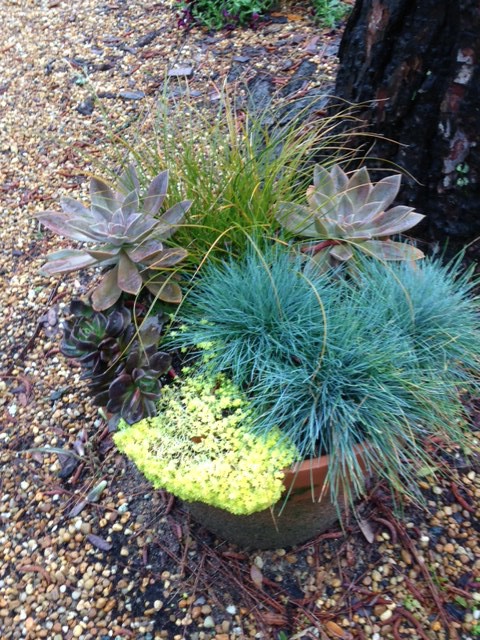
Container garden. Image: Julie McConnell, UF/IFAS
Living in a condo, apartment, or home with small yard does not mean you can’t garden at home. Whether you are interested in edible plants or ornamentals you can create a fit that is right for your space by using containers.
The first step in container gardening is the same as for traditional landscaping. First, asses your site to determine the cultural situation. Is it sunny or shady? Is water available from rainfall or from a nearby spigot? Will salt or wind be a factor? Are there height and width limitations? All of these need to be taken into consideration when you are planning to plant. These are elements that we have very little control over, so it is best to choose the right plants for the place you have.
Choose a container that will allow for adequate root growth and good drainage. If growing annuals, perennials, or small vegetables, a pot that is 12-18” deep should be sufficient. For shallow rooted or plants that like dry conditions you can go smaller. If plants grow tall make sure that the weight of the soil and pot is enough to keep it upright in gusty winds. It is not necessary to buy a container, you can reuse something as long as the water will drain and it is sturdy. Large containers may not need to be filled completely, but can be filled with a lightweight filler such as upside down nursery pots, water or soda bottles with lids, or packing peanuts. Choosing a light weight filler material makes the container easier to turn or relocate if needed and reduces the cost of potting soil.
Once you have determined site conditions, select the type of plants you would like to grow. When choosing edibles, the amount of sunlight available may be a limiting factor. Although some herbs and vegetables may benefit from a little bit of shade, they still need a bright location in order to produce well. If your site is very shady, consider shade loving ornamentals such as fern, hosta, and impatiens.
Understand the sunlight, water, and fertilizer needs of each plant. Group plants together that have similar requirements because they will receive the same care. Most herbs like a hot, dry situation and very little to no fertilizer. Grouping one of these herbs with a tomato plant that needs consistent watering and regular fertilizer will create a situation where one plant will perform poorly.
Container gardens require more care than plants in the ground because they dry out faster and may get no water from rainfall, if placed in a covered area. Consider using micro irrigation designed for containers or choose plants with low water needs such as the grasses and succulents.
To read more about container gardening read Container Gardening for Outdoor Spaces ENH1095.
The Foundation of the Gator Nation
An Equal Opportunity Institution