by Kalyn Waters | Dec 22, 2025
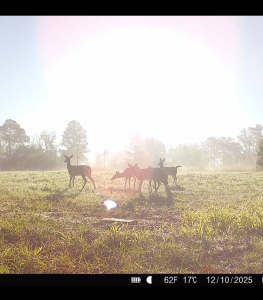
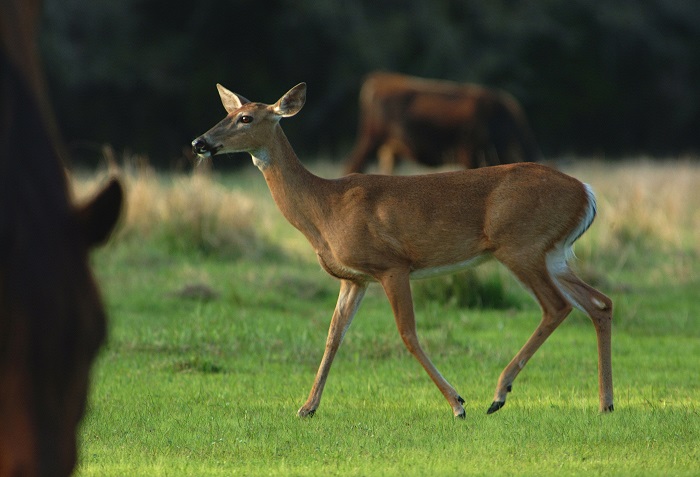
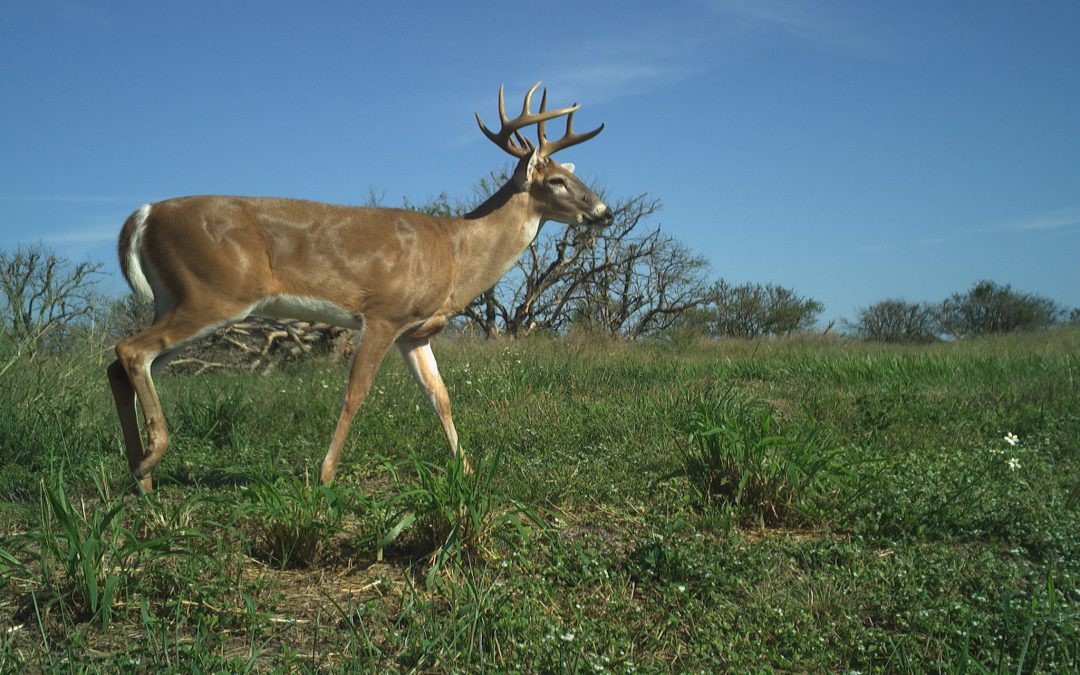
Trail camera picture of white-tailed deer on private land.
Florida has the lowest doe harvest ratio in the southeast, with a continuing decline in harvest numbers. In 2021, the total number of does harvested was at a low, being down 22% from the 5-year average. This makes it difficult to manage the overall population, especially in the Florida Panhandle, where habitat is more robust.
Without management, white-tailed deer populations become out of balance, susceptible to disease, and can cause issues for the ecosystem as a whole. Additionally, deer cause extensive and expensive damage of agronomic crops every year.
With Florida’s mild climate, natural die-offs like winter kills are not a part of the management equation. This makes the hunters role in white-tail conservation key. While buck harvest is a typical goal of hunters, managing the doe population is key to overall herd health and long-term management. Here are three reasons doe harvest is key:
- Habitat Management and Overpopulation
The female is the reproductive foundation of the white-tail herd. Overpopulation in the natural landscape can damage the natural habitat and lead of more deer than the land can support. Particularly in the Florida Panhandle, there is a lack of high-quality browsing areas
Does are the reproductive foundation of the herd. When too many deer are on the landscape, deer numbers can quickly exceed what the habitat can support. Harvesting early in the hunting season will help balance the population before the herd enters the winter season.
- Health
Scientifically, we know that overpopulated natural herds lead to disease. This can come from a lack of feed sources, which can weaken immunity; close intermingling in feeding or high-transmission areas; and reduced fawn survival. By harvesting does and controlling the population density, white-tail populations are overall more robust and healthier. In all natural populations, when the herd density is not managed (naturally or by conservation efforts), issues with health are amplified.
Learn More About Increasing Fawn Health
- Balanced Herd Structure
A healthy age structure and sex ratio within a population is key. According to the National Deer Association, a doe-to-buck ratio of 2:1 is ideal, however difficult to achieve. Additionally, while the sex ratio is often a hot topic, the age structure is just as crucial for a healthy herd. Harvesting can be a tool to support a healthy age structure and sex ratio within the population. If hunters do not harvest does, their populations will likely become skewed and less healthy.
Learn More Here
Incorporating doe harvest into deer management plans is a proven strategy that benefits the herd, the habitat in the Florida Panhandle.
by Thomas Derbes II | Dec 15, 2025
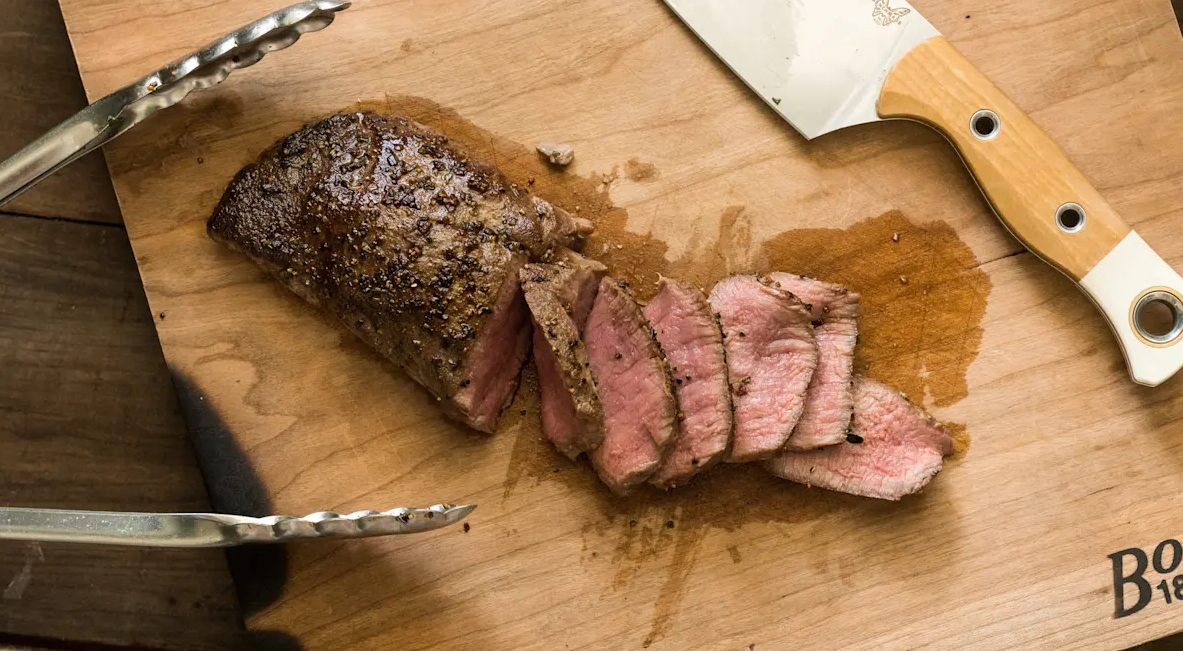
The holiday season is a time for gathering with loved ones and sharing memorable meals. This year, why not bring something unique to the table by featuring wild game dishes? Below are time-tested recipes for venison, duck, and squirrel that will delight your guests and add a rustic touch to your holiday feast.
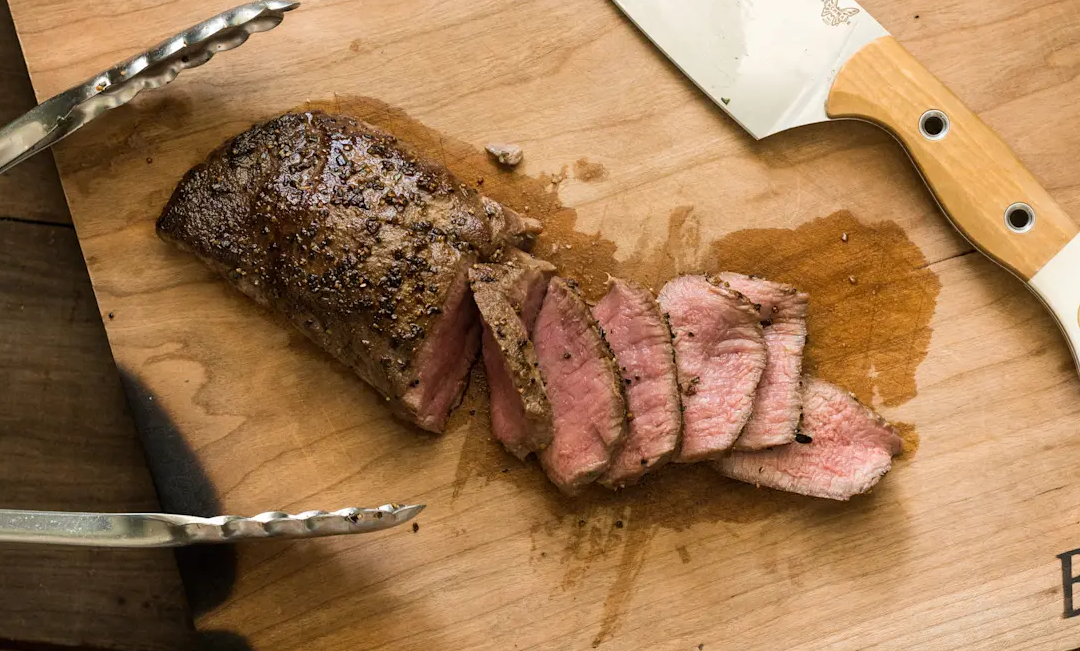
1. Herb-Crusted Smoked Venison

Smoked Venison Tenderloin – Meateater
Ingredients:
- 5 – 2 lb venison backstrap (tenderloin)
- 2 tbsp high-smoke point oil (avocado, grapeseed, etc)
- 2 tsp kosher salt
- 1 tsp black pepper
- 1 tsp dried rosemary
- 1 tsp dried thyme
- 1 tsp paprika
- 4 garlic cloves, minced
- ½ tsp brown sugar
Instructions:
- Stir all the seasonings together, including the garlic, in a small bowl. Rub the venison backstrap with the seasonings, be careful not to over season.
- Cover tightly and refrigerate for at least 12 hours. If you do not have time to pre-season, it will still turn out great!
- Preheat smoker to 200°-225°F. I prefer hickory or pecan for venison but oak and cherry work well too.
- Half an hour before cooking, remove the venison from the refrigerator. Lightly pat dry and prepare a large skillit with the high-smoke point oil. Sear the venison for about 30 seconds each side on high heat until golden brown on the outside.
- Insert meat probe/thermometer and place the venison on the smoker. Smoke for approximately 1 – 1.5 hours, or until the internal temperature is 128° – 132°F for medium rare, 135° – 140°F for medium.
- Allow the meat to rest for 10 to 15 minutes, then slice and serve!
2. Traditional Roast Teal Duck
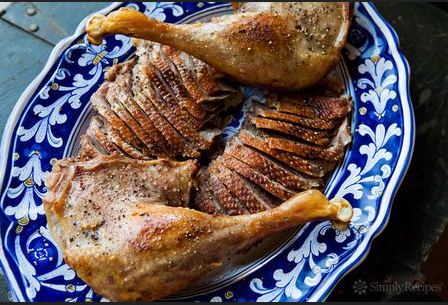
Roast Wild Duck -Simply Recipes
Ingredients:
- 1 whole duck (Teal, Wood, any puddle duck)
- Salt and pepper to taste
- 1 apple, sliced
- 1 onion, cut into small wedges
- 1 rosemary sprig
- 2 tbsp olive oil
Instructions:
- Preheat oven to 450°F.
- Pat duck dry; rub inside and out with oil followed by salt and pepper. Stuff cavity lightly with apple, onion, and rosemary sprig
- Lay duck breast up on a roast rack in a roasting pan to catch the fat drippings, Add a tiny amount of water to pan to stop any smoking. Once duck is in oven, immediately lower temperature to 425°
- Cooking times will vary. Teal and wood ducks are smaller and will take 10-20 minutes. Mallards could take upwards of 30 minutes. Instant-read thermometers are perfect for duck. Aim for 130° to 140°F in the thickest part of the breast.
- Let rest before carving and serving. Top with gravy, cranberry sauce, or apple chutney!
3. Southern Squirrel & Dumplings
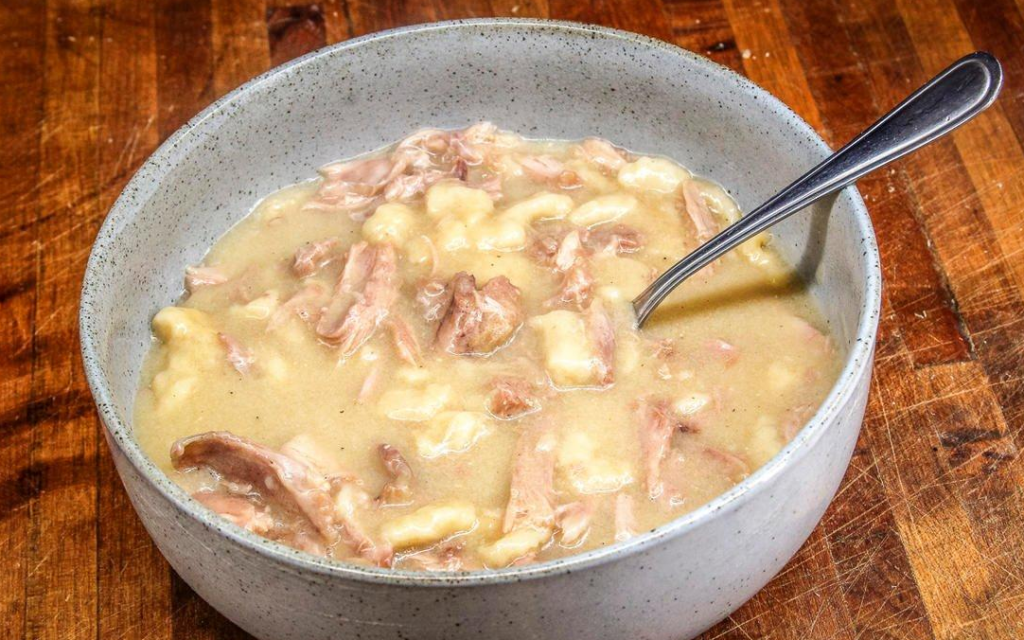
Squirrel Dumplings – Realtree Outdoors
Ingredients:
For the soup base:
- 2 Tablespoons olive oil (or butter)
- 2 celery ribs, diced
- 2 carrots (large), diced
- 1 medium yellow onion, chopped
- 1 clove garlic, minced (optional but recommended for flavor)
- 5 Tbsp unsalted butter
- 1/3 cup all-purpose flour (to make a roux)
- 6 cups squirrel stock (or premium chicken stock)
- Seasonings: about 1 tsp kosher salt (adjust to taste), ¼ tsp dried thyme, ¼ tsp dried sage (or rosemary), ½ tsp black pepper (freshly ground) — herbs add warmth and depth.
- 4 – 5 cleaned whole squirrel
For the dumplings:
- ~ 2 cups all-purpose flour (plus extra for dusting surface)
- ½ teaspoon baking powder
- 2 Tbsp cold butter, cubed (or grated)
- ~ 1 cup milk (whole milk preferred) (buttermilk or evaporated milk can also work for richness)
Instructions:
- Bring 1.5 gallons of water to a boil. Clean the squirrel and cut into pieces. Add the squirrel into the boiling water. Boil for 1.5 hours.
- Once the squirrel is tender, drain and strain/save the broth. This will be used as your “squirrel stock.” Add water if needed to make 6 cups.
- Shred the squirrel and set aside.
- Heat oil (or butter) in a large pot over medium heat. Add celery, carrots, onion and sauté about 3–5 minutes until softened. Add garlic if using, stir ~30 seconds.
- Add butter + flour; whisk for about a minute until light golden. This will thicken the soup base.
- Slowly whisk in broth to avoid lumps. Add salt, pepper, thyme, sage/rosemary. Bring to a simmer.
- Time to make the dumplings! In a bowl, combine the flour and baking powder. Add the cold butter (cubed or grated) and toss until flour is lightly coated. Gradually add milk, stirring just until dough comes together; over-mixing = tougher dumplings. Dough should be shaggy and soft.
- Drop dumplings by spoonfuls (or lightly floured hands) into simmering broth, spacing them apart so they don’t stick together. Maintain a gentle simmer, not a rolling boil. Cover the pot and let dumplings cook ~ 10–15 minutes, until risen, fluffy, and no longer doughy inside.
- Stir the shredded squirrel into the soup gently. Heat until squirrel warms through. Taste and adjust salt/pepper or herbs as needed. Garnish with chopped fresh parsley if desired. Serve hot — often with crusty bread or biscuits.
These wild game recipes offer a hearty and flavorful addition to your holiday menu. Whether you are a seasoned hunter or sourcing game from a specialty market, incorporating these dishes will create an unforgettable dining experience for your family and friends. Happy holidays and bon appétit!
by Jennifer Bearden | Nov 10, 2025
Archery Season opened October 25 in Zone D (our panhandle zone). So what better time than now to go over a few things pertaining to hunting.
First, in 2023, FWC documented a deer in our zone with CWD, Chronic Wasting Disease. Now, Georgia documented their first case on the Florida Border near where our case was located. CWD is a fatal contagious disease of the brain and nervous system of the deer. This disease is a slow progressing disease and deer shed the prion even before they show clinical symptoms. Symptoms of this disease are extreme weight loss and abnormal behaviors. Report any deer with these symptoms to FWC by calling 866 CWD WATCH – 866-293-9282. Also, read and follow the FWC CWD regulations.
Next is Hunter’s Safety. Anyone born on or after June 1, 1975 and 16 years or older, must complete the Hunter’s Safety course unless they hunt under the supervision of a qualified hunter. These courses are taught regularly here in Northwest Florida. The typical route to fulfill this requirement is to take an online course such as through the NRA. Then sign up for the field day. You attend the field day which includes some lecture and hands-on experience with firearms. Once you pass both online and the field day, you get your hunter’s safety certificate. Plan ahead. The field days during hunting season fill up fast!
Last thing! Read the new 2025-26 Hunting Regulations! These can be found online or at your favorite hunting and fishing supply stores. Know these state regulations. These change from year to year. Keep up with these changes. Ignorance won’t get you out of a citation. Also, if you hunt on a piece of public land – read and follow the WMA brochure for that piece of land. Examples of this would be Eglin, Yellow River, and Blackwater. Rules on public land are different from private land. For instance, you must wear 500 sq inches of hunters orange when hunting during general gun season on public lands but not on private lands. So take the time to know the rules and regulations for where you will be hunting.
Good luck to all the hunters out there. Be safe and legal!
by Mark Mauldin | Oct 21, 2025
Fall is here – peanuts are being picked and football season is in full swing. With fall being synonymous with the end of the growing season, it is a surprisingly good time of year to start many vegetation management operations. Fall is a particularly good time of year for a land manager to chemically control unwanted perennial vegetation.
–
General Comments & Caveats
I know plants can’t read calendars and to my knowledge they don’t watch football, so how would they even “know” it’s fall? Why does the season matter? In very general terms, perennial plants (those that live for many years) respond to shortening day length; the decreasing amount of sunlight stimulates the plants to begin storing more energy for the winter ahead. This process increases the downward flow (from leaves, towards roots and rhizomes, etc.) inside the plant. This phenomenon pairs very well with how systemic herbicides need to move within the plant to be effective. Put another way, again in very simplified terms, fall applications of systemic herbicides to perennial plants build on the plants’ natural processes associated with transitioning to winter dormancy and provide the herbicide with excellent access and opportunity to affect the plant.
While fall can be an excellent time to control perennial vegetation, taking advantage of this opportunity does require some additional attention to detail, as compared to mid-summer herbicide applications. For herbicides to work properly the chemical must be able to enter the plant and the plant must then be able to move herbicide though its xylem and phloem cells.
- In the fall it is not uncommon for it to become very dry. Drought stress can impede both necessary processes described above. Fall herbicide applications only work when adequate moisture is available.
–
- Foliar herbicides, like glyphosate, must enter a plant through a functional green leaf. At some point in the fall, the leaves of deciduous plants lose their functionality and thus their ability to convey herbicide to the rest of the plant. Chinese Tallow (popcorn tree) comes to mind here – if the leaves have changed color, they have been cut off from the rest of the plant making them useless for receiving herbicide.
–
- Cold temperatures (particularly below freezing) can cause plants to go dormant. Dormant plants do not circulate herbicide effectively. Plants vary greatly as to what temperature induces dormancy and how quickly they regain functionality after temperatures increase. When controlling perennial grasses, it is generally recommended to make fall applications before first frost and the browning of leaves that closely follows. For plants that retain green leaves after frost (privet, for example), make sure temperatures are well above freezing at the time of herbicide application.
NOW is the time to treat cogongrass – fall, with good soil moisture. Don’t miss this ideal window for herbicide application.
Photo Credit: Mark Mauldin
–
Specific Vegetation Management Practices to Consider this Fall
- Kill Cogongrass. Almost every year, about this time I write an article reminding folks that now is the best time of year to kill cogongrass. I won’t rewrite the article this year, I’ll just include links to previous iterations – see below. Cogongrass is bad, if it’s on your property kill it now. In my opinion, it is the most troublesome weed we have here in Northwest Florida. It is very difficult to control; so, you need to do everything you can to improve your chances of success. Spraying in the fall (not mid-summer) really helps.
–
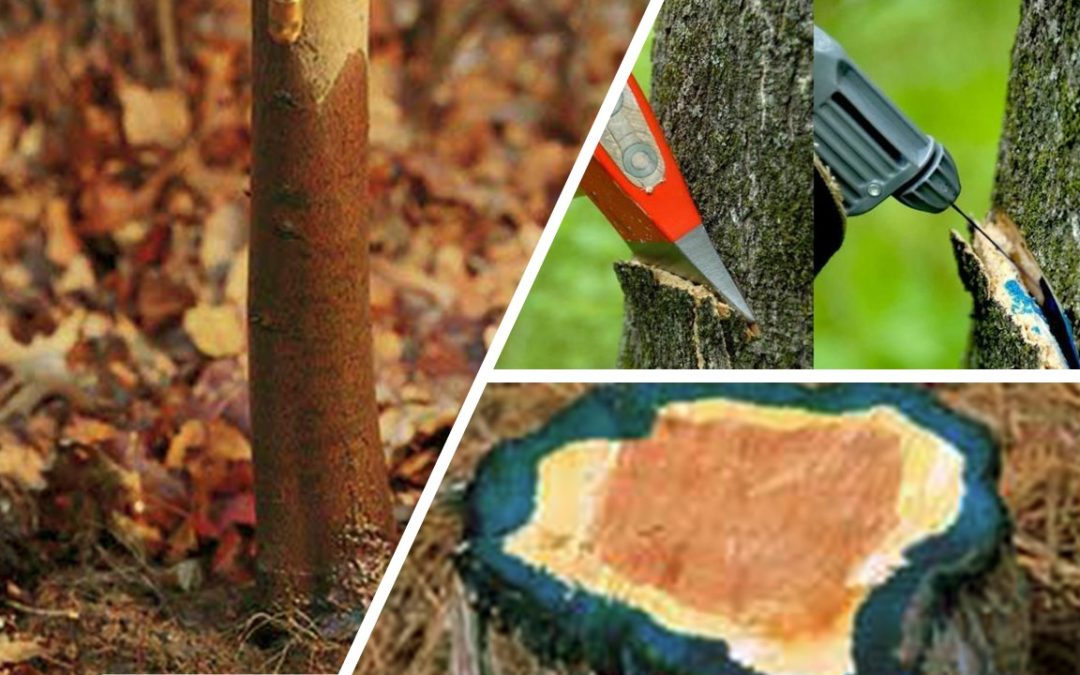
- Control Trees and Brush. Fall and winter are excellent times of year to employ several different methods which allow you to apply herbicide directly to induvial woody plants with relatively little risk to surrounding desirable vegetation. While very effective, all these individual plant techniques are quite labor intensive, making the cooler temperatures associated with the fall perhaps more important to the applicator than the plant physiology and herbicide efficacy discussed earlier. Use these links to access videos that discuss each technique in detail.
–
Foliar applications (to the leaves) of herbicide to small trees and woody brush can be very effective in the fall, for the reasons mentioned earlier and provided all of the caveats mentioned earlier are accounted for. That said, foliar applications have their limitations and generally shouldn’t be used on trees over 8ft tall. Foliar applications also generally carry more risk of damage to surrounding desirable vegetation. All that said, there are times when there is no surrounding desirable vegetation – think about doing site prep for a silviculture planting or clearing an opening for a wildlife food plot planting. In these kinds of situations fall timed, broadcast, foliar applications of systemic herbicides can be highly effective.
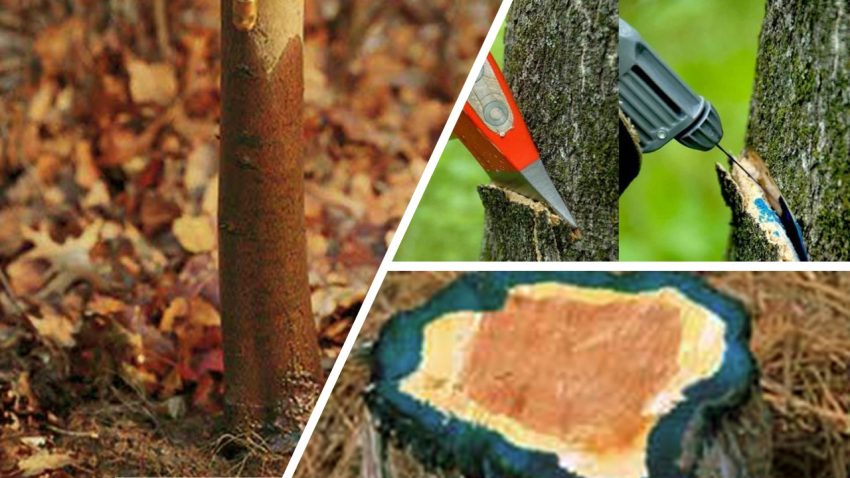
During the fall and winter trees and woody brush can be controlled via a variety of highly selective techniques, including basal bark, hack-and-squirt, and cut stump treatments. Image Credit: IFAS CAIP
–
- Mow??? I very infrequently recommend mowing for weed control but if weeds have not already made seed (many already have), fall mowing can clean up open spaces while helping to lessen the seed bank available for next year’s crop of weeds. Granted, mowing is great for quick aesthetic benefit, but it must be timed correctly to provide any long term, meaningful vegetation management. Most perennial plants can and will recover after being mowed, so mowing them after they have made seed provides little lasting benefit. Along the same lines, annual plants naturally die after making seed making timing very important to providing any meaningful weed management.
–
Fall is always a busy time year, but between tailgate parties and trips to the pumpkin patch be sure to take advantage of the opportunities the season provides for the highly effective management of some otherwise very hard to control vegetation. If you have any questions or would like to discuss any of these concepts in more detail, please don’t hesitate to reach out to me directly at mdm83@ufl.edu or 850-638-6180.

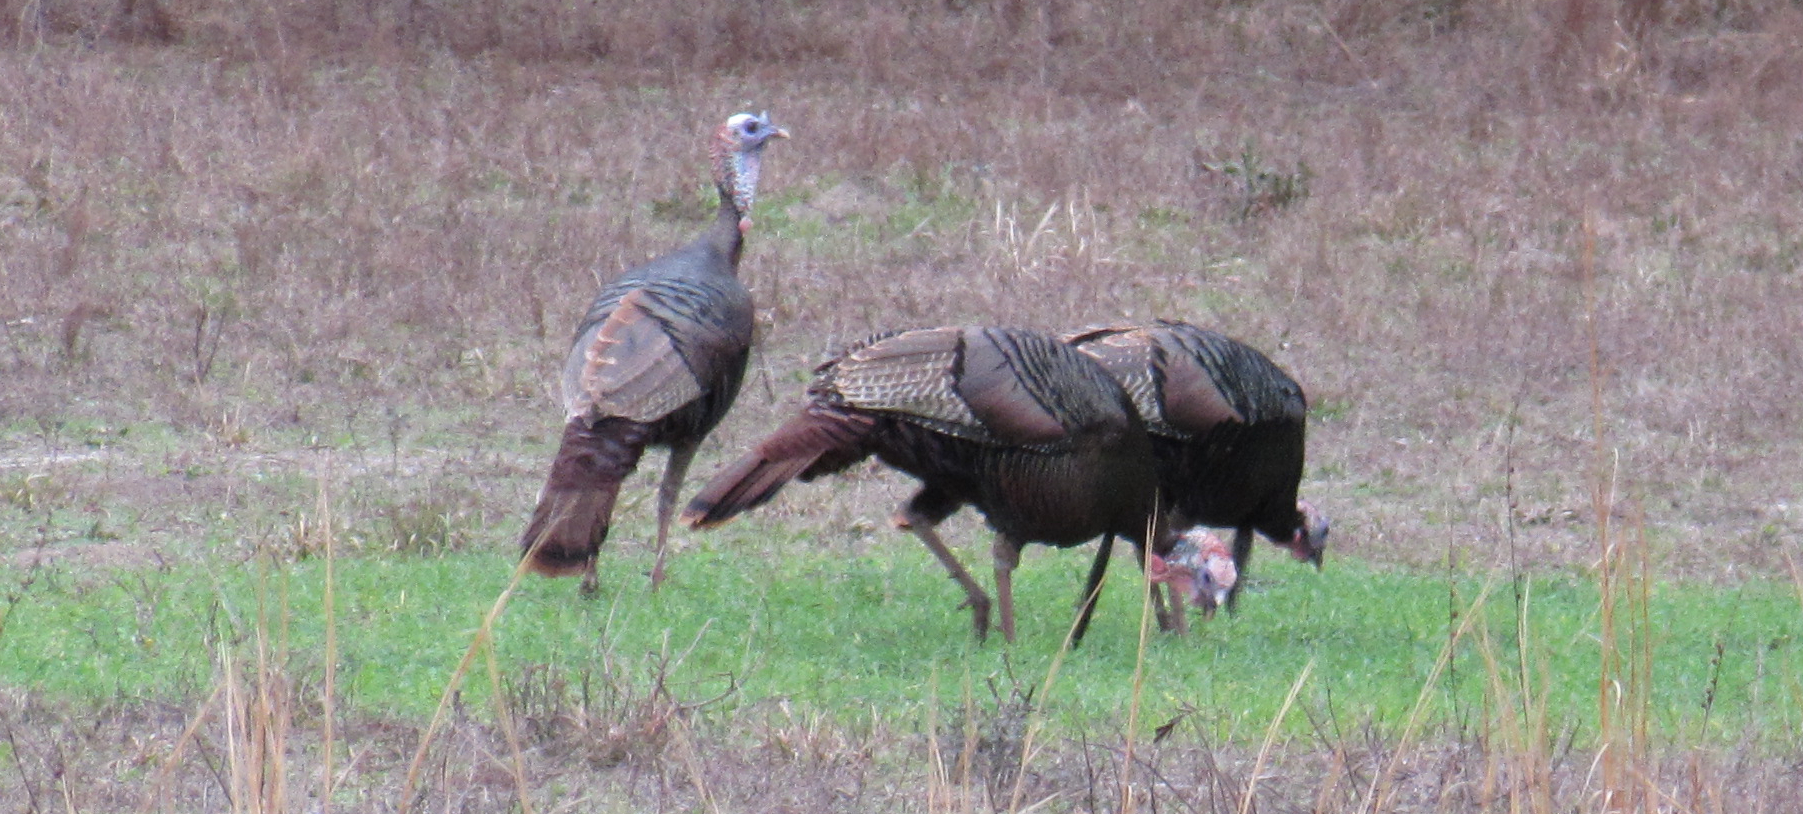
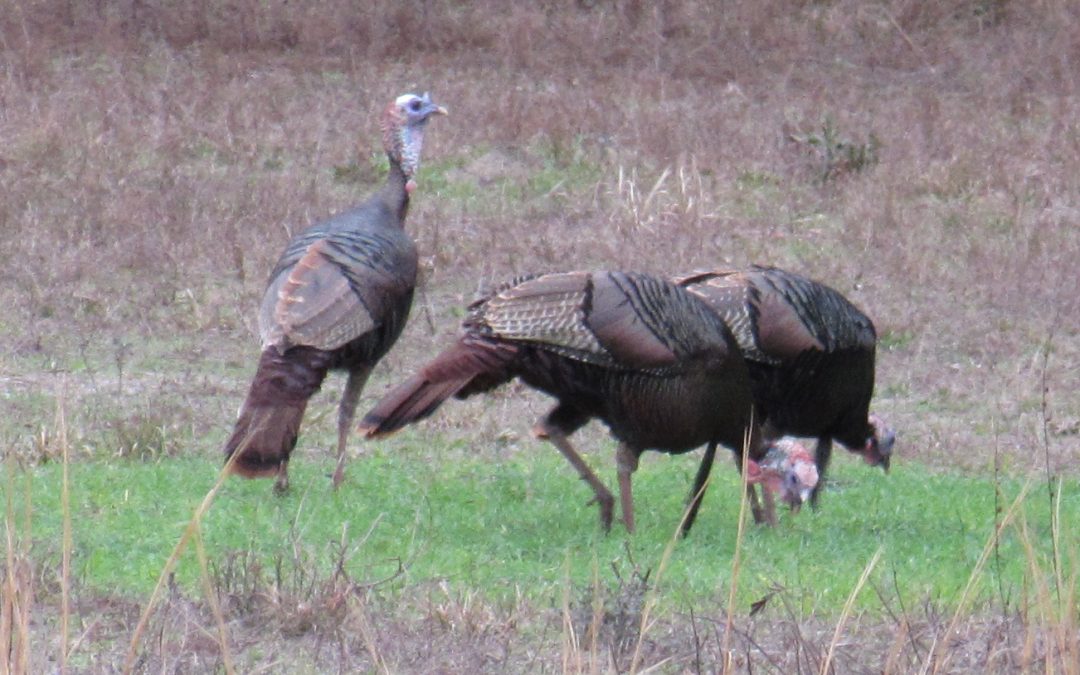
by Carolina Baruzzi | Sep 15, 2025
As Thanksgiving approaches, many people begin thinking about turkeys – and it’s hard not to, given how often they appear in seasonal displays, menus, and media. This cultural centerpiece has been a prominent part of Thanksgiving tradition for centuries. If you’re more interested in the wild side of things, you might be curious about how to manage wild turkey populations in the field.
In general, wild turkeys need a range of forested and open habitat. They typically thrive in a mix of open forests, but require areas with diverse vegetation structure for different life stages. For example, adult turkeys have a broad diet that includes soft mast (e.g., berries), insects, and other plant material. These food sources are more abundant in open areas where sunlight can penetrate the canopy and reach the forest floor. Hard mast (e.g., acorns) also makes up an important part of their diet, especially in the fall. As a result, areas with masting trees are particularly valuable, not only for foraging but also because these trees often serve as important roosting sites. Hens prefer nesting cover that tends to be denser, providing protection from predators. These nesting areas are tall enough to conceal the nest and hen, but low enough to allow her to scan for predators. In contrast, young chicks (poults) rely on more open areas with sparse vegetation and exposed ground so they can move quickly and easily and forage for insects. Because they’re small and can’t move very well in thick cover, open space is essential during their first few weeks. Around two weeks old, poults begin roosting in trees, so access to suitable trees also becomes important. In general, maintaining quality turkey habitat requires active management. Without it, vegetation can become overgrown, forests can become too dense, and the habitat quality quickly declines. Prescribed fire is one tool often used to manage and reset habitat conditions. For instance, poult rearing habitat is usually very high quality within one year since prescribed fire is applied, while nesting habitat quality usually peaks between one to three years after a prescribed burn, depending on site characteristics.
If you want to learn more about managing wild turkey habitat, consider enrolling in the online turkey habitat management training program. Led by the UF/IFAS Game Lab and the Wildlife Ecology and Land Management Lab and this program will lead you through field, forest, and grassland management strategies for wild turkeys and more (https://tinyurl.com/WildTurkeyManager).
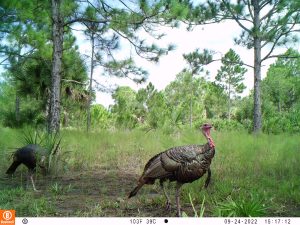
Wild turkeys in pine lands. Photo credit: UF/IFAS Wildlife Ecology and Land Management Lab
by Jennifer Bearden | Jan 31, 2025
Before you know it spring turkey season will be upon us and now is the time to start planning a killer turkey food plot. Establishing a great food plot takes more than just planting seeds. It takes planning and preparation prior to planting those seeds. The prime turkey food plot is chufas. Chufas are yellow nutsedges that turkeys absolutely love.
The first step is finding a good spot. A 20ft x 20ft spot with no trees and ample sunlight will work well. You can select a larger spot but that increases the cost of planting. Chufas prefer full sunlight so make sure the area gets 6-8 hours of sunlight per day.
Next step is to take a soil sample from the area. Here’s a video demonstrating how to properly take a soil sample. When you get your soil sample results back, you will want to adjust the pH as necessary. Perform this task well ahead of planting to give the lime time to raise the pH. Chufas grow best with the soil pH between 6.0-7.0.
Now other animals love chufas too, like hogs and rabbits. I wouldn’t plant chufas if you know you have a large population of rabbits or you have a feral hog problem. Reduce those populations before planting chufas.
Other options include plants such as brown top millet and buckwheat. Turkeys love tender young shoots. You can plant these in March ahead of spring turkey season. These plots also will attract insects which the turkeys feed on.
Now we get to the fun part – planting. Chufas can be planted anytime between April and July. They germinate quickly once soil temperatures are above 65º F.. You can plow the area or use a herbicide like glyphosate to kill existing vegetation. For chufas, you can use a pre-emergent herbicide like trifluralin or pendimethalin to help suppress weeds during the growing season.
| Plant |
Broadcast Seeding Rate |
| Chufas |
40-50lb/acre |
| Brown top millet |
20-25lb/acre |
| Buckwheat |
50- 55lb/acre |
I find that packing the soil after broadcasting the seed, either by driving over it or by using a cultipacker, helps with germination as the seeds flourish with a firm seed bed.
Next, fertilize according to your soil test results and enjoy a great spring turkey season.