by Larry Williams | Jun 10, 2017
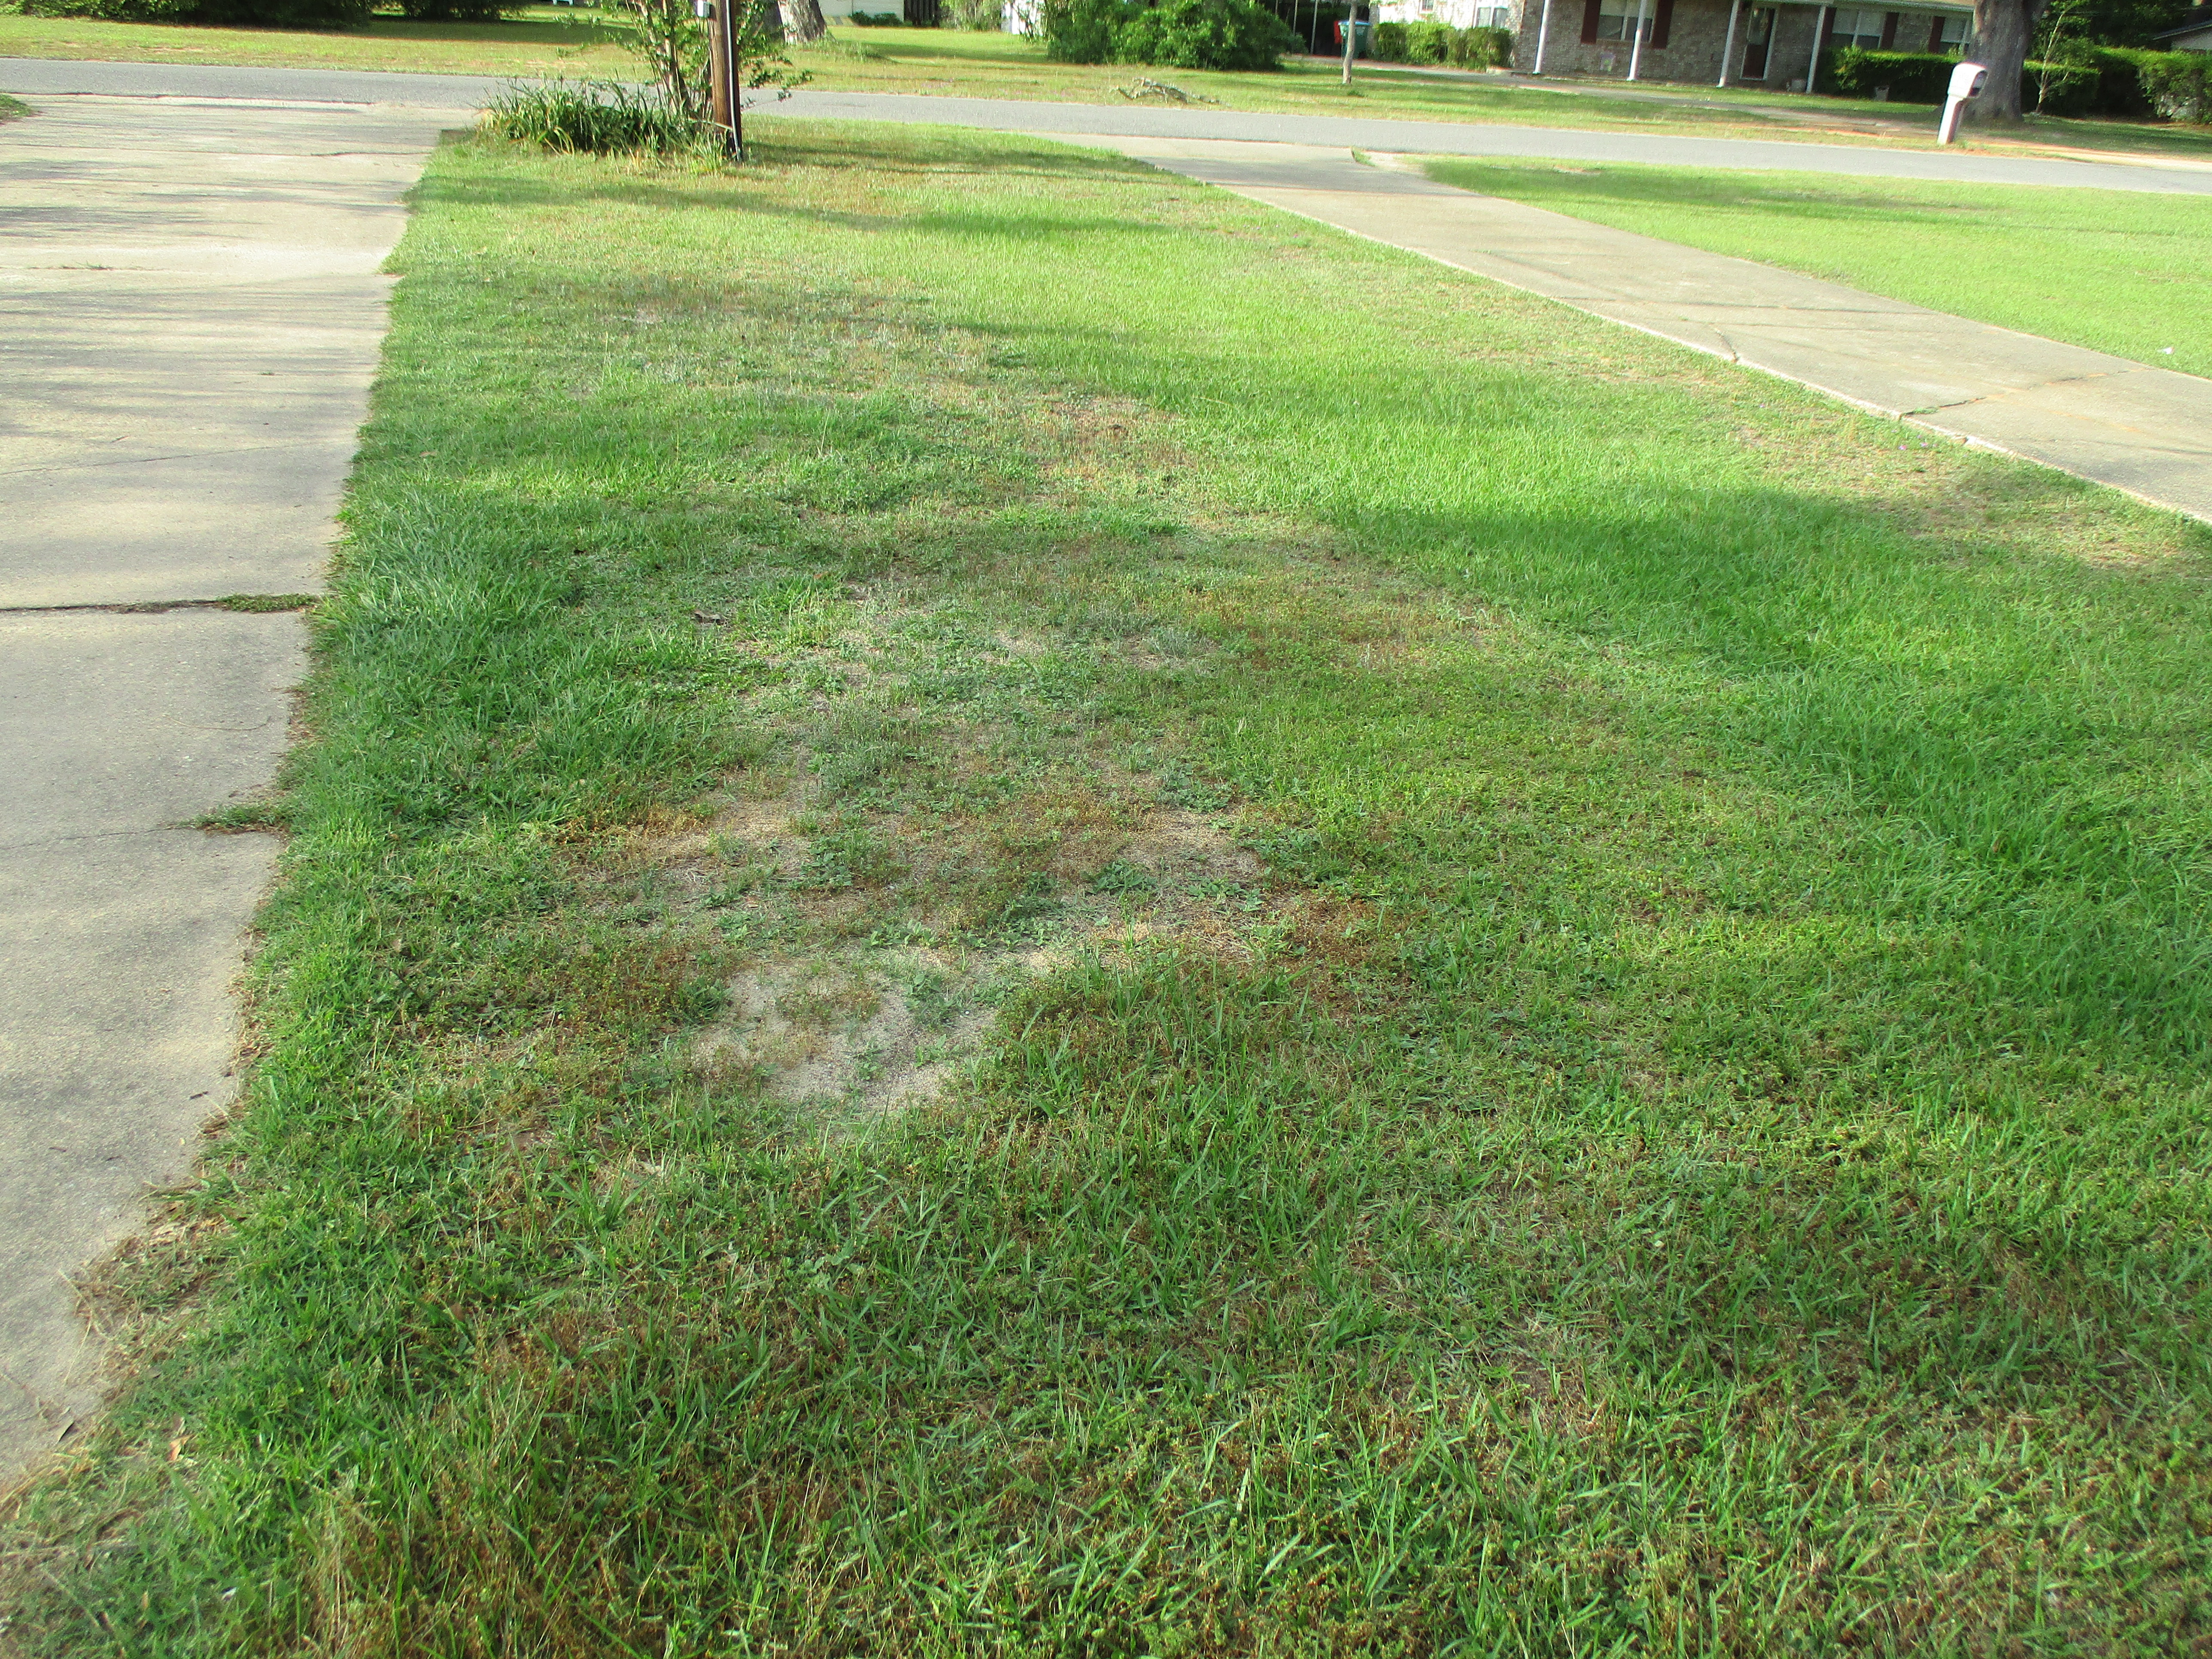
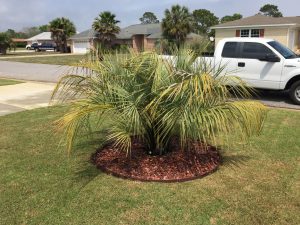
Typical ground pearl damage to lawn. Photo Credit: Larry Williams
There are numerous reasons why maintaining a North Florida lawn is challenging and ultimately frustrating.
One such reason is ground pearls.
Ground pearls, small-scale insects that bother turfgrass roots, are soil dwelling pests that are not much of a problem in northern lawns. But they are quite the problem in North Florida lawns.
Most people, having never heard of ground pearls, may blame weeds, mole crickets and a multitude of other possible causes for their lawn’s demise. But in the last two to three years, this insect seems to have become more of a problem in many of our lawns, including mine.
Unfortunately, there is no effective chemical control for ground pearls in lawns.
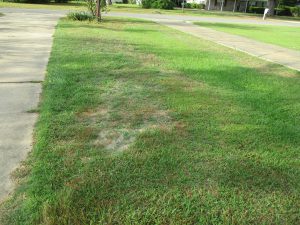
Ground pearls feed on roots of bermudagrass, bahiagrass, St. Augustinegrass and zoysiagrass but prefer centipedegrass. They suck juices from the roots. Their feeding eventually causes areas of the lawn to thin and die out to bare ground, especially when the grass is under stress due to drought, nutritional deficiencies, etc.

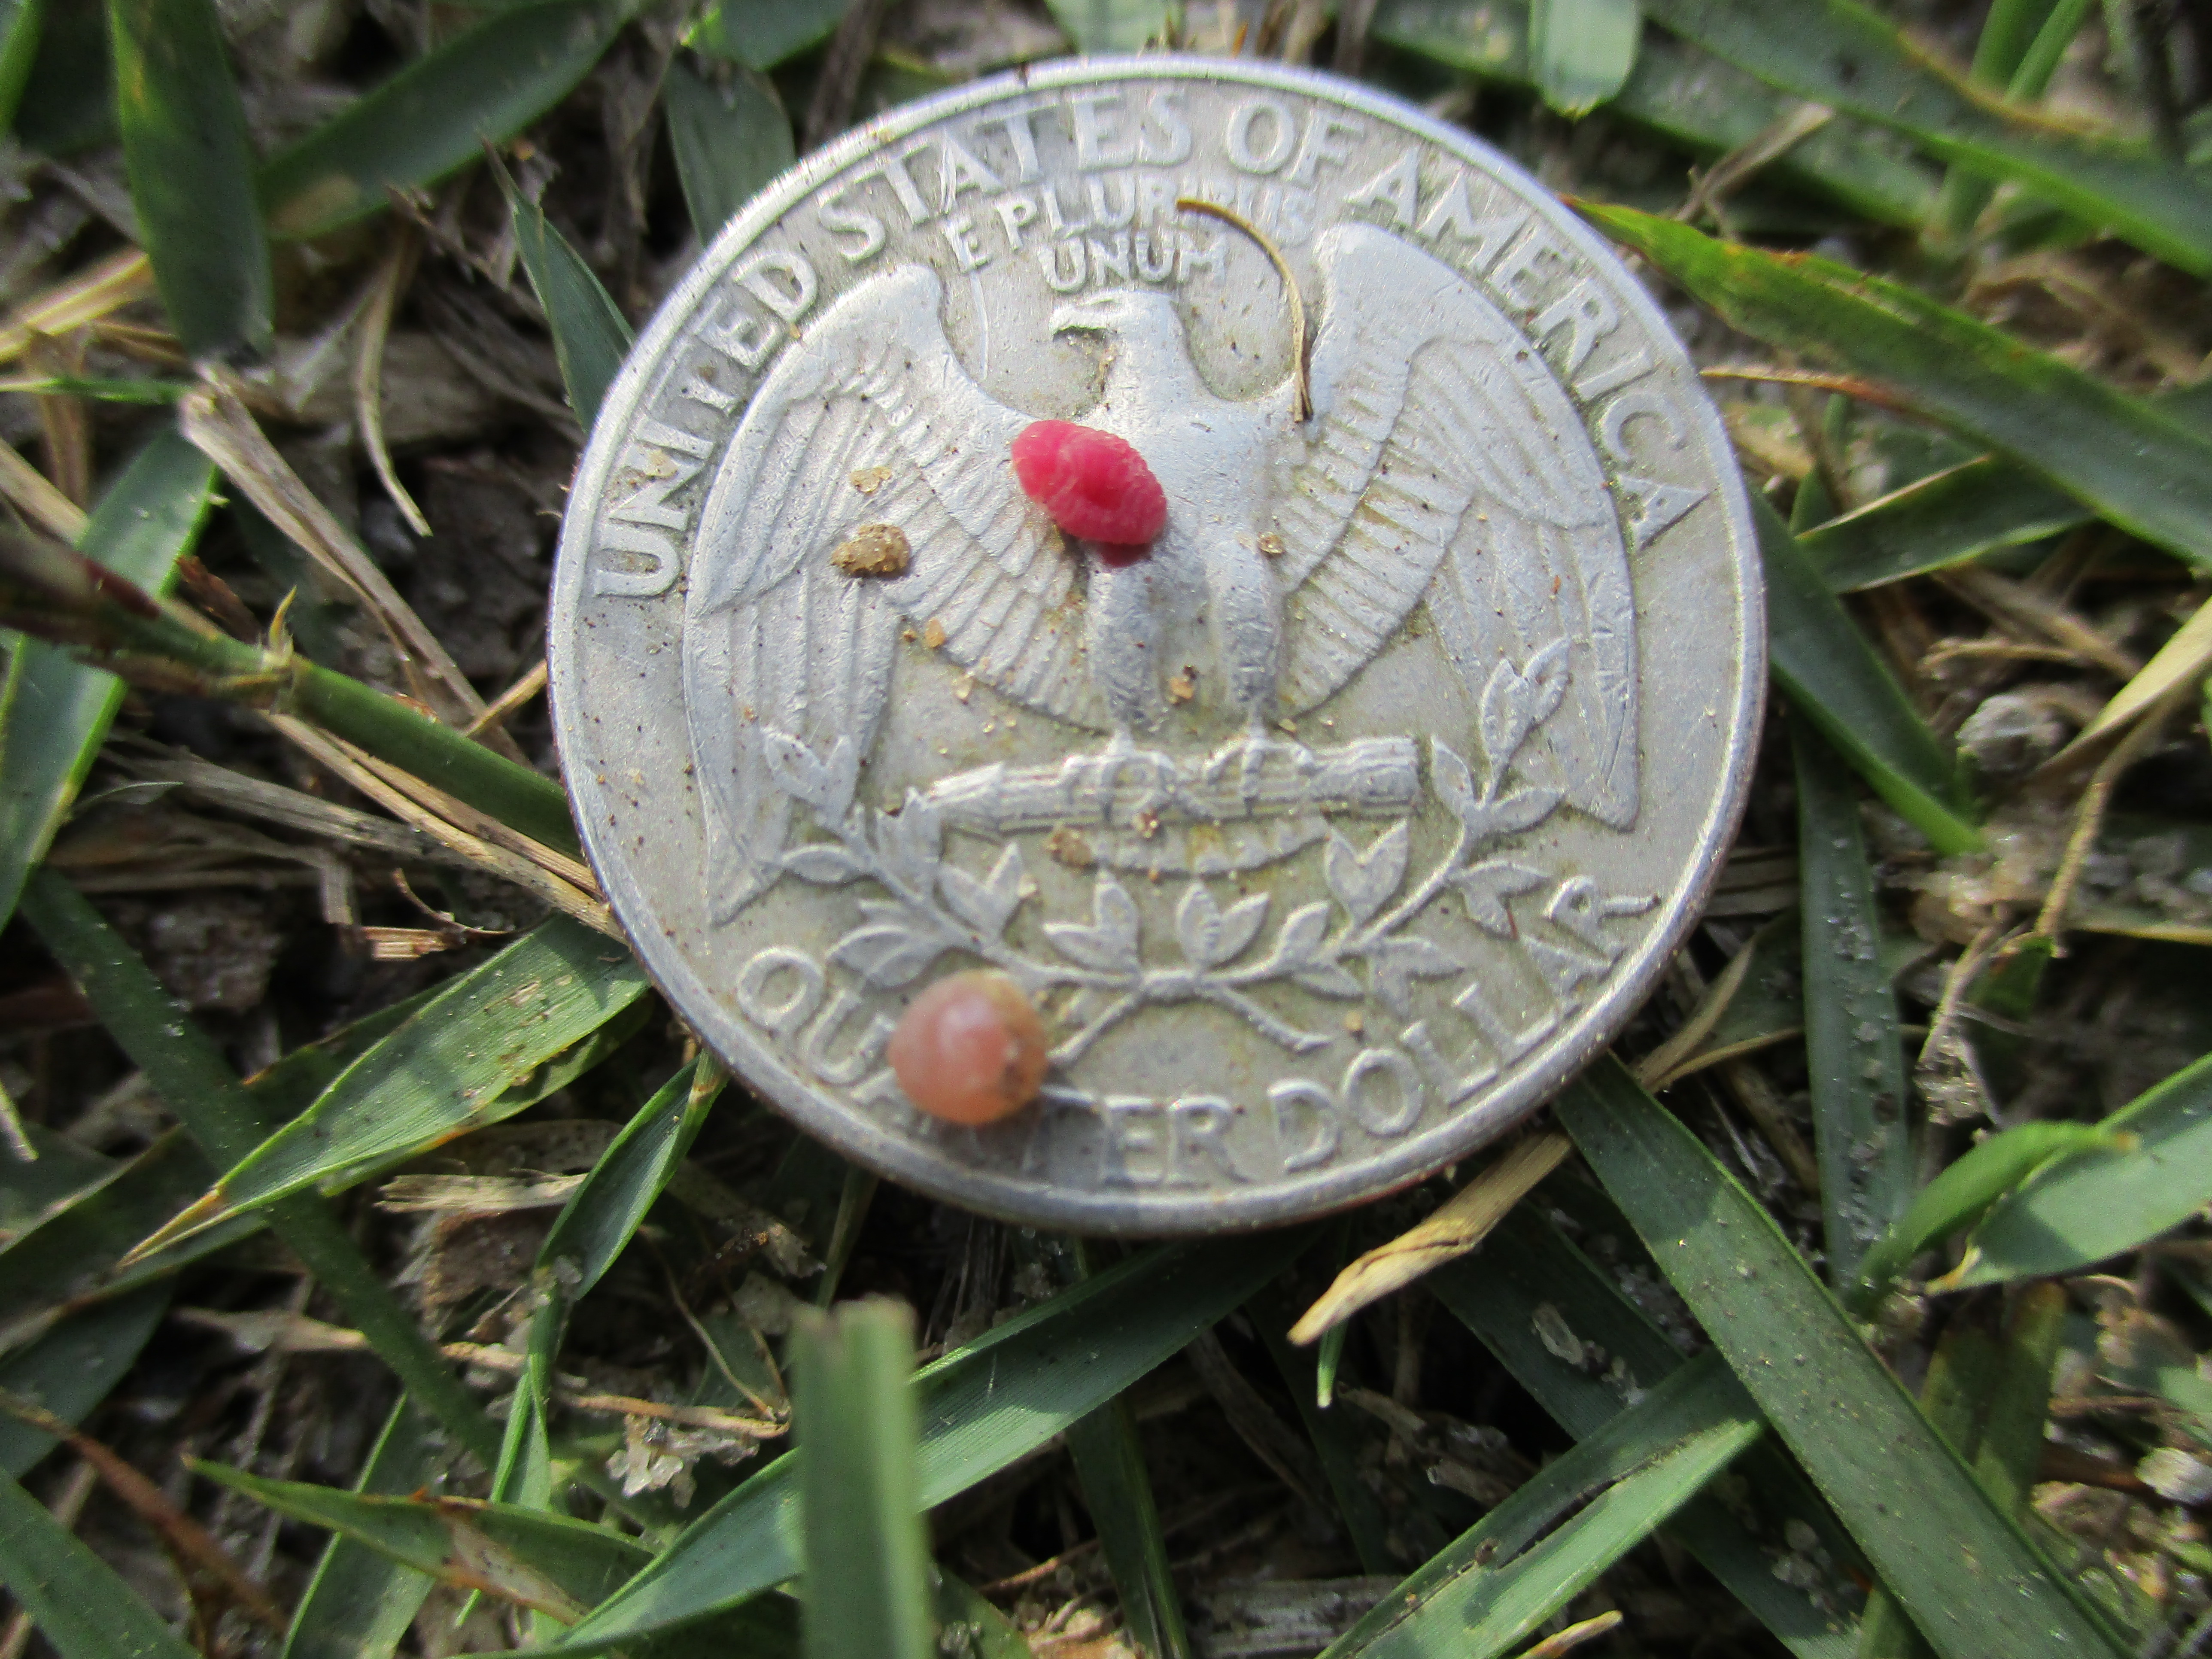
Reddish adult female ground pearl & immature “pearl” stage. Photo credit: Larry Williams
Many times, the dying areas are somewhat circular or serpentine in pattern. Sometimes the circular areas coalesce, forming larger, irregular shaped dying areas. Weeds tend to invade infested areas.
The quote below, taken from a UF/IFAS Extension publication on this insect, provides some insight into their life cycle. “Clusters of pinkish-white eggs, covered in a white waxy sac, are laid in the soil from March to June. Tiny crawlers attach to roots and cover themselves with a hard, yellowish to purple, globular shell. These “pearls” range in size from a grain of sand to about 1/16 inch. They may occur as deep as 10 inches in the soil. The adult female is 1/16 inch long, pink in color, with well-developed forelegs and claws. Adult males are rare, tiny, gnat-like insects. One generation may last from 1 to 2 years.”
It is the immature stage (nymphs), which look somewhat like tiny pearls from which they get the “ground pearl” name. In this stage, they look like tiny shiny pearls once they are uncovered and exposed to sunlight. They are less than a BB in size. They overwinter in the “pearl” stage.
The ineffectiveness of insecticides is at least partly due to the ground pearl’s ability to avoid insecticides because of being protected in the soil and because of the prolonged protective “pearl” stage of its life cycle.
Since there are currently no biological or chemical controls that work, it’s recommended to minimize lawn stress and maintain proper fertilization and irrigation to help grass tolerate the damage.
Additional information on ground pearls is available at the following UF/IFAS Extension publication “Ground Pearls”.
by Beth Bolles | Jun 10, 2017
It is common in Northwest Florida for palms to show signs of nutrient deficiencies. In general our sandy soil is often nutrient poor and available nutrients can easily move out of soils with frequent rainfall. In landscapes where fertilization is occurring, often the wrong types of fertilizer are applied. Fertilizer miss-application actually increases nutrient problems for the palm.
Palms can be deficient in many nutrients but the most common deficiencies we see in landscapes are from inadequate amounts potassium and magnesium. The simple solution would be to purchase a fertilizer labeled for palms to correct the problem. The difficulty is that most easily available fertilizers for palms do not have the correct form of nutrients that are required for the problems. With the exception of nitrogen, all other nutrients are in a quick release form so while the slow release nitrogen lasts for 2-3 months, all other nutrients have been used up. In response, the palm is encouraged to grow by the nitrogen but does not have enough of the other critical nutrients to carry out vital plant functions. What we see is often older leaves that are yellowing, browning, and die off before they should because the plant is pulling any available potassium and magnesium from old fronds to support new growth. Without the application of proper nutrients to the soil, the deficiency can continue until even new fronds are affected or the palm dies.
The fertilizer used for lawns does not have all the slow release and correct forms of nutrients for the palms. Older leaves turn yellow and brown indicating potassium deficiency. Photo by Beth Bolles, UF IFAS Extension Escambia County.
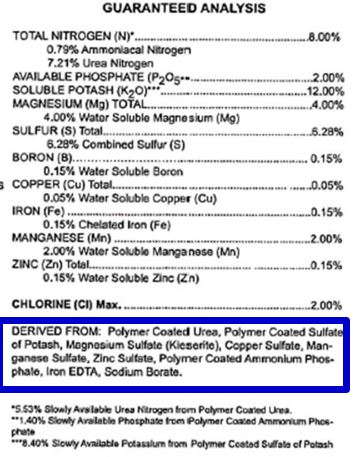
There is a solution that will help keep your palms healthy and attractive. Make sure you choose a specially designed fertilizer that has all nutrients in slow release form. Look for an analysis such as 8-2-12-4 (Nitrogen-Phosphorus-Potassium-Magnesium). Also read further on the label for Polymer Coated Sulfate of Potash, Magnesium Sulfate (Kieserite), and Chelate (Iron EDTA). These are the forms of nutrients that will be beneficial to your palms.

Look in the area ‘Derived From’ (outlined in blue) on your fertilizer label to find the forms of nutrients. Photo by Dr. Monica Elliott, US/IFAS Extension.
If you have a mixed landscape where the palms are planted in the lawn, be sure to keep all lawn fertilizers out of the root zone of the palms. Lawn fertilizers do not have the correct forms of nutrients for palms. Remember also that palms roots extend many feet beyond the palm canopy so your ‘no lawn fertilizer zone’ may be past the mulch ring.
The recommendation from the University of Florida is 1.5 pounds of fertilizer over a 100 square foot area. Broadcast this on top of the ground and lightly water after application. In North Florida, you will likely apply the correct palm fertilizer about at least two times in May and end of August or 1st of September. If you are not able to use a palm fertilizer with the correct form of slow release nutrients, it is best not to fertilize palms at all.
by Molly Jameson | Jun 10, 2017
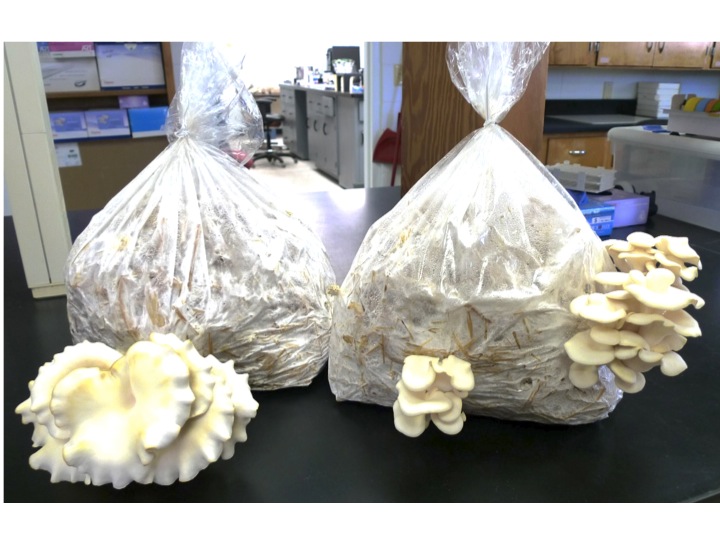
Following basic instructions, grow oyster mushrooms using sterilized straw, a plastic bag, oyster mushroom spawn, and water. Photo by Sunny Liao.
Oyster mushrooms (Pleurotus ostreatus) – which have nothing to do with oysters besides their similar shape – are some of the most delicate, subtlety flavored, and easiest to prepare mushrooms of the culinary world.
They can easily be fried, stir-fried, or braised within a matter of minutes in broths, vinegar, wines, and sauces; or added to soups, stuffed, or mixed with chopped garlic. Other mushrooms, such as shiitake, are sturdier and impart a meatier flavor and texture to a dish. Oyster mushrooms, especially those lighter in color, pair well with seafood or a white meat. Highly perishable, you will want to freeze oyster mushrooms after sautéing with butter or oil to preserve, or dehydrate them to enjoy at a later date.
In addition to being an easy mushroom to prepare, oyster mushrooms are a great source of fiber, protein, and many vitamins and minerals, as well as an excellent source of the antioxidant ergothioneine.
Oyster mushrooms can come in many shades, from cream-colored, to gray, golden, tan, and brown. Their white colored gills, when present, extend from beneath the cap down to their very short stems. They are often described as smelling slightly like licorice and can grow up to about nine inches, but are best consumed young when tender and mild.
Oyster mushrooms grow in many subtropical and temperate environments, commonly found in nature growing in layers, decomposing the wood of dying hardwood trees. This decomposition benefits the ecosystem, as the mushrooms return nutrients and minerals back into the soil.
Interestingly, oyster mushrooms are one of the few known carnivorous mushrooms. The mycelia of the fungi can consume and digest nematodes, which is how it is thought the oyster mushrooms acquire nitrogen.
Arguably one of the best qualities of oyster mushrooms are the ease to which they can be cultivated at home. Using sterilized straw, a plastic bag, oyster mushroom spawn, water, and following basic instructions, oyster mushroom can be produced in as little as two weeks!
You can learn all about oyster mushroom production on the Penn State Extension page: Cultivation of Oyster Mushrooms (http://extension.psu.edu/plants/vegetable-fruit/mushrooms/publications/guides/cultivation-of-oyster-mushrooms).
Once you have the materials gathered, follow this guide, developed by UF/IFAS Suwannee County Extension, to prepare oyster mushrooms bags at home: Preparation of Oyster Mushroom Bags (http://suwannee.ifas.ufl.edu/documents/PREPARATIONOFOYSTERMUSHROOMBAGS.2012.pdf).
As well as being healthy and delicious, oyster mushroom cultivation is fun, and just needs a small amount of space and effort!
by Matt Lollar | Jun 2, 2017
The Jackson County Master Gardeners are hosting a Mead Making Workshop on Saturday, June 17 at the Jackson County Agricultural Center Classroom, 2741 Penn Avenue, Marianna, FL. Registration opens at 8:30 AM (Central Time) and the event will end at 2:00 PM.
Mead is an alcoholic beverage made from fermenting honey. Mead is described in various writings from Aristotle, Pliny the Elder, and in the epic poem Beowulf. This workshop will teach you everything you need to know in order to make your own mead at home! You will go home with a small carboy, airlock, honey, and yeast.

The registration fee is $35.00 and covers lunch and all materials and equipment to make your own mead. The workshop is limited to 24 participants. For more information, please see the Mead Making Workshop Flyer. You can pay at the door, but we do ask that you call the Jackson County Extension Office to RSVP at: 850-482-9620 or email mlollar@ufl.edu.