by Gary Knox | Nov 6, 2017
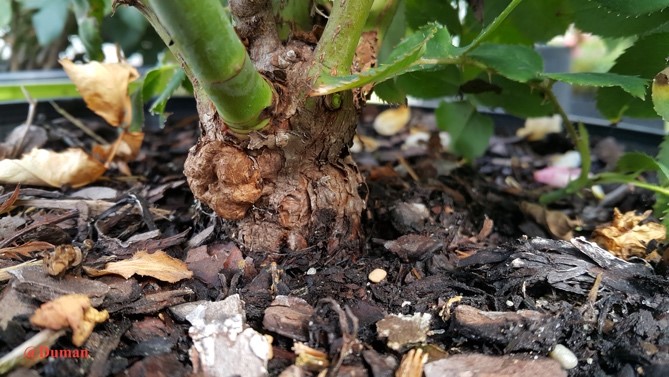
Crown gall symptoms on roses caused by the bacterium Agrobacterium tumefaciens (Rhizobium radiobacter) – Photo credits: Kamil Duman

A plant with a mature gall that is potentially releasing the crown gall bacterium into the potting media. Photo credits: Susannah Wright
For gardeners, rose enthusiasts and rosarians, each of the many rose diseases is as important as the others. But we can say for sure Crown Gall is one of the most unsightly of the many rose diseases that can been seen currently.
The disease got this name from the large tumor-like swellings (galls) that typically occur at the crown of the plant, just above the soil level. The cause of crown gall disease is a bacterium that resides in the soil, Agrobacterium tumefaciens (updated scientific name Rhizobium radiobacter).
SYMPTOMS
Galls or overgrowth (1/4 inch to several inches in diameter) of host plant tissue typically form at the soil line but also can form on branches or roots. Galls are initially white, spherical, and soft but darken with age as outer cells die. It can either be almost entirely on the surface of the plant and easily detached or can be almost indistinguishable from normal plant tissue except for its greatly enlarged appearance.
The bacterium that causes Crown Gall disease survives and persists in the soil for up to 3 years. It can invade recent wounds on the branches or roots. Swelling can be seen as early as 14 days following entry of the bacterium into the plant. The tissue near the gall can be crushed due to rapid cell enlargement. If vascular tissue is crushed, wilting can result from the restricted water movement.
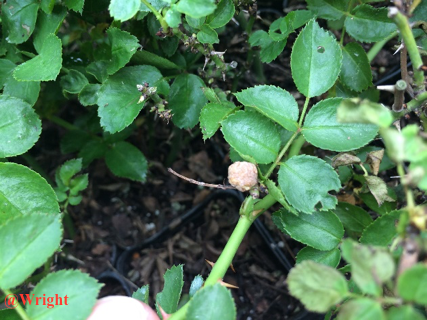
Early stage symptom of Crown Gall on roses can be noticed as the small white galls. Photo credits: Susannah Wright
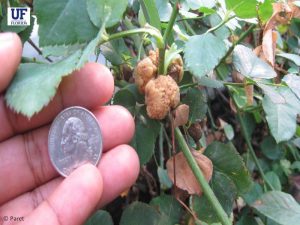
The galls can enlarge to a quarter size in a short period of time from the initial small galls. Photo credits: Mathews Paret
ABOUT THE BACTERIUM
Agrobacterium uses its genes as a weapon to attack plants. It enters the plant mostly from the soil through wounds on the roots or lower stem or from the branches during plant pruning. Symptoms are caused by the insertion of a small segment of DNA (known as the T-DNA), from a plasmid, into the host plant cell, which is incorporated into the plant genome. When the plasmid links up with the plants own DNA, the altered plant cells start dividing rapidly and uncontrollably, and the root or stem develops a tumor-like swelling.
Galls can range from pea size to softball size. Tiny cracks from freezing temperatures or wound sites can be the site of gall formation. Once the wound compounds are generated, the bacteria detach from the xylem cell walls and are carried upward with water during evapotranspiration to the wound site where they initiate galls. One of the common ways of the spread of the disease is by pruning infected plants and moving the bacterium accidentally while pruning nearby healthy plants.
The crown gall bacterium is a soil pathogen, which means main inoculum source is soil. The bacterium can overwinter in infested soils, where it can live as a saprophyte for several years. The bacterium can easily during field preparation, pruning and irrigation. Insects, nematodes and grafting materials, can also transfer the bacterium.
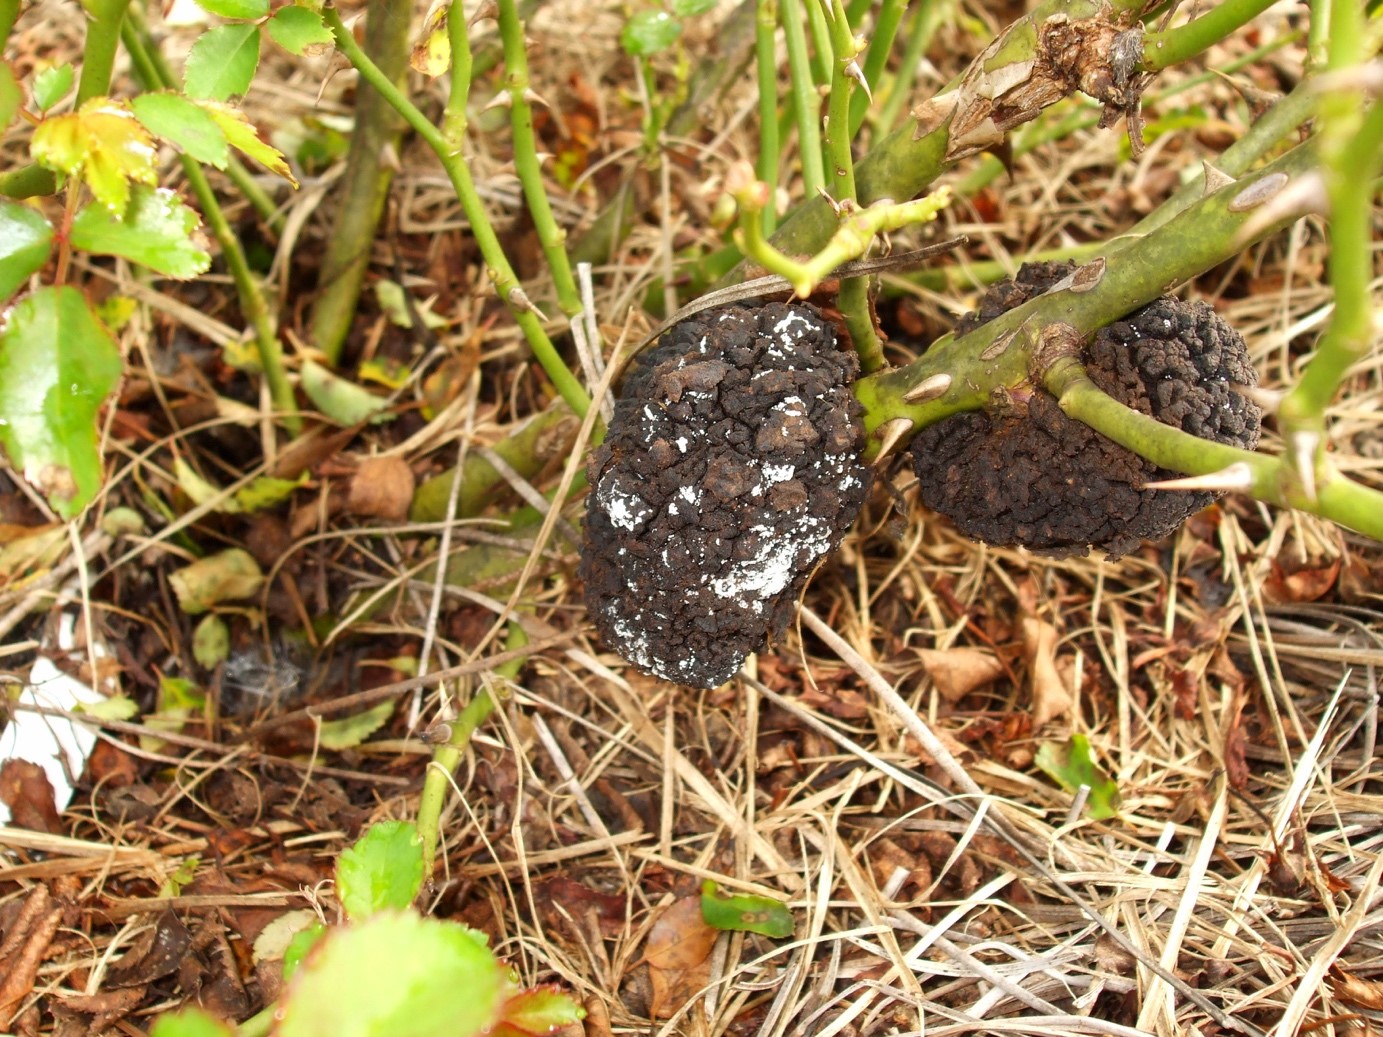
The galls will turn dark in color as they age. Photo credits: Kamil Duman
HOW CAN YOU MANAGE ROSE CROWN GALL DISEASE
- Plant only disease-free roses. Check very carefully before you buy plants for any kind of galls in the crown or branches. Use good sanitation practices in handling roses.
- Plant in clean soil. Avoid areas with a history of crown gall infestation.
- Avoid fields with heavy infestations of root-attacking insects and nematodes.
- Select well-drained soil and irrigate from clean water sources.
- Keep grafts and buds well above the soil line.
- Destroy diseased plants as soon as you notice them to avoid cross-contaminating other plants, or pruning equipment. Also, do not keep infected plants with healthy plants, as the likelihood of accidental transmission through pruning is high.
- Avoid mechanical injury to plants from tillage and hoeing. Provide winter protection so that the bark does not crack.
- Disinfect pruning tools between plants. disinfect budding/grafting tools before and after use. Bleach (10%; equivalent to 0.6% sodium hypochlorite), or quaternary ammonium-based sanitizer are effective as disinfectants. Make sure to prepare fresh stock routinely.
- If crown gall plants are noted, please let your local county extension agent know about it and they will be able to contact us for additional site-specific management plans if needed.

Gall formation at pruning sites indicating contamination of the plant during pruning. Photo credits: Kamil Duman
Authors: Kamil Duman, Susannah Wright, Fanny Iriarte, Barron Riddle, Gary Knox and Mathews Paret, University of Florida – NFREC, Quincy, FL

by Larry Williams | Nov 6, 2017
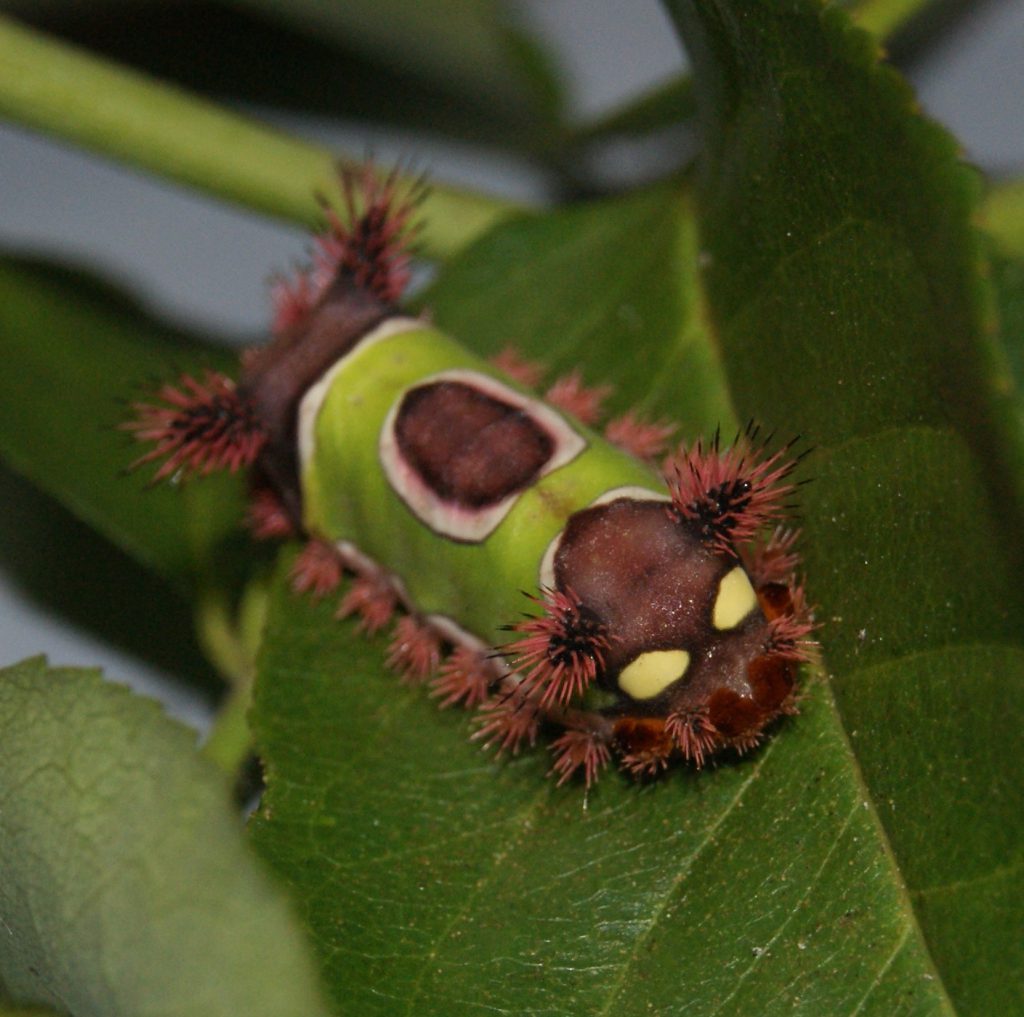
Saddleback Caterpillar. Image Credit: Matthew Orwat UF / IFAS
Did you know we have caterpillars that sting here in Northwest Florida? Well, we do and you’d be wise to learn about them and how to recognize them.
These caterpillars do not sting in the same way that a wasp or bee might sting. They do not have “stingers.” But they do have spines, also called nettling hairs, which are connected to poison glands that can inflict a painful reaction if touched.
The four nettling caterpillars that you are more likely to encounter in Florida are the hag caterpillar, Io moth caterpillar, puss caterpillar and saddleback caterpillar. Those that you are less likely to come in contact with include the buck moth caterpillar, flannel moth caterpillar, spiny oak-slug caterpillar and tussock moth caterpillar.
The “sting” is unintentional, not deliberate. When brushed against or touched, the toxin-bearing spines break off, releasing toxins. In some cases, broken spines pierce the skin. In other cases, toxins leak out onto the surface of the skin.
A University of Florida-IFAS Extension publication about these caterpillars states, “Some people experience severe reactions to the poison released by the spines and require medical attention. Others experience only an itching or burning sensation.”
The kind of reaction can depend on the type of caterpillar, extent of contact and susceptibility of individual. Fortunately, most of these caterpillars spend most of their time high up in trees away from us. But they can blow out of the trees during windy weather or come down still attached to branches and limbs that fall.
The saddleback caterpillar is more likely to be encountered because it feeds on many of our common landscape plants such as hibiscus and palms. But it is also known to feed on azaleas, fruit trees and even canna lilies. The saddleback caterpillar is striking in appearance with what looks like a bright green “blanket” draped over its back and a brown saddle-shaped oval area in the center of the blanket. Its spines are colorful, sharp and protrude from the front, back and sides of the caterpillar. It is stout and 1 to 1.5 inches long.
I’ve received questions about the puss caterpillar recently from people who have encountered it. This caterpillar is stout-bodied, almost 1 inch long and completely covered with gray to brown soft hairs. They seem to prefer leaves of oaks and citrus but they will feed on a variety of broadleaf trees and shrubs,
Because of their bright colors and interesting appearance, children may be tempted to touch or pick up some of these stinging caterpillars.
More information on these caterpillars is available at these websites:
http://edis.ifas.ufl.edu/pdffiles/IN/IN01400.pdf
http://www.poisoncentertampa.org/poison-topics/venomous-critters/caterpillars
by Carrie Stevenson | Nov 6, 2017
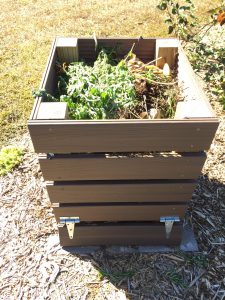
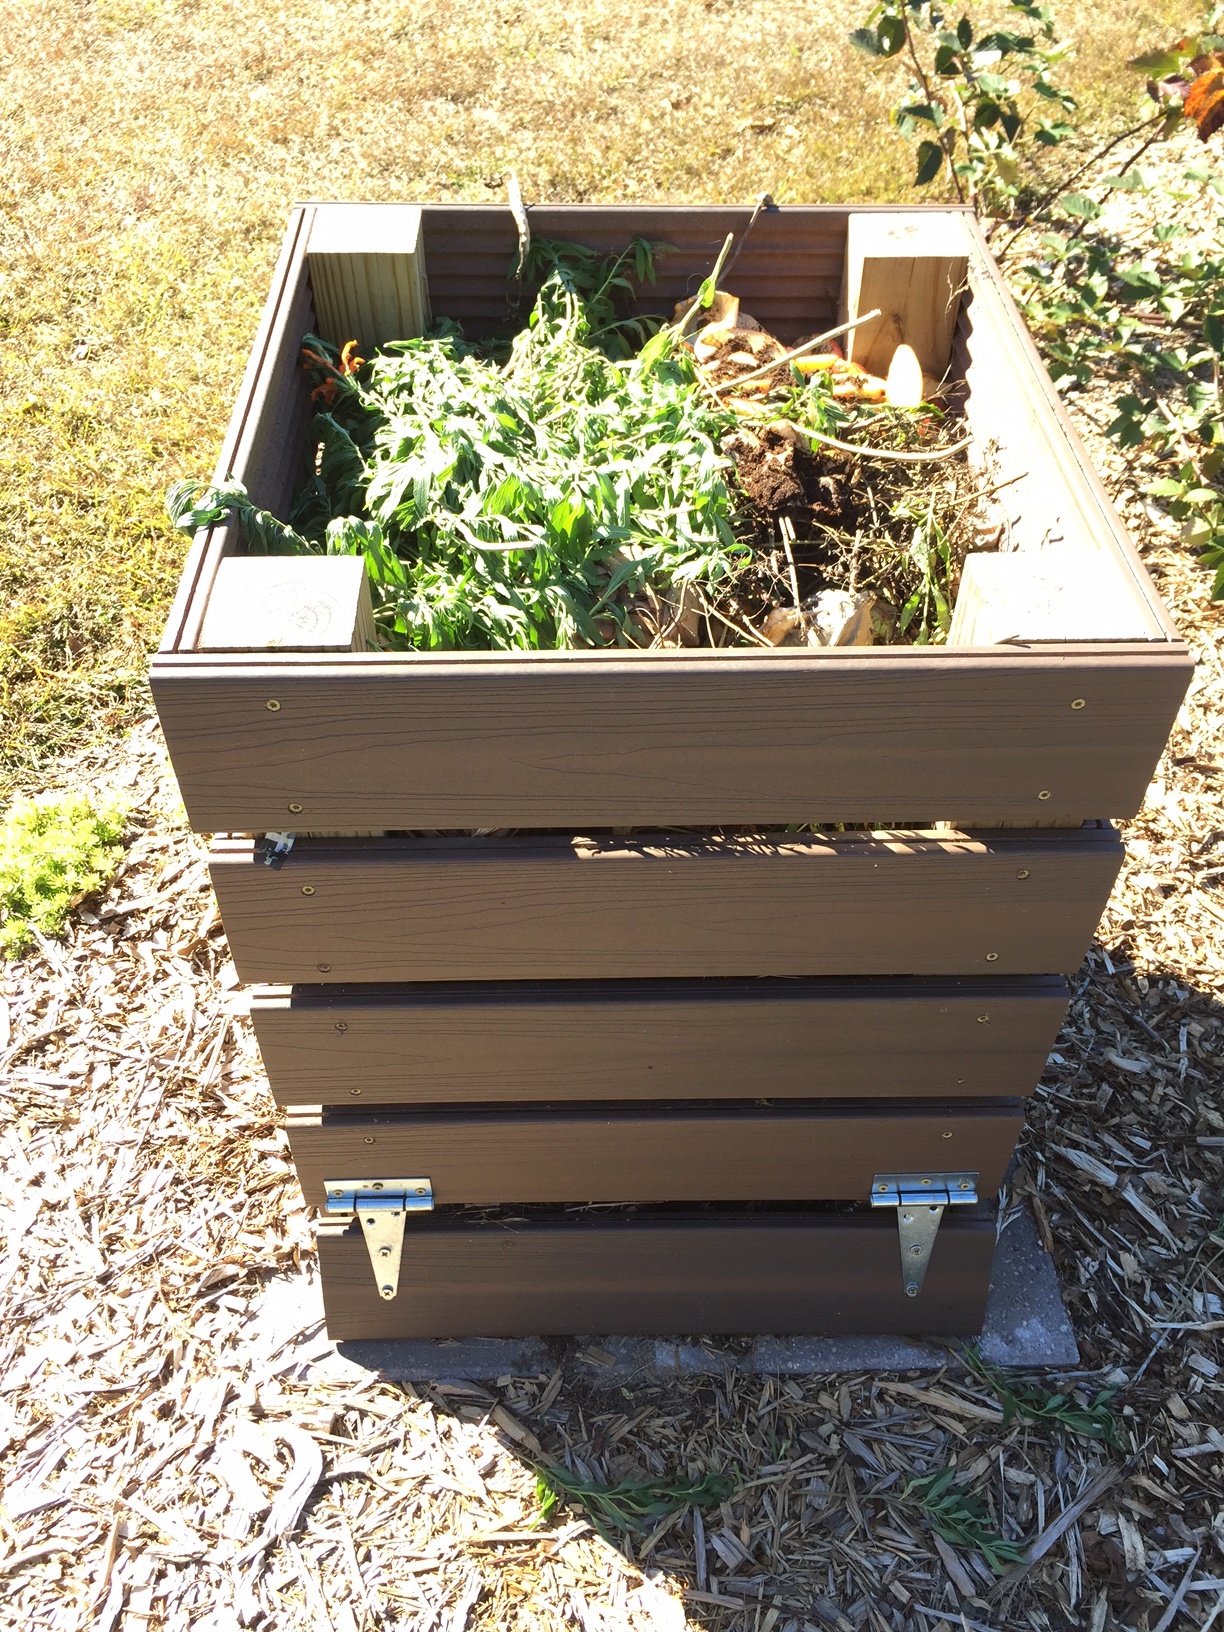
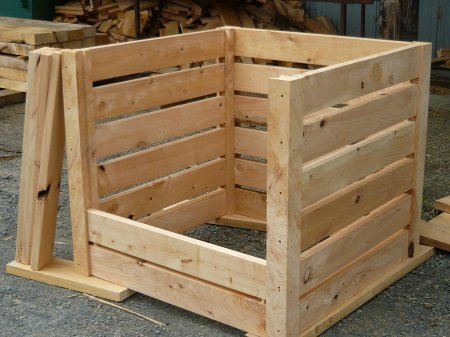
A wooden bin is easy to use for composting kitchen and yard waste. Photo credit: Carrie Stevenson
Fall is the time of year many of us spend countless hours raking leaves and pine straw, piling them up, watching kids jump into the piles (then re-raking!), and bagging them up for disposal. However, what you may not have considered is that all of those materials are ideal fertilizer for your lawn and garden.
Composting is an excellent way to recycle yard waste, and now that leaves are dropping, you’ve got plenty of material to recycle. Vegetable gardens and landscapes alike can benefit from a generous dose of compost now and then. A free source of much-needed nutrients in our often nutrient-poor sandy soil, organic-rich compost also loosens tight, compacted soils and helps them hold nutrients and water.
So what is compost? Basically, compost is what’s left of organic matter after microbes have thoroughly decomposed it. Among the compostable organic materials available to most homeowners are leaves, grass clippings, twigs, chopped brush, straw, sawdust, vegetable plants, culled vegetables from the garden, fruit and vegetable peelings and coffee grounds (including the paper filter) from the kitchen. Don’t add table scraps with meats or oils to your compost pile—meats especially will attract animals. Contrary to popular opinion, compost piles don’t typically smell—but if you do have an odor come from decomposing vegetables, turning the compost pile and adding dirt, grass clippings or leaves will eliminate any smell.
The organisms that do the actual composting are bacteria and fungi are microscopic, although you will also find worms and arthropods in a good compost bin. A number of companies sell “composting microbes,” but you don’t need them. Fortunately, plenty of these microbes are around already. To get started, just mix a few scoops of garden soil or compost from a previous batch into the compost pile will provide all the microbes you need to start the process. The microbes just need water, oxygen and nutrients to grow and multiply.
Rainfall will provide most of the needed moisture. You may need to hand water the pile on occasion, too, during dry times. For best results, keep the pile moist but not soggy; if you pick up a handful it should not crumble away nor drip water when squeezed. The right mix of organic matter can provide all the nutrients needed. Alternate using brown (leaves, straw) and green materials (grass clippings, vegetables) in your compost bin to provide the needed amounts of carbon and nitrogen. If the pile seems to be decomposing too slowly, raise the nitrogen level by adding a few more green materials or a handful of granular fertilizer. And the more you turn the pile, the faster it will decompose.
There are many ways to contain your composting materials, from a simple pile to a solar-heated, rotating bin and everything in between. For more information on composting and compost bin options, please see this University of Florida Extension article.
by Matthew Orwat | Oct 30, 2017
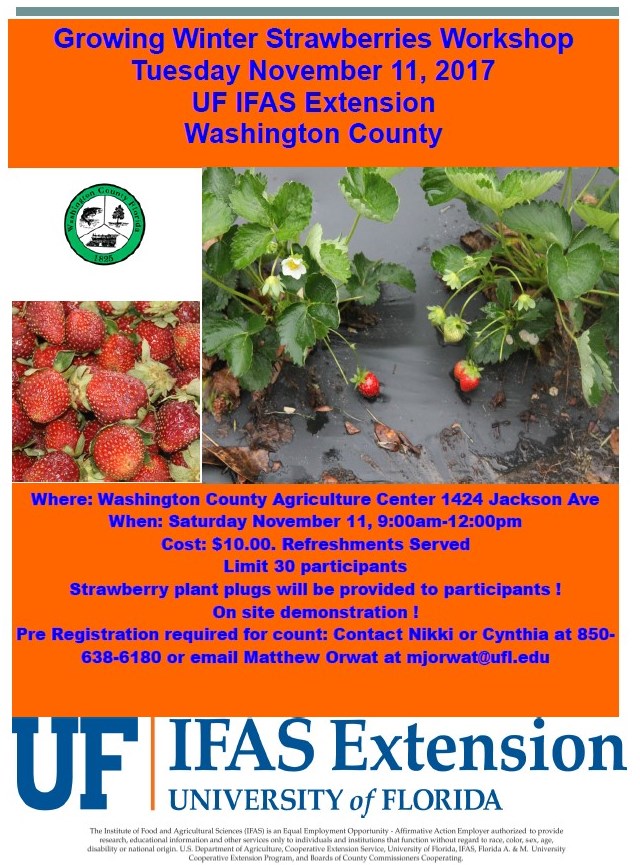
Where: Washington County Agriculture Center 1424 Jackson Ave
When: Saturday November 11, 9:00am-12:00pm
Cost: $10.00. Refreshments Served
Limit 30 participants
Strawberry plant plugs will be provided to participants !
On site demonstration !
Pre Registration required for count: Contact Nikki or Cynthia at 850-638-6180 or email Matthew Orwat at mjorwat@ufl.edu
Now is the time for Northwest Florida gardeners to plant strawberries for bountiful production of fruit beginning in January and continuing into May. The following procedure will lead to a successful strawberry garden if followed:
The best location for strawberry production provides well-drained, moist, sandy soil with substantial organic matter. It must not be too wet. A fertilizer scheme of 2 lbs of a 6-8-8 fertilizer per 100 sq ft should be broadcasted over the plot, and spaded or disked in. Prepare the bed by leveling out the soil. Commonly, a preferred system is the development of a hill system, which entails making a raised bed 6-8 inches high and 24 inches wide. A raised bed can be filled with well-rotted compost mixed at a 50:50 rate with soil. After bed preparation, provide another application of fertilizer in a single, narrowband in the middle of the bed, 4 to 8 inches deep, but DO NOT apply fertilizer directly below the plants, as the fertilizer may burn the young transplants. Do not use fertilizer with more than 6% nitrogen on strawberries, so that they have less chance of burning and greater chance of setting sweet, quality fruit.
Short day, certified disease free plants for Florida such as Sweet Charlie and Camarosa should be purchased from a reputable nursery.
If growing the plants using plastic mulch or grow fabric, put drip irrigation underneath in the form of drip emitters or bubbler type soaker hose.
When setting out the transplants:
- Keep plants moist before planting
- Spread roots out in fan-shape
- Set plants in moist soil at the correct depth. Do not cover the plants crown with dirt or leave its roots exposed above the soil.
- Space plants 12 to 18 inches apart.
- Pack the soil firmly around the roots, then sprinkle with water. Overhead sprinkling may keep the tops from drying out until the roots can get established.
For best results, strawberries should be mulched. Black polyethylene plastic mulch at 1 to 1½ mil thick is best (completely cover the top and sides of bed before planting). Be sure the bed is firm, formed correctly, moist, and fertilized adequately. Place soil on the edges of the plastic to hold it in place. Cut slits in the plastic for the transplants.
When using alternatives like straw, bark or other natural organic materials mulch to a depth of 1 to 2 inches, but do not completely cover the plant.
by Matthew Orwat | Oct 26, 2017
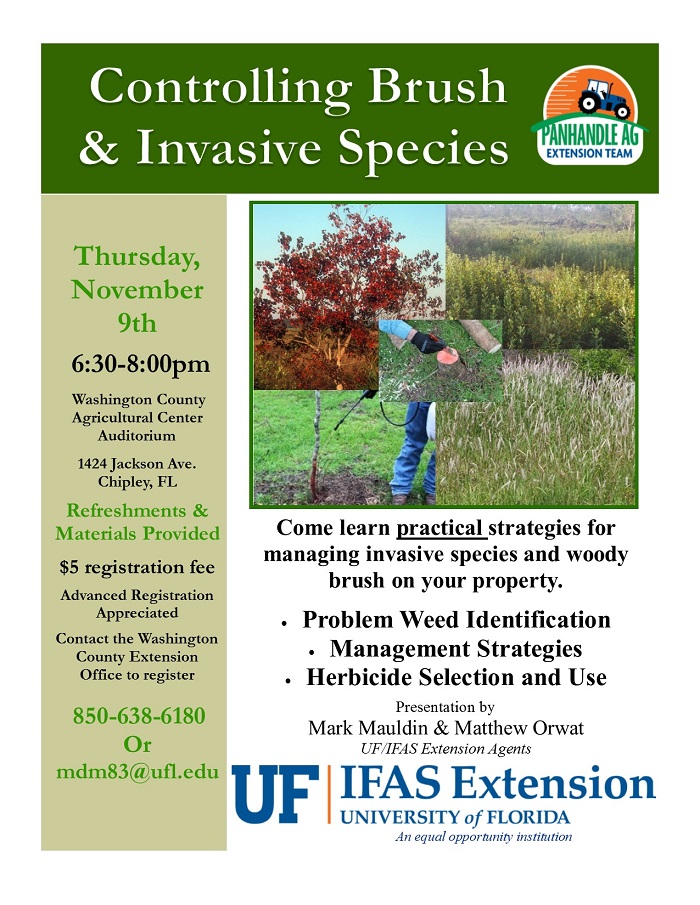
Encroaching brush, whether native or invasive, can be a problem for properties large and small. Fighting woody brush and other hard-to-kill weed species can be challenging for property owners. Many factors affect the effectiveness and efficiency of control efforts.
Timing of the application is a key factor that many property owners fail to consider. The cooler, fall and winter months are an excellent time to control a wide variety of troublesome brush species. With this in mind, the Washington County Extension Agents will be presenting a class, Controlling Brush & Invasive Species on November 9, 2017. The class will focus on plant identification and specific chemical control strategies that are effective in the fall and winter months. Herbicide selection and application techniques will be addressed in detail.
Controlling Brush & Invasive Species will be held at the Washington County Agricultural Center (1424 Jackson Ave., Chipley, FL) on Thursday, November 9, 2017 at 6:30 in the evening. Refreshments and printed reference materials will provided. There is a $5 registration fee for the class, payable at the door. Advanced registration for the class is appreciated. If you have questions or would like to register please contact Mark Mauldin at the Washington County Extension Office (850-638-6180 or mdm83@ufl.edu).