The flower of the Christmas season is the poinsettia, a tropical plant from Mexico that changes its leaf color when the daylength changes. Poinsettias were originally noticed for their bright red color and are now available in many colors, shapes and sizes, thanks to decades of work by plant breeders. As much as we love them, caring for poinsettias during and after the holiday can be a challenge. Here are a few tips to extend the bloom for a longer period and encourage it to grow for the months to come!
Photo credit: Tyler Jones.
Provide plenty of sunlight. A sunny window facing south is ideal. Be careful to not let the leaves touch the glass. Keep temperatures around 55-60F at night and 65-70F during the day.
Keep soil slightly moist on the surface. Wait until the surface feels dry before watering, then add just enough to soak in. If water collects below the pot, pour it out. Those decorative wrappers make it hard to tell, so be sure to check. However, don’t wait for wilting before watering as that is too dry. Both overwatering and underwatering can lead to wilting and excessive leaf drop. Check the soil each day.
Don’t fertilize while “blooming”. While the colored parts of poinsettias are actually modified leaves called bracts and the true flowers are the tiny yellow centers, we often refer to the entire non-green portion as a bloom. The plant can maintain its nutritional needs throughout the flowering time without additional fertilizer.
In the spring, cut the plant back, fertilize and move outside. Remember, poinsettias require temperatures to always stay above 60F. If we receive any cool nights, bring it in for the night. Let the rootball become quite dry throughout April. You may have to move it under a cover if the April showers are occurring every few days.
If you want to try your luck at re-blooming, re-pot it in a slightly larger container and cut it back to about 4” high in mid-May. Keep it in nearly full sun. A little shading in the heat of the day is helpful. Water consistently and fertilize every two weeks with a water-soluble, complete fertilizer. As it grows, you will need to pinch the plant back every six weeks or so until October, I usually remove about half of the stem that has grown out. To get coloration in time for Christmas, find something dark to cover the plant or move it to a dark location each day. The poinsettia must be in complete darkness from 5 p.m. to 8 a.m. until the leaves start to turn color, usually 10 weeks. That means moving or covering and uncovering at the same time every day. Any deviation will delay the color change. Once you see a complete set of leaves coloring, the plant can be exposed to regular daylengths. If this sounds like too much work, spent poinsettias do make good compost and garden centers will be happy to sell you a new one!
Remember, poinsettia sap does contain a latex-like chemical that can cause allergic reactions. Small animals, young children, and adults with allergies should not handle poinsettias. If eaten, get medical attention immediately.
Throughout history the evergreen tree has been a symbol of life. “Not only green when summer’s here, but also when it’s cold and dreary” as the Christmas carol “O Tannenbaum” says.
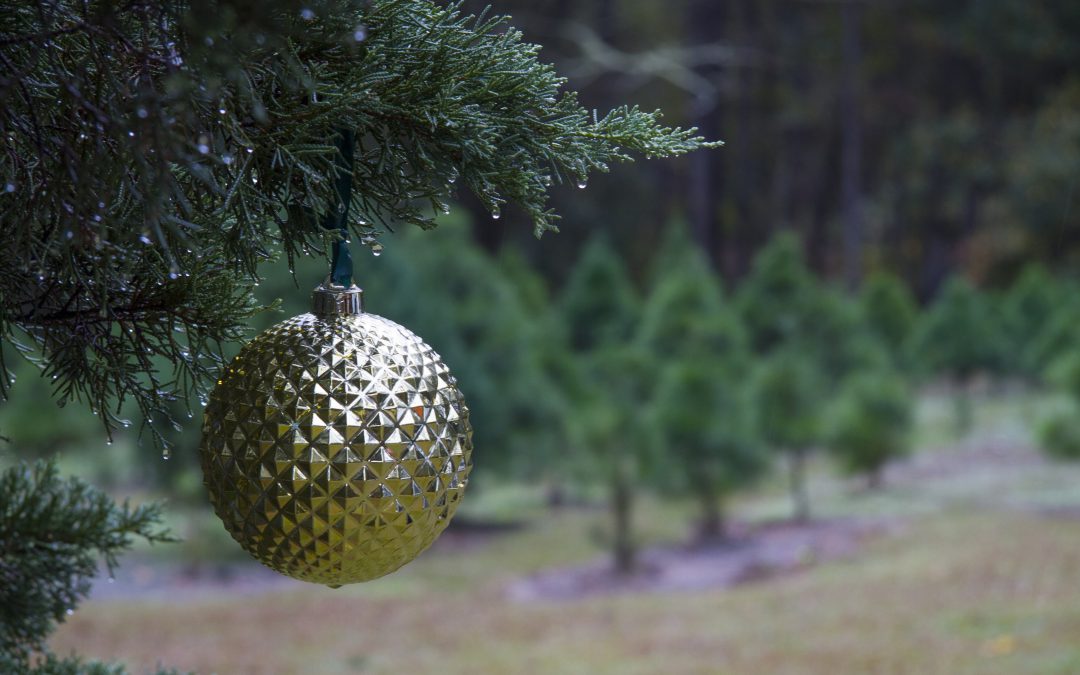
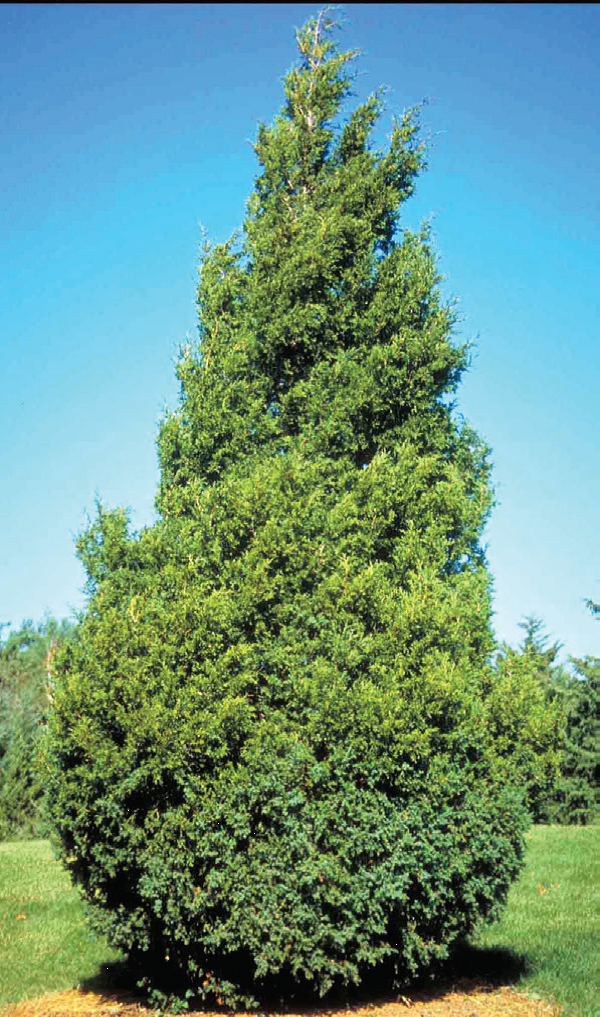
While supporting the cut Christmas tree industry does create jobs and puts money into the local economy, every few years considering adding to the urban forest by purchasing a living tree. Native evergreen trees such as redcedar make a nice Christmas tree that can be planted following the holidays. The dense growth and attractive foliage make redcedar a favorite for windbreaks, screens and wildlife cover.
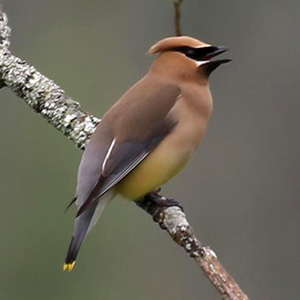
The heavy berry production provides a favorite food source for migrating Cedar Waxwing birds. Its high salt-tolerance makes it ideal for coastal locations. Their natural pyramidal-shape creates the traditional Christmas tree form, but can be easily pruned as a street tree.
Two species, Juniperus virginiana and Juniperus silicicola are native to Northwest Florida. Many botanists do not separate the two, but as they mature, Juniperus silicicola takes on a softer, more informal look.
Cedar waxwing, Bombycilla cedrorum
When planning for using a live Christmas tree there are a few things to consider. The tree needs sunlight, so restrict its inside time to less than a week. Make sure there is a catch basin for water under the tree, but never allow water to remain in the tray and don’t add fertilizer. Locate your tree in the coolest part of the room and away from heating ducts and fireplaces.
After Christmas, install the redcedar in an open, sunny part of the yard. After a few years you will be able to admire the living fence with all the wonderful memories of many years of holiday celebrations. Don’t forget to watch for the Cedar Waxwings.
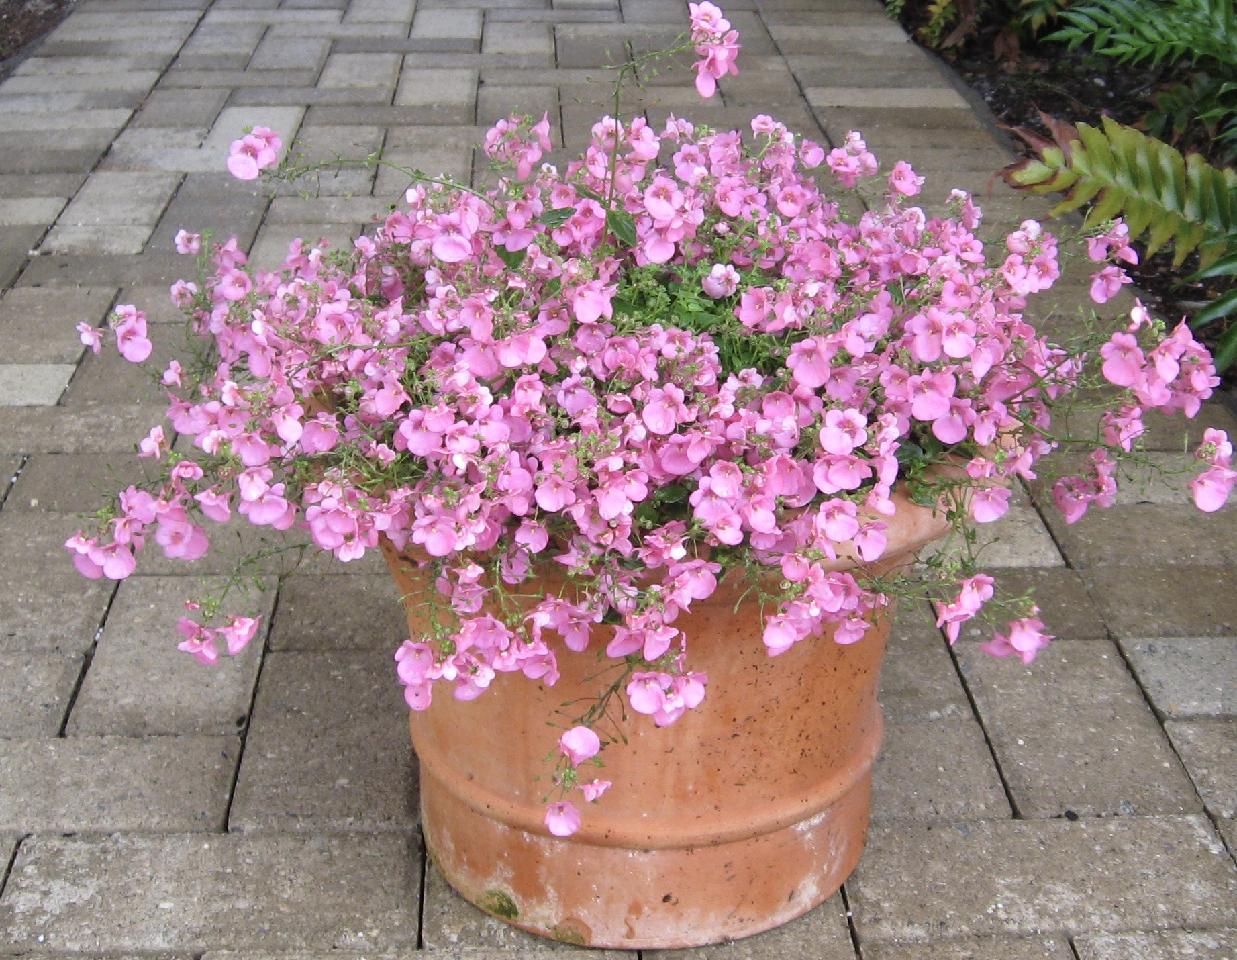
Diascia (Twinflower) in full bloom! Photo courtesy of Walton County Master Gardener Andrea Schnapp.
Since 2005, multiple varieties of Diascia have added to the U.S. fall market of winter flowering plants. Its delicate flowers are far from being ordinary though. In the early part of the last century most British gardening encyclopedias listed just one diascia – Diascia barberae – derived from seed collected by Col. J. H. Bowker and sent by Mrs. Barber to Kew Gardens, England, in 1870. Annual and perennial diascias had, of course, already been discovered and classified by several botanists visiting South Africa much earlier. The dainty, little annual, Diascia barberae, is not a very showy flower, but one which will appeal to the true flower lover. The flowers are rosy pink with yellow-green spots in the throat. The flowers are lipped, being related to the Snapdragons, but have two spurs on the lower lips, and are sometimes called twinspur.
It was not until John Kelly was given a plant called Diascia cordata by Edrom Nurseries in 1971 that anything notable happened to diascias again. He took pollen from his Diascia cordata and applied it to one flower of Diascia barberae. Of the nine seeds he obtained, just one was worthy of attention. He named it Diascia ‘Ruby Field’ (not for the color of the flowers, but for a lady who devoted her live to the long-term care of deprived children). Despite the popularity of this new, hardy hybrid, little more happened with diascias for yet another decade.
Diascia ‘Romeo’. Photo courtesy of Walton County Master Gardener Andrea Schnapp.
The boom in the diascia trade began only recently. Today’s diascia offers larger flowers, larger plants with a more open growth habit and colors ranging from scarlet through salmon and coral into pink. They bloom throughout the cooler weather and may behave as a perennial in warmer sites. But, the uniqueness of their flower structure and ecological role are as fascinating as the flower is beautiful. The common name of twinspur refers to the two downwardly pointing spurs found on the back of the flower. The spurs contain an oil which is collected in the South Africa wild by Rediviva bees. The female bees have unusually long, hairy forelegs that are used to collect the oil to feed her larvae. However, the Greek origin of the Diascia name doesn’t refer to the spurs, but rather the two sacs found in the upper part of the corolla. The flower petals help the bees to orientate themselves to the oil glands of the spurs. While North Florida isn’t home to the Rediviva bee, we can grow Diascia and it is a wonderful opportunity to show the unique connection insects and plants can have. Look for other specialized flower structures and you will find other animals that fit them perfectly, even within the species found in the Panhandle.
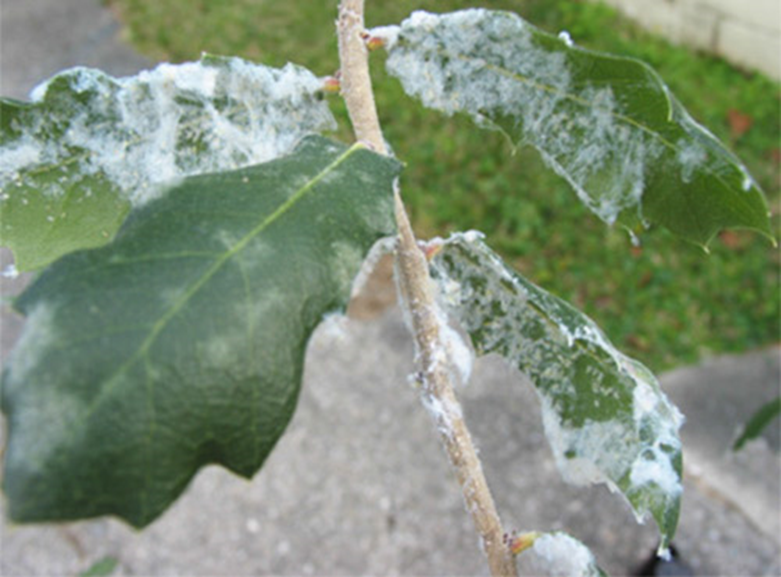
Homeowner accounts of white fluffy woolly masses on woody ornamentals, oak trees and Muhly grass have been on the rise. The good news is they are native insects that need a nursery for their young and will cause little harm to the host plant. The bad news is scientists know very little about the complete live cycle and role in the environment of these insects.
Within the cottony mass there are citrus flatid planthoppers, woolly oak aphids, or Muhly mealybugs. The adults have laid eggs or birthed their young on the leaves. The young nymphs have excreted large amounts of the woolly wax to protect them from predators and weather while they grow larger. Food from the plants is needed to grow, so these piercing-sucking insects are removing sugars from the host plant. But, typically it is not enough to significantly change the plant’s appearance, so most people are not alarmed until they notice “all the white stuff”.
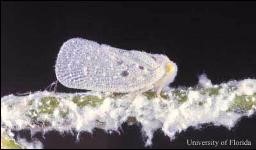
Adult citrus flatid planthopper, Metcalfa pruinosa
(Say). Credits: Photograph by: Lyle J. Buss, University of Florida
The only one that moves quickly are the citrus flatid planthoppers. When a person reaches for the flocked branch, something small moves and seems to jump at you. Most likely the jumping direction is away from you, but it still may be startling. They are planthoppers (Metcalfa pruinosa), an insect in the order Hemiptera. As the name implies, they occur on citrus but can also be found on many woody ornamentals and other fruit trees. The adult planthopper wing arrangement is tent-like, meaning that the forewings are held over the insect abdomen in a tent configuration.
Stegophylla brevirostris Quednau colony on oak. Photograph by Susan E. Halbert
Woolly oak aphids are conspicuous pests on oak (Quercus spp.), because they are covered with large amounts of flocculent wax. Two genera of woolly oak aphids occur in Florida. One species, Stegophylla brevirostris Quednau, is common, and the other, Diphyllaphis microtrema Quednau, is rare. Florida woolly oak aphids are recognized easily by the large quantities of woolly wax that they secrete. Beneath the wax, aphid bodies are pale. Young nymphs are typically pale green, and they tend to be more mobile than adults. The majority of reports of woolly oak aphids indicate a preference for live oak (Quercus virginiana Mill.) as the host. These aphids are live-bearing females. It is not known how these aphids disperse, but possibly they are picked up and carried by birds and larger flying insects because of the sticky wax that surrounds the bodies of the aphids.
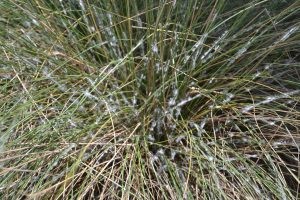
Muhly grass infested with mealybug. Photo: Beth Bolles
Muhly grass (Muhlenbergia capillaris) is a generally pest free plant in its native habitat, however, the native mealybug, Stemmatomerinx acircula, has made an appearance on plants in various landscapes. Insects feed on the leaves and are grey with white wax that may have some filaments. You may also see long ovisacs on the leaves which contain eggs and crawlers. With close inspection, you will notice they have legs and can move about.
So “what do you do?’ If the plant doesn’t appear to be suffering, let nature take its course. “This to will pass.” If someone demands perfection, use insecticidal soap to reduce the population. The soft-bodied creatures will dry up before they can become adults. To read more about these odd creatures of nature go to: https://entnemdept.ufl.edu/creatures/
Summer should be the time to relax and enjoy the fruit of all the hard work performed in the landscape over the previous winter and spring. However, there are still some essential tasks that need to be completed during the summer. Perform them in short energy bursts early in the morning or late in the evening.
1. Aerate Your Lawn
If your yard is starting to look weak and thin, even with fertilizing and proper moisture, it may need aeration. Aeration, which is creating channels into your lawn, allows water and nutrients to reach the deep roots of your grass more efficiently.
To test if you need to aerate your lawn, shovel up a patch of grass to a depth of at least four inches. If the layer of thatch is a half-inch thick or higher, your yard would benefit from aeration. There are self-drive aeration machines and tractor-pulled devices you can rent to make quick work of large areas. For smaller areas, simply punching multiple holes with a pitchfork will do the job.
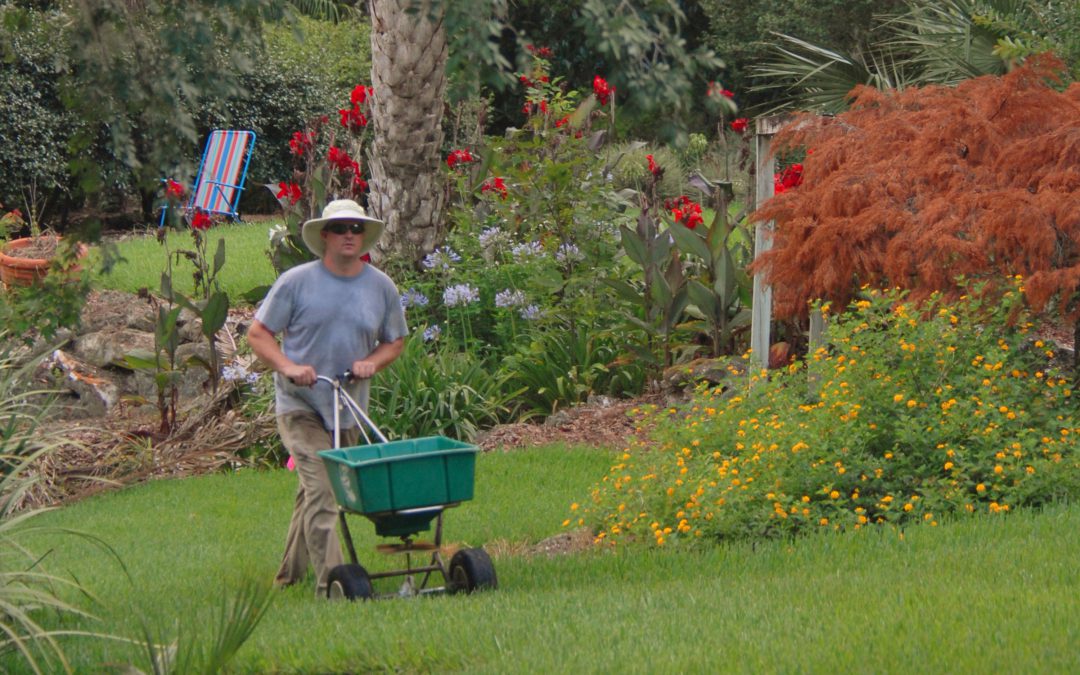
2. Fertilize
Commercial landscape fertilizer applicators must obtain state certification.
Turf grass often displays a yellow color during the mid-summer rainy seasons due to the heavy rains flushing nitrogen away from plant roots. If your lawn is looking sad and yellow, chelated iron can often give a temporary green-up. Iron is not a replacement for nitrogen, but it can work well during our summer rainy season.
If you soil test revealed a potassium or magnesium deficiency, summer is a good time to make the last corrective application. Potassium (K) is an essential macronutrient. Fertilizer bags typically show the percentage of potassium in a product as the third number displayed on the front of the bag (e.g., the “8” in 16-2-8). Potassium acts as a “vitamin” for turf grass, increasing root strength, disease resistance and cold hardiness.
Magnesium (Mg), also a macronutrient, is essential for the production of chlorophyll, necessary for photosynthesis, and also plays a part in the movement of carbohydrates from leaves to other parts of the plant.
3. Don’t Mow Too Short
It’s a natural inclination to want to mow your grass as short as you can, so you have the longest time until you have to mow it again. However, giving your grass a buzz cut every time you mow can hurt your lawn over time.
While some turf grasses can be mowed relatively short, like Bermudas and some Zoysias, most grass types shouldn’t be cut shorter than two-and-one-half to four inches high. Mowing shorter than that can damage the growth point and leave it susceptible to disease and pest infestation. It can also dehydrate the grass and lead to long term damage.
5. Water Infrequently but Deeply
One common mistake made by many is watering too often and too shallow. When only given frequent shallow waterings, grass will begin to grow their roots upwards to take advantage of the small amounts of water, which makes weak and unhealthy. The grass becomes even more dependent on water and very susceptible to disease and insect attack.
Try watering only once or twice a week, but for a considerably longer time so that the water can penetrate deeper into the soil and encourage downward roots. Ideally, each irrigation zone is calibrated to determine the length of time it take to deliver ½ – ¾ inch. Then set the system to run every 3-4 days for that number of minutes. While checking the irrigation delivery system, make sure the rain shut-off device is working and set to the same ½ – ¾ inch.
6. Prevent Mosquitoes
Summer rains on a nearly daily basis lead to lots of standing water. In less than one inch of water, hundreds of mosquitoes can hatch 3 -5 days later. Not only are these blood-sucking pests annoying, but they can also transmit dangerous diseases like West Nile and Zika Virus. Even without disease, their bites are painful and irritating.
To prevent mosquitoes, make sure no standing water is allowed to remain in your yard, either in low points or in empty containers like flower pots or wheelbarrows. Any amount of stagnant water is the perfect breeding ground for mosquitoes. Take a walk around the yard, dumping out water and disturbing the oak and magnolia leaves that are acting a collection cup. Treat birdbaths and water features with floating “donuts” specifically designed to kill mosquito eggs.
While getting tasks done in quick morning trips to the yard, make sure to keep hydrated. Heat exhaustion can happen fast.