by Taylor Vandiver | Aug 4, 2014
Attracting Butterflies into Your Landscape
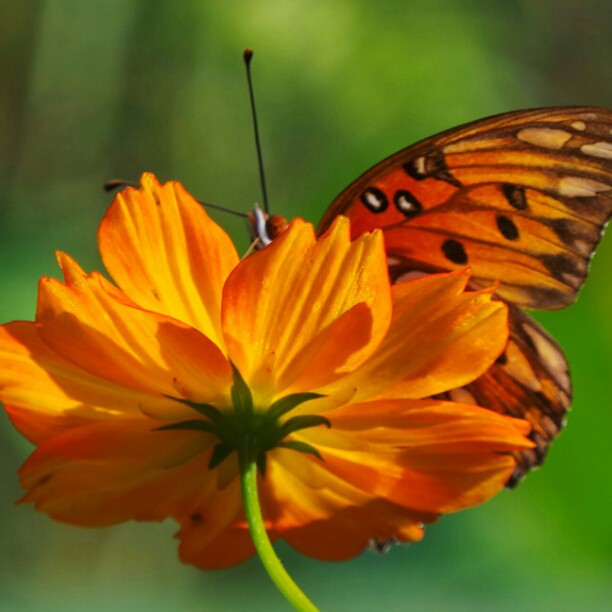
Have you been itching to add some life and color into your landscape? Why not plant a butterfly garden?! Butterfly gardens are a great way to add movement and life to an otherwise stagnant landscape. Most butterfly gardens are not only an attractant for our Florida butterflies, but are also a magnet for hummingbirds and beneficial insects. To start your garden all you need are a few key plants.

Gulf Fritillary. Photo Courtesy Scott Jackson.
Incorporate at least one host plant and one nectar plant into your garden. The host plant provides a suitable habitat for the female butterfly to lay her eggs. These eggs will hatch and the baby caterpillars will eat the leaves of the host plant. Host plants are often not as showy as nectar plants, nor are they even necessary to attract adult butterflies. However, while nectar plants invite butterflies into your garden to feed, host plants offer them a reason to stay and reproduce. And you can watch this entire cycle unfold in your own garden!
Most of your butterfly attractant plants will do best in full sun to partial shade. Try not to apply pesticides in areas where you want to maintain healthy caterpillar/butterfly populations. Providing water for butterflies is very important and easily done. One option is to fill a clay tray with sand and then place a rock in the center, where the butterfly can perch. Keep the sand wet, but avoid standing water. Feel free to contact your local extension office for more information on our winged friends!

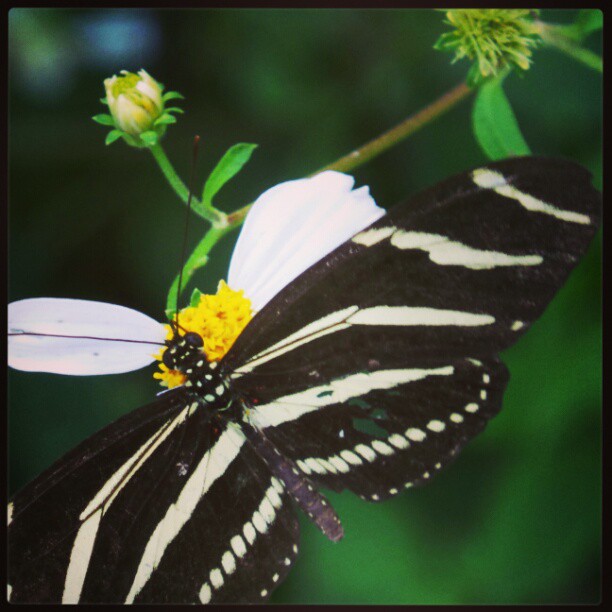
Zebra Longwing, our state butterfly! Photo courtesy Scott Jackson.
Here are a few examples of butterflies and their preferred host plants:
o Host Plants – Fennel, Parsley, Bishopsweed
o Host Plants – Pawpaw
o Host Plants – Wild Lime, Hercules-club, Citrus spp.
o Host Plants – Ash, Black Cherry, Tulip tree, Sweetbay Magnolia
o Host Plants – Partridge Pea, Cassia
o Host Plants – Passion Vines
- Zebra Longwing (State Butterfly of Florida)
o Host Plants – Passion Vines
o Host Plants – Milkweed, Butterfly Weed
Here are nectar plants that will have the butterflies swarming to your garden:
- Firebush
- Milkweed
- Blanket Flower
- Sage (Salvia spp.)
- Butterfly Bush
- Blazing Star
- Yarrow
- Pentas
- Stoke’s Aster
by Taylor Vandiver | Jul 1, 2014
The summertime often reminds us of our uninhibited spirit. With Independence Day not far off, Floridians will be celebrating the freedom of our nation while battling the oppressive climate you can’t seem to escape this time of year. As we approach the apex of heat and humidity here in Florida, we would do well to remember the tenacity of our native wildflowers and their “spirited” survival of Florida’s extreme conditions.

Coreopsis flowers. Photo courtesy UF/IFAS.
Historically, Florida’s landscape was alive with color throughout the seasons. Through urbanization and cultivation we’ve lost a large part of that legacy; however, we can reestablish some of Florida’s colorful past in our own yards and neighborhoods.
In order to ensure successful planting of wildflowers it is important to properly select and prepare your site. You will want to choose a sunny-well drained area and cut any existing vegetation to the ground. It may be beneficial to put down sheets of cardboard to smother what’s left of the vegetation. This is best done in the summer in advance of fall planting.
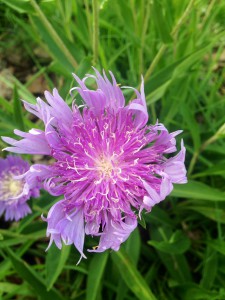
Stokes’ Aster in bloom.
Planting is best done late August to early September in North Florida. Soil-to-seed contact is critical so 1 day before seeding, or just prior to seeding, firmer soils need to be lightly scratched with a rake. Sandy soils might have to be made more firm to ensure that seed do not sink too deep. Broadcast the wildflower seeds at the recommended rate then press them into the soil by walking around on the planting site.
Wildflower seeds require adequate moisture during germination. After planting irrigate the site with about 1/4 to 1/2 inch of water daily for the first few weeks. After that, irrigate with about 1/2 inch water only if the wildflowers show signs of drought stress. Once established though, the meadow needs very little, if any, irrigation. Fertilizers should be avoided altogether as they promote the growth of aggressive weeds. Many of Florida’s native wildflower species are adapted to and perform well in soils with low fertility. Your wildflowers will re-send themselves if given the opportunity so wait until seed have matured before deadheading or mowing. Cut no lower than six to eight inches to avoid damaging the crowns of grasses and wildflowers.

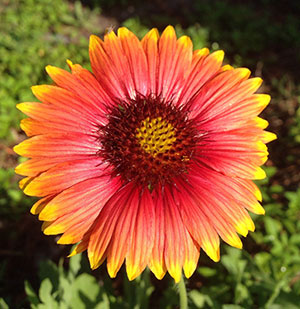
Native Gaillardia. Photo courtesy UF/IFAS.
To successfully cultivate a wildflower meadow in your home landscape, it’s helpful to select plants with the qualities to fit the conditions at your site. Also, consider blooming dates of flowers in order to provide color and interest for your landscape spring through fall. While not always possible, it’s best to purchase seeds and plants known to be Florida ecotypes. Consult with local nurseries and garden centers for more information on plant and seed availability and seeding rates. You can always contact your local Extension Office for more information. Other good sources of information are the Wildflower Seed And Plant Growers Association, Inc. (www.floridawildflowers.com); Association of Florida Native Nurseries (www.afnn.org); and the Florida Wildflower Foundation (www.floridawildflowerfoundation.org).
Growing wildflowers can restore a special sense of natural history close to home. So if you are looking for an “explosion” of color that will stand the test of time, Florida’s native wildflowers will not disappoint.

by Taylor Vandiver | Jun 3, 2014
In a world of limited time and space, container gardens seem to make more and more sense. Poor soil and no place to put plants in the ground are no longer good excuses for not being able to enjoy the simple pleasures of gardening. Container gardening allows the individual to create gardens to fit any situation. Gardening in containers can be just as rewarding as having a full-size garden.
There are a few items to consider when you are planning your container garden. The first is the plants you intend to use. If you are planting more than one plant in the same pot be sure that all your plants meet the same requirements. The requirements you should consider are amount of light, amount of water, climate and fertilizing needs. Some other things you might want to think about when planning your container garden are height, color, and texture. A nice variation of these elements will make your container gardens more attractive and increasingly more interesting to look at.
The next step in container gardening is choosing your container. A good rule of thumb is: “Anything that holds soil and has drainage holes in the bottom may be transformed into a container garden.” It can be a pot you purchased from the local gardening center or an old bathtub you picked up off the side of the road. However, be sure that the size of the container matches the current and potential size of your plant. For vibrant plant growth, the containers must provide adequate space for roots and soil media, allowing the plant to thrive.

Colorful containers bring life to your small spaces.
Next on your list is choosing a soil for your container. Container soils need have good aeration and decent drainage, while still being able to retain enough moisture and nutrients for plant growth. When choosing what to use in containers, never use garden soil by itself. When garden soil is added to a container, both drainage and aeration are severely impeded, and the results are plants that grow poorly or not at all.
Container soils are often referred to as soilless or artificial media, because they literally contain no soil. They are commonly composed of various media such as peat moss, perlite, vermiculite, bark and coir fiber (ground coconut hulls) in a variety of mixes. When using soilless media remember t0 moisten it slightly before planting. Fill a tub with the media, add water and lightly fluff the media to dampen it. This will keep the mixture from becoming hydrophobic (unable to take up water) throughout its life in the container. When adding media to your containers, never fill the pot to the top. You should leave about a one-inch space between the top of the soil and rim of the pot. This will make watering the pot easier as it provides a place to “put water” and not have it run over the edge.
When watering your container gardens, the best time to do so is in the morning. Watering in the morning allows the leaves of your plants and soil to dry out, preventing diseases and viruses. Remember that overwatering is the most common reason for fatalities in container gardens. Check your soil by pushing your finger into the media; if the media is moist don’t water it. When it comes to fertilizing your container gardens, fertilize only as needed. Over-fertilization will result in a buildup of salts and may burn the roots of your plants. Try to fertilize your plants during the growing season, and only if needed during the dormant seasons.
The most important objective when container gardening is to be creative. Maybe, try a variety of plants in one container garden. While an nicely put together individual container can be quite impressive, think what might happen if you put several containers together in a group. Also, don’t limit your container gardens to flowers–many vegetables can be grown in a container and actually do quite well. There really is no limit to what can be done in a container!
by Taylor Vandiver | Apr 29, 2014
Now that spring has finally sprung and summer is well on its way, you may find yourself taking a stroll through your landscape and assessing damage done by late cold spells. However, it may not be a frost problem that has your plants looking worse for the wear. They could be experiencing nutritional imbalances which affect overall plant health. Most cases involving nutrition issues in plants can be linked back to the soil. Therefore, if you suspect a problem I suggest testing your soil to ascertain pH and nutrient levels. You can obtain a soil test kit at your local UF IFAS Extension office. Another way to diagnose your plant damage is to visually catalog its symptoms. Symptoms of mobile nutrients, such as nitrogen and phosphorus, tend to reveal themselves on older leaves first. Whereas, immobile nutrient symptoms (i.e. boron and calcium) will show up on newer leaves. These flow charts can help to narrow down which essential element may be lacking in your plant’s diet.
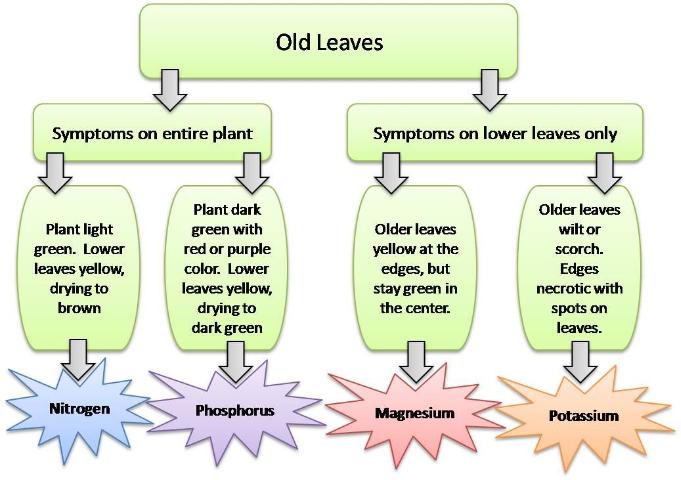
Mobile Nutrient Symptoms.
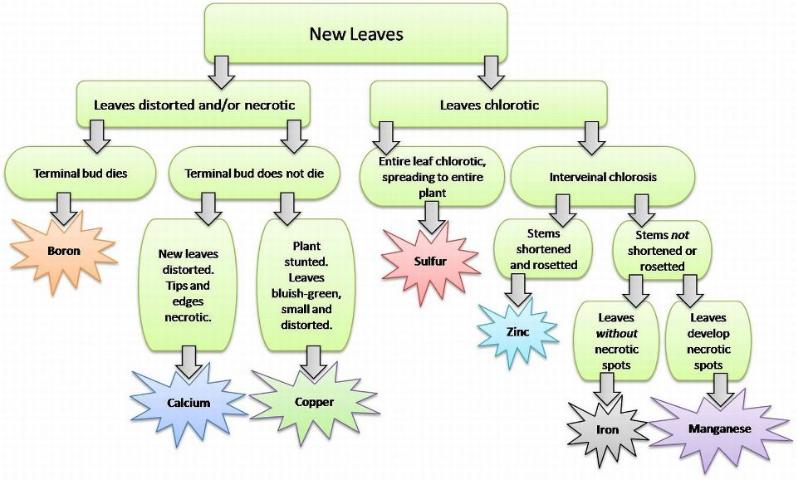
Immobile Nutrient Symptoms.

by Taylor Vandiver | Feb 25, 2014
Considering it is the month of Valentine’s, roses are an appropriate subject to discuss. Not bouquets couriered to various locations all over town, but bushes in the landscape that have been strategically neglected over the winter. Now their time has come; pull on the gloves and get to work.
February is the perfect time to prune rose bushes. Pruning is a step that is required to maintain healthy roses. When roses are pruned, new growth is promoted by removing dead, broken or diseased canes. Pruning also allows the gardener to give their plant an attractive shape and encourage flowering, which is ultimately the reason roses are planted!

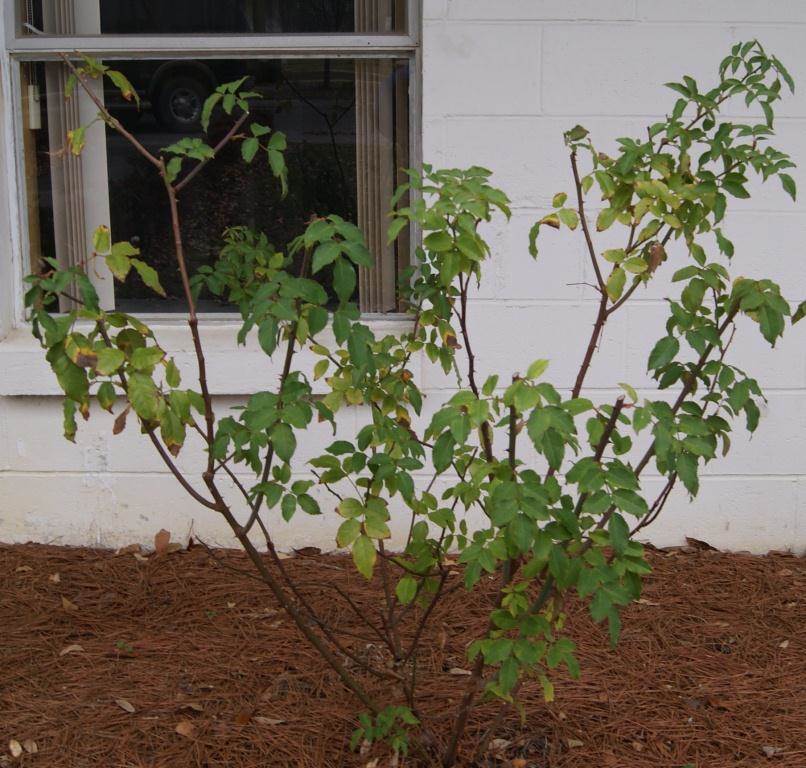
Belinda’s Dream rose before pruning. Image Credit Matthew Orwat
Deciding which roses to prune will depend on their class. Hybrid tea, grandiflora and floribunda roses are repeat bloomers and need a moderate to heavy annual pruning this time of year. Some old-fashioned roses and climbers that bloom only once a year should be treated differently and pruned immediately after flowering. They set their buds on old wood from the previous year’s growth; therefore, pruning them would remove most of this year’s blooms. An exception to this would be dead, diseased or damaged wood on any rose bush or canes that are crossing and rubbing. This should be removed immediately upon notice.
There are certain techniques that should be used when pruning any type of rose, no matter the time of year. Any pruning shear, saw or lopper you use should be sharp and sterile. Always wear protective gloves when dealing with roses, unless you don’t mind coming back bloody and mangled.
[warning]
Crown gall and canker can be spread between gardens and individual plants by dirty shears. To prevent the spread of disease, always disinfect pruning shears when beginning to prune with a 5-10% bleach or 20% rubbing alcohol solution, especiallly if they have been used in any other garden. If crown gall or canker has been found in one’s own garden, shears should be disinfected between each plant, no exception. This should also occur when bringing new plants into the garden, until they have been observed to be disease free.
[/warning]
The first step when pruning any rose is to remove dead, damaged or weak stems leaving only the most vigorous, healthy canes. Try to cut the stems one inch below darkened areas, making sure to cut back to green wood. Always make your cut at a 45-degree angle; this will keep water from sitting on top of a stem and causing rot. When pruning try to open up the center of the rose bush. Pruning like this will increase air circulation and help prevent diseases.
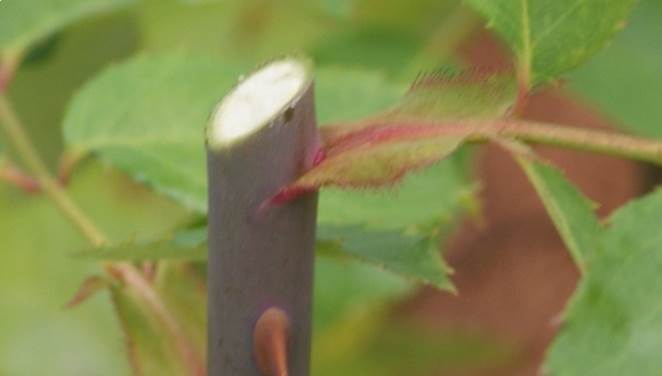
Pruning Cut on Belinda’s Dream rose. Image Credit Matthew Orwat
Since roses send out new growth from the bud just below a pruning cut, try to make pruning cuts above a leaf bud facing out from the center of the plant. Make your cut about ¼ inch above the bud and at the same angle as the bud. If any rubbing or crossing branches are noticed, the weakest of those branches should be removed.
Deadheading, or removing spent flowers, can also be done at this time of year. When deadheading, remove the flower by making a cut just above the next five or seven-leaf branch down on the stem. This will allow for a strong and healthy cane to grow in its place. If no live buds remain, remove the entire cane.
Modern reblooming roses (hybrid teas, floribundas, and grandifloras) should be pruned just as the buds begin to swell, which is around mid to late February. When practicing hard pruning, try to leave about four to eight large, healthy canes the diameter of your finger or larger on the shrub. For a more moderate approach, prune shrubs as discussed earlier and cut them back to about 12 to 24 inches from ground level. Generally, any cane thinner than a pencil should be removed.
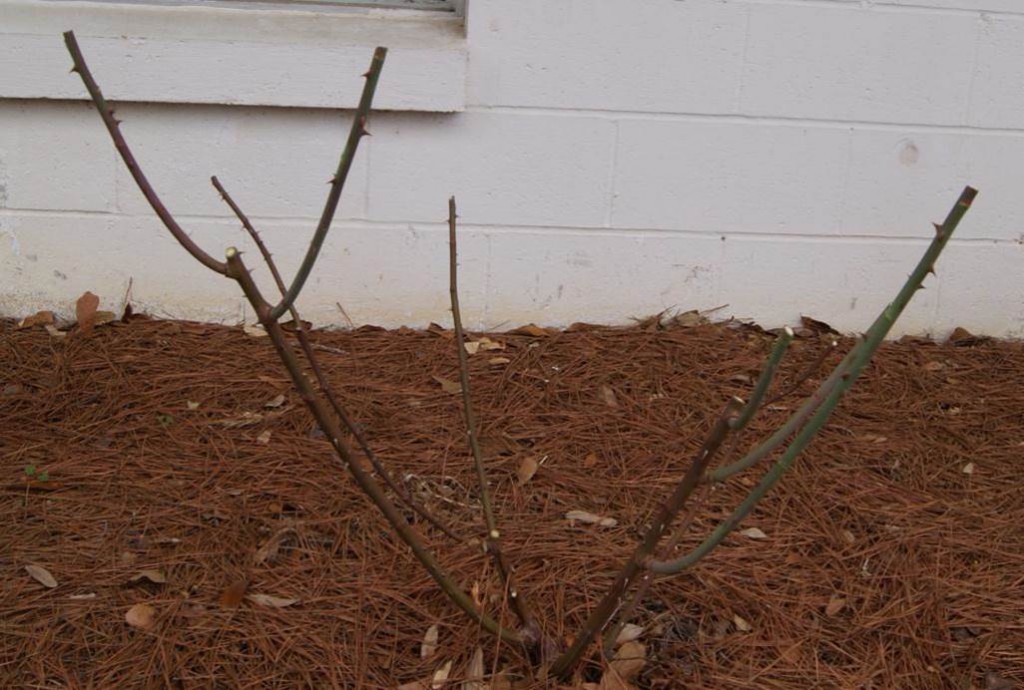
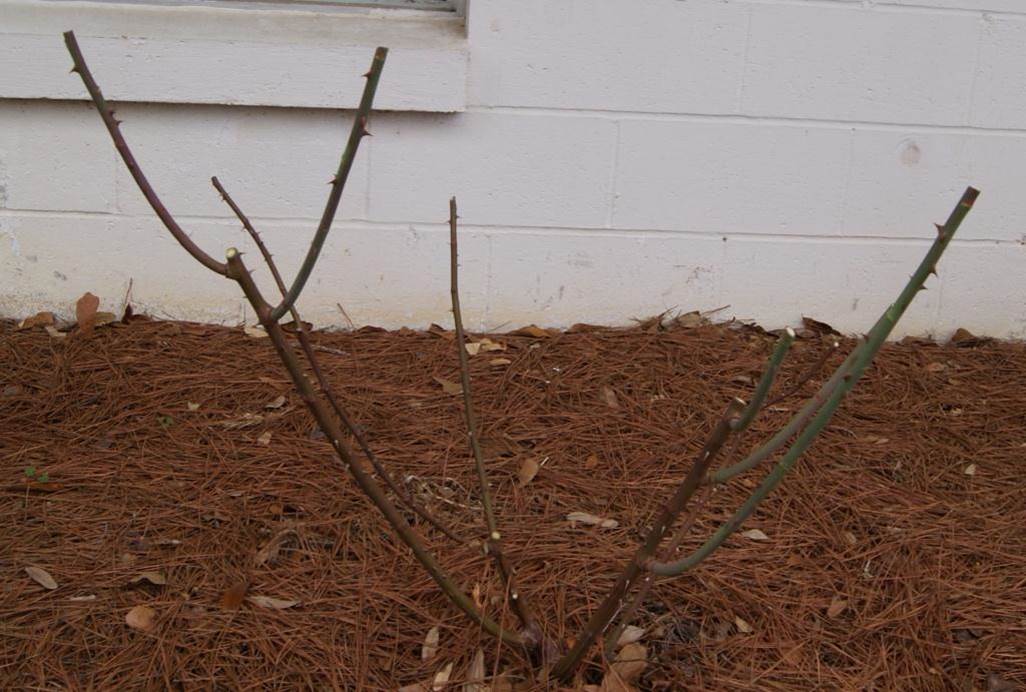
Belinda’s Dream rose after pruning. Image Credit Matthew Orwat
Don’t worry about pruning recently purchased new roses. Newly purchased roses have most likely been pruned, and no further cutting is necessary. Hopefully with the help of this article you can make a date to spend some quality time with your roses this season. The price of neglect is overgrown roses that are not nearly as attractive.
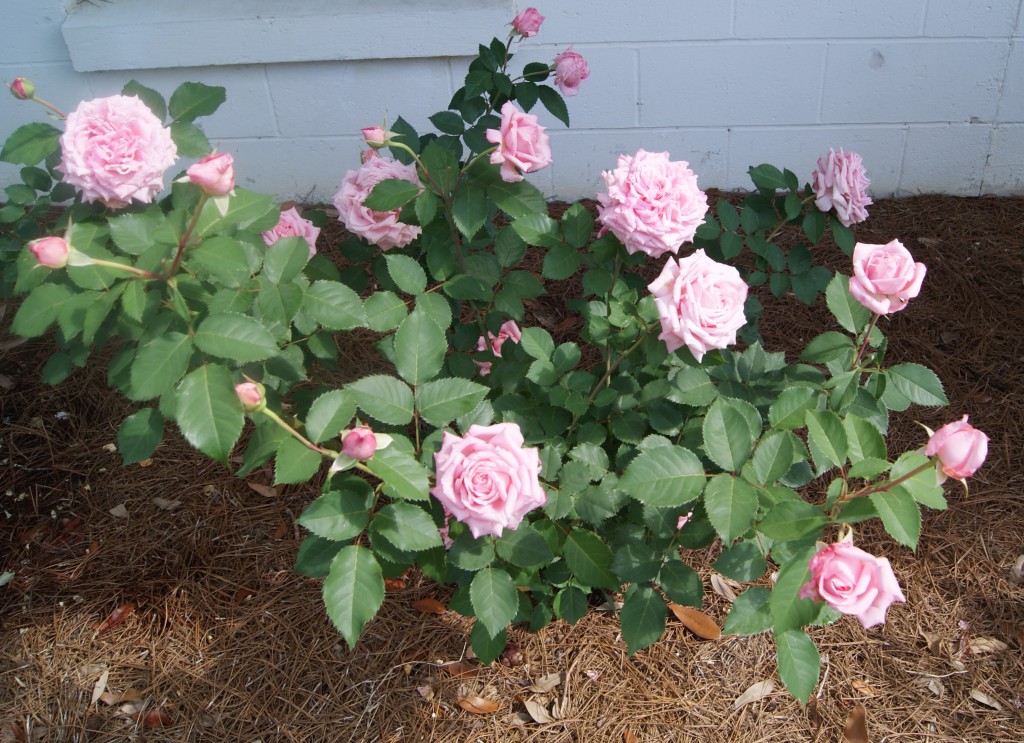
First flush of properly pruned Belinda’s Dream shrub rose. Image credit Matthew Orwat
Article written by Taylor Vandiver with additional content about sanitation by Matthew Orwat