by Matthew Orwat | Oct 26, 2017
Encroaching brush, whether native or invasive, can be a problem for properties large and small. Fighting woody brush and other hard-to-kill weed species can be challenging for property owners. Many factors affect the effectiveness and efficiency of control efforts.
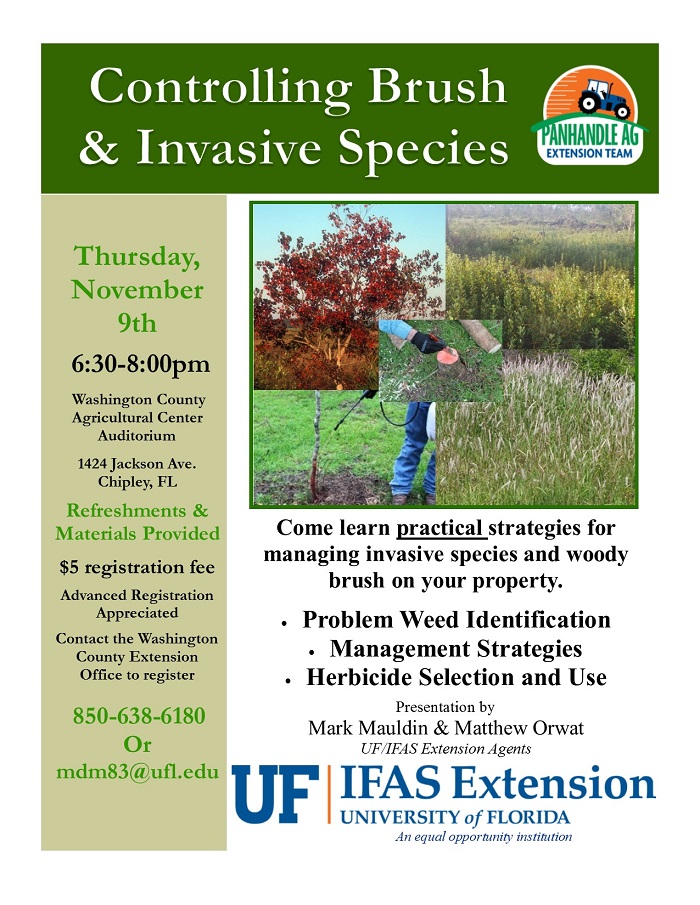
Timing of the application is a key factor that many property owners fail to consider. The cooler, fall and winter months are an excellent time to control a wide variety of troublesome brush species. With this in mind, the Washington County Extension Agents will be presenting a class, Controlling Brush & Invasive Species on November 9, 2017. The class will focus on plant identification and specific chemical control strategies that are effective in the fall and winter months. Herbicide selection and application techniques will be addressed in detail.
Controlling Brush & Invasive Species will be held at the Washington County Agricultural Center (1424 Jackson Ave., Chipley, FL) on Thursday, November 9, 2017 at 6:30 in the evening. Refreshments and printed reference materials will provided. There is a $5 registration fee for the class, payable at the door. Advanced registration for the class is appreciated. If you have questions or would like to register please contact Mark Mauldin at the Washington County Extension Office (850-638-6180 or mdm83@ufl.edu).
by Beth Bolles | Oct 23, 2017
Trees are a landscape asset for many homeowners. When a new tree is installed in our landscapes, we can’t wait for it to mature to provide shade or landscape interest. The heartbreak for many homeowners comes when this important part of their landscape, begins to decline five to ten years after establishment. We often consider a pest as the cause. The common culprit is often hidden below the mulch and soil and is easily preventable.
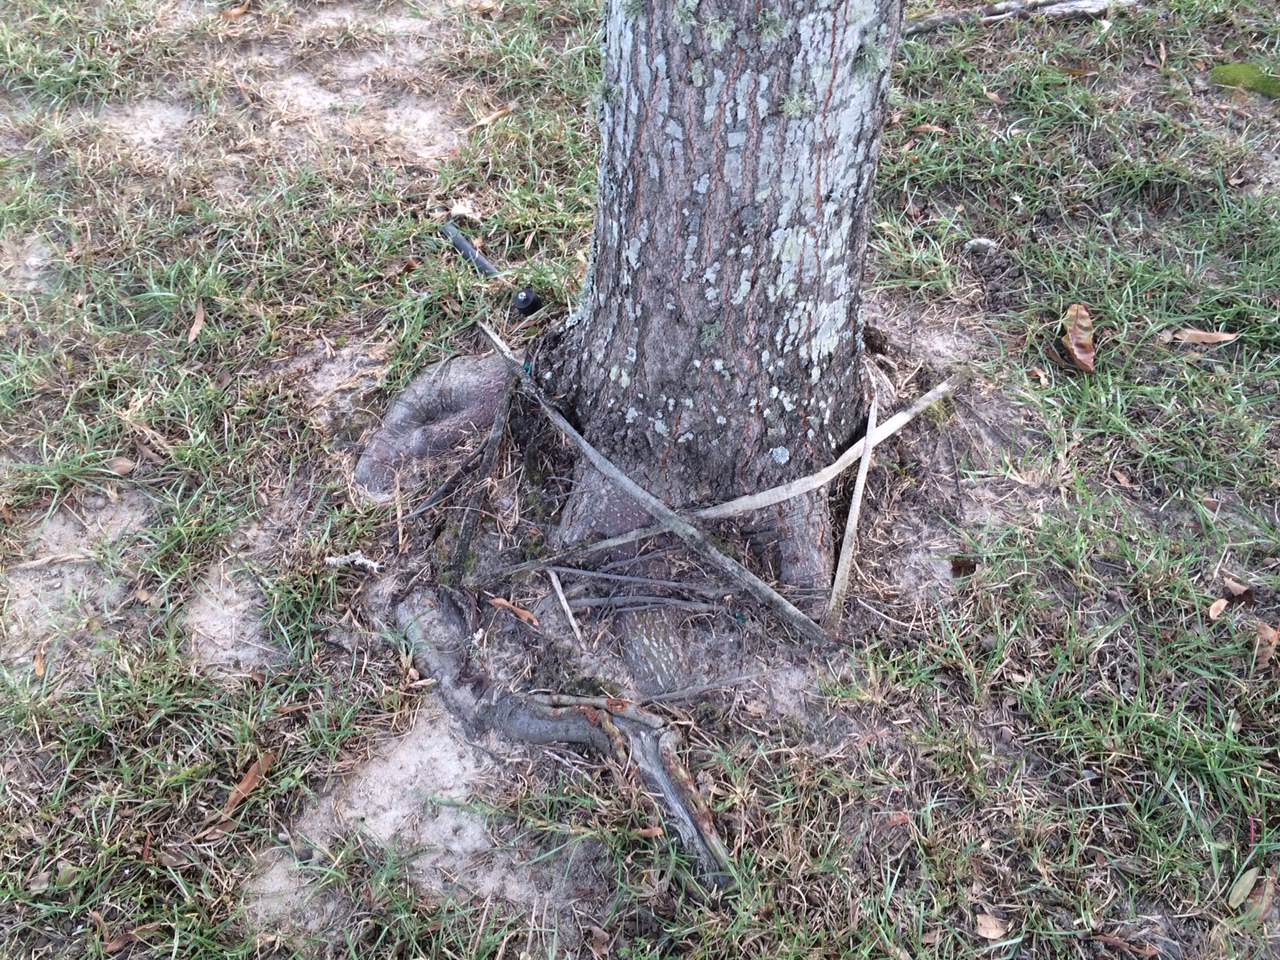
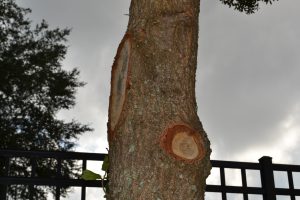
When larger specimen trees are installed in residential and commercial landscapes, they may be delivered with materials that help hold the rootball in place. Strapping often runs over the rootball and when trees are young is several inches away from the trunk. Installers or homeowners often do not cut the strapping during installation.

As this tree continue to grow, the rootball straps will interfere with normal trunk development. Cutting the straps takes only a few seconds at the time of planting. Photo by Beth Bolles, UF / IFAS Extension Escambia County
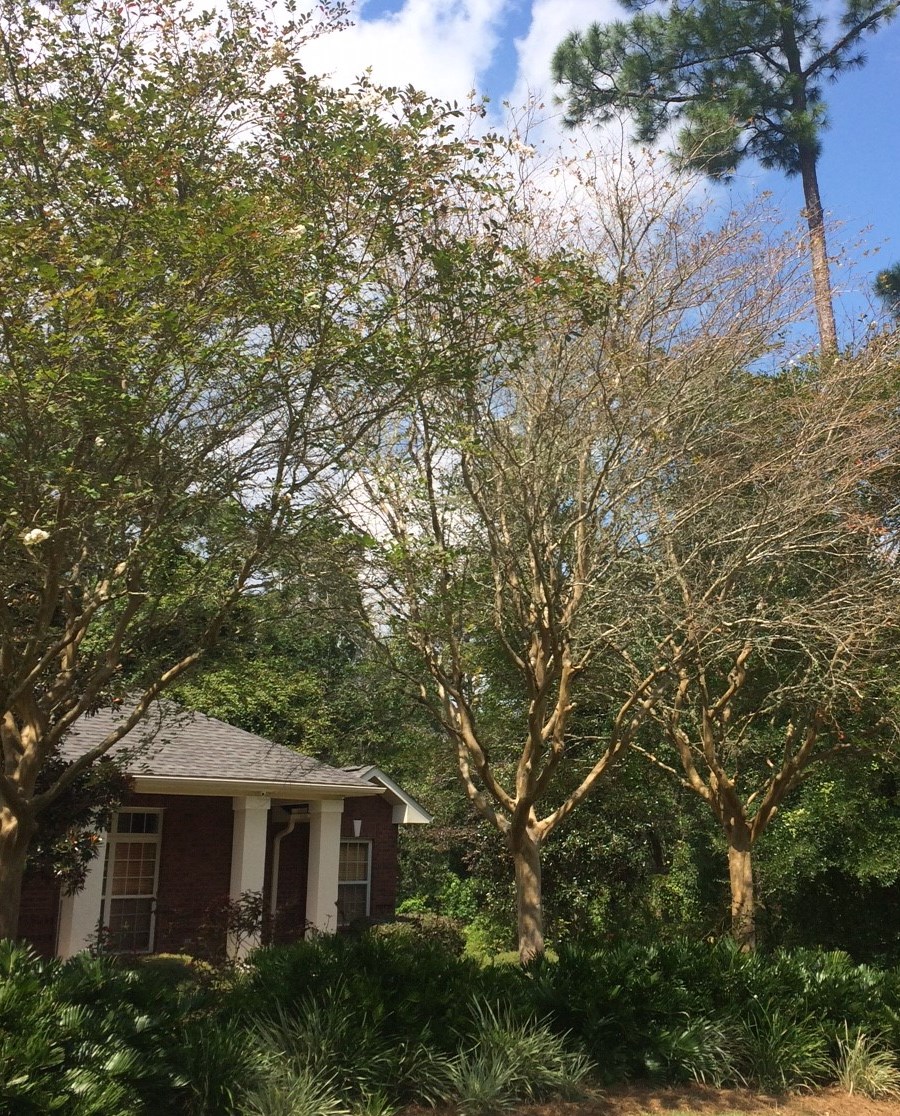
Over the years, tree trunks will grow in diameter and eventually reach the strapping. Because the strapping is still firmly in place, it can cut into a growing tree, resulting in girdling. Although many trees try to overcome the injured area by forming new wood over and around the girdling, this is a major stress that interferes with water and food movement in the plant. What we see is a tree that may be slower to leaf out in the spring, a thinning canopy, and twig dieback. These symptoms may be confused with another cause since the strapping is normally hidden from view.
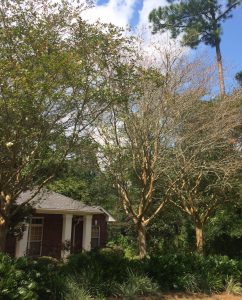
The crape myrtle on the right has a very thin canopy. Investigation found a severe area of girdling from strapping left uncut at planting. Photo by Beth Bolles, UF / IFAS Extension Escambia County.
If you do have a tree that exhibits the above listed symptoms, it never hurts to look at the trunk and root flare just below the mulch and soil surface. If you find strapping still in place, cut it so that it is loose. Depending on the severity of the problem, this may not save the tree but it is worth a try on your important investment.
by Matthew Orwat | Sep 18, 2017
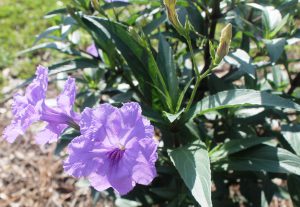
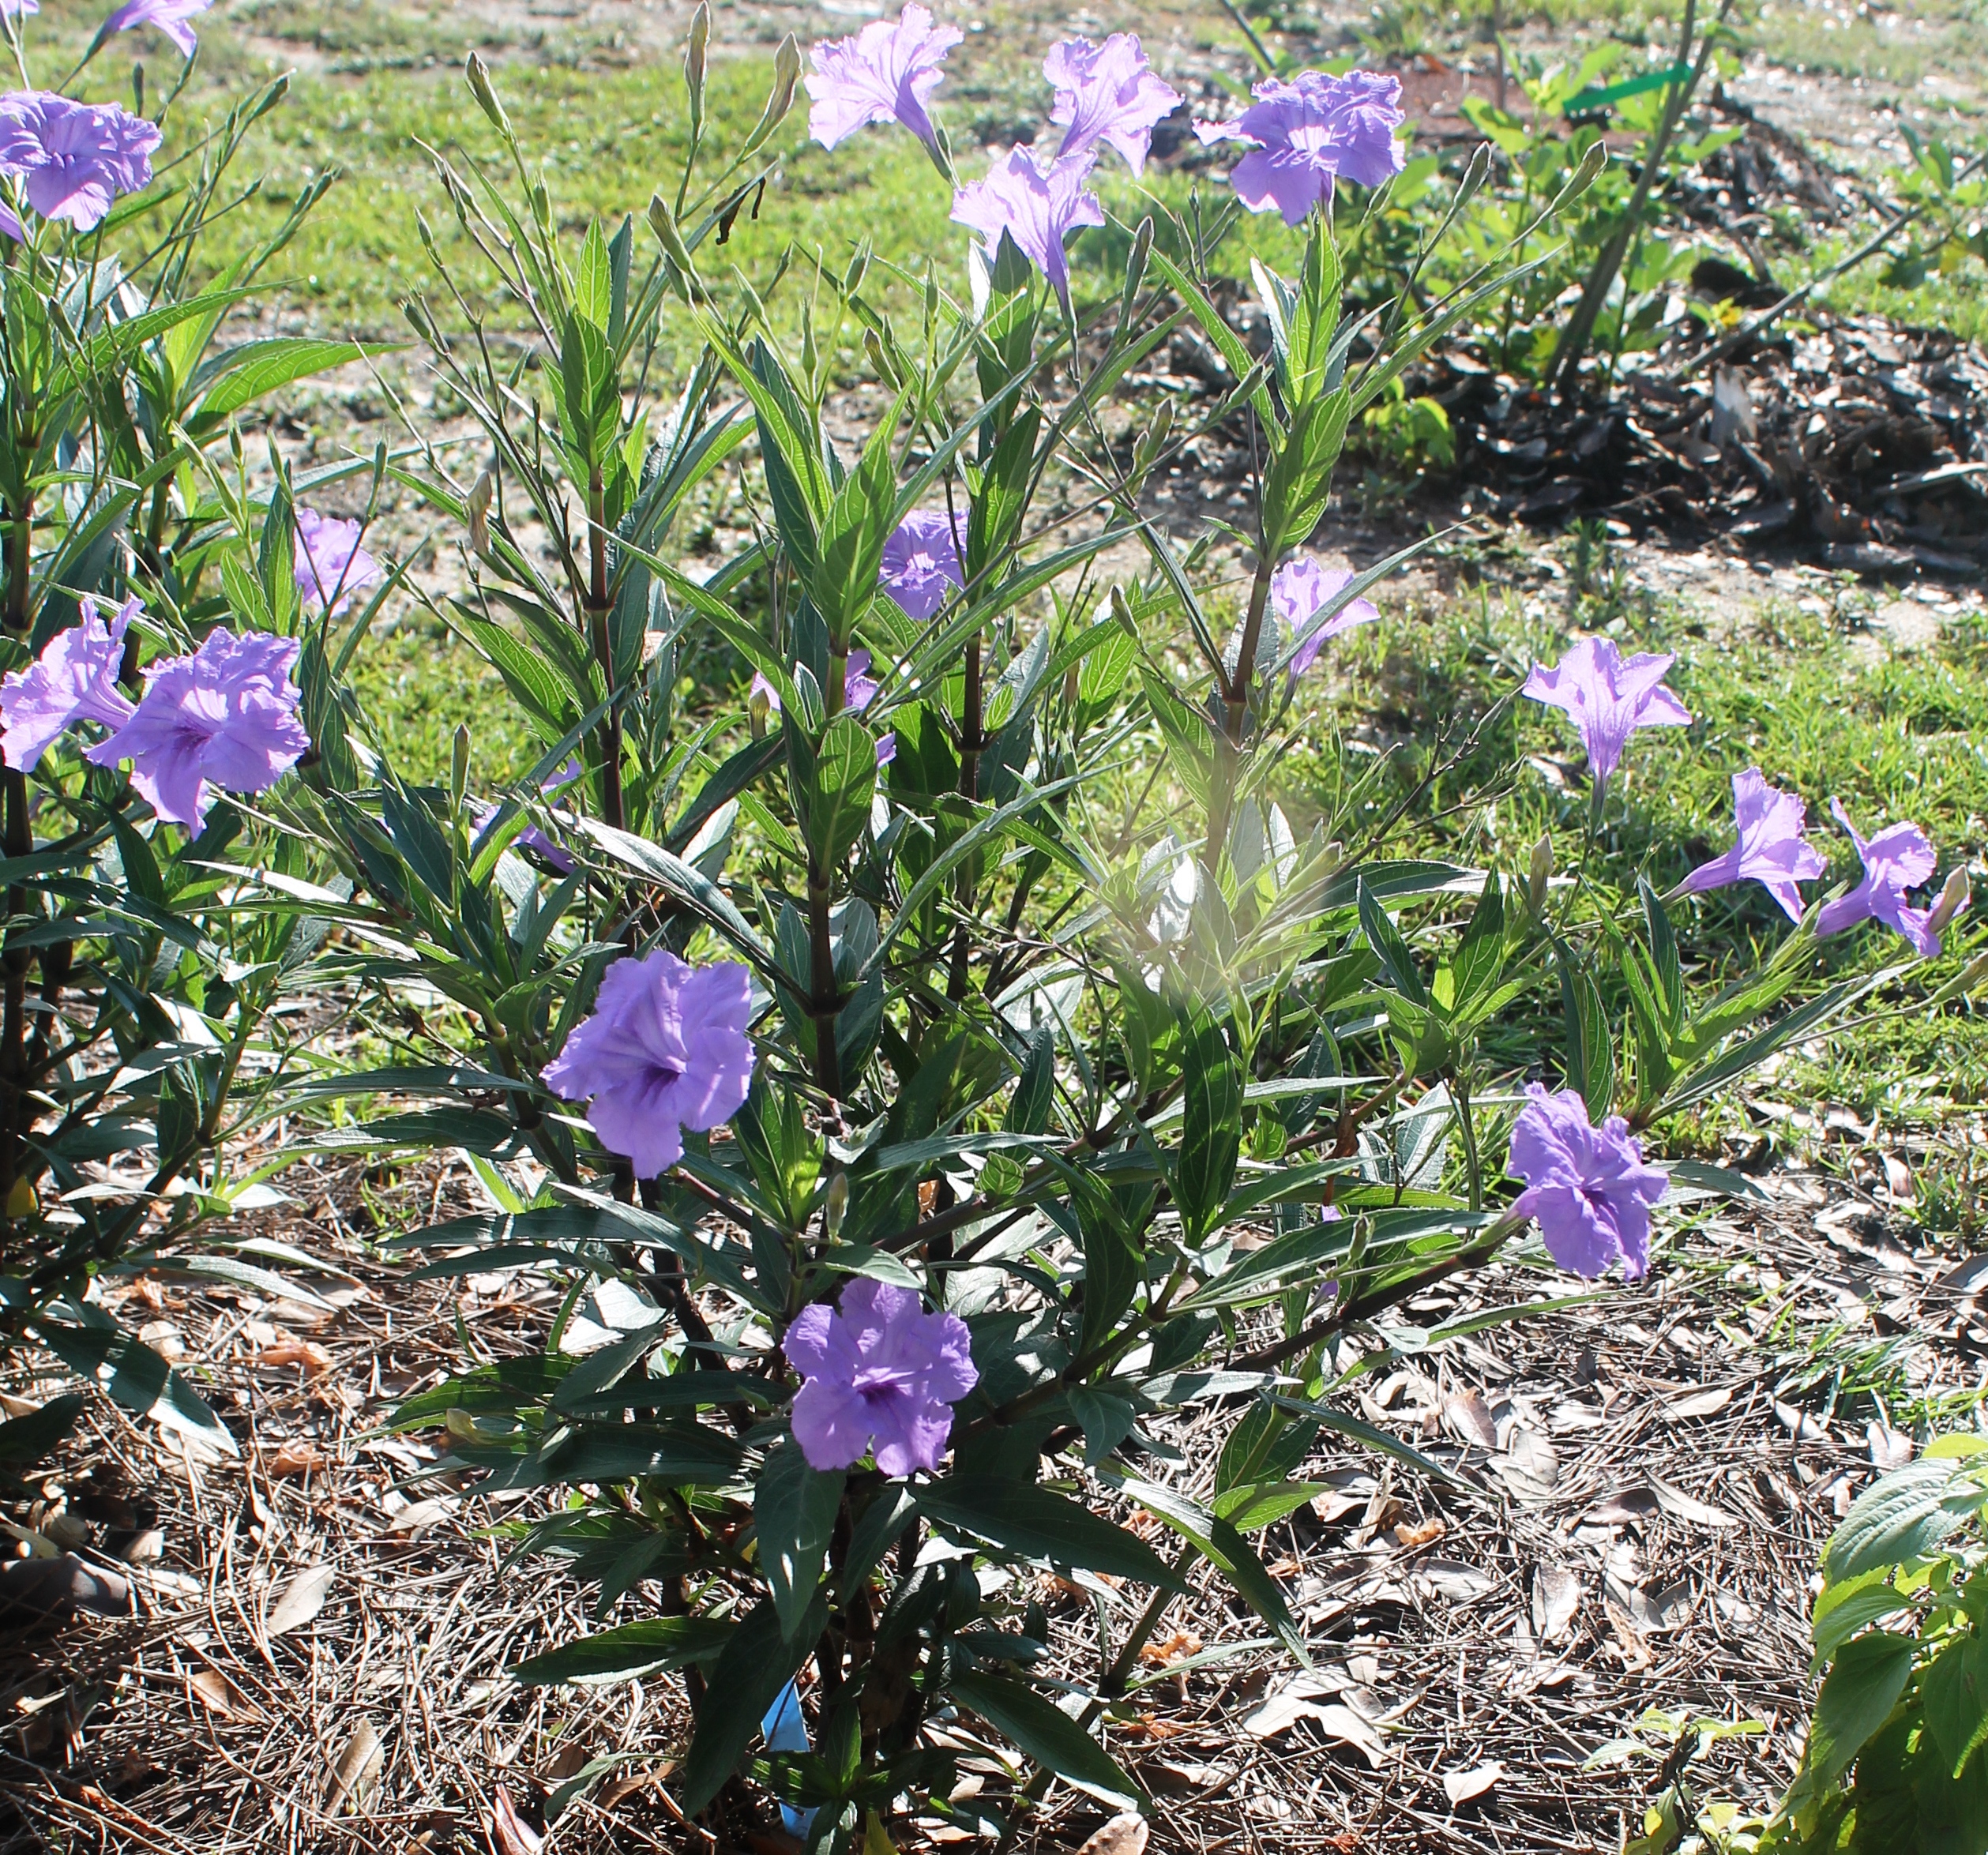
Individual Ruellia ‘Mayan Compact Purple’ flower. Image Credit: Matthew Orwat
Avid horticulturists often get frustrated when attractive, floriferous, versatile, durable, and easy-to-grow plants get sidelined because they have been declared an invasive species. Ruellia simplex (commonly known as Mexican petunia) was declared a category 1 invasive in 2001 by the Florida Exotic Pest Plant Council, described as “a plant that is altering native plant communities by displacing native species, changing community structures or ecological functions, or hybridizing with natives” (Source: UF/IFAS Center for Aquatic and Invasive Plants).
It produces copious amounts of seed year-long, which do not require exposure to cold weather (stratification) or mechanical damage (scarification) to germinate. Its excellent garden characteristics such as prolific flower production, and adaptability to varying light, temperature and moisture levels also increase its invasive potential.
Fortunately, recent developments in the field of plant breeding have developed several sterile Ruellia cultivars that have demonstrated low invasive potential in field trials. UF / IFAS researchers have developed the MayanTM series, which includes four distinct new cultivars: ‘MayanTM White’, ‘MayanTM Pink’, ‘MayanTM White’ and’ MayanTM Compact Purple’. They are available to the public through various licensed nurseries.
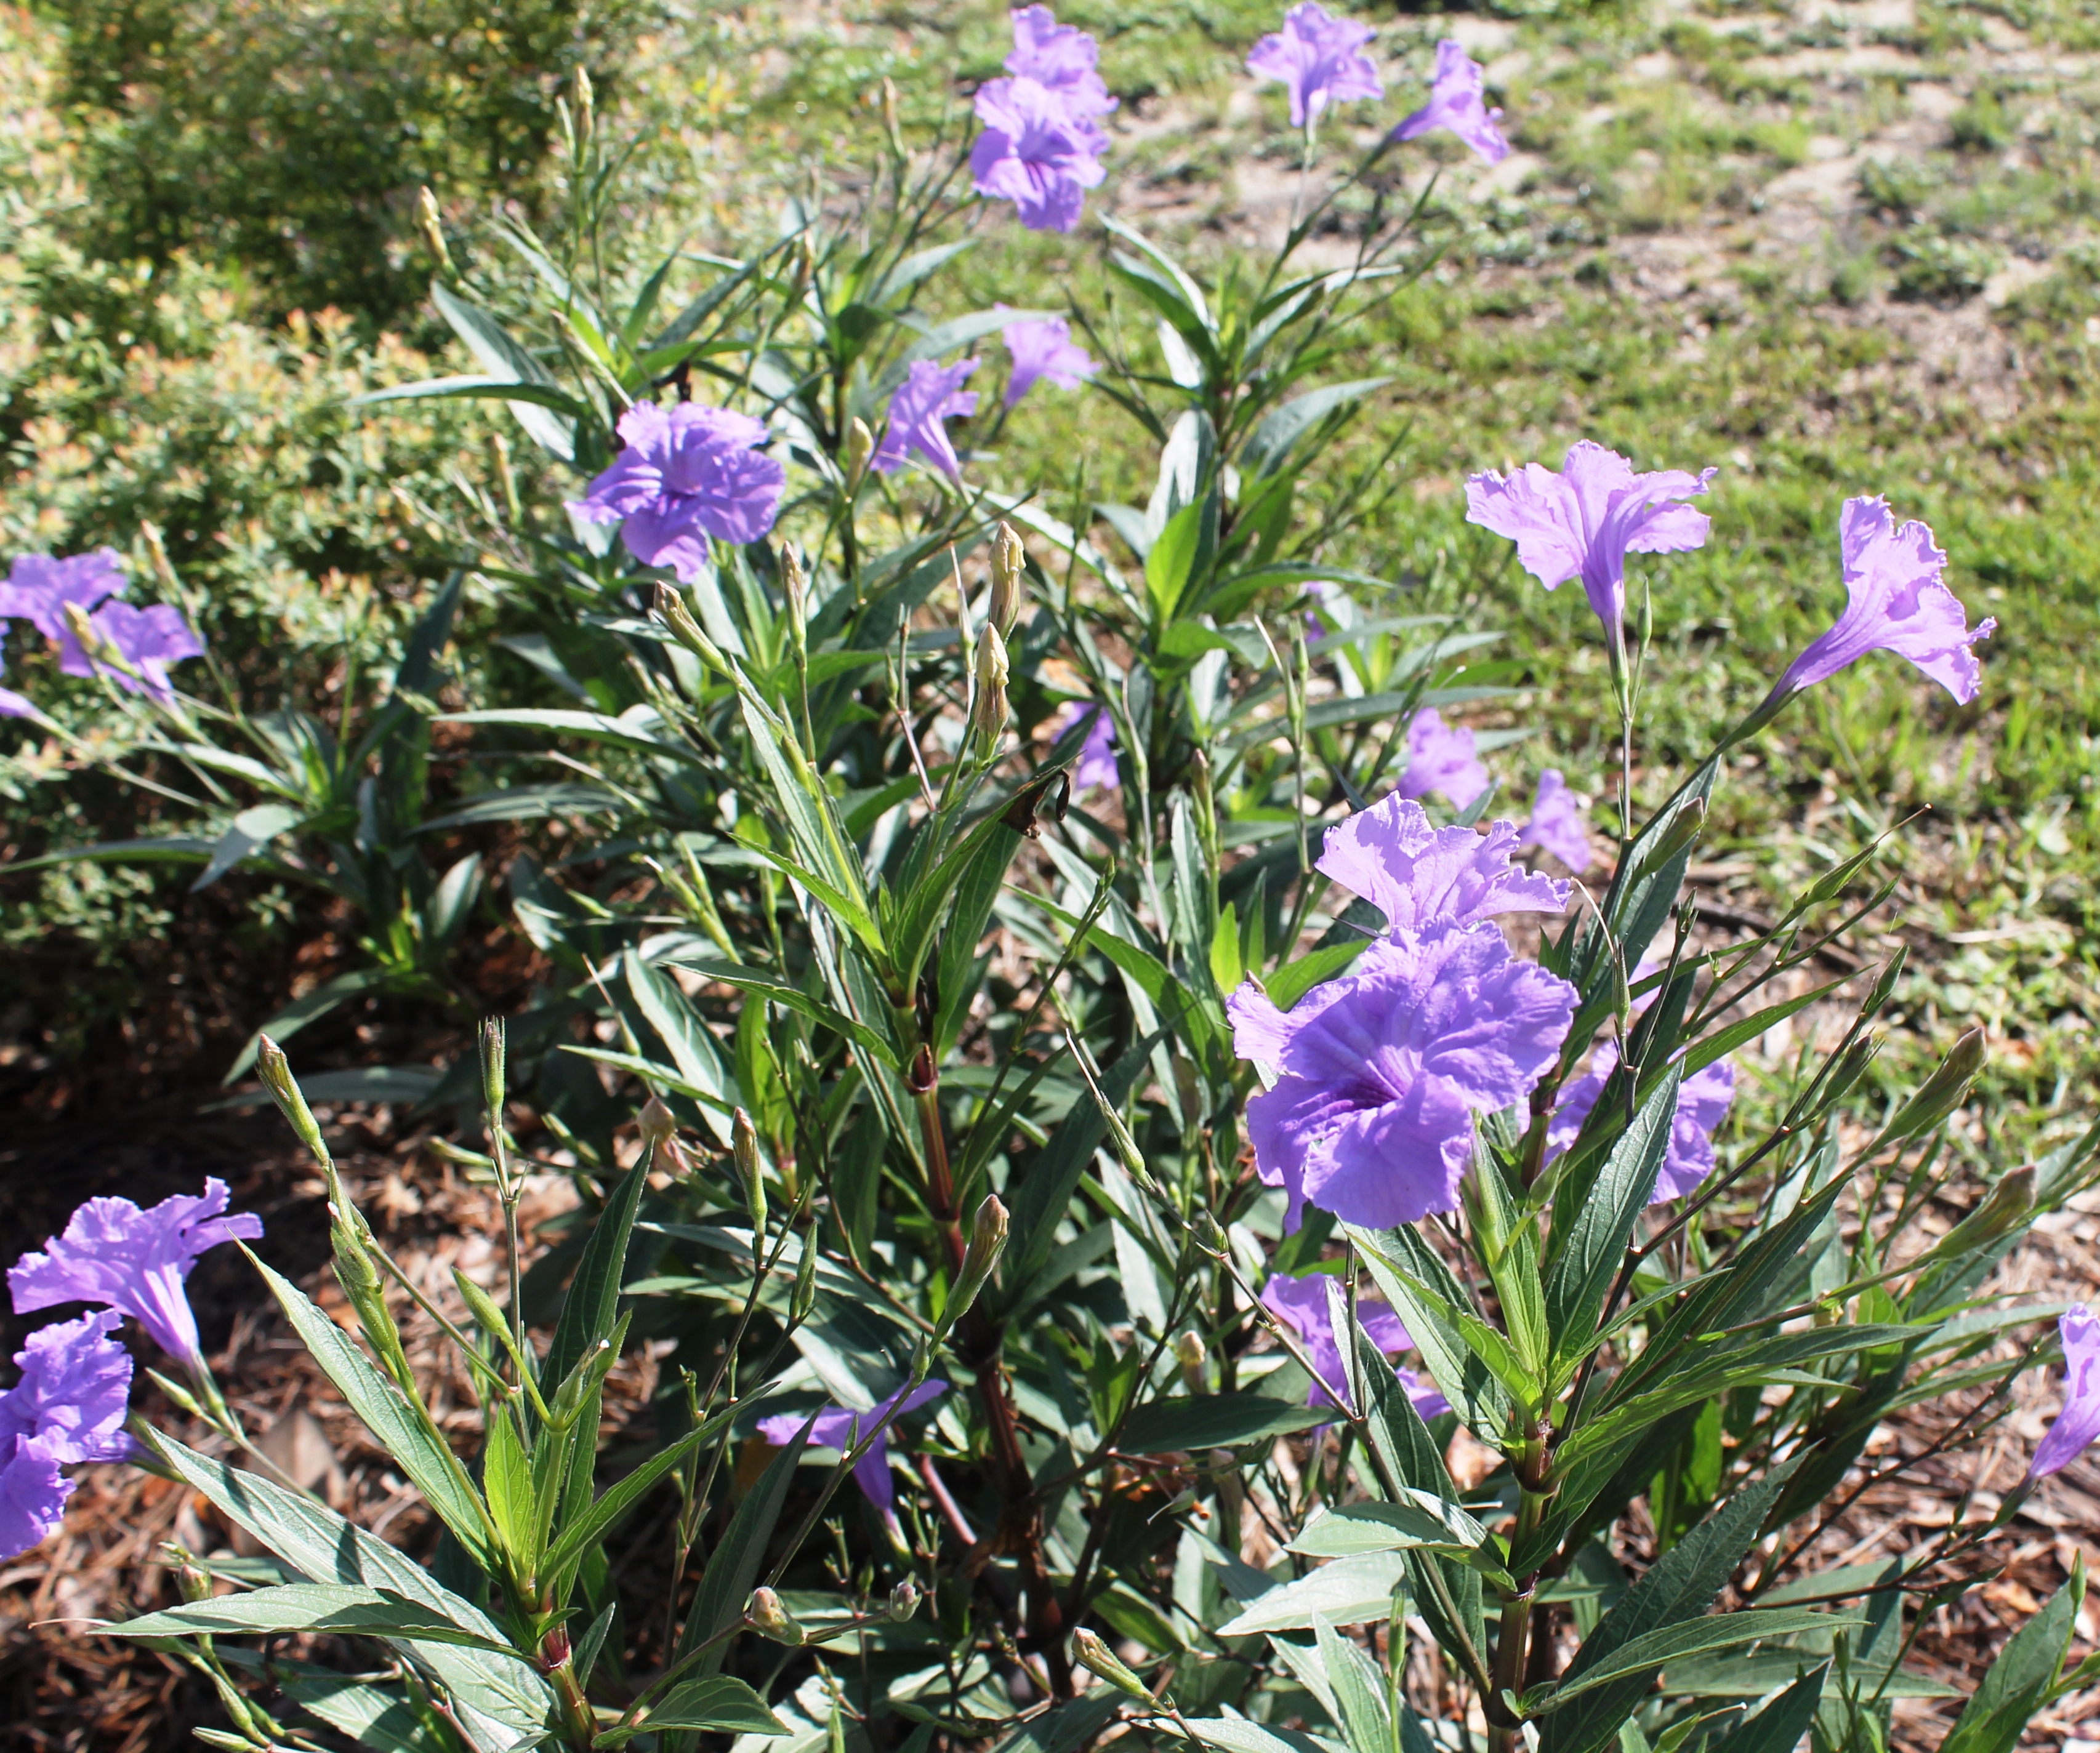
Three month old plant of Ruellia ‘Mayan Compact Purple’ in full flower. Image Credit: Matthew Orwat
This spring, UF/IFAS Extension agents were given the opportunity to try MayanTM Series Ruellia at their local offices. I opted to try the ‘MayanTM Compact Purple’ cultivar and so far it has been an excellent landscape plant. It is shorter than other Ruellia cultivars and has adequate branching throughout so as to not look leggy. It blooms regularly and flowers have a nice, purple hue. It does not mind full morning sun but benefits from afternoon shade, particularly during the hot summer months. So far, it seems like an excellent selection for plant borders or areas where a durable source of color is needed. Additionally, it produces no fruit and very little viable pollen, so it does not have potential to hybridize with naturalized Ruellia simplex populations.
Although this is a sterile selection, it can still multiply by rhizomes. While I have not observed any invasive behavior in ‘MayanTM Compact Purple’, I have just tested it in one location.
For more information consult this article from Florida Foundation Seed Producers and one from Hort Science on the ‘MayanTM Compact Purple’ cultivar.
Ruellia ‘Mayan Compact Purple’. Image Credit: Matthew Orwat
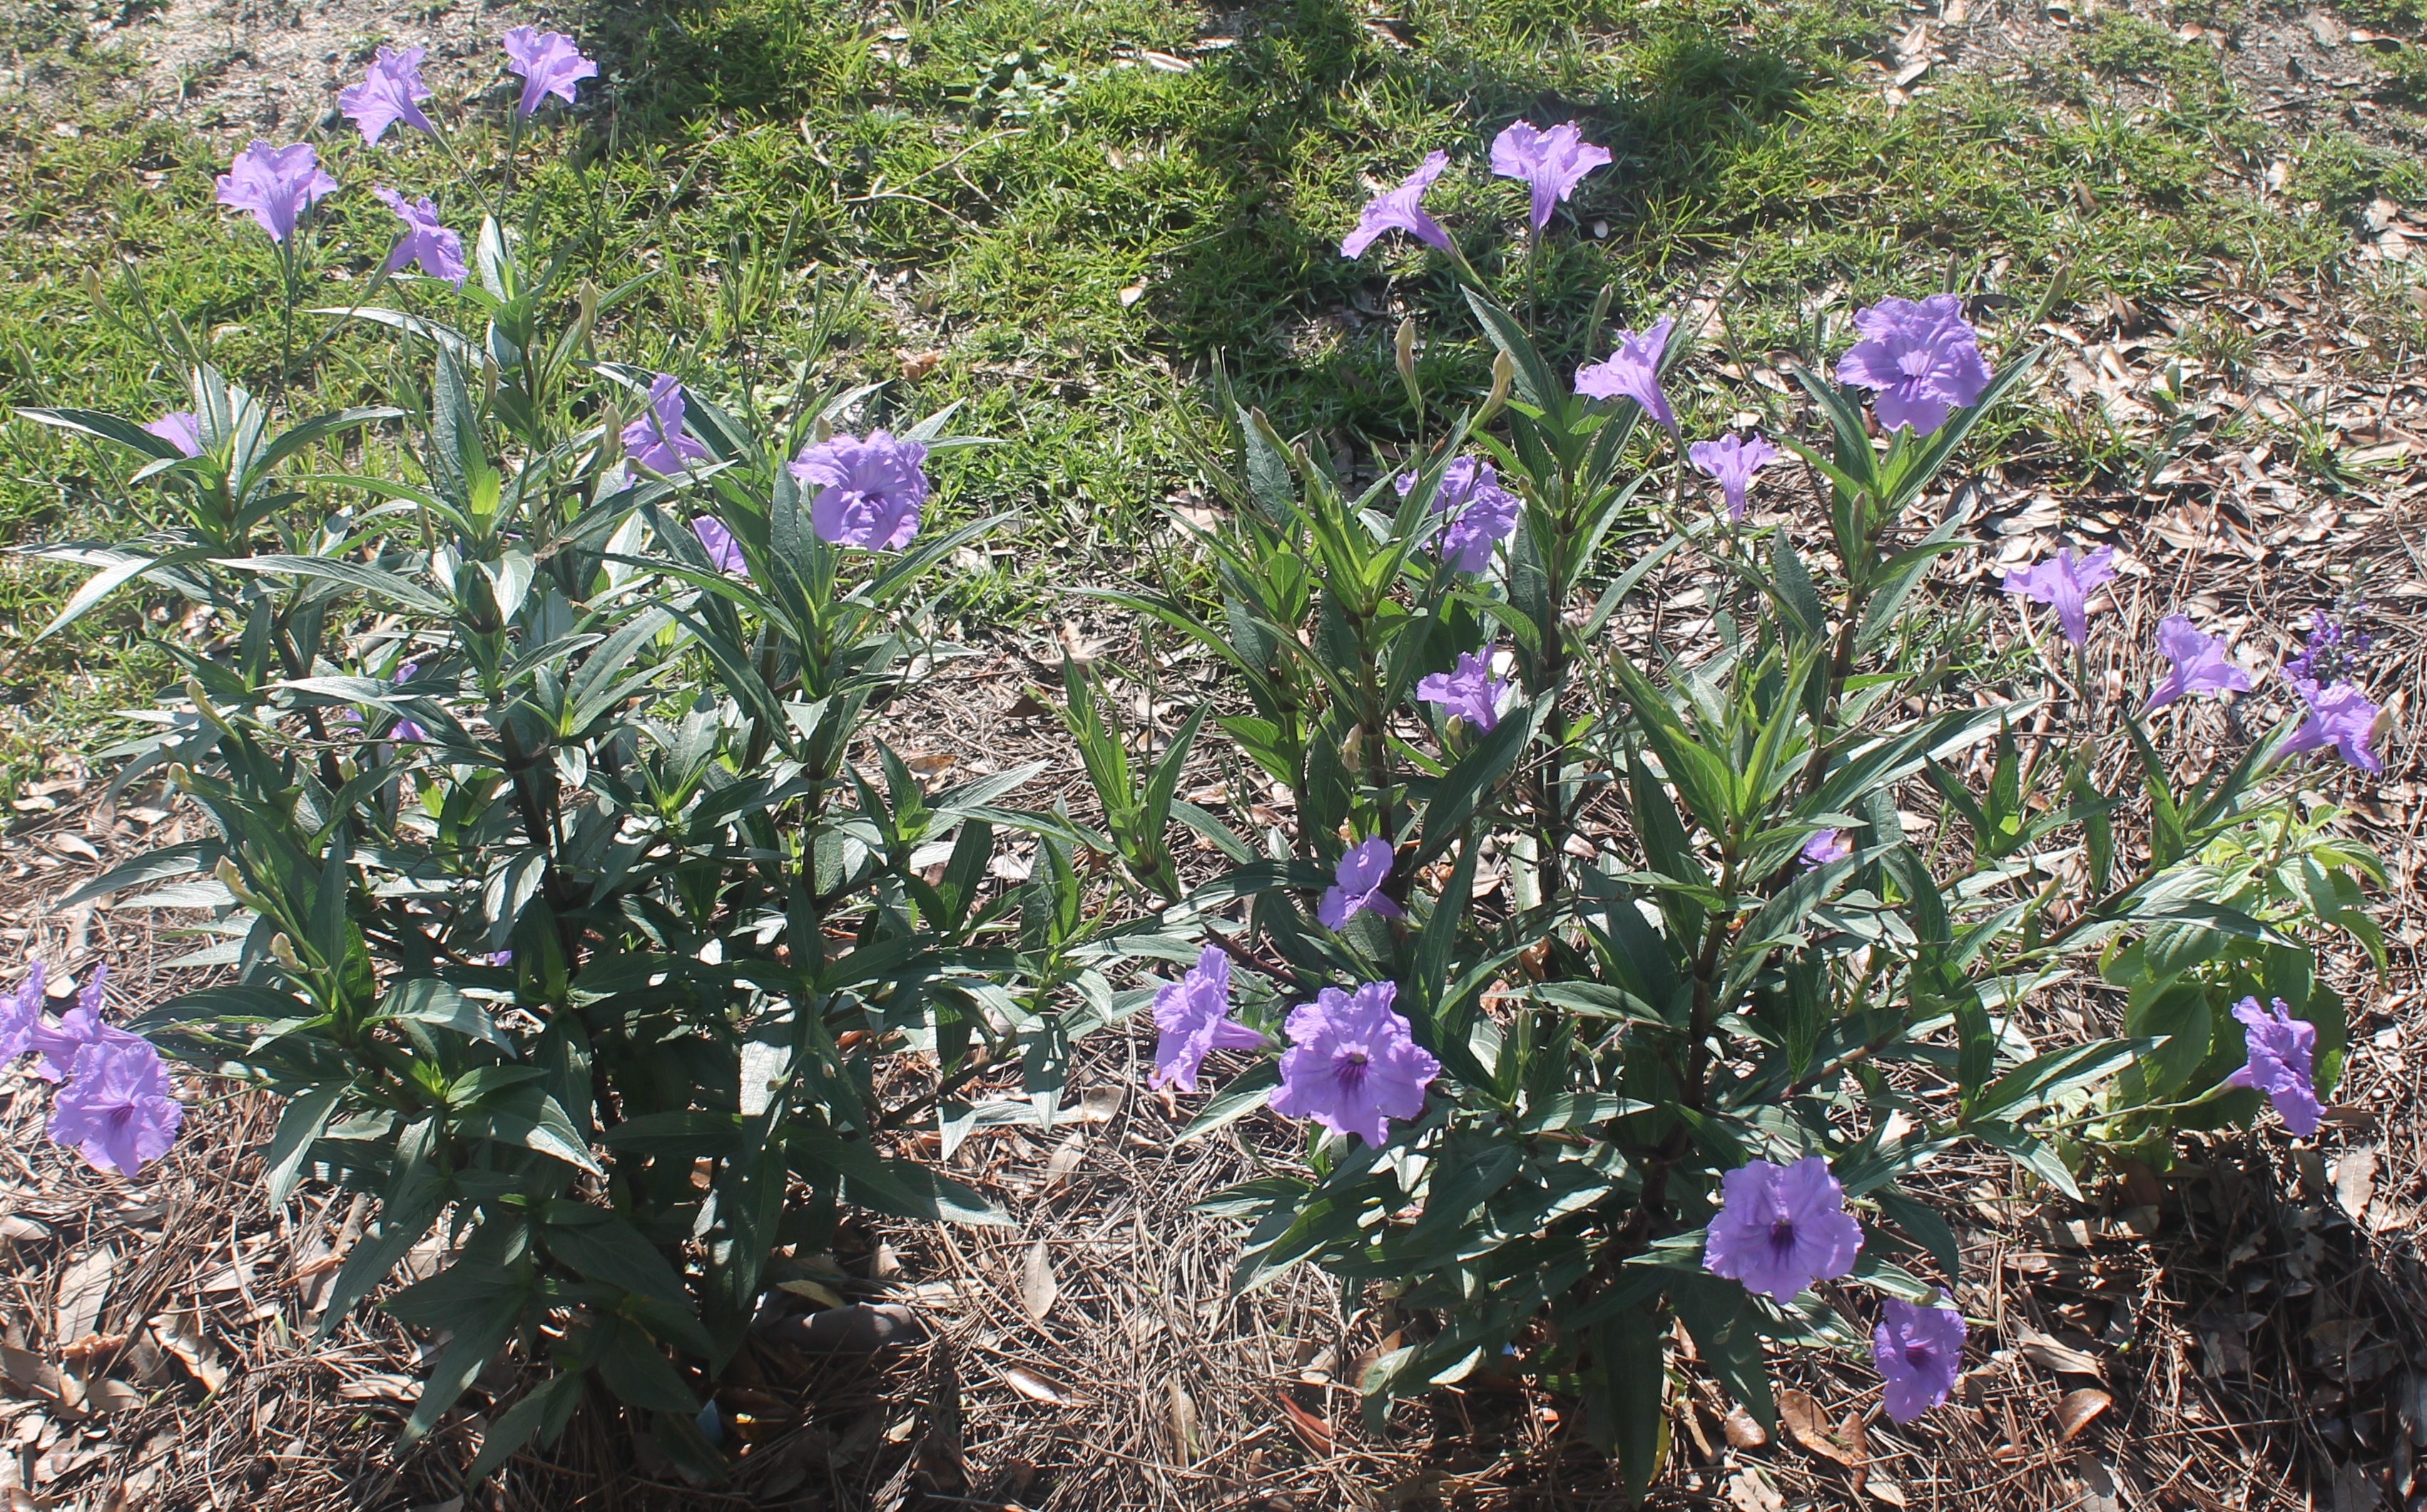
Ruellia ‘Mayan Compact Purple’ Image Credit: Matthew Orwat
by Beth Bolles | Sep 8, 2017
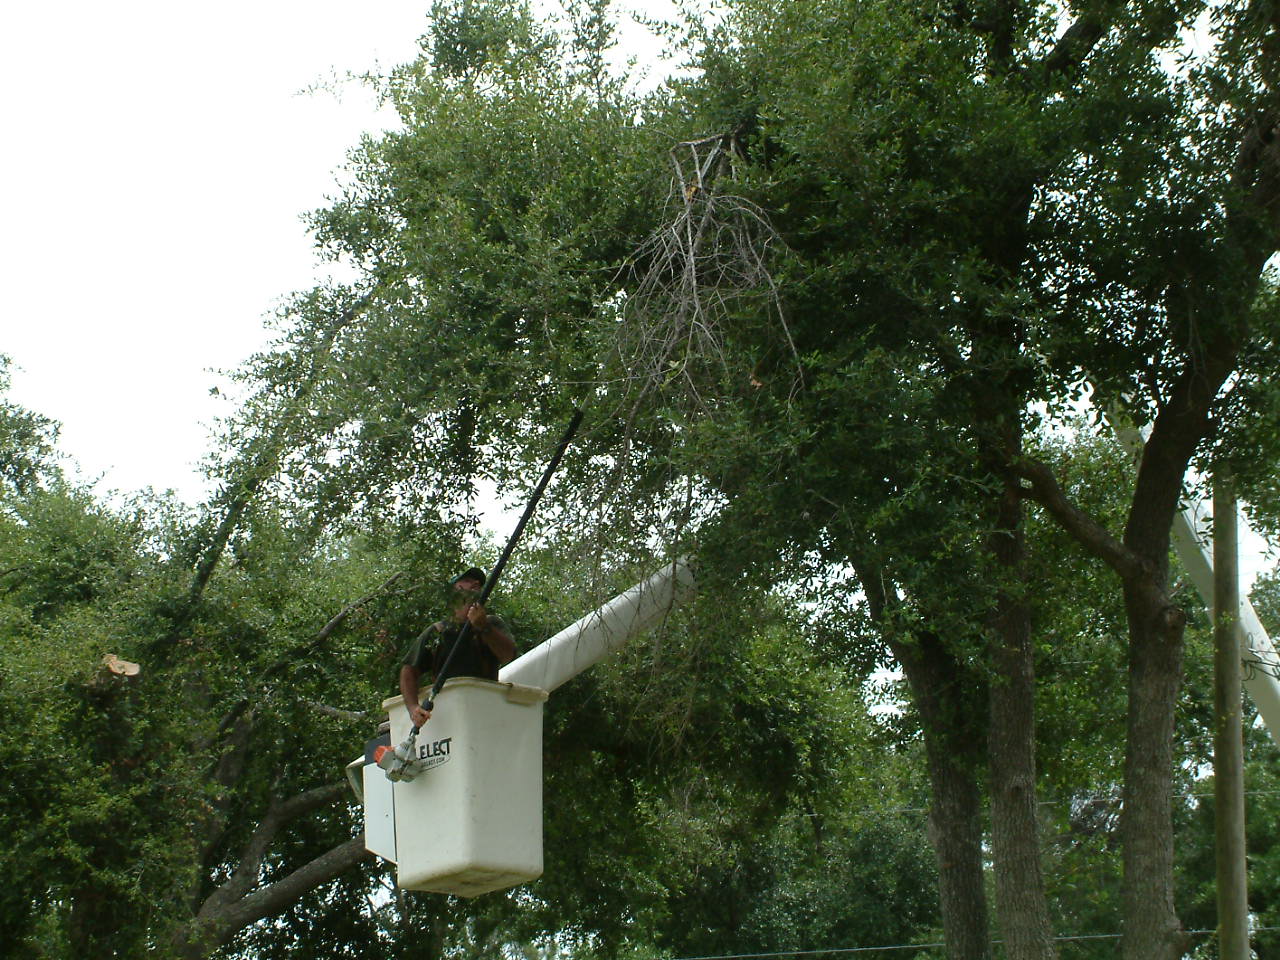
Trees are a valuable resource. They add beauty to our community, serve as food and shelter for animals, filter the air, and cool urban environments. Trees can also be a liability when poorly maintained, damaged, or diseased. There are often times when an arborist is needed to help determine the best course of action for the tree.
There are many individuals who are involved in the tree care and removal business. Not all of these people are certified in the care of trees. Arborists are people who receiving training in the planting, care, and maintenance of trees.

Professional arborists have specialized training to create safe, structurally sound trees, even when damaged by storms. Photo by Beth Bolles, UF IFAS Extension Escambia County
Certified arborists go through a voluntary certification process with the International Society of Arboriculture which means that they have at least three years experience and have passed a comprehensive examination developed by tree experts. A certified arborist maintains certification by attending regular training courses.
An arborist may also be a member of another organization which helps professionals stay up-to-date on tree care techniques and information. These include the National Arborist Association and the American Society of Consulting Arborists.
Hiring an arborist to work on your trees is important for several reasons. An arborist can evaluate the tree and determine the steps necessary to create a healthy specimen. In regards to pruning, the professional will determine what type of pruning is necessary and remove branches properly.
Professionals will also perform tree care practices that are recommended by University research. A few practices that the arborist would not perform include topping trees, using climbing spikes on trees which are not being removed, and making flush cuts against the trunk.
Flush cuts are damaging to trees and can create a future hazard in your landscape. Photo by Beth Bolles, UF IFAS Extension Escambia County
Finally arborists have the skills and equipment to safely and efficiently prune or remove trees. This includes personal and property damage insurance and workers compensation insurance.
Next time you need tree work or advice, hire a professional for the job. It will definitely be worth the investment.
by Les Harrison | Aug 11, 2017
July’s hot summer weather has given way to August’s 31 days of what will likely be temperatures and humidity equally elevated and intense. Wishes for November’s cooler thermometer reading are already creeping into daily conversations. The lawns and gardens in Wakulla County have rains as a mitigating factor to counteract the wilting potential of normal to excessive temperature readings. Unfortunately the arrival of water from above is not on a set or easily predictable schedule.
Traditionally, summer is the wettest season in Florida, with more than half of the annual rainfall occurring during the June to September “wet season”. Florida’s highest average annual rainfall occurs in the Panhandle with averages exceeding 60 inches per year. The Pensacola and Tallahassee weather stations are listed among the ten “wettest” stations in the nation. Still, this pattern of seasonal precipitation can vary greatly between locations, years and even days. This variability often results in the need to water the lawn, landscape and garden. By following a few guidelines, you can produce the best results for plants under stress and conserve a vital and limited resource.
It is most efficient to apply water between 5:00 a.m. and 10:00 a.m. for several reasons. Only water that is in contact with roots can be absorbed by the plant. If water is applied after 10:00 a.m., a substantial portion of it will evaporate before it reaches the roots; more will then need to be applied and this resource’s productivity will be reduced. Never water late in the afternoon as evaporation will still be a problem, and wet turf and plants will invite a variety of fungal diseases to flourish as night settles.

Photo Courtesy: Les Harrison, UF/IFAS Wakulla County Extension
In the case of landscapes and gardens, water should be applied only when the moisture in the root zone system has been depleted to an unacceptable level, usually by 1/2 to 2/3 of the stored soil-water. There are several ways to determine when the soil-water reservoir has been depleted beyond an acceptable level. The simplest method is a visual inspection of the turf or plants. Common symptoms of water stress include leaf color changes to a bluish-gray tint, footprints which linger long after being pressed into the grass and curled or folded leaf blades. Be sure the sprinklers are delivering water to the target area as water which misses the soil and is applied to hard surfaces such as driveways and sidewalks will be wasted. It also may pose an environmental problem in the form of runoff. Surface runoff that flows past the landscape will usually reach streams, ponds, or the Gulf of Mexico. If it picks up pollutants along the way, they too will reach the surface water bodies.
Over watering can be just as damaging as too little water. Excessive irrigation water can infiltrate the ground and reach groundwater aquifers. This issue is complicated when groundwater runs close to the surface. Excessive nutrients or pollutants can be discharged into surface bodies or move vertically into the deeper land layers. The connected springs and sinkholes in Wakulla County make the movement of surface water a common concern. Responsible and efficient irrigation will have positive effects far beyond the front yard.
To learn more about the effective use of water in Wakulla County’s landscapes, contact your UF/IFAS Wakulla Extension Office at 850-926-3931 or http://wakulla.ifas.ufl.edu/
by Mark Tancig | Aug 1, 2017
Florida’s panhandle has received quite a bit of rain this summer. In the last three months, depending on the location, approximately 15 to 35 inches of rain have come down, with the western panhandle on the higher end of that range. In addition to the rain, we all know how hot it has been with heat index values in the triple digits. And who can forget the humidity?! Well, these weather conditions are just the right environmental factors for many types of fungi, some harmful to landscape plants, most not.
In the classification of living things, fungi are divided into their own Kingdom, separate from plants, animals, and bacteria. They are actually more closely related to animals than plants. They play an important role on the Earth by recycling nutrients through the breakdown of dead or dying organisms. Many are consumed as food by humans, others provide medicines, such as penicillin, while some (yeasts) provide what’s needed for bread and beer. However, there are fungi that also give gardeners and homeowners headaches. Plant diseases caused by various fungi go by the names rusts, smuts, or a variety of leaf, root, and stem rots. Fungal pathogens gardeners may be experiencing during this weather include:
- Gray leaf spot – This fungus can often show up in St. Augustine grass lawns. Signs of this fungus include gray spots on the leaf (very descriptive name!). This disease can cause thin areas of lawn and slow growth of the grass.
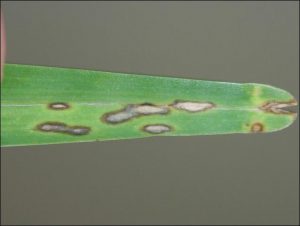
Gray leaf spot on St. Augustine grass. Credit: Phil Harmon/UF/IFAS.
- Take-all root rot – This fungus can attack all our warm-season turfgrasses, and may start as yellow leaf blades and develop into small to large areas of thin grass or bare patches. The roots and stolons of affected grasses will be short and black.
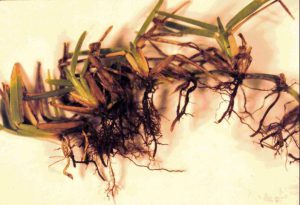
Signs of take all root rot. Credit: UF/IFAS.
Powdery mildew – This fungus can be found on many plants, from roses to cucumbers. It looks like white powder on the leaves and can lead to plant decline.
- Armillaria root rot – This fungus can infect a variety of landscape plants, including oaks, hickories, viburnums, and azaleas. Symptoms can include yellowing of leaves and branch dieback, usually in adjacent plants. Old hardwood stumps can harbor this fungus and lead to the infection of nearby ornamentals.
Because fungi are naturally abundant in the environment, the use of fungicides can temporarily suppress, but not eliminate, most fungal diseases. Therefore, fungicides are best used during favorable conditions for the particular pathogen, as a preventative tool.
Proper management practices – mowing height, fertilization, irrigation, etc. – that reduce plant stress go a long way in preventing fungal diseases. Remember that even the use of broadleaf specific herbicides can stress a lawn and exacerbate disease problems if done incorrectly. Since rain has been abundant, irrigation schedules should be adjusted to reduce leaf and soil moisture. Minimizing injury to the leaves, stems, and roots prevents stress and potential entry points for fungi on the move.
If you think your landscape plants are suffering from a fungal disease, contact your local Extension Office and/or visit the University of Florida’s EDIS website at http://edis.ifas.ufl.edu for more information.