With cold temperatures having arrived in the Panhandle last week, we’re finally getting close to prime landscape planting season. But why is winter the best time to install landscape trees and shrubs? Shouldn’t we plant when things are leafed out and growing? While it’s counterintuitive to think bitter cold, dreary days are significantly better to plant landscape plants in than the warm, sunny days of summer, it’s usually true! Let’s explore why winter is the time to plant woody trees and shrubs and then look at some of the best woody plants no Panhandle landscape should be without.
Most people from elsewhere think that Florida is always lush, green, and tropical. Those people have clearly never been to the Panhandle – heck it snowed last year! Our region of Florida has more in common, climate wise, with the rest of the south – subtropical with long hot, humid summers and wet, mild winters (though rain has been hard to come by recently), occasionally wracked by intense cold fronts. Because of those cold fronts, tropical plants cannot survive, and woody plants enter a dormant stage where above ground growth ceases. This cold-forced dormant season is the perfect time to plant woody plants because the planting process is stressful (the root system is purposefully damaged to remove circling and J-shaped roots and encourage outward growth) and regular rainfall and cool temps means conditions are right for plants to get a solid root system re-established before growth and transpiration begins in the heat of spring/summer.
Now that you know why we plant woody landscape plants when we do, let’s select a few quintessential, versatile Florida-Friendly trees and shrubs (2 each, one native and one non-native) to install in our landscapes this planting season.
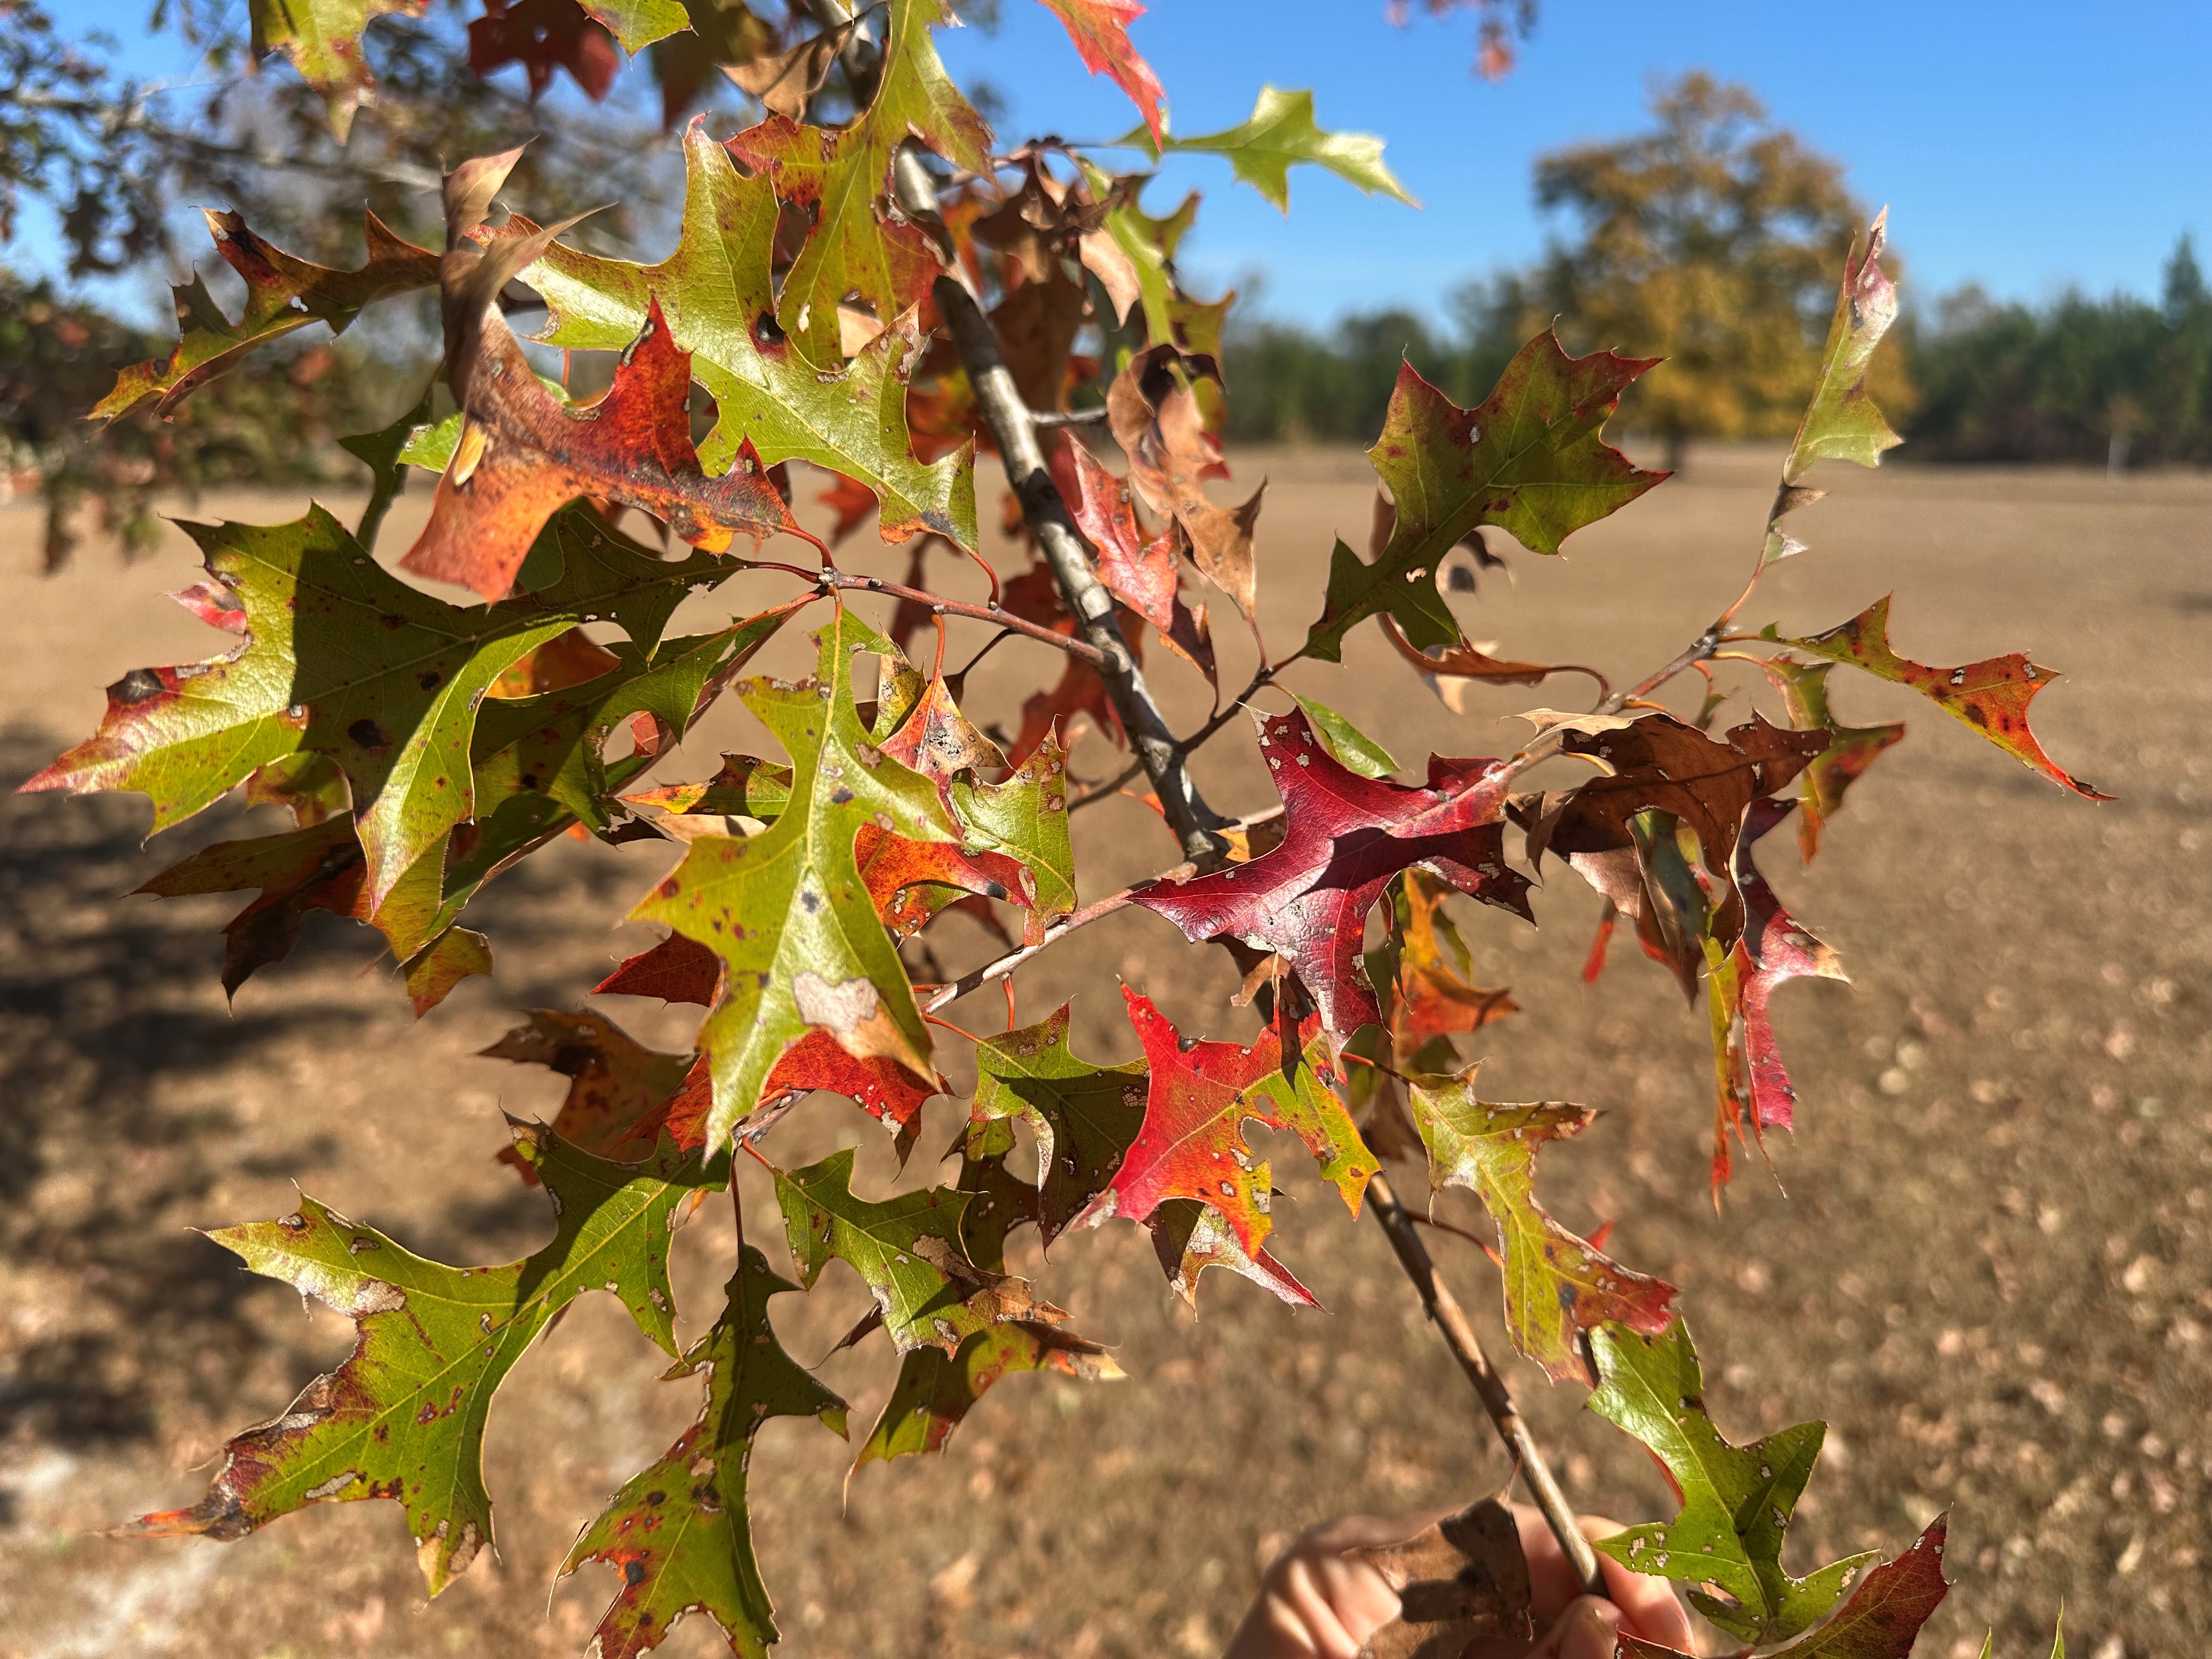
Nuttall Oak (Quercus texana) is one of the most adaptable landscape trees around. The species is tolerant of many soil types, native to moist bottomland areas but tolerating drier spots well once established. While it’s a large tree – up to 70-80’ tall, I find its rounded upright habit to often be more in scale with landscapes than the wide spreading Live Oak (Quercus virginiana). Nuttall Oak certainly has many positive attributes (tough, wind-resistant, pollinator friendly, etc), but its fall color is probably my favorite. For the Panhandle it is quite good, delivering autumnal hues of red and orange.
It’s not North Carolina Sugar Maple color but Nuttall Oak possesses attractive foliage. Photo courtesy of Daniel Leonard.
Crape Myrtle (Lagerstroemia indica) is the most widely grown landscape tree in the South for good reason! They’re tough, widely adapted, offer excellent summertime flower displays, and possess interesting architecture and unique bark. The primary consideration with Crape Myrtle is simply picking the right one. Do you need an upright, compact tree? Choose ‘Sioux’ or ‘Apalachee’. Do you want a big crape that can double as a small shade tree? Choose ‘Natchez’ or ‘Muskogee’. Do you want a new dwarf variety or one with black foliage? There’s now plenty of those to choose from as well. There’s truly a Crape Myrtle for every yard.
Oakleaf Hydrangea (Hydrangea quercifolia) is a wonderful native flowering deciduous shrub that’s at home in all Panhandle landscapes. It prefers moist soil with a little afternoon shade but can tolerate most conditions thrown at it. Growing 5-7’ in height, sporting footlong white flower panicles each summer, and beautiful foliage each fall, Oakleaf Hydrangea is a must. You can find unnamed seedlings of the species or look for named varieties such as ‘Snow Queen’, ‘Semmes Beauty’, and ‘Alice’. In my experience, you can’t go wrong with any of them.
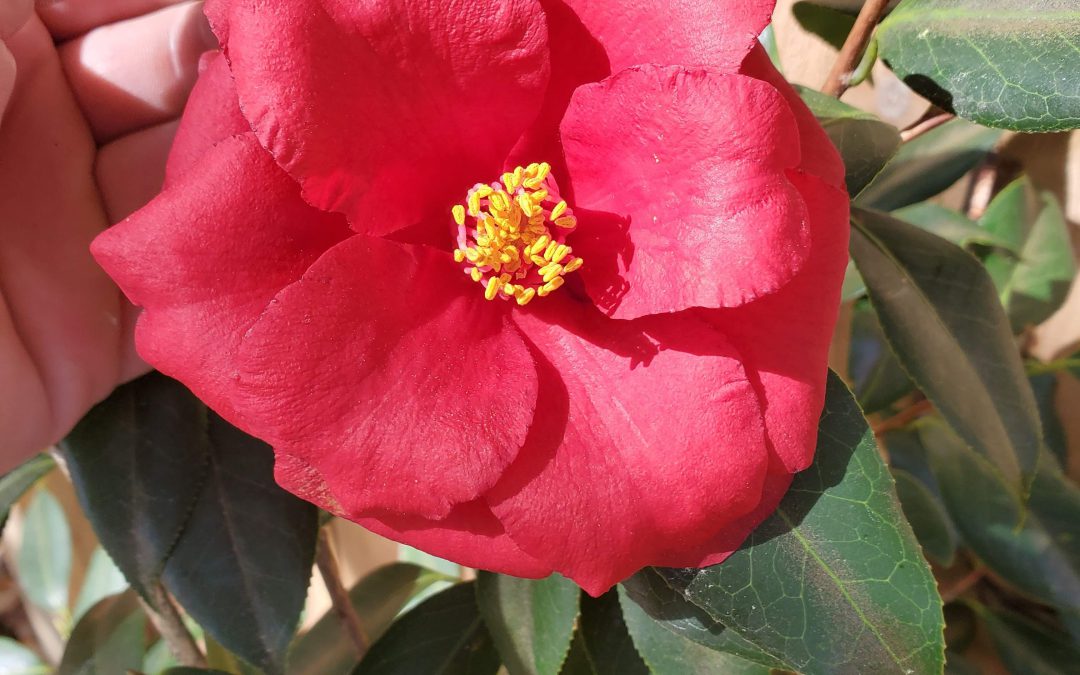
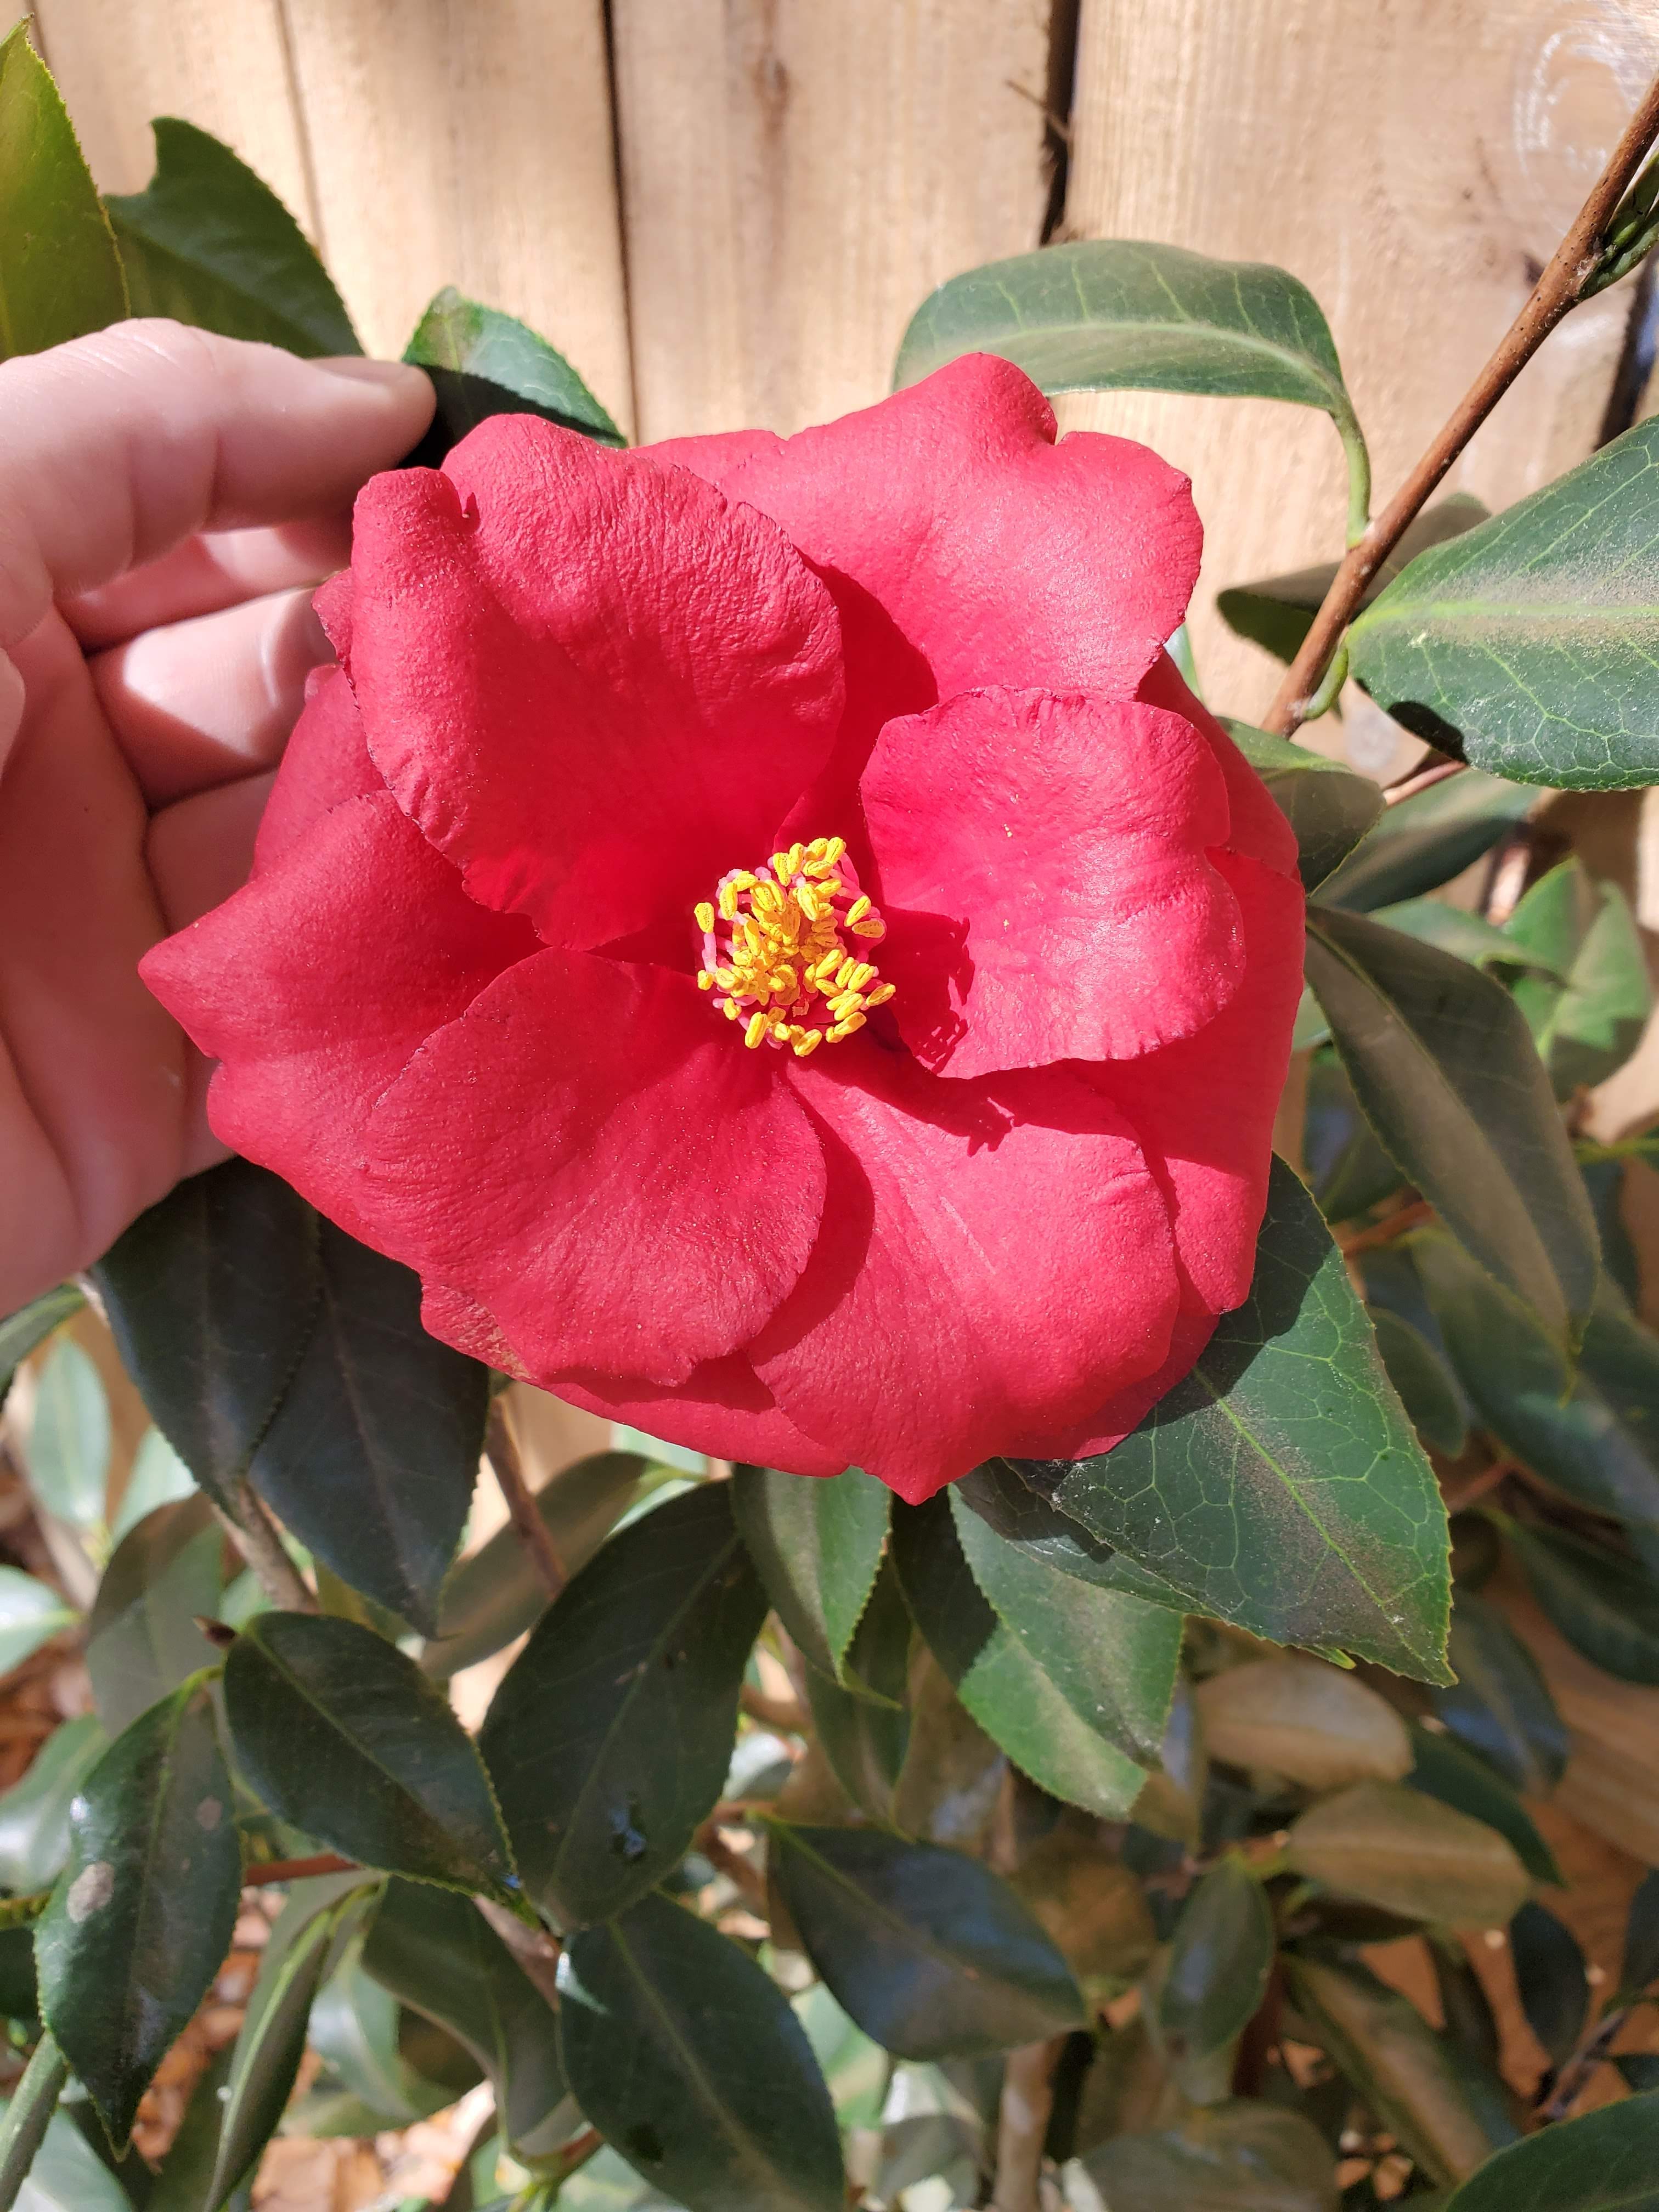
Camellia Sasanqua is without a doubt my favorite fall flowering shrub. Impossibly durable (it’s common to find specimens over 100 years old), incredibly beautiful in flower and form, and coming in all shapes, sizes, and flower color, a Sasanqua of some kind belongs in ever yard. A few of my favorites are ‘Leslie Ann’ (upright form, white/pink bicolored flowers), ‘Shi Shi Gashira’ (dwarf that makes an excellent informal hedge), and ‘Yuletide’ (compact plant with red flowers & showy gold stamens).
So, as the weather continues to be mild with those cold front swings occasionally and rain begins to be more regular, think about getting some woody trees and shrubs planted into your landscape this winter. Keep in mind the excellent above selections and be sure to check out the Florida-Friendly Landscaping Plant Guide for more possibilities! Happy Gardening!
Camellias have been a part of the landscape in the Southeastern United States for over 200 years. They are native to Asia and were introduced near Charleston, South Carolina in 1786. The common name camellia refers to varieties and hybrids of Camellia japonica and to lesser known varieties of C. sasanqua and C. reticulata. The growing conditions in Northwest Florida are well suited for many camellia varieties. Camellias can serve several functions in the landscape including foundation plantings, screens, accent plants, background groupings and hedges. Maximum benefit can be achieved by mass plantings or groupings. Single plants should be focal point in beds rather than randomly placed throughout the lawn. Camellias flower in the fall and winter when their display of colorful blooms is most appreciated. During the remainder of the year their evergreen foliage, interesting shapes and textures, and relatively slow growth make camellias excellent landscape plants. Some camellia growers enjoy competing in flower shows and manipulate the flower buds to achieve larger and earlier flowers. This involves removing competing flower buds and applying gibberellic acid (a plant hormone). Individual cultivars can be selected for size and form ranging from small and irregular to large and upright. Texture and foliage color also differ among the various species and multiple varieties. Midseason flowering varieties that bloom from November through January are best suited for Florida conditions. Warm fall temperatures may prevent early varieties from flowering properly. Late-blooming selections may attempt to send out new leaves before the end of the flowering period which results in “bullnoses”. Bullnosing is characterized by poor quality flowers which do not open fully and may even drop while still tight buds. Extended dry periods while in the bud stage can make the condition more likely. While flowering, camellias need 1 inch of water applied each week. Camellias perform best in partially shaded locations which are enhanced by good drainage and air movement. Fertile, acidic soils high in organic matter are preferred. The soil must be well drained because camellias will not grow in wet areas. Do not plant them in areas with a high water table and/or hard pan. This will result in a shallow root system which is more susceptible to injury during dry periods. Camellias should be installed where cold air can move in and out freely, but the area should be protected from strong northwest winds. Plantings under established trees or in areas that have structures to block the wind are usually injured less by cold temperatures. These conditions enable the plants to gradually thaw or warm in the morning before being exposed to direct sunlight. Dense shade may result in sparse foliage and poor flowering. Camellias exposed to full sun may appear yellow-green, but may yield more flowers. Either situation is stressful to the plants and can lead to pest problems. Tea scale is the most common insect on camellias. Scales generally feed on the underside of leaves and may not be noticed until large populations have developed. Symptoms include very small elongated white and/or brown raised “flakes” on the underside of leaves that turn yellowish in color.
Q. Some of the leaves on my azalea and/or camellia are swollen and light green. What caused this?
A. This is caused by a fungus that has been relatively common this spring.
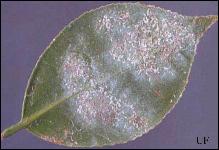
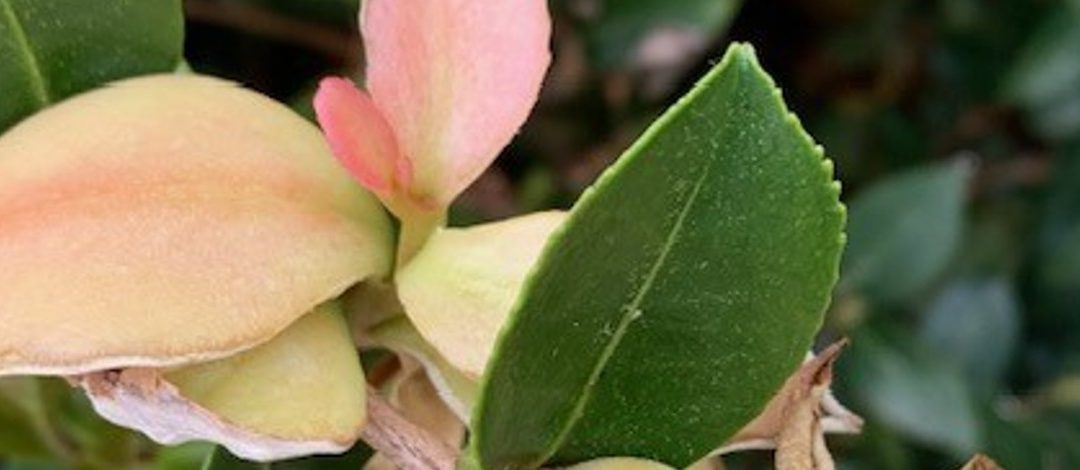
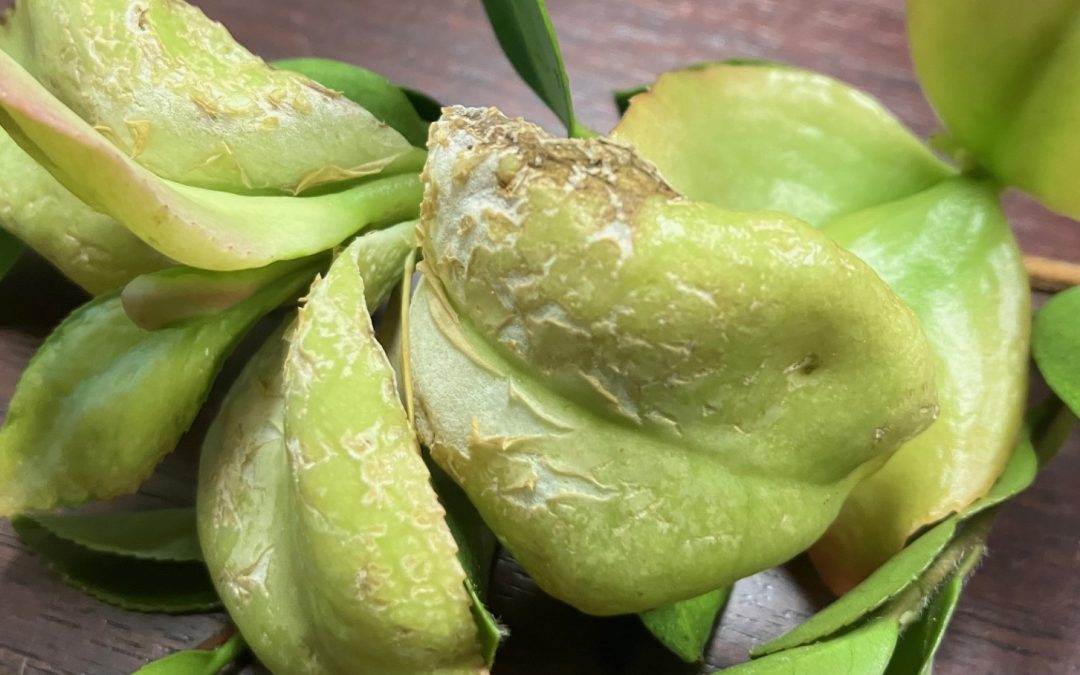
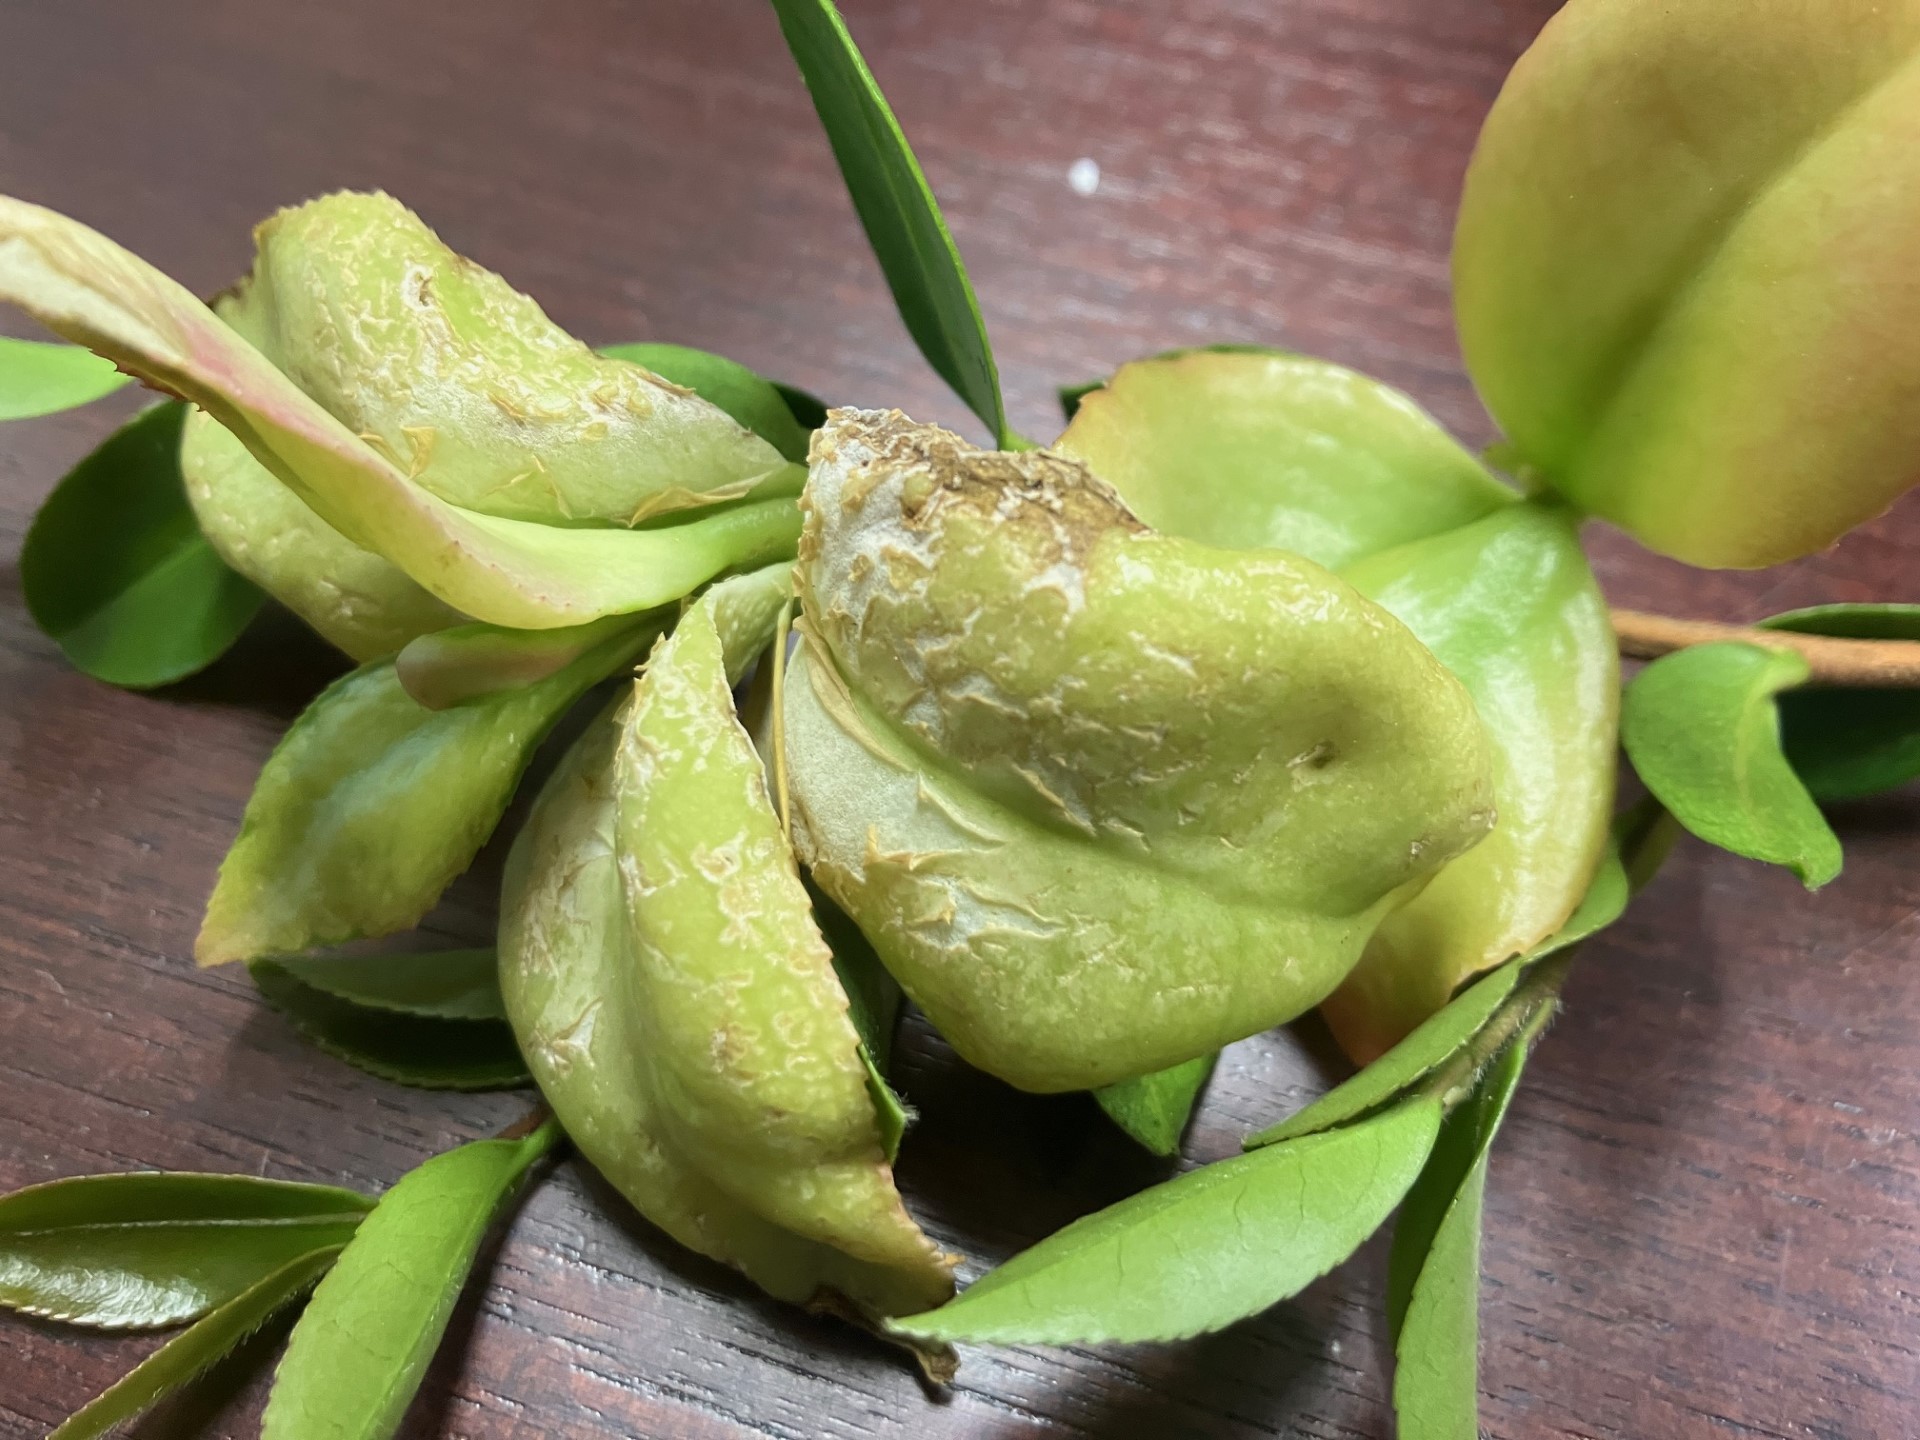
The fungus Exobasidium vaccinii causes leaves and flowers to become swollen or thickened, curled and waxy in appearance. This fungus causes leaves, and in some cases flower petals, to enlarge abnormally and is commonly referred to as azalea or camellia leaf and flower gall.
Exobasidium leaf gall on camellia. Credit: Larry Williams
Symptoms vary somewhat based on the host plant. In addition to azalea and sasanqua camellia, it can occur on blueberry, as well. Infected blueberry leaves turn an unusual bright red in spring with almost no swelling of tissue. With azaleas and camellias, leaves become large and distorted and eventually a white powder covers the galls. The white growth consists of spores, which is how the fungus reproduces. Galls ultimately turn brown and harden. Not every leaf will be infected. It’s more common for the plant’s lower leaves to be the most heavily infected but under humid conditions and in shaded locations galls may form on leaves throughout the plant canopy.
The disease relies on airborne spores produced in the whitish mold on the surface of galls in late spring to early summer to reproduce. The galls then form the following spring. It’s important to remove and dispose of infected leaves before they turn white with spores.
Once you see evidence of infected leaves, it’s too late for chemical control. Besides, there currently is no effective or practical fungicide to control this disease in the home landscape. But you can reduce the amount of infection on your plants the following year by pruning infected leaves and throwing them away before spores are produced. After removing infected leaves with galls, never leave them on the ground around the plants.
It’s best to bury, burn or place the infected leaves in a plastic bag and throw them away. This disease is more severe during a cool, wet spring. It’s advisable to not add to the problem by artificially providing the “wet weather” the spores need by frequently using an overhead sprinkler and keeping the foliage wet in the spring during disease development. This is exactly what this and many other plant diseases need – wet conditions. Yet another reason to water during early morning and on an as needed basis, versus allowing an irrigation system to frequently run when there is already adequate moisture from rain.
In the home landscape, the fungus does not cause any long-term problems for the plant. It just makes the plant’s leaves look ugly. The infected leaves will usually fall prematurely.
Extended spring weather with cool nights and frequent rain can be enjoyable for humans, but does strange things to plants, especially if dormant fungi are hanging around. Exobasidium vaccinii is a fungus that is believed to overwinter as spores attached to bark and bud scales. It can cause infection with the opening of buds in spring, creating odd shaped leaves and flowers that are referred to as galls. Infection is dependent on high humidity and moisture during bud break. Gall growth is due to plant cell division resulting from the stimulus of hyphal growth within host tissue. When galls are still soft, the fungus grows between epidermal cells, breaks the cuticle, and sporulates giving the gall a white cast. Either all or part of a leaf may become thickened, fleshy, and covered with a white bloom of spores. At first, diseased leaves are succulent and white, but they later shrink into hard, brown, gall-like bodies. Galls are composed of fungus-infected plant tissue. Older leaves are resistant to infection. Exobasidium vaccinii is most common in azaleas and camellias.
Photo by Sheila Dunning
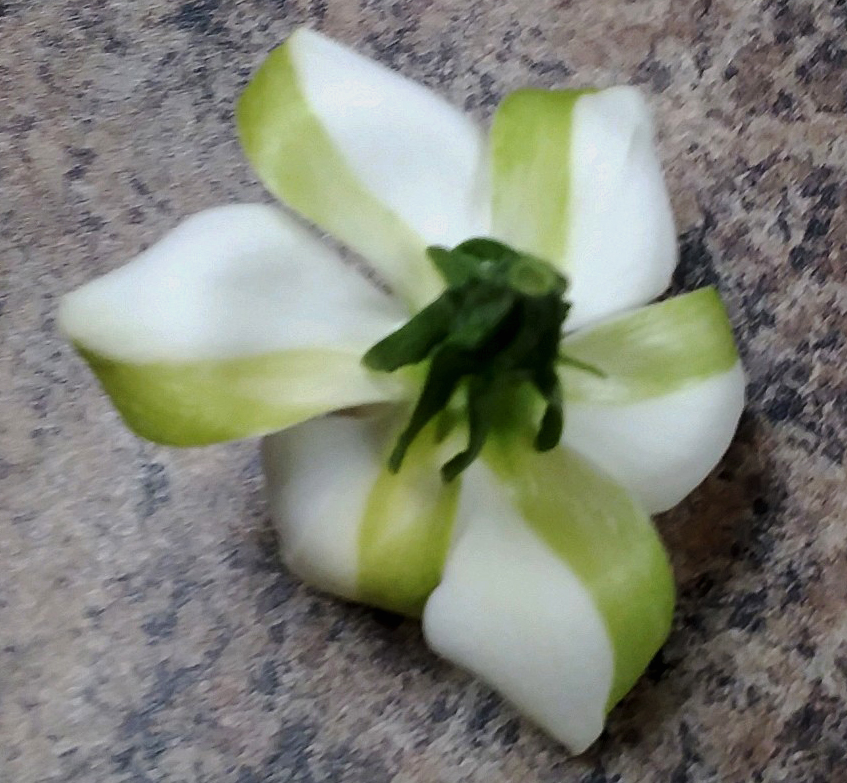
But, other Exobasidium species are floating out there, and with just the right conditions they can deform other plants. That’s what caused this odd formation on one flower of a gardenia plant. In this case, the spores fused the sepals to the petals of the flower.
Photo by Margaret Stewart
While chemical controls are available, they would need to begin before symptoms appear and continue until the gall dried completely. It may be an option for the fastidious weather watcher with a good working knowledge of this disease. But, for the rest of the population, removing and destroying galls before they turn white is the best management practice to avoid having spores form and hang around until next spring. Proper pruning of the plants to improve air circulation will also reduce the chances of favorable conditions, should there be an extended cool, wet season next year.
Vegetative plant propagation is a way for one plant to create another plant without the need for pollination to occur. This process is often much faster in achieving a new plant than growing from seed. The genetics of the parent plant can be carried on through this vegetative propagation method. There are many methods to propagate plants and the one covered in this article was taught to me by my grandmother many years ago – layering. Layering is a science and an art and has been performed by humans for over four thousand years.
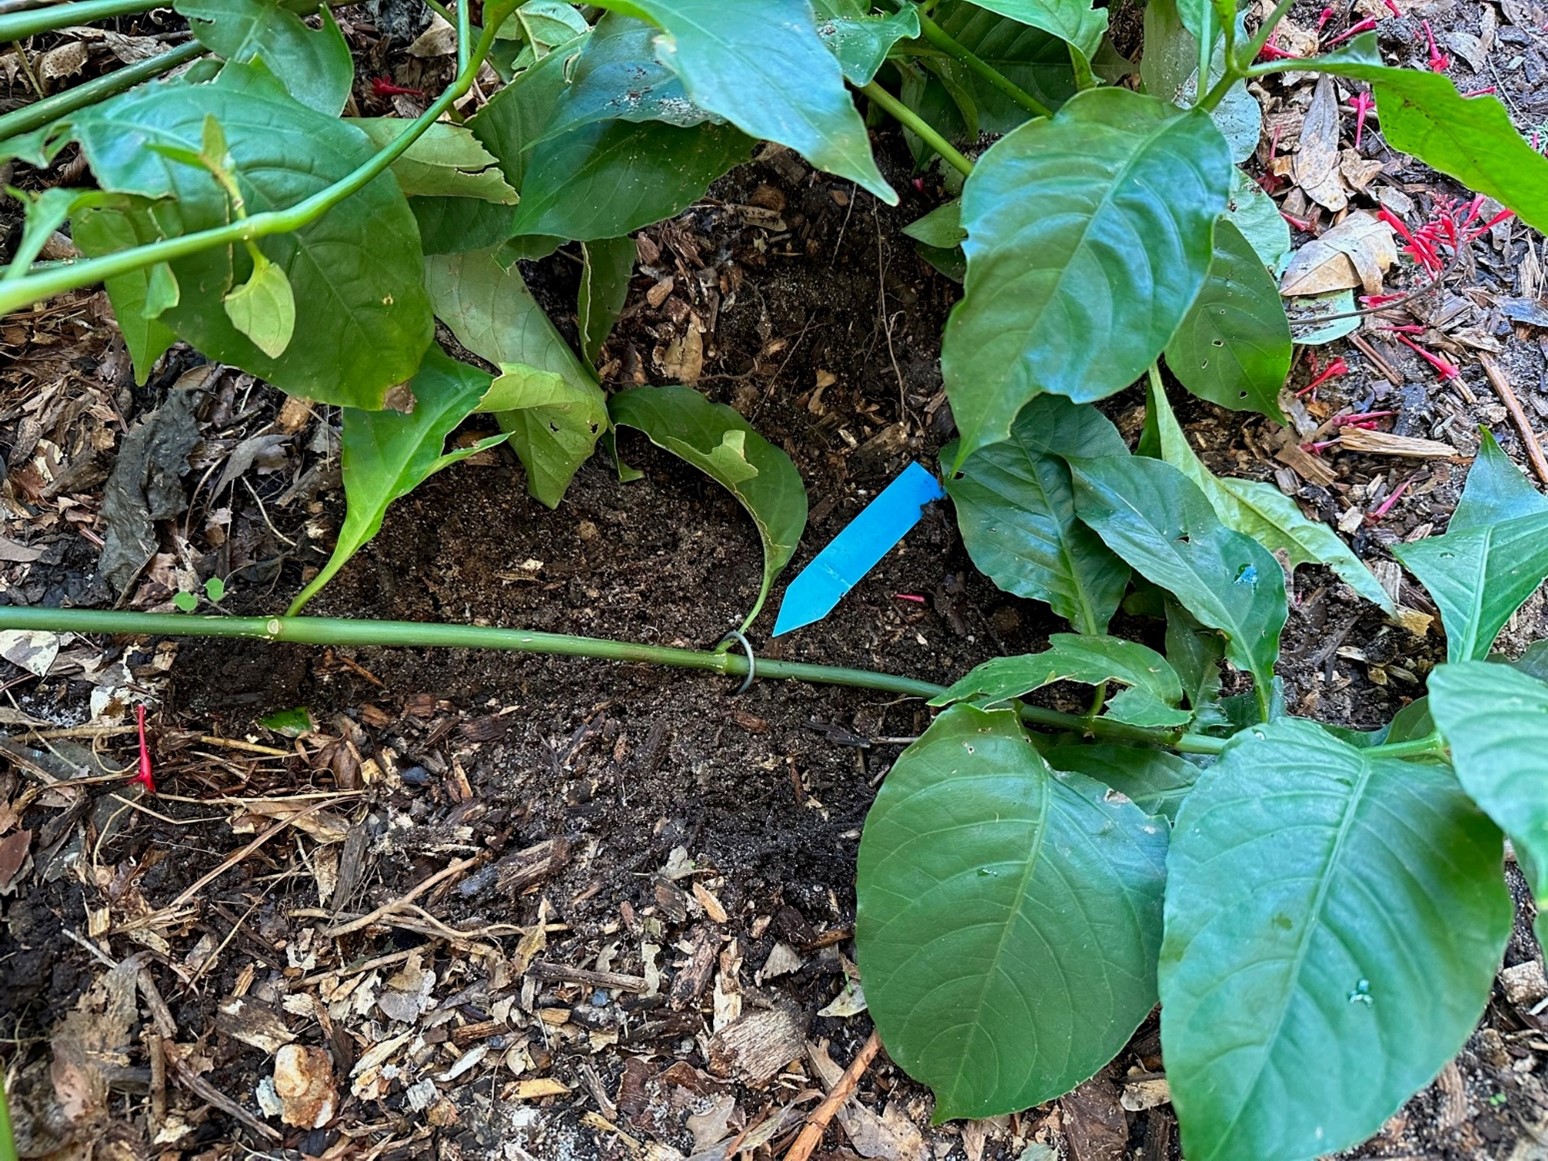
Propagating plants by layering can be accomplished in several ways, including simple, tip, air, mound, compound, and runner production layering methods. Many plants in nature propagate by layering accidentally when long, low-lying limbs contact the soil around the plant and are eventually covered by leaves from other surrounding trees and shrubs. This creates an organic cover over a part of the limb and keeps the area moist. This creates the situation for adventitious roots to develop at the soil contact area. This occurrence is called simple layering and is often mimicked by gardeners in the landscape. Not all plants respond to this type of propagation, but several common species that do are azaleas, jasmine, viburnum, climbing rose, and grapevines.
Unlike simple layering, tip layering involves digging out a shallow 3–4″ hole, which will allow space to bend the end of the branch down into the hole with the tip out the other side. Then, simply cover the hole to keep the branch in the ground. It may take something with a little weight placed over the covered hole to keep the branch from popping out. A brick or rock may be all that is needed. Both methods will take months for enough roots to develop before clipping the branch with a new plant ready to be dug and set somewhere new. For best results with both simple and tip layering, begin either in early spring with last seasons growth or late summer, utilizing that current year’s growth.
Simple layering. Photo Credit: Stephen Greer, University of Florida/IFAS – Santa Rosa County
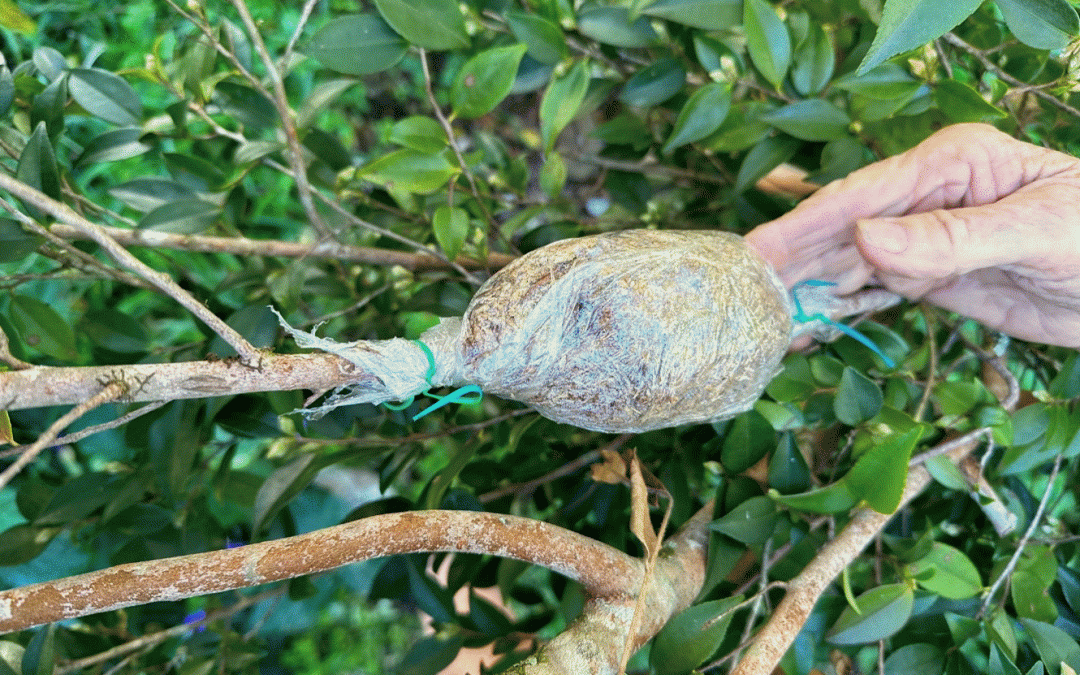
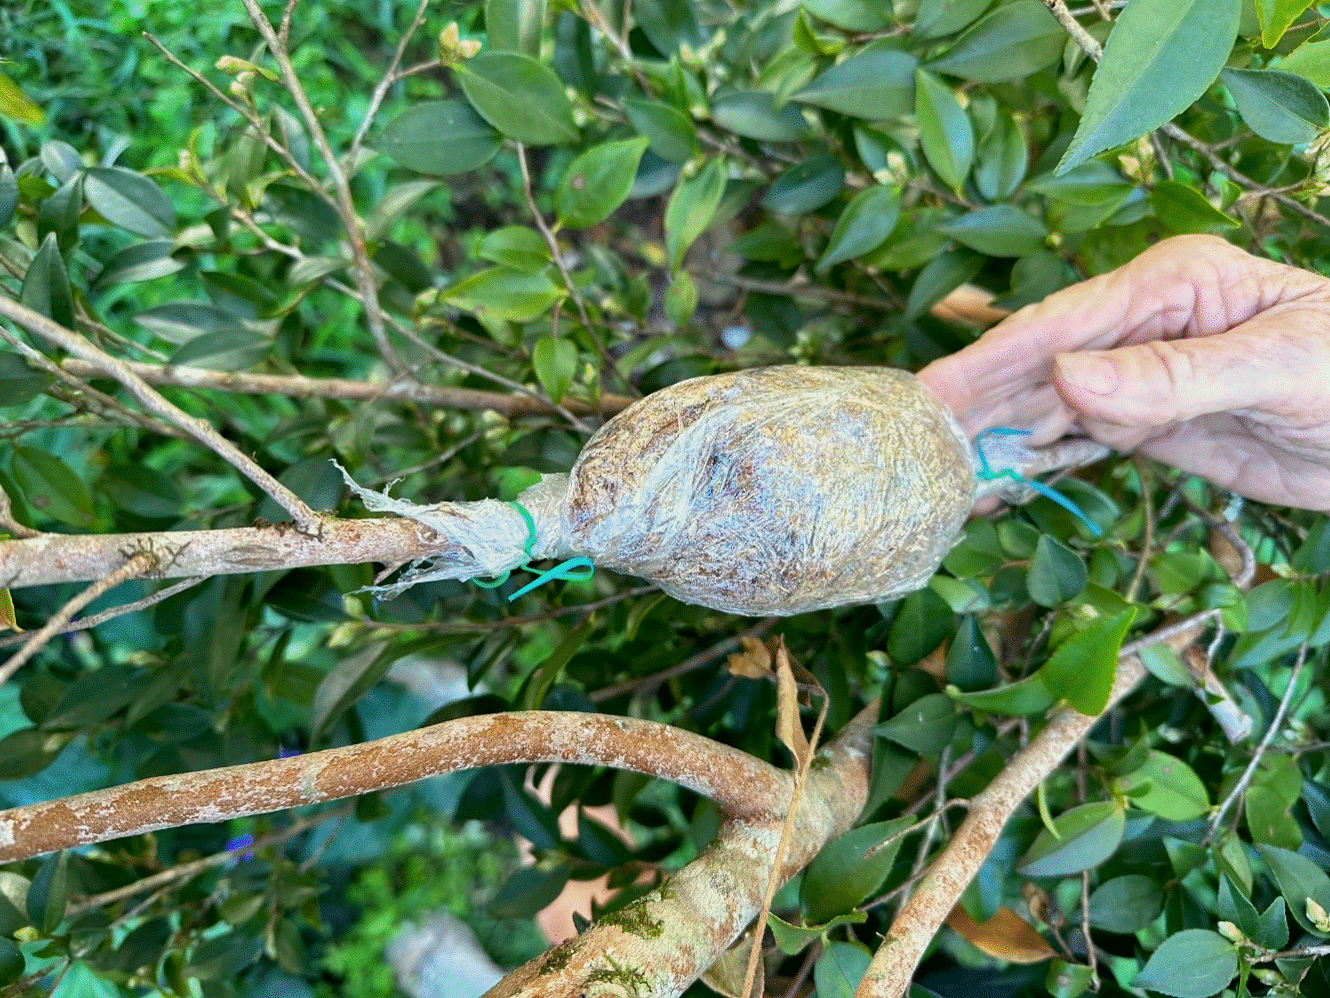
Air layering is a fun adventure to rooting a new plant and can be used with both outdoor and indoor plants. It can be used on outdoor plants like camellia, azalea, maples, and magnolia, or indoor plants including weeping fig, rubber tree, and dieffenbachia. This type of layering requires a bit more planning and preparation than simple or tip layering. If the plant has a bark layer surrounding the cambium layer (this is the growing part of the limb and trunk and appears green) this area will need to be removed with a sharp clean knife. Choose a 1- ½ inch long area of the limb and scrape this area to remove the cambium layer located just beneath the bark. This is done to prevent the outside limb area from reconnecting back to the limb portion connected to the plant. Sphagnum moss will be needed to wrap around the wound site to create a rooting zone. Be sure to soak the moss with water by immersing it in a bucket of water, then squeeze it out. Wrap the moss with plastic wrap, making sure the moss is fully covered and tucked inside of the plastic. Both ends of the plastic wrap need to be secured tightly with twist ties or string. Make sure it remains tight throughout the 2 – 4 months needed for rooting to occur. If this process takes place in a sunny location, cover the plastic wrap with tin foil to block out the light.
Air layering a camelia. Photo Credit: Stephen Greer, University of Florida/IFAS – Santa Rosa County
There are other methods to layering plants and if you are interested, search online through the University of Florida IFAS EDIS site or contact your local UF IFAS Extension office in your local county. Enjoy growing your new plants.
Camellia japonica may be the quintessential Southern flowering plant, as it has decorated Southern landscapes with its giant winter flowers for over two centuries at this point. It wasn’t always that way though. The species took a long, winding road to the southern US, where it now enjoys its iconic garden status.
Camellia japonica is a native of the mountainous regions of east Asia. It was from there that “japonicas” were accidentally introduced to Europe in the late 1600s by British tea merchants, who mistook Camellia japonica for its very close cousin, the Tea Plant (Camellia sinensis). After a century-long stay in England, Camellias then made their way to America around 1800. As in England, Camellias were mostly grown as greenhouse flowering plants in the northern United States. However, in 1843, Reverend John Drayton of South Carolina, brought camellias to his home, Magnolia Plantation, and popularized them outdoors in the Charleston area. Many cultivars that are grown today trace their roots back to Rev. Drayton and Magnolia Plantation!
Camellia japonica ‘RL Wheeler’. Photo courtesy of Daniel Leonard.
Surviving every gardening fad and landscaping trend, Camellia’s popularity endures today for a couple of reasons. First is their winter flower display. Camellias provide a giant splash of color in an otherwise drab time of the year and there are literally thousands of japonica varieties in nearly every conceivable size, form, and color (provided you like white, pink, purple, and red) – there’s a camellia for everyone! Camellias are also about as low maintenance a plant as can be found in landscapes. It is not uncommon for camellias to persist in yards for generations without any help from gardeners. After the establishment phase, camellias can go decades without supplemental water, fertilizer, or pesticide applications in many cases – especially if they are sited in an ideal spot. Just plant these treasured passalong plants in a spot where water does not stand and that will receive some filtered or afternoon shade and enjoy the annual flowering show!
For more information on growing camellias, sourcing camellia plants for sale, or any other gardening topic, contact your local UF/IFAS County Extension Office. Happy gardening!