by Ray Bodrey | Jun 29, 2017
 Although we’ve received much-needed rainfall of late, it’s still a struggle to manage moisture levels in our Panhandle landscapes this summer. During wet summer seasons, one recurring issue is that watering plants too much can have as much of an ill effect as not watering enough.
Shallow rooted plants, as well as newly set plants can easily become water stressed. Some people lightly water their plants each day. With this practice, one is only watering an inch or less of the topsoil. Most roots are deeper than this. Instead of a light watering every day, soaking the plant a few times a week works better. A soil that has been soaked will retain moisture for several days. This is a very good practice for young plants. In contrast, some people soak their plants to often. This essential drowns the roots by eliminating vital oxygen in the root zone. This can also cause root rot. Leaves that turn brown at the tips or edges, as well as leaf drop, are displaying signs of overwatering.
The following are tips from the UF/IFAS Florida-Friendly Landscape Program. These tips will help conserve water by providing best management practices for your landscape:
- Choose the right plant for the right place: Be sure to place plants in your landscape that match existing environmental conditions.
- Water Thoughtfully: Water early in the morning and water when plants and turfgrass start to wilt. Refrain from watering in the late afternoon or evening. This is when insects and diseases are most active.
- Perform regular irrigation maintenance: Remember, an irrigation system is only effective if it is maintained regularly. Check for and repair leaks. If using a pop-up heads for turfgrass, point heads away from driveways and sidewalks.
- Calibrate turfgrass irrigation system: Ideal amount of water to apply to turfgrass is ½”- ¾”. A simple test can be done to calibrate. Place a coffee or tuna cans throughout the landscape. Run the irrigation system for 30 minutes. Average the depth of the water containers. Adjust running time to apply the ½”- ¾” rate.
- Use micro-irrigation in gardens and individual plants: Drip, or microspray irrigation systems apply water directly to the root system with limited surface evaporation.
- Make a rain barrel: Rain barrels are an inexpensive way to capture rainwater from your roof. This can translate into a big impact on your water bill as well.
- Mulch plants: Mulch helps keep moisture in the root zone. Two to three inches in-depth, for a few feet in diameter will work well for trees, shrubs, flowers and vegetables.
- Mow correctly: Mowing your grass at the highest recommended length is key. Be sure to cut no more than 1/3 of the leaf blade each time you mow. Keep mowing blades sharp as dull cuts often cause grass to be prone to disease.
- Be a weather watcher: Wait at least 24 hours after a rainfall event to water. If rain is in the forecast, wait 48 hours until irrigating. Use a rain gauge or install a rain shut-off device to monitor irrigation scheduling.
For more information on water conservation principles contact your local county extension office.
Supporting information can be found at the UF/IFAS Center for Landscape Conservation & Ecology’s Drought Toolkit: http://clce.ifas.ufl.edu/drought_toolkit/
by Daniel J. Leonard | May 18, 2017
If you’re like me, growing turfgrass is often more of a hassle than anything else. Regardless of the species you plant, none tolerates shade well and it can seem like there is a never-ending list of chores and expenses that accompany lawn grass: mowing (at least one a week during the summer), fertilizing, and constantly battling weeds, disease and bugs. Wouldn’t it be nice if there were an acceptable alternative, at least for the parts of the lawn that get a little less foot traffic or are shady? Turns out there is! Enter the wonderful world of perennial groundcovers!
Perennial groundcovers are just that, plants that are either evergreen or herbaceous (killed to the ground by frost, similar to turfgrass) and are aggressive enough to cover the ground quickly. Once established, these solid masses of stylish, easy to grow plants serve many of the same functions traditional turf lawns do without all the hassle: choke out weeds, provide pleasing aesthetics, reduce erosion and runoff, and provide a habitat for beneficial insects and wildlife.
The two most common turfgrass replacements found in Northwest Florida are Ornamental Perennial Peanut (Arachis glabra) and Asiatic Jasmine (Trachelospermum asiaticum); though a native species of Mimosa (Mimosa strigillosa) is gaining popularity also. All of these plants are outstanding groundcovers but each fills a specific niche in the landscape.

Perennial Peanut Lawn
Perennial Peanut is a beautiful, aggressive groundcover that spreads through underground rhizomes and possesses showy yellow flowers throughout the year; the show stops only in the coldest winters when the plant is burned back to the ground by frost. It thrives in sunny, well-drained soils, needs no supplemental irrigation once established and because it is a legume, requires little to no supplemental fertilizer. It even thrives in coastal areas that are subject to periodic salt spray! If Perennial Peanut ever begins to look a little unkempt, a quick mowing at 3-4” will enhance its appearance.

Asiatic Jasmine
Asiatic Jasmine is a superb, vining groundcover option for areas that receive partial to full shade, though it will tolerate full sun. This evergreen plant sports glossy dark green foliage and is extremely aggressive (lending itself to very rapid establishment). Though not as vigorous a climber as its more well-known cousin Confederate Jasmine (Trachelospermum jasminoides), Asiatic Jasmine will eventually begin to slowly climb trees and other structures once it is fully established; this habit is easily controlled with infrequent pruning. Do not look for flowers on this vining groundcover however, as it does not initiate the bloom cycle unless allowed to climb.

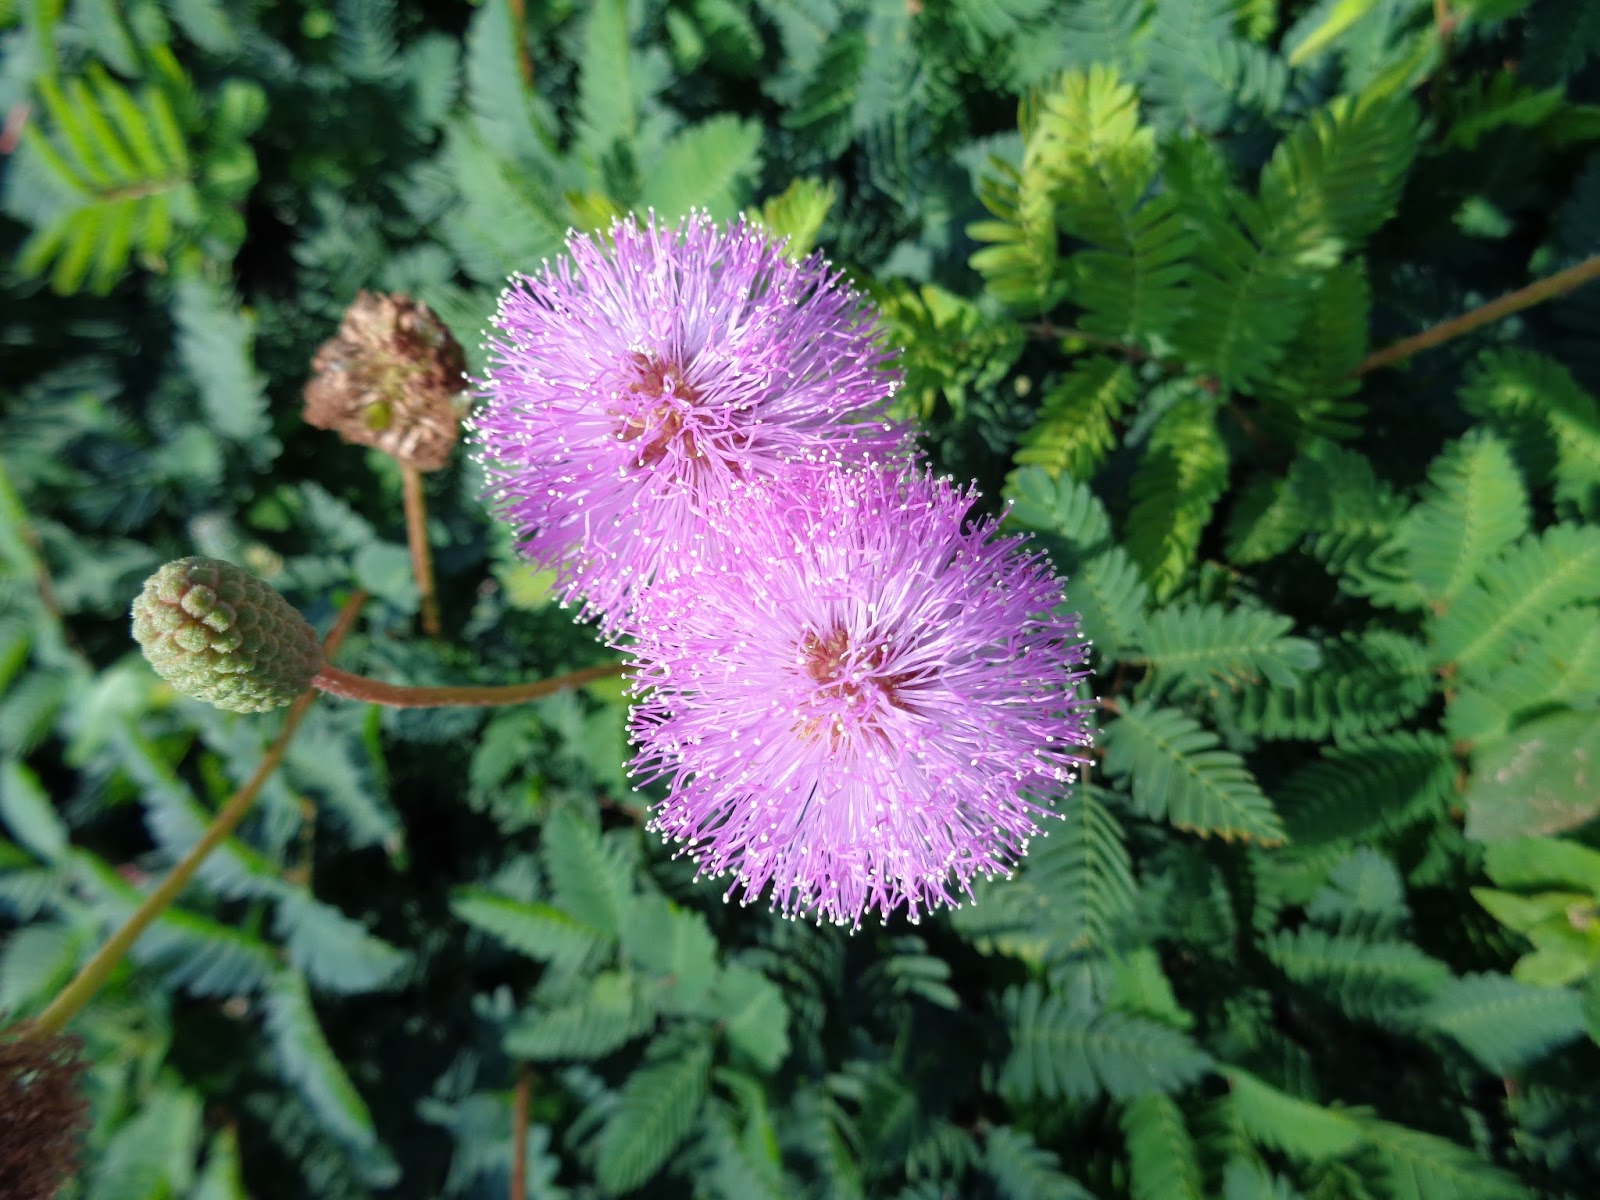
Sunshine Mimosa
For those that prefer an all-native landscape, Sunshine Mimosa (Mimosa strigillosa), also known as Sensitive Plant, is a fantastic groundcover option for full-sun situations. This herbaceous perennial is very striking in flower, sending up bright pink, fiber-optic like blooms about 6” above the foliage all summer long! Sunshine Mimosa, like Perennial Peanut, is a legume so fertility needs are very low. It is also exceptionally drought tolerant and thrives in the deepest sands. If there is a dry problem spot in your lawn that receives full sun, you can’t go wrong with this one!
As a rule, the method of establishing groundcovers as turfgrass replacements takes a bit longer than with laying sod, which allows for an “instant” lawn. With groundcovers, sprigging containerized plants is most common as this is how the majority of these species are grown in production nurseries. This process involves planting the containerized sprigs on a grid in the planting area no more than 12” apart. The sprigs may be planted closer together (8”-10”) if more rapid establishment is desired.
During the establishment phase, weed control is critical to ensure proper development of the groundcover. The first step to reduce competitive weeds is to clean the site thoroughly before planting with a non-selective herbicide such as Glyphosate. After planting, grassy weeds may be treated with one of the selective herbicides Fusilade, Poast, Select, or Prism. Unfortunately, there are not any chemical treatments for broadleaf weed control in ornamental groundcovers but these can be managed by mowing or hand pulling and will eventually be choked out by the groundcover.
If you are tired of the turfgrass life and want some relief, try an ornamental groundcover instead! They are low-maintenance, cost effective, and very attractive! Happy gardening and as always, contact your local UF/IFAS County Extension Office for more information about this topic!
by Julie McConnell | Apr 7, 2017
It’s really tempting to buy a tree and plant it in the middle of your lawn or directly in front of your picture window, but instead take some time to choose the best spot first. Several considerations such as maintenance and mature size should be taken into account before the site is selected.
Mowing close to the trunk of this Pindo palm has caused repeated injury to the trunk. Photo: JMcConnell, UF/IFAS
Placing a tree in a lawn area without creating a bed can lead to maintenance issues for both the tree and the turfgrass. It is easy to simply cut out a small patch of turf the size of the rootball and install a tree, however, as the grass grows up towards the trunk over time maintaining that grass will become difficult. It is common to see mechanical injuries to tree trunks because weed eaters or mowers have chipped away at the bark when trying to cut the grass. Other potential problems are irrigation zones calibrated for turf delivering the wrong amount of water to trees and herbicides used on grass that may cause injury to trees.
Over time, as the tree canopy grows, it will create shade and any grass trying to grow in that area will thin and be more susceptible to disease and insect pressure. By creating a large ornamental bed for your tree, you will prevent some pitfalls associated with placing the tree in the lawn.
Another common mistake is planting a tree too close to a house or other structure. It can be difficult to imagine how large a tree will grow at maturity because it is not a quick process. Trees placed close to houses may grow into eaves and shed leaves onto roofs and into gutters. This adds to maintenance and can provide mosquito breeding grounds. Also, some tree roots may interfere with walkways or septic systems and should be sited far enough away to avoid these issues.
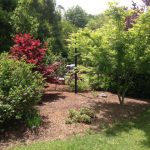
These Japanese Maples are planted in a bed separate from the lawn making care for both plant types easier. Photo: JMcConnell, UF/IFAS
Be sure to research any tree you plan to install to find out ideal growing conditions and mature size. If you plan ahead and use good maintenance practices, a tree can become an valuable part of your home landscape to be enjoyed for years to come.
by Beth Bolles | Nov 22, 2016
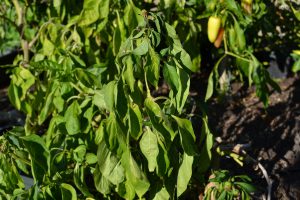
Leaf wilt may indicate more than just dry soil. Photo by Beth Bolles
Plants have specific ways of telling gardeners that there is a problem, but not all plant symptoms lead us directly to the cause. During drier conditions, we often use wilting leaves as an indicator that water is needed. This can be a reliable symptom that the soil is lacking moisture but it is not always the case. Wilting leaves and herbaceous branches actually tell us that there is not adequate water in the plant. It does not necessarily indicate lack of moisture in the soil.
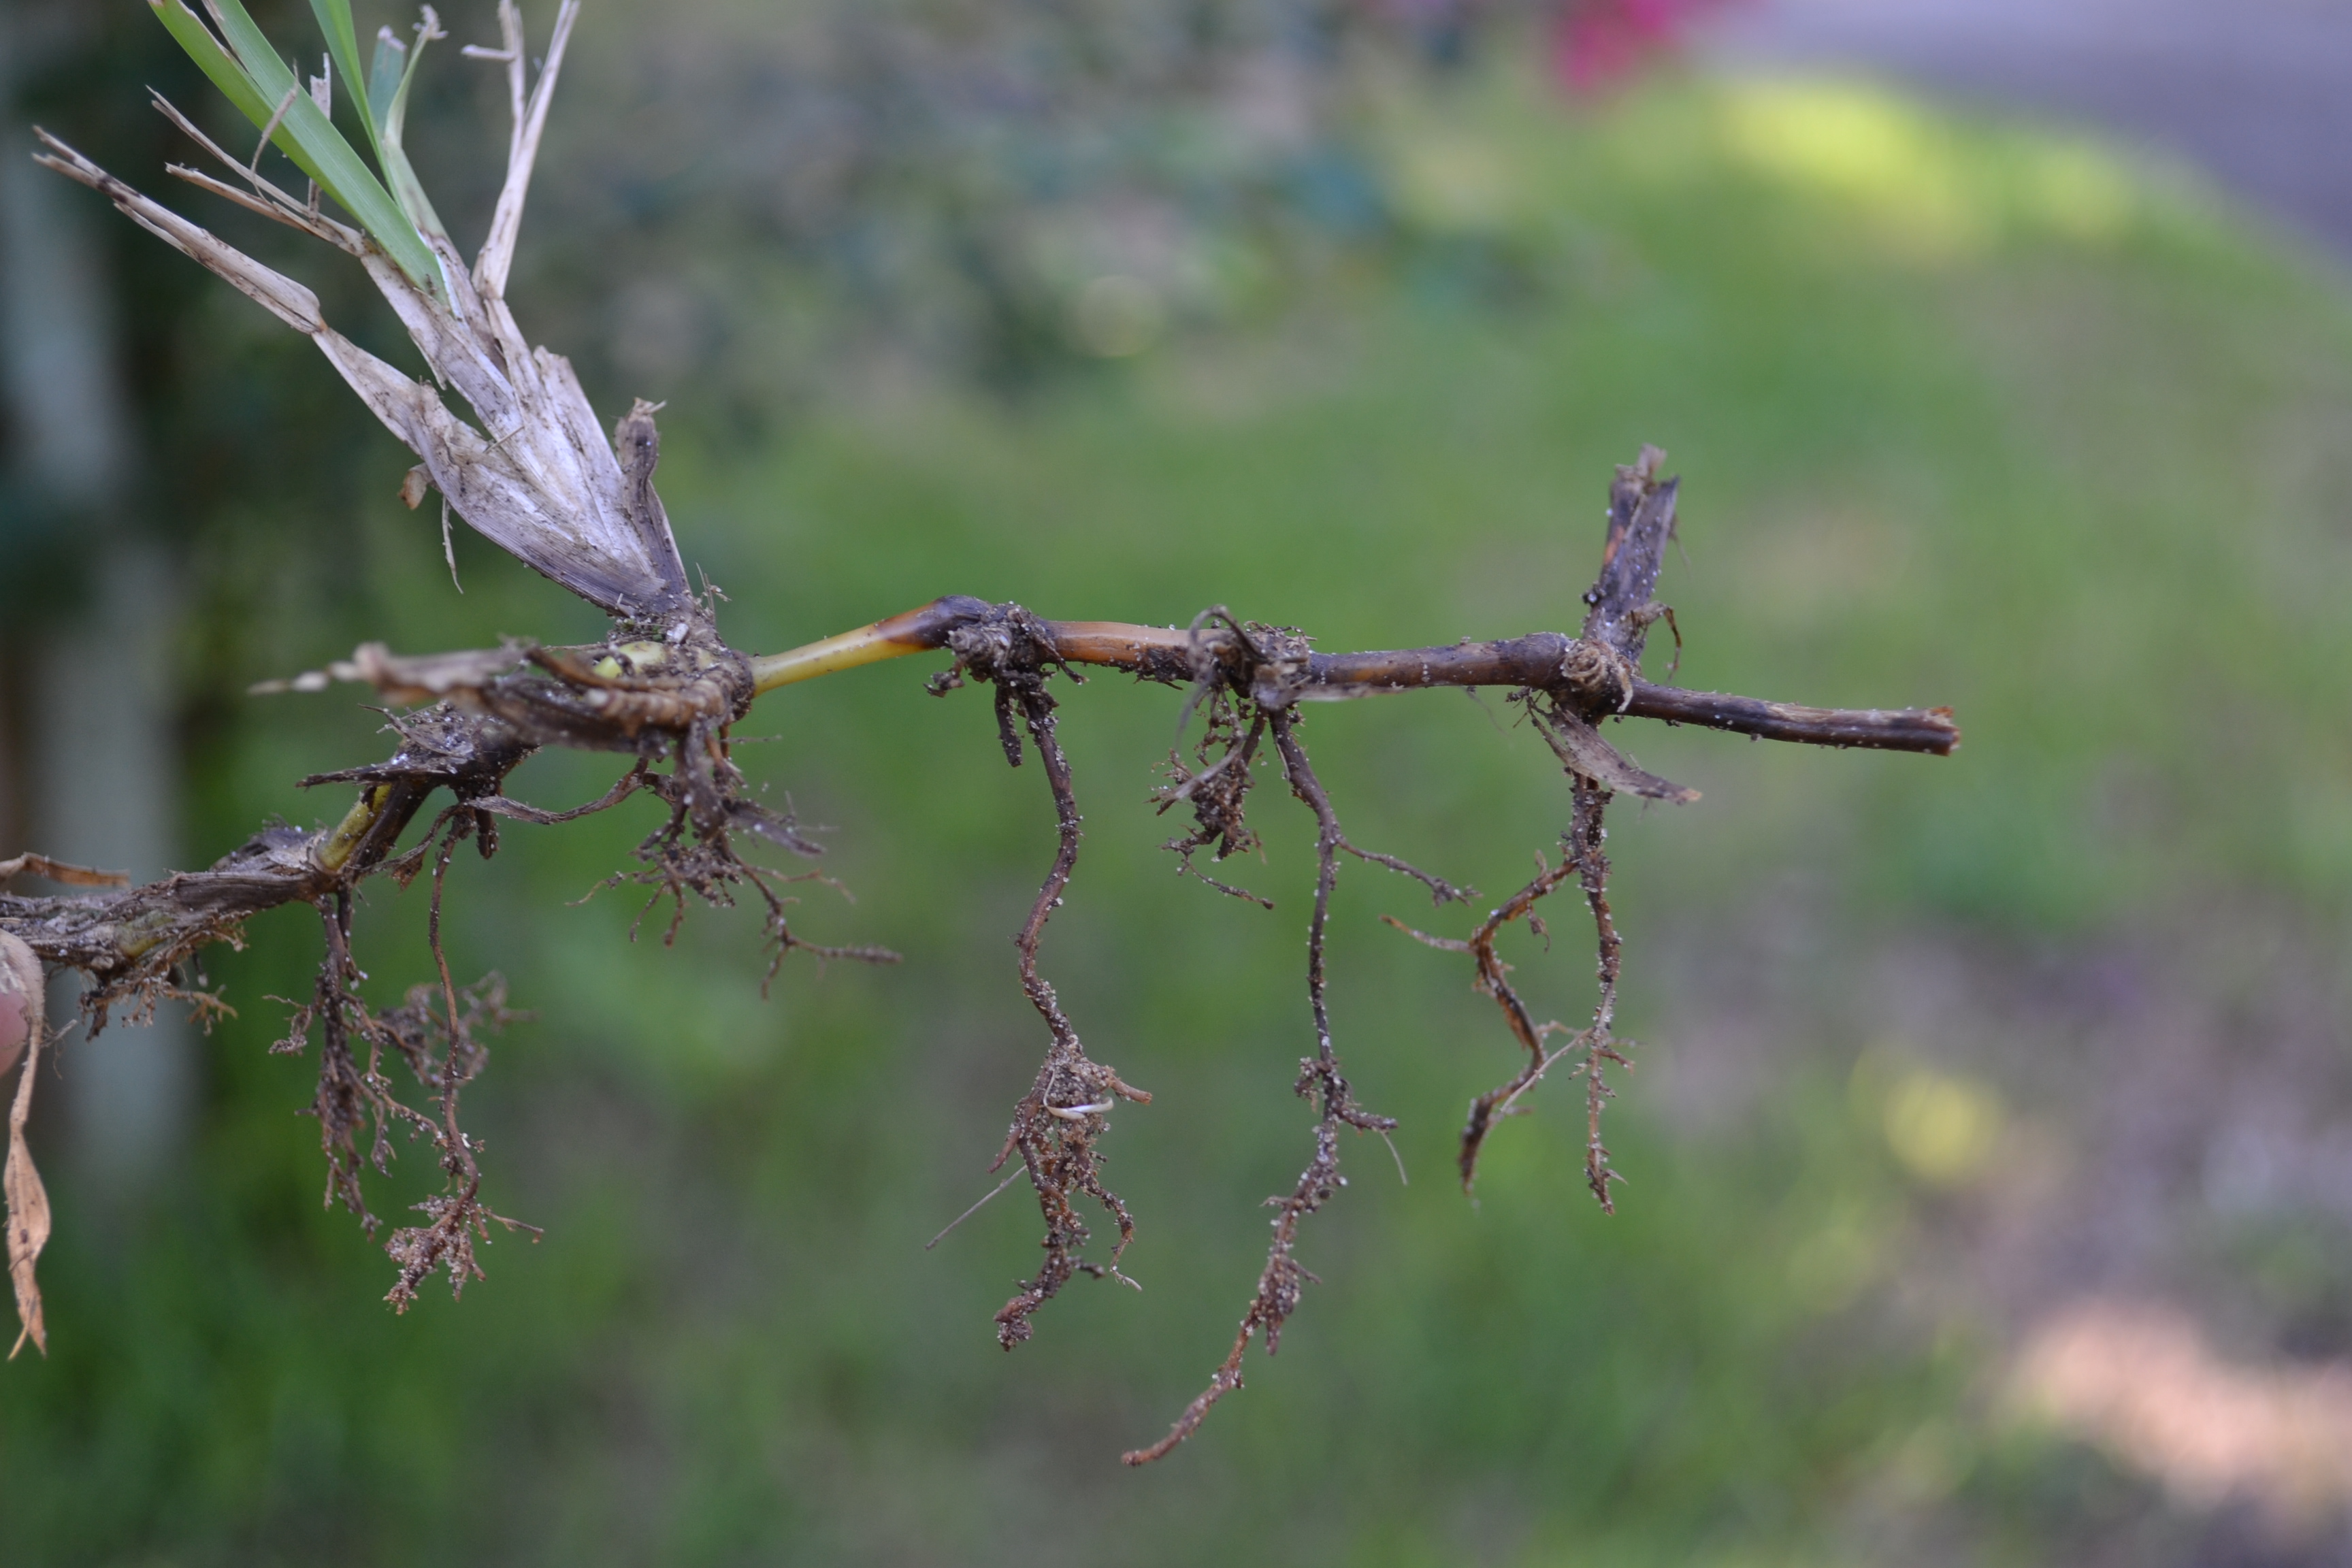
There can be many reasons why water is not being absorbed by roots and moved to tissues in the plant. The obvious place to start is by checking soil moisture. If soil is powdery several inches deep around the plant, water is likely needed. However, if you ball the soil up in your hand and it holds together, there may be another reason for lack of water reaching the upper plant parts. The harder part is determining why the root system is not taking up water. Causes can be a rotted root system from too much water, a poorly developed root ball that has circling or kinked roots, and even problems in the soil such as compaction. Insects, diseases, and other pathogens can also injure root systems preventing the uptake of water.
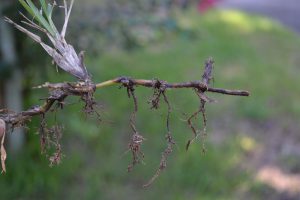
Too much water can cause roots to decay, preventing the uptake of water. Photo by Beth Bolles
So before automatically grabbing the hose or turning on the sprinkler, do a little soil investigation to make sure that the plant wilt is really indicating lack of water in the soil. If you need help in your diagnosis, always contact your local Extension office.
by Matthew Orwat | Oct 21, 2016
Wednesday November 9th, 8am-4pm. Green Industries Best Management Practices
Okaloosa County Extension 3098 Airport Rd. Crestview, FL. Click Here for flyer.
by Carrie Stevenson | Oct 12, 2016
Dr. Ramon Leon, Extension Weed Specialist, West Florida Research and Education Center
Herbicides simplify weed management by allowing you to cover extensive areas in a relatively short time, and reduce the need for time-consuming control practices such as hand weeding. Additionally, many herbicides have the advantage of selective control. Selective herbicides are those that kill weeds without significantly injuring the desired plant. In turfgrass, selective herbicides are particularly important because we do not have the option of using cultivation or non-selective herbicides, as is commonly done in other agricultural systems such as row crops and orchards.
A common misconception is that when a herbicide is registered for use on a given turfgrass species, this herbicide has little negative effect on the turf. In reality, even when the herbicide is registered for a specific turfgrass species, it can cause a certain level of injury. If the herbicide is applied at the recommended label rate, and the growing conditions are ideal, the turfgrass will only suffer minor, temporary injury that may go completely unnoticed. Conversely, the weeds that are susceptible to the herbicide will be severely affected resulting in the desired control.
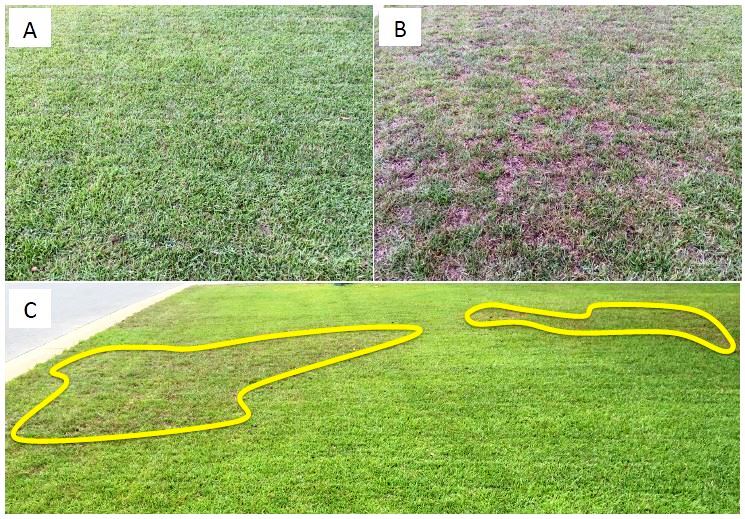
Over the last few summers, there has been an increase in complaints about herbicide injury on sod farms, golf courses, and home lawns after applications of herbicides, especially during the summer months. Many of those complaints originated from situations in which the application was done properly, using the recommended label rate, and thus the level of injury observed was not justified. After studying all these cases, it was determined that at the time of herbicide application the turf was under a moderate level of stress, but not high enough stress to cause visible symptoms. However, when the herbicide was applied the combined effect of the existing stress, and the stress caused by the herbicide made it harder for the turf to maintain the desired quality. For example, Figure 1 below shows that the turf looked fine before the application (A), but after the herbicide was applied, there was a significant loss in turf cover and quality (B). The interesting aspect is that the injury was not present across the entire treated area, but only on patches (C). Those patches corresponded with sand pockets where soil moisture, especially on hot days, was considerably lower than the rest of the area. In that particular case, the irrigation system was providing enough water to help the turf tolerate the moderate stress of high temperatures and limited moisture, but not enough for the turf tolerate the combined stress that occurred after the herbicide was applied.
Figure 1. Centipedegrass growing during the summer in Florida before herbicide application (A), 3 weeks after herbicide (sulfentrazone and metsulfuron-methyl) application (B). Herbicide injury pattern with highlighted areas showing where sand pockets caused drought and heat stress that contributed to herbicide injury (C).
In Florida, there are a combination of environmental factors such as high temperatures and sandy soils that can create stressful conditions limiting turfgrass growth, especially when irrigation is not sufficient to keep the turf hydrated. Furthermore, we also experience periods of excess rainfall, and areas of turf growing under shade. Additionally, pest problems that affect roots and leaves are frequently found in our state. All these conditions affect turfgrass health and its ability to tolerate herbicide applications. For these reasons, turf producers and managers need to be proactive to help turfgrass overcome the injury that herbicides might cause. To achieve this goal, you need to follow five simple steps:
1) Identify weed problems early. Most weed problems will start in the spring for summer weeds and in the fall for winter weeds. Controlling them when they are small not only increases the effectiveness of our applications, but also allows us to implement our control when the turfgrass is less likely to be stressed.
If herbicide applications are needed when conditions might be stressful for the turf (high temperatures and/or dry conditions)
2) Make sure irrigation is adequate (increase frequency or duration if needed) for up to three weeks following application.
3) Reduce mowing frequency and increase mowing height 0.5 inches for up to 3 weeks following a herbicide application, to allow the turfgrass to continue producing energy to support its recovery. Mowing too short and too frequently immediately after the application weakens the turfgrass.
4) Fertilize with a small amount of nitrogen (0.25 to 0.5 lb N/acre) a week or two after herbicide application to help the turf recover and produce new leaves.
5) If the turfgrass is suffering from serious pest problems (pathogens, nematodes or insect infestations) do not apply herbicides on the affected areas until the turfgrass has recovered.
Maintaining optimal turfgrass growth is the best way to ensure that herbicide applications will maximize weed control while still protecting the health and aesthetics of your turfgrass.
For more information on growing turfgrass in Florida, please see the following:
Dr. Ramon Leon, Extension Weed Specialist, West Florida Research and Education Center