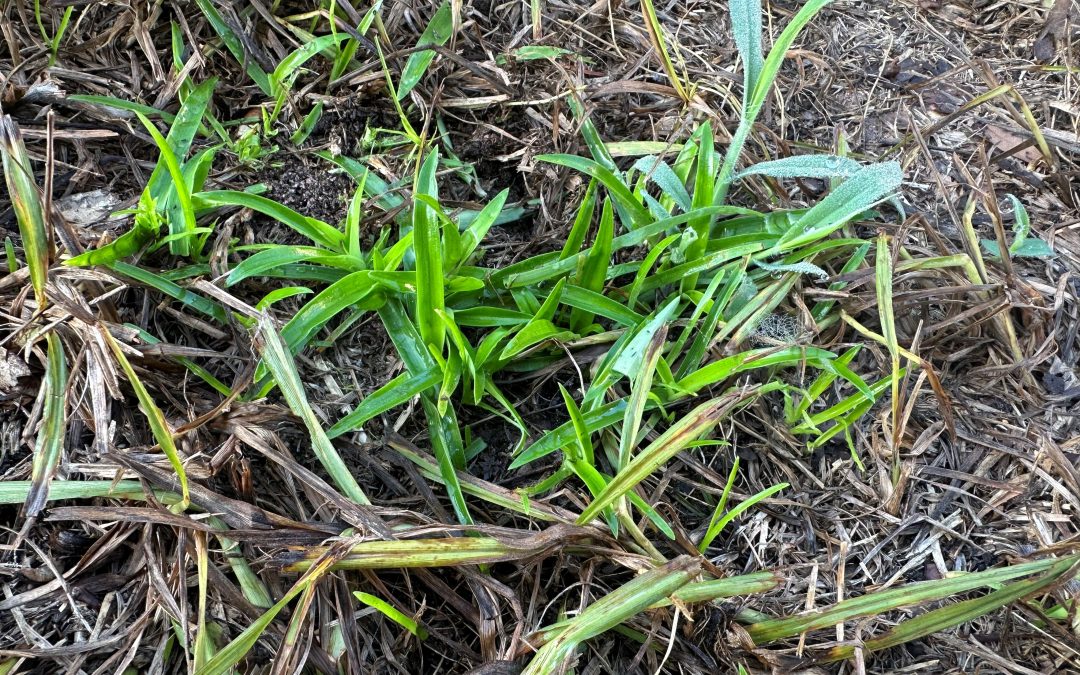
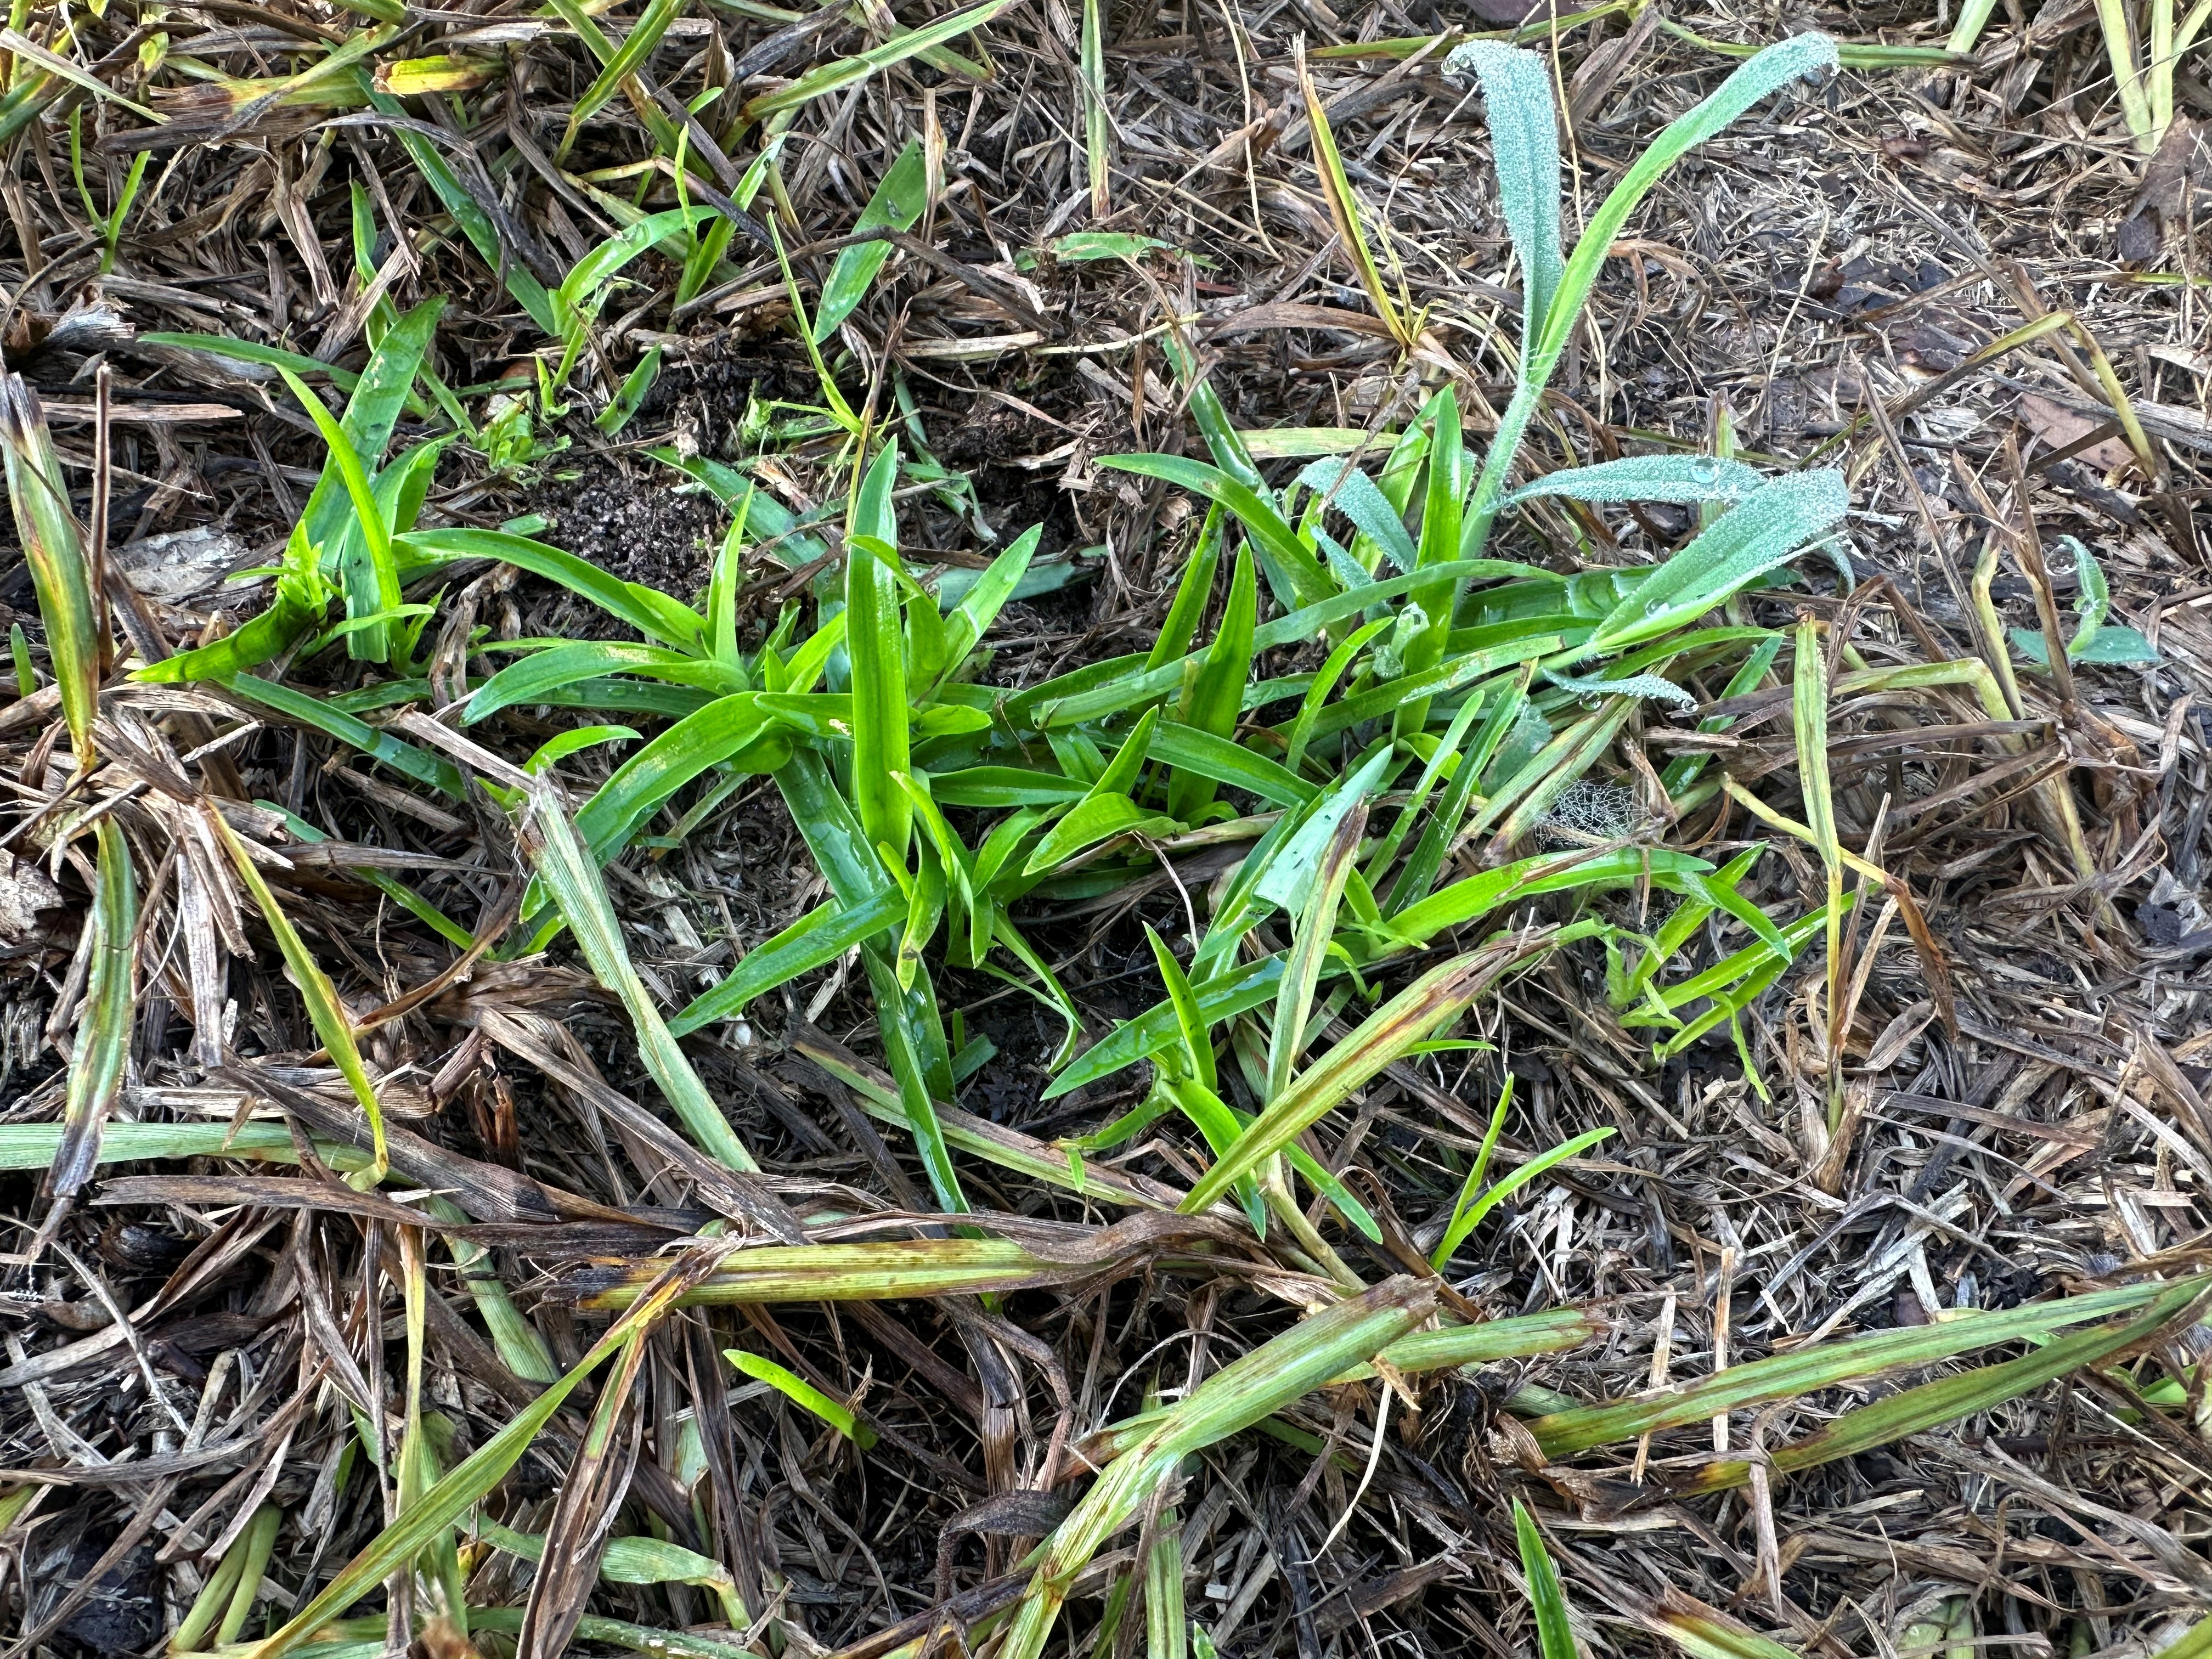
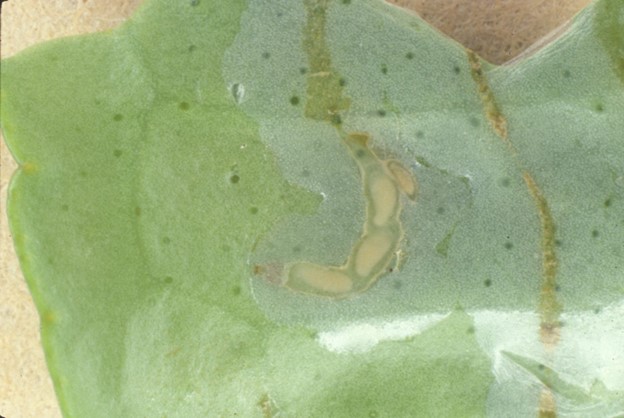
The Panhandle’s dreaded summer heat has finally arrived in force and has brought with it one of the most difficult to control lawn/landscape weeds, our annual enemy Doveweed (Murdannia nudiflora). Doveweed is characterized as one of the world’s worst weeds due to its broad range of growing conditions, ability to root along its stems, forming mats as it grows, massive seed production (each plant can produce up to 2,000 seeds per year), and inconspicuous nature – it looks like a grass to the untrained eye. So, what can gardeners do to control Doveweed that’s already up this year and prevent it next summer? Let’s find out.
Doveweed emerging in a bare patch of a Centipedegrass lawn in late May 2025. Photo courtesy of Daniel Leonard.
First, the best prevention for all weeds, Doveweed included, is a healthy lawn/landscape. Ensuring healthy, thick Centipedegrass turf and landscaped beds that don’t allow light to hit bare soil goes a long way towards reducing the overall weed load lawns and landscapes can experience. For lawns, this can be achieved through mowing regularly at the proper height for your turfgrass (2.5” or so for Centipedegrass), irrigating no more than 0.75”-1” per week in the absence of rain, limiting stress from overfertilization, and removing excess thatch. In landscapes, preventative weed control focuses on limiting overwatering/fertilization and maintaining a 2-3” organic mulch layer of pinestraw, pine bark, leaves, wood chips, etc. Adopting these practices can greatly reduce the occurrence of weeds in your yard, however they will not eliminate weeds altogether and supplemental chemical weed control is often necessary.
Unlike Crabgrass, Florida Pusley, and other commonly encountered Panhandle annual weeds that emerge when the soil begins to warm in early spring (usually late February-March), Doveweed waits until mid-April-May (soil temperatures of 70-80 degrees F). All these annual weeds are best controlled by preemergent herbicides, like Indaziflam (Specticle G), before seeds germinate. For Doveweed, that means the first preemergent application should occur mid-April with a follow-up application 6-8 weeks later. However, for this year that opportunity is behind us and our only option is post emergent herbicides.
Which postemergent herbicide you choose depends on if your Doveweed issue is in turfgrass or in landscaped beds. In landscaped beds, the primary control option is either hand pulling or spot treating Doveweed with a 41% glyphosate product (Roundup and other generic products) at a rate of 3% (3-4oz glyphosate/gal). As glyphosate is a non-selective herbicide, be sure to not get any overspray on any ornamental plant foliage. In turfgrass, Doveweed control becomes a little more difficult. You essentially have three options – atrazine, a generic 3-way broadleaf product, or a commercial grade broadleaf product. Though it provides very good control of Doveweed and has pre-emergent properties to help discourage future weeds, I don’t prefer atrazine because it has a high potential to leach into groundwater following heavy rains in sandy soils, which describes much of the Panhandle. The generic 3-way products (usually a mix of Dicamba, Mecoprop, and 2,4-D) are fairly effective on Doveweed, however follow-up applications are usually required and the 2-4D component can be harsh on Centipedegrass at the higher label rates required for Doveweed control. Though somewhat expensive, the best post emergent option for most people is probably a commercial grade product like Celsius WG. Celsius WG is a very strong post emergent broadleaf herbicide that is very effective on Doveweed and is also very safe on Centipedegrass, even in hot weather. If the cost of the product (>$100) is off-putting, it is helpful to remember that even at the highest labelled rate, a 10 oz Celsius WG bottle goes a long way, enough to cover several acres of lawn.
* Regardless of what method you choose, be sure to get after emerged Doveweed seedlings early, before they mature and begin flowering – even the strongest post emergent herbicides work better on young weeds.
While Doveweed is a nasty little plant that is perfectly capable of taking over a lawn or landscaped bed, there are a variety of preventative and control options available. Using a combination of the above techniques should help achieve lasting Doveweed controls in future seasons! For more information about Doveweed and other summer annual weed control in lawns and landscapes, contact your local UF/IFAS Extension County office.
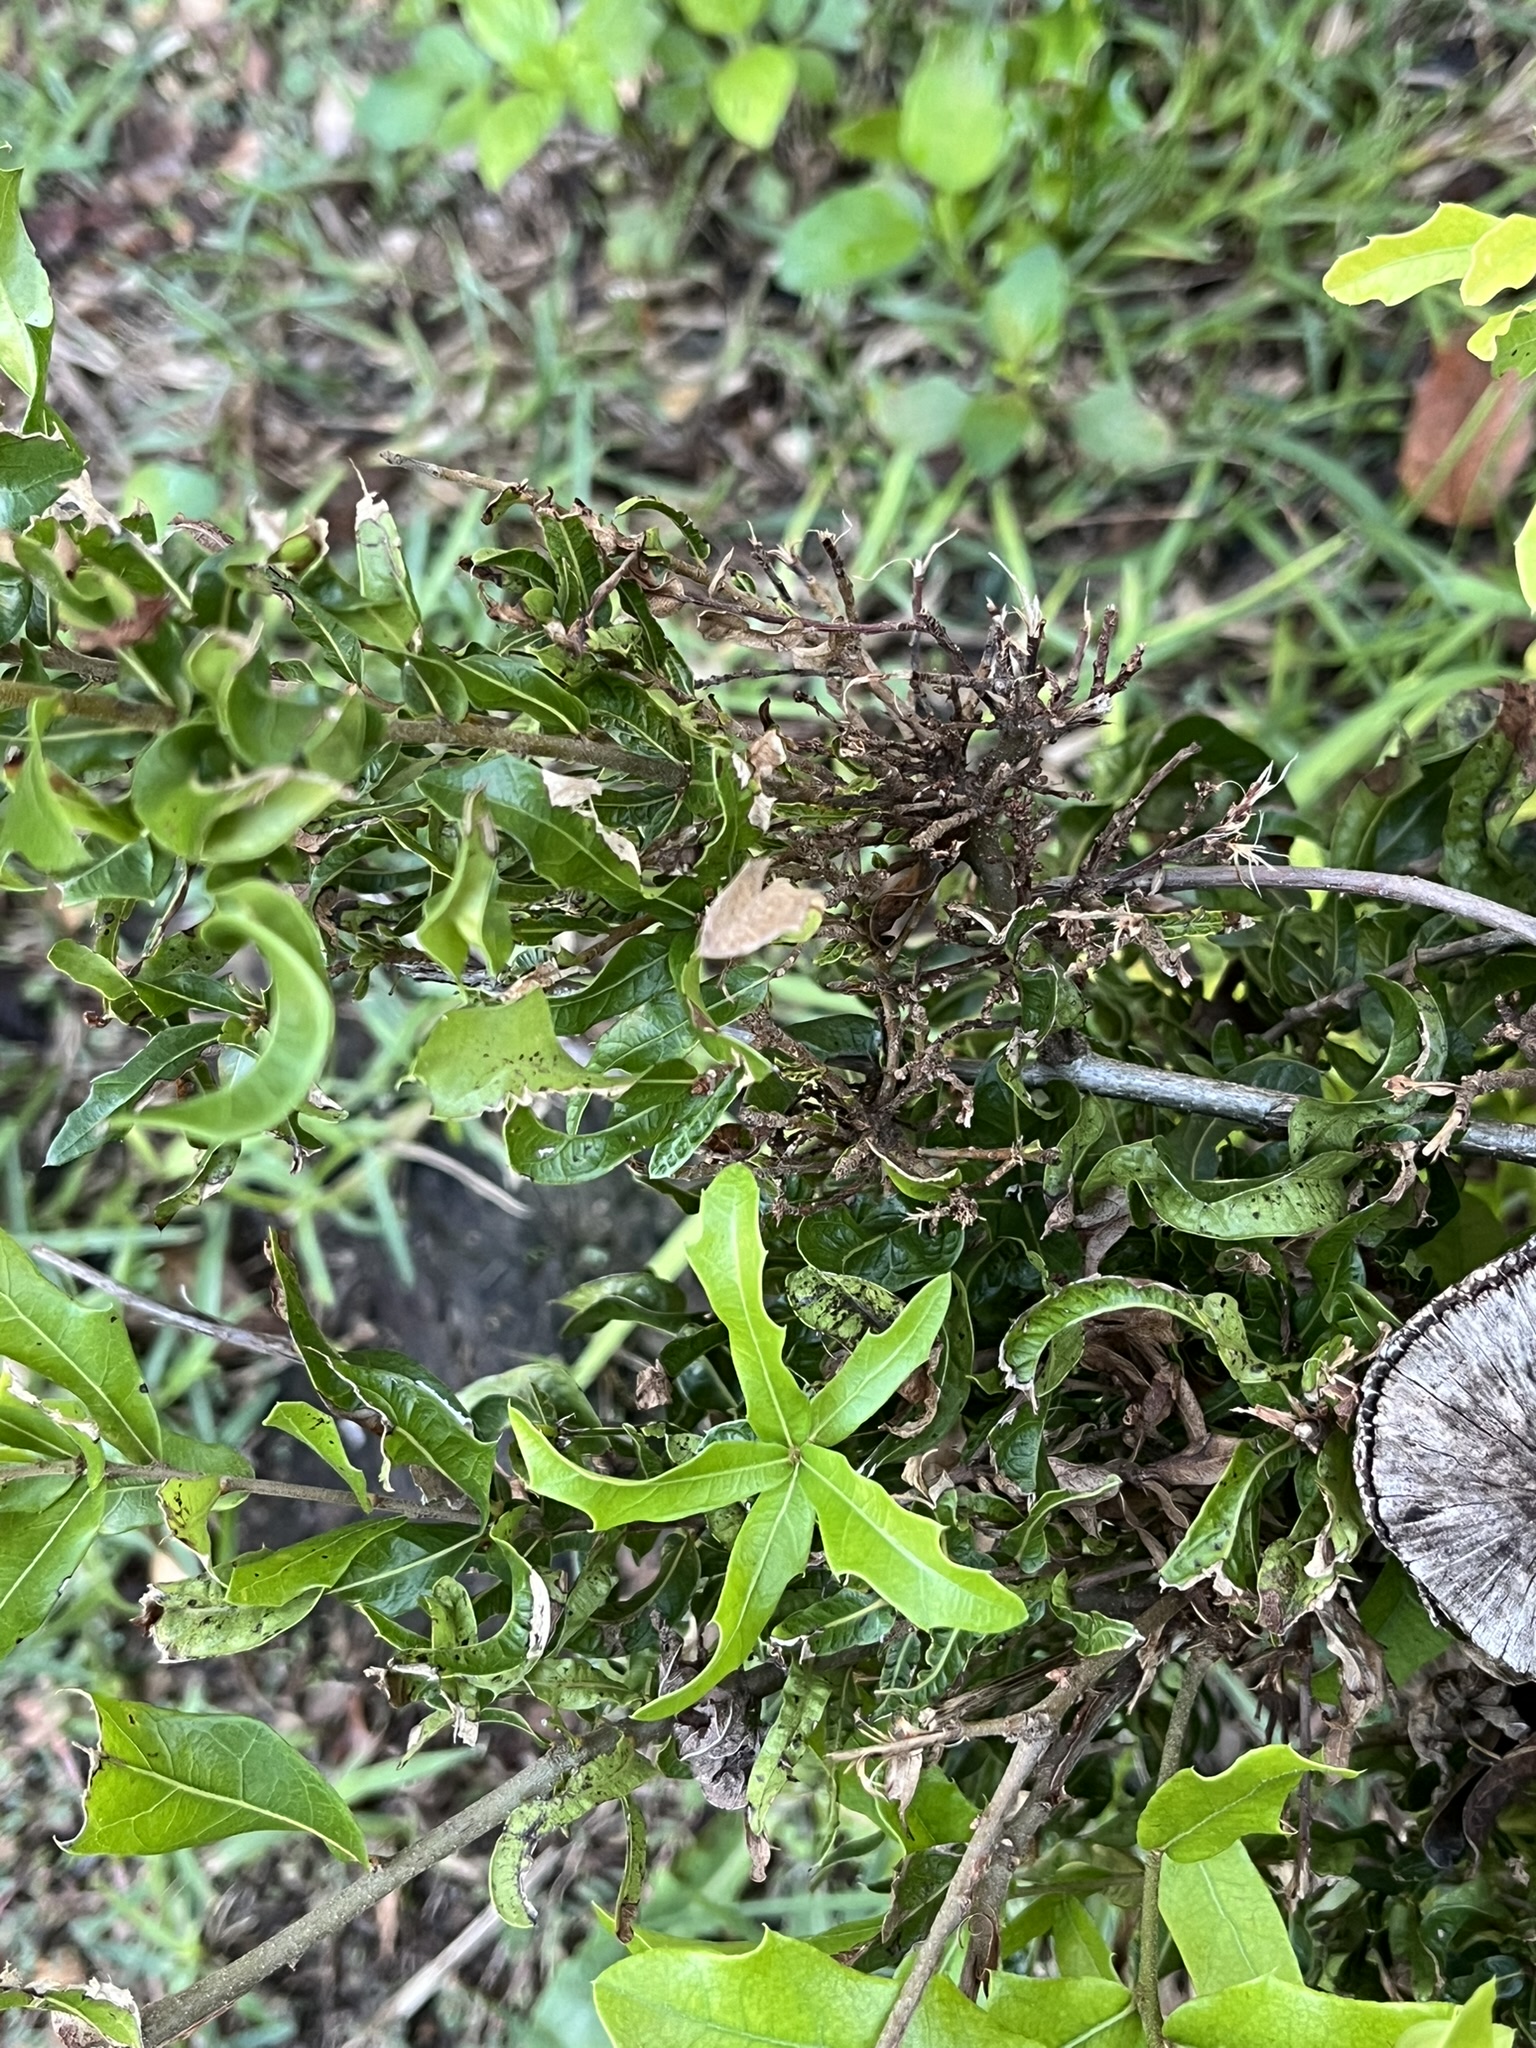
Not all trees and woody species are welcome in the landscape. In fact, some woody species can be pesky and problematic and for lack of a better term “weeds”. Despite the fact that some of these species are native trees, bushes, and vines, many can be aggressive and problematic in the home landscape and urban settings. If you have ever cared for a flower bed or garden in the Panhandle, you are probably well acquainted with these and have pulled seedlings and small saplings out of beds, hedges, and seemingly any other nook and cranny of your landscape. If you cut them off using loppers or a saw you also know how aggressively they resprout and how extensive their root system can become. Vegetation grows quickly and often aggressively in our humid sub-tropical climates. If you leave an area of land vacant for very long here, it quickly becomes a thicket in no time. Some of our oaks, particularly water and laurel oaks, can be pesky and troublesome. It seems like I am constantly battling problem oaks in my home landscape, with varying degrees of success. I will pull out, cut out, and apply herbicide only to look up and see a substantial oak sapling rocketing up through azaleas or other hedges. Without fail this is a water or laurel oak nearly 100% of the time, with some other hardwood trees and shrub species thrown in occasionally.
Oak sapling overtaking shrubbery in a local landscape Escambia County, FL Photo Credit: Ian Stone
What is the best way to tackle these pesky woody “weeds” when they cause persistent problems and pop up in undesirable spaces? The answer is to either mechanically removal them or employ very careful and targeted herbicide application. As a professional forester I have spent a large part of my career controlling these brush species using a host of mechanical and herbicide control methods and very well planned prescribed fires. Obviously using large heavy machinery and prescribed fire in urban and suburban settings and landscapes is not an option but using hand tools for mechanical removal and herbicides where needed and best suited is a winning combo for the home landscape.
First you want to determine what species you are dealing with and what stage of development it is in. As I mentioned, water oak and laurel oak are usually the problem oaks we encounter and can reproduce at extremely high rates and create undesirable crowded stands of stunted oak. These species are what foresters call early successional, meaning they tend to establish in forest openings and areas impacted by a disturbance such as a hurricane or windstorm. They produce large amounts of small acorns and grow very fast and they also have poor characteristics where they are susceptible to wind throw and disease. Effectively, they reproduce heavily, grow fast, and die young; that is their natural adaptation and life cycle and what causes them to be pesky and weedy in the home landscape. We don’t realize it, but our home lawns and flower beds create the perfect early successional habitat for these oaks and other brush species such as yaupon holly, titi, wax myrtle, and others. It doesn’t stop there – in heavily shaded areas, very shade tolerant oaks, brush, and vines tend to become established. Vines such as Virginia creeper, greenbriers (Smilax spp.), pepper-vine, and others are particularly annoying as these woody species also love to grow up in fences, particularly chain link, and are difficult to remove.
So what are the best methods to handle problem woody species in the home landscape? The best option is to catch them as seedlings and young plants and pull them up by the roots and all. If you can do this, you will avoid issues with resprouting. If you have larger, more well-established brush and small trees in your landscape, you can cut them back close to the ground, but you are likely to have issues with resprouting. This can be very frustrating and can result in a persistent problem. By consistently cutting these back you may be able to exhaust the plant’s reserve, but this is unlikely. Depending on the size of the root system you may be able to dig up the roots using some elbow grease and a shovel or mattock, but if significant roots are left behind, some woody species can resprout from the remaining roots. This is when simply cutting off the main stem or other mechanical methods often are not sufficient for long term control.
When dealing with well-established woody species with a significant stem size, using a properly labeled and effective herbicide can be a big time and hassle saver. You want to use a herbicide that is labeled for hack and squirt applications and/or cut stump applications. Many brush control and tough brush herbicides are labeled this way and can be applied using these methods. Herbicides with the active ingredients of triclopyr or glyphosate are the most effective for these methods and readily available for home use. Triclopyr products are usually the most effective on tough brush and woody species. Make sure the species you are targeting is listed on the label and follow the label directions exactly for the methods and concentrations to apply the herbicide correctly.
Oak resprouting from stump after herbicide treatment. Note the deformed leaves on the regrowth showing herbicide damage. Photo Credit: Ian Stone
Cut stump and hack and squirt applications require a bit of a different method of application. Instead of spraying foliage, you apply the herbicide into fresh cuts using a squirt bottle or a paint brush. You should wear proper protective equipment when working with any herbicide and this is also listed in the label. Long sleeves and pants along with chemical resistant gloves and eye protection is usually the minimum recommended. For hack and squirt, make a series of connecting cuts in a ring around the problem stem and squirt the herbicide mixture into the fresh cuts using the squirt bottle. For cut stump treatments cut the stem(s) of the problem tree or shrub off slightly above the ground and apply the mixture using a paint brush or squirt bottle, focusing on the outer portion of the stump right next to the bark. These methods work by introducing the herbicide to the cambium layer, which is the actively growing and live tissue just under the bark in woody plants. By doing this it will travel through the tissue and kill both the roots and stems. It is very important that the cuts are fresh, and the application must be made as soon as possible after the cuts are completed. Once the brush is killed back, you can wait for the stem or stump to rot or remove it once it has completely died. This method is effective at controlling resprouting but is not 100% effective on all applications. If the woody plant in question continues to resprout, you can make fresh cuts and reapply. An advantage of this method is it can be done in winter even when the plant is dormant, as it does not rely on foliage to uptake the herbicide. That means you can use it year-round, and you can take advantage of the cooler winter weather to do this labor-intensive work.
With careful work and proper technique, these methods can be beneficial to control persistent brush problems in the home landscape. When using herbicides it is very important to be aware of off target damage to desirable plants. One of the advantages of hack and squirt and cut stump applications is that they are very targeted and minimize issues with off target damage and drift. Care should be taken not to get the herbicide mixture on the stems of desirable shrubs and trees, and they can penetrate the bark and do damage, especially on thin barked species. If you have questions about how to properly use a herbicide or reading the label contact your local extension office.
Pesticides can be helpful tools in the home landscape and garden, helping to protect fruits, vegetables, and landscape plants from pests. While pesticides can be valuable tools in controlling pests, their improper use can pose risks to human health, beneficial organisms, and the environment. One crucial aspect of responsible pesticide use is understanding and interpreting the pesticide label. The label provides information on how to mix, apply, store, and dispose of a pesticide product to ensure the safety of the user and the environment.
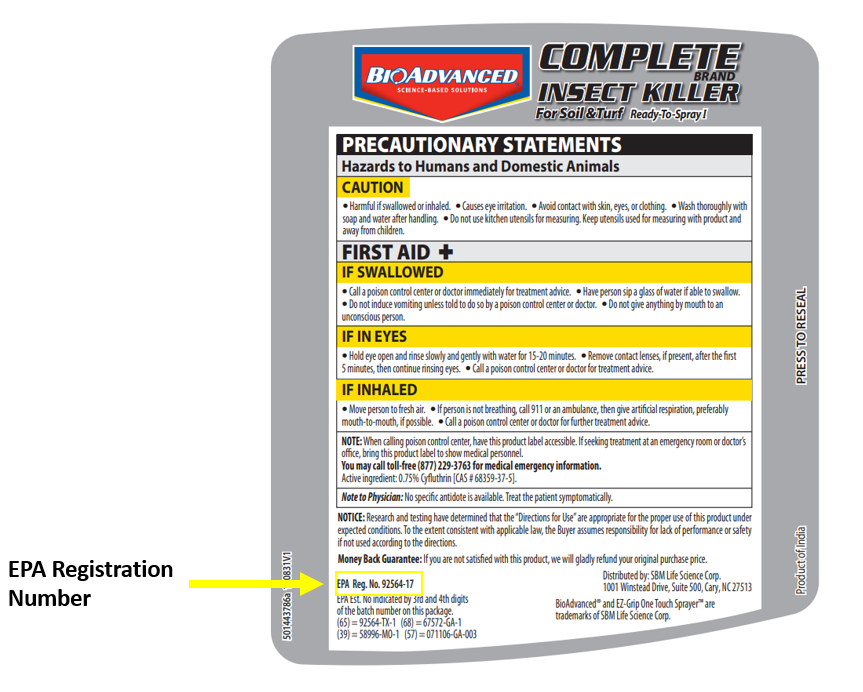
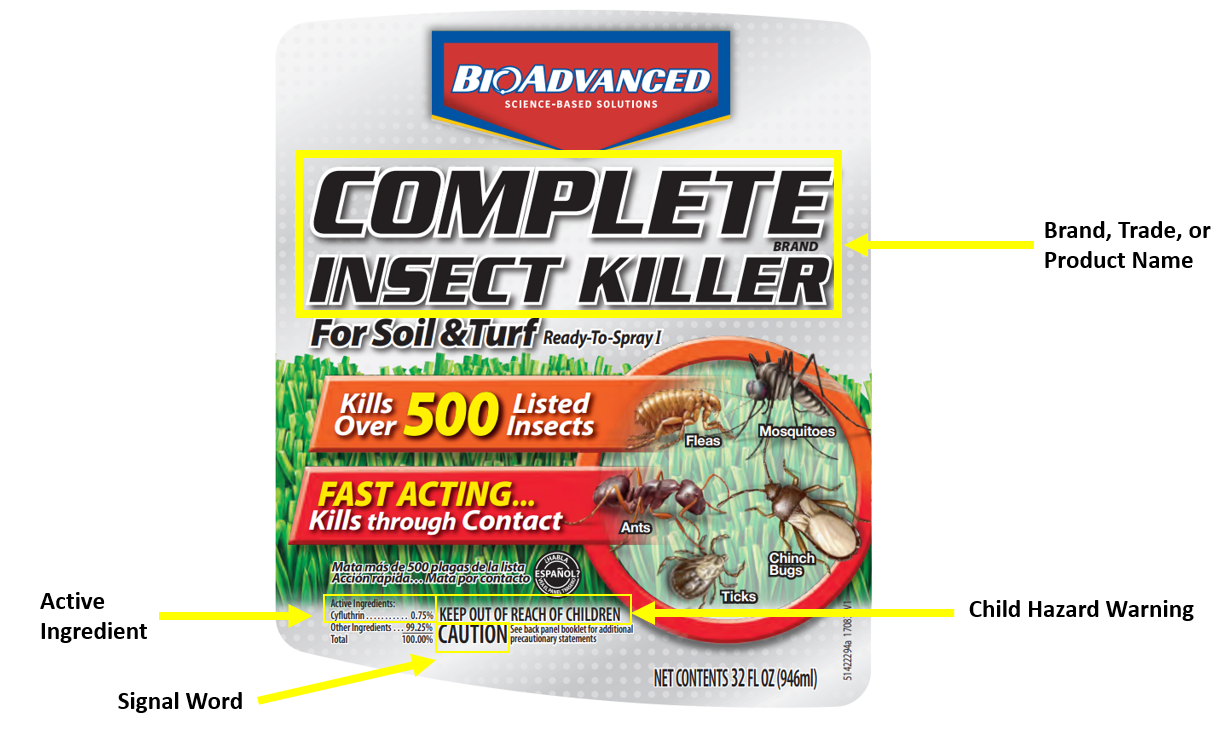
First, it’s important to recognize what a pesticide is. A pesticide is a chemical substance or mixture used to kill or repel pests. Pests can include insects, weeds, plant pathogens, nematodes, mold, nuisance animals, and other organisms that can injury crops, plants, structures, or cause harm to human health. If you are unsure whether a product is considered a pesticide or not, the label will have an Environmental Protection Agency (EPA) number listed. This number is the EPA’s stamp of approval for the product to be sold and used as a pesticide (Figure 1). In the example shown in Figure 1, the EPA registration number is found on the back page of the pesticide label.
Figure 1. Example of EPA Registration Number found on a pesticide label.
A pesticide label is the information on or attached to the pesticide container and is more than just a piece of paper. This document is a legal document. If you’ve contacted your local Extension office for pest control assistance, you’ve likely heard “follow the label – the label is the law” repeatedly. That is because the label is a contract between the product manufacturer, the Environmental Protection Agency (EPA), and the end user.
What information does the label contain?
Brand or Trade Name: The brand, trade, or product name is used to identify and market the product. It is found on the front panel of the pesticide label. For example, in Figure 2, the brand name of the pesticide is “Complete Insect Killer”. Different manufacturers may use different brand names to market products, even if the same pesticide active ingredient is used.
Active Ingredient: The active ingredient is the chemical that is responsible for killing, repelling, or controlling the target pest. The front panel of the label identifies the name and percentage weight of each active ingredient.
Child Hazard Warning: The front panel of every pesticide label must have the statement “KEEP OUT OF REACH OF CHILDREN” due to poisoning being a major cause of injury to children.
Signal Word: A pesticide label must also display a signal word on the front panel of the label to identify the relative toxicity of the product. Since all pesticides are poisons to some extent, it’s important to note that they do pose some risk. The signal word is based on the entire contents of the product, not just the active ingredients. Signal words are:
DANGER: Highly toxic
WARNING: Moderately toxic
CAUTION: Slightly toxic
Figure 2. An example of the front panel of a pesticide label.
Personal Protective Equipment (PPE): The type of clothing that must be worn during the handling mixing process to protect the applicator from harm.
Statement of Practical Treatment: The statement of practical treatment or first aid statement, describes what to do if a person is exposed to the pesticide.
Directions for Use: This section of the label is the bulk of a pesticide label. This section provides detailed instructions on how to correctly apply the pesticide, including the site where the product may be used, application method, amount of pesticide that should be applied, timing of application, and frequency. It will also contain information on restrictions (if any) on product use including weather, time of day, season of year, contamination of sensitive areas, etc. Applying a pesticide to a site not listed on its label is illegal.
Storage and Disposal: Each pesticide has general storage and disposal instructions. Most pesticide labels will contain a general statement to the effect of “do not contaminate, water, food, or feed by storage, disposal, or cleaning of equipment” and “store in original containers only”. This section of the label provides guidance on how to store the product safely, including temperature requirements, shelf-life, and precautions to prevent contamination. It also outlines guidelines for disposing of unused pesticides or empty containers to prevent environmental harm.
Pesticides can be a valuable tool if used correctly. The first step in using a pesticide safely is to read the product label to learn about how the product may be used. For more information on understanding pesticide labels or for assistance with interpretation, please contact your local Extension Office.
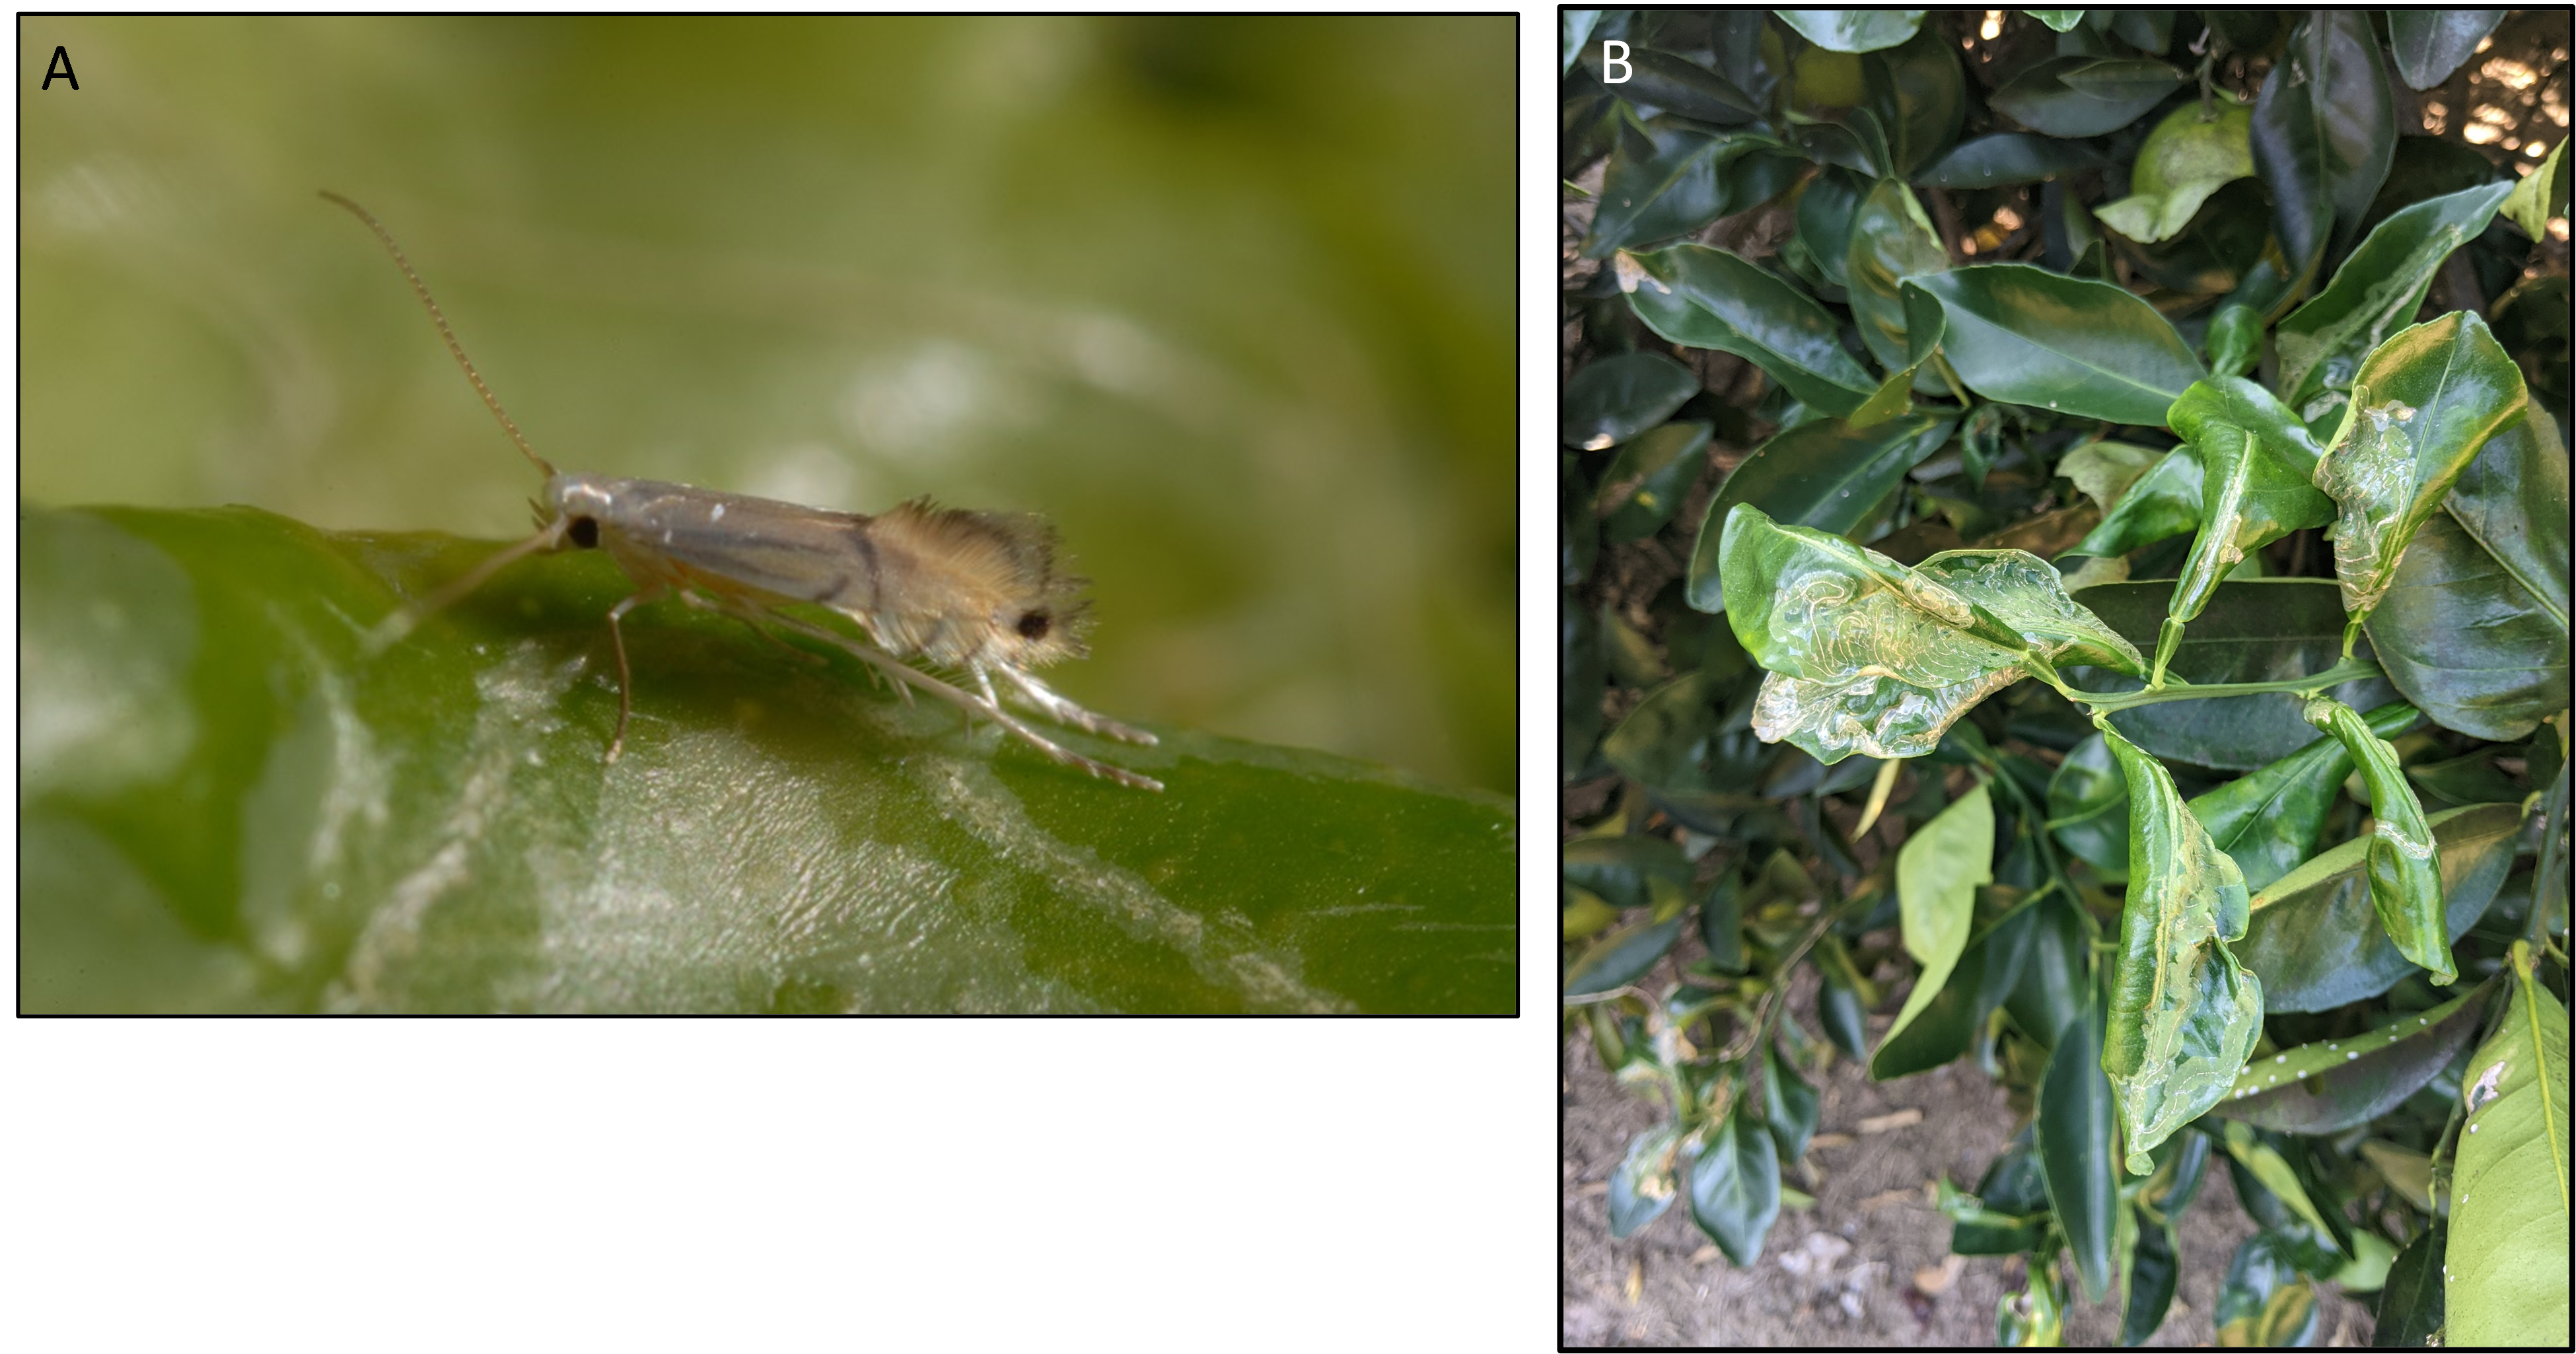
Citrus is one of the most cherished fruit trees in the Panhandle. Citrus owners are well aware that every year the main damage to their trees come from citrus leafminer (CLM). CLM is a small moth and its larvae feeds between the tissue layers of new leaf growth, causing serpentine mines to form under the leaf cuticle (Fig. 1). The feeding damage results in leaf curling and distortion, and severe infestations of CLM on young trees can retard the growth of trees. Another threat concerning CLM in Florida is that the mines provide an open wound for citrus canker to enter, a bacterial disease that has been found recently in the Florida Panhandle, Georgia, and Alabama.
Most commercial growers deal with CLM in young trees by a soil application of systemic insecticide before the flush season, followed by a foliar insecticide when the systemic drench’s toxicity is declining. Homeowners, however, have limited access to these chemistries. Garden systemic insecticides that include imidacloprid (Bayer’s Tree & Shrub Insect Control™, Merit®, etc.) and dinotefuran (Greenlight Tree and Shrub Insect Control™, Safari®, etc.) are among the few options for CLM control. For the best efficacy, those insecticides should be applied two weeks before the start of the flushing season to allow time for the insecticide to move from the roots into the canopy. To avoid leaching of insecticide away from the root zone, soil applications should be made within a 24-hour period without rain. Citrus trees usually have several flushes per year, depending upon cultivar, climate, and crop load. However, in the Florida Panhandle, most citrus cultivars have two major flushes in May and September.
Importantly, systemic insecticides are only efficient against CLM for small immature trees; therefore, the only products labeled for use against CLM on mature trees are foliar sprays. Horticultural oils or insecticides with spinosad (such as Monterey® Garden Insect Spray) are some options available for homeowners. However, achieving leafminer control with foliar applications on mature trees is challenging due to unsynchronized flushing of trees. Foliar applications should be timed with the appearance of the first visible leaf mines. In any case, be sure to READ THE LABEL and follow all the label directions.
Cultural practices, and non-insecticidal methods.
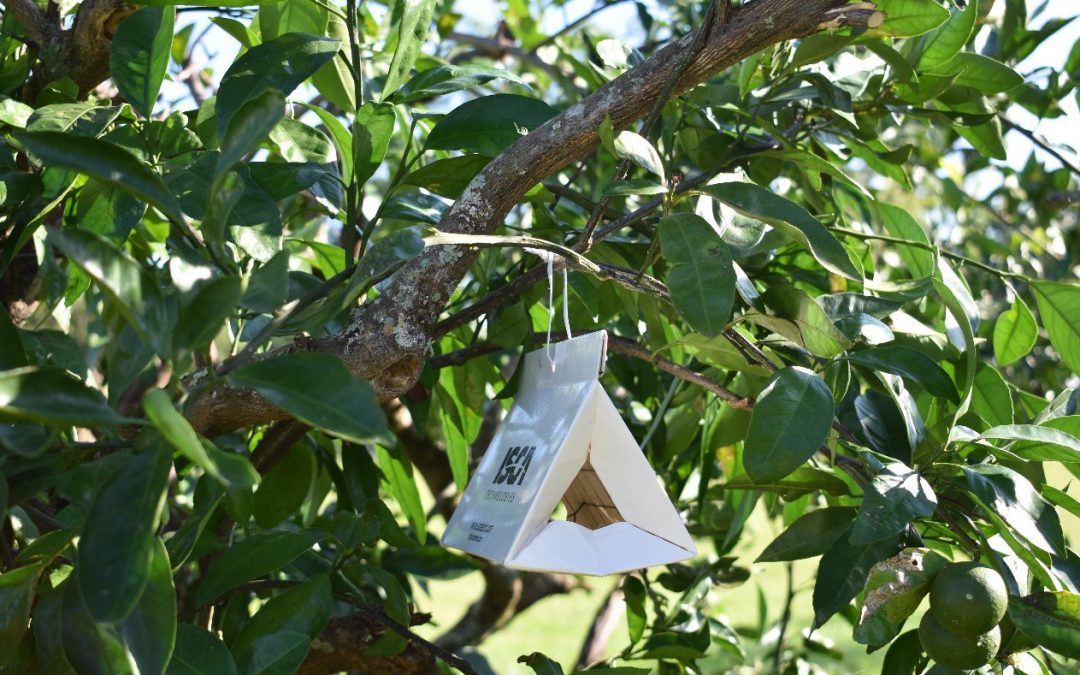
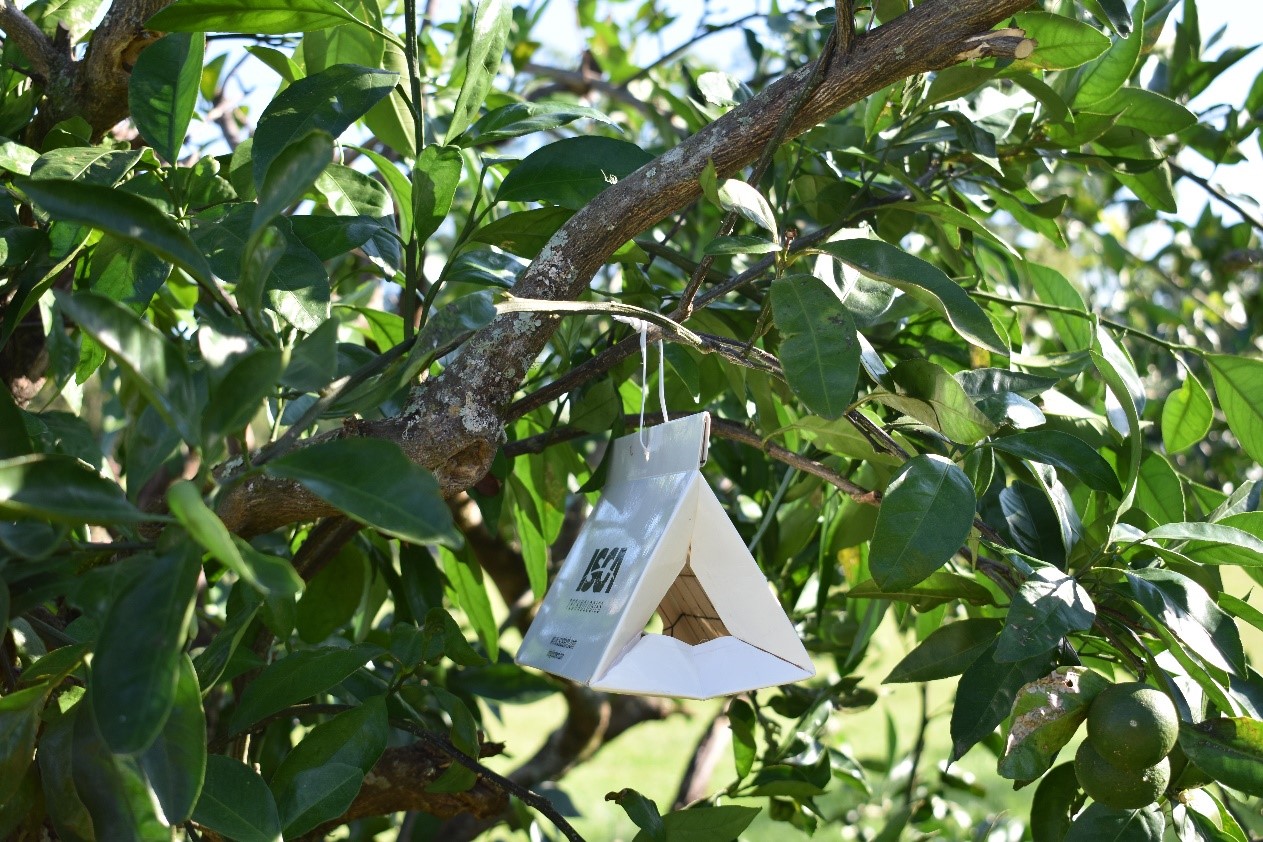
For isolated trees in a backyard, cultural practices and control through mass trapping are usually sufficient to control CLM and insecticide use is not recommended, especially for mature trees. One of the basic cultural practices is to remove any stems that grow below the bud union or from the rootstock, also called ‘suckers’ (Fig. 2). Those rootstock shoots compete with the scion shoots and are great reservoirs for CLM; removing them will help reducing CLM population. On isolated trees, mass trapping using CLM pheromone provide good results (Fig. 3). The mass trapping method is constituted of a delta trap baited with a lure that emits a large quantity of CLM sex pheromone. CLM males are attracted by the odor and are captured in the delta trap’s sticky liner. Those traps are commonly used by growers to monitor CLM populations, but for homeowners they are sufficient to control CLM on a single tree. This trap and a lure method should protect a single tree for approximately 3 months. Finally, the last option is the use of biological control. Several natural enemies are predators or parasitize CLM. In some case, biological control can reduce CLM populations by 90%. Primary predators of CLM include ants, lacewings, and spiders, as well as a parasitic wasp, Ageniaspis citricola that was introduced into Florida and has become established (Fig. 4).
New growth from the rootstock (called ‘suckers’, red arrow) are a source for CLM infestation and should be removed.
Baited pheromone trap for citrus leafminer (picture Danielle Sprague).
Math isn’t always fun! Here is Euclid explaining math in Raphael’s The School of Athens. Credit: Creative Commons.
There are a lot of things gardeners need to know to cultivate a beautiful landscape. Between plant zones, scientific names, soil chemistry, and pest identification, being a gardener takes curiosity and willingness to learn new things. Unfortunately, one topic that needs to be well understood, especially when it comes to applying pesticides and fertilizers, is a subject that many cringe when they hear it – mathematics!
Some of the most common mathematical concepts to have a good grasp on for gardening include area, converting decimals to percentages and vice versa, estimating volume and converting units, and determining how much fertilizer to be applied based on your fertilizer grade.
Here’s a couple tips to help you gardeners out with math.
Area
Most often, we need to know the square footage of our gardens. Rectangles are straightforward, you multiply length (in feet) by width (in feet) to get feet squared. Since most yards are not rectangles, we sometimes need to use other shapes to best calculate the area, such as circles and/or triangles. The area (A) of a circle is , where “π” is 3.14 and “r” is the radius (half of the diameter or the distance from the center to the edge). Remember that the little raised 2 means you multiply the radius by itself twice, not by two.
Most of the time, square feet is the best area unit to use. But just in case you need to know, one acre equals 43,560 square feet. So, if you find your lawn is 10,000 square feet, that means you have 0.23 of an acre (10,000/43,560).
Get your calculator’s out! Credit: iStockphoto.
Percent Conversions
This one may be better understood by most, but this becomes important later when we determine fertilizer needed or doing volume conversions. Basically, any percent can be divided by 100 to convert it to a decimal that can be used easily in other calculations. For example, 15% is the same as 0.15 (15/100). The easy way to remember is that 100% is the same as one, and 50% is the same as 0.5.
Volume Estimation and Conversions
Determining volume is required when figuring out how much mulch is needed for a garden bed or soil required for a raised bed. Converting one unit to another is especially important when determining how much pesticide product is needed to prepare a mixture.
For mulch and soil, the cubic feet (cf) or cubic yards (cy) are needed to figure out how many bags or truckloads will be needed. Most bulk products are sold by the cubic yard. Since we are dealing with volume, we need three measurements, the length, width, and depth. If we want to add three inches of mulch to a 500 square foot garden, we multiply the 500 by 0.25 feet (3”/12” equals 0.25 inches) to get 125 cubic feet. That is about 62 bags of mulch from the hardware store, which are often sold in 2 cubic foot bags. If we divide 125 cubic feet by 27 (three feet in a yard so 3’ x 3’ x 3’ = 27) we now have the answer in cubic yards and find that we need about 4.5 cubic yards of mulch. One cubic yard is roughly a half of a full-size pickup truck bed.
When it comes to converting liquid volume units to help with pesticide mixtures, fortunately we have the internet to help. However, it is a good idea to at least be familiar with converting ounces to gallons and vice versa. Since 128 ounces equals 1 gallon, to go from gallons to ounces you multiply by 128. For example, 0.5 gallons equals 64 ounces (0.5 x 128). To go from ounces to gallons, we just divide by 128. For example, 192 ounces equals 1.5 gallons (192/128).
Applying the proper amount of fertilizer keeps your landscape healthier and protects local waterbodies. Credit: UF/IFAS.
Calculating Fertilizer Needed
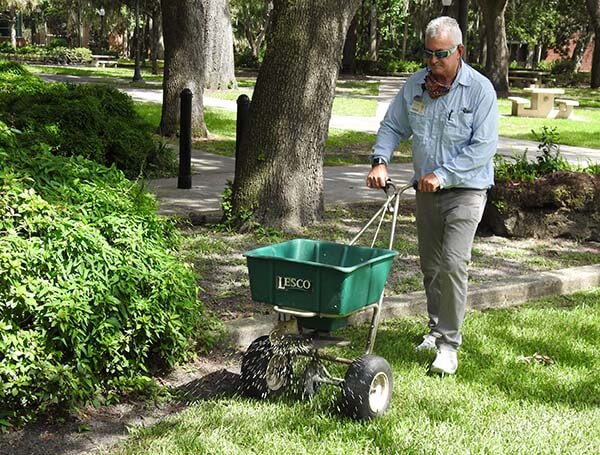
Okay, bear with me, as we are about to do some hard math and piece together several of the above concepts. First of all, most fertilizer rates are provided by extension resources and given in terms of pounds of a particular nutrient for a set area, usually 1,000 square feet. For example, when using slow-release fertilizer a homeowner should apply no more than one pound of nitrogen for every 1,000 square feet of lawn. To figure out how much actual fertilizer to apply to meet the recommendation, we will need 1) the recommended rate, 2) the size of the lawn, and 3) the fertilizer grade on the product (the three numbers that represent the percent N, P, and K). Our rate is one pound nitrogen per 1,000 square feet. The size of our lawn is 50 feet by 30 feet, so 1,500 square feet. We are going to use a 16-0-8 fertilizer. Now, here is the hard part! To figure out how much of our 16% nitrogen fertilizer will provide one pound of nitrogen, we need to convert 16% to a decimal (16/100 = 0.16) and then divide the amount of fertilizer we need by that number – 1 pound/0.16 – to find that 6.25 pounds of our fertilizer product are required for each 1,000 square feet. Since we have 1,500 square feet, we need to multiply our answer by 1.5, which gives us a total of 9.4 pounds.
Math is hard and there are usually many methods to get the same solution. When using pesticides and fertilizers in the home landscape, it’s important to make sure we’re using the right amount of materials to minimize the chance of harming ourself, our plants, and the local environment. If you need help, or would like someone to check your work, contact your local extension office.
Biological control is a pillar of integrated pest management. It may seem a bit daunting the principle is simple. All things in nature have predators including insects. Biological control is simply building a conducive environment for the predators of undesired pests. One animal not often thought of in this capacity is bats. Insectivores by nature, these underutilized creatures have a big impact to your open spaces. Their steady diet of moths (Lepidoptera), beetles (Coleoptera) and flies (Diptera, which includes mosquitoes) reduce insect pressure to your gardens and landscaping.
I know what you are thinking. How effective can they possibly be? Pregnant females consume up to two thirds of their body weight through the summer months while rearing pups. Bats are small but keep in mind that these are not solitary animals. In south Texas, a single large colony consumes enough insects to save cotton farmers an estimated $741,000 per year in insecticides. That is just to illustrate the point as you won’t be able to attract huge colony. There is no reason to believe a smaller colony will not provide similar services in your gardens.
Habitat
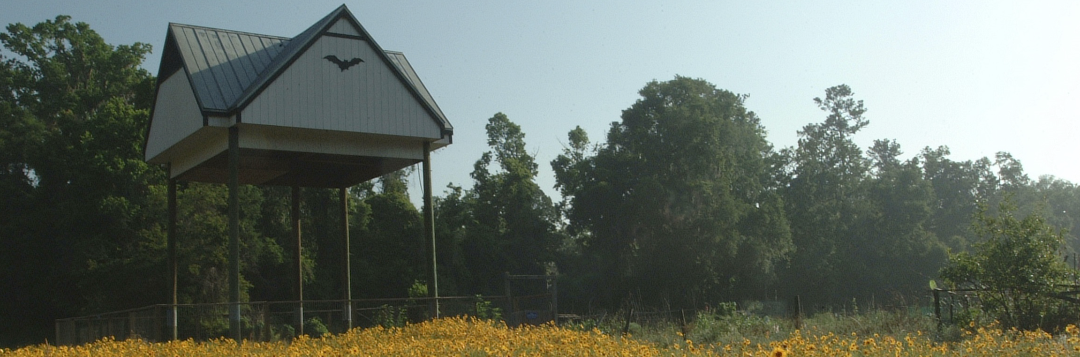
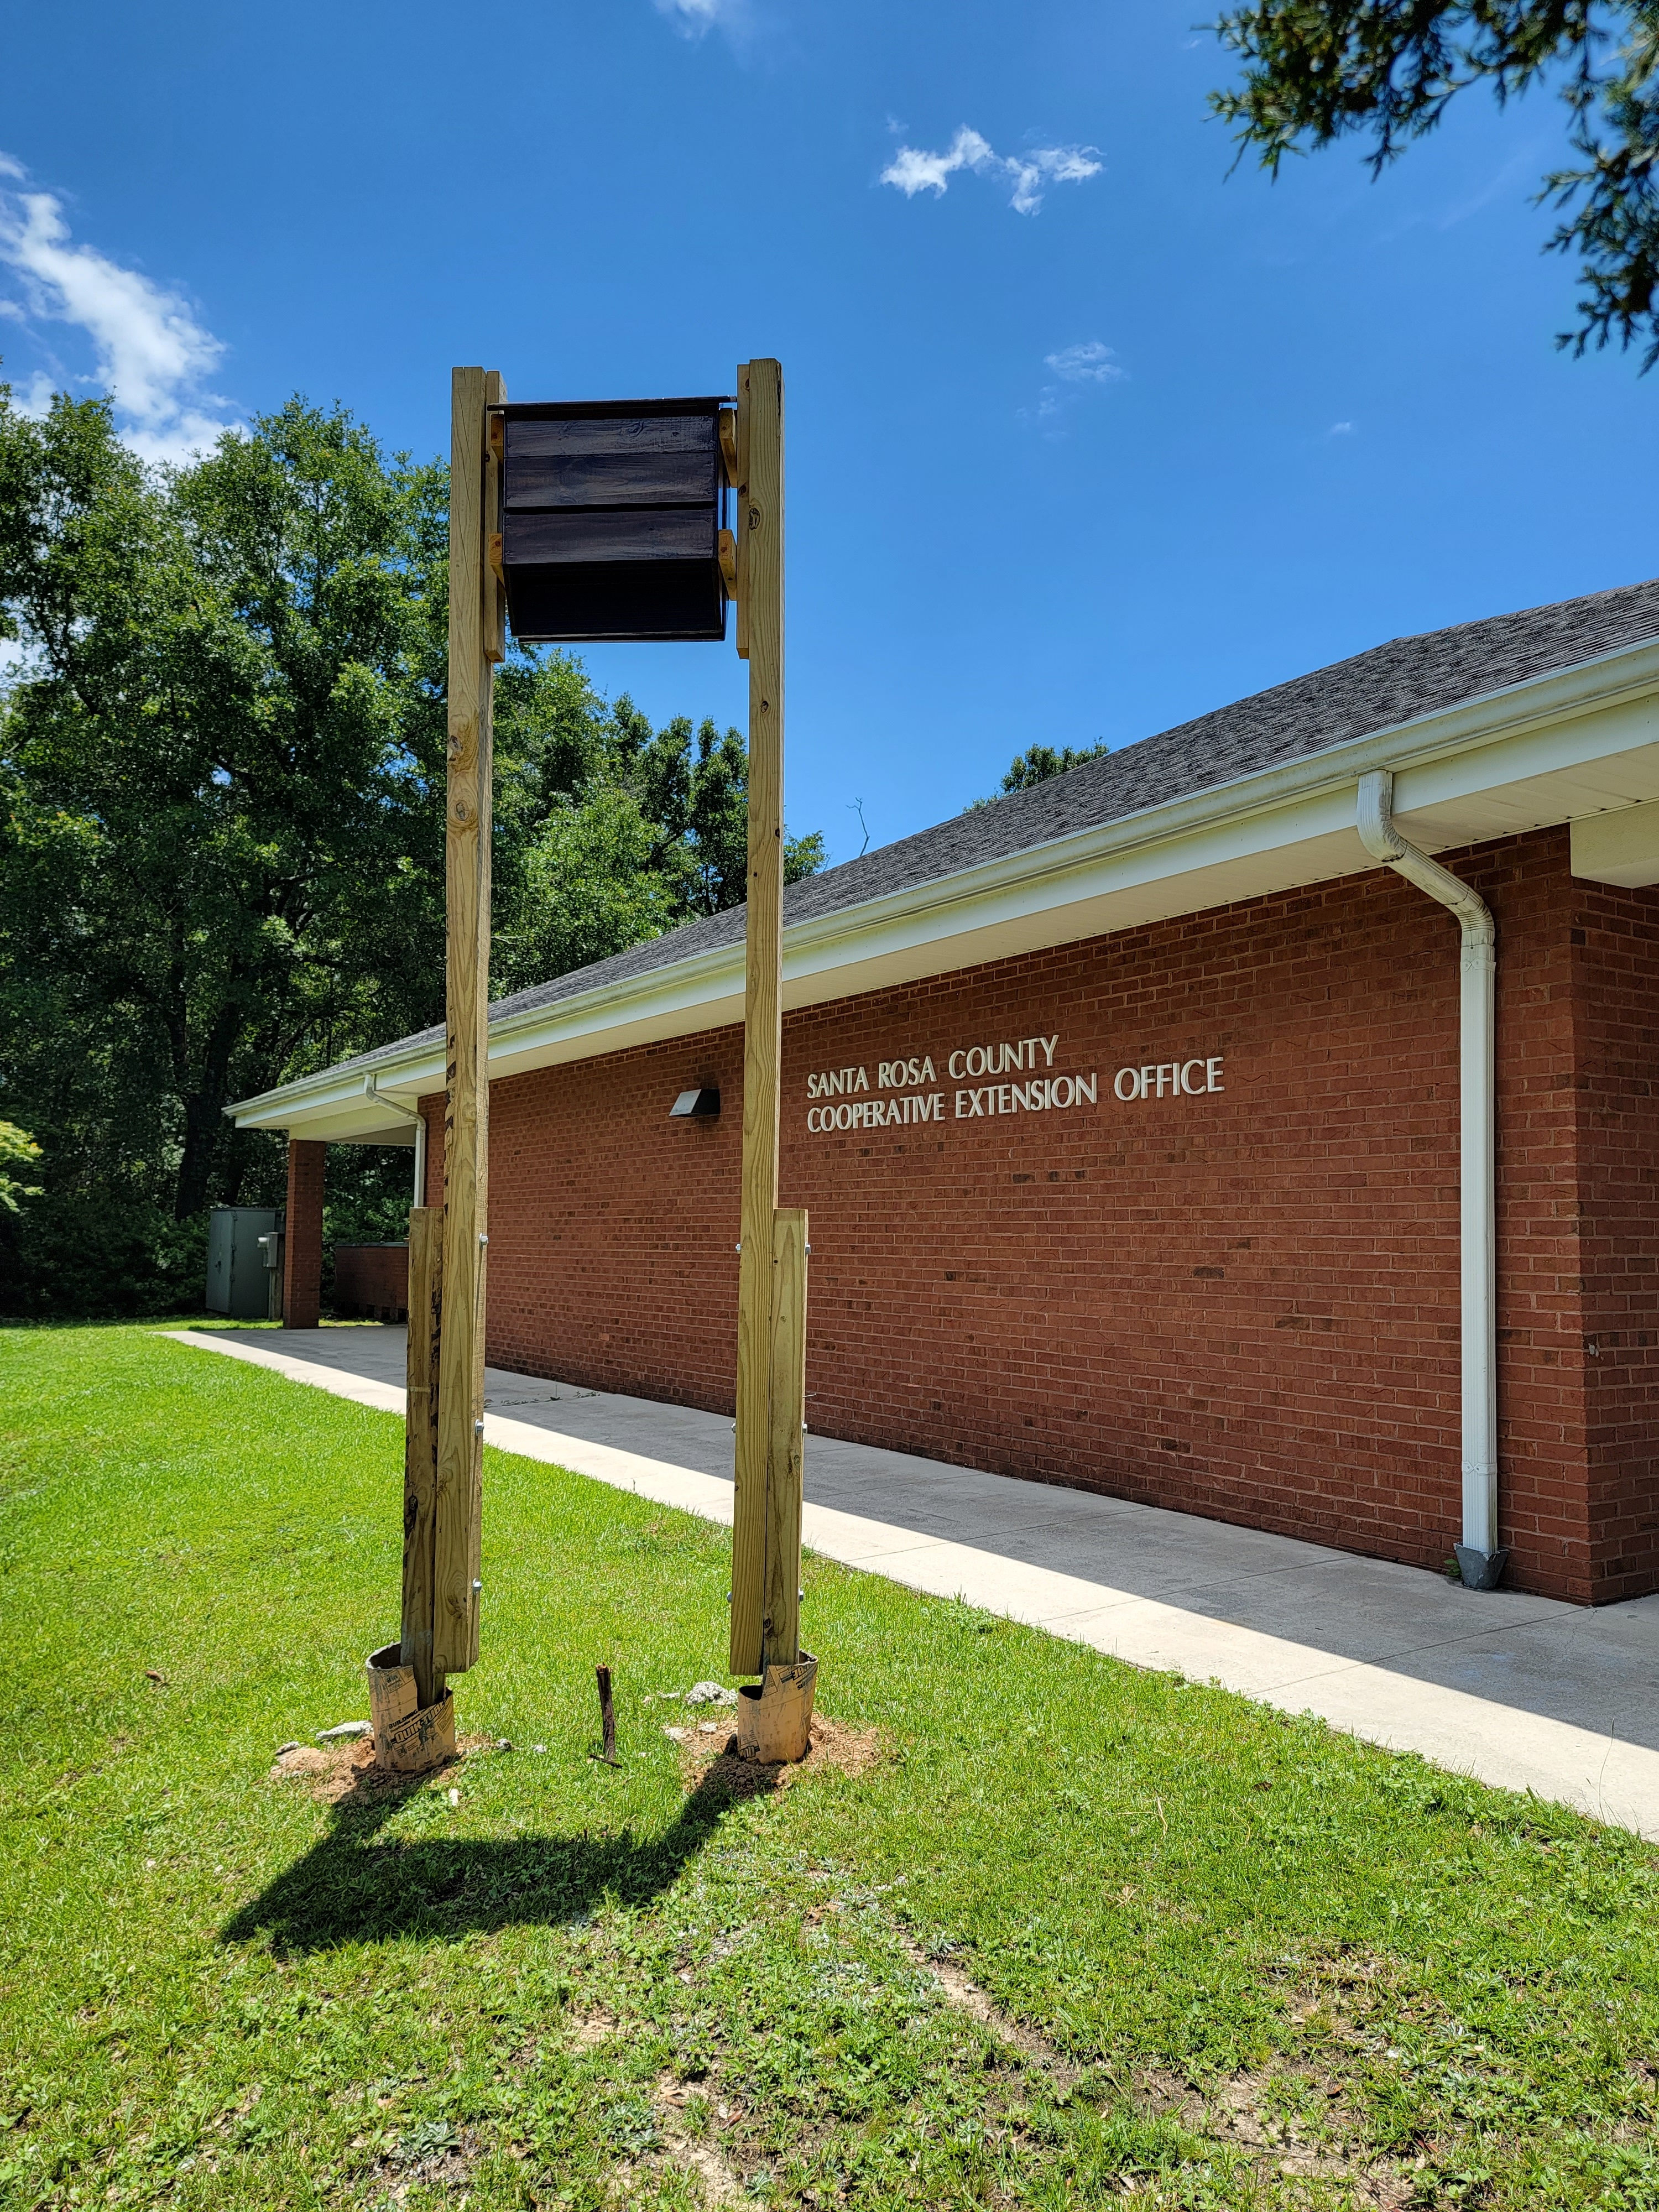
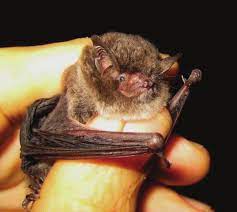
Now that your interest is piqued, how can you attract bats to your property? Installing a bat house is the easiest way. They are typically a two foot by one foot structure holding single or multiple chambers in which bats roost. It provides shelter from predation and weather while providing a place to rear pups. Though commercially available they may be built at home with minimal cost. Place the bat house in a location with morning sun at least 12 feet off the ground. Ensure there is enough airflow around the house to keep them cool, but that the structure is watertight. Mount houses on poles next to buildings and you’ll have better success attracting residents. With everything in place, it is time to discover who will most likely be your new neighbor.
photo: Joshua Criss
The Bats of North Florida
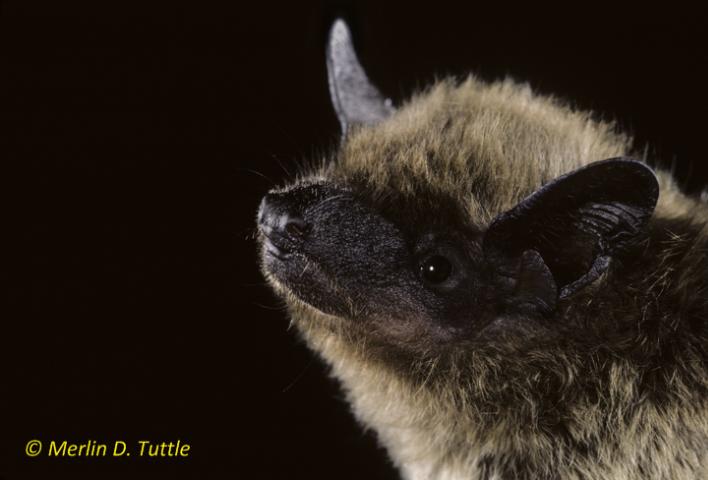
Florida is home to 13 species of bats statewide. Of these, 11 may be found in the Panhandle but only 3 are common enough to be routinely seen. The Brazilian free-tailed bat (Tadarida brasiliensis) is the most common. Medium sized with brown fur, they have a long tail, wrinkled cheeks, and roost in man-made structures.
Photo: IFAS
Second most common are Evening bats (Nycticeius humeralis). These dark brown to yellow bats have short ears with a broad hairless muzzle. They are tolerant of other bat species often roosting in tandem with them.
Photo: IFAS
Finally, the panhandle is home to Southeastern Myotis (Myotis austroriparius). Easily the smallest of these bats, they are dull gray to brown with a lighter belly and long hairs between their toes. This species is the bat most likely to eat mosquitoes.
Photo: Jeff Gore, FWC
Finally, the panhandle is home to Southeastern Myotis (Myotis austroriparius). Easily the smallest of these bats, they are dull gray to brown with a lighter belly and long hairs between their toes. This species is the bat most likely to eat mosquitoes.
A Word of Caution
No article on wildlife would be complete without a word of caution. Bats are wild animals and should be treated as such. Never touch a bat on the ground as it most likely is not healthy. Bats do not generally cause issues but have been known to be disease vectors. Call a professional to collect the animal and never bring it into your home.
Bats can be a wonderful tool in controlling pests on your property. Creating habitat can help reduce pesticide need and cost to the homeowner. For more information on bats, see this Ask IFAS document, or contact your local extension agent for additional information on this and any topic regarding your gardens and more.