by Daniel J. Leonard | Apr 8, 2019
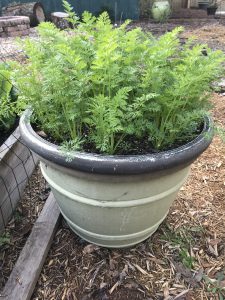
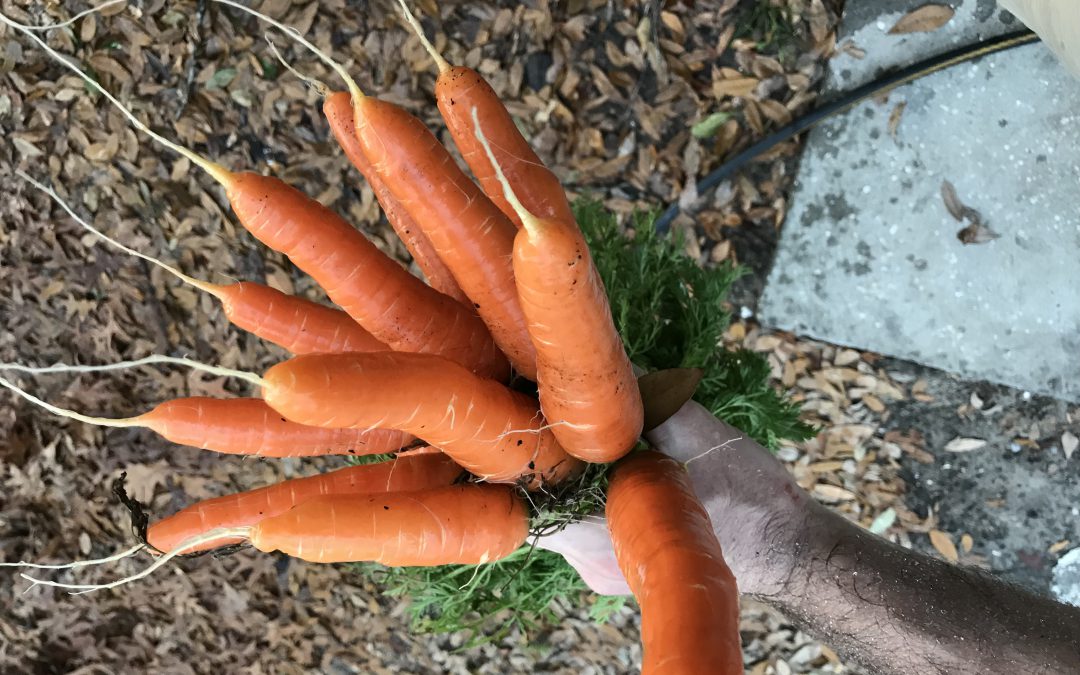
Carrots growing in a large container.
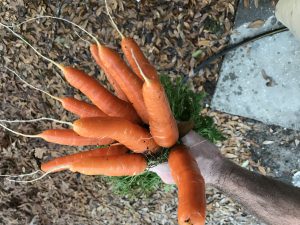
After tending a home vegetable garden for any length of time in the Panhandle, you begin to learn some things. Tomatoes are awfully hard to grow. Raised beds drastically lower the difficulty of gardening in general. You should never plant mint in a permanent veggie garden. Swiss Chard has to be started early because it grows as molasses creeps. Of all of these anecdotal maxims I’ve discovered, the one with the most flavor return on my gardening investment is that carrots should always be a part of your cool season garden. A fresh carrot out of the garden is hard to beat. The difference between a grocery store carrot and one fresh out of your own garden is astonishing and will change your culinary life. Though carrot season in Florida is just ending (my final batch was harvested yesterday), it’s the perfect time to learn about growing carrots here and plan to get some in the ground this fall!
There are a number of reasons to grow and eat carrots. They’re obviously very healthy, though I dispute the whole eat carrots and you’ll have great eyesight thing – apparently I acquired the taste for them too late to help. They go well in more dishes than they don’t. However, the real two reasons you should supplement your grocery store carrot purchases with home grown harvests are that they’re so easy to grow and that there are so many more options than the standard long, thin orange varieties adorning the produce aisle shelves.
‘Bolero’ Carrots
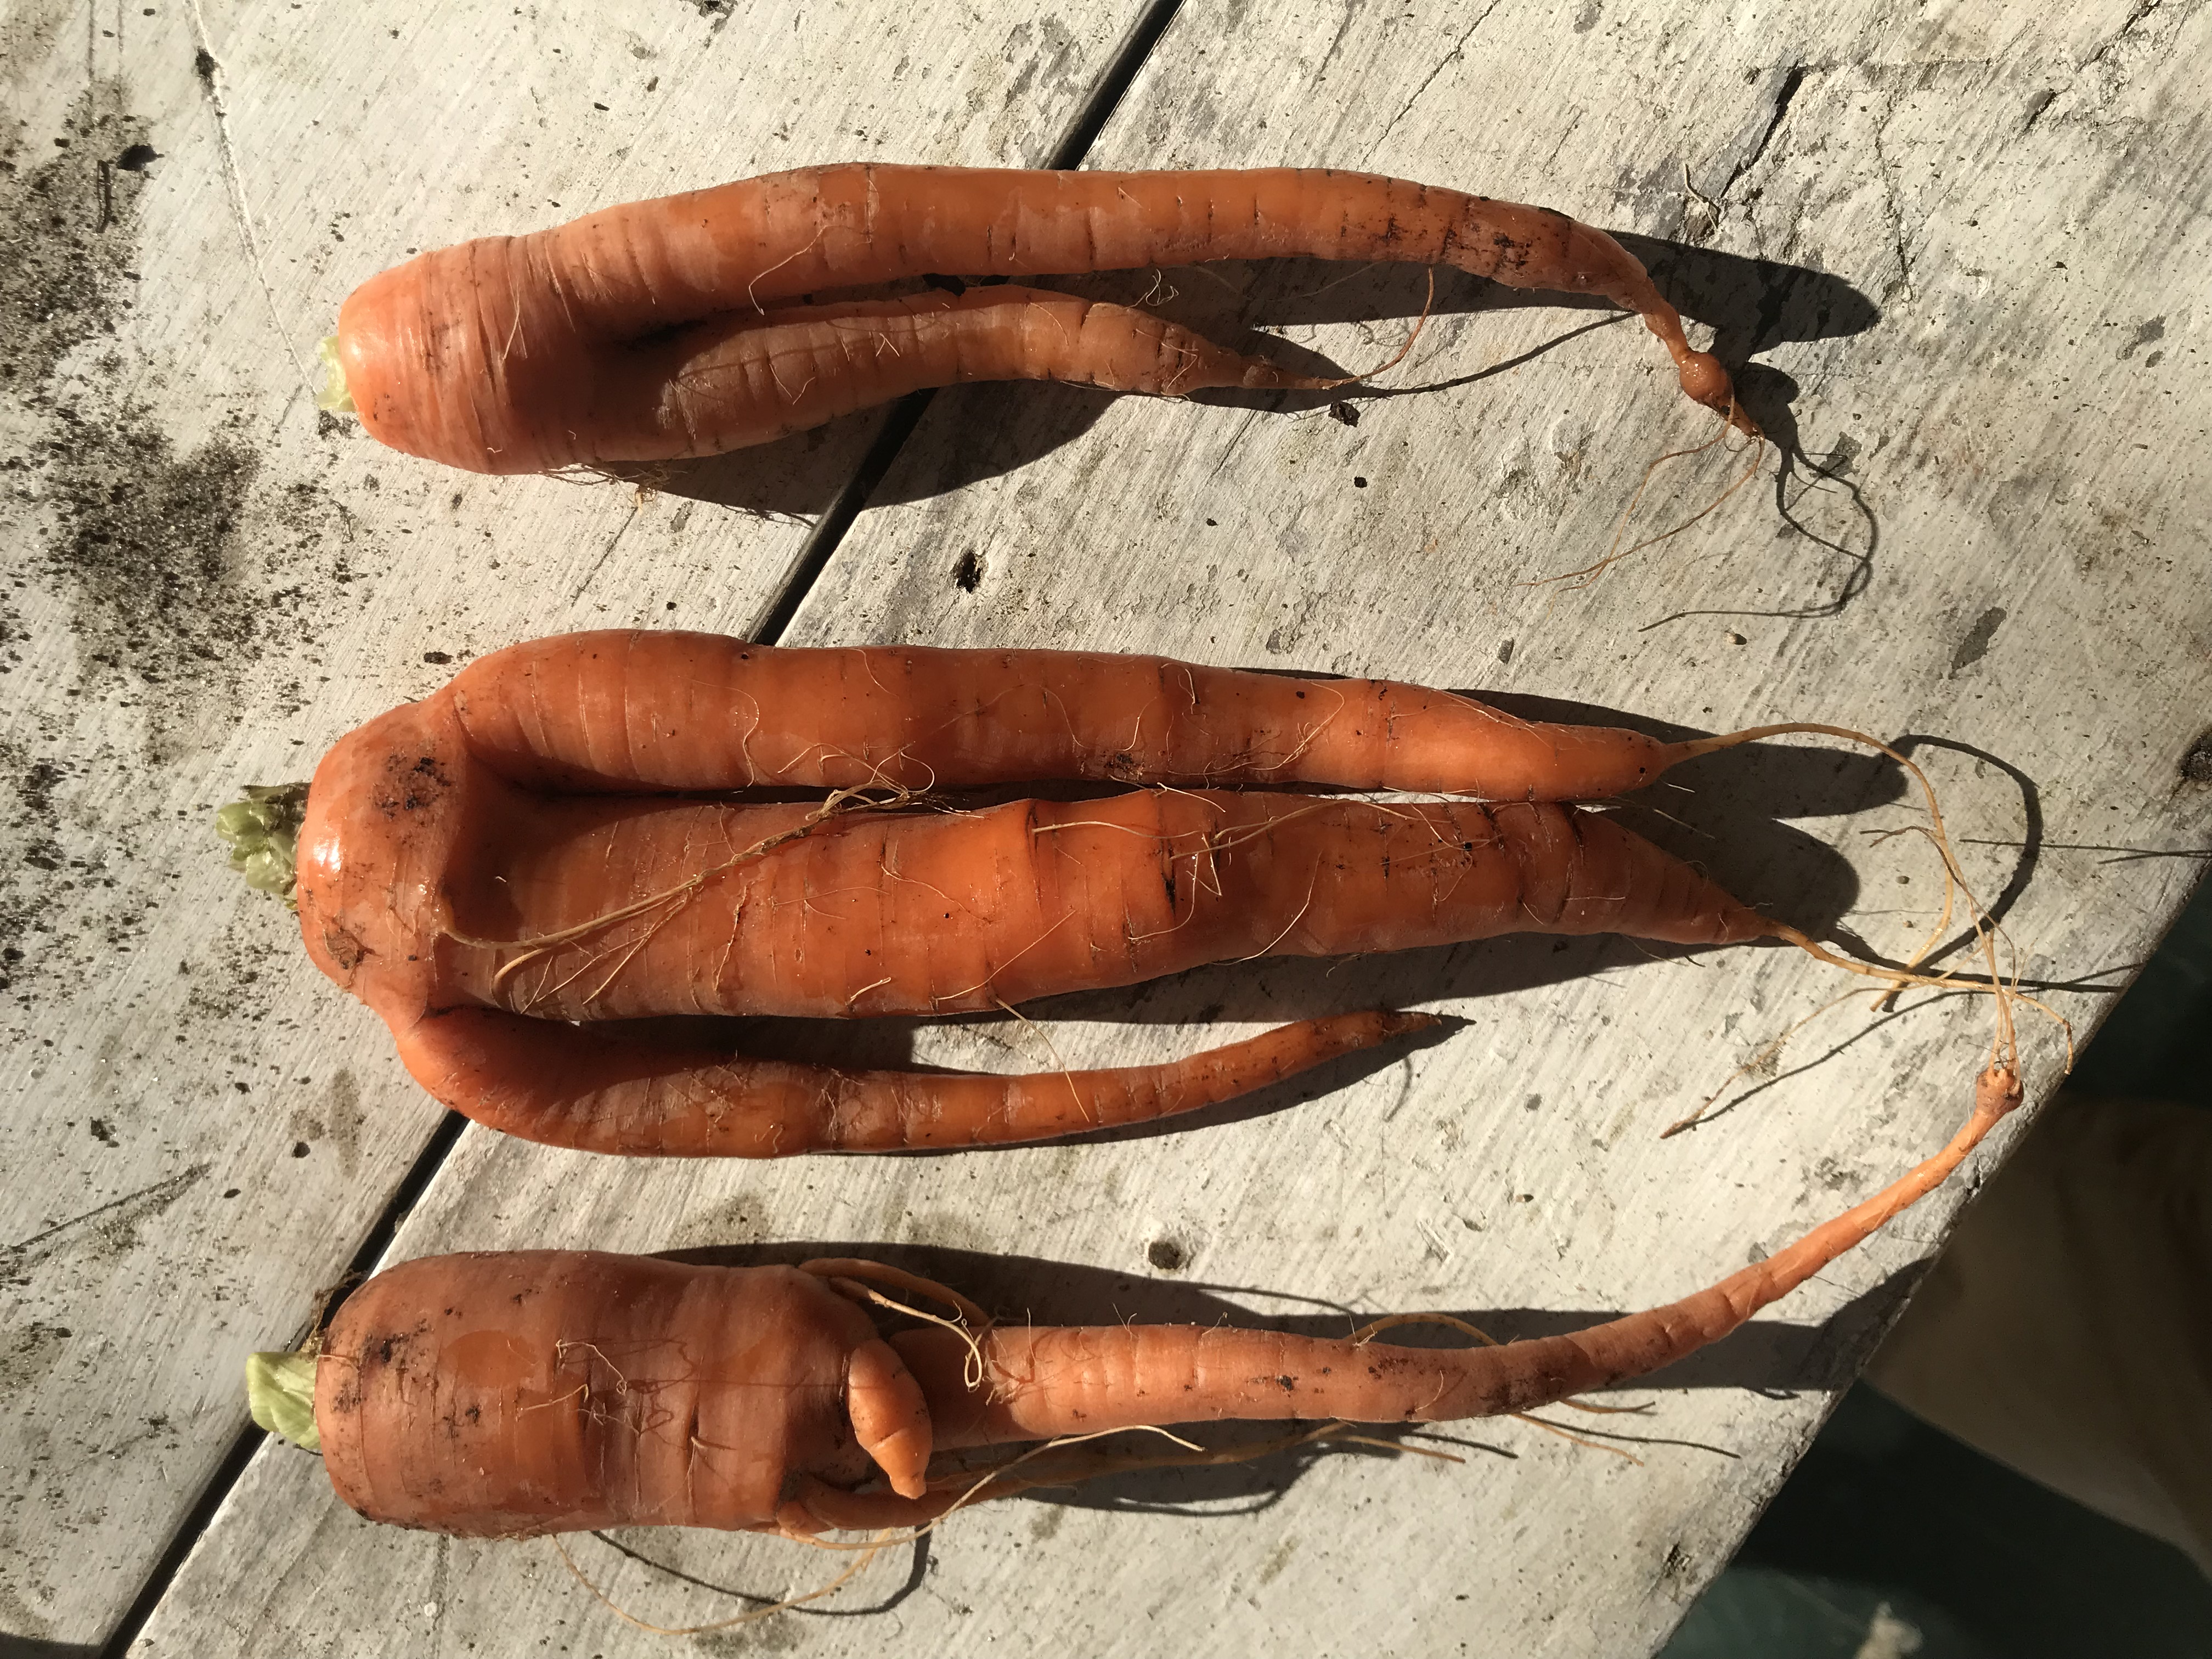
Though carrots are remarkable easy to grow, they do ask a couple of things of gardeners. They are a cool season vegetable and are generally planted from seed beginning in late August through early September in the Panhandle, though successive plantings can continue through at least February if you want to extend your harvest. Also, like many other root vegetables, carrots don’t transplant well so direct seeding in the garden is a must. But before you even consider seeding, care must be taken to make sure the soil bed you’ll be seeding in has been properly prepared. One of the few ways to fail growing carrots is to not start with a loose soil free from any potential obstructions. If the development of the carrot root is disturbed by anything during the germination and growing process (this includes manure aggregates or other clumpy soil, sticks, rocks or even a hard layer of soil hiding under your loose compost), the end product will be deformed. To prevent this, thoroughly till your raised bed soil to at least 12” and break up any larger soil particles that are left with your hands. If you don’t get your soil bed perfect though, fear not, deformed carrots are definitely edible, they just won’t look like they’re supposed to and are more difficult to clean and process!
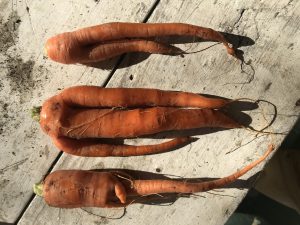
Deformed carrots due to clumpy compost!
Once you’re ready to plant, I’ve found it easier on poor eyes and fumbling fingers like mine to sprinkle the tiny carrot seeds in shallowly furrowed rows 10”-12” apart and thin the seedlings later, rather than trying to individually space seeds the recommended 1”-3” apart. Finally, these colorful little veggies love water and require good fertility. To ensure good expansion of the edible root, maintain consistent moisture and fertilize at planting with a good slow release fertilizer. Additional fertilizer applications may be required later in the growing season as most carrots take around ten weeks to gain maturity.

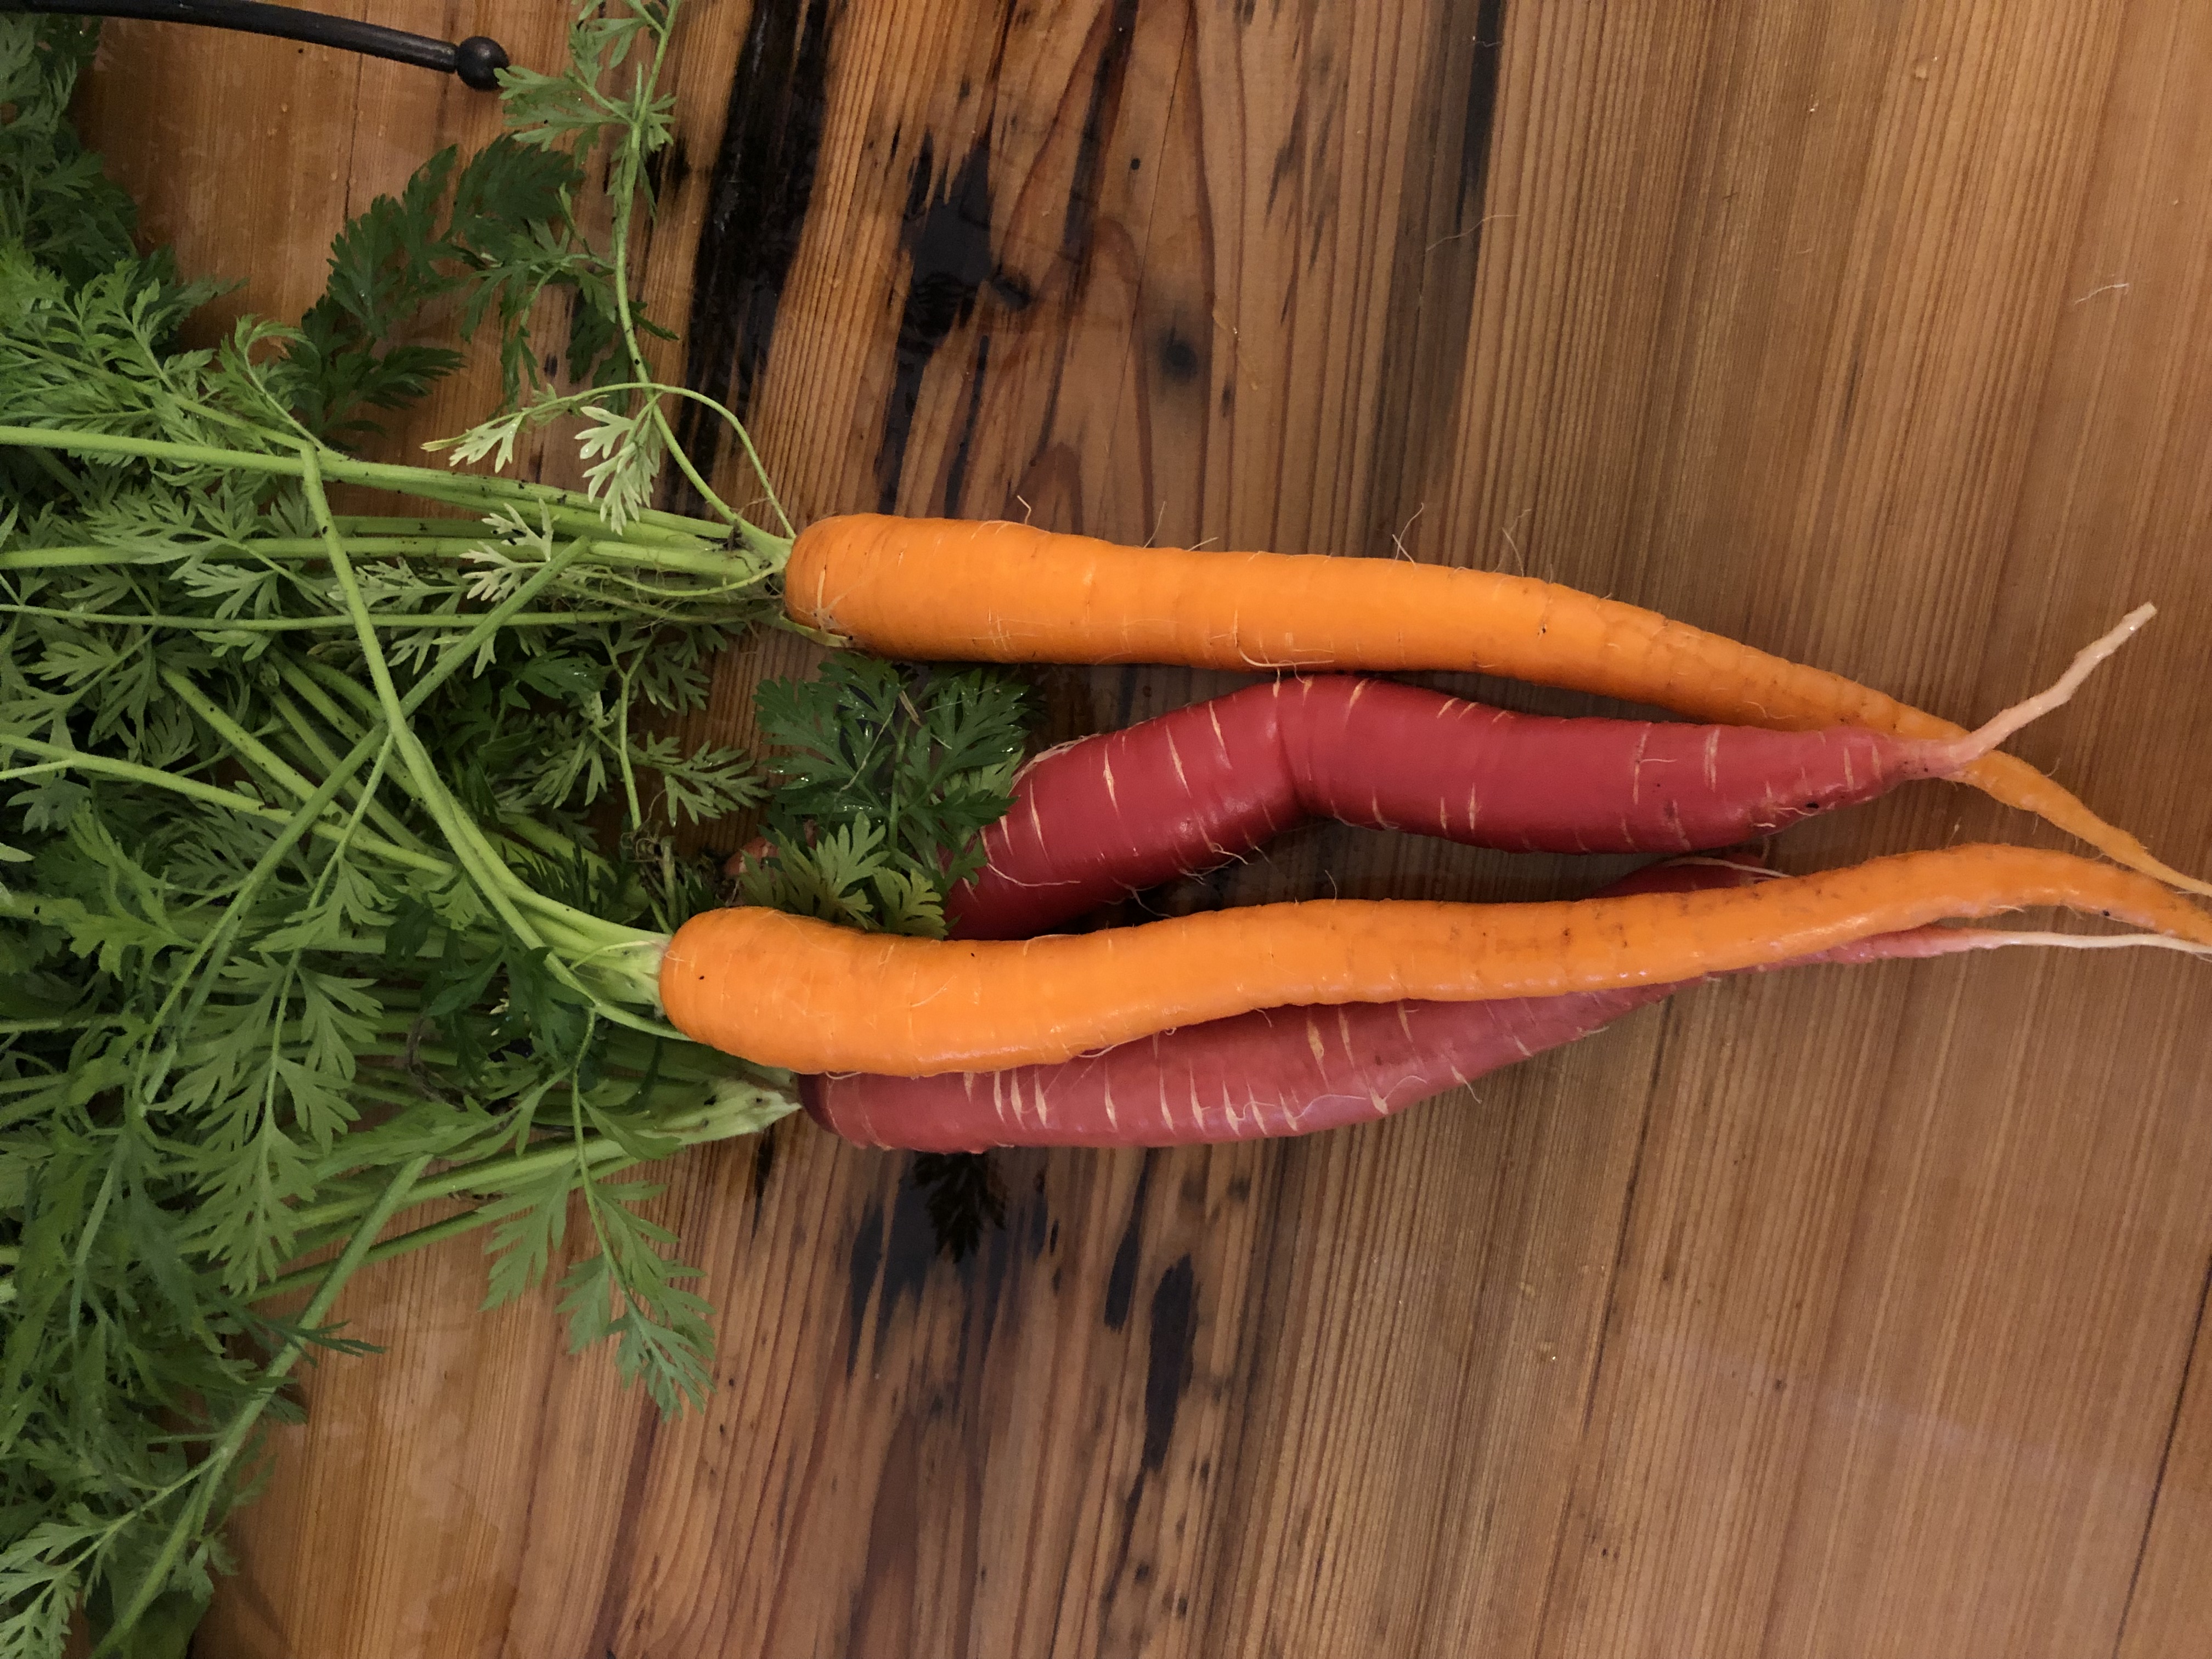
‘Sugarsnax’ (orange) and ‘Malbec’ (red) carrots
In this age of online catalogs, farmer’s markets, and demanding consumers who crave interesting food, the selection of carrot varieties available for gardeners to grow has never been better. Among the hundreds of individual cultivar options are several broad types of carrots you’ll need to choose from. You’re probably familiar with the Imperator types. These are the extra-long, durable carrots most often find in stores. If you have a deep raised bed or other large container, Imperator varieties can be extremely rewarding! I grew the Imperator-type ‘Sugarsnax’ this year and highly recommend it for ease of growing, size and flavor. Next up are the Nantes types. These carrots are medium length and cylindrically shaped. Sometimes called “storage” carrots, these types tend to store well for long periods of time after harvest and retain their flavor well. I’ve tried a few over the last several years and can recommend ‘Bolero’ and ‘Napoli’ with confidence. There is even a carrot type for those of you with shallow raised beds (8” or less) that can’t accommodate the previously listed types! Chantenay type carrots are excellent performers in these situations as they are generally a bit shorter and possess a conical shape with roots wider at the top and tapering to the tip, making a deep soil bed a bit less critical. Finally, there are even some excellent cultivars of carrots in colors other than orange! That’s right, you can grow white, purple, yellow, and even red carrots! I’ve done very well with ‘Purple Haze’ (purple with orange interior), ‘White Satin’ (creamy white color), and ‘Malbec’ (deep, rich red) and highly recommend all three. Keep in mind that the red and purple carrots tend to lose their color when cooked, so the greatest effect is seen when eaten fresh. All of these cultivars can be found at nearly any of the numerous online and catalog seed retainers such as Johnny’s Selected Seeds, Baker Creek Heirloom Seeds, Burpee, and others.
As you can see, carrots are an easy to grow, extremely rewarding vegetable for the home gardener; give some a try in your raised beds next fall! And as always, if you have any questions about growing carrots or any other gardening related question, contact your local UF/IFAS Extension office!
by Matt Lollar | Nov 8, 2018

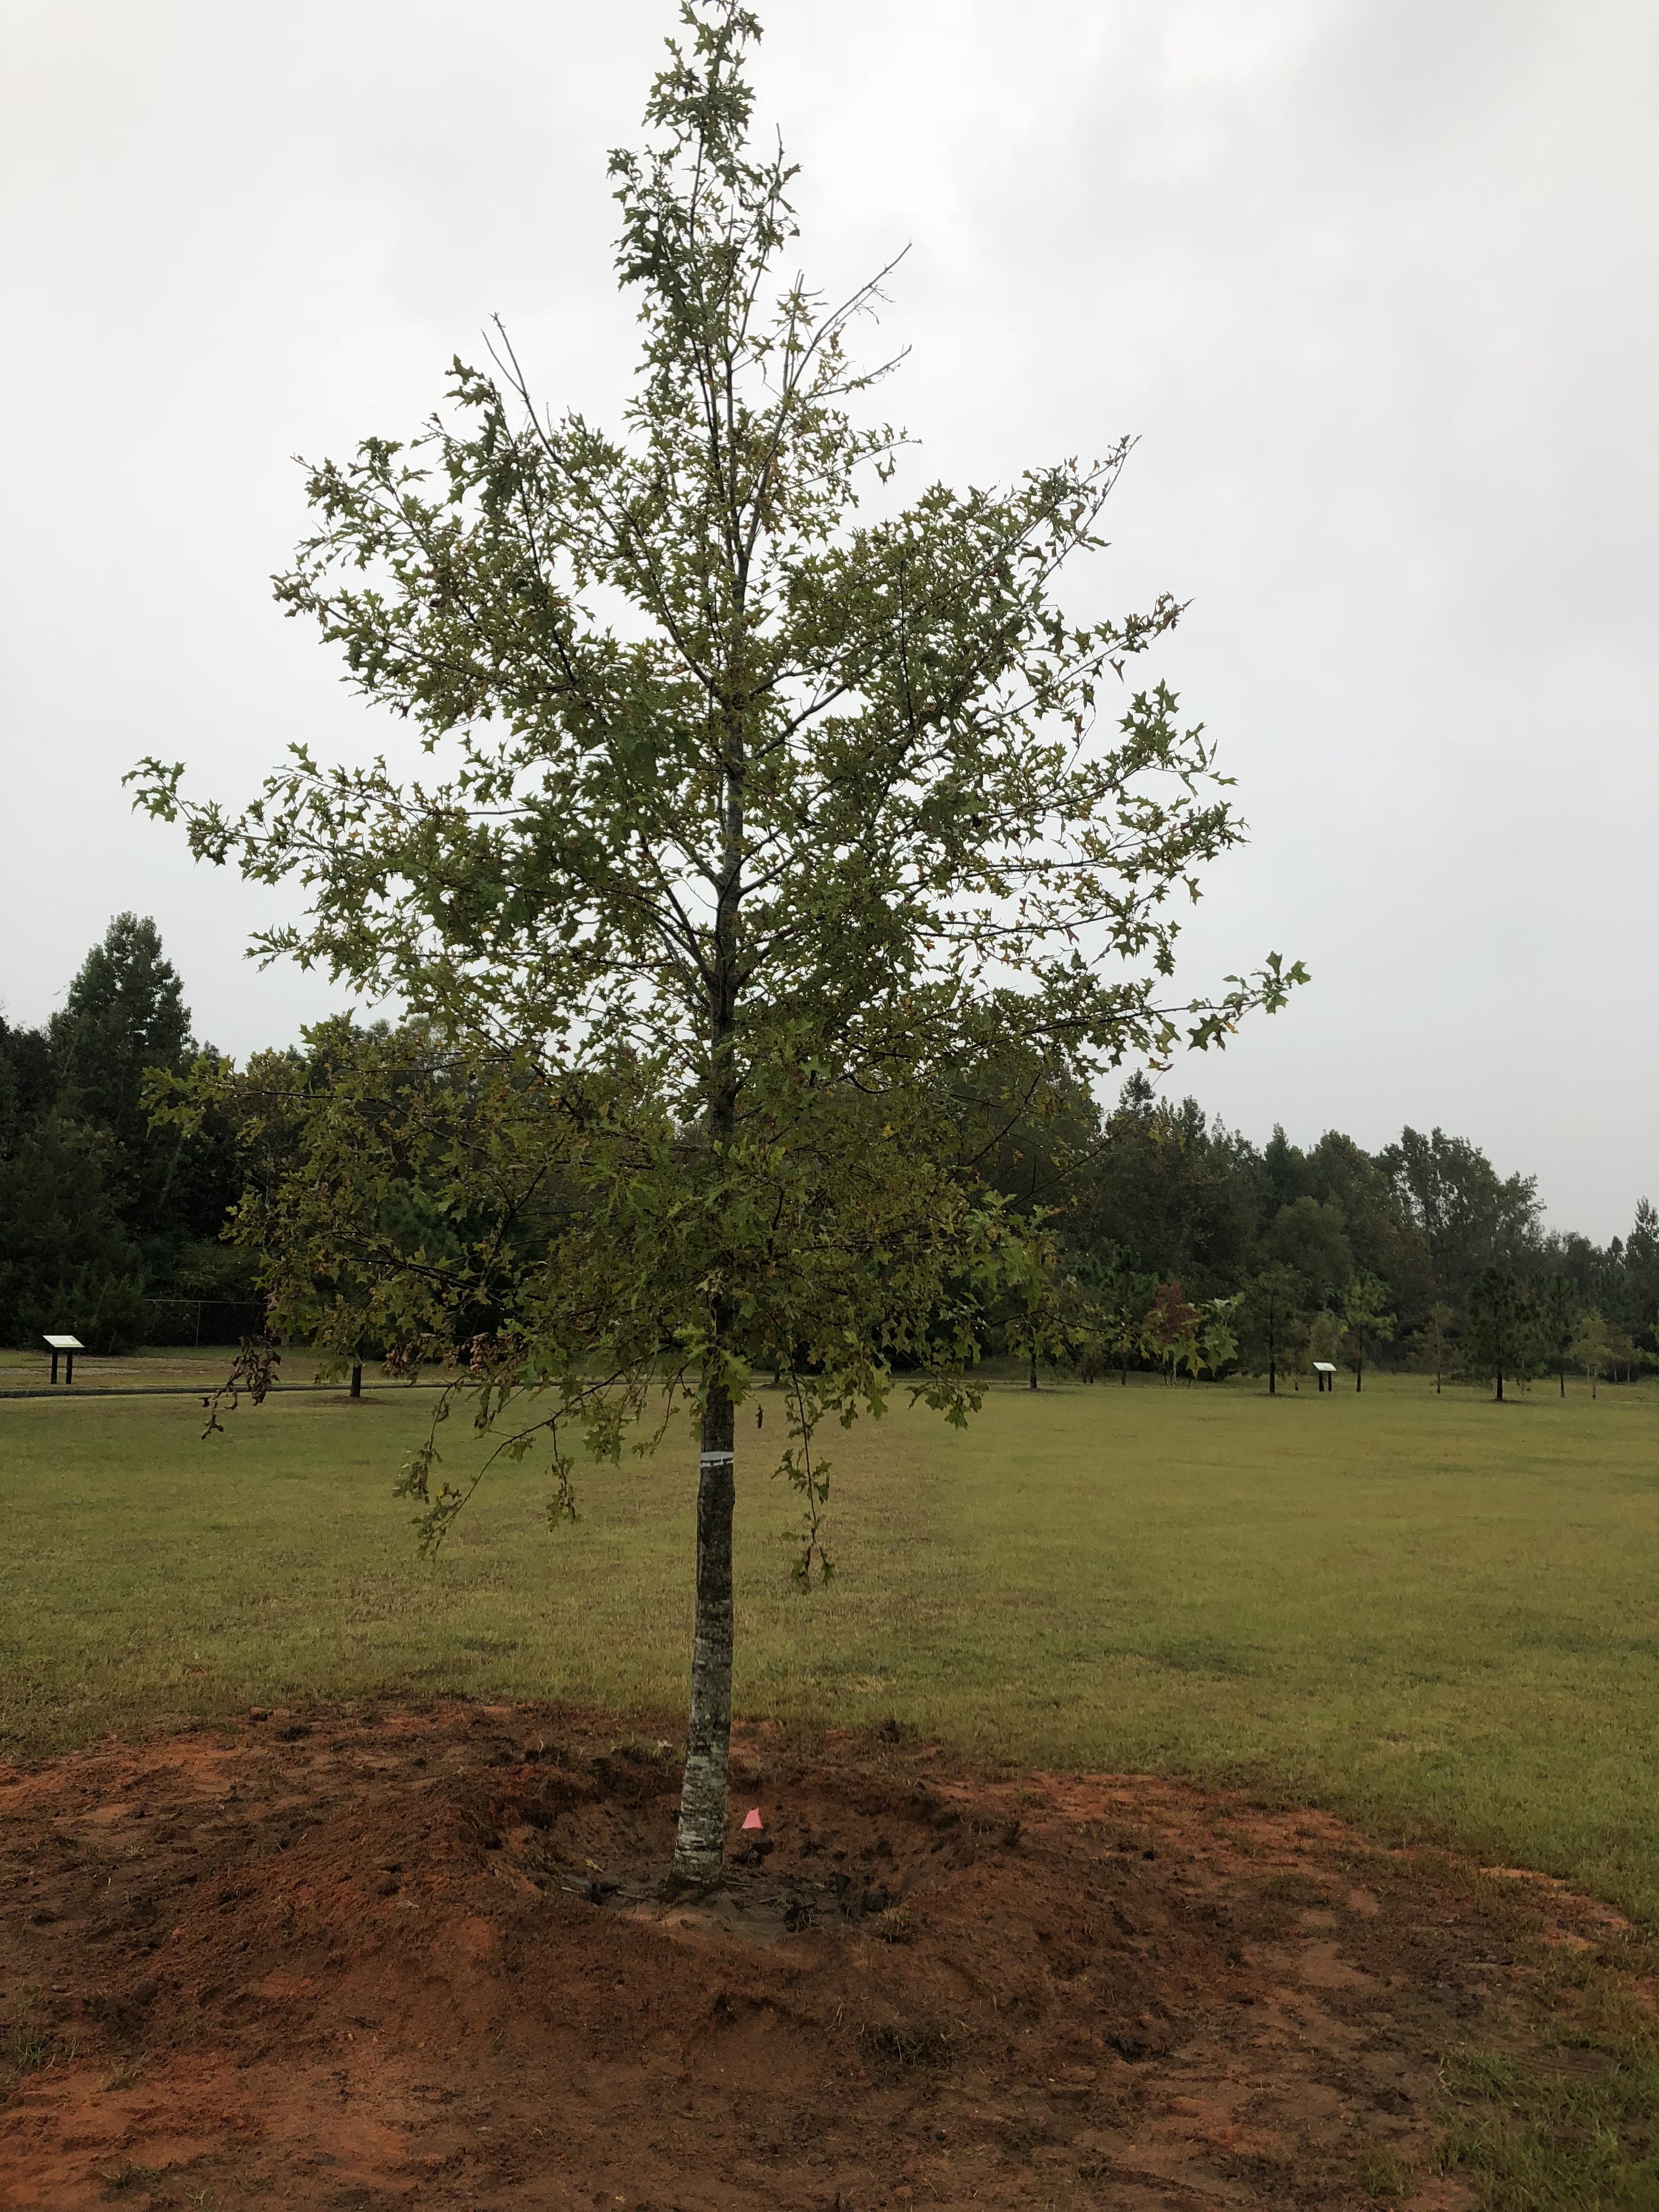
A planted tree with water retention berm. Photo Credit: Matt Lollar, University of Florida/IFAS Extension – Santa Rosa County
Often, Extension agents are tasked with evaluation of unhealthy plants in the landscape. They diagnose all sorts of plant problems including those caused by disease infection, insect infiltration, or improper culture.
When evaluating trees, one problem that often comes to the surface is improper tree installation. Although poorly installed trees may survive for 10 or 15 years after planting, they rarely thrive and often experience a slow death.
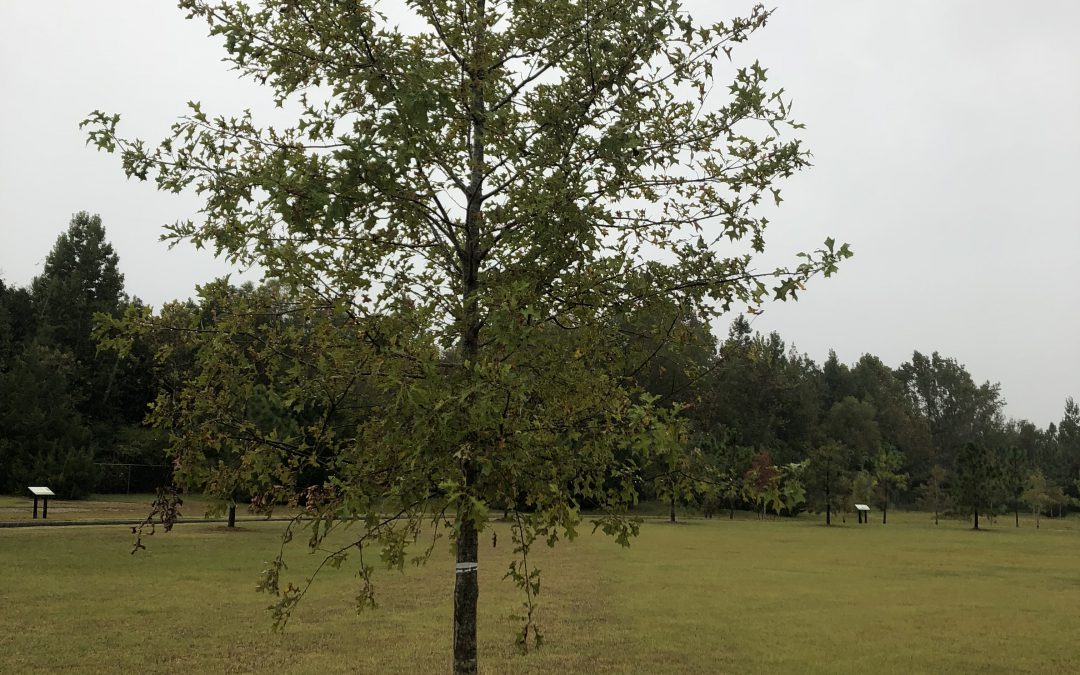
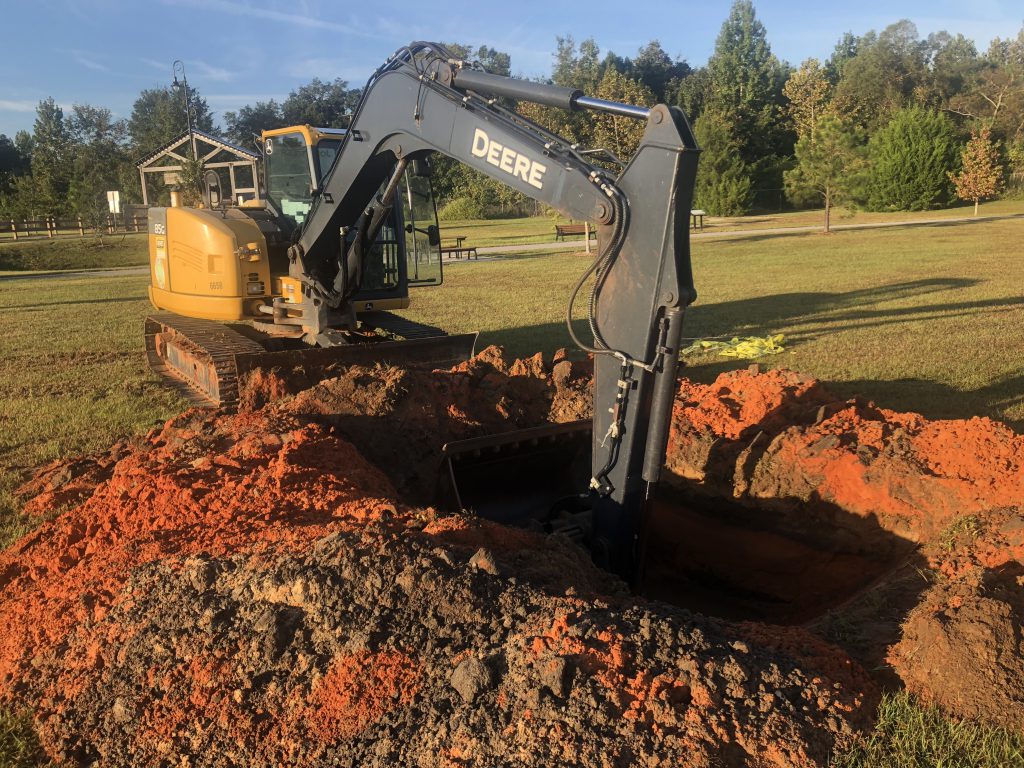
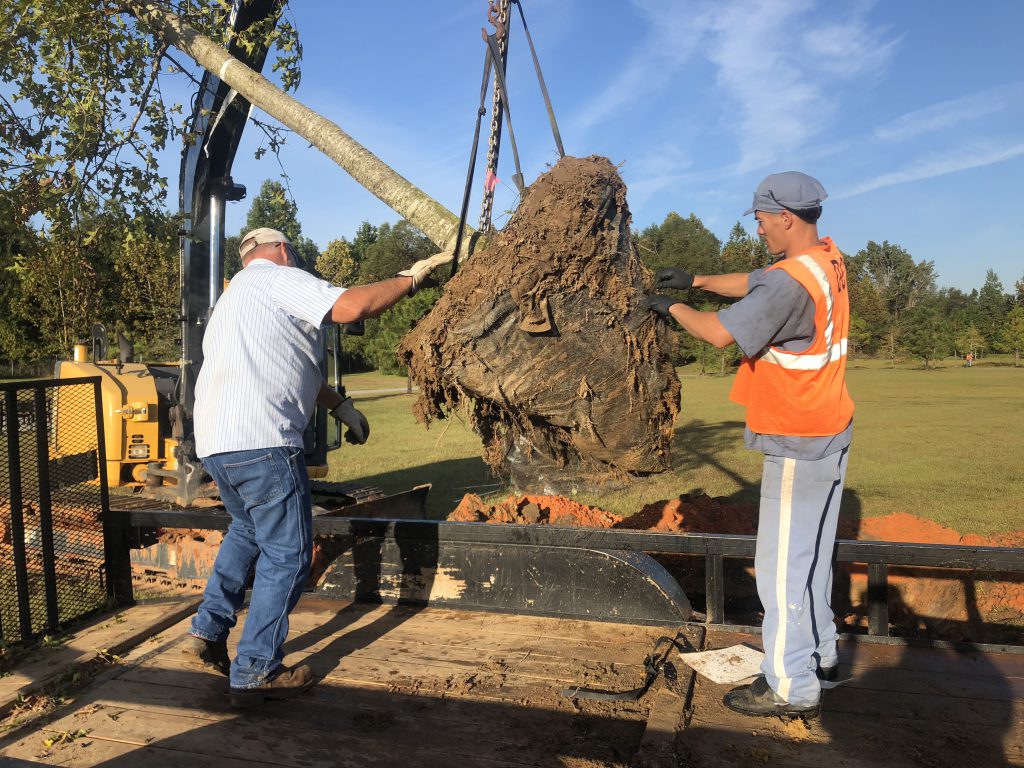
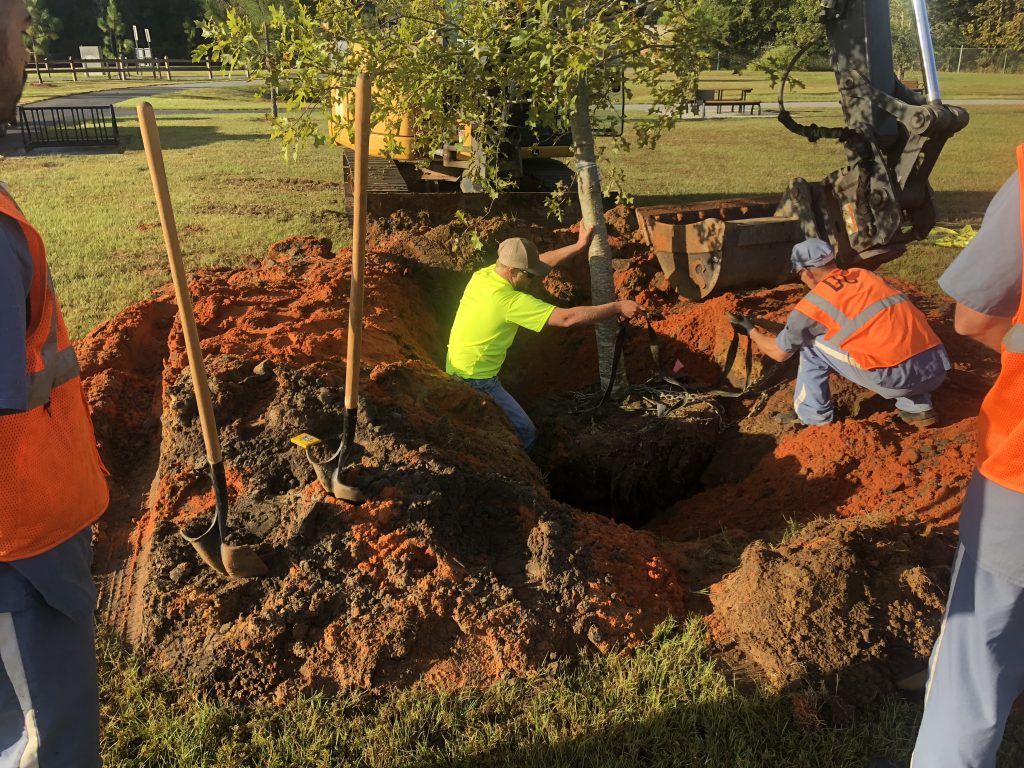
Fall is an excellent time to plant a tree in Florida. A couple of weeks ago beautiful Nuttal Oak was planted at Bagdad Mill Site Park in Santa Rosa County, FL. Here are 11 easy steps to follow for proper tree installation:
- Look around and up for wire, light poles, and buildings that may interfere with growth;
- Dig a shallow planting hole as wide as possible;
- Find the point where the top-most root emerges from the trunk;
- Slide the tree carefully into the planting hole;
- Position the point where the top-most root emerges from the trunk slightly above the landscape soil surface;
- Straighten the tree in the hole;
- Remove synthetic materials from around trunk and root ball;
- Slice a shovel down in to the back fill;
- Cover the exposed sides of the root ball with mulch and create water retention berm;
- Stake the tree if necessary;
- Come back to remove hardware.
Digging a properly sized hole for planting a tree. Photo Credit: Matt Lollar, University of Florida/IFAS Extension – Santa Rosa County
Removing synthetic material from the root ball. Photo Credit: Matt Lollar, University of Florida/IFAS Extension – Santa Rosa County
Straightening a tree and adjusting planting height. Photo Credit: Matt Lollar, University of Florida – Santa Rosa County
For more detailed information on planting trees and shrubs visit this UF/IFAS Website – “Steps to Planting a Tree”.
For more information Nuttall Oaks visit this University of Arkansas Website.
by Daniel J. Leonard | Jul 3, 2018
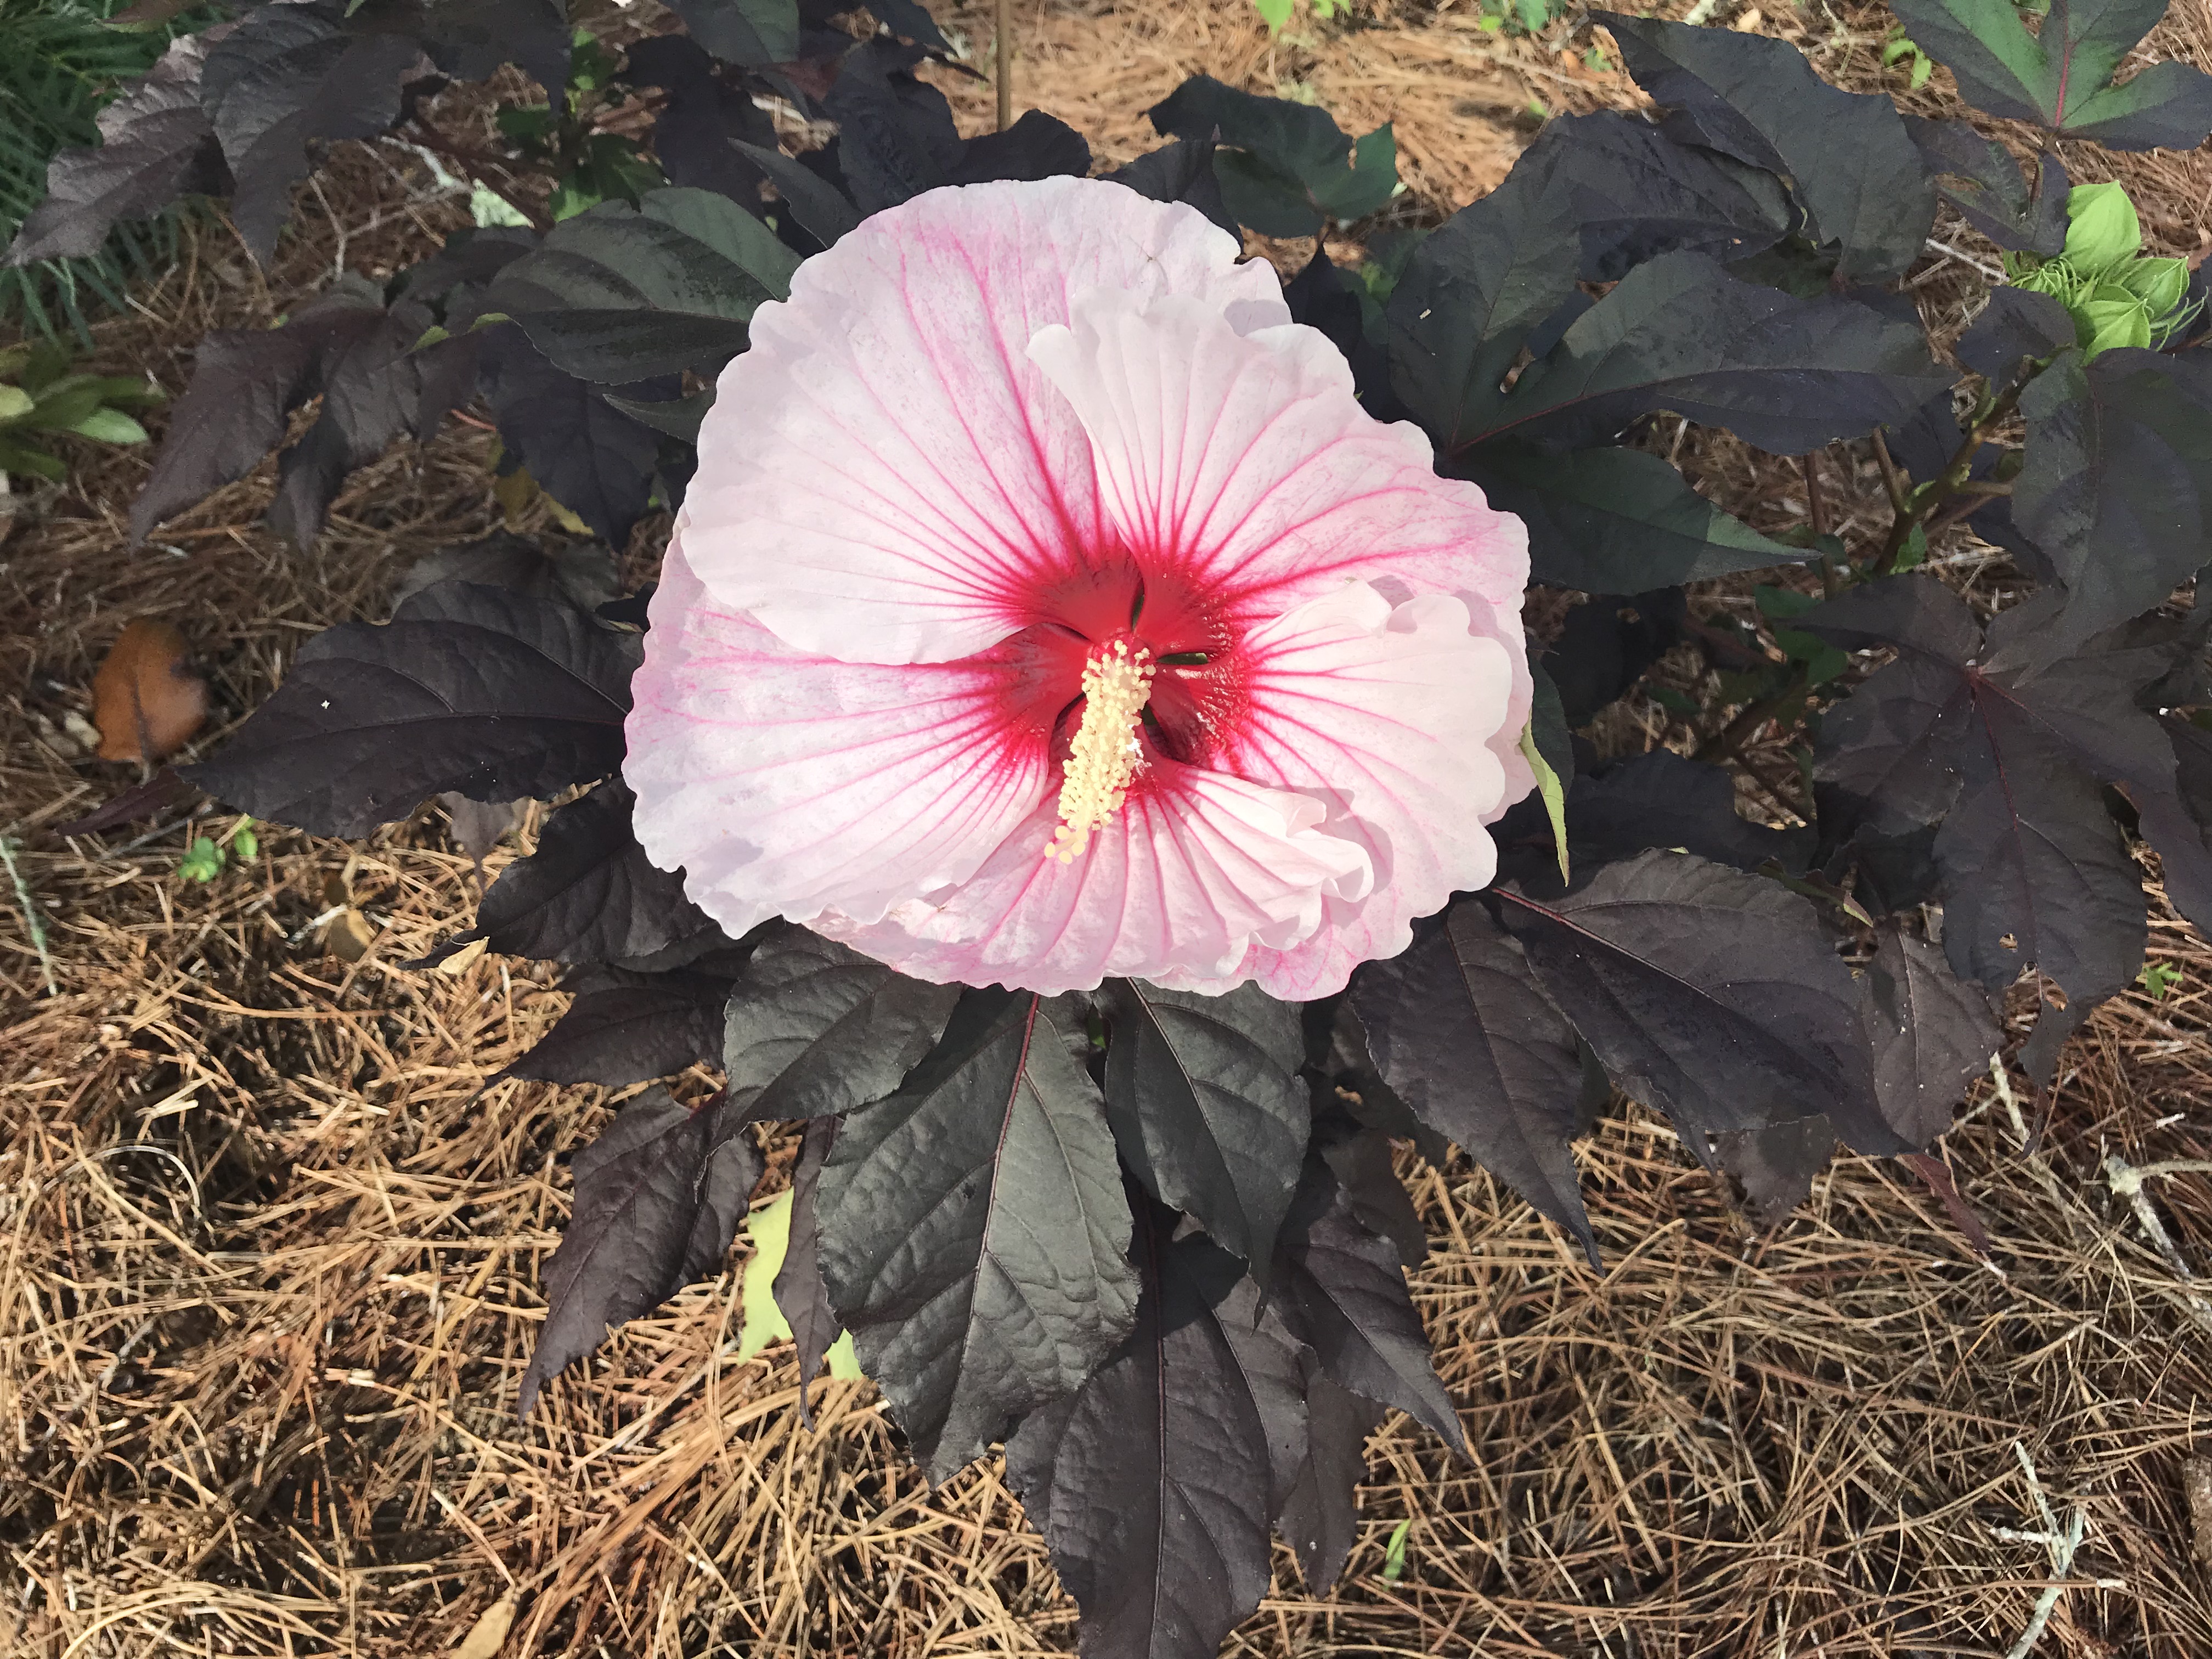
Each time I travel to central and south Florida and observe the wonderfully flamboyant tropical flora, I am reminded of the unique and frustrating climatic characteristics of Northwest Florida. Our weather is tropical enough through the summer to sustain virtually everything our friends to the south grow, but winters north of the Big Bend are just cold enough to prevent long-term success with most tropical species. However, the genus that is maybe most synonymous with tropical color, the Hibiscus (it even has its own texting emoji!), contains several species that are hardy through our winters. The best landscape plant of these hardy Hibiscus species is creatively (sarcasm) called Hardy Hibiscus or Giant Rose Mallow (Hibiscus moscheutos) and is an absolute star in the Panhandle, bringing the beauty of the tropics to your yard!

Hibiscus ‘Starry Starry Night’ – Photo courtesy Daniel Leonard
Rose Mallow is a native perennial species that occurs in sunny wetlands across the eastern U.S. This species can grow 7-8’ in height in its natural, unimproved state and possesses the largest flowers of any hardy perennial, some varieties easily eclipse 12” in diameter. Rose Mallows bloom through the heat of our long summers and return reliably each winter unfazed by frost. The flowers also happen to be a favorite of butterflies and hummingbirds and bring beneficial wildlife to the landscape. These characteristics and the trend towards the use of pollinator friendly, low-maintenance native perennials in landscapes quickly made Rose Mallow a jewel for plant breeders and now virtually all major horticultural brands have a line of Hardy Hibiscus available at garden centers, in varying sizes, flower color and leaf color/form. Recent breeding efforts have focused on introducing plants with enormous, richly colored flowers held on compact plants with attractive foliage. The results have yielded two series and three individual cultivars that I consider superior selections and are more than worthy of inclusion in your garden:
- Summerific® Series by Proven Winners. This series is comprised of four robust (up to 5’ in height) cultivars, ‘Cherry Cheesecake’ (bicolor magenta and white flowers), ‘Berry Awesome’ (purplish lavender flowers), ‘Cranberry Crush’ (a red you really have to see to believe), and ‘Perfect Storm’ (notable for its deep purple foliage).
- Luna Series by Monrovia. This series is notable for its ultra-compact (3’ in height or less) size and characteristically large flowers. It is also composed of four cultivars, ‘Luna Red’ (deep red), ‘Luna Blush’ (white, fading to pink near flower margins), ‘Luna Pink Swirl’ (pictured and my favorite, bicolor swirly flowers), and ‘Luna White’ (white with a red center).

Hibiscus ‘Luna Pink Swirl’ – Photo courtesy Daniel Leonard
- ‘Starry Starry Night’ by Walter’s Gardens. (Pictured) This cultivar combines dark purple to black leaves with swirled pale and dark pink flowers. It has performed very well in my landscape and if I could only grow one, this might be it.
- ‘Lord Baltimore.’ The classic, large growing cultivar with bright red flowers that is widely available and easily found. An oldie (introduced in 1955) but a goodie.
- ‘Midnight Marvel’ by Walter’s Gardens. A “hot off the press” new cultivar that is currently difficult to find due to popularity, though some online outlets have them available in small sizes. This one is worth your patience. Sporting deep red blooms on near black foliage, there’s nothing else like it in the landscape.
In addition to being gorgeous plants, Rose Mallows are extremely versatile in the landscape and could not be easier to grow. Because the size varies so greatly (from the diminutive 30” tall ‘Luna’ series to the 8’ tall unimproved species), there really is a place for one in every garden. I like to use the smaller cultivars in large containers to facilitate moving them around where their floral display has the greatest impact or to create a tropical effect where in ground plantings are not an option (pool decks, patios, etc). The larger cultivars make spectacular specimen plantings in perennial and shrub beds and even make a really dense, striking hedge (just know they disappear in the winter). Be sure to give them as much sun as possible, as this will enhance the number of flowers on each plant and darken the foliage on the cultivars with purplish/black leaves. Too little sun will result in fewer flowers and lighter green foliage. As wetland plants, Rose Mallows enjoy regular water, either from rainfall or irrigation; they will let you know when they need it – their large leaves readily wilt under drought stress, somewhat like Hydrangea.
For low-maintenance, native, pollinator friendly, cold-hardy tropical color, you need look no further than Rose Mallow. These perennial shrubs come in all sizes and colors and fit any landscape! Look for the above listed series and cultivars at better garden centers and online retailers and enjoy the oohs and ahhs elicited when people first get a glimpse of Hardy Hibiscus in your landscape! Happy Gardening!
by Daniel J. Leonard | Jun 21, 2018
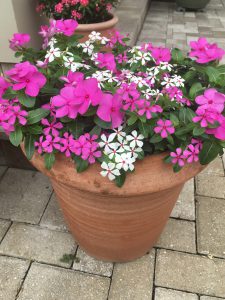
It’s that time of year. School is out, hurricane season is in, and the mercury is up! Gardens wilt by midday and gardeners retreat into the air conditioning long before then. Unless you have your toes in the water on one of Northwest Florida’s beautiful beaches, it can be a miserable time to be a Floridian, for plants and people! However, despite the relentless heat and blistering sunshine, low-maintenance, eye-catching color can still be had in the landscape. When the calendar flips to June, I turn to my two favorite Florida-Friendly annuals to do the heavy lifting in my landscape: ‘Diamond Frost’ Euphorbia, and the ‘Cora’ Vinca series.
‘Diamond Frost’ Euphorbia – Photo Courtesy Daniel Leonard
A relative newcomer to landscapes, the award winning ‘Diamond Frost’ Euphorbia is an amazing introduction from Proven Winners. The ultimate in tough, ‘Diamond Frost’ does great both as a mounding accent in a container or as a standalone bedding plant in the landscape. Though its individual, teardrop-shaped, white flowers are tiny, the hundreds of them that open each day really pack a floral punch in the landscape! One caveat: if planting in the landscape, I find ‘Diamond Frost’ to be most effective massed in groups of three or more. Due to the daintiness of the flowers, a single plant can get lost among other garden inhabitants. However, when done right, ‘Diamond Frost’ is a proven winner in any landscape!
Mixed container featuring ‘Diamond Frost’ Euphorbia – Photo Courtesy Daniel Leonard
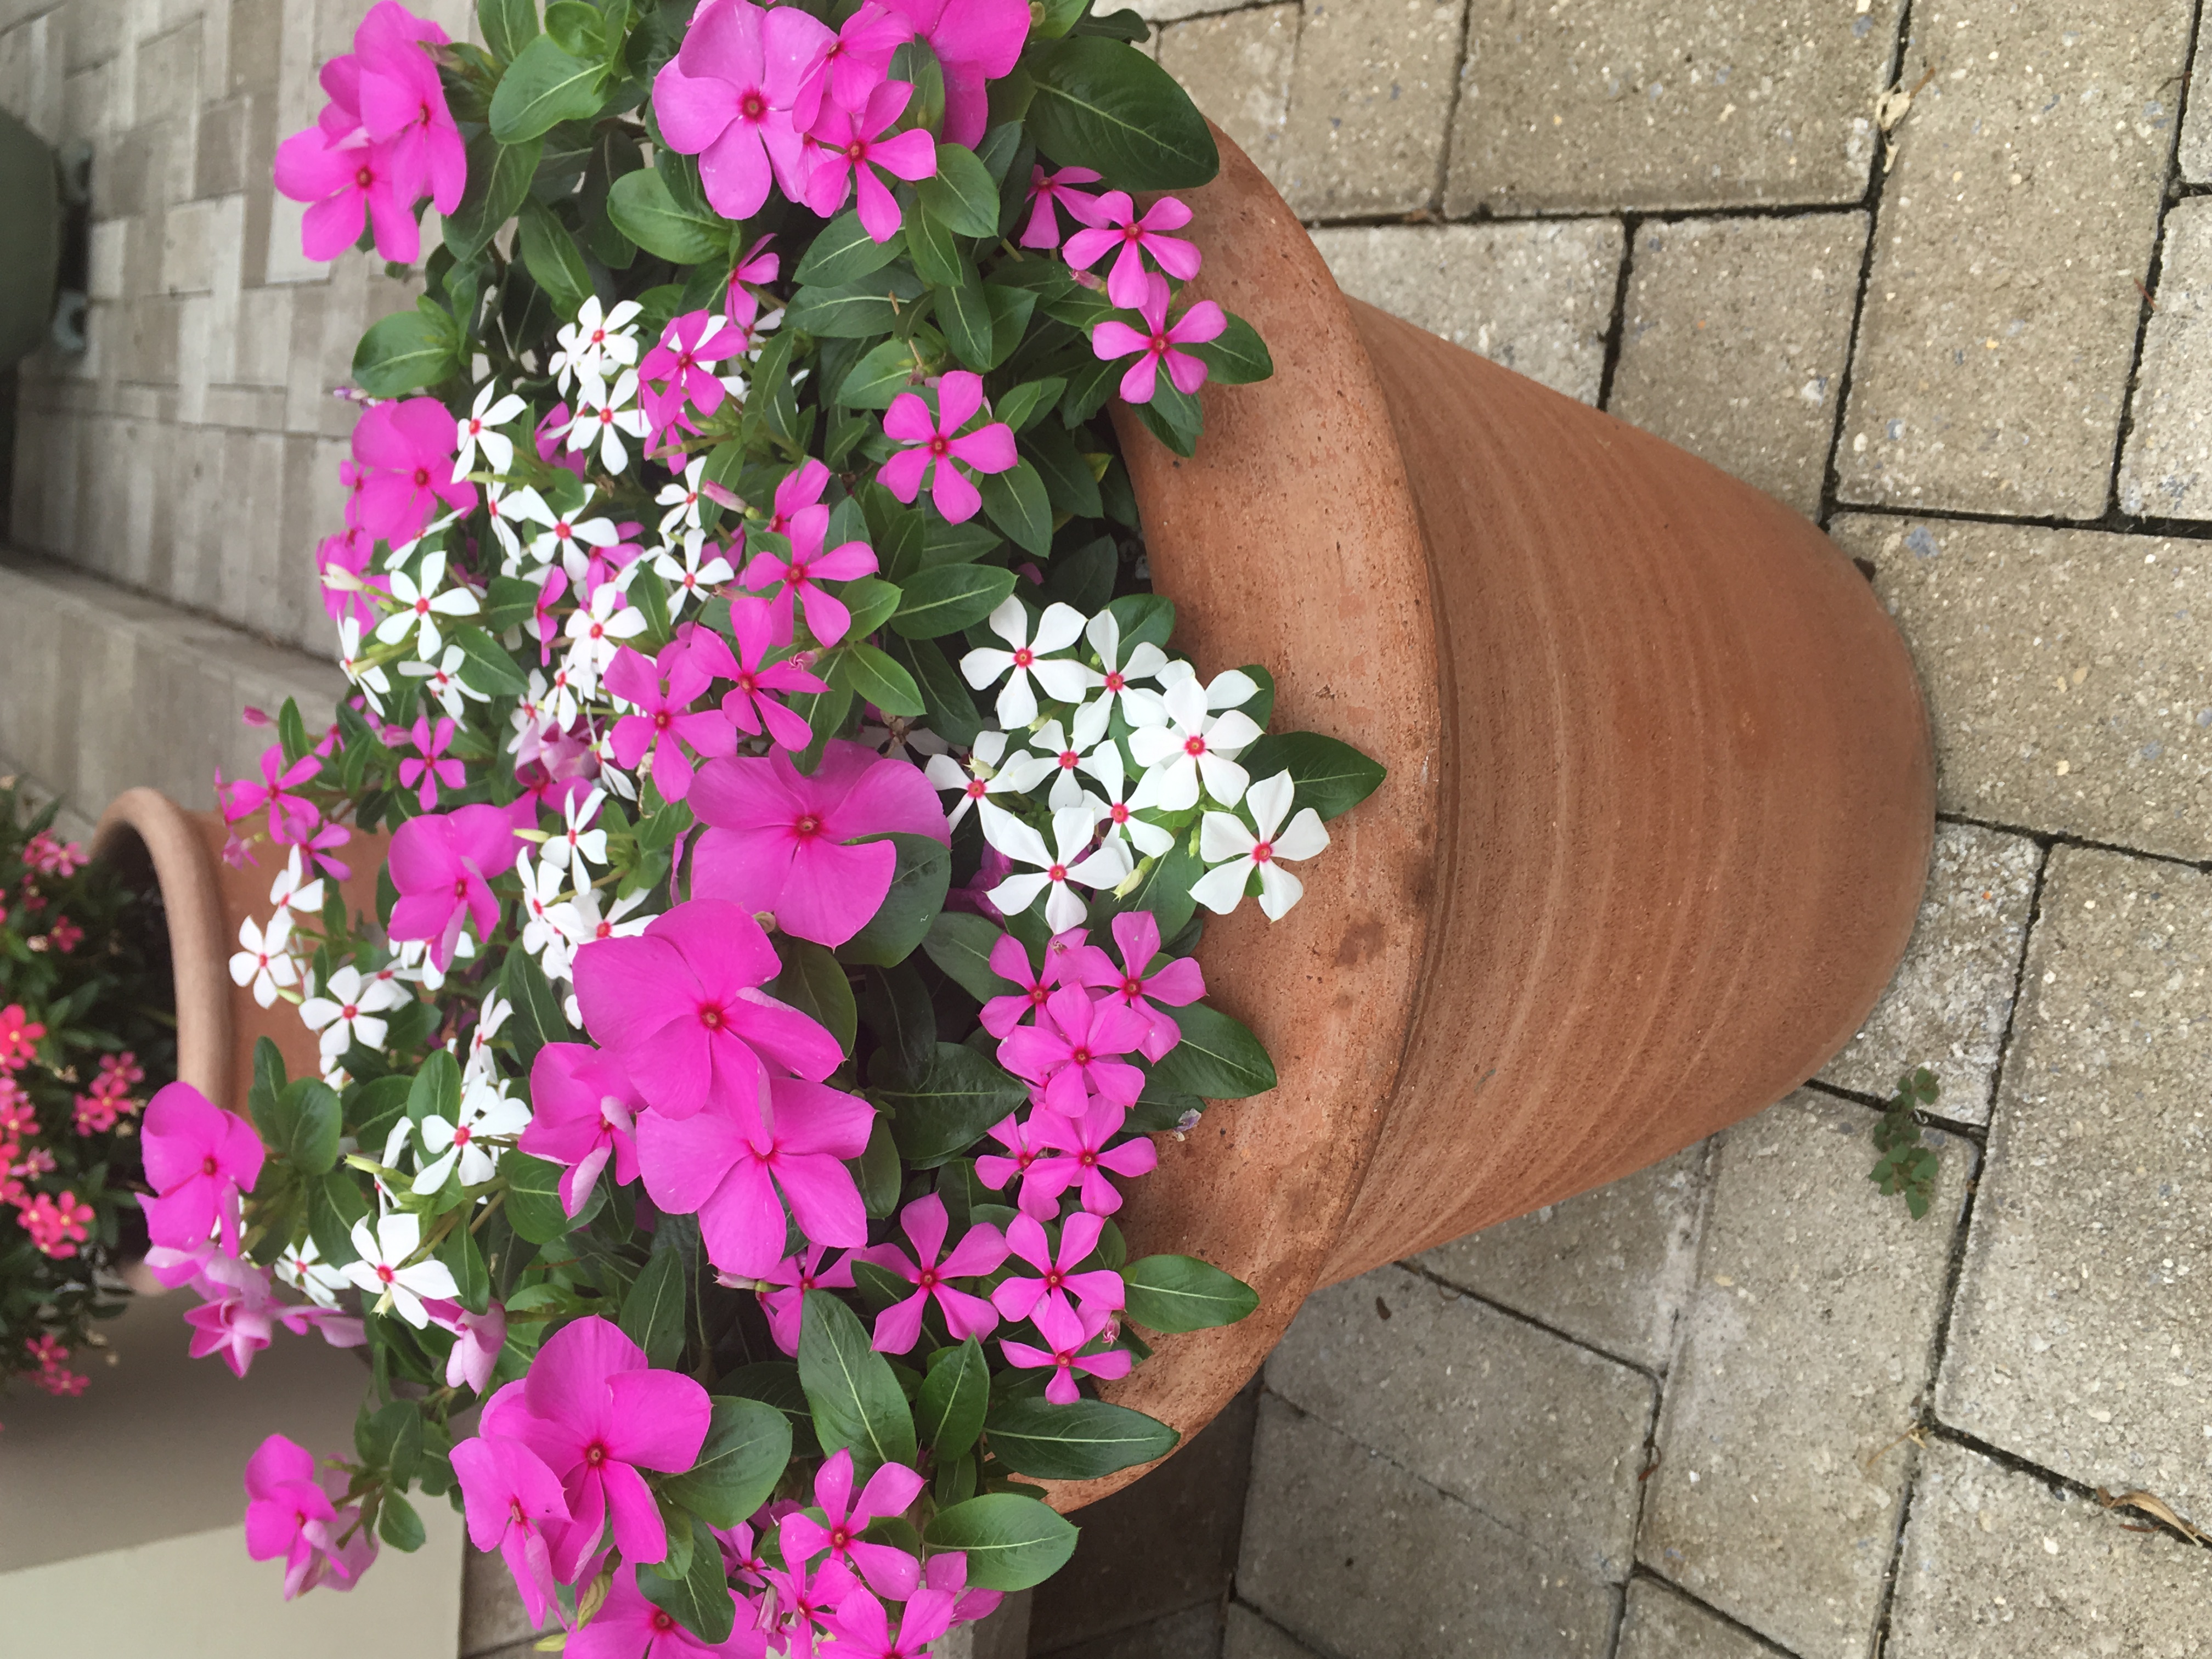
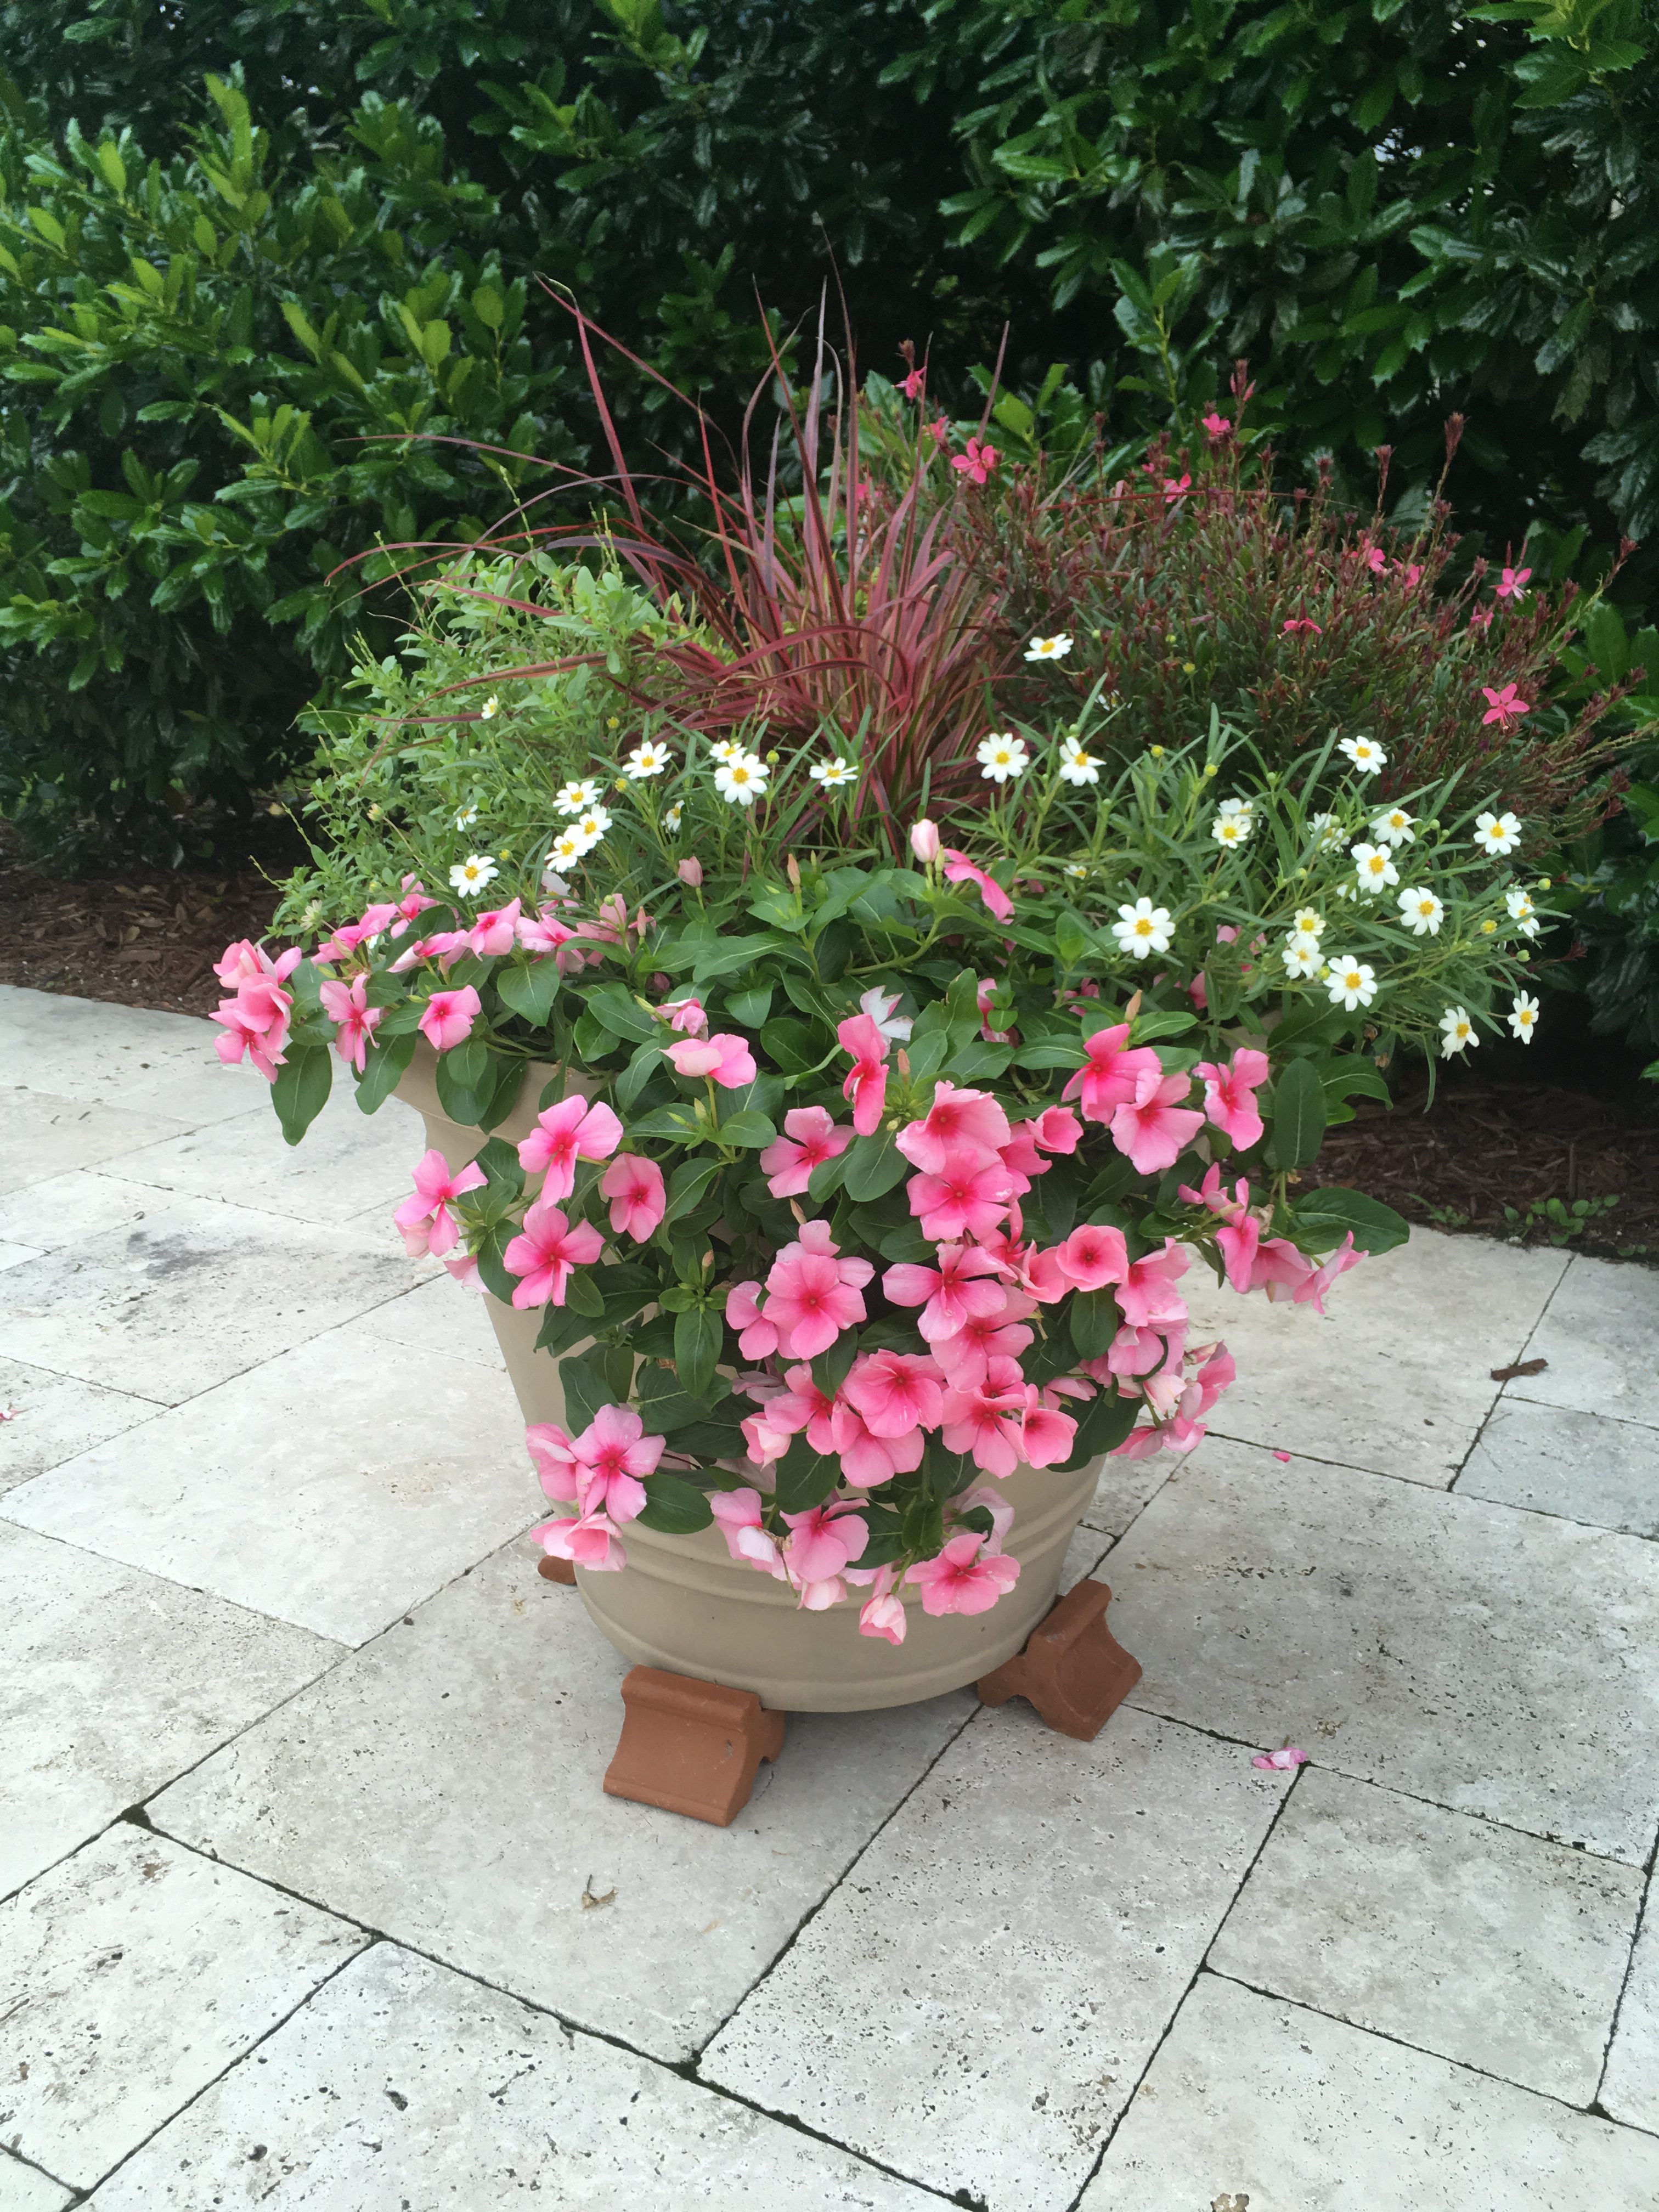
Next, the ‘Cora’ series of Vinca (Catharanthus roseus), also introduced by Proven Winners, is an improvement on an old favorite. Note: This species is also, on occasion, called Periwinkle. However, do not confuse it with the spreading, purple-flowered, perennial groundcover of the same common name! Gardeners in the South have been growing Vincas for years. This species is unbelievably tolerant of harsh conditions, sometimes even seen growing in sidewalk cracks! However, the unimproved species had an Achilles heel: susceptibility to Phytophthora, a devastating fungal rot disease. ‘Cora’ overcomes this issue and is as close to a perfect bedding annual as you’re likely to find. The ‘Cora’ series is composed of cultivars with pinwheel-shaped white, pink and lavender flowers, a color for everyone! The kind (and clever) marketing folks at Proven Winners have even made ‘Cora’ easy to spot on retail nursery benches; just look for the plants in the hot pink containers!
‘Cora’ Vinca
Photo: Andrea Schnapp
Both of the above-described plants are extremely undemanding of gardeners. Once established, little is required in the way of irrigation and fertilization. To ensure success, water daily for the first week after planting, back off to a couple of times per week for the next two weeks or so and then watch ‘Diamond Frost’ and ‘Cora’ thrive with only rainfall for the rest of the summer! Keep in mind, during periods of excessive drought, supplemental watering may be required to keep any plant, even drought tolerant ones, looking their best! To meet the minimal nutrition demands of these plants, I incorporate a quality, slow-release fertilizer (for example, Osmocote, Harrell’s Polyon, or any other similar product) at planting. These products last two or three months in our rainy, hot, humid climate and generally need a second application accordingly for full-season performance. ‘Diamond Frost’ Euphorbia and ‘Cora’ Vinca also require full, blazing sun for maximum floral performance. Don’t be shy about siting them in harsh, sunny places, even a few hours of shade tend to make leggier plants that flower less!
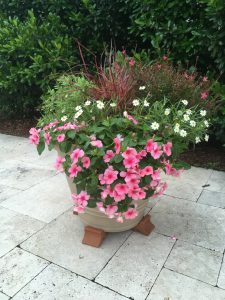
Mixed container with ‘Cora’ Vinca accent
Photo: Andrea Schnapp
When you need low-maintenance, season long color that can beat the heat, look for ‘Diamond Frost’ Euphorbia and the ‘Cora’ series of Vinca at your local nursery! Stay cool out there folks and happy gardening!
by Matt Lollar | Jun 4, 2018
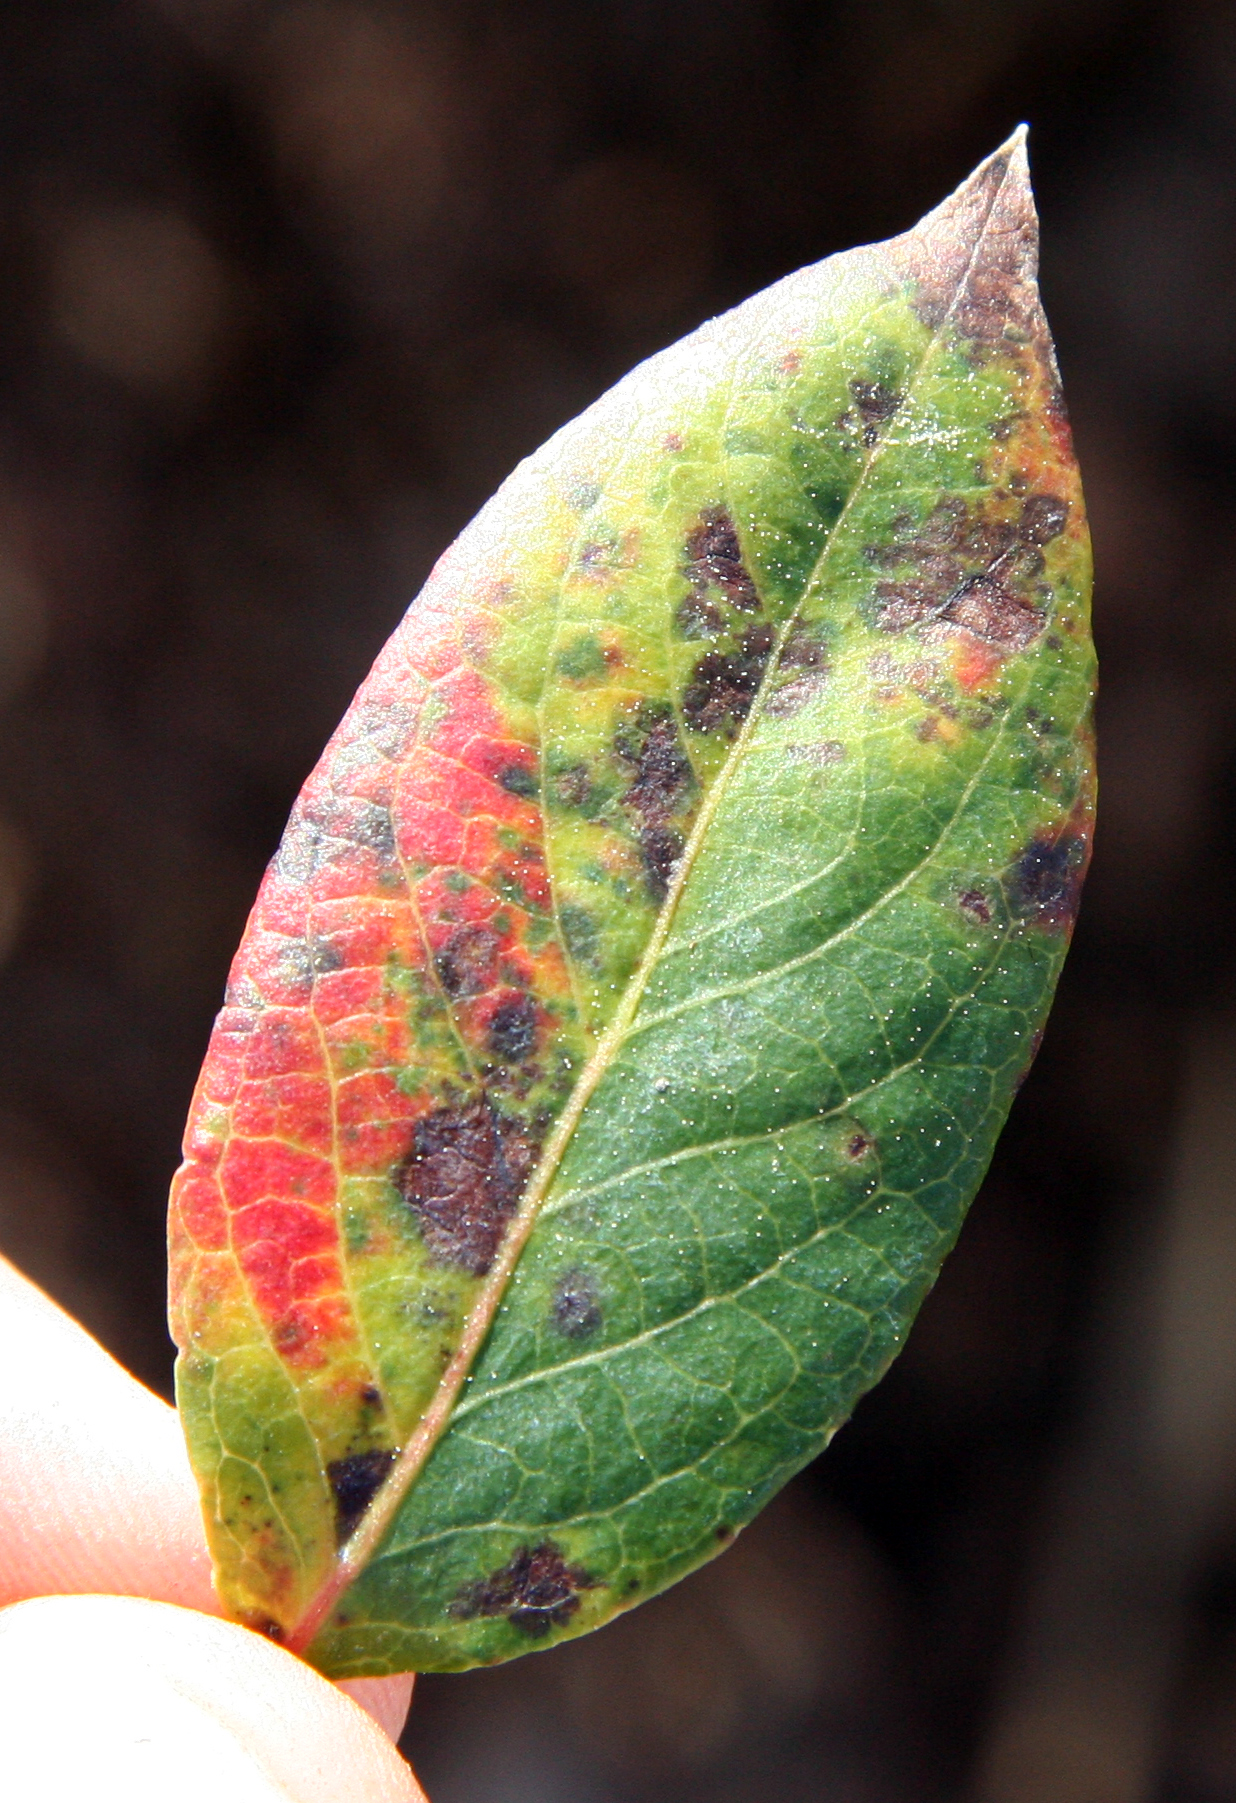
Normally we think of rust as something that deteriorates metal, but a number of different fungal rusts can affect plants in the garden. Rust disease can affect corn plants, cedar trees, and even blueberry bushes. Just like the broad range of plant species that can be plagued by rust, there are a number of species of rust fungal spores floating around and ready to infest your garden. This article will focus on leaf rust of blueberry.

Blueberry leaf rust on the top of a leaf. Photo Credit: Philip Harmon, University of Florida/IFAS Extension.
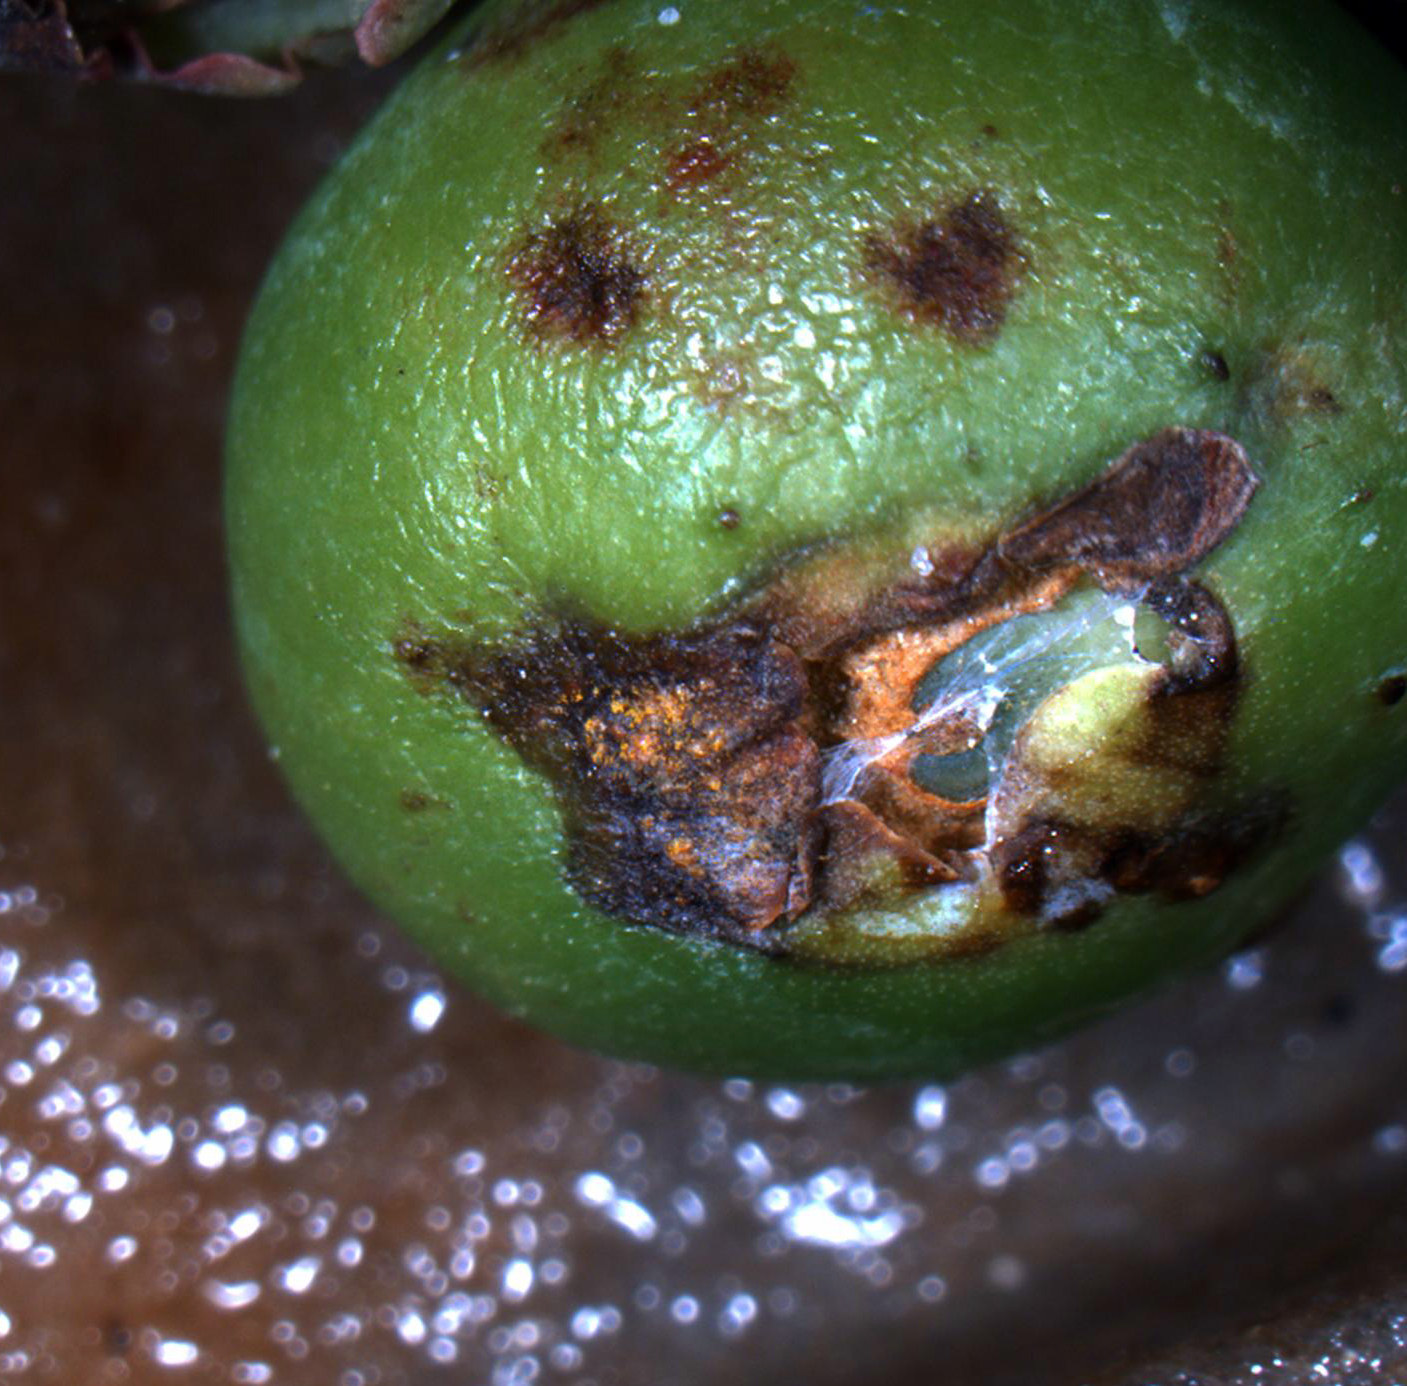
Leaf rust of blueberry in Florida is caused by the fungus Pucciniastrum vaccinii. Although the common name of the disease is “leaf rust”, the disease can also infect the stems and fruit of blueberry plants. The disease causes small, round spots visible on the tops of leaves. Spots will multiply and the leaves will eventually yellow and fall off. Young stems and green fruit can also become infected as the disease progresses. Bright orange lesions will form on stems and fruit as the thousands of microscopic spores conjoin. The clusters of spores are easily wiped or washed off of plant material. When spores dry out, they become airborne and can be transferred to nearby plants.
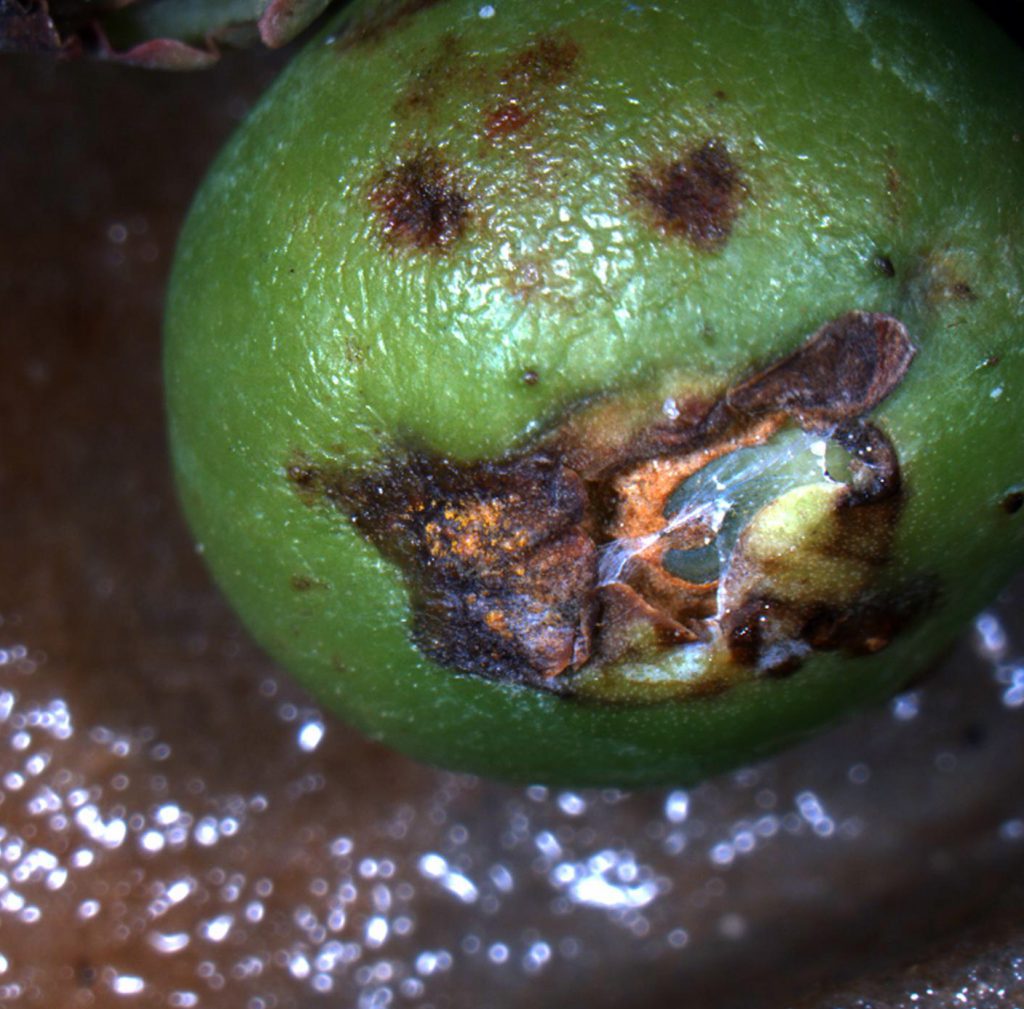
Blueberry leaf rust on fruit. Photo Credit: Philip Harmon, University of Florida/IFAS Extension
The rust fungus thrives in hot, humid, wet conditions. A number of cultural practices can be adopted to reduce disease progression and survival.
-
Irrigation
Disease persistence can be reduced by limiting the amount of water that contacts the plant leaves. Water the base of plants or install drip irrigation for your bushes rather than watering from overhead. If overhead irrigation is the only option, then water plants in the morning rather than in the evening. This allows the leaves to dry out over the course of the day.
-
Pruning
Removal of approximately 25% of the oldest canes in late winter before spring growth begins will stimulate the production of new canes and should result in plants with canes of different ages and will provide a good mix of vigorous branching and fruit production. Moderate summer pruning can also improve yield and shoot growth. When pruning, cut out vigorous shoots that are growing well beyond the desired canopy height and are in the interior portion of the bush. This will promote a more open growth habit and help with air circulation on the remaining plant material. Some vigorous canes developing from the ground and growing on the outside of the bush can be topped to stimulate branching and flower bud formation.
-
Mulch
Pine bark mulch helps with establishment of young plants and helps keep soil pH low in existing plantings. A layer of aged pine bark 3 inches deep extending about 2 feet out from the plants will provide a good growing medium for surface feeder roots. Pine straw can be used if pine bark is unavailable. Mulch also moderates soil temperature, helps keep weeds at bay, and adds organic matter to the soil. Make sure to keep mulch raked back about three inches away from the plant canes to provide good air circulation to the roots.
Hopefully this article has given you some tips to have a good blueberry crop for years to come. For more information on growing blueberries in Florida, please visit the University of Florida/IFAS EDIS Publication: Blueberry Gardener’s Guide.
by Daniel J. Leonard | May 4, 2018
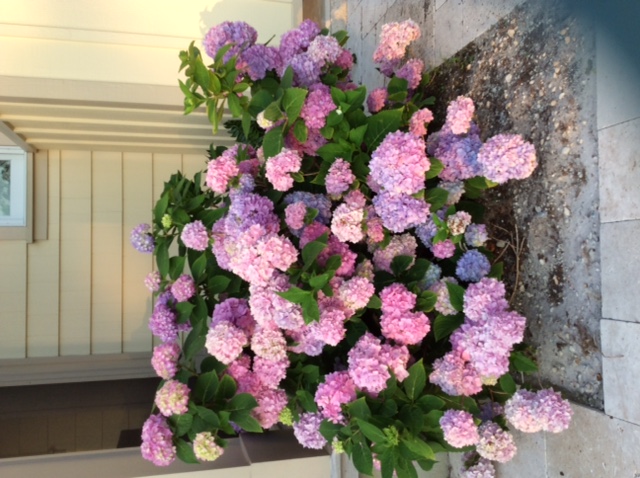
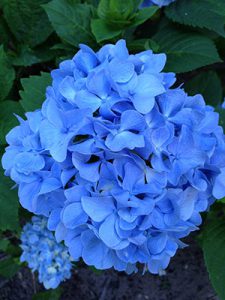
H. macrophylla ‘Bloomstruck’
Photo courtesy of Andrea Schnapp
Generally, when folks find out what I do for a living, among the first questions asked is “What is your favorite plant?” Being somewhat of a plant nerd, that can be a tough question to answer! However, I usually circle back to the same answer, “Hydrangea”. There are many reasons my fellow gardeners and I love hydrangeas. It’s undeniable that few plants conjure more fond memories of summers gone by or cause more impulse purchasing at nurseries than a hydrangea in full, billowy bloom. Additionally, few specimen shrubs give more floral firepower and ask so little of the gardener in return. My own love affair with hydrangea stems from my first propagation experience, a softwood cutting of Hydrangea macrophylla ‘Nikko Blue’ (taken with the help of someone who knew a lot more about what they were doing than I did) that, seemingly magically, sprouted roots in a makeshift greenhouse, a cypress box with an old, crusty, sliding glass door. Hydrangeas hooked me. However, even with all of those attributes to its name, Hydrangea, as a genus, remains underappreciated and underutilized in modern landscapes. Let’s shed some light on the two primary reasons for gardeners’ failure and frustration with hydrangeas in the landscape and highlight some of the best Hydrangea species and cultivars to look for at the nursery!
First, hydrangea has a reputation as being a high water user. As the name (hydrangea comes from “hydor”, which is Greek for water) might suggest, hydrangeas are indeed water sensitive. However, this does not necessarily mean they require more or less water than other plants, rather they simply betray drought quicker than most other plants. This feature makes hydrangea particularly useful in the landscape as an indicator plant. As a general rule, hydrangeas (particularly those planted in too much sun) wilt in the afternoon heat; this is totally normal. However, if the plants remain wilted the next morning, it is an indicator to the gardener that irrigation is required! If they don’t get irrigation soon after telling you they need it, the plants may begin to decline. Rather than being viewed as a drawback, think of this feature as an early warning system. Name another plant that looks out for us gardeners like that!
The second primary reason people fail with hydrandea is improper site selection. Attempting to grow hydrangea in full sun in Florida leads to less than spectacular results. All species of hydrangeas are most happy when sited to receive at least some afternoon shade, if not filtered shade throughout the entire day. Exposure to blistering afternoon sun is problematic and results in increased wilting from heat stress, increased irrigation requirements and “bleached” flower coloration. Remember, there are fewer frustrating things than growing the right plant in the wrong place!
Now that you know how not to fail with hydrangeas, it’s time to select the proper plant for your property! Three primary species perform noticeably better here than the rest of their kin and deserve the gardener’s consideration in Northwest Florida: H. macrophylla (Bigleaf Hydrangea), H. quercifolia (Oakleaf Hydrangea), and H. paniculata (Panicle Hydrangea).
H. macrophylla
H. macrophylla, the old-fashioned hydrangea everyone’s grandmother grew, is truly one of the standouts in the shady, Southern landscape and commands attention when in flower. Sporting giant “mopheads” of inflorescences in gorgeous hues of blue (or pink, depending on soil pH), H. macrophylla is an extremely low maintenance plant, requiring only periodic irrigation and infrequent fertilizer; H. macrophylla even tolerates salt spray and can be grown on the Gulf Coast! By far, the greatest percentage of questions I receive concerning H. macrophylla involve plants not flowering because of pruning at the wrong time of year. For best flowering results, time pruning of once-blooming traditional cultivars like ‘Nikko Blue’ soon after flowering is finished in late summer. These plants set flower buds on the previous season’s wood; pruning older cultivars in the fall or winter may rejuvenate the plant but will prevent flowering the next year! Fortunately, over the last twenty years, advances in Hydrangea breeding have given gardeners the option of planting remontant cultivars that bloom on current season’s wood. Commonly sold remontant cultivars like ‘Endless Summer’, ‘Penny Mac’, ‘Bloomstruck’, and ‘All Summer Beauty’ have an early summer flower display like the traditional types but then continue to flower periodically throughout the rest of the summer! Even better, they may be pruned at any time without worry of damaging the next season’s flower show!
H. quercifolia (Oakleaf Hydrangea) Photo Courtesty of Andrea Schnapp
Those looking to diversify their hydrangea collection should next look to the native Oakleaf Hydrangea (H. quercifolia). The Oakleaf Hydrangea is a Florida native, growing wild on the steep, shady ravines along the northern end of the Apalachicola River. If the plants never flowered, the Oakleaf would be worth planting; its massive leaves, oak-shaped as the name suggests, can grow up to a foot in length and provide some of the best fall foliage color available to Floridians. However, the real show, as with all hydrangea species, are the flowers. This species flaunts 8”-10” white, panicle shaped flowers that are held elegantly above the coarsely textured foliage. In addition to these features, Oakleaf Hydrangeas couldn’t be easier to grow; obtaining heights up to 10’ and asking very little of the gardener other than adequate irrigation and some shade in the heat of the day! Look for the author’s favorite cultivars: ‘Alice’, ‘Semmes Beauty’, and ‘Snowflake’. Each of these cultivars and selections of the common species H. quercifolia perform very well in Northwest Florida.

H. paniculata ‘Quickfire’
Photo courtesy of Andrea Schnapp.
Finally, the newest hydrangea species introduced to Florida gardens, H. paniculata, has made significant inroads in the landscape industry over the last decade. Primarily grown as the cultivar ‘Limelight’, H. paniculata overcomes some of the weaknesses of the two aforementioned species, namely it tolerates full-sun and persists on much less water, making it a potentially more sustainable plant for many landscapes. This plant, like the remontant H. macrophylla cultivars, blooms on new wood and even seems to enjoy a hard pruning each winter; plants pruned this way seem to be more vigorous the next season and produce larger greenish-white flower panicles than unpruned specimens. Though it is a relative newcomer, H. paniculata, particularly ‘Limelight’, is a worthy addition to any landscape.
As you can see, there is a hydrangea for every yard and no true Southern landscape is complete without a few. When perusing your local garden center this summer, look for the selections and species mentioned above, plant properly, and enjoy the ensuing annual flower show for many years into the future! Who knows, you may be hooked by hydrangeas as I once was!