by Daniel J. Leonard | Oct 14, 2020
Article by Jessica Griesheimer & Dr. Xavier Martini, UF/IFAS North Florida Research and Education Center, Quincy
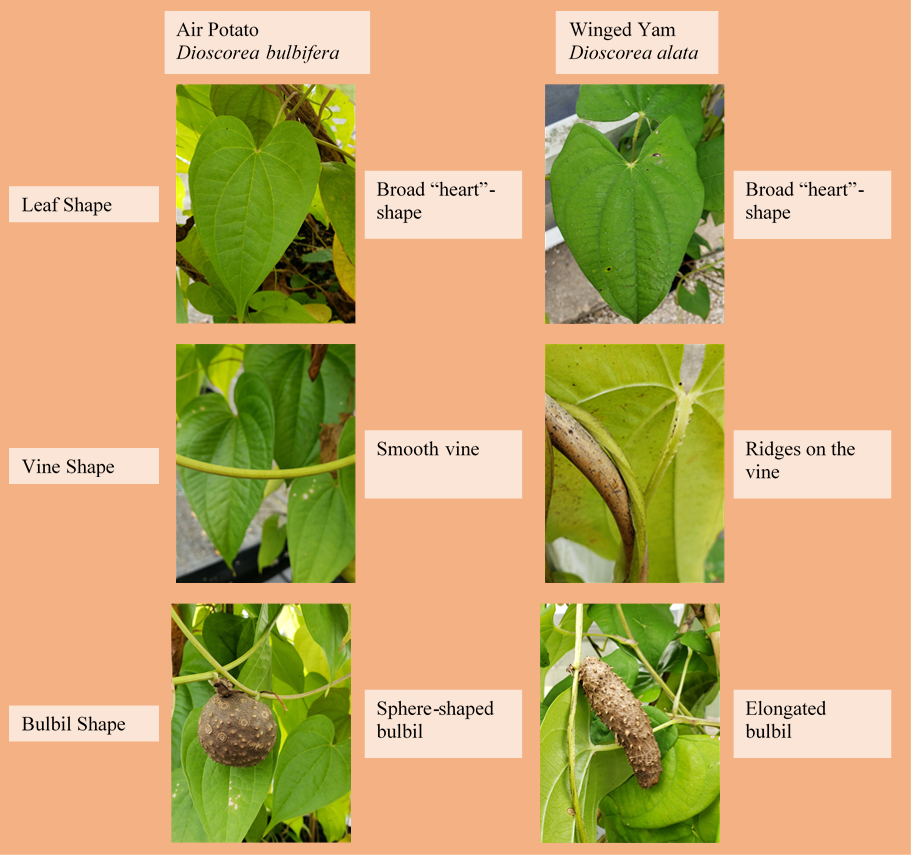
Dioscorea bulbifera, commonly known as the air potato is an invasive species plaguing the southeastern United States. The air potato is a vine plant that grows upward by clinging to other native plants and trees. It propagates with underground tubers and aerial bulbils which fall to the ground and grow a new plant. The aerial bulbils can be spread by moving the plant, causing the bulbils to drop to the ground and tubers can be spread by moving soil where an air potato plant grew prior. The air potato is commonly confused with and mistaken as being Dioscorea alata, the winged yam which is also highly invasive. The plants look very similar at first glance but have subtle differences. Both plants exhibit a “heart”-shaped leaf connected to vines. The vines of the winged yam have easily felt ridges, while the air potato vines are smooth. They also differ in their aerial bulbil shapes, the winged yam has a long, cylinder-shaped bulbil while the air potato aerial bulbil has a rounded, “potato” shape (Fig. 1).

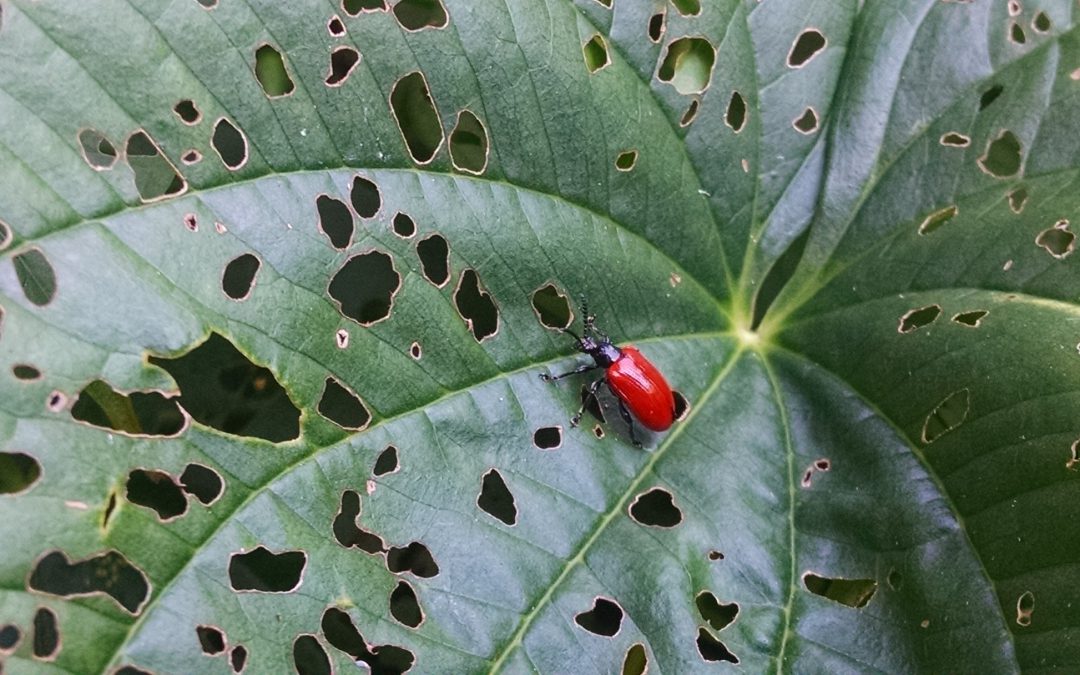
In its native range of Asia and Africa, the air potato has a local biocontrol agent, Lilioceris cheni commonly known as the Chinese air potato beetle (Fig. 2). As an adult, this beetle feeds on older leaves and deposits eggs on younger leaves for the larvae to later feed on. Once the larvae have grown and fed, they drop the ground where they pupate to later emerge as adults, continuing the cycle. The Chinese air potato beetle will not feed on the winged yam, as it is not its host plant.Current methods of air potato plant, bulbil, and tuber removal can be expensive and hard to maintain. The plant is typically sprayed with herbicide or is pulled from the ground, the aerial bulbils are picked from the plant before they drop, and the underground tubers are dug up. The herbicides can disrupt native vegetation, allowing for the air potato to spread further should it survive. If the underground tuber or aerial bulbils are not completely removed, the plant will grow back.
The Chinese air potato beetle is currently being evaluated as a potential integrated pest management (IPM) organism to help mitigate the invasive air potato. The beetle feeds and reproduces solely on the air potato plant, making it a great IPM organism choice. During 2019, we studied the Chinese air potato beetle and its ability to find the air potato plant. It was found the beetles may be using olfactory cues to find the host plant. Further research is conducted at the NFREC to increase natural aggregation of the beetles on air potato to improve biological control of the weed.
Chinese Air Potato Leaf Beetle.
If you have the air potato plant, or suspect you have the air potato plant, contact your local UF/IFAS Extension Agents for help!

by Sheila Dunning | Oct 7, 2020

American Beautyberry Photo by: UF/IFAS
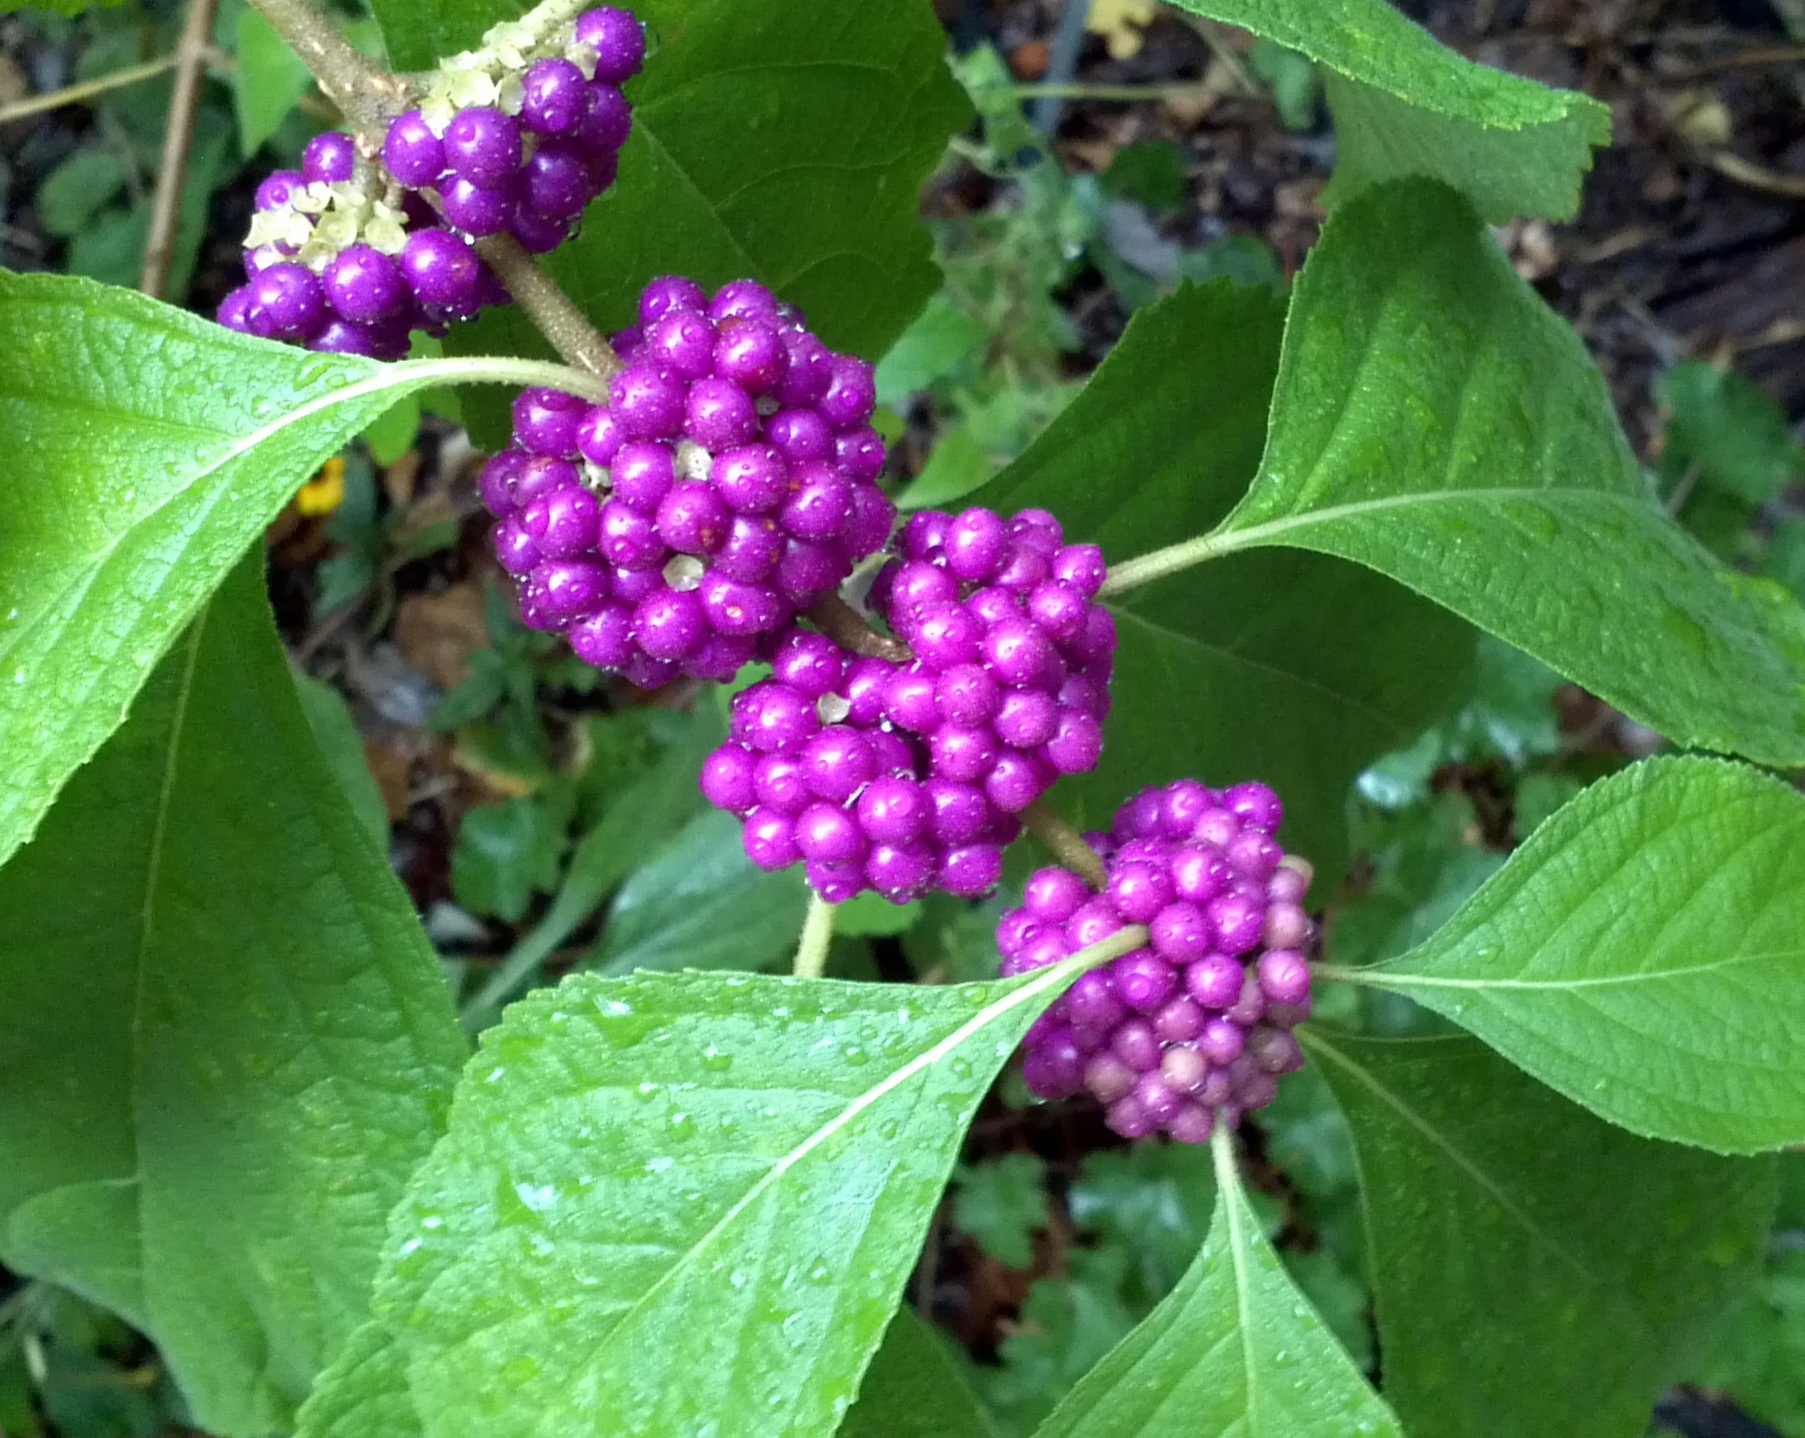
Each fall, nature puts on a brilliant show of color throughout the United States. As the temperatures drop, autumn encourages the “leaf peepers” to hit the road in search of the red-, yellow- and orange-colored leaves of the northern deciduous trees. In Northwest Florida the color of autumn isn’t just from trees. The reds, purples, yellow and white blooms and berries that appear on many native plants add spectacular color to the landscape. American Beautyberry, Callicarpa americana, is loaded with royal-colored fruit that will persist all winter long. Whispy pinkish-cream colored seedheads look like mist atop Purple Lovegrass, Eragrostis spectabilis and Muhlygrass, Muhlenbergia capillaris. The Monarchs and other butterfly species flock to the creamy white “fluff” that covers Saltbrush, Baccharis halimifolia. But, yellow is by far the dominant fall flower color. With all the Goldenrod, Solidago spp., Narrowleaf Sunflower, Helianthus angustifolius and Tickseed, Coreopsis spp., the roadsides are golden. When driving the roads it’s nearly impossible to not see the bright yellows in the ditches and along the wood’s edge. Golden Asters (Chrysopsis spp.), Tickseeds (Coreopsis spp.), Silkgrasses (Pityopsis spp.), Sunflowers (Helianthus spp.) and Goldenrods (Solidago spp.) are displaying their petals of gold at every turn. These wildflowers are all members of the Aster family, one of the largest plant families in the world. For most, envisioning an Aster means a flower that looks like a daisy. While many are daisy-like in structure, others lack the petals and appear more like cascading sprays.
Helianthus
So if you are one of the many “hitting the road in search of fall color”, head to open areas. For wildflowers, that means rural locations with limited homes and businesses. Forested areas and non-grazed pastures typically have showy displays, especially when a spring burn was performed earlier in the year. Peeking out from the woods edge are the small red trumpet-shaped blooms of Red Basil, Calamintha coccinea and tall purple spikes of Gayfeather, Liatris spp. Visit the Florida Wildflower Foundation website, www.flawildflowers.org/bloom.php, to see both what’s in bloom and the locations of the state’s prime viewing areas. These are all native wildflowers that can be obtained through seed companies. Many are also available as potted plants at the local nurseries. Read the name carefully though. There are cultivated varieties that may appear or perform differently than those that naturally occur in Northwest Florida. For more information on Common Native Wildflowers of North Florida go to http://edis.ifas.ufl.edu/ep061.
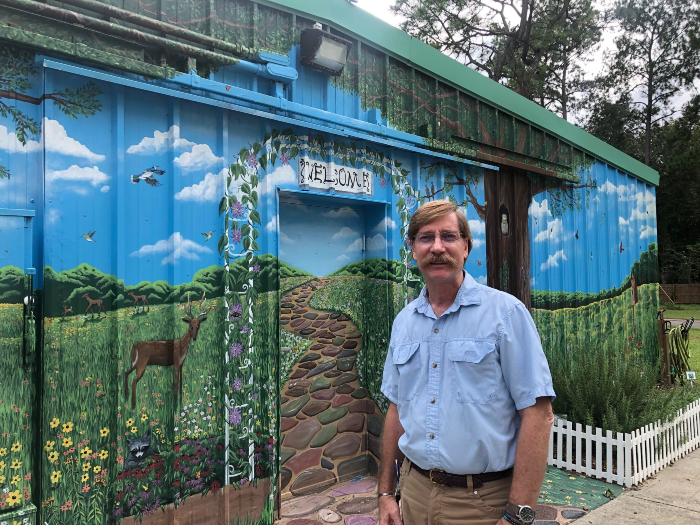
by Pat Williams | Oct 1, 2020
Pat is the County Extension Director and the Agriculture/Horticulture/Natural Resources agent for UF/IFAS Extension Wakulla County while also serving as the Master Gardener Volunteer Coordinator for both Franklin and Wakulla counties.
Pat by their outdoor mural at the Extension office.
He earned his doctorate from Texas A&M University in horticulture, a M.S. degree from Kansas State University in horticultural therapy, a B.S. degree in ornamental horticulture/floriculture from Cal Poly San Luis Obispo and an A.S. degree in ornamental horticulture from Crafton Hills College.
Over his horticulture career that started at age 13 working for Chrysanthemum Gardens in Crestline, CA, he has resided in 10 different states with a wide range of environmental influences (CA, KS, NJ, ME, NY, WA, TX, KY, TN and FL). He has held various positions in his career from teaching adults with developmental disabilities in NJ and ME, designing, installing and maintaining landscapes, landscape construction, being a horticultural therapist in New York City, working for the USDA in WA, teaching in a TX federal prison for his Extension appointment, teaching horticulture in a TN high school and was an university horticulture professor for 14 years in KY after teaching at Kansas State University, Washington State University and Texas A&M University as a teaching assistant. He started with the University of Florida/Institute of Food and Agricultural Sciences in April 2017 as the Sarasota County Residential Horticulture Agent/Master Gardener Volunteer Coordinator and transitioned to the Wakulla County Extension office in June 2020.
Teaching and greenhouse growing are his professional joys. Florida is the first state where there has not been a greenhouse to play in and he misses it greatly, however Extension does offer many opportunities to share his passion for plants and outdoors with a new group of learners. Otherwise Pat grew up on the beaches and ski resort areas of southern CA and still finds solace today relaxing on the beach or kayaking. He has traveled a bit visiting 49 states with only Hawaii to go. When indoors he would rather be baking or cooking in the kitchen as his second career choice would have been a chef. There is usually a yard full of flowers, herbs and vegetables and he is an extremely proud FSU Seminole Dad to Tara, a 2020 graduate.
Pat wears many hats at the Wakulla office and handles topics other than 4-H/Youth Development or Family and Consumer Sciences. Once again he finds himself in a transition adapting to the new horticultural environment of Florida’s panhandle and developing more programs in agriculture and natural resources. Please feel free to reach out to see how the UF/IFAS Extension Wakulla County can be of assistance.
by Daniel J. Leonard | Sep 8, 2020
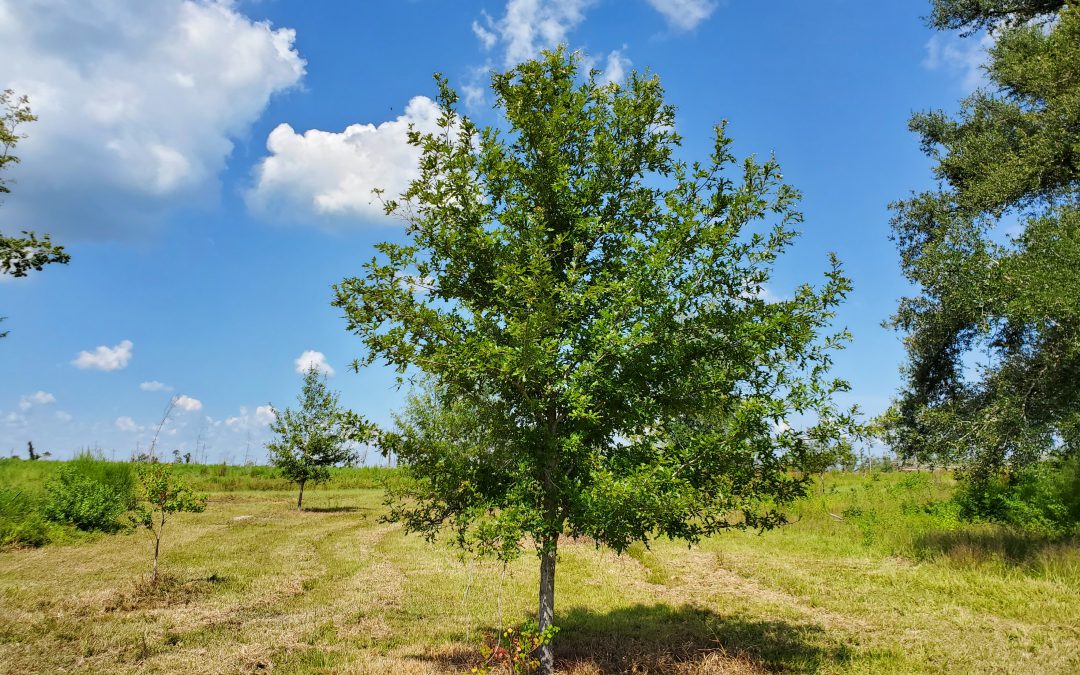
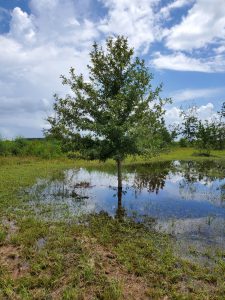
7 year old Overcup Oak (Quercus lyrata) on the edge of a wet weather pond in Calhoun County. Photo courtesy of Daniel Leonard.
Haunting alluvial river bottoms and creek beds across the Deep South, is a highly unusual oak species, Overcup Oak (Quercus lyrata). Unlike nearly any other Oak and most sane people, Overcups occur deep in alluvial swamps and spend most of their lives with their feet wet. Though the species hides out along water’s edge in secluded swamps, it has nevertheless been discovered by the horticultural industry and is becoming one of the favorite species of landscape designers and nurserymen around the South. The reasons for Overcup’s rise are numerous, let’s dive into them.
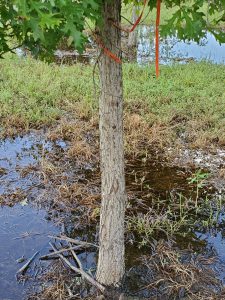
First, much of the deep South, especially in the Coastal Plain, is dominated by poorly drained flatwoods soils cut through by river systems and dotted with cypress and blackgum ponds. These conditions call for landscape plants that can handle hot, humid air, excess rainfall, and even periodic inundation (standing water). It stands to reason our best tree options for these areas, Sycamore, Bald Cypress, Red Maple, and others, occur naturally in swamps that mimic these conditions. Overcup Oak is one of these hardy species. Overcup goes above and beyond being able to handle a squishy lawn, it is often found inundated for weeks at a time by more than 20’ of water during the spring floods our river systems experience.
The same Overcup Oak thriving under inundation conditions 2 weeks after a heavy rain. Photo courtesy Daniel Leonard.
The species has even developed an interesting adaptation to allow populations to thrive in flooded seasons. Their acorns, preferred food of many waterfowl, are almost totally covered by a buoyant acorn cap, allowing seeds to float downstream until they hit dry land, thus ensuring the species survives and spreads. While it will not survive perpetual inundation like Cypress and Blackgum, if you have a periodically damp area in your lawn where other species struggle, Overcup will shine.
Overcup Oak is also an exceedingly attractive tree. In youth, the species is extremely uniform, with a straight, stout trunk and rounded “lollipop” canopy. This regular habit is maintained into adulthood, where it becomes a stately tree with a distinctly upturned branching habit, lending itself well to mowers and other traffic underneath without having to worry about hitting low-hanging branches. The large, lustrous green leaves are lyre-shaped if you use your imagination (hence the name, Quercus lyrata) and turn a not-unattractive yellowish brown in fall. Overcups especially shines in the winter, however, when the whitish gray, shaggy bark takes center stage. Overcup bark is very reminiscent of White Oak or Shagbark Hickory and is exceedingly pretty relative to other landscape trees that can be successfully grown here.
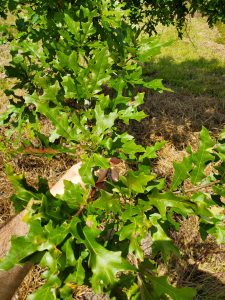
Overcup Oak leaves in August. Note the characteristic “lyre” shape. Photo courtesy Daniel Leonard.
Finally, Overcup Oak is among the easiest to grow landscape trees. We have already discussed its ability to tolerate wet soils and our blazing heat and humidity, but Overcups can also tolerate periodic drought, partial shade, and nearly any soil pH. They are long-lived trees and have no known serious pest or disease problems. They transplant easily from standard nursery containers or dug from a field (if it’s a larger specimen), making establishment in the landscape an easy task. In the establishment phase, defined as the first year or two after transplanting, young, transplanted Overcups require only a weekly rain or irrigation event of around 1” (wetter areas may not require any supplemental irrigation) and bi-annual applications of a general purpose fertilizer, 10-10-10 or similar. After that, they are generally on their own without any help!
Typical shaggy bark on 7 year old Overcup Oak. Photo courtesy Daniel Leonard.
If you’ve been looking for an attractive, low-maintenance tree for a pond bank or just generally wet area in your lawn or property, Overcup Oak might be your answer. For more information on Overcup Oak, other landscape trees and native plants, give your local UF/IFAS County Extension office a call!

by Gary Knox | Aug 31, 2020
Gary Knox is professor of environmental horticulture and Nursery Crops Extension Specialist at the University of Florida/IFAS at the North Florida Research and Education Center (NFREC) in Quincy. Dr. Knox is heavily involved in research and extension on nursery/landscape problems like Rose Rosette Disease, Crapemyrtle Bark Scale, and invasive plants. On a more uplifting note, he also evaluates perennials for their attractiveness to pollinators, and new woody plants for their ornamental qualities and usefulness in Florida landscapes. These plant evaluation activities largely take place in “Gardens of the Big Bend,” a new botanical, teaching and evaluation garden established in 2009 and located on the grounds of NFREC. The Gardens are a collaboration of NFREC with Gardening Friends of the Big Bend, Inc. (GFBB), a nonprofit volunteer group of gardening enthusiasts and Green Industry professionals. Members of GFBB actively volunteer to develop, maintain and fund-raise for the Gardens as well as assist Dr. Knox with research and extension activities.

This 2019 photo shows Gary at the fabulous gardens and fountains of Villa d’Este in Tivoli outside Rome, Italy.
Gary’s current plant passions include magnolia, crapemyrtle, camellia, hydrangea, Southern bulbs, succulents, and palms (so many species, so little time!). It’s no secret that he is particularly fond of magnolias, going so far as to serve four years as president of Magnolia Society International (MSI), the organization supporting magnolia conservation and research. Gary’s roles with UF and MSI have taken him from Cuba to China and England to Ecuador promoting magnolia conservation and research. Furthermore, Gary is a “Johnny Appleseed” of the magnolia world by collecting rare Magnolia species to propagate and share them with botanic gardens in Florida and nationwide to help conserve these species in as many places as possible. The collection of Magnolia species at Gardens of the Big Bend has been named part of the National Collection of Magnolia by the Plant Collections Network, a collaboration of the American Public Gardens Association and USDA.
When not gardening at home, Gary and husband Ken particularly enjoy travel, whether across the country to visit family, or abroad to visit inspirational gardens and historical sites and to meet people from other cultures. Otherwise, you might find Gary meeting friends to play cards and board games, attending civil rights-oriented events, or collecting vintage restaurantware made in his hometown of New Castle, PA. With more than 30 years under his belt at UF/IFAS, Gary is looking forward to retirement, but he’s not quite ready for it yet!