by Daniel J. Leonard | Aug 6, 2020
I know this is going to come as a shock to some readers, but not all bugs are bad. In fact, while there are over 1 million species of insects worldwide, less than 1% are problem pests! This problem 1%, composed of common garden pests, including aphids, stinkbugs, nuisance caterpillars, and scales, get all the attention and for good reason; they can be extremely destructive to home and commercial crops. However, the good guys, beneficial predatory insects, are out there too, providing valuable pest control day and night and should be considered in part of a quality garden pest management strategy.
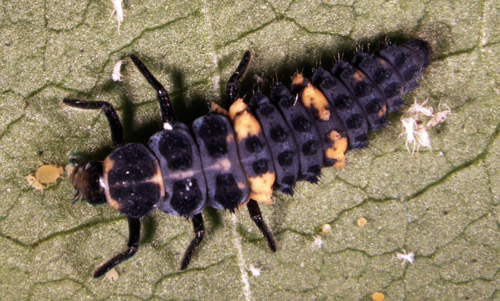
 Beneficials come in many shapes and sizes. Some are commonly known predators, such as spiders, Lady Beetles and Praying Mantids, while others are lesser known pest nemeses, like Paper Wasps, Pirate Bugs, and Lacewings. Regardless, gardeners should do their homework and be able to identify beneficials when they see them and allow them to do their jobs. The presence, or not, of a handful of Lady Beetles or Lacewings on the attack can be the difference between needing to treat with insecticides for an aphid outbreak or just letting nature take its course. Studies have shown that just one individual Lady Beetle in the larval stage can consume as many as 500 aphids; adult Lady Beetles are even hungrier aphid eaters! Paper Wasps, you know the ones who make the large “papery” nests around eaves of house and other structures, play an important beneficial role, frequently preying on caterpillars. If their nests aren’t near highly trafficked areas around your home and you don’t have family members allergic to wasp stings, your garden will thank you for leaving a few paper wasp colonies as caterpillar insurance!
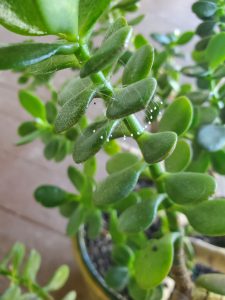
Lacewing eggs on a Jade plant in close proximity to the author’s vegetable garden.
In many instances, beneficial insects can keep pest insect infestations at bay, allowing gardeners to spot treat outbreaks when they get out of hand or even prevent the problem from needing chemical intervention altogether.
As helpful as they are, beneficial insects in the garden won’t totally negate the need for chemical treatment entirely. From time to time, garden pest populations outpace the beneficials’ abilities to kill them and intervention from humans is needed. In these times, it is advisable to use a couple of best practices to limit exposure to beneficial insects. First, try to use selective insecticides that only target specific pests and are nontoxic to other bugs, like the product Bt for caterpillar pests (sold under many brands like Dipel, Garden Safe Bt Worm and Caterpillar Killer, Thuricide, etc). However, if a nonselective, general insecticide, like the Pyrethroids (many common homeowner insecticide brands) and carbamates (Sevin and others), is needed, timing these broad spectrum sprays for early in the morning and late in the evening when many beneficials are not very active can help reduce friendly fire casualties. Care should also be taken to only spot treat infested plants and not the entire garden, this helps reduce beneficial exposure to these broadly toxic pesticides.
Every gardener should have a plan for pest control and beneficials can play an important role in this overall strategy. Gardeners can help ensure that nature pulls its weight in controlling problem pests by taking a little time to scout for beneficial insect populations, keeping a close eye on developing pest outbreaks, using selective insecticides when you can, and only spraying broad spectrum products as spot treatments when necessary and timing those applications for very early or late in the day. If you have a question about whether or not a garden insect is a good guy or a pest or want more information on garden pest control strategies, contact your local UF/IFAS County Extension Office! Happy Gardening!
The following resources were used in the development of this article:
https://gardeningsolutions.ifas.ufl.edu/care/florida-friendly-landscapes/beneficial-insects.html
https://sfyl.ifas.ufl.edu/sarasota/gardening-and-landscaping/horticulture-commercial/integrated-pest-management/beneficial-insects/
http://www.missouribotanicalgarden.org/gardens-gardening/your-garden/help-for-the-home-gardener/advice-tips-resources/pests-and-problems/other/beneficial-insects.aspx
by Daniel J. Leonard | Jul 23, 2020
I enjoy starting my garden from seeds. Ordering seed opens so many more options relative to the limited old-fashioned seed and transplant selections that line garden shelves. Picking newer, improved varieties has several other advantages as well, including increased disease resistance, earlier fruiting, unusually colored/shaped fruit, and generally more vigorous plants. One of the most exciting days of the year in my house is when the cardboard box full of the season’s seed packets comes in the mail! However, I garden exclusively in small, 4’x8’ raised beds and only need a couple of plants of each veggie variety to fill the fridge with fruit; meaning I always have leftover seeds in the packets! In the past, I’ve thrown the excess seed away and chalked it up to the cost of gardening in small spaces, but this spring, as seeds became somewhat hard to come by and several of the varieties I normally grow were out of stock, I started saving and storing my leftover seed packets for future seasons to ensure I have what I want! You can save and store seeds too, here’s how.
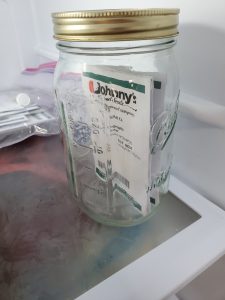
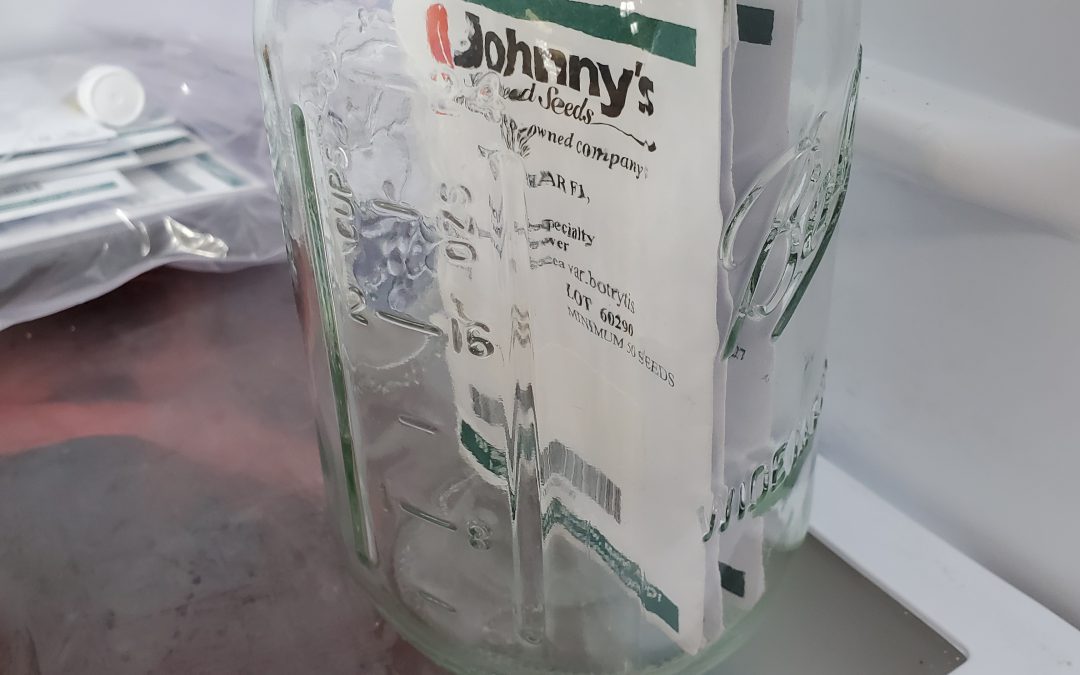
Cauliflower seed waiting for the fall garden in the author’s refrigerator.
Properly storing your leftover seeds is a relatively simple process. While seed longevity definitely varies somewhat according to species, regardless of how they are treated by you, remembering the following few tips can help improve the stored seeds’ viability and vigor for the next season.
- Store Cool. Seeds like to be stored in a refrigerator around 40 degrees F. Seeds stored warmer, near room temperature, or colder, as in a freezer, will decline much more rapidly than those in the fridge.
- Keep it Dry. Humidity or moisture in the seed storage area is a sure way to reduce the shelf life of seeds. Store dry in plastic bags or glass containers and add a dessicant. Dessicants help keep storage containers dry and can be found for around $1 each from various online purveyors, making them a cheap insurance policy for your home seed bank!
- Don’t Store Pelleted Seed. These days, you can buy pelleted seed for many of the smaller seeded vegetable varieties, like lettuce and carrots. The pelleting process and materials used, while making it easier for old eyes and those of us with fumbling fingers to plant, reduces seed longevity. Do your best to plant all the pelleted seed you purchase. If you store pelleted seed, don’t say you weren’t warned when next season’s germination is poor!
- Plant All Stored Seed the Next Season if Possible. Remember, that while most non-pelleted vegetable species’ seed can remain viable in storage for more than a year, it’s best to only store seeds until the next season and use them up. Regardless of how well you store them, seed germination percentage (how many in the lot will sprout when planted) and vigor (how strong the germinating seedlings are) decline in direct proportion to time spent in storage.
- Plant Old Seed Heavy. As germination rates in storage may have declined, it’s best to plant stored seed a little thicker than you normally might. If you need a squash plant in a certain spot, instead of just planting one seed, put three or four in the hole to ensure you get a plant. You can always thin extras later, but time lost replanting cannot be regained.
By following these few simple tips, you can waste a lot less seed and ensure that you have what you want to plant for the following year! As always, if you have any questions about saving and storing seed or any other agriculture or horticultural topic, please contact us at the UF/IFAS Calhoun County Extension Office. Happy Gardening!
The following resources were used as references when writing this piece and may prove helpful to you also, check them out:
- Johnny’s Selected Seeds Seed Storage Guide: https://www.johnnyseeds.com/growers-library/tools-supplies/seed-storage-guide.html
- Seeding the Garden EDIS Publication: https://edis.ifas.ufl.edu/vh026#:~:text=Storing%20Leftover%20Seeds,better%20than%20in%20the%20refrigerator.

by Ray Bodrey | May 27, 2020
Whether it’s the warm or cool season of the year, vegetable gardening is as popular activity as any. In writing articles, I usually discuss best management practices on a backyard garden scale. But, what if you don’t have much of a backyard?
Many Floridians live in apartments, condominiums, mobile home parks, or simply homes built on small parcel lots with little open gardening space. This doesn’t mean you can’t grow vegetables. You just have to be a bit creative and that’s when the fun starts. In addition to being an enjoyable activity, mini vegetable gardening can be practical and ornamental. Containers can fit almost anywhere in the landscape, such as porches, balconies, roof tops and that spot on your property where nothing seems to fit.
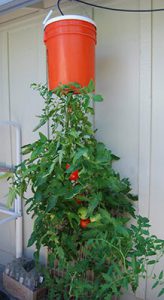
Tomato Bucket Gardening. Photo courtesy UF/IFAS Gardening Solutions.
There’s practically no limit to the kinds of containers one can use for mini vegetable gardening. Some examples are pots and pans, milk jugs, hollow concrete blocks, bushel baskets, trash cans, barrels, buckets and even plastics bags and “to go” food containers. As long as the container will hold soil and let excess water drain, you’re good to garden.
So, what can I use as a growing medium? Traditional garden soil will work fine. Mixing garden soil 1:1 with mushroom compost is also acceptable. Adding lightweight components to the soil mixture such as perlite or vermiculite will make it easier if you need move the container from time to time. This will also help with drainage. Sprinkling a handful of 6-6-6 or 8-8-8 fertilizer and gardening lime into the mixture will give plants much needed nutrients for development.
This growing medium will not require fertilizer applications very often. A small amount every two to three weeks should be adequate for most vegetable plants. Whether the fertilizer you choose is solution or dry form, be sure to use small amounts and water the product thoroughly into the root zone. A heavy application of fertilizer may cause plant burn.
So what vegetable crops grow best in containers? Most any crop will do well in containers. Some examples are tomato, pepper, eggplant, collard, cabbage, turnip, mustard, strawberry, broccoli, cauliflower and many herbs. Container gardening is a fun and rewarding hobby. You’ll enjoy both the activity and the delicious produce you’ve grown.
For more information contact your local county extension office.
Supporting information for this article was provided by Extension’s Emeritus Vegetable Specialist Jim Stephens of UF/IFAS Extension. More information can be found at this website: http://gardeningsolutions.ifas.ufl.edu/plants/edibles/vegetables/growing-vegetables-in-containers.html
UF/IFAS Extension is an Equal Opportunity Institution.
by Daniel J. Leonard | May 13, 2020
It’s been a challenging spring in this guy’s garden! Despite getting the normal early start required for successful gardening in Florida, I’ve been affected by Bacterial Leaf Spot stunting my tomatoes, cutworms that reduced my watermelon plantings by half, and an eternal test of my patience in the form of a dog that seems to think my raised beds are merely a shortcut to a destination further out in the yard. My latest adversary is the most potentially destructive yet, an outbreak of Southern Armyworm (Spodoptera eridania).
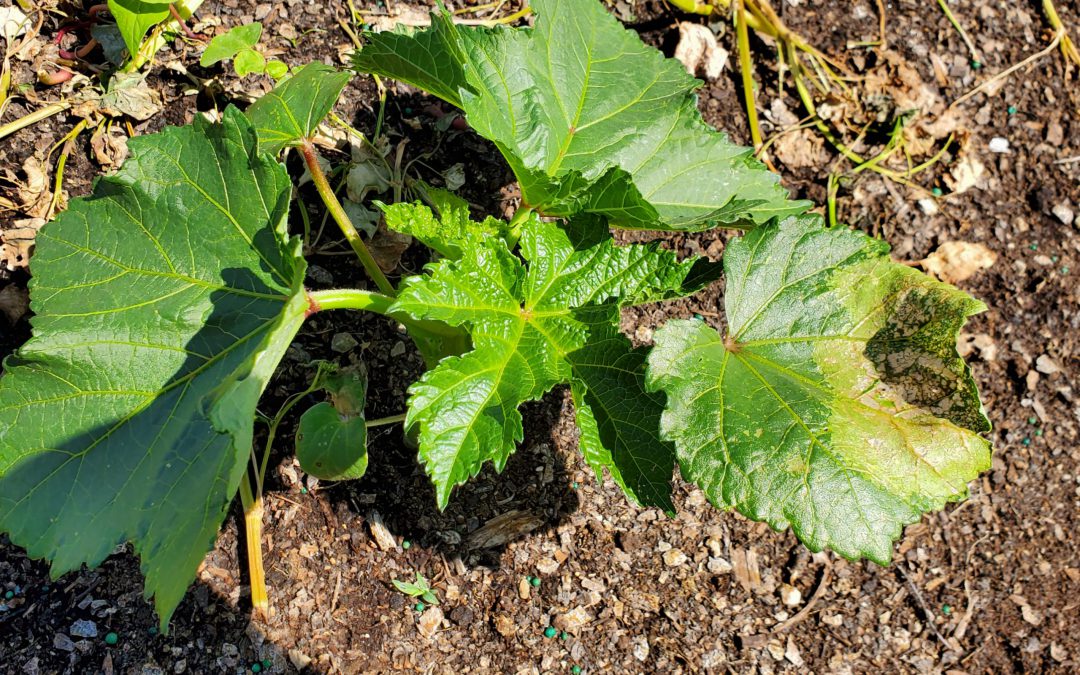
Early Southern Armyworm damage on Okra seedlings. Photo courtesy of the author.
Unlike some serious garden pests that wait until the heat of summer to emerge, Southern Armyworms begin appearing in spring gardens around the end of April. Adult moths can survive mildly cold weather and venture into the Panhandle as soon as warmer spring weather arrives. Once the adult moths arrive, egg masses are then laid on the undersides of leaves and hatch in a little under a week. Once loosed upon the world, Southern Armyworm larvae (caterpillars) become indiscriminate, voracious feeders and congregate in extremely large numbers, allowing them to destroy small, developing garden vegetable plants in a manner of days. Young larvae feed on the undersides of leaves and leave little but a skeleton. As larvae grow larger, they become solitary and begin to bore into fruit. Once they’ve eaten the good stuff (leaves and fruit), large larvae turn to branches and even plant stems!
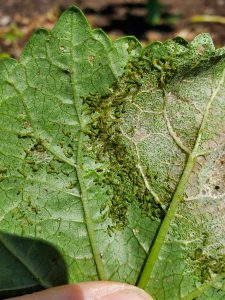
Southern Armyworm larvae feeding on Okra leaves. Photo courtesy of the author.
The good news for gardeners is that Southern Armyworm, and most other caterpillar pests, are easily controlled if outbreaks are caught early. Scouting is critical for early detection and good control. Armyworm damage generally appears from above as brownish-gray sections of affected leaves with a yellowish ring surrounding these sections, this ring indicates the current feeding zone. Affected areas will appear transparent and “lacy” due to the skeletonizing effects of larval feeding. If you see leaves that look “off” in the manner just described, check underneath for the presence of a horde of tiny greenish worms.
If found in this early stage, an application of Bacillus thuringiensis (Bt), a biological pesticide utilizing a bacterium destructive to caterpillars, is extremely effective. Bt has to be ingested by caterpillars with leaf tissue to work; thorough coverage of leaf surfaces is critical for maximum control. I generally follow up with a sequential application of Bt a day later to ensure that I achieved good coverage of the plant surfaces and, therefore, good control. Unfortunately, Bt is much less effective on older larvae. Infestations not caught early require harsher chemistries like carbamates, pyrethroids and organophosphates for adequate control.
Don’t let armyworms or other caterpillar pests destroy your garden, get out there daily and scout! You have a short window for easy caterpillar control with a harmless to people, natural product, Bt. Don’t waste it!
For more information about Southern Armyworm, other caterpillar pests, Bt, or any other horticultural topic, please consult your local UF/IFAS Extension Agent. Happy Gardening!
by Daniel J. Leonard | May 7, 2020
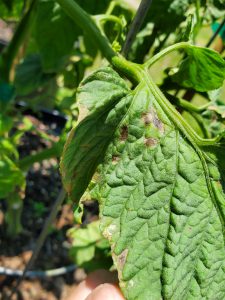
Early BLS symptoms appear on lower leaves. Photo courtesy of the author.
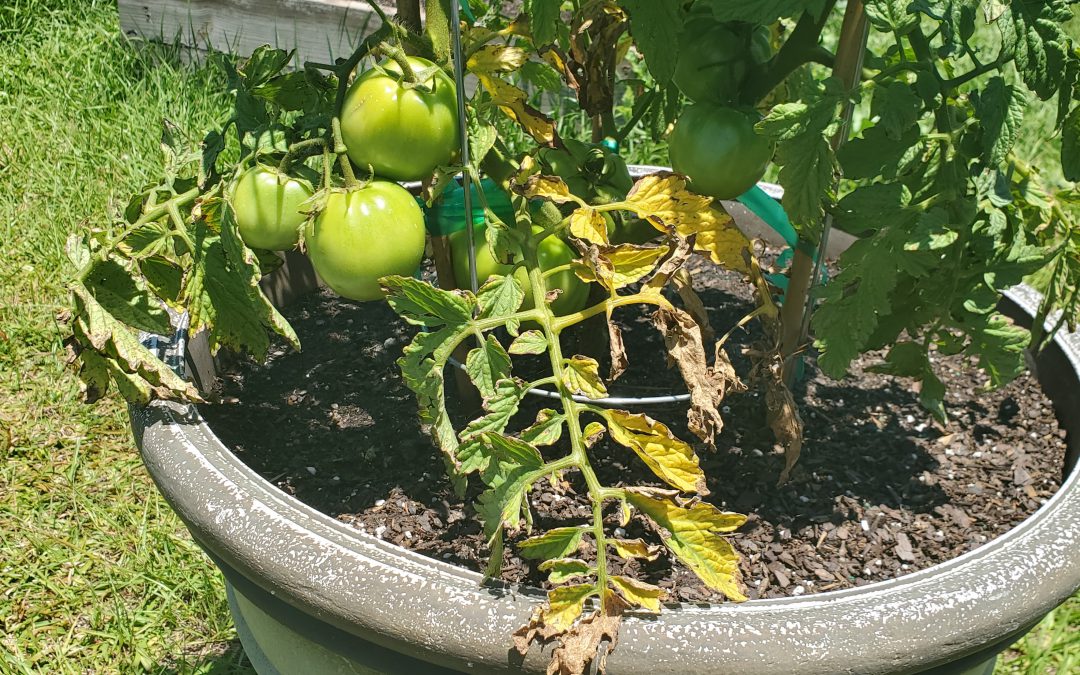
Tomatoes are among the most notoriously difficult vegetable species to grow in Florida. Even when you do everything right (choose disease resistant varieties, buy clean seed/healthy transplants, plant early, rotate crops, scout for insects, prune and support vines, etc), things can go wrong in a hurry. Bacterial Leaf Spot (BLS) caused by the pathogen Xanthomomas perforans, is one of those things. BLS often hitches a ride into gardens undetected on seed and transplants and presents itself as warm and humid weather arrives in late April/early May. Outbreaks typically happen in concurrence with the frequent heavy rainstorms that accompany these months and quickly wreak havoc on tomato plants.
BLS occurrence, much worse in some springs than others, has exploded this year in home gardens. First noticed on the plant’s lower leaves, BLS pathogens enter through natural openings in leaves called stomata, manifest as small, “water-soaked” leaf lesions and then develop within days into dark circular spots, sometimes surrounded by a yellow halo. As conditions worsen, all these individual infections cause a general yellowing or “blighting” of entire leaves. Though the issue begins on tomato leaves, BLS can affect all parts of the plant, including stems, flowers and fruit too! It’s at this point, when blighted leaves become obvious and lesion developing on flower stalks cause both flowers and small fruit to drop, that most home gardeners notice that something is up.
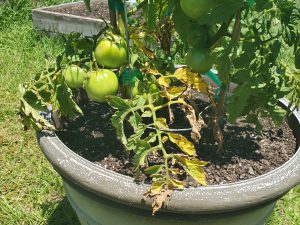
Advancing progression of BLS with “blighted” leaves. Photo courtesy of the author.
Unlike with many other pathogens, gardeners don’t have an abundance of options to control BLS. However, taking the following preventative measures can reduce the pathogen’s impact and stave off disease progression until ripe fruit can be harvested.
- Don’t irrigate overhead. Utilize drip/microirrigation or hand water beds and containers at soil level. This prevents the leaves from becoming wet; wet leaves become a perfect host for BLS.
- Never work tomato plants when leaves are wet. No staking, pruning, tying, or anything else until plant tissue is dry. Working wet tomato plants is an excellent way to spread bacteria!
- Sanitize pruning tools often and wash hands after working infected plants.
- Maintain airflow in plants by planting at correct spacing and thinning interior leaves as necessary to facilitate quicker drying of the plant.
- Prune lower leaves to at least 12” from the soil’s surface to prevent disease transmission from soil to leaves through splashing water.
- Remove infected leaves (when plants are dry!) to slow disease progression.
- Rotate crops and destroy infected plants to prevent buildup of BLS organisms in soil.
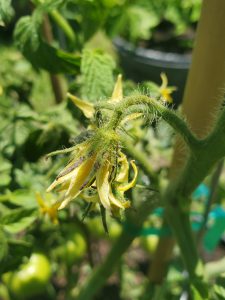
BLS lesions on tomato flowers. Photo courtesy of the author.
- Preventative measures are best, but if your garden has a history of BLS and local weather forecasts call for warm/wet/humid weather, it is best to spray fungicides proactively to protect your crop. A weekly spray with a tank mixture of copper and mancozeb is effective at keeping BLS at bay. This is the only chemical spray combination proven to be effective in controlling BLS.
- Unlike many common tomato pathogens that can be reliably avoided through planting resistant cultivars like ‘Big Beef’, ‘Celebrity’ and others, no varieties are resistant to BLS.
While BLS is an extremely destructive pathogen of both home and commercially grown tomatoes, growers can lessen the disease’s effects by following the preventative measures outlined above and spraying with a copper/mancozeb mix if necessary. Growing tomatoes this year hasn’t been easy, but it’s worth it to fight back and realize a harvest despite difficulties like BLS!
If bacteria have given you the blues or other garden issues are bringing you down, give your local UF/IFAS County Extension Agent a call! We’re here to help you be successful in all your horticultural endeavors. Happy gardening!

 Beneficials come in many shapes and sizes. Some are commonly known predators, such as spiders, Lady Beetles and Praying Mantids, while others are lesser known pest nemeses, like Paper Wasps, Pirate Bugs, and Lacewings. Regardless, gardeners should do their homework and be able to identify beneficials when they see them and allow them to do their jobs. The presence, or not, of a handful of Lady Beetles or Lacewings on the attack can be the difference between needing to treat with insecticides for an aphid outbreak or just letting nature take its course. Studies have shown that just one individual Lady Beetle in the larval stage can consume as many as 500 aphids; adult Lady Beetles are even hungrier aphid eaters! Paper Wasps, you know the ones who make the large “papery” nests around eaves of house and other structures, play an important beneficial role, frequently preying on caterpillars. If their nests aren’t near highly trafficked areas around your home and you don’t have family members allergic to wasp stings, your garden will thank you for leaving a few paper wasp colonies as caterpillar insurance!


