
We plant trees with the intention of them being there long after we are gone. However, m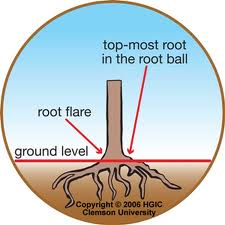 any trees and shrubs fail before ever reaching maturity. Often this is due to improper installation and establishment. Research has shown that there are techniques to improve survivability. Before digging the hole:
- Look up. If there is a wire, security light, or building nearby that could interfere with proper development as it grows, plant elsewhere.
- Dig a shallow planting hole as wide as possible. Shallow is better than deep! Many people plant trees too deep. A hole about one-and-one-half the diameter of the width of the root ball is recommended. Wider holes should be used for compacted soil and wet sites. In most instances, the depth of the hole should be LESS than the height of the root ball, especially in compacted or wet soil. If the hole was inadvertently dug too deep, add soil and compact it firmly with your foot. .
- Find the point where the top-most root emerges from the trunk. If this is buried in the root ball then remove enough soil from the top so the point where the top-most root emerges from the trunk is at the surface. Burlap on top of the ball may have to be removed to locate the top root.
- Slide the plant carefully into the planting hole. To avoid damage when setting a large tree in the hole, lift the tree with straps or rope around the root ball, not by the trunk. Special strapping mechanisms need to be constructed to carefully lift trees out of large containers.
- Position the plant where the top-most root emerges from the trunk slightly above the landscape soil surface. It is better to plant a little high than to plant it too deep. Remove most of the soil and roots from on top of the root flare and any growing around the trunk or circling the root ball. Once the root flare is at the appropriate depth, pack soil around the root ball to stabilize it. Soil amendments are usually of no benefit. The soil removed from the hole and from on top of the root ball makes the best backfill unless the soil is terrible or contaminated. Insert a square-tipped balling shovel into the root ball tangent to the trunk to remove the entire outside periphery. This removes all circling and descending roots on the outside edge of the root ball.
- Straighten the plant in the hole. Before you begin backfilling have someone view the plant from two directions perpendicular to each other to confirm that it is straight. Break up compacted soil in a large area around the plant provides the newly emerging roots room to expand into loose soil. This will hasten root growth translating into quicker establishment Fill in with some more backfill soil to secure the plant in the upright position.
- Remove synthetic materials from around trunk and root ball. Synthetic burlap needs to be completely removed from the root ball; treated burlap can be left in place. String, strapping, plastic, and other materials that will not decompose and must be removed from the trunk at planting. Remove the wire above the soil surface from wire baskets before backfilling.
- Apply a 3-inch-layer of mulch. To retain moisture and suppress weeds cover the outer half of the root ball with an organic mulch. Do not cover the stem of the plant or the connecting root flare.
- Water consistently until established. For nursery stock less than 2-inches in caliper, this will require every other day for 2 months, followed by weekly 3-4 months. At each irrigation, apply 2 to 3 gallons of water per inch trunk caliper directly over the root ball. Never add irrigation if the ground is saturated.
Latest posts by Sheila Dunning (see all)
- Sunshine in the Winter - December 20, 2024
- Helene’s Potential Impact on the Florida Coastal Wetlands - October 4, 2024
- April is Safe Digging Awareness Month - April 6, 2024