
by Mary Salinas | Sep 23, 2014
In the midst of your September strolls through natural Florida, you may come across this native beauty, the narrowleaf sunflower, Helianthus angustifolius. Another common name is swamp sunflower. I found this gorgeous patch in the photo close to the shore of Apalachicola Bay. It occurs throughout Florida and north throughout much of the eastern United States. Florida is fortunate to be home to over 20 native species of sunflower.
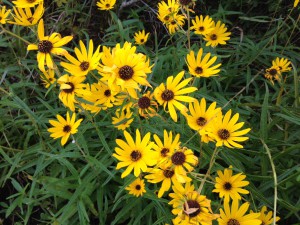
Narrowleaf Sunflower. Photo credit: Mary Derrick, UF/IFAS Extension.
This perennial starts blooming in late summer and dazzles admirers throughout autumn. The 2 to 3 inch flowers with bright yellow petals and brown centers are attractive to butterflies and other pollinators. What a great addition to your butterfly garden!
Plants generally grow to about 2 foot tall but they can grow a bit leggy to 6 foot. If desired, keep them more compact through pruning in late spring. Clumps can be divided every few years to spread them out or to share with friends and neighbors.
Like all sunflowers, it loves full sun but can tolerate some light shade. Narrowleaf sunflower is salt and flood tolerant and will do well in most soil types, however it does best in consistently moist conditions.
Narrowleaf sunflower plants may be difficult to find in the nursery trade but they can be readily started from seed.
For more information and seed sources:
Florida Wildflower Foundation
Atlas of Florida Vascular Plants: Helianthus species
Common Native Wildflowers of North Florida

by Roy Carter | Sep 16, 2014
Image Credit Dan Culbert, UF / IFAS Extension
You can’t judge fertilizer by appearance. Fortunately, state law requires each fertilizer label to include specific content facts. However, these can be confusing.To obtain the proper types of fertilizers for various applications, you must understand the label. At the top you’ll find the identification of the manufacturer or distributor. Of course, this doesn’t tell how well the fertilizer will help your lawn, ornamentals, or vegetables.
Next, if the term “organic” is used, these will be a statement identifying the type of material, as well as how much is natural, and how much is synthetic. This is an important indication of how the fertilizer will react in your soil. For example, natural, natural organic nitrogen is released slowly. A fertilizer containing a high percentage of this material would be good for lawns, helping them stay green, without causing spurts of extra fast growth.
The key information is found in the guaranteed analysis section of the label. A series of numbers, such as 8-8-8 or 10-10-10, tell you which, and how much, of the primary plant nutrients the fertilizer contains. That is, the numbers show the guaranteed amount of nitrogen, phosphorus, and potassium. For example, a fertilizer labeled 10-10-10 contains ten percent nitrogen, ten percent phosphorous, and ten percent potassium. Thus, a hundred pounds of this product contains 30 pounds of plant food. The other 70 pounds is conditioner and filler, required for even spreading. These may include some incidental trace elements. If the fertilizer contains significant amounts of secondary plant foods, such as calcium, magnesium, copper and others, they will be listed near the bottom of the tag.
The most difficult part of the label to understand is the information listed right after the total nitrogen figure, in the guaranteed analysis section. In addition to the total amount, the label gives percentages of each of several types of nitrogen in the mix. This tells you a lot about how the fertilizer works.
You’ll see the terms nitrate nitrogen, ammoniacal nitrogen, water soluble organic nitrogen, urea nitrogen, and water insoluble nitrogen. Plants use nitrate, water soluble organic, and urea nitrogen fairly quickly. They might work well in a vegetable garden. But, they won’t last very long, because they’re rapidly leached out of the soil by rain and irrigation water. On the other hand, ammoniacal and water insoluble nitrogen will last longer in sandy Florida soils.
Following the basic analysis, is a statement of the maximum amount of chlorine the fertilizer contains. Excess chlorine may be injurious to certain plants, both vegetables and ornamentals species. Small amounts can be beneficial under some condition.
Unfortunately, I can’t fully explain anything this complicated in one short article. I hope I’ve clarified a few of the basic points. To obtain the proper fertilizer for your specific vegetable and ornamental gardening needs, you must understand the information on fertilizer labels when in doubt; we suggest you check with your County Extension Agent.
For More Information:
The Florida Fertilizer Label

by Matthew Orwat | Sep 16, 2014
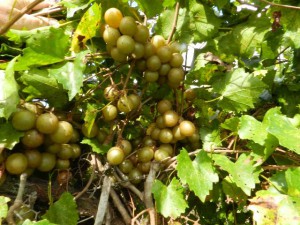
Prolific producing muscadine cultivar ‘Granny Val’ – Image Credit Dr. Peter C. Andersen
Mother always said “never be late” but in the case of certain muscadine (Vitis rotundifolia) cultivars, it’s good to be late.
Although muscadine harvest can begin as early as July, gardeners with late bearing muscadines are still reaping the benefits of fruit harvest and may until early October.
Northwest Florida gardeners often grow muscadines as a substitute for traditional grape (Vitis vinifera) cultivars such as ‘Concord’ or ‘Thompson’s Seedless’, since they are prone to Pierce’s Disease. In fact, muscadines are native to the southwest USA and resistant to a variety of insect and disease pests, so much so that they can be grown in the home garden without the use of insecticides or pesticides.
An additional advantage of gardening with muscadines is that they can easily be asexually propagated. To mimic the natural asexual propagation of wild muscadines, home gardeners may use the pegging method. Pegging entails wounding the branch in several locations, then burying the wounded section of the branch in moist soil while leaving the shoot tip exposed. If this is done in the late spring or summer, roots should form from the main branch in about a month. After roots are confirmed, the connection with the mother plant can be cut.
Planting time for muscadines depends on the type of plant purchased. If gardeners want to plant bare root vines, they should plant them between December and January, but containerized plants can be planted any time.
Before muscadines are planted, soil tests should be performed to determine pH. Muscadines can be grown in the pH range of 5.5 to 7.0, with the optimal level between 6.0-6.5. Since many soils in northwest Florida are highly acidic, tests should be done at least 3 months before planting. This will allow the addition of an optimal lime source Dolomite, which takes 3 months to raise the pH but also adds magnesium to the soil.
If this article prompts the reader to plant muscadines, refer to HS # 753 “The Muscadine Grape” for information about establishment, irrigation and fertilization.
Here is a list of recommended late bearing cultivars to look for when selecting plants.
-
Big Red
-
Delight
-
Doreen
-
Farrer
-
Granny Val
-
Late Fry
-
Nesbitt
-
Polyanna
-
Supreme
-
Pineapple
by Mary Salinas | Sep 16, 2014
Many of us have a tendency to want to spoil those we care for – our significant other, our pets, our children, even our lawns. Some homeowners who long to have a lush, green, healthy lawn tend to spoil their lawns with lots of water. Their lawns should not suffer through a dry, thirsty day! However, spoiling a lawn with too much water can literally be killing it with kindness. (Keep in mind that we are discussing established turf, not newly installed lawns; new lawns do need special care.)
 Turfgrass that is overwatered can suffer several fates. Roots can stay shallow near the surface and not dig deep into the soil as they should. A deep root system allows the turf to be more resistant to stress from drought, disease and abiotic factors such as wear from traffic. Excessive water leads to excessive lush growth – that may sound like a good thing, but it’s not. Excessive lush growth leads to thatch build-up and it creates a perfect environment for pests and diseases. An abundance of water also assists those nasty weed seeds to germinate and compete with your turfgrass.
So how do you know how much irrigation is best for the health of your lawn? That depends on the temperature, time of year, the type of turf and your soil type. Irrigate just enough to get water to the root zone without leaching beond that zone. Usually, that amount is 1/2″ to 3/4″ of water each time you irrigate. How often, then, do you turn on those sprinklers?
Let your lawn get thirsty before you water. University of Florida research shows that lawns that dry out and start to show a little drought stress before getting more water actually perform better in the long run. So wait until the leaf blades start to fold, the blades start to look a bit off-color, or you can start to see footprints where you’ve walked.
For lots of great information and publications on caring for your lawn, consult the Your Florida lawn website.
by Taylor Vandiver | Sep 9, 2014
What’s eating my lawn? Does your grass look ragged in areas, as if someone randomly used a weed-eater here and there? Are you noticing brown patches that have a closely clipped appearance compared to other areas of your lawn? Your turf may be playing host to Tropical Sod Webworm.
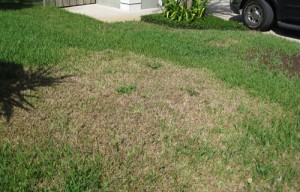
Sod webworm damage in a home lawn. Photo courtesy UF/IFAS.
Sod webworm damage is subtle at first. You have to look closely to notice larval feeding damage. However, an easy indication of their presence is the light tan/brown colored moths, which are the adult stage of the pest. You may see them fly up as you walk through your lawn or if you disturb a nearby bush. The moths do not cause any damage to the turf, but they are depositing eggs, which will result in their offspring, the caterpillars, who do all the chewing damage.
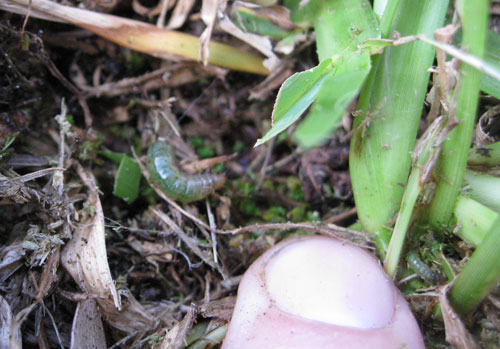
The larvae are gray-green and have spots on each segment. The mature larvae can be up to 1 inch in length. Larvae will curl up in the soil during the day and feed at night. So if you happen to notice caterpillars feeding during the day, it’s probably not sod webworm. You will notice chewed notches along the leaf blade, holes in the leaf and even leaf blade skeletonizing. The older the larvae are, the more they will eat. Damage may start out as a ragged appearance in your turf, which can be hard to diagnose. However, if left unchecked, sod webworm can cause considerable injury to your lawn.

Sod webworm larvae. Photo courtesy UF/IFAS.
If you are uncertain of their presence you can always use a soap drench to flush out larvae. Mix 2 tablespoons of dish soap with 2 gallons of water and pour it over a damaged area (about 3 square ft.). The soap mixture will irritate the pest and bring them to the surface so you can easily identify them. If nothing appears in the area tested move to another damaged site and try again. Here is a link to a video that will give more information on identifying Tropical Sod Webworm.
Tropical Sod Webworm is considered a pest of all warm-season turfgrasses. However, St. Augustinegrass is most commonly affected. The best way to prevent a pest infestation is to use proper cultural maintenance practices for your lawn type. However, if the pest does appear, chemical control should be targeting the larvae stage of the pest. There are multiple products marketed to control lawn caterpillars. However, you may want to consider using B.t. (Bacillus thurengiensis), which is a bacterium that will only harm caterpillars and not bother beneficial insects that may be in your lawn. For more information you can contact your local extension office.


