by Matt Lollar | Sep 23, 2015
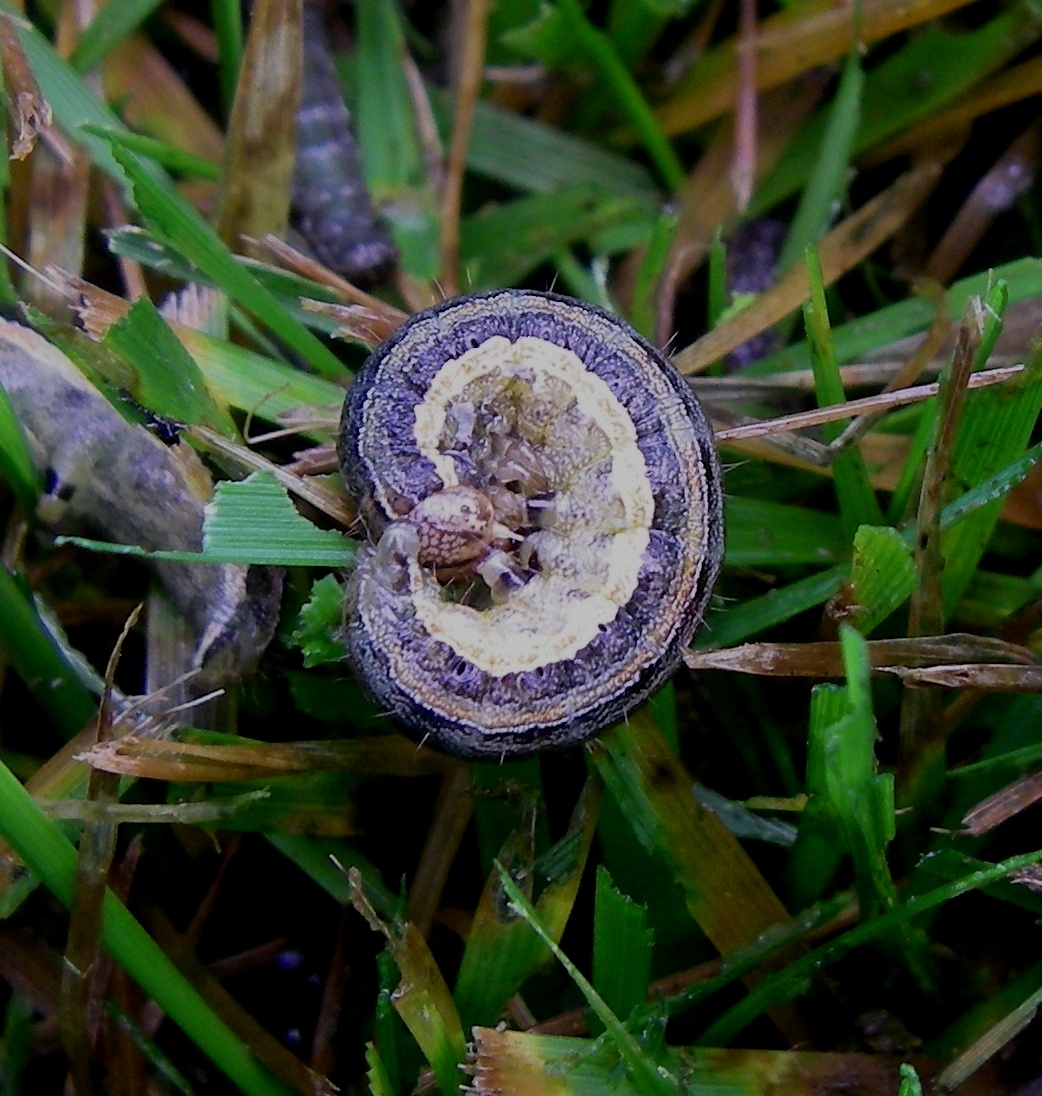
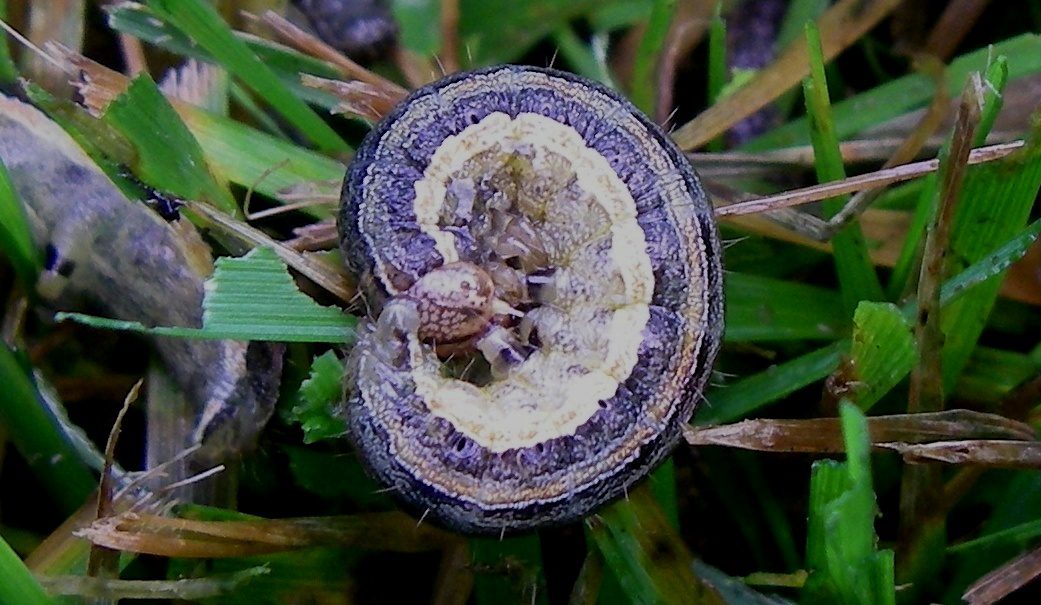
Armyworms come in a wide range of colors and sizes. A few of the prominent species living in Florida are beet, southern, and fall armyworms. And the term “living” is not an exaggeration, because Florida is one of the lucky states where it is warm enough for armyworms to overwinter. They are the snowbirds that never leave!
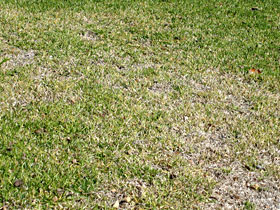
Armyworm damage on a lawn. Credit: Purdue University
Armyworms are notorious for unanticipated invasions. They feed on most turfgrass species and most vegetable crops, but they prefer grassy vegetable crops such as corn. Armyworms feed in large groups and their feeding has been described as “ground moving” in lawns. They feed during cooler times of the day (morning and evening) and they roll up and rest under the vegetative canopy (in the thatch layer in turf and in the base of leaves in vegetables) during the heat of the day.
Armyworms are difficult to control because of their spontaneity. However, in the lawn they hide in the thatch during the heat of the day. Over watering and fertilization can increase the amount of thatch. It is important to follow UF/IFAS guidelines for home lawn management. A good weed control program can also help to deter armyworms, because weeds serve as an alternate food source.
Numerous chemical control options are available, but softer chemicals such as horticultural oils and insecticides containing the bacteria Bacillus thuringiensis are recommended as a first line of defense. Insecticides should be applied in the morning or evening during feeding time. For additional control strategies and basic information please visit the UF/IFAS Armyworm Publication Page.
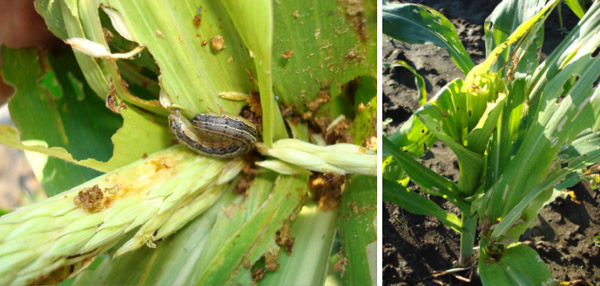
Armyworm feeding on a young corn plant. Credit: University of Illinois
by Sheila Dunning | Sep 16, 2015
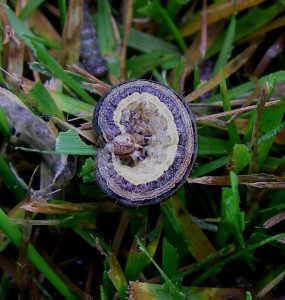
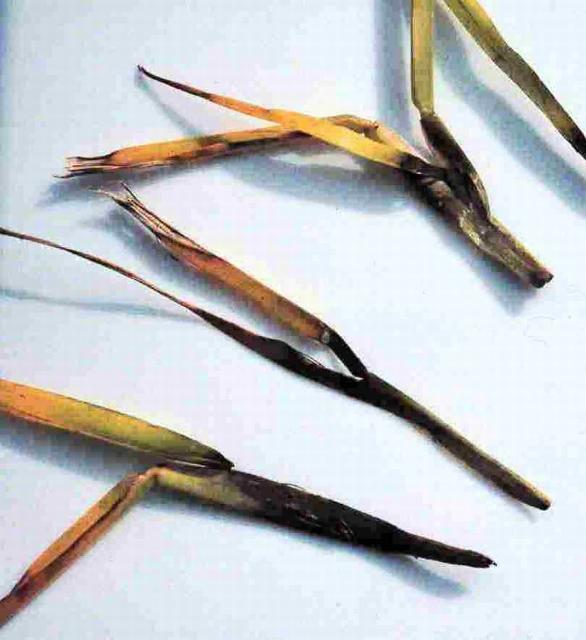
“We have replaced this grass several times over the past few years; and it’s dying again.” I have heard this complaint too many times this summer. Last summer’s heavy rain, the stress of January’s icy weather, and this year’s extended summer have contributed to widespread outbreaks of Take-All Root Rot, a soil-inhabiting fungus Gaeumannomyces graminis var. graminis.
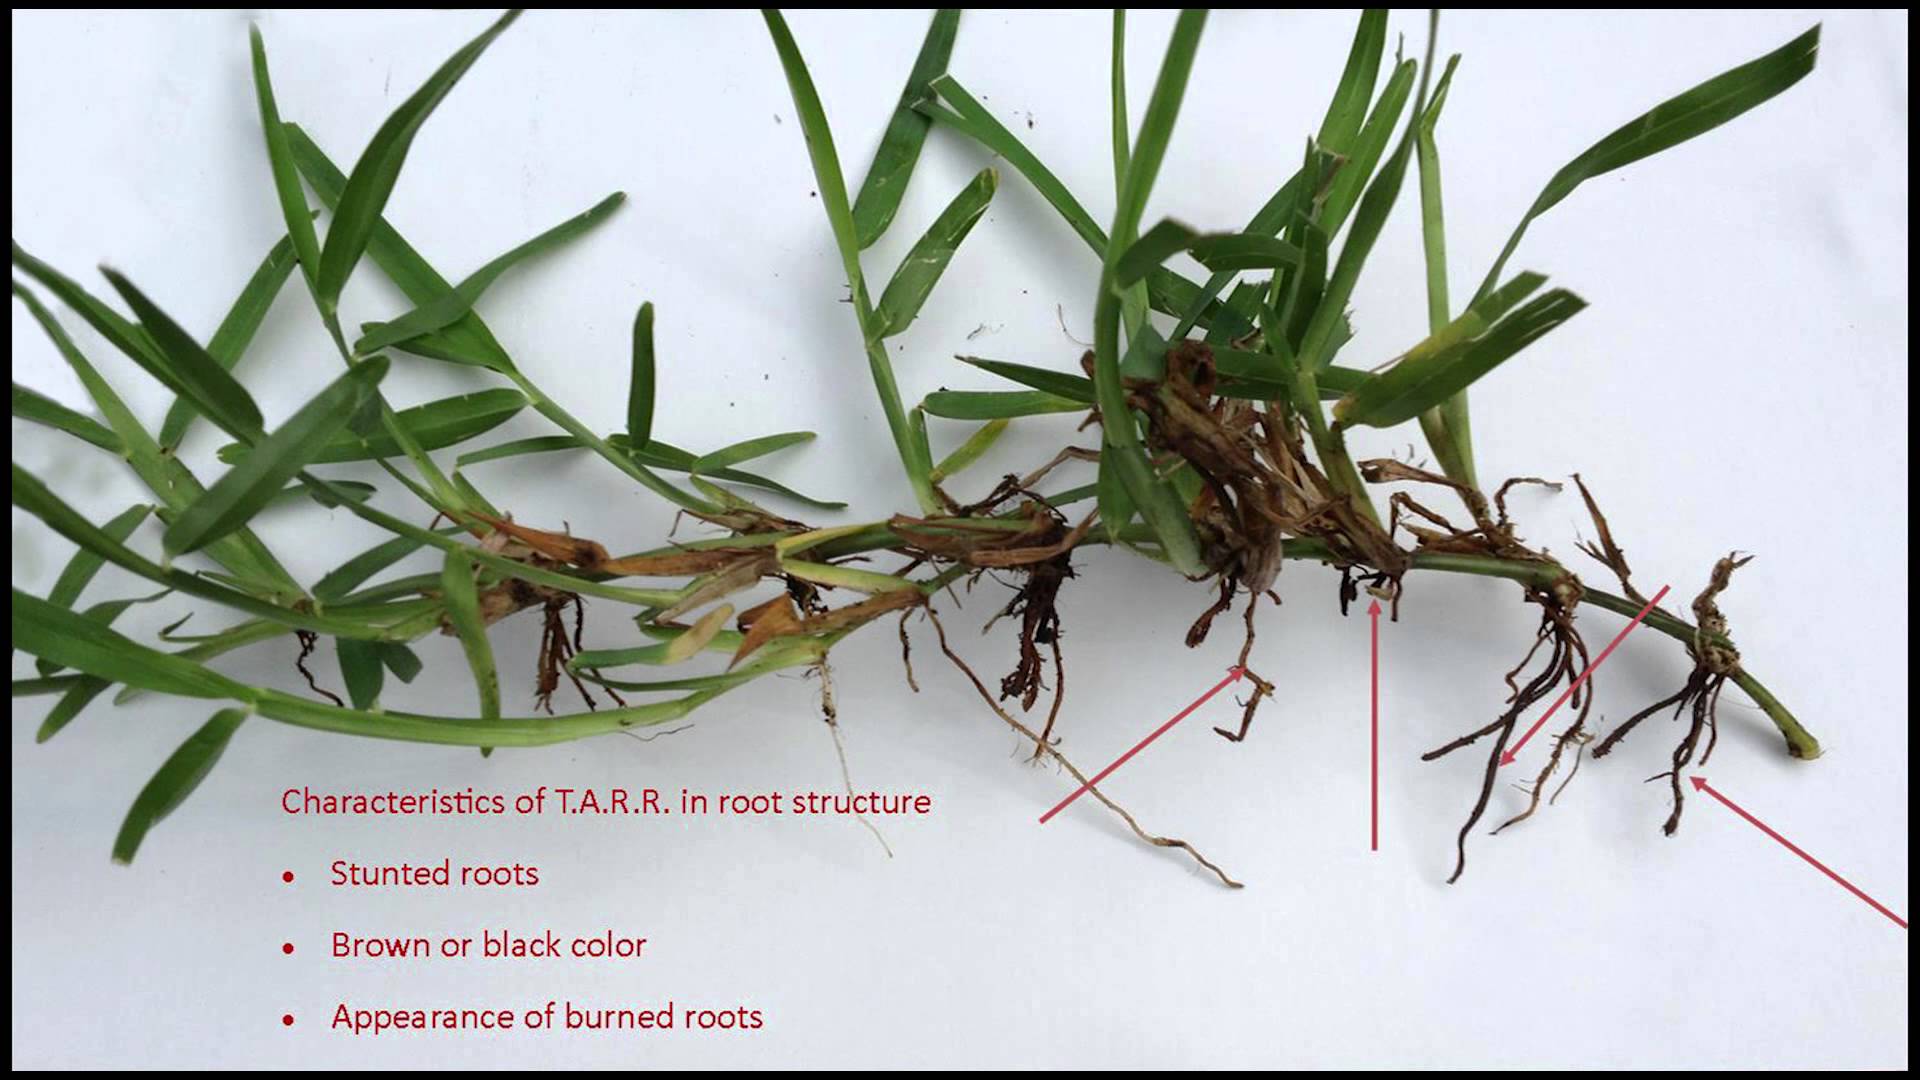
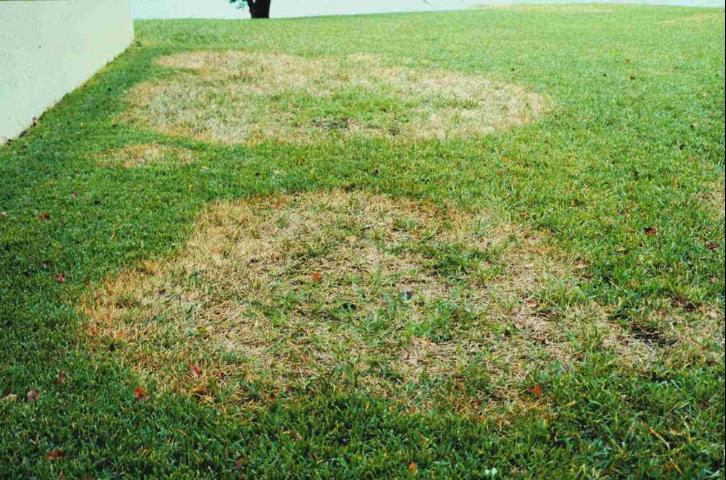
Symptoms of Take-All-Root-Rot. Photo credit: Sheila Dunning, UF/IFAS.
This disease causes yellow grass patches ranging in diameter from a few inches to more than 15 feet. The symptoms first appear in the spring, but the disease can persist all summer and survive the winter. Over time, the entire area dies as the root system rots away. The pathogen is naturally present on warm-season turfgrass roots. High rainfall and stressed turfgrass trigger the disease.
Since the roots are affected, they are not able to efficiently obtain water or nutrients from the soil, nor are they able to store the products of photosynthesis, which result in the loss of color in the leaves. By the time the leaf symptoms appear, the pathogen has been active on the roots for several weeks, probably longer; the disease has been there potentially for years. If the turfgrass is not stressed, leaf symptoms may never be observed.
This disease is very difficult to control once the aboveground symptoms are observed. Measures that prevent or alleviate stress are the best methods for controlling the disease. Any stress (environmental or manmade) placed on the turf weakens it, making it more susceptible to disease. Remember, that every maintenance practice, fertilizer application, and chemical (especially herbicide), application has an impact on turfgrass health. Cultural practices that impact the level of stress experienced by a lawn include:
- proper turfgrass species selection
- mowing at the correct height
- irrigation timing, frequency and volume
- fertilizer: nitrogen and potassium sources and application quantities
- thatch accumulation, and
- soil compaction
The selection of turfgrass species should be based on existing soil pH, sunlight exposure, use of the area and planned maintenance level.
Mower blades must be sharp to avoid tearing of the leaves. Additionally, turfgrasses that are cut below their optimum height become stressed and more susceptible to diseases, especially root rots. When any disease occurs, raise the cutting height. Scalping the grass damages the growing point. Raising the cutting height increases the green plant tissue available for photosynthesis, resulting in more energy for turfgrass growth and subsequent recovery from disease.
If an area of the lawn has an active fungus, washing or blowing off the mower following use will reduce the spread of the disease to unaffected areas.
The amount of water and the timing of its application can prevent or contribute to disease development. Most fungal pathogens that cause leaf diseases require free water (rainfall, irrigation, dew) on the leaf to initiate the infection process. Irrigating every day for a few minutes is not beneficial for the turfgrass because it does not provide enough water to the root zone, but it is beneficial for turfgrass pathogens. It is always best to irrigate when dew is already present, usually between 2 and 8 a.m., and then only apply enough water to wet the root zone of the turfgrass.
Excessively high nitrogen fertility contributes to turfgrass diseases. The minimum amount required for the grass species should be applied. Potassium (K) is an important component in the prevention of diseases, because it prevents plant stress. Application of equal amounts of nitrogen and potassium is recommended for turfgrass health. When turfgrass roots are damaged from disease, it is beneficial to apply nutrients in a liquid solution. However, nitrate-nitrogen increases the severity of diseases, so their use should be avoided when possible. Ammonium-containing fertilizers are the preferred nitrogen sources.
Heavy liming has also been linked to increases in Take-All Root Rot. Since most turfgrasses can tolerate a range of pH, maintaining soil at 5.5 to 6.0 can suppress the development of the pathogen. When the disease is active, frequent foliar applications of small amounts of nutrients is necessary to keep the turfgrass from declining.
Additional maintenance practices that need to be addressed are thatch removal and reduction of soil compaction. Excessive thatch often causes the mower to sink which can result in scalping and reducing the amount of leaf tissue capable of photosynthesizing. Thatch and compacted soil prevent proper drainage, resulting in areas remaining excessively wet, depriving root systems of oxygen. Since recovery of Take-All-Root-Rot damaged turfgrass is often poor, complete renovation of the lawn may be necessary. Removal of all diseased tissue is advised.
As a native soil-inhabiting pathogen, Take-All-Root-Rot cannot be eliminated. However, suppression of the organism through physical removal followed by proper cultivation of the new sod is critical to the establishment of a new lawn. Turfgrass management practices, not chemicals, offer the best control of the disease.
It is acceptable to use fungicides on a preventative basis while rooting in the sod. Azoxystrobin, fenarimol, myclobutanil, propiconazole, pyraclostrobin, thiophate methyl, and triadimefon are all fungicides that can be utilized to prevent disease development while having to excessively irrigate newly laid sod. Ideally, the turf area should be mowed and irrigated prior to a fungicide application. Unless the product needs to be watered in, do not irrigate for at least 24 hours after a chemical treatment. Do not mow for at least 24 hours, to avoid removal of the product attached to the leaf blades.
With all the stresses that our lawns have experienced, it is very important to continue monitoring the turf and be cautious about the cultural practices being used. Take-All Root Rot is likely to flourish. Do not encourage its development. A pathology test with the University of Florida Laboratory can confirm the presence of the disease causing organism. Before resodding again, have the dying sod tested.
For information and the submission form go to:
Sample Submission Guide
For more information on the disease go to:
Take-All-Root-Rot
by Blake Thaxton | Sep 16, 2015
Brown patch symptoms on St. Augustinegrass.
Credit: M. L. Elliott
Beautiful weather and pleasant cool temperatures have made their way into the Florida panhandle in the last week. They will not stay long. It will be scorching hot again this year before the relief of fall settles in for good. As nice as the weather has been, it could cause problems for lawns in the panhandle. Temperatures below 80° F with moisture from rainfall can be a trigger for Brown Patch, also known as Large Patch.
The disease damages the turf by rotting the lower portion of the grass blade. When inspected closely and smelled, Brown Patch has a rotted odor associated. The disease does not affect the roots of the grass but will totally rot the base of the leaf and eventually kill the entire leaf. Patches generally die out in a 1 foot diameter area and move out from there.
Base of leaf is rotted due to brown patch.
Credit: UF/IFAS photos
Some homeowners apply a fall application of fertilizer this time of year to “winterize” their lawns. Excess nitrogen can exacerbate the problem during times of favorable conditions. Many of the “winterizer” fertilizer on the market have a high percentage of nitrogen; so avoid these fertilizers this time of year. Choose a fertilizer with little to no nitrogen but a high percentage of potassium to encourage strong root growth headed into winter.
For more information regarding the disease, read this University of Florida/IFAS publication: Large Patch by M. L. Elliott and P. F. Harmon
by Beth Bolles | Sep 16, 2015
Just when you think your battle against weeds is over for the summer, cooler nighttime temperatures and shorter days spark the beginning of a new crop of your least favorite plants. The question of many homeowners is: how did all the weeds get into my landscape?
There are many ways that weeds make it to the landscape. They can be brought in with new soil, mulch, container plants, dropped by birds, delivered on the fur of animals, carried by wind, or on the deck of a lawn mower. If that is not enough to depress you, then also realize that regardless of outside sources of weeds, your landscape already has plenty onsite that you don’t even know about.
In the soil, there is a large number of weed seeds ready to germinate when the conditions are just right. Understanding how your common landscape practices can encourage or discourage the germination of these seeds, can help you begin to manage some weed infestations.
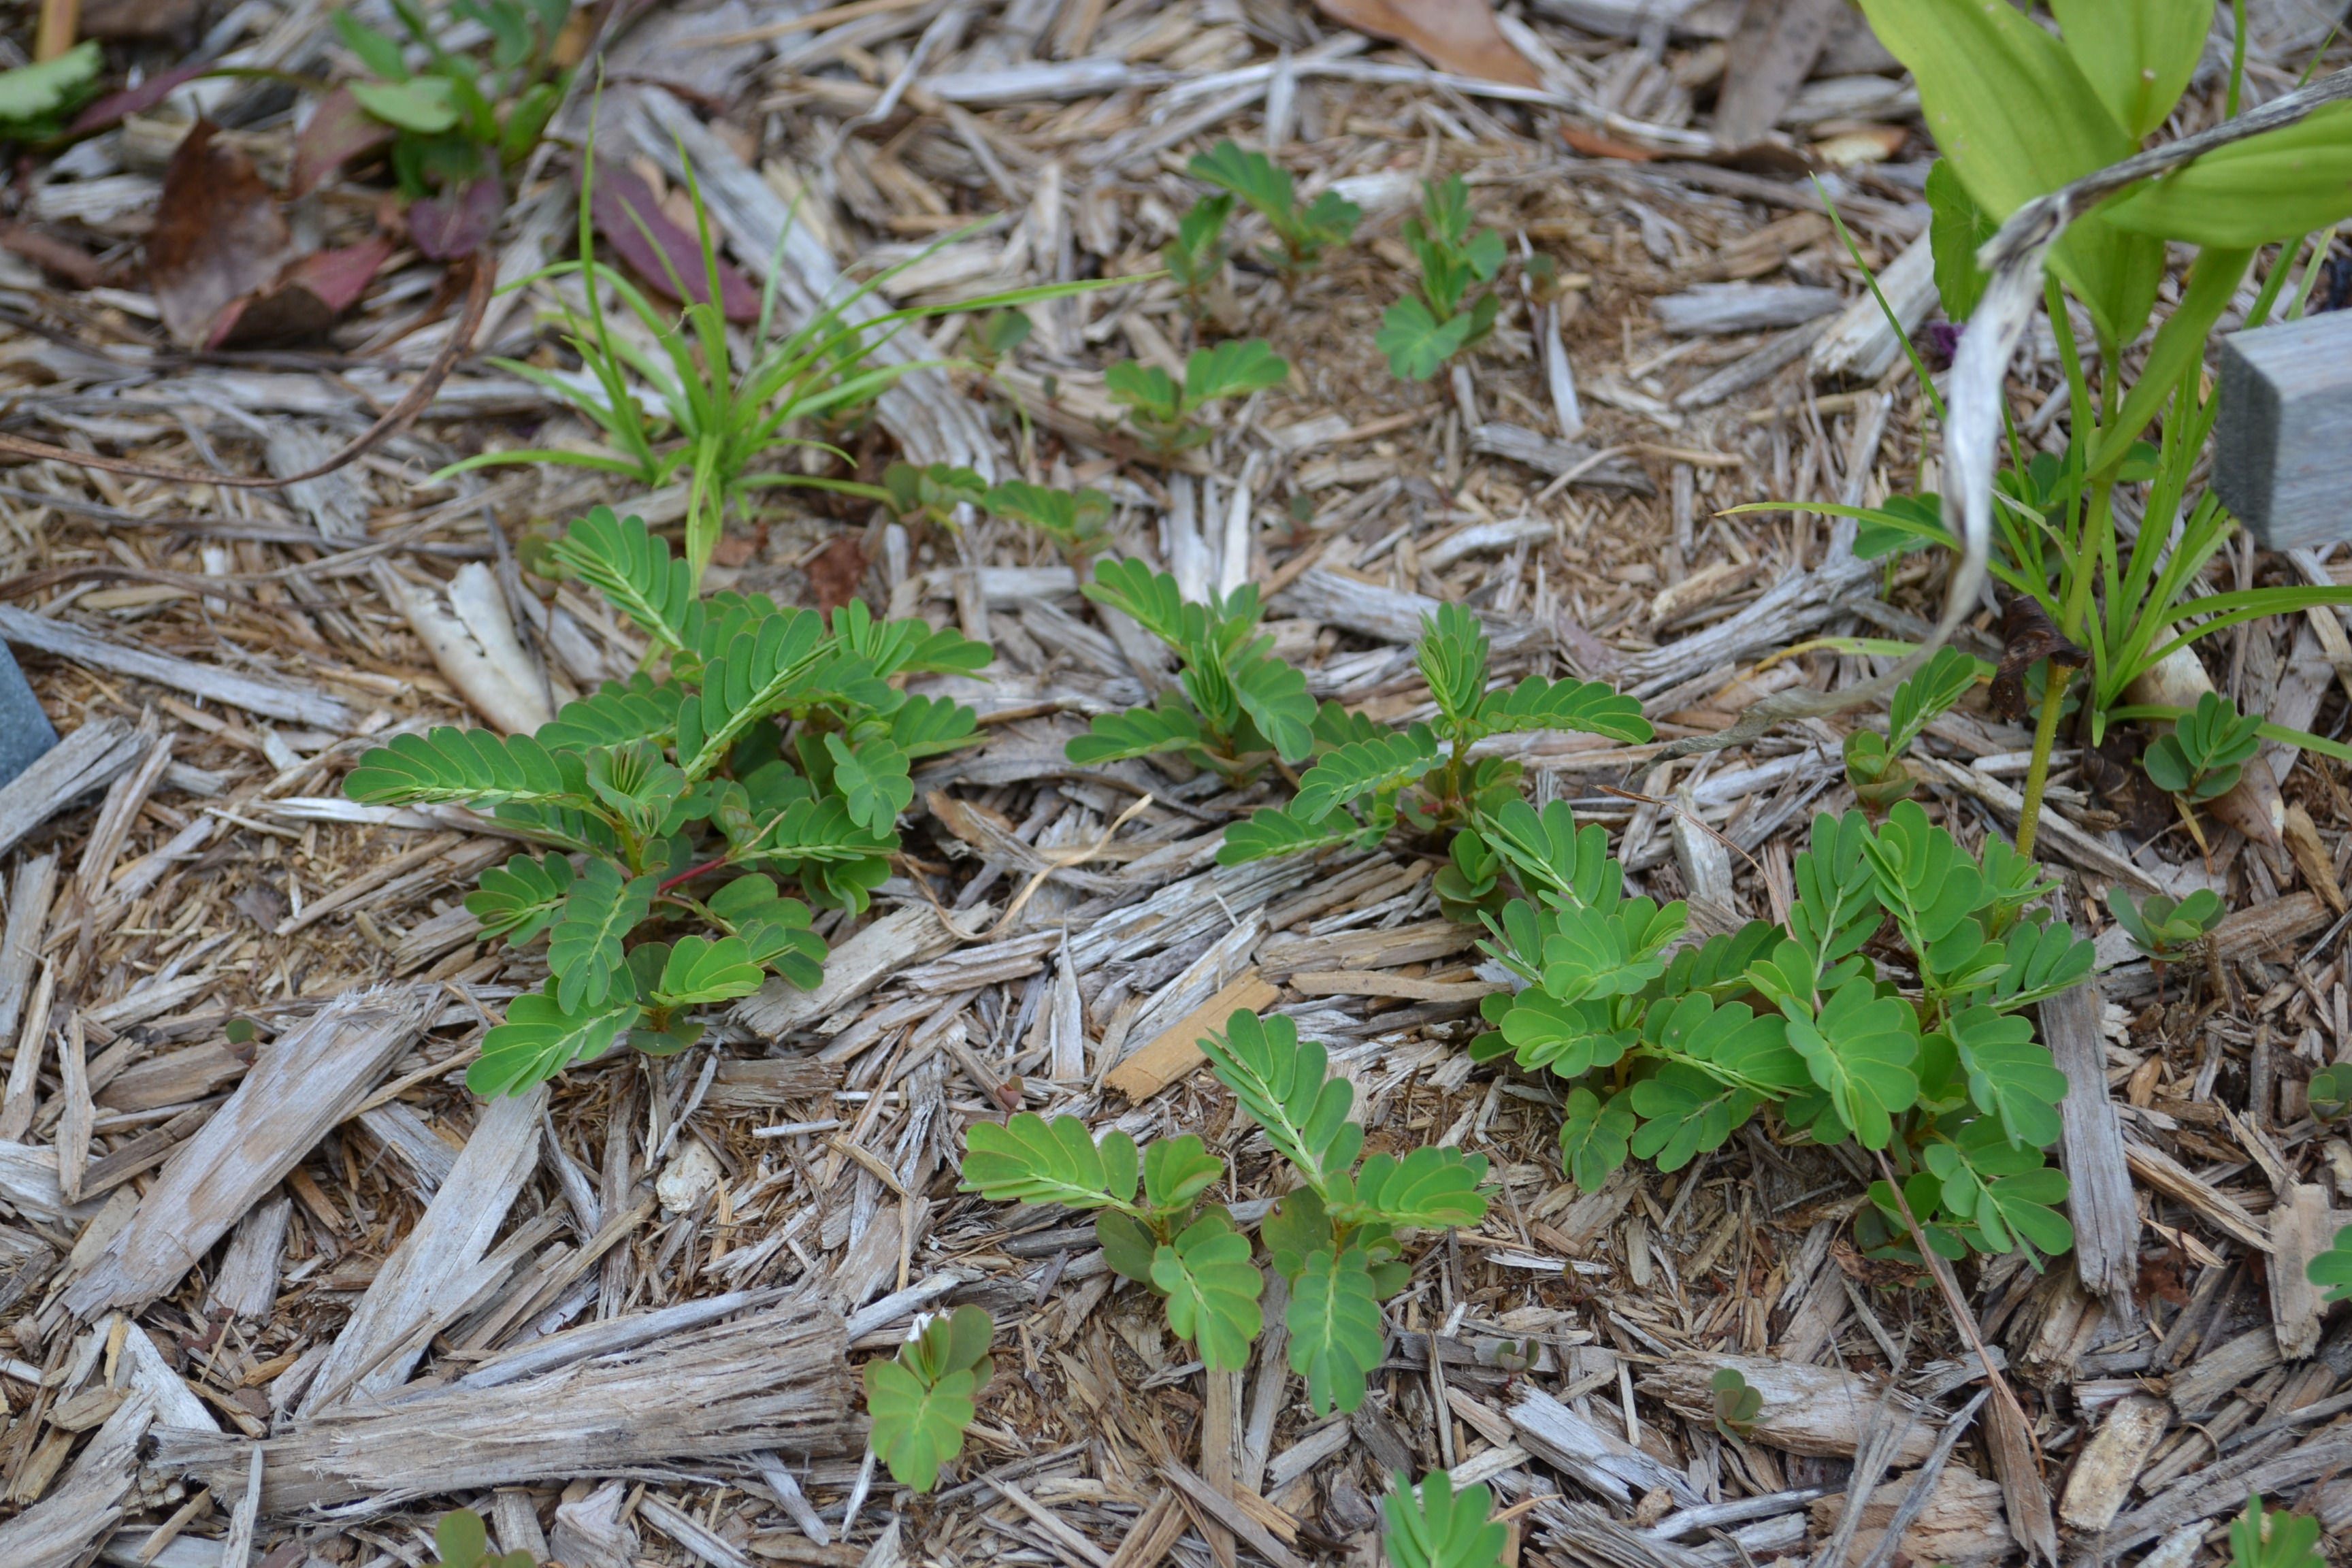
Many of the seeds of common annual weeds are very small. They require exposure to sunlight in addition to the proper temperatures and moisture to germinate. Sunlight is critical, though, and seeds will not germinate without adequate sunlight. If the small seeds are deep in the soil, you will probably never know they are there. When you turn soil or disturb soil such as when installing plants, you bring the small seeds close to the surface and closer to light. They can then be stimulated to germinate. The next thing you know, you have an area covered in weed seedlings.
As mulch thins, small seeds of weeds are stimulated by sunlight to begin growing.
What does this mean for your gardening practices? Try your best to block sunlight from hitting exposed soil. You can do this by keeping a healthy turf, free of thinning spaces. A 2 to 3 inch layer of mulch in plant beds and vegetable gardens will reduce weed seed germination. Finally, when you are installing plants in an established bed, try not to mix soil with surrounding mulch. Seeds will easily germinate within the mulch if it becomes mixed with soil.
It is inevitable that your landscape will have some weeds but a few easy gardening practices can reduce some of your weed frustrations.
For more information:
Gardening Solutions: Weeds and Invasive Plants
Improving Weed Control in Landscape Planting Beds
by Mary Salinas | Sep 9, 2015
You’ve grown some wonderful vegetables, annuals or perennials and you would like to save some of the seed from those plants to have for planting in the future. This is a great way to get more of the plants you know and love while saving on the expense of new plants. One exception are plants that are F1 hybrids; seeds from these plants will produce crops quite dissimilar to the parent.
First, you need to collect ripe seed from the desired plants. How do you know when the seeds are ripe and ready to harvest? The strategies for annuals/perennials and vegetable plants differ.

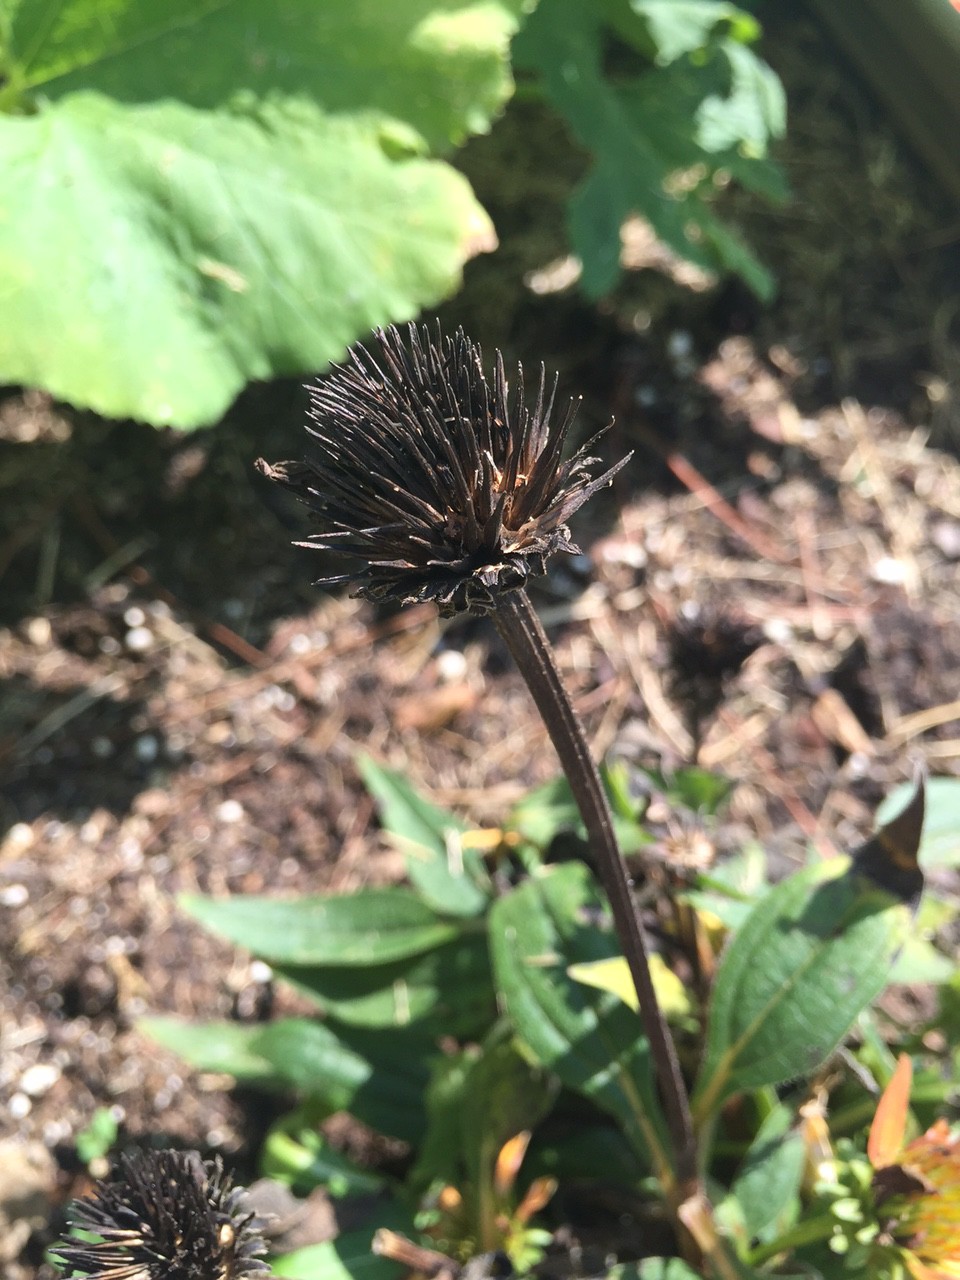
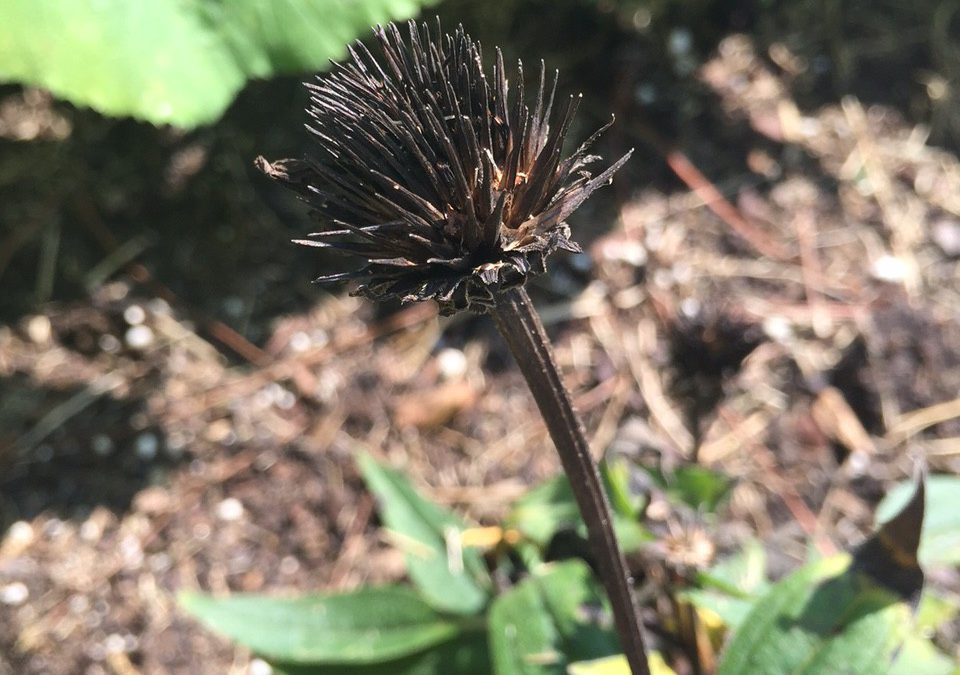
The ripe seedhead of a coneflower. Photo credit: Mary Derrick, UF/IFAS Extension.
For annuals and perennials that flower without making a fruit, wait until the flower has dried up and the seed head is brown and dead-looking. The seeds are then mature and ready to harvest. Take a look at the photo of the coneflower seedhead for reference. These seeds are already dry and can be put into an envelope and then into a sealed jar or plastic stage bag that contains a desiccant to absorb any excess moisture. There are a few options for desiccants: the little packets that come in vitamin bottles and purses to keep them dry, cornmeal or dried milk in bottom of the bag. Be sure to label your envelope with the date and name of your plant seeds. Store in the refrigerator.
When you are saving seed from a vegetable that has seeds inside it such as a tomato, pepper or squash, harvest the vegetable when it is ripe and ready to eat and scoop out the seeds and wash away all other plant parts from the seed. These seeds are very moist and if stored in this state, they will rot into a mess. You want to get the moisture content below about 8% for long term storage. There are several methods:
- If the humidity is low and the temperature high, (I know, those can be rare conditions for Florida) you can put the seeds in a single layer on a baking sheet in the shade to let them dry all day.
- Another option is to take that baking sheet with a single layer of seeds and put it in a 100° oven for 6 hours with the door open. It’s crucial to monitor your oven temperatures as those above 100° will kill the seeds.
Once the seeds are dried sufficiently, store them as described above for flower seeds. Your seeds can then last for several years.
For more information:
Seed Saving from Colorado State Extension
Saving Vegetable Seeds from University of Minnesota Extension