by Mary Salinas | Nov 13, 2017
Cilantro ready for harvest. Photo credit: Howard F. Schwartz, Colorado State University, Bugwood.org
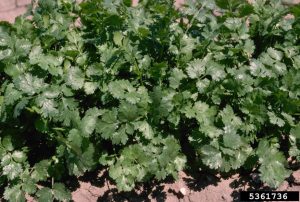
Cilantro (Coriandrum sativum) is a short-lived annual herb with bright green, feathery, flat leaves that look very similar to flat-leaved parsley. Leaves can be harvested at will after they grow to a mature size and then continuously as needed. The flavor of cilantro compliments many Latin American, Indian and Asian dishes and is a great addition to salads. The ripe seeds are known as coriander and used as a spice.
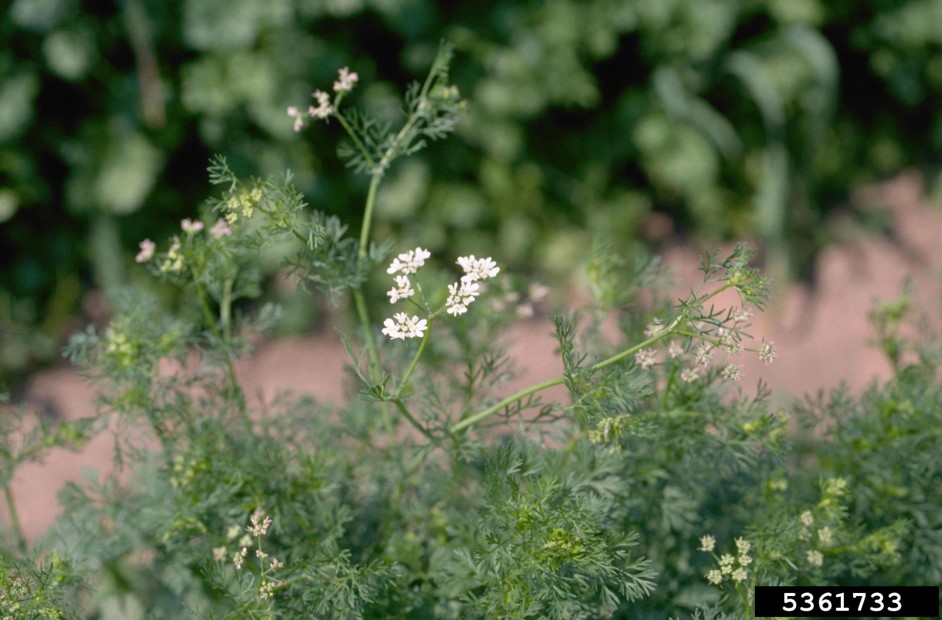
Maybe some of you have grown cilantro, harvested a time or two and then watched in horror as it quickly flowered, went to seed and died. Me, too. This scenario most likely happened in the warm summer months. Hot weather and long days stimulate this annual herb to quickly complete its life cycle. When temperatures increase, it causes plants to bolt which is a sudden switch to producing flowers and seeds, often on tall stalks. After cilantro bolts, the leaves become smaller and less palatable.

Cilantro bolting and blooming. Photo credit: Howard F. Schwartz, Colorado State University, Bugwood.org
The solution is to grow cilantro in the fall and winter. The cooler weather encourages more leafy growth, so you can harvest the leaves for a longer period of time. The warmer weather in the spring will bring flowers, and then seeds to start next autumn’s planting. Collect the seeds and store for planting the following season.
Start cilantro in your garden from seed or transplants. A benefit of growing from seed is that a few seeds can be sown every two weeks to extend your harvest season. Like most herbs, cilantro likes rich, well-drained soils, regular moisture and full or part sun. If the weather is getting warmer, full sun in the morning with some afternoon shade will help keep the herb cooler and less likely to bolt.
For more information:
Herbs in the Florida Garden
Seeding the Garden

by Sheila Dunning | Nov 13, 2017
University of Minnesota Extension
Julie Weisenhorn
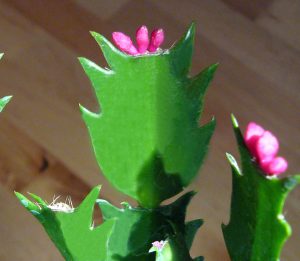
Is your grandmother’s pass along Christmas cactus blooming really early? Do the leaf segments have “teeth” along the edges? Are the “stringy things” sticking out of the flowers yellow in color?
Well, I hate to tell you this, but that is not a Christmas cactus, (Schlumbergera bridgesii). It is a Thanksgiving cactus, (Schlumbergera truncata). You can tell the Thanksgiving cactus apart from the Christmas cactus by the shape of the leaves and flower anthers. The leaves, botanically referred to as phylloclades, are serrated on the Thanksgiving cactus. Additionally, the pollen-bearing anthers in Thanksgiving cactus flowers are yellow. Christmas cactus have smooth-edged leaves and pinkish-purple anthers.
Both of these species are native to the coastal mountains of south-eastern Brazil, where they are found growing in trees or on rocks. Therefore, the preferred potting media for Thanksgiving and Christmas cacti should contain about 40% perlite to ensure good drainage and aeration.
To care for your Thanksgiving cactus, allow the soil to dry out when it is not blooming. As flower buds develop, the soil should be moist to the touch. However, overwatering can kill the plant. Additionally, provide plenty of indirect light and temperatures of 60-65 degrees F.
Want to get last year’s plant to bloom again? Beginning in mid-September, it will need 12-14 hours of total darkness along with cool (60-65 degrees F) nighttime temperatures for 3-4 weeks. To achieve the light control the cactus can be placed in a closet or covered with a large brown paper bag overnight. Once buds start to form, fertilizer can be applied to encourage growth and blooms. However, flower buds will fall off with any significant changes in temperature (below 50 degrees F), light or watering.
Now, if your “Christmas cactus” doesn’t set flowers until spring, it is probably an Easter cactus, a totally different species (Rhipsalidopsis gaetner). The leaf margins of Easter cactus have small bristles and are more three-dimensional with a thick ridge on one side. Additionally, the flower are more star-shaped than the other two cacti. All three cacti species have flowers that come in a range of colors including variations of red, pink, peach, purple, orange or white.

by Molly Jameson | Nov 13, 2017
Take lessons from a farmer to control fire ants in your garden. Photo by Molly Jameson.
As I near the three-year mark of being an Extension Agent, I think about how fortunate I am to have a career that not only encourages me to meet all our local farmers, but also to learn from them and share their knowledge with the community.
A few months ago, I visited Blake Canter of Owen River Farm. Blake gave me the grand tour of his small mixed vegetable plot, which is in far east Tallahassee.
One thing that I remember most about my visit with Blake was what has worked for him in controlling the notorious red imported fire ant (Solenopsis invicta). I have heard of many different ways to control these non-native invaders, each with its drawbacks, and, it seems, anecdotally limited success.
For instance, spinosad, a nervous system toxin, has been known to be effective on fire ant populations and is considered safe to use in vegetable gardens. But in practice, I have heard mixed reviews. In my home garden, I either douse the mounds with boiling water (be careful!) or leave my garden hose in the hot sun and scorch them while the water is still hot. But often, I signal defeat, letting them take captive of two corners of my raised beds.
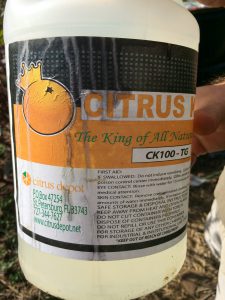
Blake at Owen River Farm makes his fire ant control mixture by combining commercial grade d-Limonene and a hefty squirt of eco-friendly dish soap into five gallons of water. Photo by Molly Jameson.
Blake’s technique on Owen River Farm is using commercial grade d-Limonene, which is a distilled orange oil nerve toxin. Blake mixes one-third cup of d-Limonene with a hefty squirt of eco-friendly dish soap in a five-gallon bucket of water. He then uses this mixture as a drench for fire ant mounds – which he figures is about as effective as boiling water – but much safer and easier to handle (be sure to follow the label carefully when using any product).
Blake goes out early in the morning (when fire ants move slower and queens are usually higher in their nests) and pours the mixture onto the mounds in a spiral formation, from outside in, to minimize escape. He tries to collapse the mound as much as possible, while pouring slowly so it penetrates deeply, with minimal runoff.
Depending on colony size, Blake uses about half the bucket, or more, on just one mound. He warns that he has lost a cucumber plant that was about a foot away to this method, but he knows the ants will often do even more damage, if not sting and bite (they do both!) him hundreds of times, as he works in his vegetable beds.
Blake likes this method because, “I can specifically target the fire ants, and after doing its job, the all-natural orange oil quickly becomes inert. When I used organic ant bait I found that the native ants took up the poison, often times faster than the fire ants. This was particularly bad because native ants are the number one competition for fire ants.”
Blake also points out, “Make sure anyone you recommend this to can identify the difference between fire ant mounds with no center opening to the mound, and native ant mounds, where there is usually an entrance hole in the center of the mound.”
The hardest part, Blake says, is finding the queens. For instance, he says ants often make auxiliary mounds at the base of okra plants, but this is not where the queen resides. The queen will often be in a central mound many yards away from where her workers are foraging. And, unfortunately, these worker ants love easily habitable soft soil, just like in our raised bed vegetable gardens.
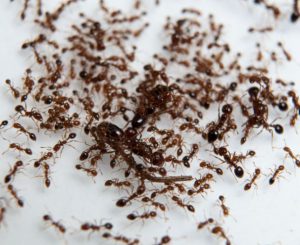
Fire ants in a petri dish. Photo by UF/IFAS.
Despite these challenges, last fall Blake drenched colonies whenever he found a mound around his farm (sometimes daily), and after a few weeks he noticed a drastic reduction in fire ant populations. And happily, an increased population of harmless (and even helpful!) native black ants. His brassica (think kale, collards, broccoli, cabbages) transplants were no longer getting girdled by vicious fire ants and he was no longer ending up with dozens of ant bites every time he worked in his beds!
Blake does warn that you must stay vigilant, especially in the summer and fall and after rain events, when the ants become busy building new colonies.
Lastly, Blake also uses his orange oil mixture as a spray for contact killing ants and other garden pests. However, just as with all horticultural oils and soaps (often made from plant oils, animal fats, or petroleum), care must be taken not to burn the foliage of your crops. Blake will sometimes dilute his mixture for this purpose. But just remember, to really stop an ant infestation, you must take down the queen!
For more information on least-toxic garden pest control strategies, read the UF/IFAS EDIS publication “Natural Products for Managing Landscape and Garden Pests in Florida” available at: https://edis.ifas.ufl.edu/in197.
by Gary Knox | Nov 6, 2017
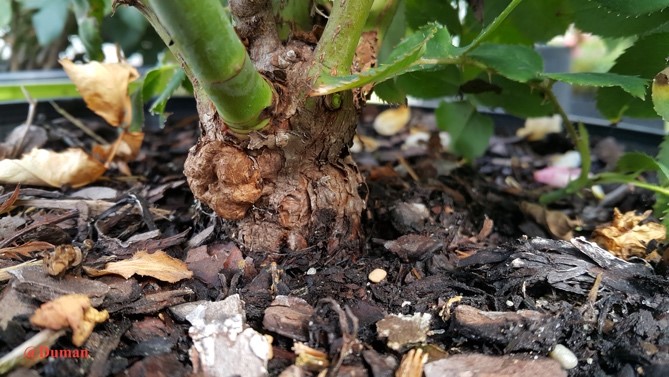
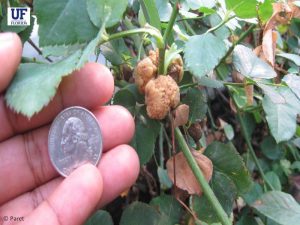
Crown gall symptoms on roses caused by the bacterium Agrobacterium tumefaciens (Rhizobium radiobacter) – Photo credits: Kamil Duman

A plant with a mature gall that is potentially releasing the crown gall bacterium into the potting media. Photo credits: Susannah Wright
For gardeners, rose enthusiasts and rosarians, each of the many rose diseases is as important as the others. But we can say for sure Crown Gall is one of the most unsightly of the many rose diseases that can been seen currently.
The disease got this name from the large tumor-like swellings (galls) that typically occur at the crown of the plant, just above the soil level. The cause of crown gall disease is a bacterium that resides in the soil, Agrobacterium tumefaciens (updated scientific name Rhizobium radiobacter).
SYMPTOMS
Galls or overgrowth (1/4 inch to several inches in diameter) of host plant tissue typically form at the soil line but also can form on branches or roots. Galls are initially white, spherical, and soft but darken with age as outer cells die. It can either be almost entirely on the surface of the plant and easily detached or can be almost indistinguishable from normal plant tissue except for its greatly enlarged appearance.
The bacterium that causes Crown Gall disease survives and persists in the soil for up to 3 years. It can invade recent wounds on the branches or roots. Swelling can be seen as early as 14 days following entry of the bacterium into the plant. The tissue near the gall can be crushed due to rapid cell enlargement. If vascular tissue is crushed, wilting can result from the restricted water movement.
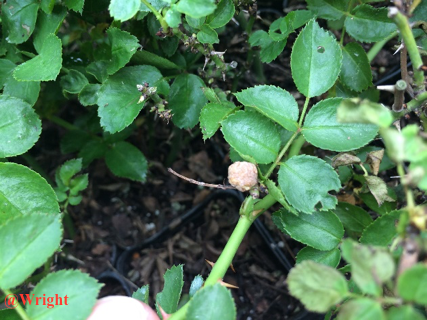
Early stage symptom of Crown Gall on roses can be noticed as the small white galls. Photo credits: Susannah Wright
The galls can enlarge to a quarter size in a short period of time from the initial small galls. Photo credits: Mathews Paret
ABOUT THE BACTERIUM
Agrobacterium uses its genes as a weapon to attack plants. It enters the plant mostly from the soil through wounds on the roots or lower stem or from the branches during plant pruning. Symptoms are caused by the insertion of a small segment of DNA (known as the T-DNA), from a plasmid, into the host plant cell, which is incorporated into the plant genome. When the plasmid links up with the plants own DNA, the altered plant cells start dividing rapidly and uncontrollably, and the root or stem develops a tumor-like swelling.
Galls can range from pea size to softball size. Tiny cracks from freezing temperatures or wound sites can be the site of gall formation. Once the wound compounds are generated, the bacteria detach from the xylem cell walls and are carried upward with water during evapotranspiration to the wound site where they initiate galls. One of the common ways of the spread of the disease is by pruning infected plants and moving the bacterium accidentally while pruning nearby healthy plants.
The crown gall bacterium is a soil pathogen, which means main inoculum source is soil. The bacterium can overwinter in infested soils, where it can live as a saprophyte for several years. The bacterium can easily during field preparation, pruning and irrigation. Insects, nematodes and grafting materials, can also transfer the bacterium.
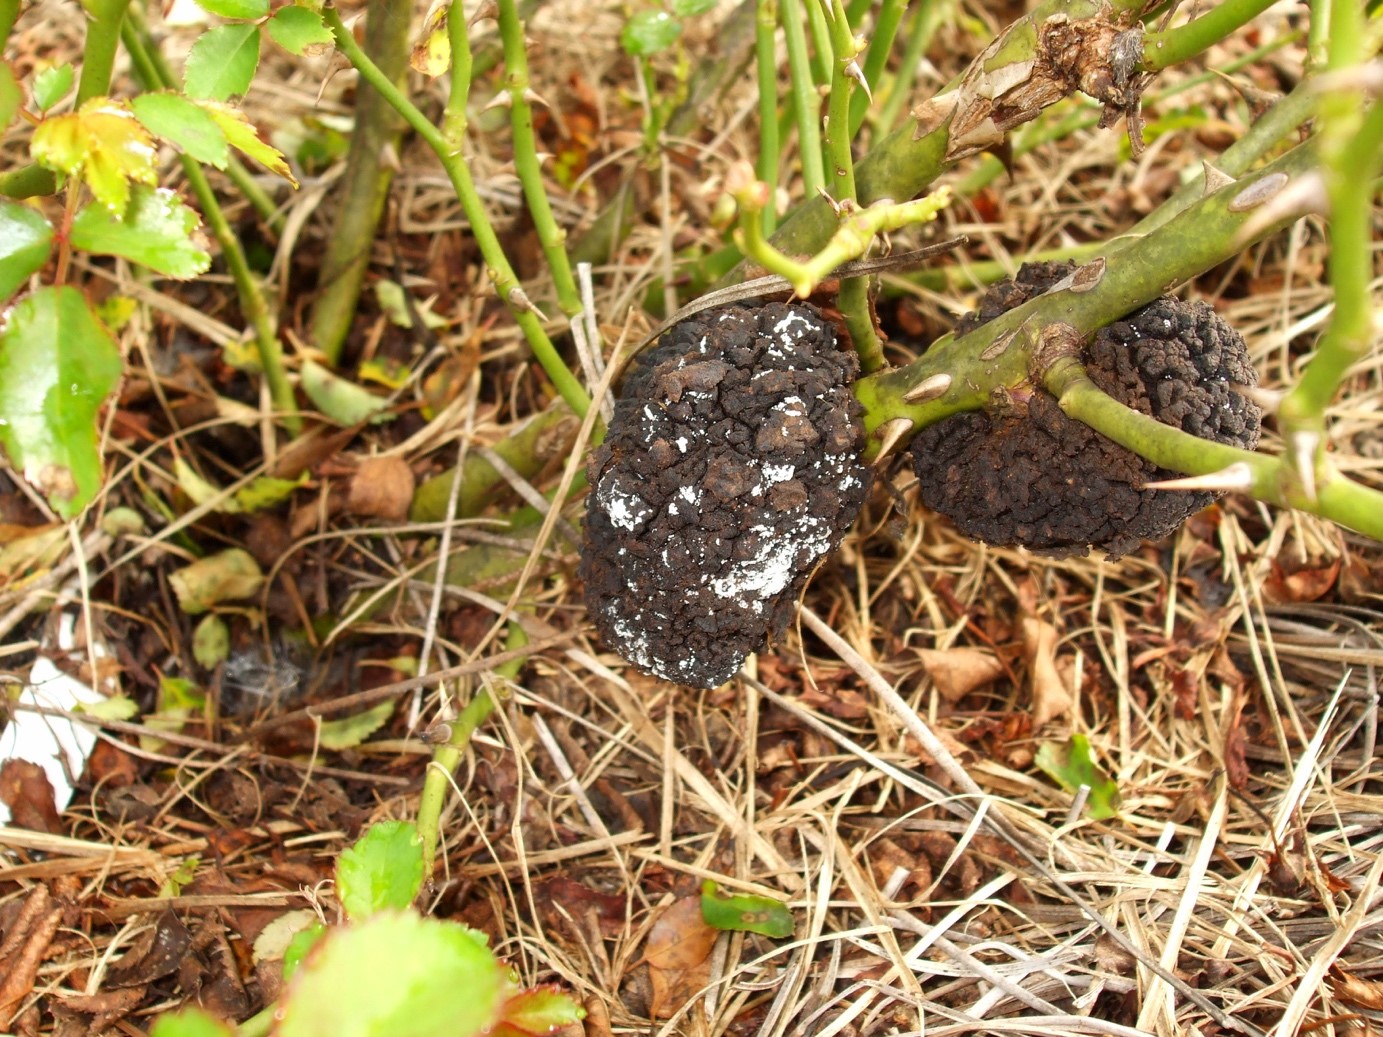
The galls will turn dark in color as they age. Photo credits: Kamil Duman
HOW CAN YOU MANAGE ROSE CROWN GALL DISEASE
- Plant only disease-free roses. Check very carefully before you buy plants for any kind of galls in the crown or branches. Use good sanitation practices in handling roses.
- Plant in clean soil. Avoid areas with a history of crown gall infestation.
- Avoid fields with heavy infestations of root-attacking insects and nematodes.
- Select well-drained soil and irrigate from clean water sources.
- Keep grafts and buds well above the soil line.
- Destroy diseased plants as soon as you notice them to avoid cross-contaminating other plants, or pruning equipment. Also, do not keep infected plants with healthy plants, as the likelihood of accidental transmission through pruning is high.
- Avoid mechanical injury to plants from tillage and hoeing. Provide winter protection so that the bark does not crack.
- Disinfect pruning tools between plants. disinfect budding/grafting tools before and after use. Bleach (10%; equivalent to 0.6% sodium hypochlorite), or quaternary ammonium-based sanitizer are effective as disinfectants. Make sure to prepare fresh stock routinely.
- If crown gall plants are noted, please let your local county extension agent know about it and they will be able to contact us for additional site-specific management plans if needed.

Gall formation at pruning sites indicating contamination of the plant during pruning. Photo credits: Kamil Duman
Authors: Kamil Duman, Susannah Wright, Fanny Iriarte, Barron Riddle, Gary Knox and Mathews Paret, University of Florida – NFREC, Quincy, FL

by Larry Williams | Nov 6, 2017
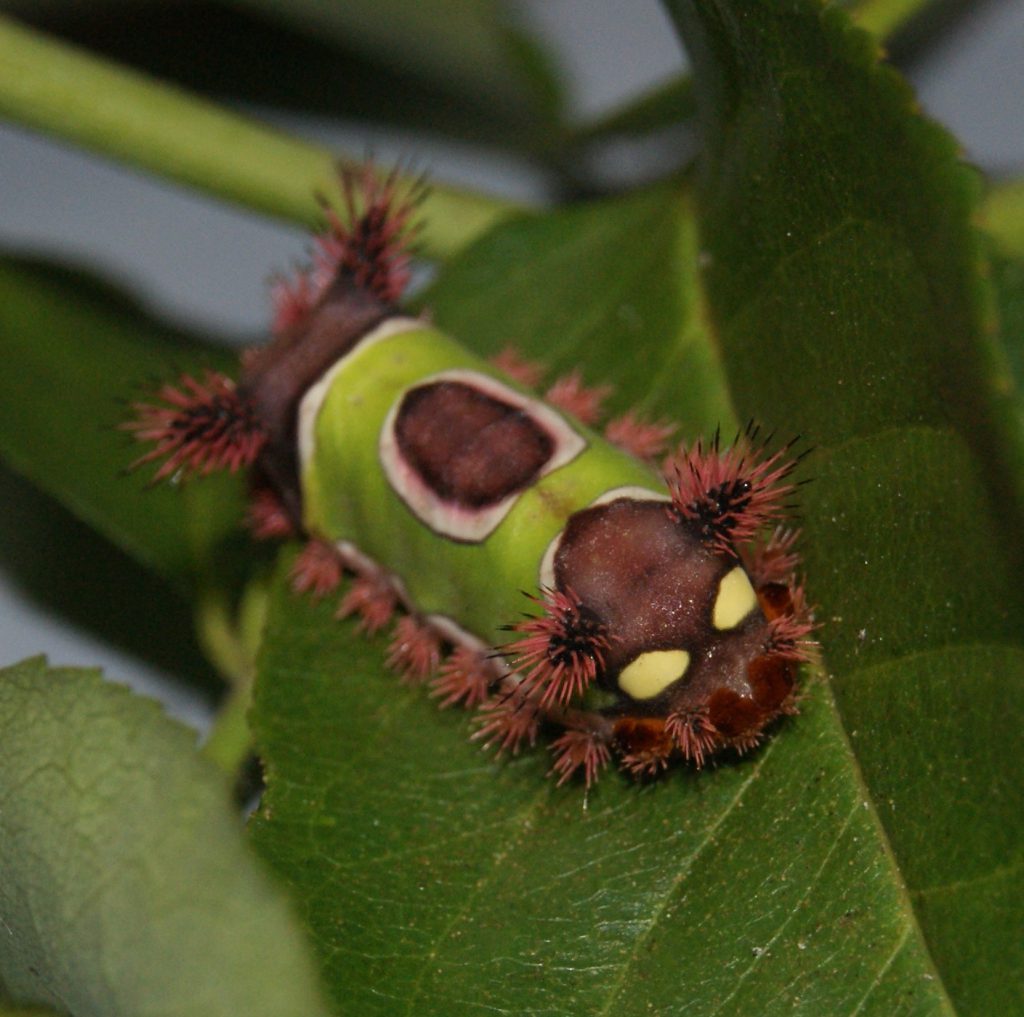
Saddleback Caterpillar. Image Credit: Matthew Orwat UF / IFAS
Did you know we have caterpillars that sting here in Northwest Florida? Well, we do and you’d be wise to learn about them and how to recognize them.
These caterpillars do not sting in the same way that a wasp or bee might sting. They do not have “stingers.” But they do have spines, also called nettling hairs, which are connected to poison glands that can inflict a painful reaction if touched.
The four nettling caterpillars that you are more likely to encounter in Florida are the hag caterpillar, Io moth caterpillar, puss caterpillar and saddleback caterpillar. Those that you are less likely to come in contact with include the buck moth caterpillar, flannel moth caterpillar, spiny oak-slug caterpillar and tussock moth caterpillar.
The “sting” is unintentional, not deliberate. When brushed against or touched, the toxin-bearing spines break off, releasing toxins. In some cases, broken spines pierce the skin. In other cases, toxins leak out onto the surface of the skin.
A University of Florida-IFAS Extension publication about these caterpillars states, “Some people experience severe reactions to the poison released by the spines and require medical attention. Others experience only an itching or burning sensation.”
The kind of reaction can depend on the type of caterpillar, extent of contact and susceptibility of individual. Fortunately, most of these caterpillars spend most of their time high up in trees away from us. But they can blow out of the trees during windy weather or come down still attached to branches and limbs that fall.
The saddleback caterpillar is more likely to be encountered because it feeds on many of our common landscape plants such as hibiscus and palms. But it is also known to feed on azaleas, fruit trees and even canna lilies. The saddleback caterpillar is striking in appearance with what looks like a bright green “blanket” draped over its back and a brown saddle-shaped oval area in the center of the blanket. Its spines are colorful, sharp and protrude from the front, back and sides of the caterpillar. It is stout and 1 to 1.5 inches long.
I’ve received questions about the puss caterpillar recently from people who have encountered it. This caterpillar is stout-bodied, almost 1 inch long and completely covered with gray to brown soft hairs. They seem to prefer leaves of oaks and citrus but they will feed on a variety of broadleaf trees and shrubs,
Because of their bright colors and interesting appearance, children may be tempted to touch or pick up some of these stinging caterpillars.
More information on these caterpillars is available at these websites:
http://edis.ifas.ufl.edu/pdffiles/IN/IN01400.pdf
http://www.poisoncentertampa.org/poison-topics/venomous-critters/caterpillars