by Matt Lollar | Oct 8, 2019
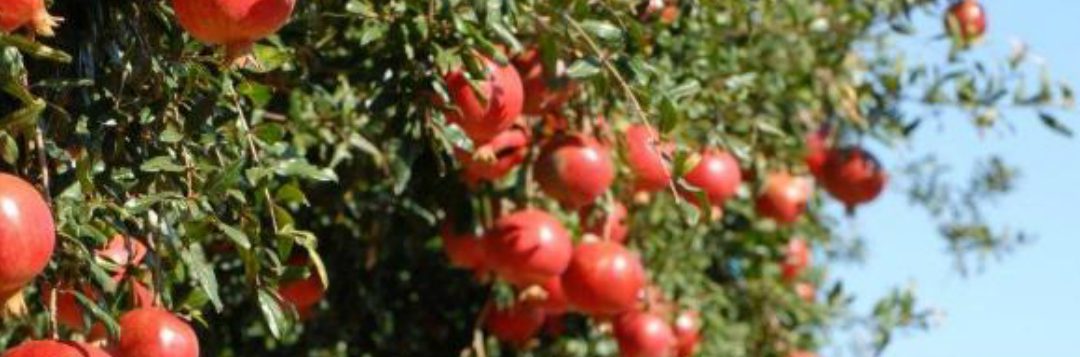
Last week at the Panhandle Fruit and Vegetable Conference, Dr. Ali Sarkhosh presented on growing pomegranate in Florida. The pomegranate (Punica granatum) is native to central Asia. The fruit made its way to North America in the 16th century. Given their origin, it makes sense that fruit quality is best in regions with cool winters and hot, dry summers (Mediterranean climate). In the United States, the majority of pomegranates are grown in California. However, the University of Florida, with the help of Dr. Sarkhosh, is conducting research trials to find out which varieties do best in our state.
In the wild, pomegranate plants are dense, bushy shrubs growing between 6-12 feet tall with thorny branches. In the garden, they can be trained as small single trunk trees from 12-20 feet tall or as slightly shorter multi-trunk (3 to 5 trunks) trees. Pomegranate plants have beautiful flowers and can be utilized as ornamentals that also bear fruit. In fact, there are a number of varieties on the market for their aesthetics alone. Pomegranate leaves are glossy, dark green, and small. Blooms range from orange to red (about 2 inches in diameter) with crinkled petals and lots of stamens. The fruit can be yellow, deep red, or any color in between depending on variety. The fruit are round with a diameter from 2 to 5 inches.
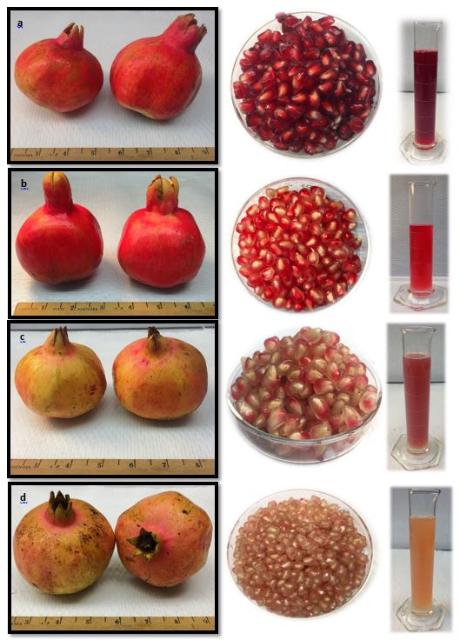
Fruit, aril, and juice characteristics of four pomegranate cultivars grown in Florida; fruit harvested in August 2018. a) ‘Vkusnyi’, b) ‘Crab’, c) ‘Mack Glass’, d) ‘Ever Sweet’. Photo Credit: Ali Sarkhosh, University of Florida/IFAS
A common commercial variety, ‘Wonderful’, is widely grown in California but does not perform well in Florida’s hot and humid climate. Cultivars that have performed well in Florida include: ‘Vkusnyi’; ‘Crab’; ‘Mack Glass’; and ‘Ever Sweet’. Pomegranates are adapted to many soil types from sands to clays, however yields are lower on sandy soils and fruit color is poor on clay soils. They produce best on well-drained soils with a pH range from 5.5 to 7.0. The plants should be irrigated every 7 to 10 days if a significant rain event doesn’t occur. Flavor and fruit quality are increased when irrigation is gradually reduced during fruit maturation. Pomegranates are tolerant of some flooding, but sudden changes to irrigation amounts or timing may cause fruit to split.

Two pomegranate training systems: single trunk on the left and multi-trunk on the right. Photo Credit: Ali Sarkhosh, University of Florida/IFAS
Pomegranates establish best when planted in late winter or early spring (February – March). If you plan to grow them as a hedge (shrub form), space plants 6 to 9 feet apart to allow for suckers to fill the void between plants. If you plan to plant a single tree or a few trees then space the plants at least 15 feet apart. If a tree form is desired, then suckers will need to be removed frequently. Some fruit will need to be thinned each year to reduce the chances of branches breaking from heavy fruit weight.
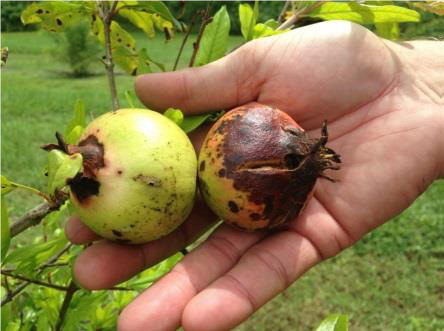
Anthracnose caused by Colletotrichum sp. to pomegranate fruit. Photo Credit: Gary Vallad, University of Florida/IFAS
Anthracnose is the most common disease of pomegranates. Symptoms include small, circular, reddish-brown spots (0.25 inch diameter) on leaves, stems, flowers, and fruit. Copper fungicide applications can greatly reduce disease damage. Common insects include scales and mites. Sulfur dust can be used for mite control and horticultural oil can be used to control scales.

by Ray Bodrey | Mar 20, 2017
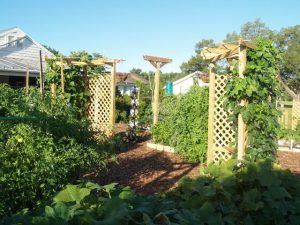
Figure 1: Edible Landscaping.
Credit: Dr. Gail Hansen, Environmental Horticulture-UF/IFAS
Edible landscaping has become a trend for many gardening enthusiasts. A combination of edible plants along with traditional ornamentals can create an artful presentation. There are some challenges when designing such a landscape, but in those challenges opportunities’ may be found. One of the most difficult challenges is making sure your garden or landscape is healthy and vibrant year-round since many edibles are short-lived annuals. These include plants such as eggplant, pepper, lettuce, artichoke and some annual herbs. There is a solution to this concern. First, know your edible plant’s propagation and maturity months. This way you can offset plantings to ensure color in your landscape. Another key measure is to mix some evergreen ornamentals in with short season edibles and long season edibles. Examples of long season edibles include berry shrubs, fruit trees and biennial or perennial herbs.

Table 1: North/Central Florida Front Yard Edibles.
Credit: Dr. Gail Hansen, Environmental Horticulture-UF/IFAS.
When designing your edible landscape, think about style and theme to help guide you through the process. A formal design has more straight edges and geometric shapes, whereas the more natural approach has meandering edges and irregular shapes. A color scheme in harmony is very important. Remember, an edible landscape should not just be a production food garden but a visual treat. The goal is not to grow a high yield garden, but only to produce supplemental edibles to make the endeavor worthwhile.
Dr. Gail Hansen, Associate Professor of Environmental Horticulture at the University of Florida, has developed twelve ideas when creating an edible landscape:
- Combine reliable, low-maintenance ornamental with edible plants. Use evergreen ornamentals to maintain enough green structure, so that potential cool season bare spots are not visual.
- Use support structures for an artistic effect and to assist in growth of some plants. Trellises, arbors and even tomato cages are some examples that can be used.
- Use containers in areas to keep the landscape more organized. Planters will also help in maintenance, as plants will be easier to reach and the soil will be easier to manage.
- Create some hard edges in your landscape. Raised beds, garden walls and borders will give defining lines to the landscape and promote a clean appearance.
- A pathway through the landscape will both provide an access to plants and give an inviting appeal. Brick pavers, gravel and mulch are good examples of pathway material.
- Remember color is key. Create a visually pleasing combination of plant color, form, texture and sizes.
- Always start by keeping it simple. So, start small and simple. Then, you can begin filling in the landscape.
- Look for one unique feature to create an added interest to you landscape and provide growth to plants. This could be a shade house for ferns and other hanging baskets or a hay bale, where lettuce, tomatoes or peppers could grow upon.
- Select appealing and easy to grow plants that you want to eat!
- Let plants reach maturity before taking them out of the landscape. For example, rainbow chard will grow larger, if allowed to continue to grow after seed has been produced.
- Use the Florida-Friendly Landscaping principle, “Right Plant, Right Place”, when adding edibles to your landscape. Match the growing needs with the most suitable location.
- Consider your location and layout for irrigation. All plants need some degree of water. An above ground drip irrigation system is usually the most flexible and adjustable irrigation method in regards to overall plant watering needs in a landscape.
Following Dr. Hansen’s ideas will help you create the edible landscape of your dreams. For more information on edible landscaping, please contact your local county extension office for more details.
Supporting information for this article can be found in the UF/IFAS EDIS Publications, “Landscape Design with Edibles” by Dr. Gail Hansen: http://edis.ifas.ufl.edu/pdffiles/EP/EP47500.pdf
UF/IFAS Extension is an Equal Opportunity Institution.
by Roy Carter | Jun 10, 2014
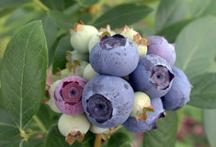
Blueberry. Photo credit: Eric Zamora, UF IFAS.
Blueberries are native to Eastern North America. They are one of the few crop plants that originated here. The rabbiteye blueberry occurs mostly in certain river valleys in Northern Florida and Southeastern Georgia. The high bush blueberry is native to the eastern third of the United States and Southeastern Canada. Florida is rich in other native species. The woods and swamps of Florida are populated with at least eight wild blueberry species. No area of the state lacks wild blueberries, except where soil pH is above 6.0.
The two types of blueberries grown in Florida are Southern highbush and rabbiteye. The earliest ripening southern highbush varieties ripen about 4 to 6 weeks earlier than the earliest rabbiteye varieties grown at the same location.
Some rabbiteye varieties recommended for our area are: Alice blue, Beckyblue, Climax, Bonita, Brightwell, Chaucer and Tifblue. Some recommended Southern Highbush varieties are: Blue Crisp, Gulf Coast, Jewel, Sharpblue, Santa Fe, Star and Misty.
Blueberries need a fairly acid soil; a pH range of 4 to 5 is suggested. Blueberries grown on alkaline or deep sands will grow poorly. If you need to lower the soil pH before planting, mix in some acidic peat moss.
Blueberries have a shallow, fibrous root system. That means plants should be placed in the ground about an inch deeper than they were growing in the nursery. Rabbiteye blueberries grow poorly in soils with excessive drainage. But they won’t tolerate too much moisture for long periods of time either.
Blueberries are very sensitive to fertilizers. During the first growing season, no mineral fertilizer should be added at all. In the second season, apply about two ounces of an acidic fertilizer per plant. Blueberries can use the same fertilizer as camellias and azaleas, but be careful not to overdo it. Excessive amounts of fertilizer will kill the plants.
Before planting blueberries, you should cultivate the soil by plowing or roto tilling to a depth of at least six inches. Dig a hole large enough so that the roots won’t be crowded. Lightly pack the soil around the roots and water thoroughly. Keep in mind that newly set plants need a good water supply.
Bare-root bushes should be transplanted during the winter months; container grown bushes can be transplanted anytime. The first year after planting, the blossoms should be removed to help the bush grow more quickly.
Pruning is an important part of blueberry culture. It promotes the growth of strong wood, and rids the tree of weak twiggy growth. The strong wood growth is necessary for good fruit production.
Believe it or not, the worst pests of blueberries are birds. You need to protect your bushes with some kind of netting, or employ the old fashioned scarecrow to do the job. It you don’t protect your bushes, you can count on the birds getting to the fruit before you do.
Other than birds, rabbiteye blueberries have few pest or disease problems. Powdery mildew can occur on bushes that don’t get full sun, but this problem can be easily controlled with a sulfur spray. Bud mites, thrips, fruitworms, and defoliating insects can sometimes be a problem.
Weeds will compete with young blueberry bushes for nutrients and water, so keep the beds as free of weeds as possible. Mulches are good for controlling weed growth. If necessary, there are herbicides available.
For more information please see:
Blueberry Gardener’s Guide

