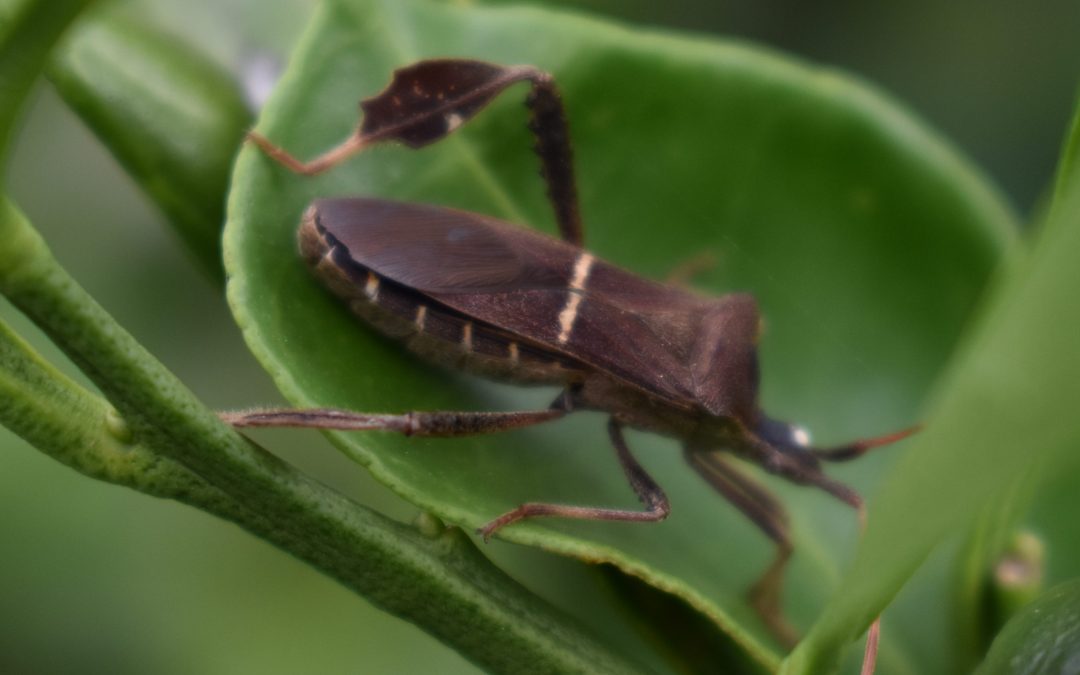
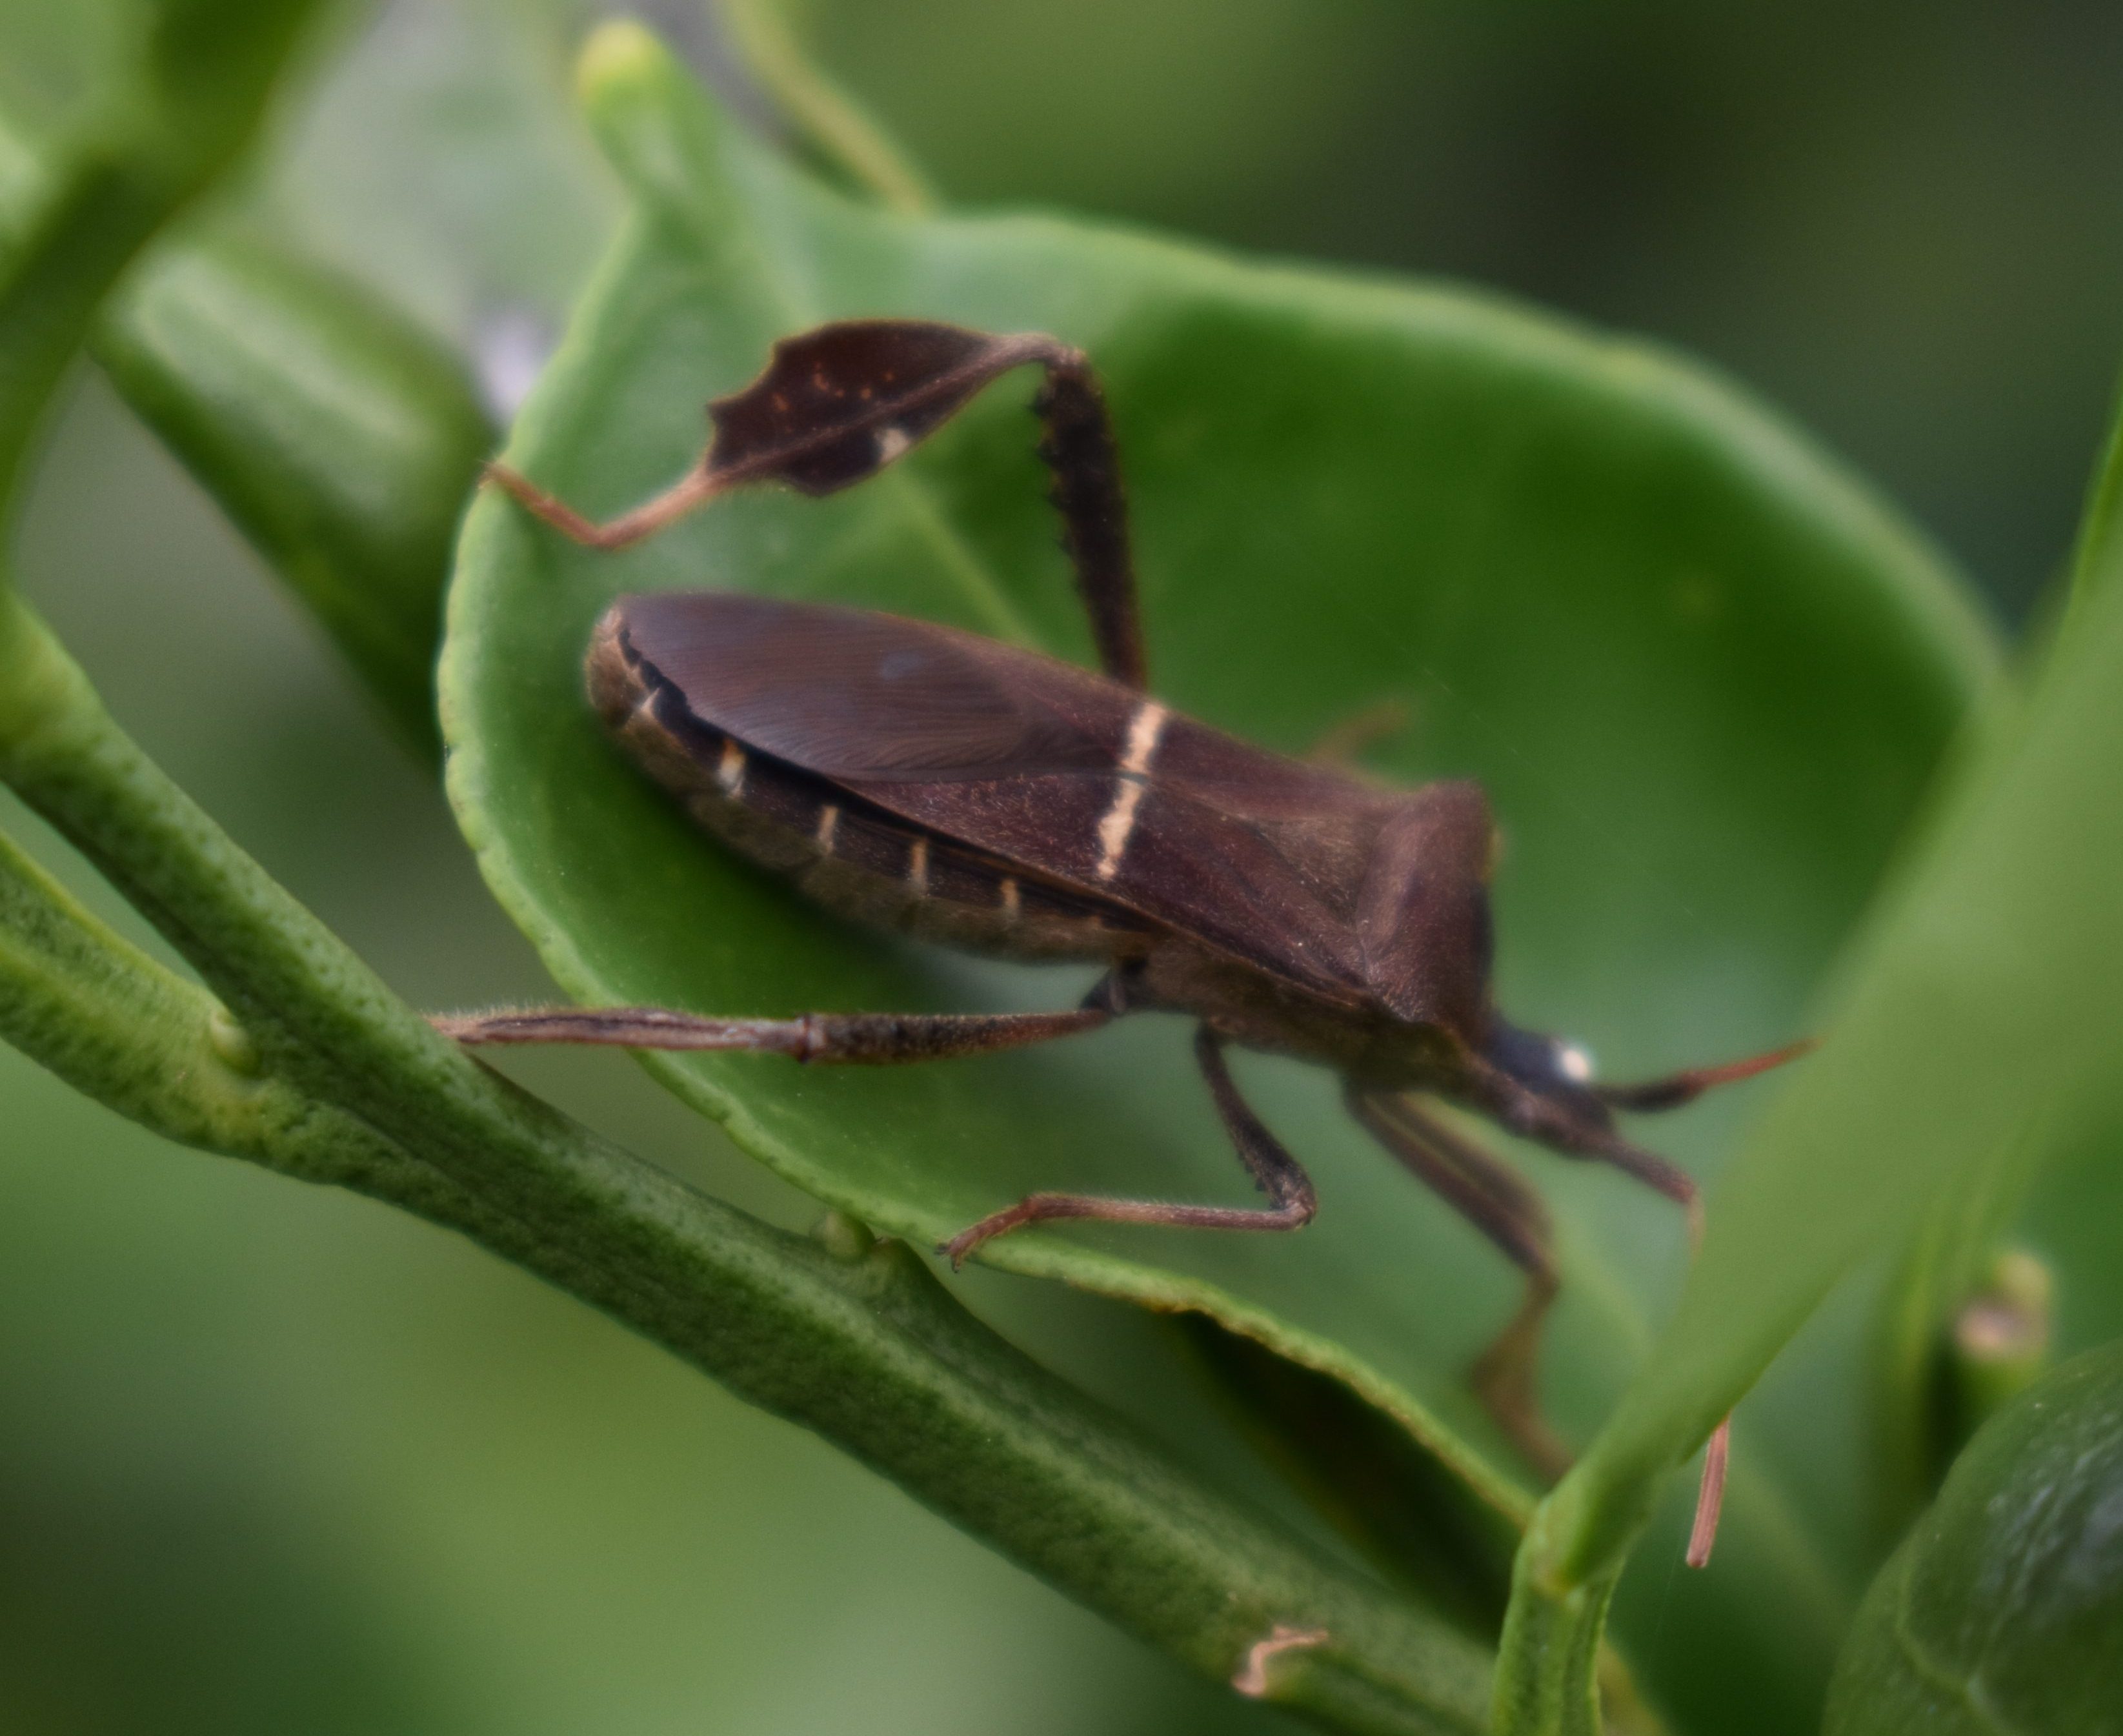
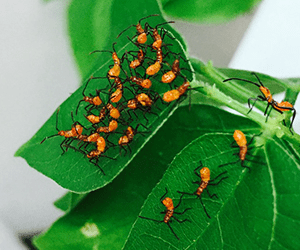
Florida is home to at least nine species of insects from the genus Leptoglossus, some of which possess “foliaceous hind tibiae,” but only Leptoglossus phyllopus has earned the common name “leaf-footed bug.” This insect, a close relative of the stink bug, plays a fascinating yet problematic role in gardens. The nymphs are bright orange, while the adults are brown with a distinct flattened, leaf-shaped structure on their hind legs. Unfortunately, both stages of the leaf-footed bug are notorious pests, causing significant damage to buds, flowers, fruits, and seeds.
Photo Credit: Jennifer Carr
These pests feed on a wide variety of plants, including tomatoes, peaches, blueberries, beans, okra, and sunflowers. Their feeding activity can cause yellow and brown spots, misshapen fruits, and shriveled produce, depending on the severity and timing of the infestation.
In the fall, leaf-footed bugs can gather on warm windowsills or home siding. They can sometimes find openings in homes and get inside, but they don’t cause any damage indoors and don’t deposit eggs. Adult leaf-footed bugs also seek shelter in weedy areas or beneath layers of mulch and debris. They lay their eggs in neat rows on the undersides of leaves or along stems, with eggs hatching within 5 to 7 days. The nymphs then mature in approximately 25 to 30 days, leading to a rapid increase in population.
Integrated Pest Management (IPM) strategies are highly effective for controlling leaf-footed bugs. IPM involves a combination of cultural, physical/mechanical, biological, and—when necessary—chemical control methods. Following the IPM triangle approach, gardeners can start with the least harmful methods (like cultural practices) and gradually escalate to chemical controls if needed, depending on the infestation threshold. Early scouting and intervention are crucial to preventing the population from escalating throughout the growing season.
Though there are only a few organic pesticides that effectively manage leaf-footed bugs, proactive steps like hand-picking and reducing overwintering sites can help curb their numbers in the following year. For larger infestations, homeowners might consider using pyrethroids, which should be applied according to the manufacturer’s instructions. Leaf-footed bugs are also susceptible to insecticidal soaps and other pyrethroid-based products available at most garden retailers.
A word of caution: Some beneficial insects, such as assassin bugs, resemble the orange nymphs of leaf-footed bugs. Be sure to correctly identify these insects to avoid harming species that are beneficial to your garden.
For more information about leaf-footed bugs and effective control measures click on the link below or contact your local Extension office for more details.
The mercury is starting to rise, and the days are getting sunnier. Likely, you are beginning to or have been fantasizing about the potential of your landscape. Visions of multicolored flowers or rows of vegetables lined up waiting to be picked are synonymous with these visions, but they are not free from planning or work. You are not the only one waiting and hoping your gardens become flush with flowers. A veritable army of insects are looking to your landscape for their next meal. Some of these are good, providing critical pollination services, but some seek only to devastate your plants by consuming the leaves or sucking the sap out directly. It’s important to know who these culprits are and to understand the strategies within integrated pest management used to overcome or avoid the damage they bring.
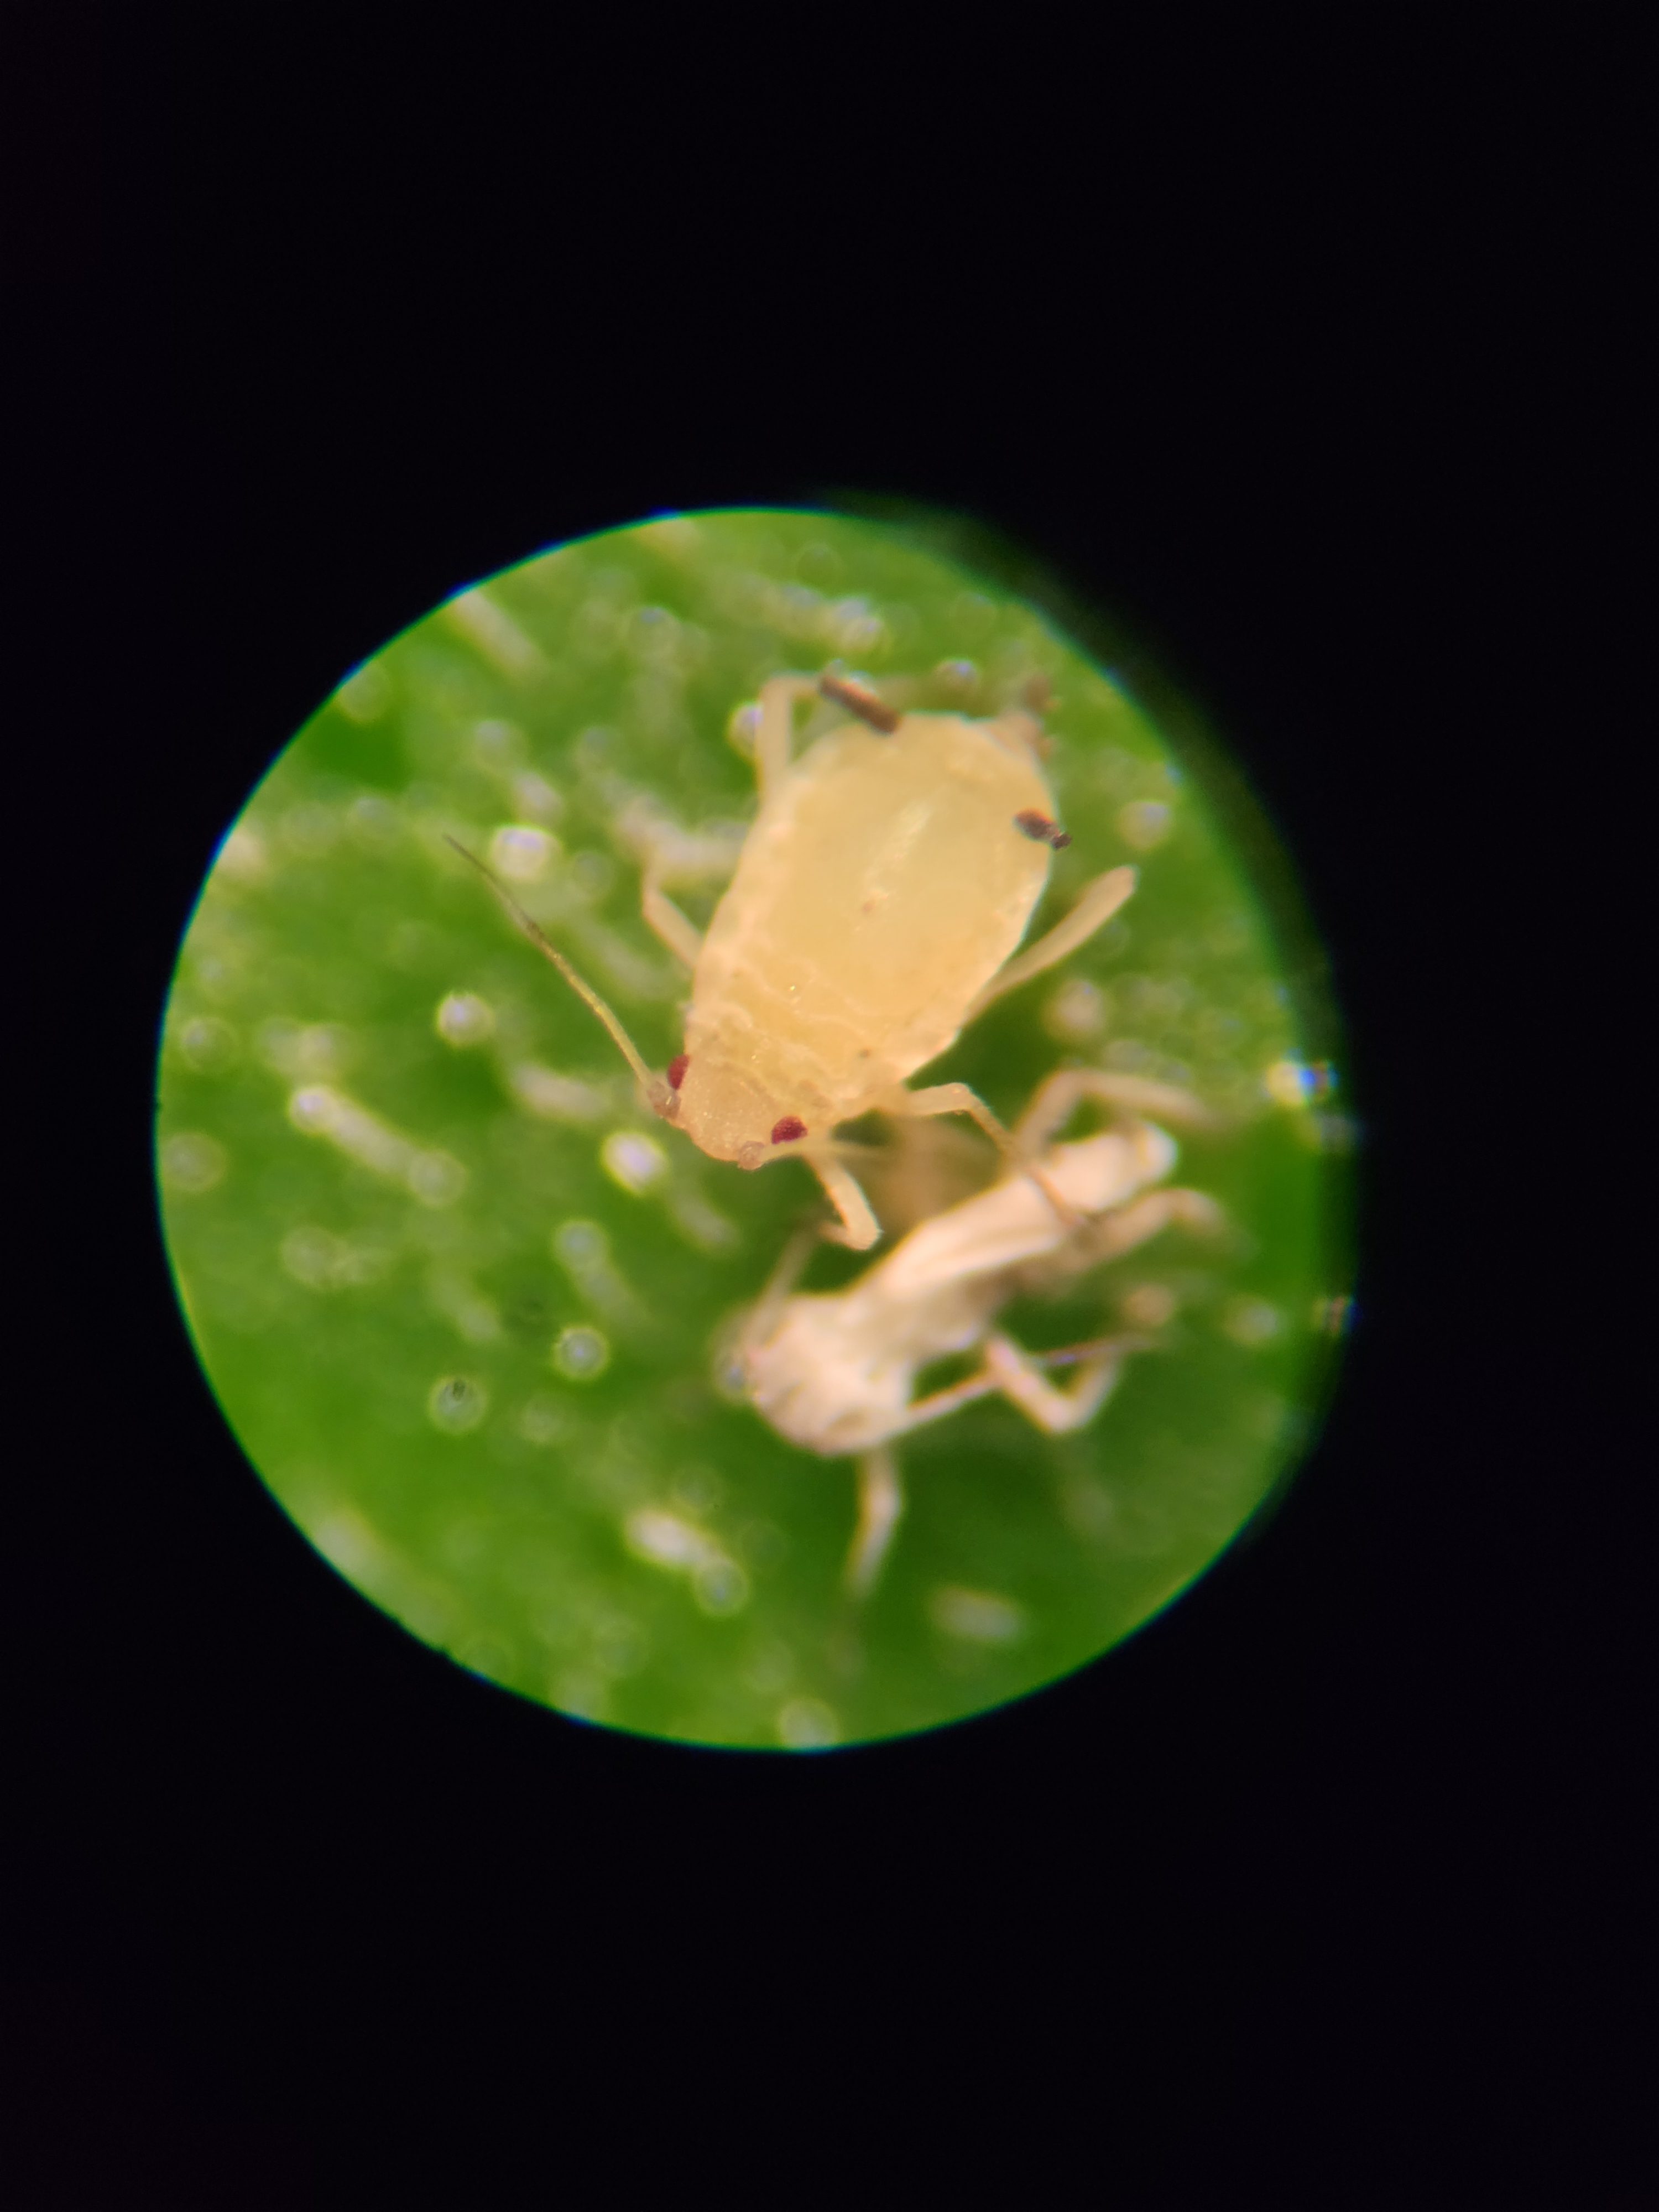
Aphid nymph UF/IFAS Photo: J. Criss
The Bad Guys
First, let’s examine the perpetrators. Insects, like all subdivisions of animals, come in many forms. Those seeking to feast on your plant life are herbivores. They cause damage in several ways, and to understand them, a gardener should start by understanding the mouthparts of these creatures. Damage from chewers such as the Eastern Lubber Grasshopper (Romalea microptera) will be obvious as parts of the leaves will be skeletonized or left with large holes. Others are much more subtle, utilizing hypodermic-style mouths to remove the sugary photosynthates. The damage caused by these insects is much more subtle. It may present as pathogenic, including but not limited to misshaped or discolored leaves, damaged buds, fruit drops, and blackened leaves from sooty mold (Capnodium citri). Insects in this category include stinkbugs (Pentatomoidea) and aphids (Aphidodea). At this stage, you’re probably convinced that gardening in Florida is pointless, but have no fear; there are strategies to overcome these threats.
Scouting
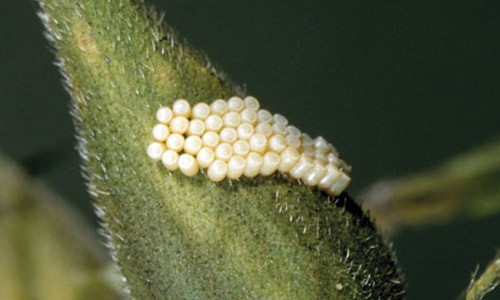
Defending your gardens and landscapes begins with scouting. It seems very simple, but getting into your gardens daily will alert you to burgeoning issues well before they become major concerns. Get out there and look through stems, on the undersides of leaves, and for discoloration. It is much easier to remove leaves covered with stinkbug eggs than the adults once they’ve hatched.
Southern Green Stink Bug eggs UF/IFAS Photo: James Castner
First Steps
Next, investigate your gardening practices. Keep plants stress-free with appropriate fertilization and irrigation; these plants will fare better with any insects escaping your scouting efforts. Remove stressed and diseased plants as well as any which have been harvested. This will deny habitat to herbivorous insects. These combined practices are collectively known as cultural controls and are among the best for preventing insect issues. Any insect still appearing through these controls may be removed by hand. This is considered a mechanical control and is the least environmentally taxing, though it is the most labor-intensive methodology.
Ask Nature to Help
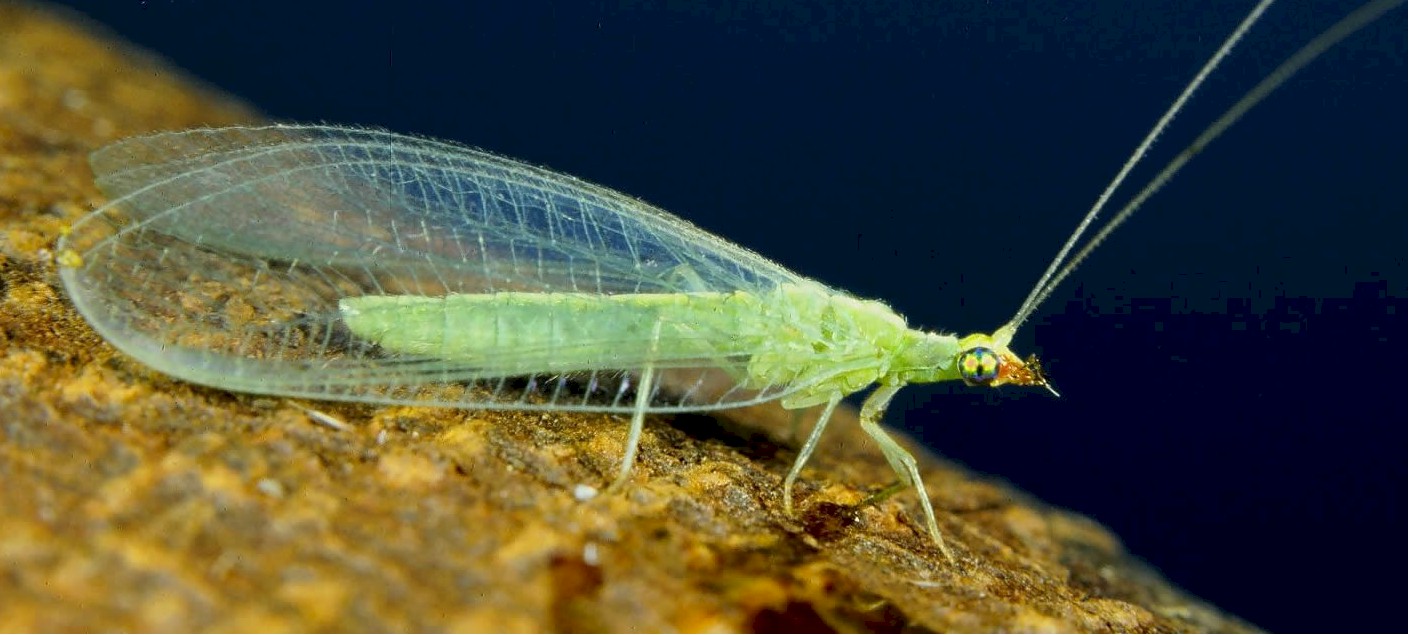
Biological controls are next in this hierarchy. Although they may seem confusing, they are nothing more than letting nature take care of itself. This article focuses on herbivores, but the insect world is diverse and includes predatory species. Creatures such as ladybugs (Coccinellidae) and lacewings (Chrysoperia sp.) actively hunt and consume those pests in your gardens, keeping you from this task. This method is not limited to Insects. Numerous animals, such as frogs, birds, nematodes, and even household pets, can fill this role. Fungi and bacteria have also been found to fill this role, as anyone who has applied Bacillus thuringiensis, commonly called BT, has discovered. This control method is the most environmentally friendly and involves the least amount of physical labor.
Green Lacewing UF/IFAS photo
Chemical use in Landscapes
Finally, chemical controls are a viable method to control insects in your landscape. These should be used as a last resort when the controls listed above are just not working. When used, make sure you follow the label provided on the product you’ve purchased and that it is the appropriate product designed to control your specific pest. The concern with this control is that pest species may adapt to the chemical, thus rendering it ineffective. When applied, ensure it is done minimally, both in volume and across square footage thus minimizing risk to off-target species.
Controlling pests in your garden can seem a daunting task. The multipronged approach utilizing the above control methods is known as integrated pest management. Following this methodology will keep your plants pest free and your landscape healthy. For more information on integrated pest management, see these Ask IFAS documents, or contact your local extension agent for additional information on this and any topic regarding your gardens and more.
In Florida, we have plenty of native critters trying to find their way into our homes – cockroaches, mosquitoes, lizards, squirrels, mice, and even alligators and bears every now and again. So, we don’t really need any more non-native critters to worry about, but we do. The Argentine ant is one of these non-native nuisances that can be quite difficult to control.
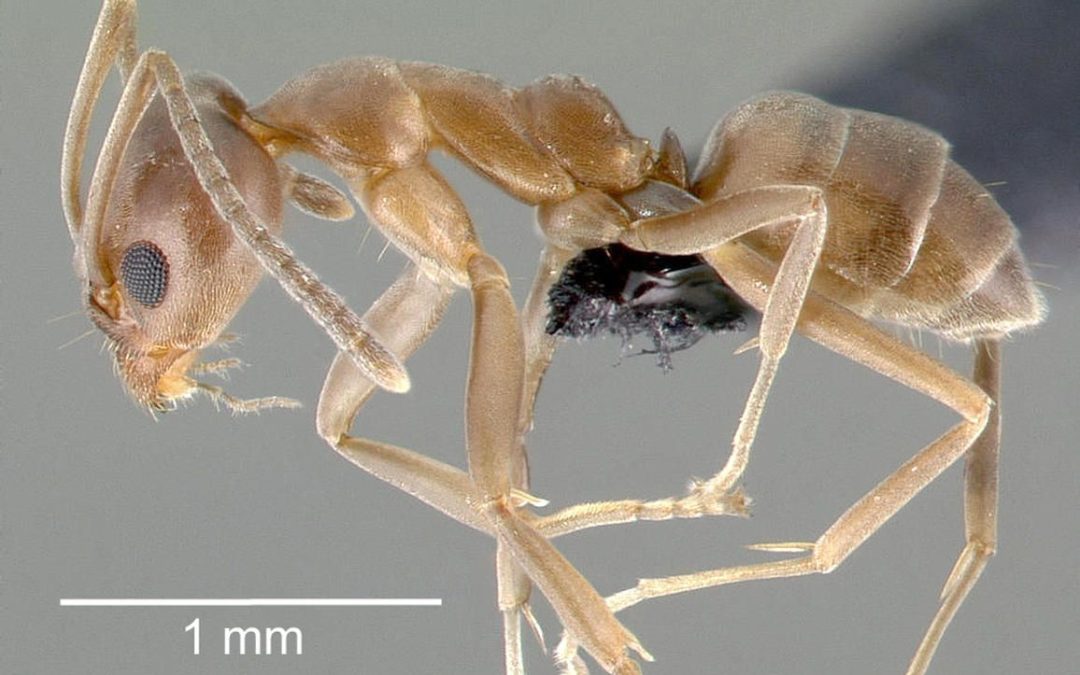
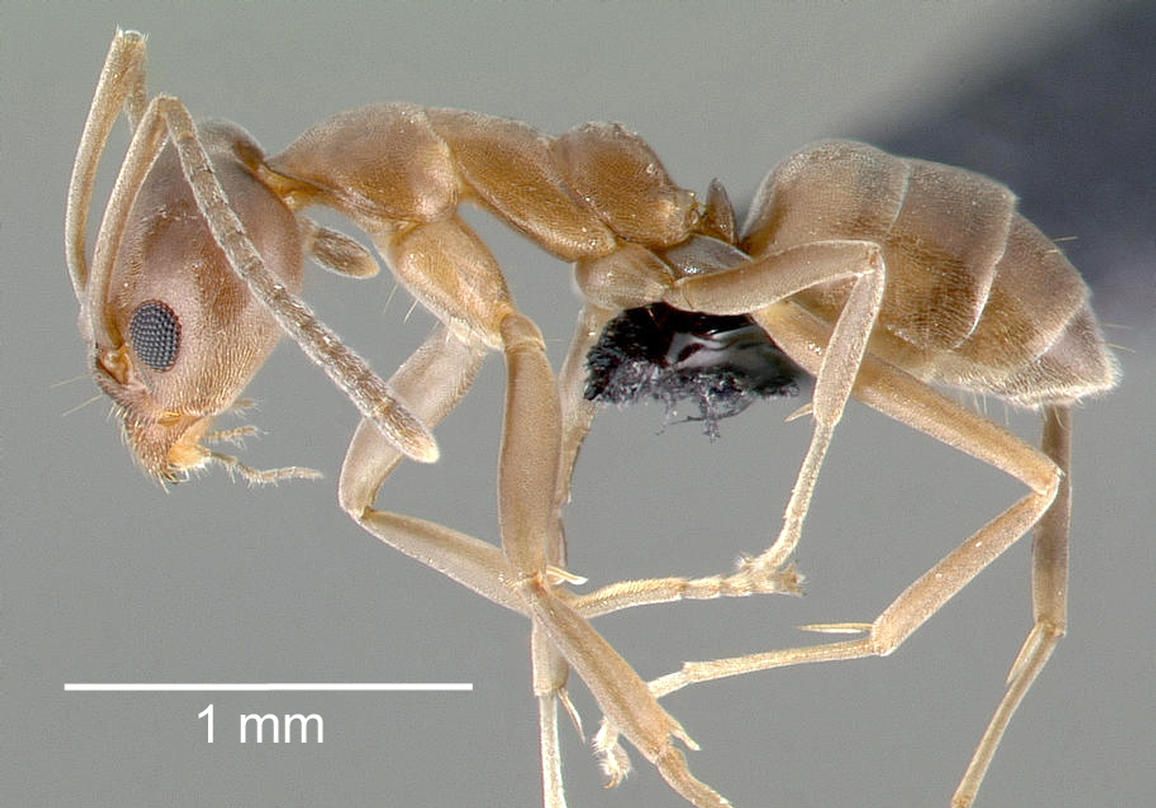
The Argentine ant is from South America and has become a pest worldwide. Although these ants don’t sting or bite, they can be a major nuisance in the home as they search for food and water. A unique feature that makes these ants especially difficult to deal with is that they form multi-queen colonies that can form a network of interrelated colonies. Unlike other ant colonies that may compete with each other, Argentine ants are able to spend less time defending their nests and more time looking for resources. These ants are also really small, with the workers only about 2.2 to 2.6 mm (around 1/10 of an inch). The Argentine ant emits a musky odor when crushed, helping to identify it among other small pest ants.
The Argentine ant is a small, nuisance pest ant that readily invades structures, especially during the warmer months. Credit: April Noble, from www.antweb.com.
These minute, cooperative ants can quickly invade a structure looking for food and water, especially when it warms up. At 70°F, it takes 25 days for the pupa to change into an adult compared to only 8 days at 86°F. This ability to reproduce quickly is a trait shared by most invasive species, whether plant or animal.
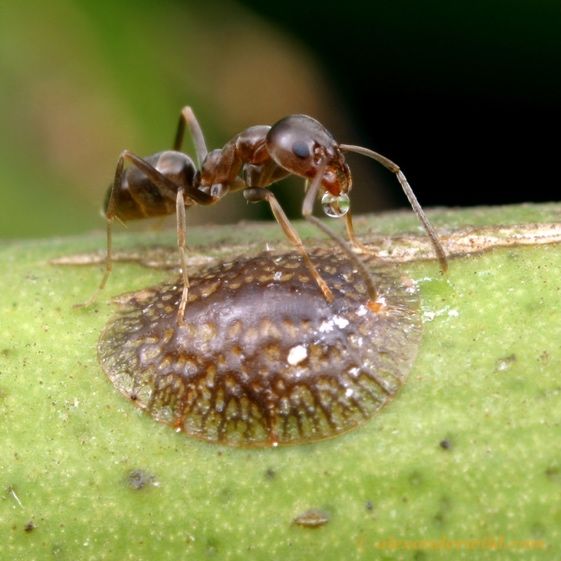
While not a health threat to humans, they are very annoying pest. In the home, they are attracted to sugars and oils and like to hide in the soil of potted houseplants. Outdoors, they nest in mulch, leaves, and rotting logs. You can often find them “tending” to insects on your outdoor landscape plants. The ants eat the sugary feces of sap-feeding insects, called honeydew, and provide these insects protection in exchange. In citrus groves, the Argentine ant has been known to help the Asian citrus psyllid better compete against predators, allowing this other invasive species to potentially spread citrus greening.
This Argentine ant is “tending” a scale insect. Credit: Alex Wild, University of Texas at Austin, alexanderwild.com
To help control the Argentine ant, you need to start with the perimeter of the home. It’s best to keep a 2’ barrier around the home free of leaves, mulch, woody debris, and landscape plants. This minimizes areas to nest near the home. If they begin to enter the home, place ant bait stations or gel baits along their trail. Argentine ants tend to like sweet baits. Broadcast pesticide spray treatments are not as effective because the nest is usually located far enough below ground where the pesticides can’t penetrate. Pesticide powder formulations are available to treat small crevices. These ants are difficult to control and you may want to consider hiring a professional pest management company for backup. For more information on the Argentine ant, it’s identification and control methods, please see the UF/IFAS Argentine Ant Factsheet. For any questions on ants or other structural pests, contact your local county extension office.
Insects use pheromones to attract their mates and communicate with each other. Ants use pheromones to tell fellow ants where to find food. Aphids use pheromones to warn each other about potential predators. And all insects use pheromones to call for a mate.
So what exactly are pheromones? Pheromones are substances that are secreted by an individual and received by another individual of the same species. In humans, pheromones are most commonly found in sweat and detected by the olfactory system. Most animals have a functioning vomeronasal organ inside their noses to detect and process pheromones. However, it is debatable whether adult humans possess a functional vomeronasal organ.
Although most of us may not be able to detect insect pheromones, scientists have been able to identify and synthesize the pheromones of many economically important insects. These pheromones are impregnated on rubber and plastic dispensers and placed in different types of traps depending on the pest. The pheromone traps attract males of the target species. These traps are commonly used for monitoring, but in some cases can be utilized to disrupt mating habits which can help control some pests.
The most common pheromone trap in this part of the country is probably a boll weevil trap. Growing up, I thought they looked like little green lighthouses. These traps consist of a yellow-green cannister with an inverted funnel on top that contains the pheromone. While you may not be growing cotton in your home garden, there are some other common insect pests you may want to monitor and possibly disrupt.
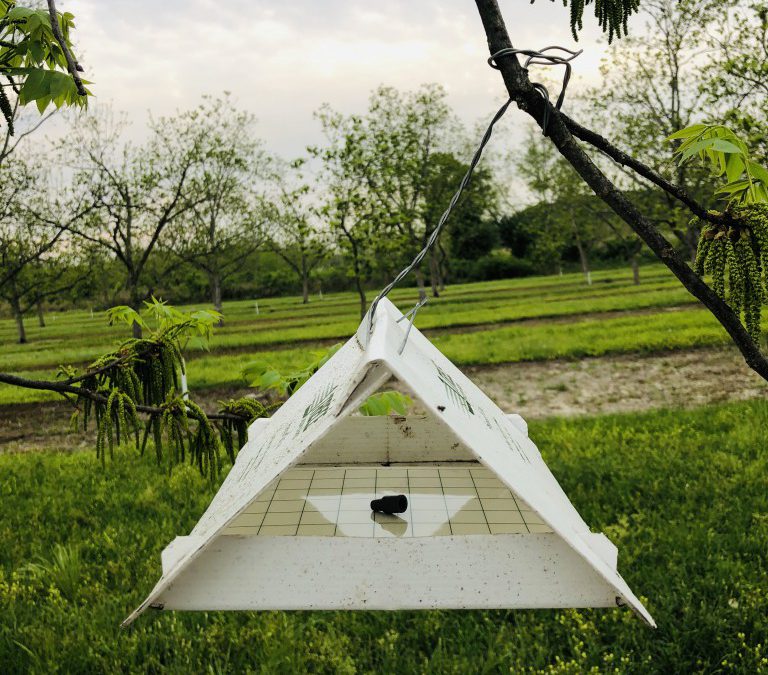
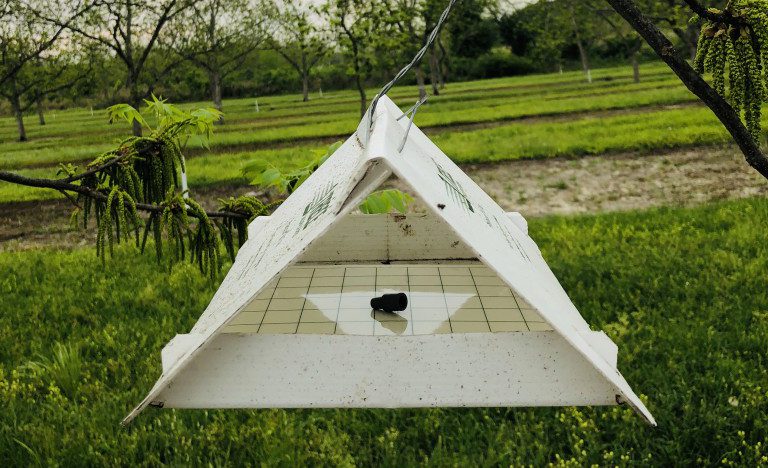
Pecan nut casebearer trap with pheromone bait. Photo Credit: UGA Cooperative Extension
Pecan Nut Casebearer (PNC) – These moths are gray with a dark line of scales on their forewings. PNC moths are about 1/3 inches long. They lay their eggs on the outside of pecan husks in April/early May. Their larvae bore into the base of developing nuts and remain inside the nuts for four to five weeks to feed then pupate. A tent-type trap with pheromone can be hung in a pecan tree in April or May to help monitor for this insect. Depending on how many trees you have, multiple traps can be installed to possibly disrupt the mating cycle of this pest.
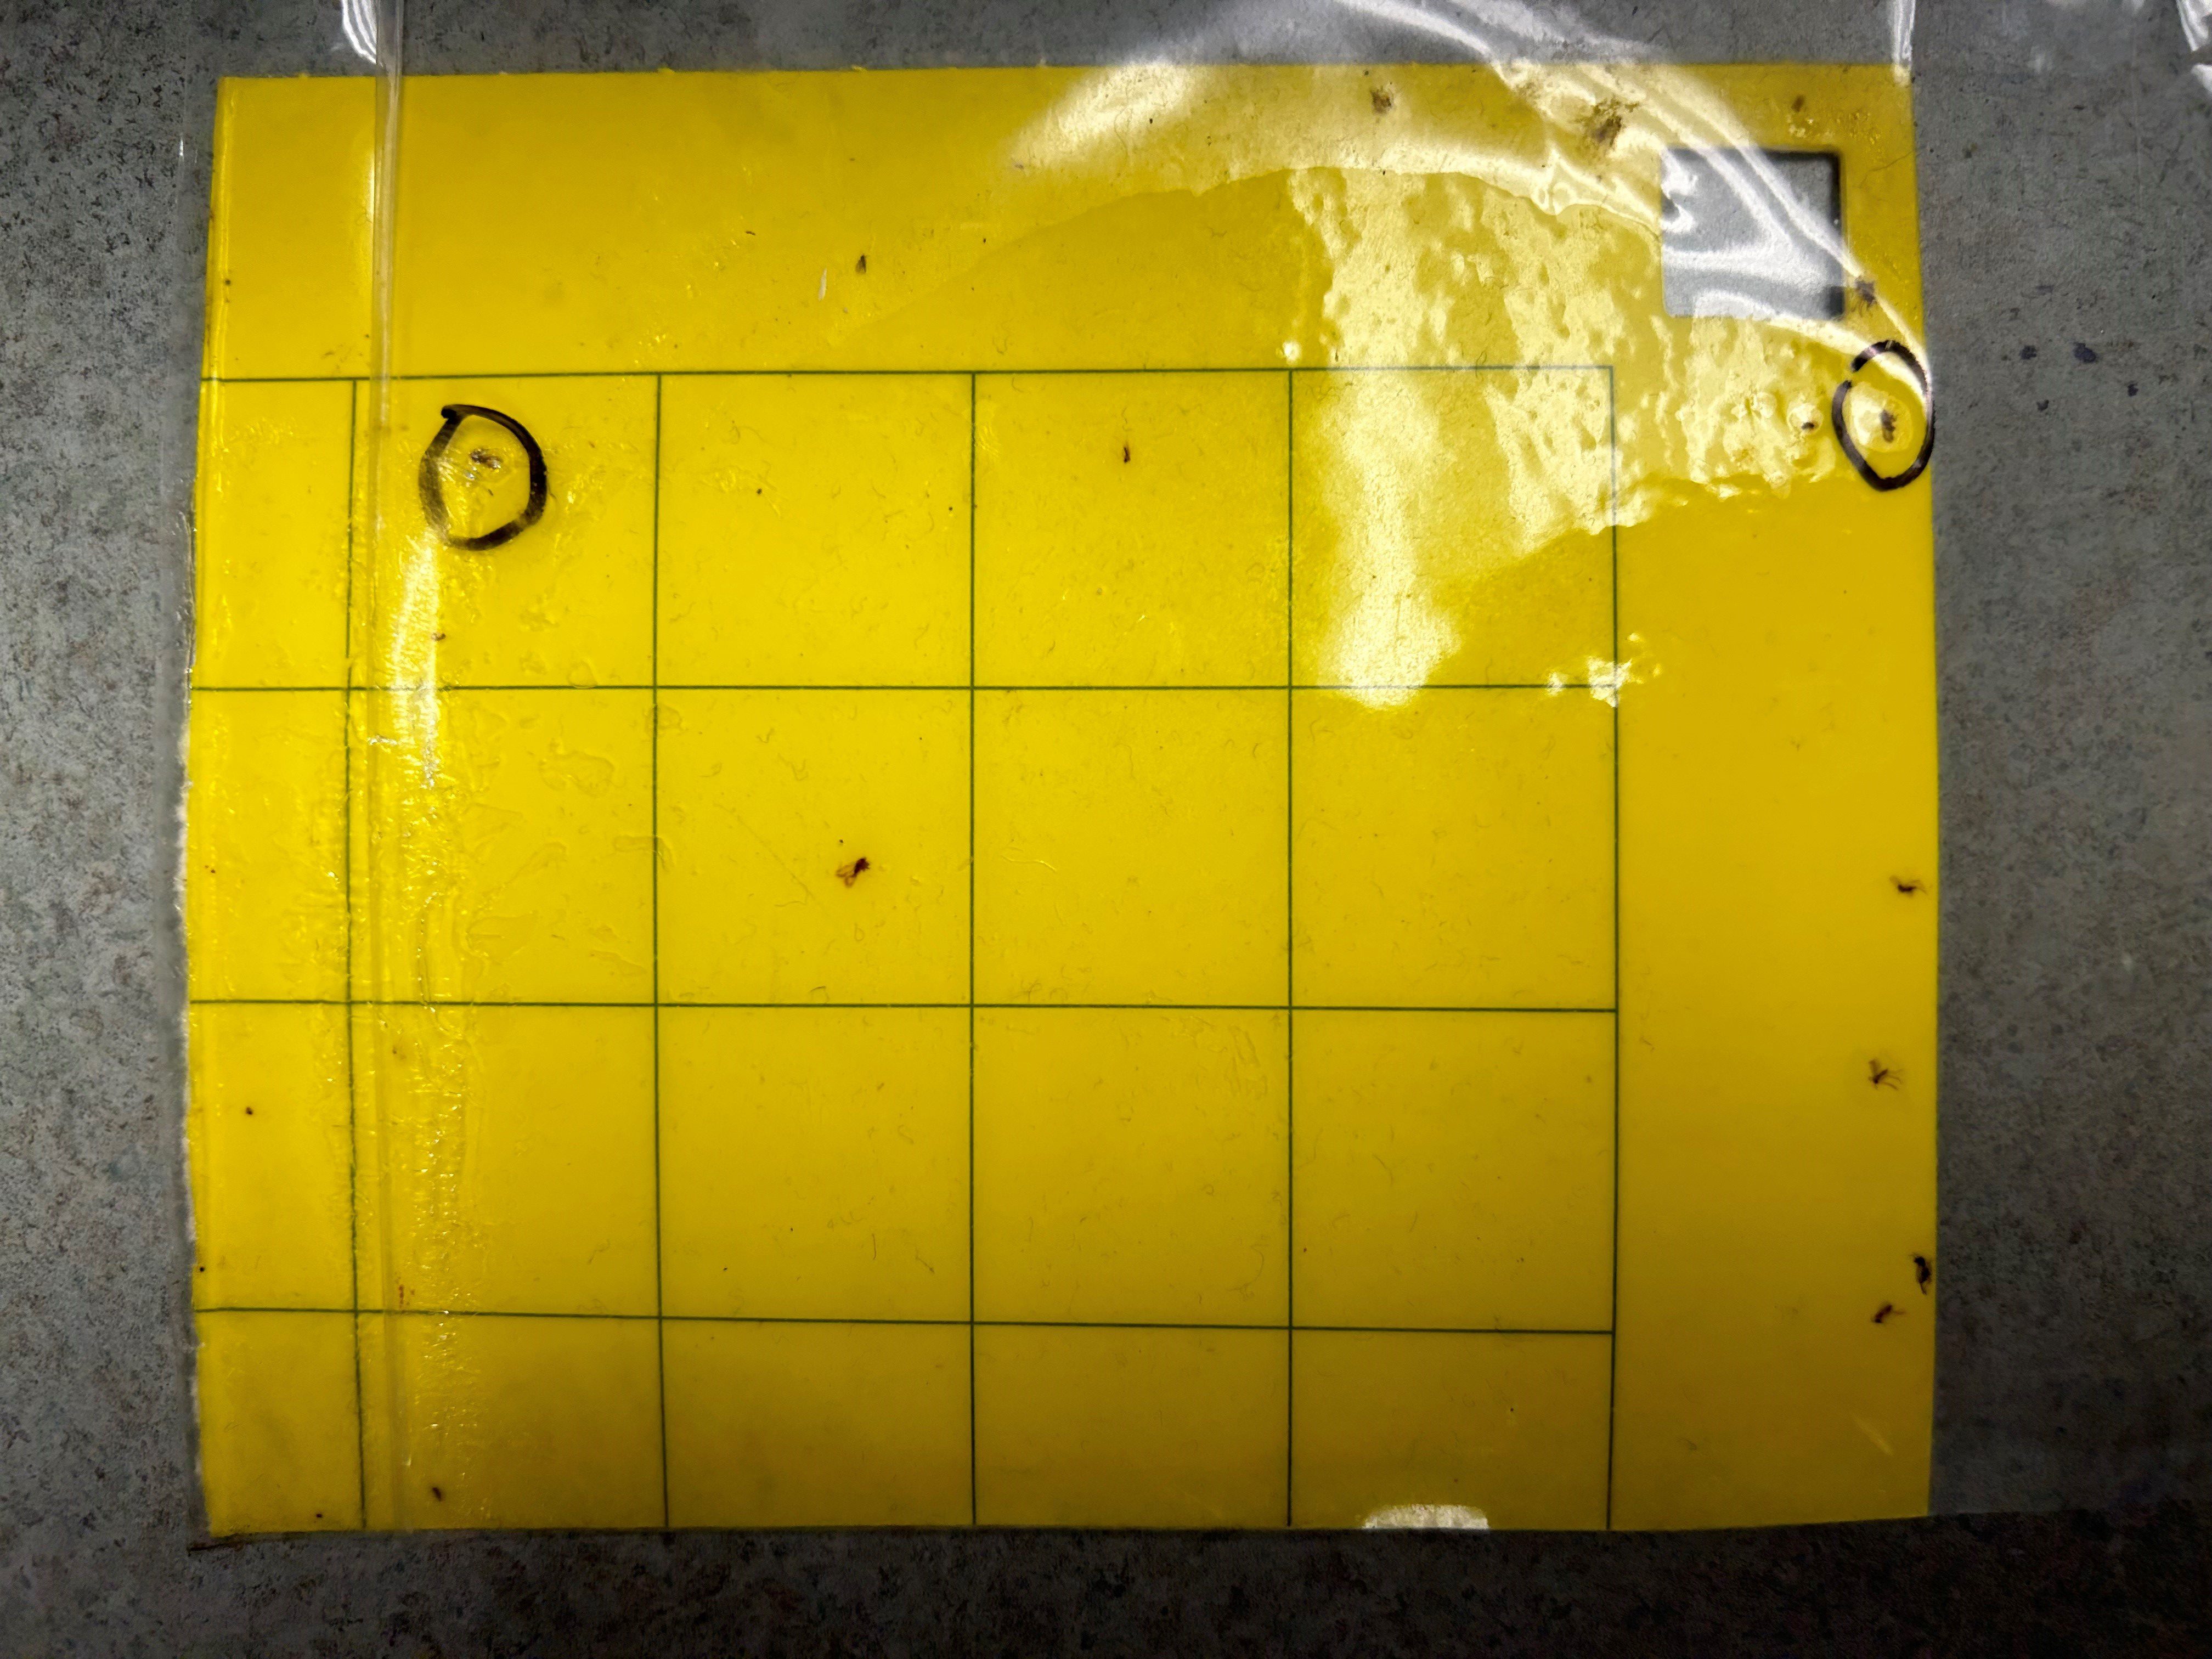
A yellow sticky trap with Asian citrus psyllids circled. Photo Credit: Matt Lollar, University of Florida/IFAS Extension – Santa Rosa County
Asian Citrus Psyllid (ACP) – These tiny insects are about the size of the tip of a pencil (about 1/8 inches long). They vector the Huanglongbing (HLB) disease also known as citrus greening. This disease blocks the nutrient uptake tissue of citrus trees and eventually kills infected trees. Traps consist of a yellow sticky card with a pheromone bait sometimes impregnated on the twist tie hanger. The citrus industry has been heavily impacted by citrus greening, so monitoring for this pest is very important.
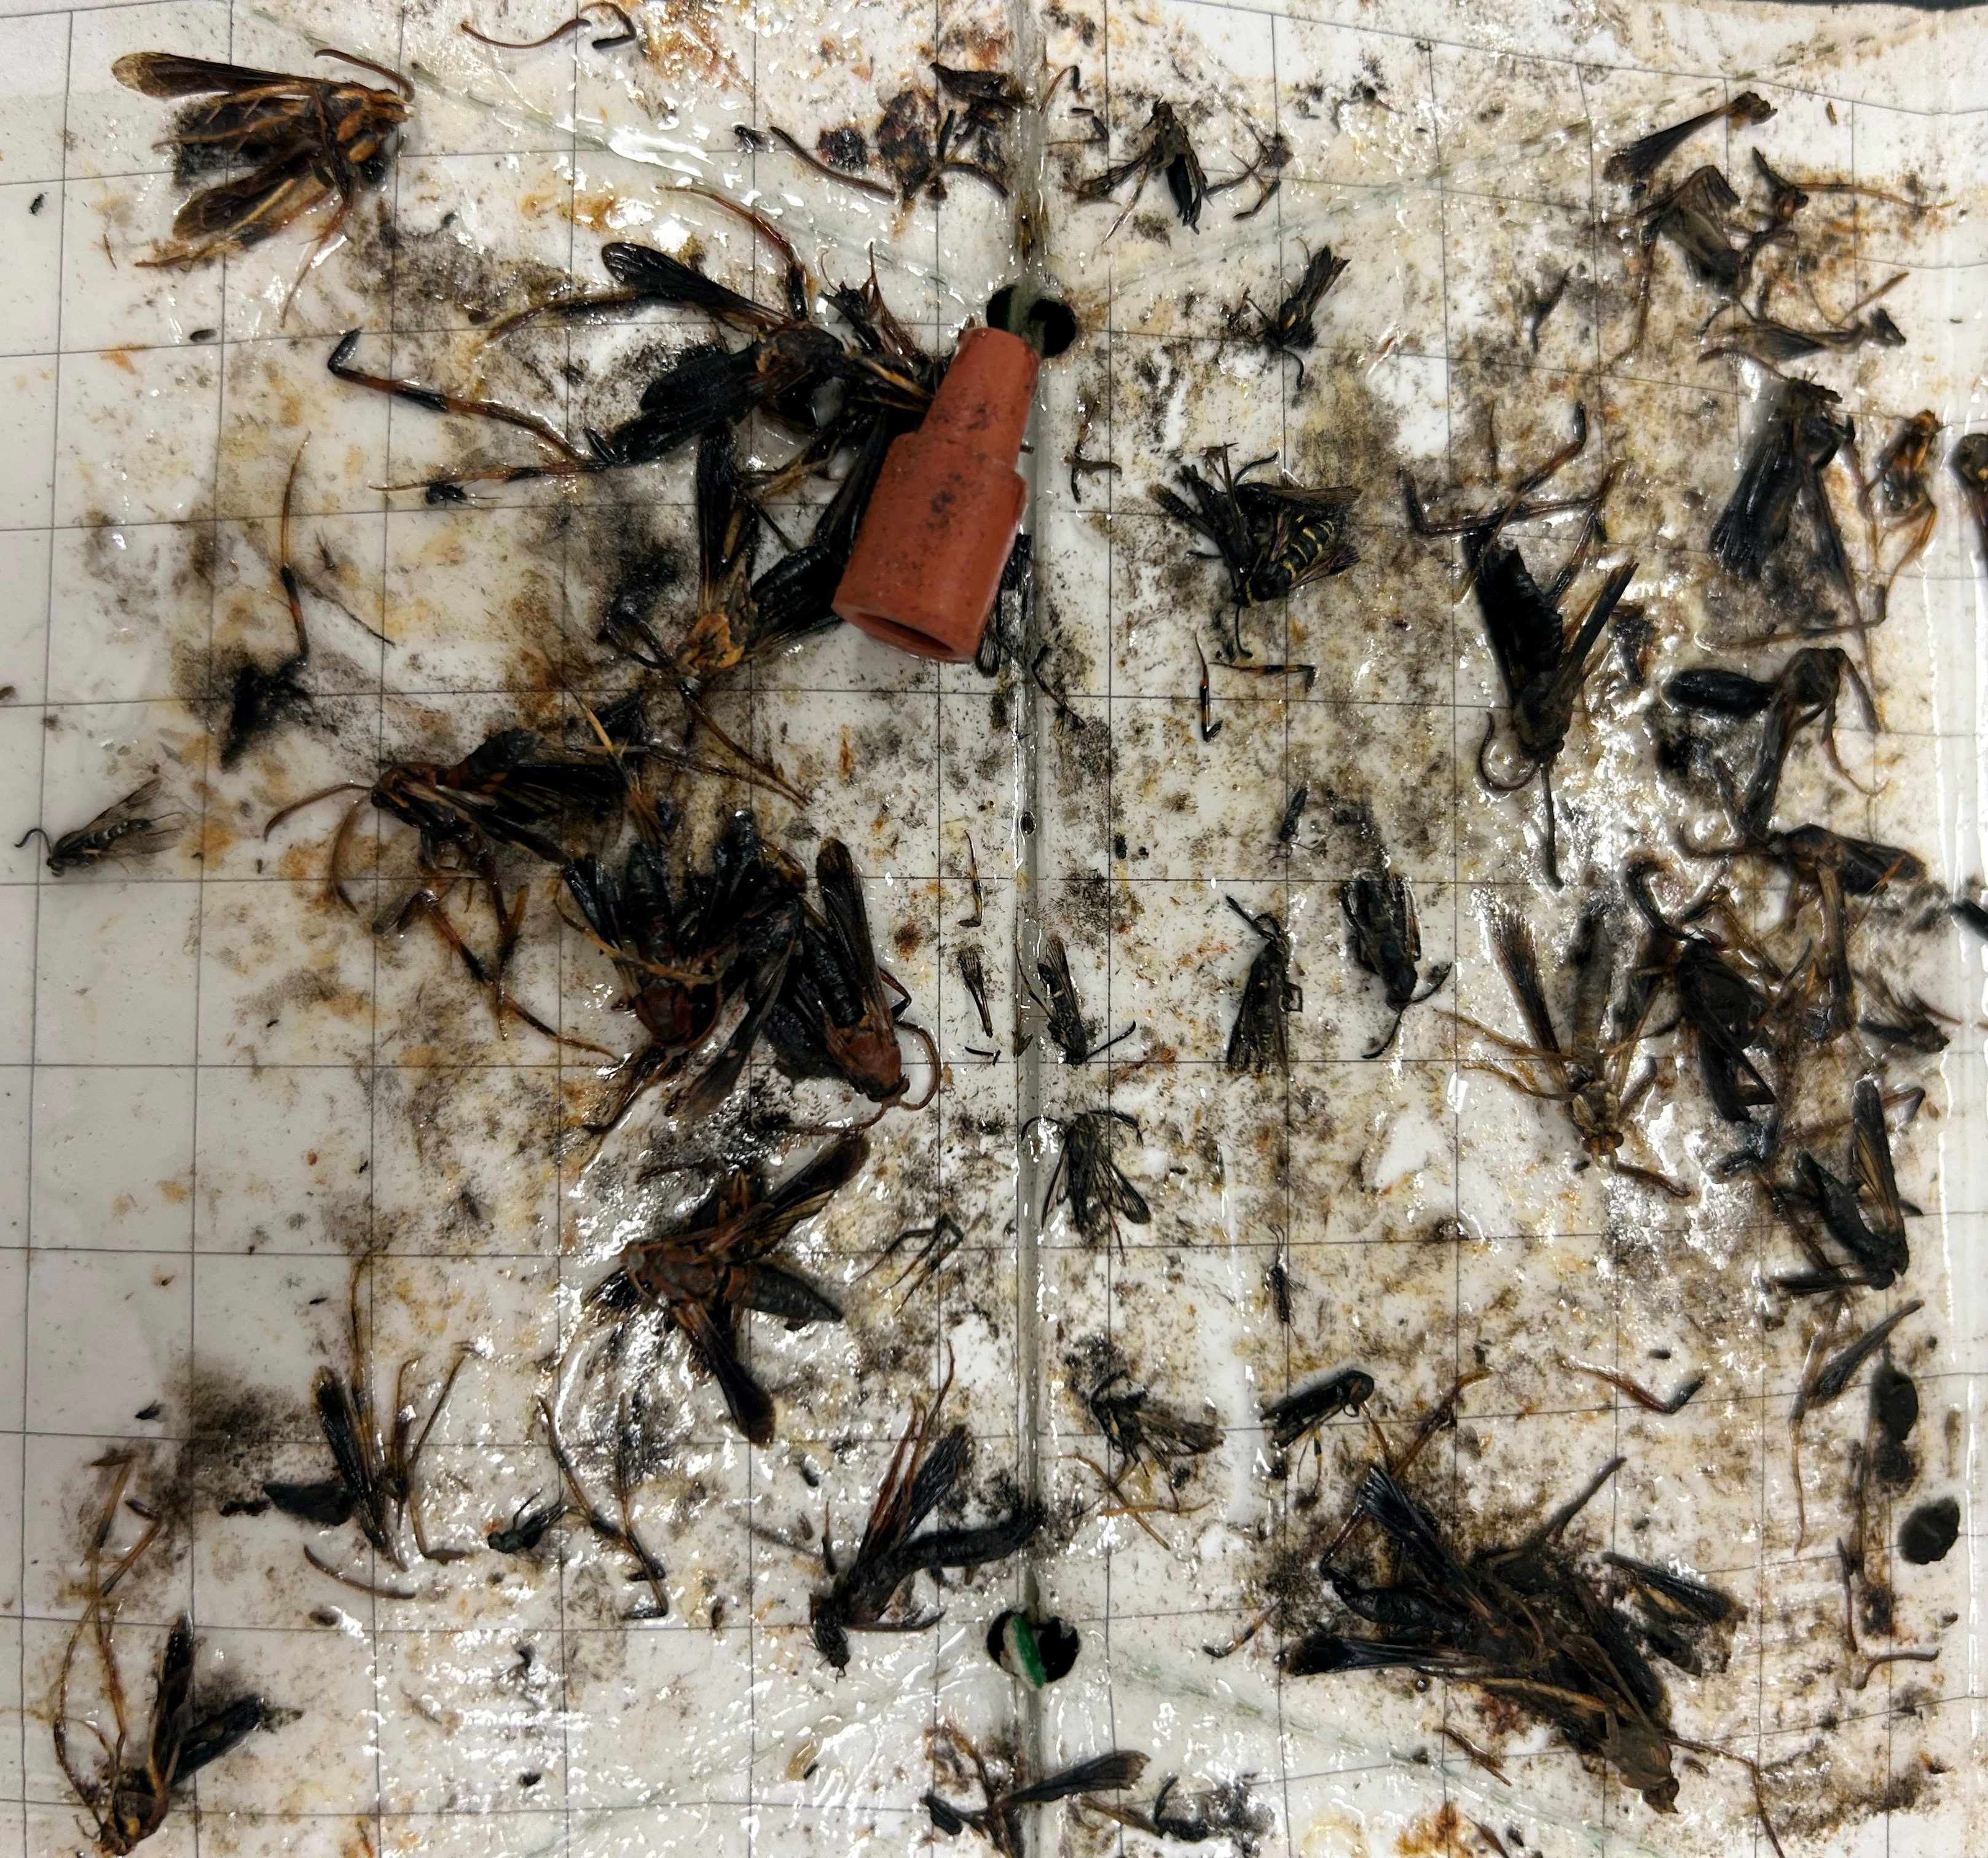
An abundance of clearwing moths on a pheromone trap that has been pulled apart. Photo Credit: Matt Lollar, University of Florida/IFAS Extension – Santa Rosa County
Clearwing Moth – There are numerous species of clearwing moths that bore into the trunks of fruit and ornamental trees and shrubs. One of the most common is the peachtree borer. These insects don’t look like a typical moth. Instead, they resemble wasps. Tent-type pheromone traps can be used to monitor for clearwing moths and potentially disrupt their mating habits. Another common clearwing moth is the ash borer (lilac borer). As their name would suggest, these moths bore into the wood of ash trees, but they also like various Ligustrum species and olive trees.
These are just a few of the species of insects that can be monitored by pheromone traps. To help with the timing of trap dispersal and placement, you should get a grasp of concept of “Degree Days”. Degree day accumulation is used to predict important life events for particular insects such as the average egg laying date, egg hatch date, and larval development. More information on calculating degree days can be found in the article “Predicting Insect Development Using Degree Days” from the University of Kentucky. Fortunately for us, we can skip some of the math by utilizing the AgroClimate Growing Degree Days Calculator. Simply select the weather station closest to you on the provided map and a graph will appear.
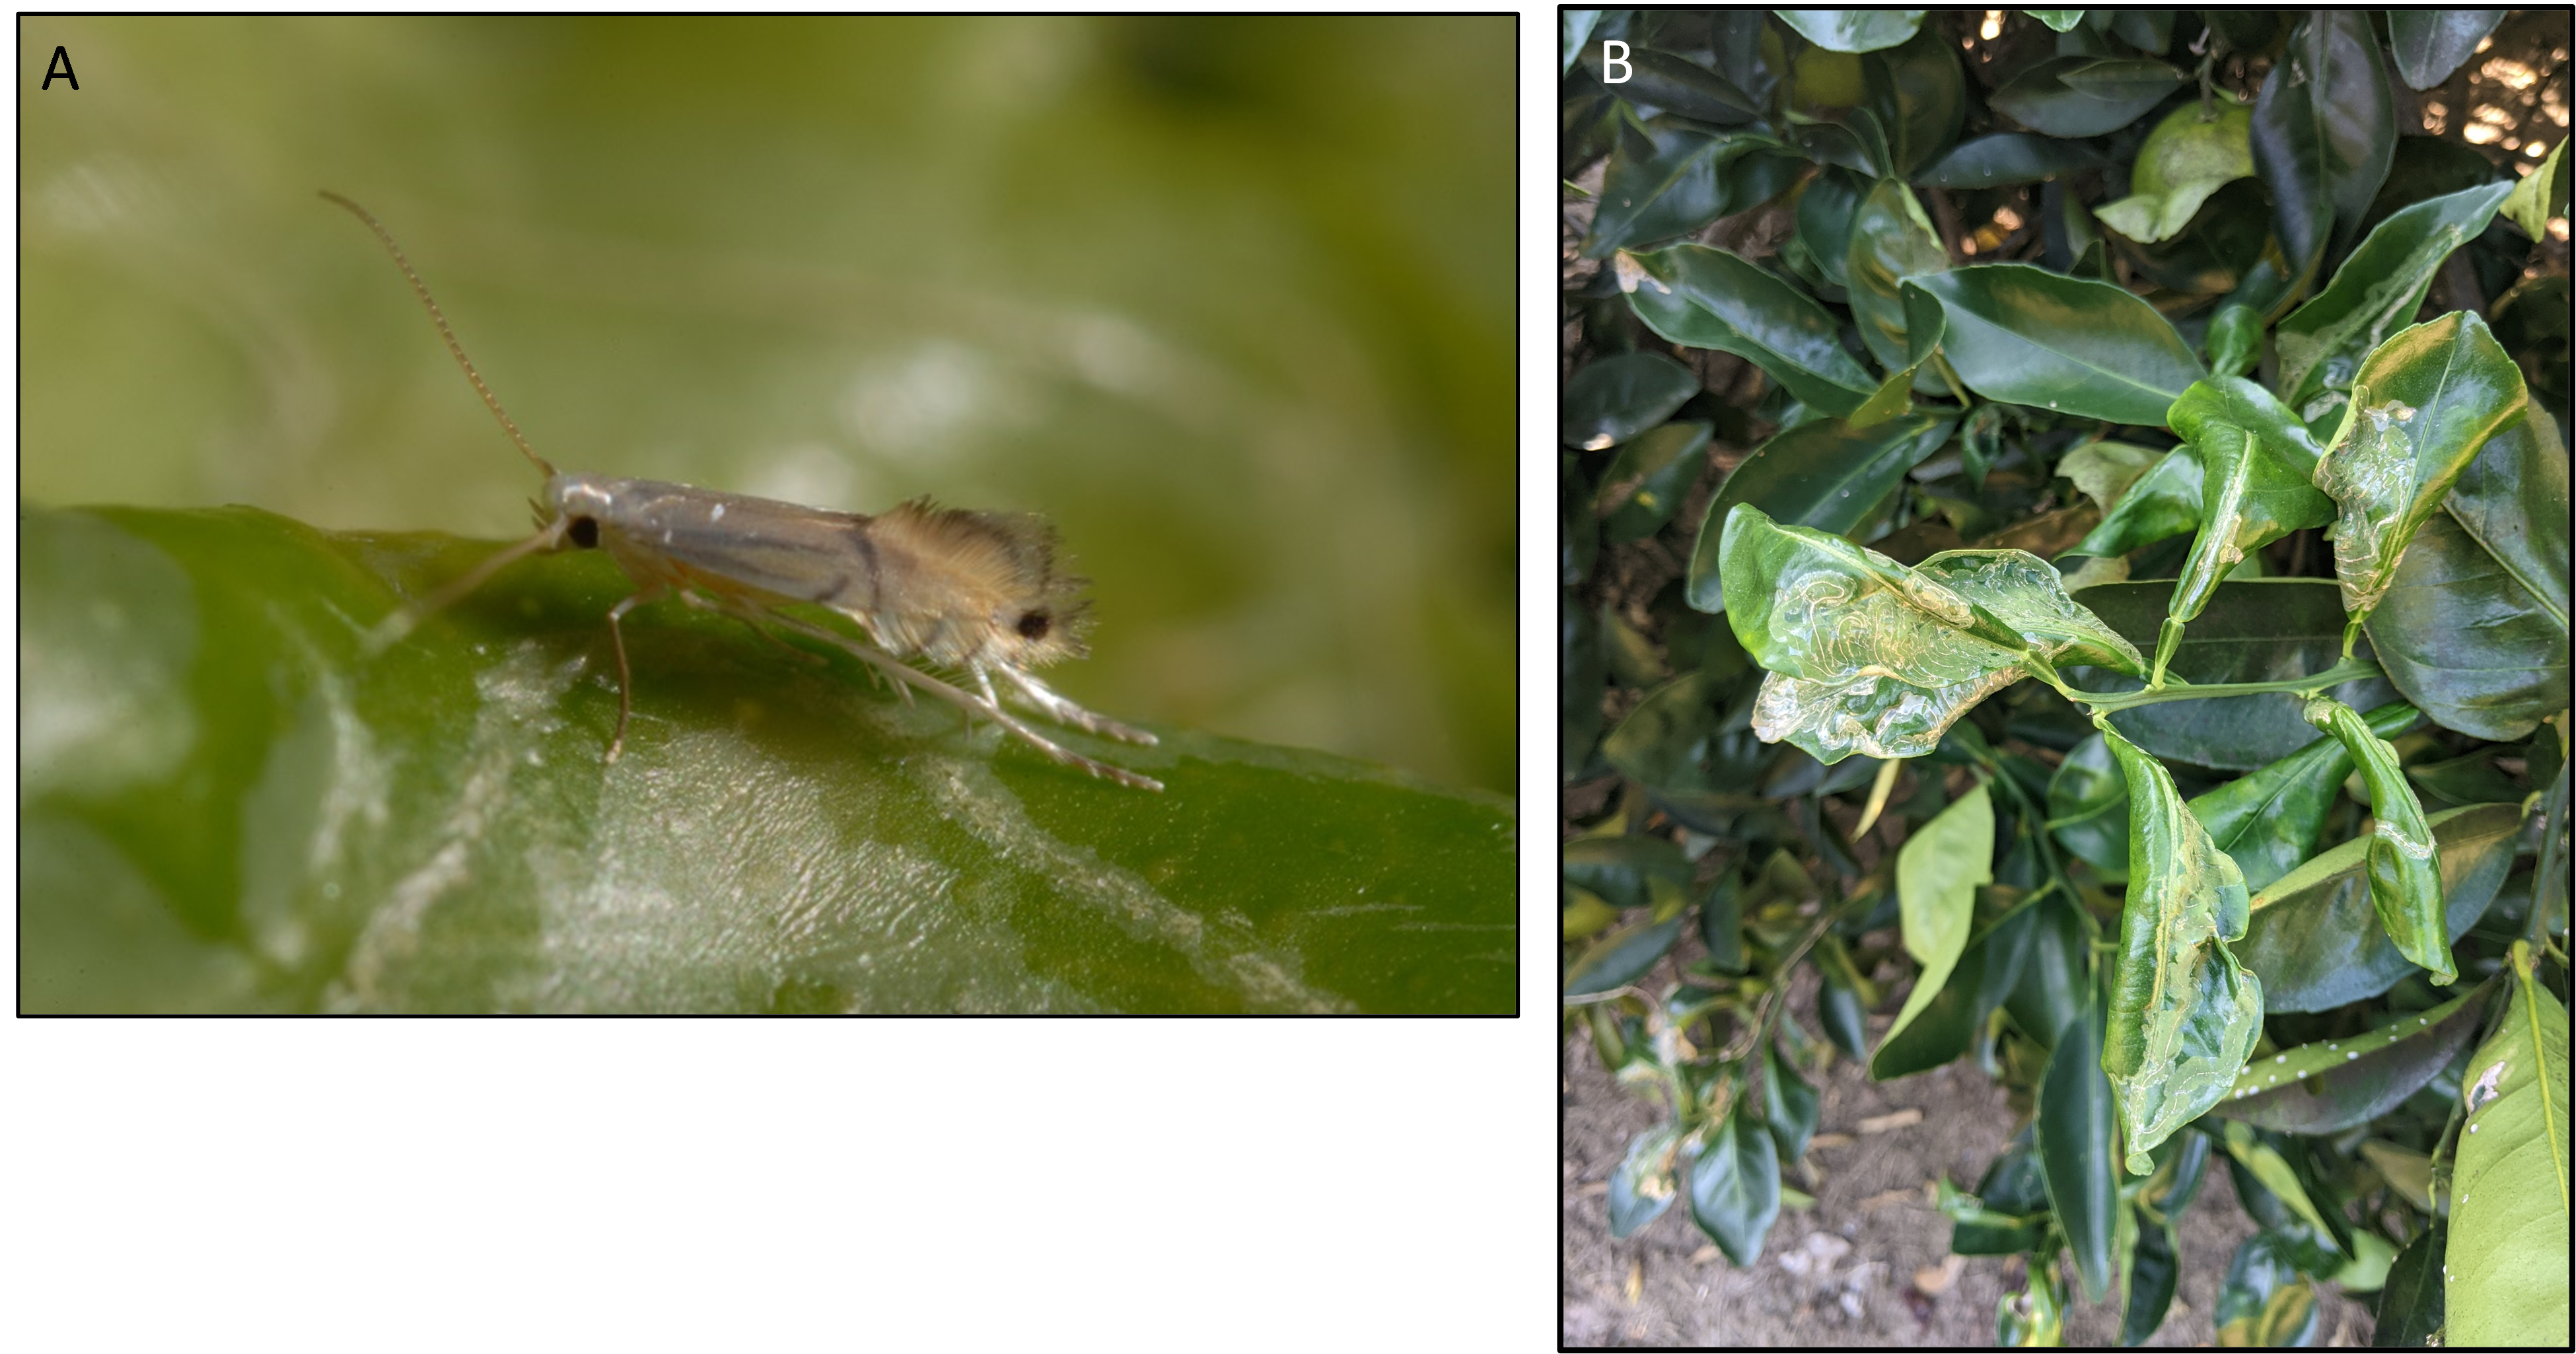
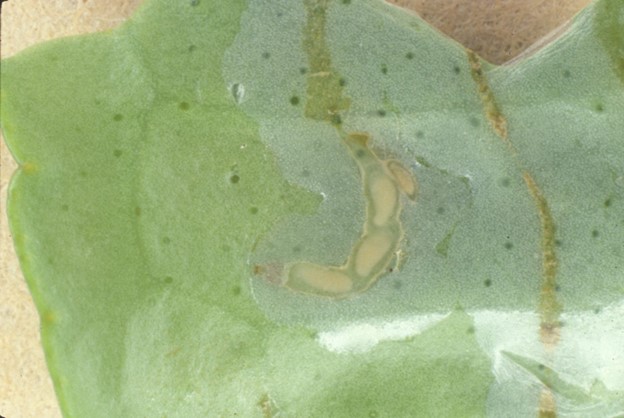
Citrus is one of the most cherished fruit trees in the Panhandle. Citrus owners are well aware that every year the main damage to their trees come from citrus leafminer (CLM). CLM is a small moth and its larvae feeds between the tissue layers of new leaf growth, causing serpentine mines to form under the leaf cuticle (Fig. 1). The feeding damage results in leaf curling and distortion, and severe infestations of CLM on young trees can retard the growth of trees. Another threat concerning CLM in Florida is that the mines provide an open wound for citrus canker to enter, a bacterial disease that has been found recently in the Florida Panhandle, Georgia, and Alabama.
Most commercial growers deal with CLM in young trees by a soil application of systemic insecticide before the flush season, followed by a foliar insecticide when the systemic drench’s toxicity is declining. Homeowners, however, have limited access to these chemistries. Garden systemic insecticides that include imidacloprid (Bayer’s Tree & Shrub Insect Control™, Merit®, etc.) and dinotefuran (Greenlight Tree and Shrub Insect Control™, Safari®, etc.) are among the few options for CLM control. For the best efficacy, those insecticides should be applied two weeks before the start of the flushing season to allow time for the insecticide to move from the roots into the canopy. To avoid leaching of insecticide away from the root zone, soil applications should be made within a 24-hour period without rain. Citrus trees usually have several flushes per year, depending upon cultivar, climate, and crop load. However, in the Florida Panhandle, most citrus cultivars have two major flushes in May and September.
Importantly, systemic insecticides are only efficient against CLM for small immature trees; therefore, the only products labeled for use against CLM on mature trees are foliar sprays. Horticultural oils or insecticides with spinosad (such as Monterey® Garden Insect Spray) are some options available for homeowners. However, achieving leafminer control with foliar applications on mature trees is challenging due to unsynchronized flushing of trees. Foliar applications should be timed with the appearance of the first visible leaf mines. In any case, be sure to READ THE LABEL and follow all the label directions.
Cultural practices, and non-insecticidal methods.
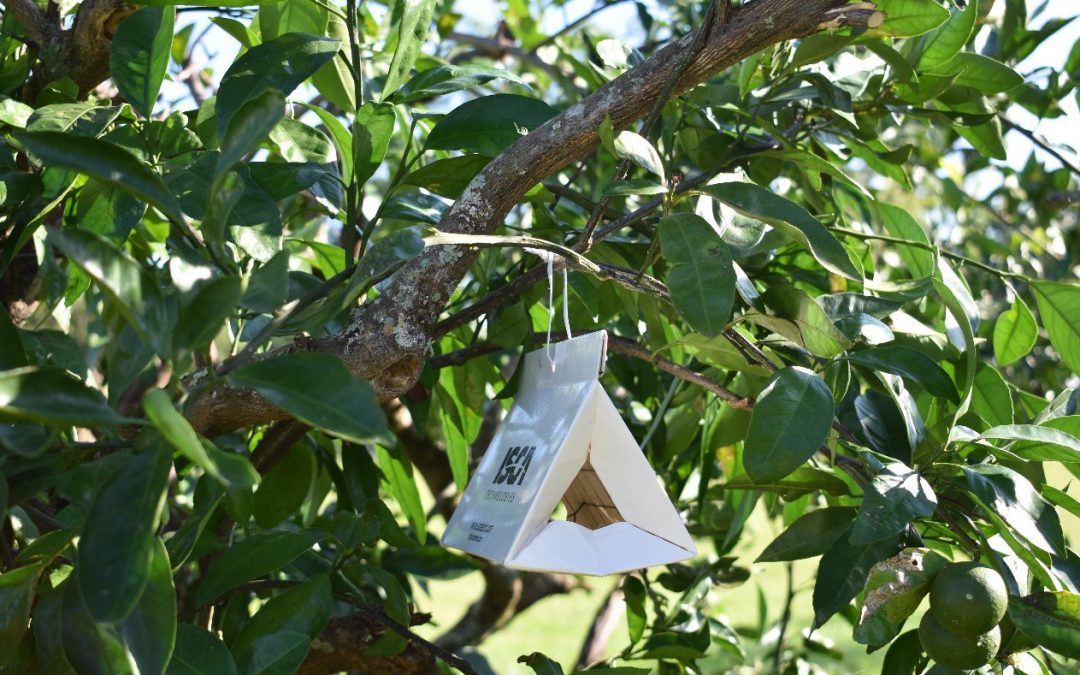
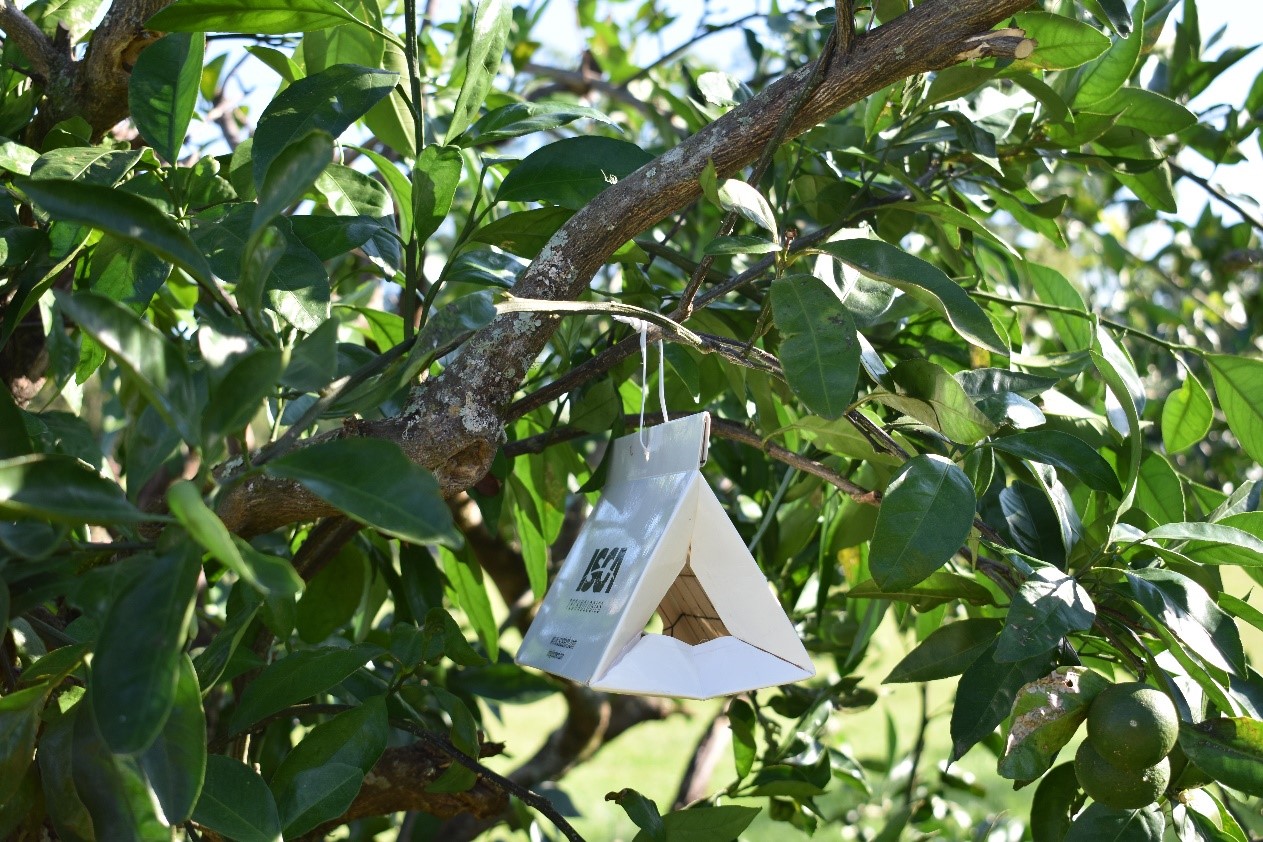
For isolated trees in a backyard, cultural practices and control through mass trapping are usually sufficient to control CLM and insecticide use is not recommended, especially for mature trees. One of the basic cultural practices is to remove any stems that grow below the bud union or from the rootstock, also called ‘suckers’ (Fig. 2). Those rootstock shoots compete with the scion shoots and are great reservoirs for CLM; removing them will help reducing CLM population. On isolated trees, mass trapping using CLM pheromone provide good results (Fig. 3). The mass trapping method is constituted of a delta trap baited with a lure that emits a large quantity of CLM sex pheromone. CLM males are attracted by the odor and are captured in the delta trap’s sticky liner. Those traps are commonly used by growers to monitor CLM populations, but for homeowners they are sufficient to control CLM on a single tree. This trap and a lure method should protect a single tree for approximately 3 months. Finally, the last option is the use of biological control. Several natural enemies are predators or parasitize CLM. In some case, biological control can reduce CLM populations by 90%. Primary predators of CLM include ants, lacewings, and spiders, as well as a parasitic wasp, Ageniaspis citricola that was introduced into Florida and has become established (Fig. 4).
New growth from the rootstock (called ‘suckers’, red arrow) are a source for CLM infestation and should be removed.
Baited pheromone trap for citrus leafminer (picture Danielle Sprague).