by Matt Lollar | Apr 23, 2020
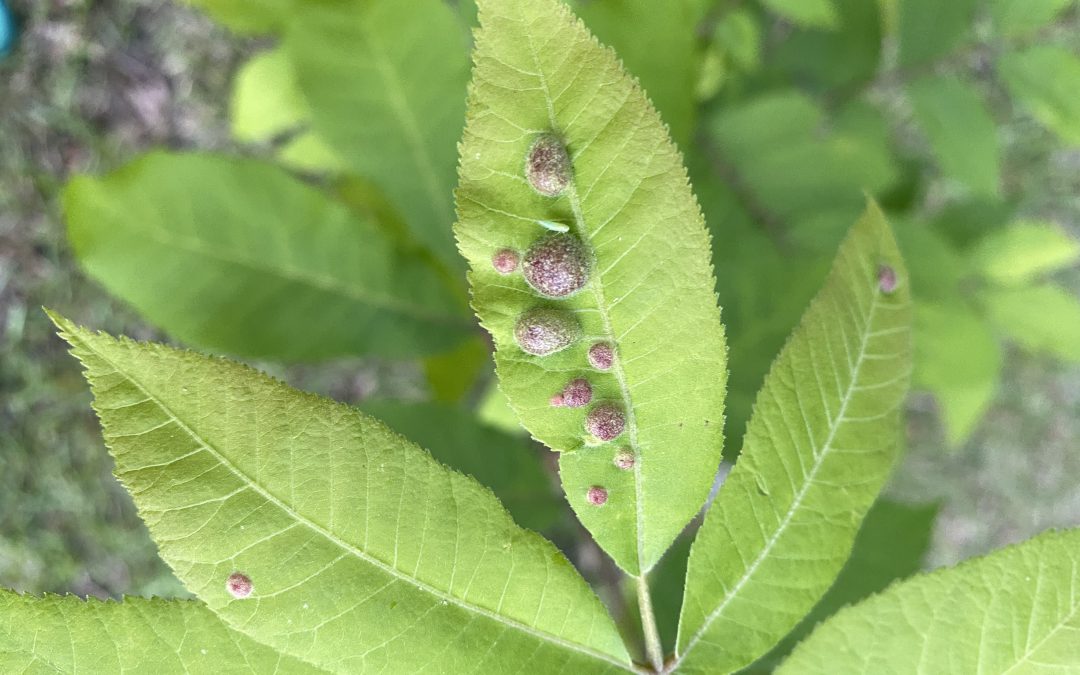
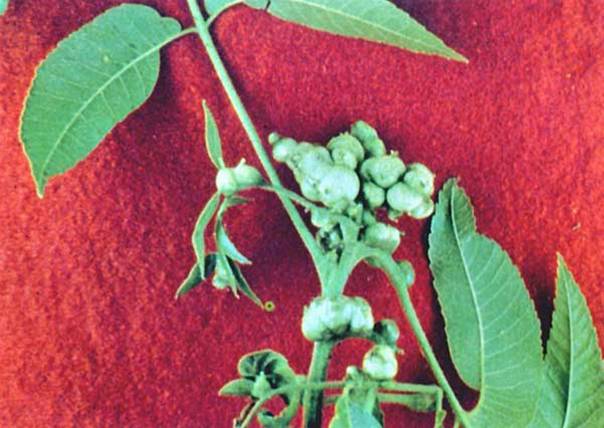
I was recently sent some pictures of some unusual growths on pecan tree leaves. At first glance, the growths reminded me of the galls caused by small wasps that lay their eggs on oak leaves. However, after a little searching it became apparent this wasn’t the case. These galls were caused by the feeding of an aphid-like insect known as phylloxera.
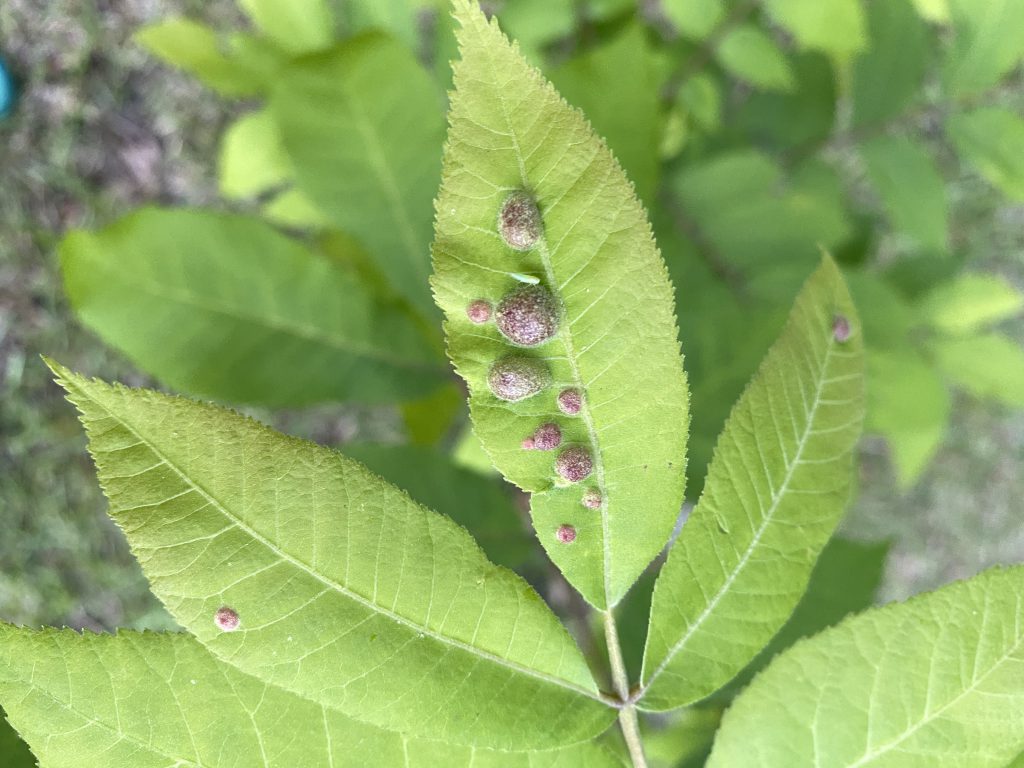
Leaf galls caused by pecan phylloxera. Photo Credit: Matt Lollar, University of Florida/IFAS Extension – Santa Rosa County
The feeding from the phylloxera causes the young leaf tissue to become distorted and form a gall that encloses this female insect called a “stem mother”. These insects are rarely seen, but the hatch from over-wintering eggs in March/April just after budbreak. Once hatched, these “stem mothers” crawl to the new leaves and begin feeding. Once the gall forms, they start to lay eggs inside the gall. The eggs hatch inside the gall and the young phylloxera begin to feed inside the gall and the gall enlarges. The matured insects break out of the gall in May and some will crawl to new spots on the leaves to feed and produce more galls.
Pecan stem damage from phylloxera. Photo Credit: University of Georgia
There are two common species of phylloxera that infect the leaves. The Pecan Leaf Phylloxera seems to prefer young trees and the Southern Pecan Leaf Phylloxera prefers older trees. The damage from each of these insects is nearly indistinguishable. Damage from these insects is usually not severe and merely an aesthetic issue.
Once the damage is discovered on a tree, it is too late to control the current year’s infestation. There are currently no effective methods for control of phylloxera in home gardens. Soil drench applications witha product containing imidacloprid have been limited in their effectiveness.
by Matt Lollar | Mar 20, 2020
It’s always fun to add new plant to the landscape. And it’s even more fun to propagate your own plant material. The question is, what plant propagation method is best? The answer depends on a number of factors such as:
- How much time and money is available?
- Is a uniform crop desired or is trait variation preferred?
- What is the plant species being propagated?
Plants can be propagated either by seed (sexual propagation) or by segments of vegetative material (asexual propagation). Sexual propagation takes far less time and effort because new plants are being started from the seeds (offspring) of parent plants. This type of propagation promotes genetic diversity because offspring may not have the exact characteristics of the parent plants. Sexual propagation increases the possibility of hybrid vigor, which is the improved quality of plant material to that of parent plants. Asexual propagation usually takes more time, but generally ensures that propagated plants will maintain the same characteristics as the parent plant. For some species it may be the only way to pass on desired traits to subsequent generations and it may be the only way to propagate certain species. A plant produced vegetatively can become larger than a plant produced by see in the same amount of time.
Tips for Successful Sexual Propagation
- Seed Collection – Seeds should be collected when fruit is ripe, just before they fall to the ground. In general, seeds should be cleaned, dried, and stored at 40 degrees Fahrenheit (in a refrigerator). However, palm seeds should be planted immediately after harvesting and cleaning.
- Seed Dormancy – Some seeds have thick seed coats the inhibit germination. Some seeds need to be scarified (breaking of the seed coat) and/or stratified (stored in a specific environment) in order to germinate.
- Seed Sowing – Seeds can be germinated in flats or other suitable containers in a seed starting media. Seeds should be planted at a depth of two to three times their diameter, but no deeper than 3 inches. Cycad seeds should be planted just below the medium surface.
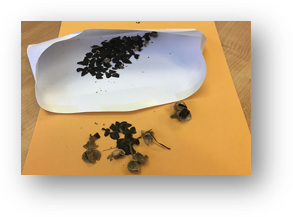
Seeds stored in an envelope. Photo Credit: University of Florida/IFAS
Tips for Successful Asexual Propagation – In general, asexual propagation is the propagation of plant material from cuttings of stems, leaves, and/or roots.
- Rooting Hormones – Increase rooting percentage, hasten root initiation, increase the number of roots per cutting, and increase root uniformity. Auxin based rooting hormones (Indolebutyric acid (IBA) and Naphthalenacetic acid (NAA)) are available in dry or liquid forms. It is important to use the correct concentration for the particular plant species because over application can cause damage to cutting base.
- Sticking Cuttings – Cuttings should be stuck in the medium only deep enough to support the cuttings and hold them upright (1/2″ to 1″ deep).
- Post-Rooting Care – Fertilization should be applied as soon as roots emerge from the cuttings. However, overfetilization can increase soluble salts and burn roots.
Examples of Asexual Propagation
- Softwood Cuttings – Taken from woody plants usually three to four weeks after a new flush of growth. Commonly propagated species using this method include: crape myrtle; magnolia; oleander; azalea; jasmine; and boxwood.
- Semihardwood Cuttings – Similar to softwood cuttings, but the lower portion of the cutting has become lignified (woody). Usually taken from new shoots six to nine weeks after a flush of growth. Commonly propagated species using this method include: camellia; pittosporum; junipers; and some hollies.
- Hardwood Cuttings – Taken from the previous season’s growth, just before or during the dormant period. Commonly propagated species using this method include narrow-leaved evergreens and deciduous species during the dormant season after leaves have dropped.
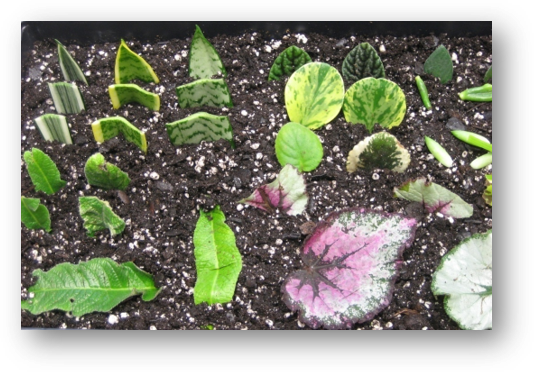
- Leaf Cuttings – Comprised of only the leaf blade or the leaf blade and petiole (leaf stalk). Cuttings are stuck upright in the propagation medium with the basal end (petiole end) of the leaf inserted into the propagation medium. Commonly propagated species using this method include begonias and peperomias.
- Root Cuttings – Taken in late winter or early spring from two to three-year-old plant material. Plants propagated by root cuttings may not reproduce true to type if they are budded or grafted. Commonly propagated species using this method include: plumbago; bayberry; oakleaf hydrangea; and yucca.
Plants being propagated by leaf cuttings. Photo Credit: University of Florida/IFAS
This article provides only a brief overview of propagation methods and techniques. For more information on plant propagation please visit University of Florida Plant Propagation Glossary or Plant Propagation Techniques for the Florida Gardener. Please be advised that some plant material is patented and it is illegal to propagate patented material without written authorization or licensing of the patent holder. If it is patented, a notation of patent number will be on the tag.
by Matt Lollar | Jan 13, 2020
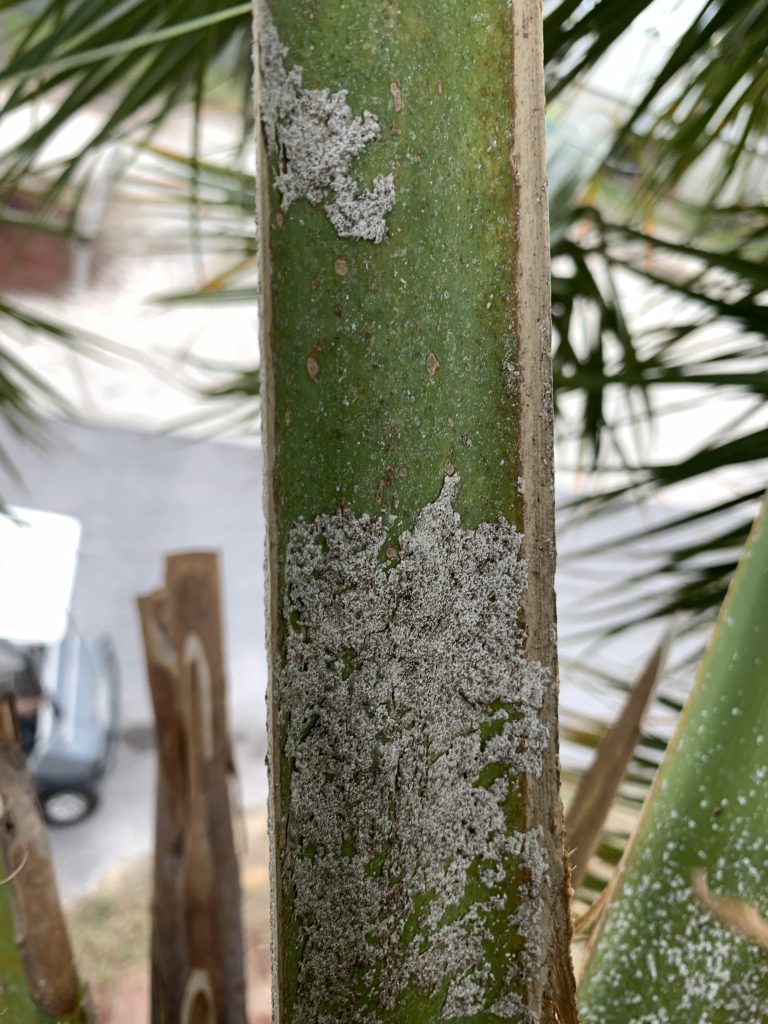
Scale insects on a cabbage palm (Sabal palmetto). Photo Credit: Matt Lollar, University of Florida/IFAS Extension – Santa Rosa County
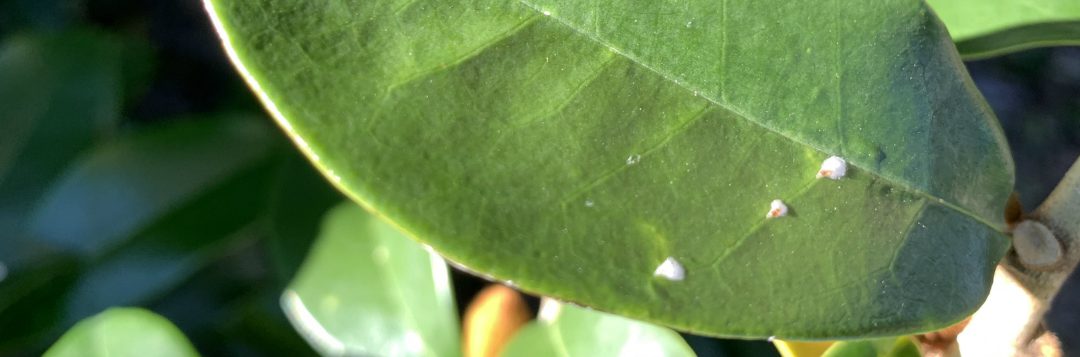
This week I was on a couple site visits to look on some cabbage palms (Sabal palmetto) and some banana shrubs (Michelia figo). The palms had a white, waxy substance on their frond petioles and the banana shrubs had white specs on the tops of their leaves. Upon further investigation, I realized the waxy substance and specs were both different species of scales. Scale insects are serious pests of a number of ornamental plants. Here in Florida there are 13 different families of scales with the most common being armored scales, soft scales, and mealybugs. Scales have piercing-sucking mouthparts which they use to siphon fluids from the leaves, stems, and sometimes roots of many ornamental plants. Heavy infestations cause extensive leaf yellowing, premature leaf drop, branch dieback, and eventually plant death.
Scale Biology
The life cycle of a scale begins with eggs being laid beneath wax coverings or beneath the adult female. Eggs typically hatch in 1 to 3 weeks. The newly hatched nymphs, called crawlers, move around a plant until they find a spot to feed. Once a feeding site is located, their piercing sucking mouthparts are inserted into the plant and the crawlers begin to feed and grow. The males of many scale species develop wings as adults and fly to other plants to reproduce.
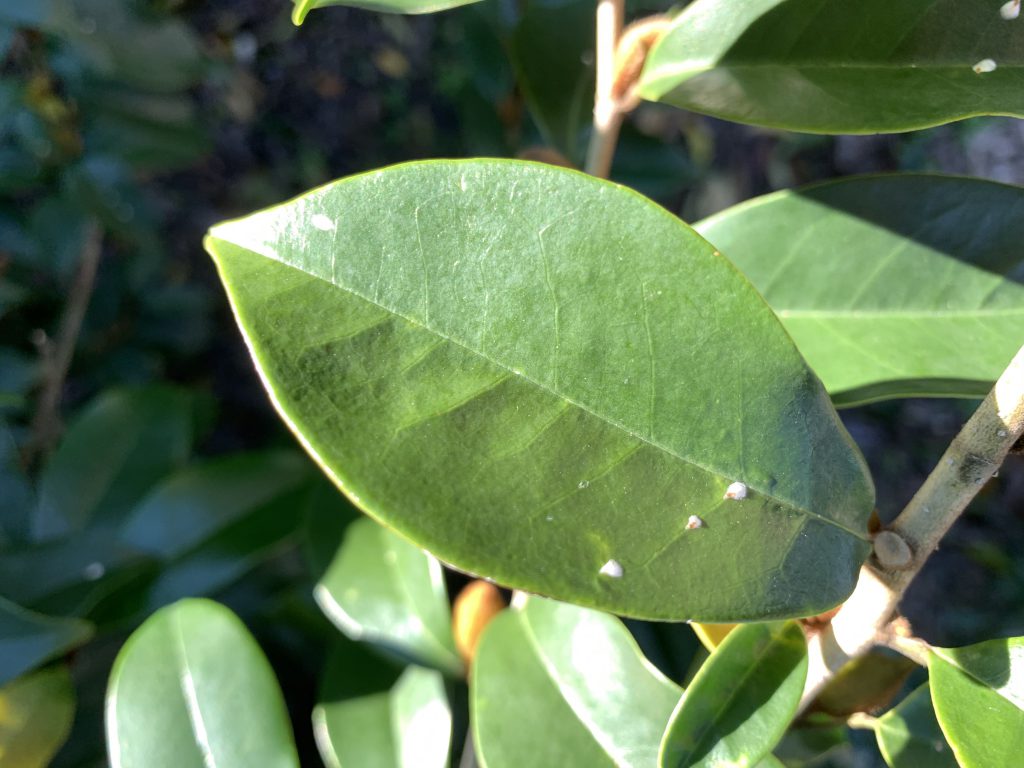
Magnolia white scales on a banana shrub (Michelia figo). Photo Credit: Matt Lollar, University of Florida/IFAS Extension – Santa Rosa County
Armored Scales
Armored scales get their armor by secreting a waxy covering over their bodies that is not attached. The scale lives under this covering and uses it as a protection to feed under. Armored scales can be almost any color or shape and range anywhere from 1/16 to 1/8 inch in diameter. For females, these shapes range from circular to oval to long and slender. The males typically have coverings that are more elongate and smaller than the females. As adults, the males are tiny, winged, gnat-like insects and are rarely seen.
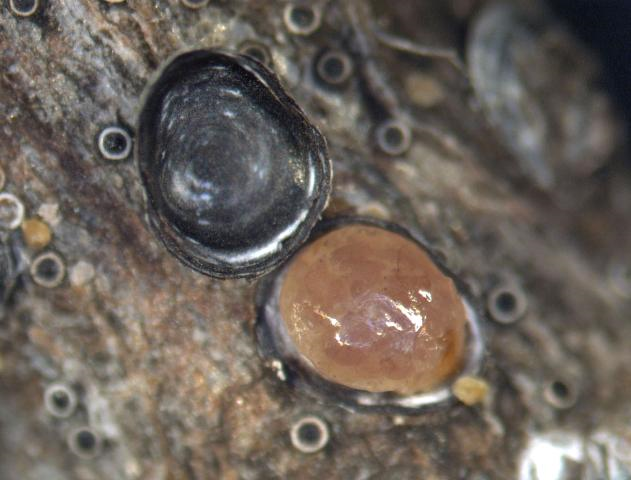
Gloomy scale (Melanaspis tenebricosa) with armored covering removed. Photo Credit: A. G. Dale, University of Florida/IFAS
Soft Scales
Similar to armored scales, soft scales secrete a waxy covering, but it is attached to their bodies. Soft scales can be a number of colors, shapes, and sizes and range anywhere from 1/8 to 1/2 inch in diameter. Their shapes vary from spherical to nearly flat.

Population of adult and immature tuttle mealybugs (Brevennia rehi) on a blade of zoysiagrass. Photo Credit: Lyle J. Buss, University of Florida/IFAS
Mealybugs
Mealybugs are soft-bodied insects that possess a covering of flocculent, white, waxy filaments. They are about 1/8 inch in length and usually pinkish or yellowish in color. Mealybugs have piercing-sucking mouthparts which they use to siphon fluids from the leaves, stems, and sometimes roots of many ornamental plants. Mealybug damage produces discolored, wilted, and deformed leaves.
Scale and Mealybug Management
- Cultural Control – Plant inspection prior to purchase or installation is the first line of defense against a scale or mealybug population. Make sure to inspect the undersides of leaves and plant stems. Infested sections of plants can be pruned and plant material should be cleaned from the planting area and discarded. Also, you can increase air flow and decrease humidity by proper installation and pruning. Over-fertilizing can also increase pest populations.
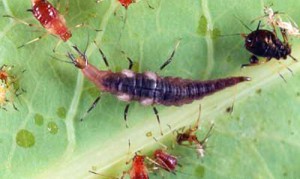
Larva of a brown lacewing. Credits: Lyle Buss, University of Florida.
- Biological Control – Predators, such as ladybugs and green lacewings, are usually present in large enough numbers to suppress scales and mealybugs to a desirable threshold. However, broad-spectrum insecticides and bad weather can reduce predator numbers. Look for signs of predation by inspecting dead scales for jagged holes in their waxy coatings. If predation signs are present, use more selective chemical controls and oils as opposed to broad-spectrum products.
- Chemical Control – Timing is everything when it comes to managing scale and mealybug insects. Crawler activity is more pronounced with the flush of new plant growth in the spring. Before application, prune infested plant parts off first to promote greater penetration of insecticides into the foliage. Dormant Oils are often used in the winter to smother scale insects. These are good choices to implement because they don’t harm non-target or beneficial insects. Care must be taken to read the label and use them at the correct temperature, since use in hot weather may burn foliage. Contact products (acephate, bifenthrin, carbaryl, etc.) must be applied to inhibit the crawler stages of these insects and systemic products (acetamiprid, imidacloprid, thiamethoxam, etc.) can be used on the sessile growth stage. Plants should be sprayed thoroughly to the point of drip or “run off” from leaves, twigs, and stems. Repeated applications may still be necessary even if the timing is right, as crawler populations are often large and crawlers like to hide under old waxy scales. Systemic drenches are also a viable option. With good spray coverage, horticultural oils can kill scales at all stages of growth. Refer to the product label for phytotoxicity and temperature guidelines. Even after successful treatment, the outer coatings of the scales may remain on the plant material for weeks, which can be unsightly. The best way to determine if scales are dead is to squeeze them. They will be dry when squeezed if they are dead and they will ooze liquids if they are living (they were at least alive to the point of being squashed).
For insect identification and additional information on scale control, please see:
A Guide to Scale Insect Identification
UF/IFAS Featured Creatures
Your County Extension Office
by Matt Lollar | Dec 10, 2019
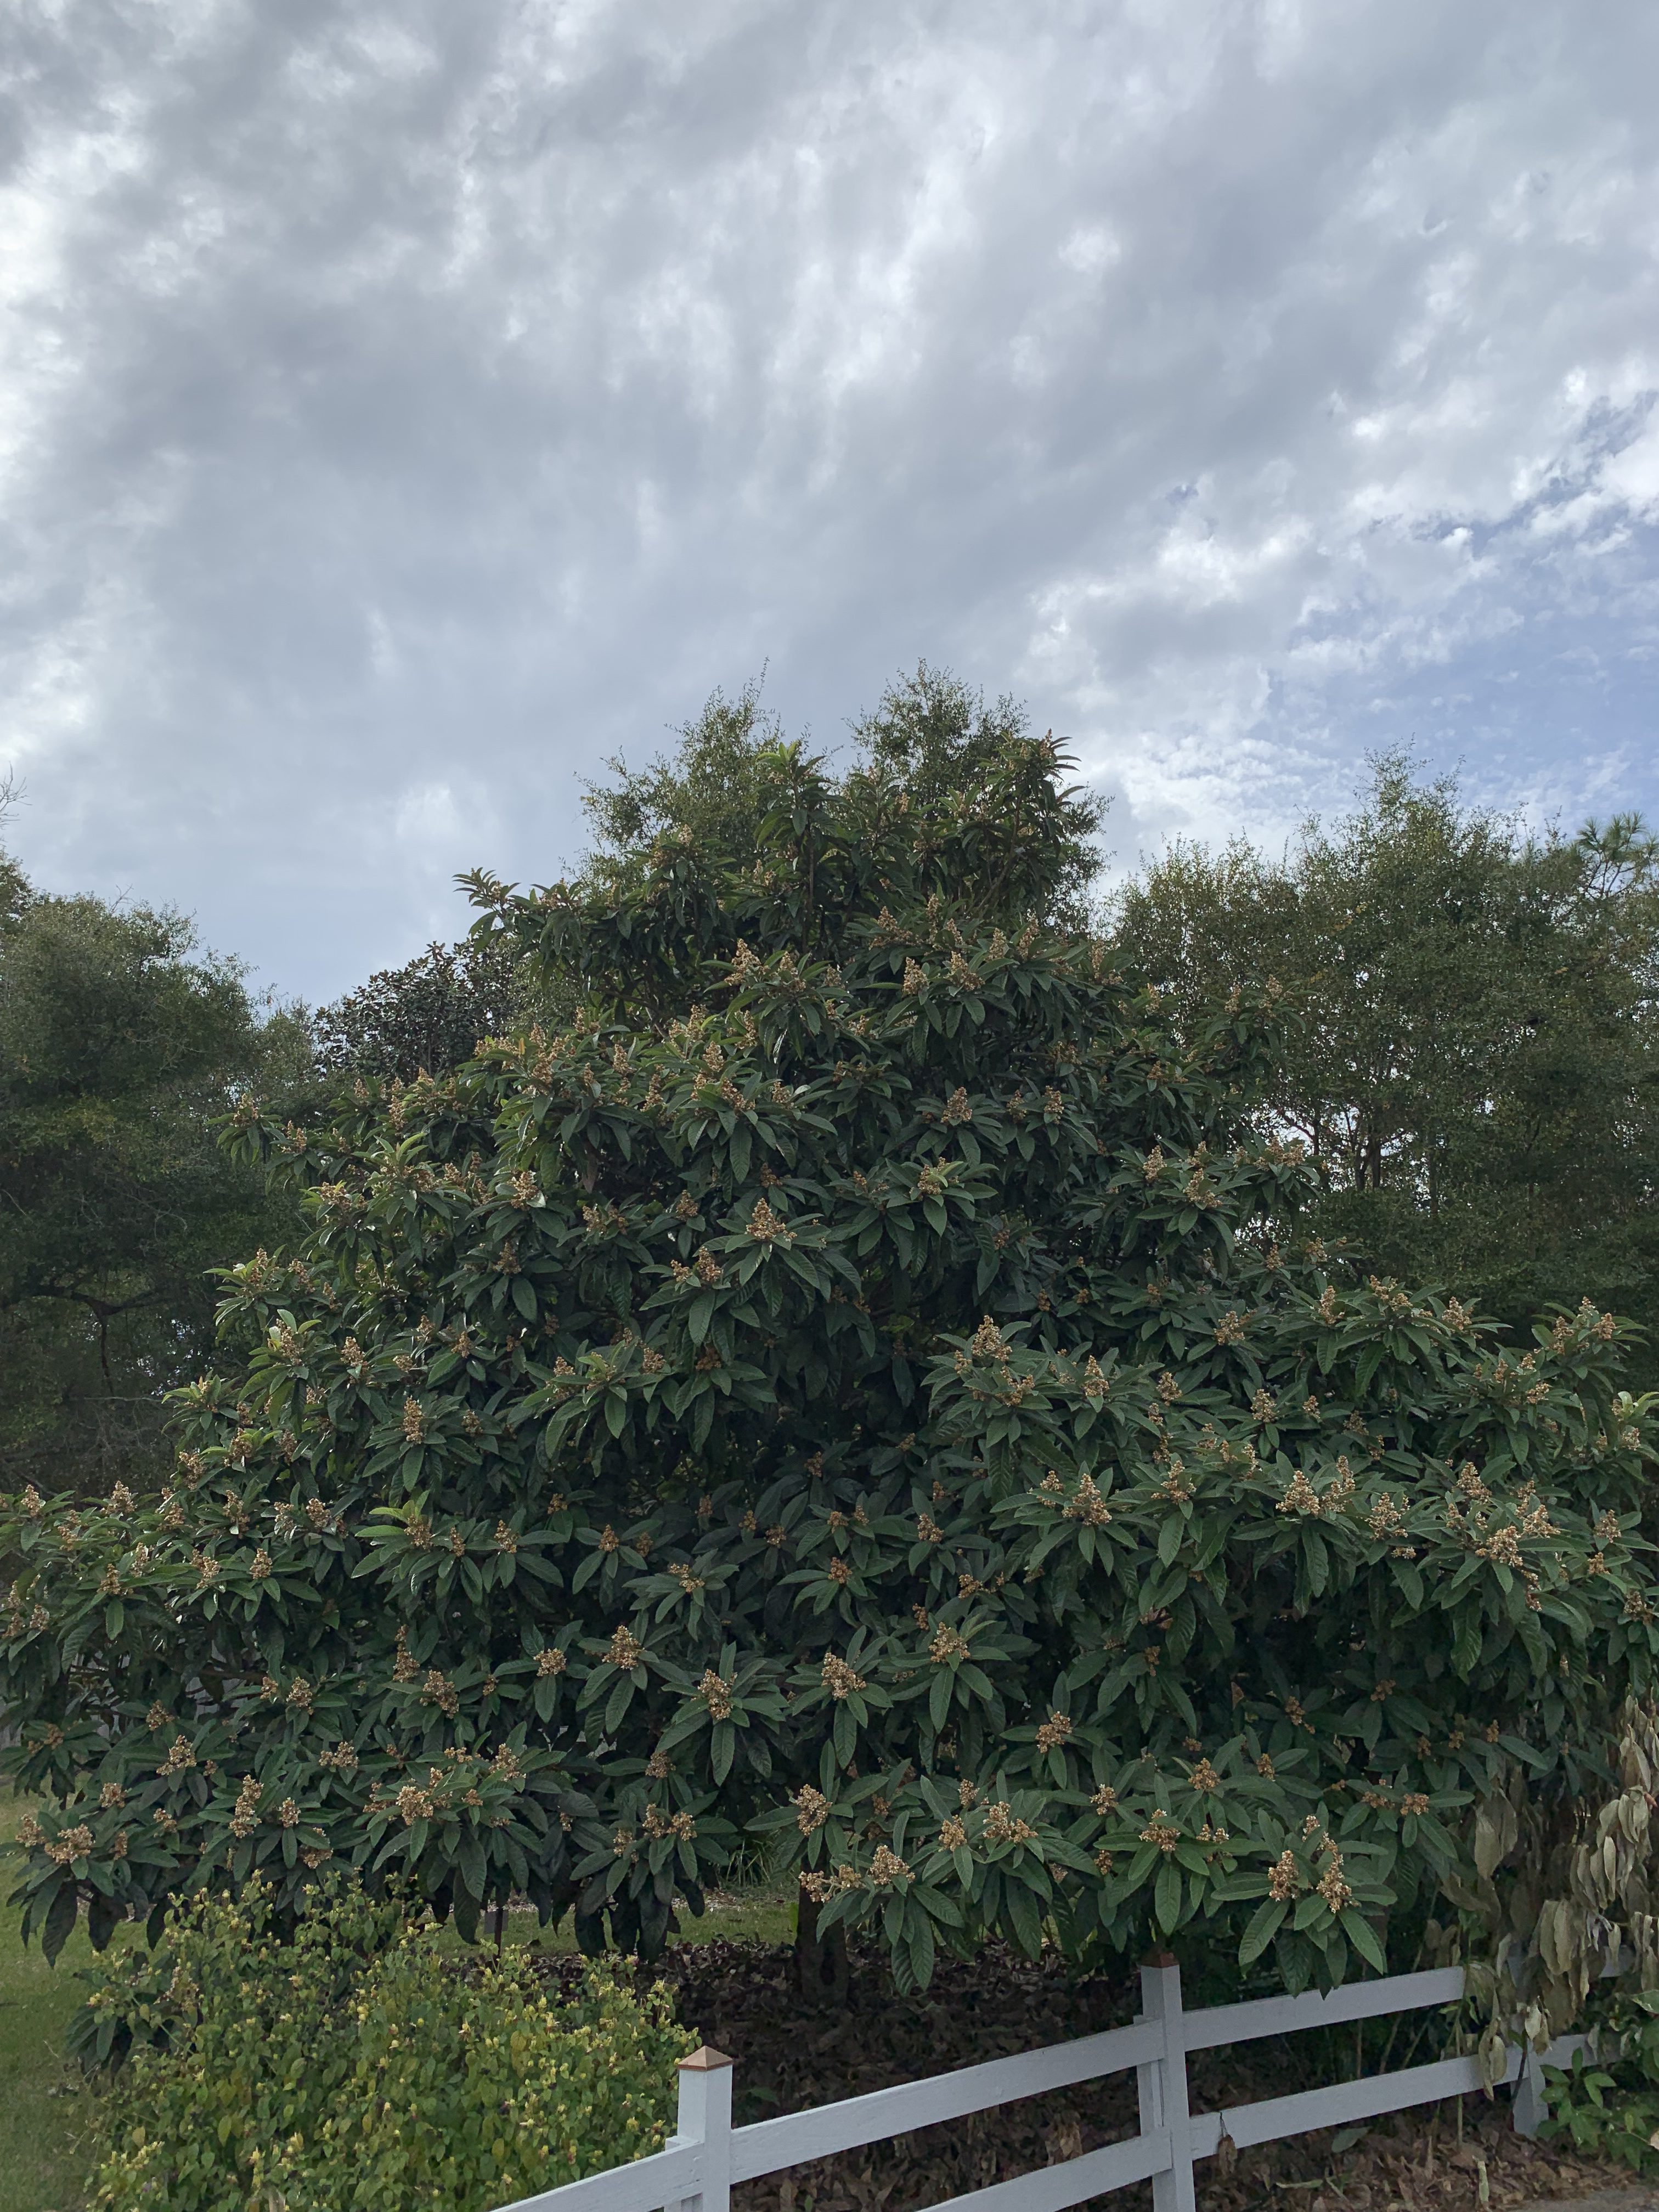
Loquat trees provide nice fall color with creamy yellow buds and white flowers on their long terminal panicles. These small (20 to 35 ft. tall) evergreen trees are native to China and first appeared in Southern landscapes in the late 19th Century. They are grown commercially in subtropical and Mediterranean areas of the world and small production acreage can be found in California. They are cold tolerant down to temperatures of 8 degrees Fahrenheit, but they will drop their flowers or fruit if temperatures dip below 27 degrees Fahrenheit.
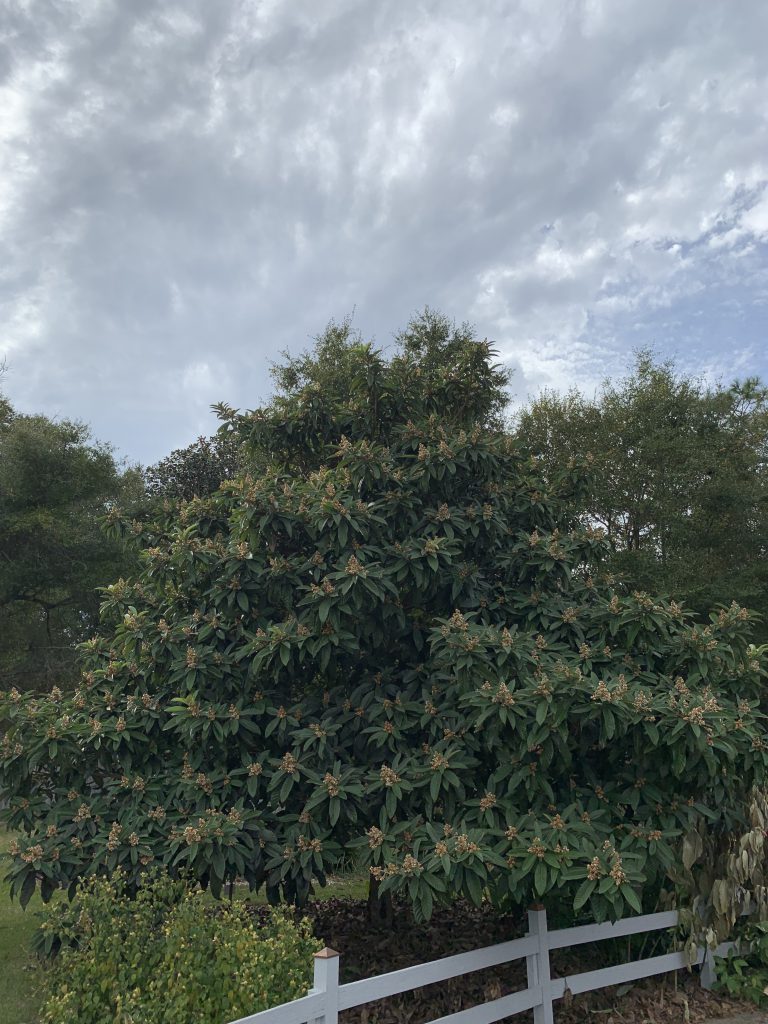
A beautiful loquat specimen at the UF/IFAS Extension at Santa Rosa County. Photo Credit: Matt Lollar, University of Florida/IFAS – Santa Rosa County
Leaves – The leaf configuration on loquat trees is classified as whorled. The leaf shape is lanceolate and the color is dark green with a nice soft brown surface underneath. These features help give the trees their tropical appearance.
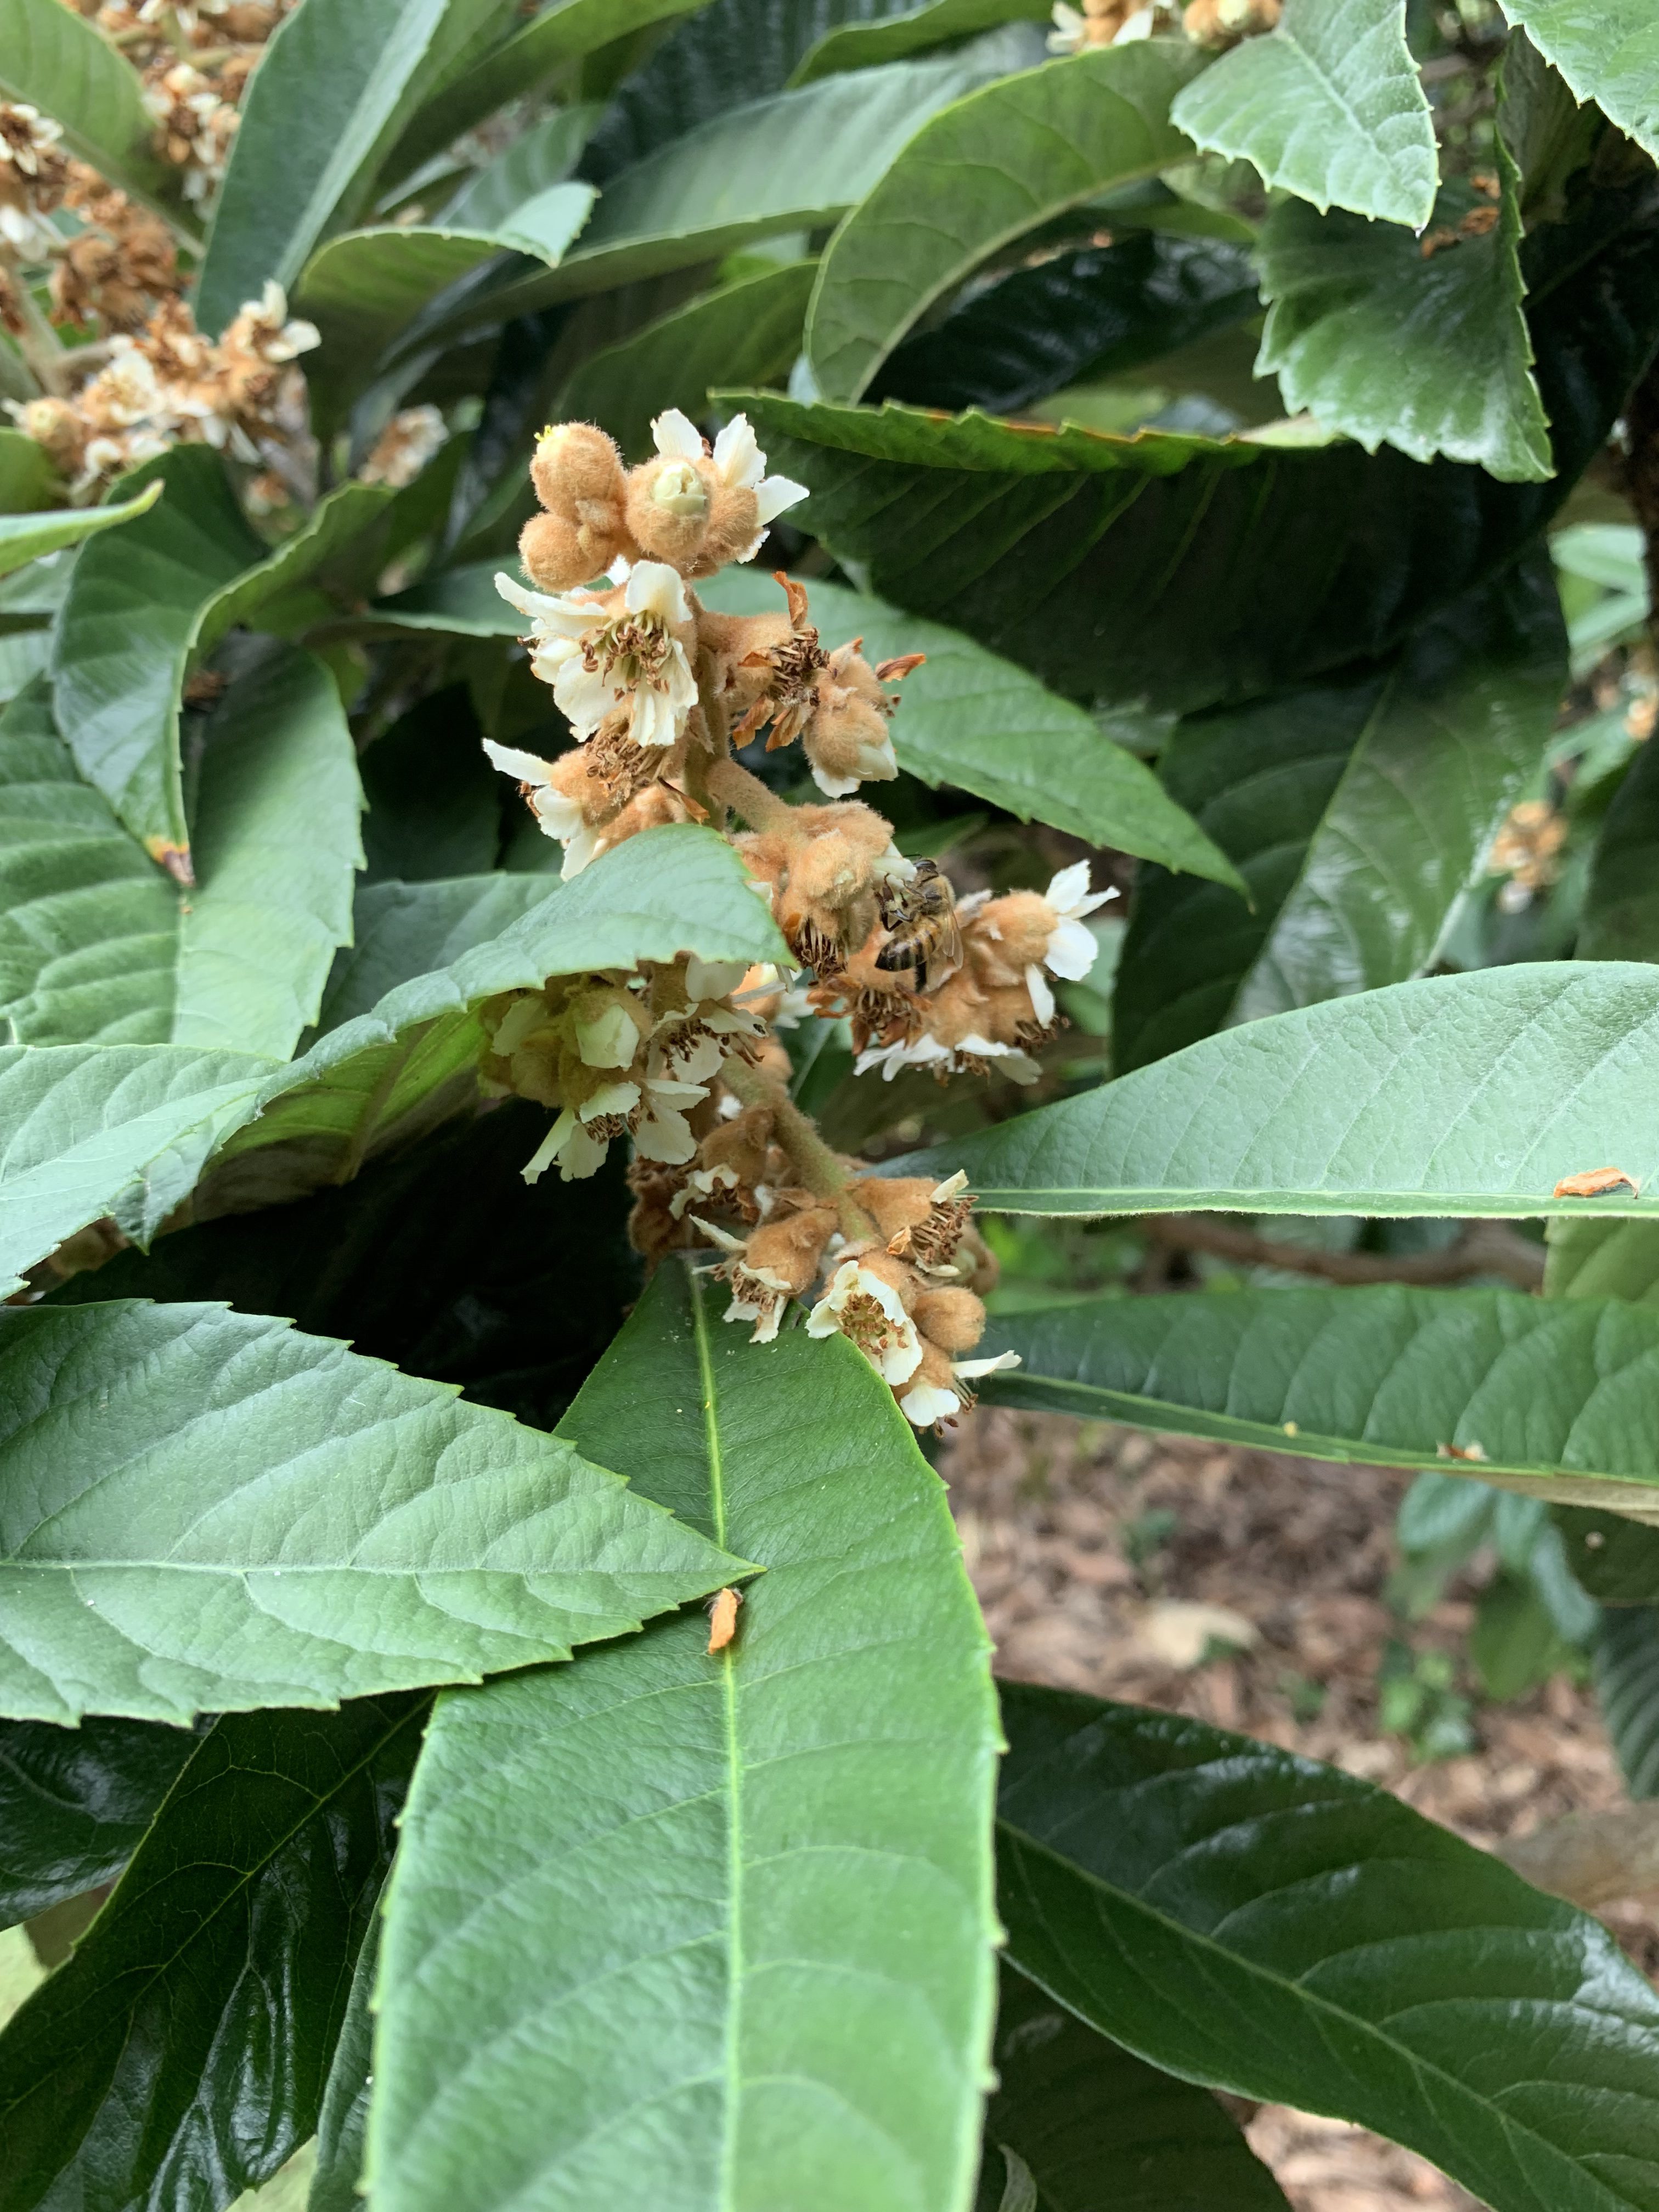
Flowers – 30 to 100 flowers can be present on each terminal panicle. Individual flowers are roughly half an inch in diameter and have white petals.
Fruit – What surprises most people is that loquats are more closely related to apples and peaches than any tropical fruit. Fruit are classified as pomes and appear in clusters ranging from 4 to 30 depending on variety and fruit size. They are rounded to ovate in shape and are usually between 1.5 and 3 inches in length. Fruit are light yellow to orange in color and contain one to many seeds.

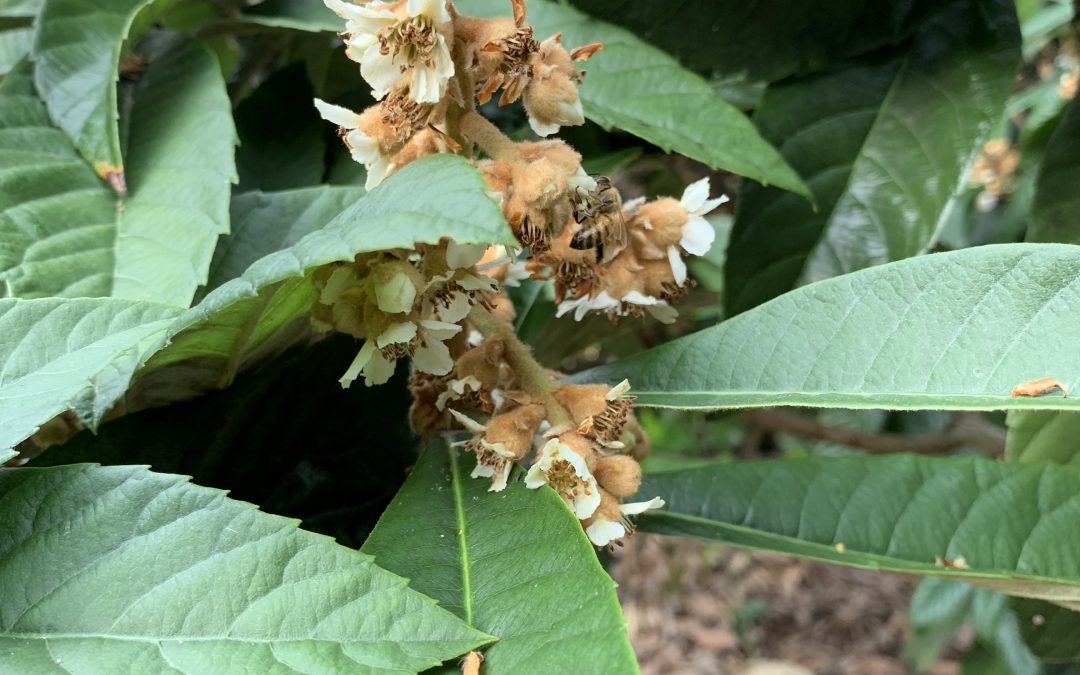
A cluster of loquat flowers/buds being pollinated by a honey bee. Photo Credit: Matt Lollar, University of Florida/IFAS – Santa Rosa County
Propagation – Loquat trees are easily propagated by seed, as you will notice as soon as your tree first bears fruit. Seedlings pop up throughout yards containing even just one loquat tree. It is important to note that the trees do not come true from seed and they go through a 6- to 8-year juvenile period before flowering and fruiting. Propagation by cuttings or air layering is more difficult but rewarding, because vegitatively-propagated trees bear fruit within two years of planting. Sometimes mature trees are top-worked (grafted at the terminal ends of branches) to produce a more desirable fruit cultivar.
Loquat trees are hardy, provide an aesthetic focal point to the landscape, and produce a tasty fruit. For more information on growing loquats and a comprehensive list of cultivars, please visit the UF EDIS Publication: Loquat Growing in the Florida Home Landscape.
by Matt Lollar | Oct 8, 2019
Last week at the Panhandle Fruit and Vegetable Conference, Dr. Ali Sarkhosh presented on growing pomegranate in Florida. The pomegranate (Punica granatum) is native to central Asia. The fruit made its way to North America in the 16th century. Given their origin, it makes sense that fruit quality is best in regions with cool winters and hot, dry summers (Mediterranean climate). In the United States, the majority of pomegranates are grown in California. However, the University of Florida, with the help of Dr. Sarkhosh, is conducting research trials to find out which varieties do best in our state.
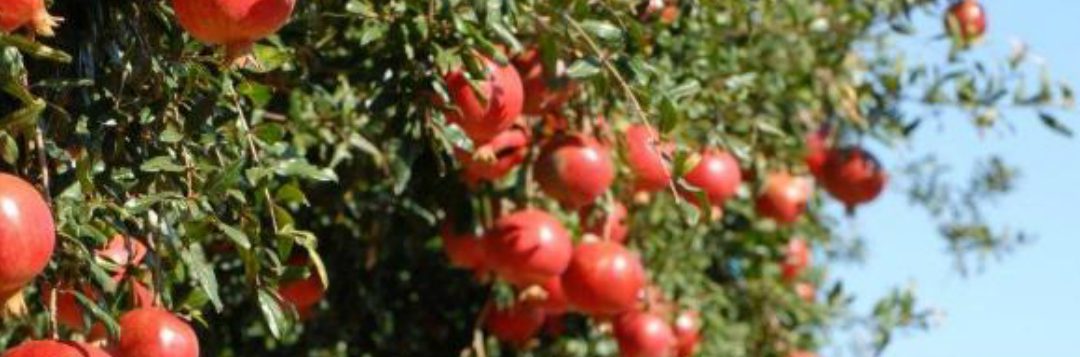
In the wild, pomegranate plants are dense, bushy shrubs growing between 6-12 feet tall with thorny branches. In the garden, they can be trained as small single trunk trees from 12-20 feet tall or as slightly shorter multi-trunk (3 to 5 trunks) trees. Pomegranate plants have beautiful flowers and can be utilized as ornamentals that also bear fruit. In fact, there are a number of varieties on the market for their aesthetics alone. Pomegranate leaves are glossy, dark green, and small. Blooms range from orange to red (about 2 inches in diameter) with crinkled petals and lots of stamens. The fruit can be yellow, deep red, or any color in between depending on variety. The fruit are round with a diameter from 2 to 5 inches.
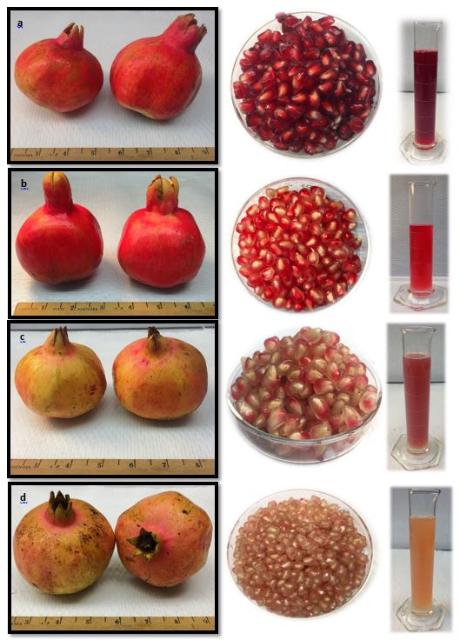
Fruit, aril, and juice characteristics of four pomegranate cultivars grown in Florida; fruit harvested in August 2018. a) ‘Vkusnyi’, b) ‘Crab’, c) ‘Mack Glass’, d) ‘Ever Sweet’. Photo Credit: Ali Sarkhosh, University of Florida/IFAS
A common commercial variety, ‘Wonderful’, is widely grown in California but does not perform well in Florida’s hot and humid climate. Cultivars that have performed well in Florida include: ‘Vkusnyi’; ‘Crab’; ‘Mack Glass’; and ‘Ever Sweet’. Pomegranates are adapted to many soil types from sands to clays, however yields are lower on sandy soils and fruit color is poor on clay soils. They produce best on well-drained soils with a pH range from 5.5 to 7.0. The plants should be irrigated every 7 to 10 days if a significant rain event doesn’t occur. Flavor and fruit quality are increased when irrigation is gradually reduced during fruit maturation. Pomegranates are tolerant of some flooding, but sudden changes to irrigation amounts or timing may cause fruit to split.

Two pomegranate training systems: single trunk on the left and multi-trunk on the right. Photo Credit: Ali Sarkhosh, University of Florida/IFAS
Pomegranates establish best when planted in late winter or early spring (February – March). If you plan to grow them as a hedge (shrub form), space plants 6 to 9 feet apart to allow for suckers to fill the void between plants. If you plan to plant a single tree or a few trees then space the plants at least 15 feet apart. If a tree form is desired, then suckers will need to be removed frequently. Some fruit will need to be thinned each year to reduce the chances of branches breaking from heavy fruit weight.
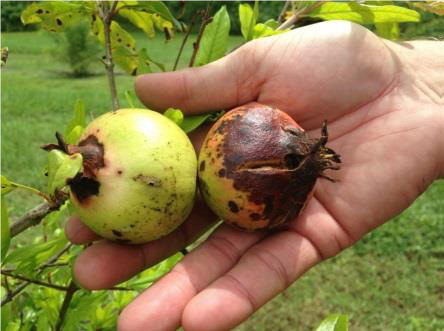
Anthracnose caused by Colletotrichum sp. to pomegranate fruit. Photo Credit: Gary Vallad, University of Florida/IFAS
Anthracnose is the most common disease of pomegranates. Symptoms include small, circular, reddish-brown spots (0.25 inch diameter) on leaves, stems, flowers, and fruit. Copper fungicide applications can greatly reduce disease damage. Common insects include scales and mites. Sulfur dust can be used for mite control and horticultural oil can be used to control scales.