by Beth Bolles | Aug 28, 2019
More and more homeowners are incorporating edible plants into their home landscape in order to enjoy the fresh taste of fruits and vegetables. Another trend to consider this coming cool season is to start a few common flowers that can serve as flavor enhancements for many of your dishes.
There are numerous plants that we commonly grow that have edible flowers but before striking out on your first taste test, be sure to research first. Always remember the common saying that every flower is edible once. Find a reputable reference guide from a friendly neighborhood Extension office for a list of common edible flowers, then be ready to start from seeds. It is best not to purchase transplants from an ornamental nursery unless you are sure of all the treatments for that plants. Nurseries are often selling these for beauty alone, not with intention that they will be eaten.
Here are a few edible flowers to try:
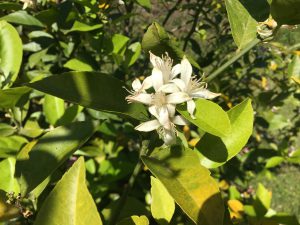
Pot marigold or Calendula is a wonderful cool season flower on its own. Brightly colored orange or yellow flowers improve the drab colors of our cool season and plants are sturdy annuals for borders, mass plantings, or in containers. Petals have a peppery flavor and add spice to salads and sandwiches. You may also add flowers to soups, fishes and butters for added coloring. Calendula petals can be a saffron substitute.
Calenduala is easily started from seeds and will reseed in your garden once established. Photo by Beth Bolles, UF IFAS Extension Escambia County.
The well known dianthus is a great transition plant as our days cool and warm up again the spring. Use as front of the border plantings or in containers as a filler. When harvesting petals of dianthus, you will want to remove the white petal base which is a little bitter. The flavor is a little more delicate than cloves so you can add petals to punches, desserts, and fruit salads.
If you like a little more spice, try nasturtiums. We often plant these after the last frost and they grow until we get too hot. Since our fall weather is so unpredictable, you may be able to start some seeds for a fall planting and have flowers before our first cold spell. Either way, nasturtium flowers are often sliced for salads and sandwiches as a mustard or pepper substitute. You can also mince flowers to add to a butter. If you let some flowers go to seed, collect the unripe seeds to make a caper substitute vinegar.
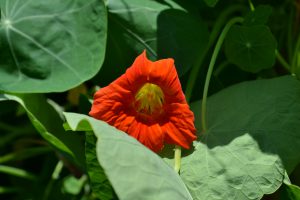
Grow nasturiums during our transition times of spring and fall. Photo by Beth Bolles, UF IFAS Extension Escambia County.
If you are going to use edible flowers from your garden remember to keep all non food labeled pesticides away from plants. Harvest flowers at their peak after the dew dries. Separate petals from other flower parts and if you have allergies be sure to remove any pollen. Place flowers in a moist towel in the refrigerator if you will not use them immediately. Rinse carefully so not to damage tender petals.
There are many other ornamental plants that offer edible flowers you may want to consider growing in the future. These flowers not only enhance the look of the dish but can offer unique flavoring from a locally grown source – your own backyard.
by Daniel J. Leonard | Aug 20, 2019
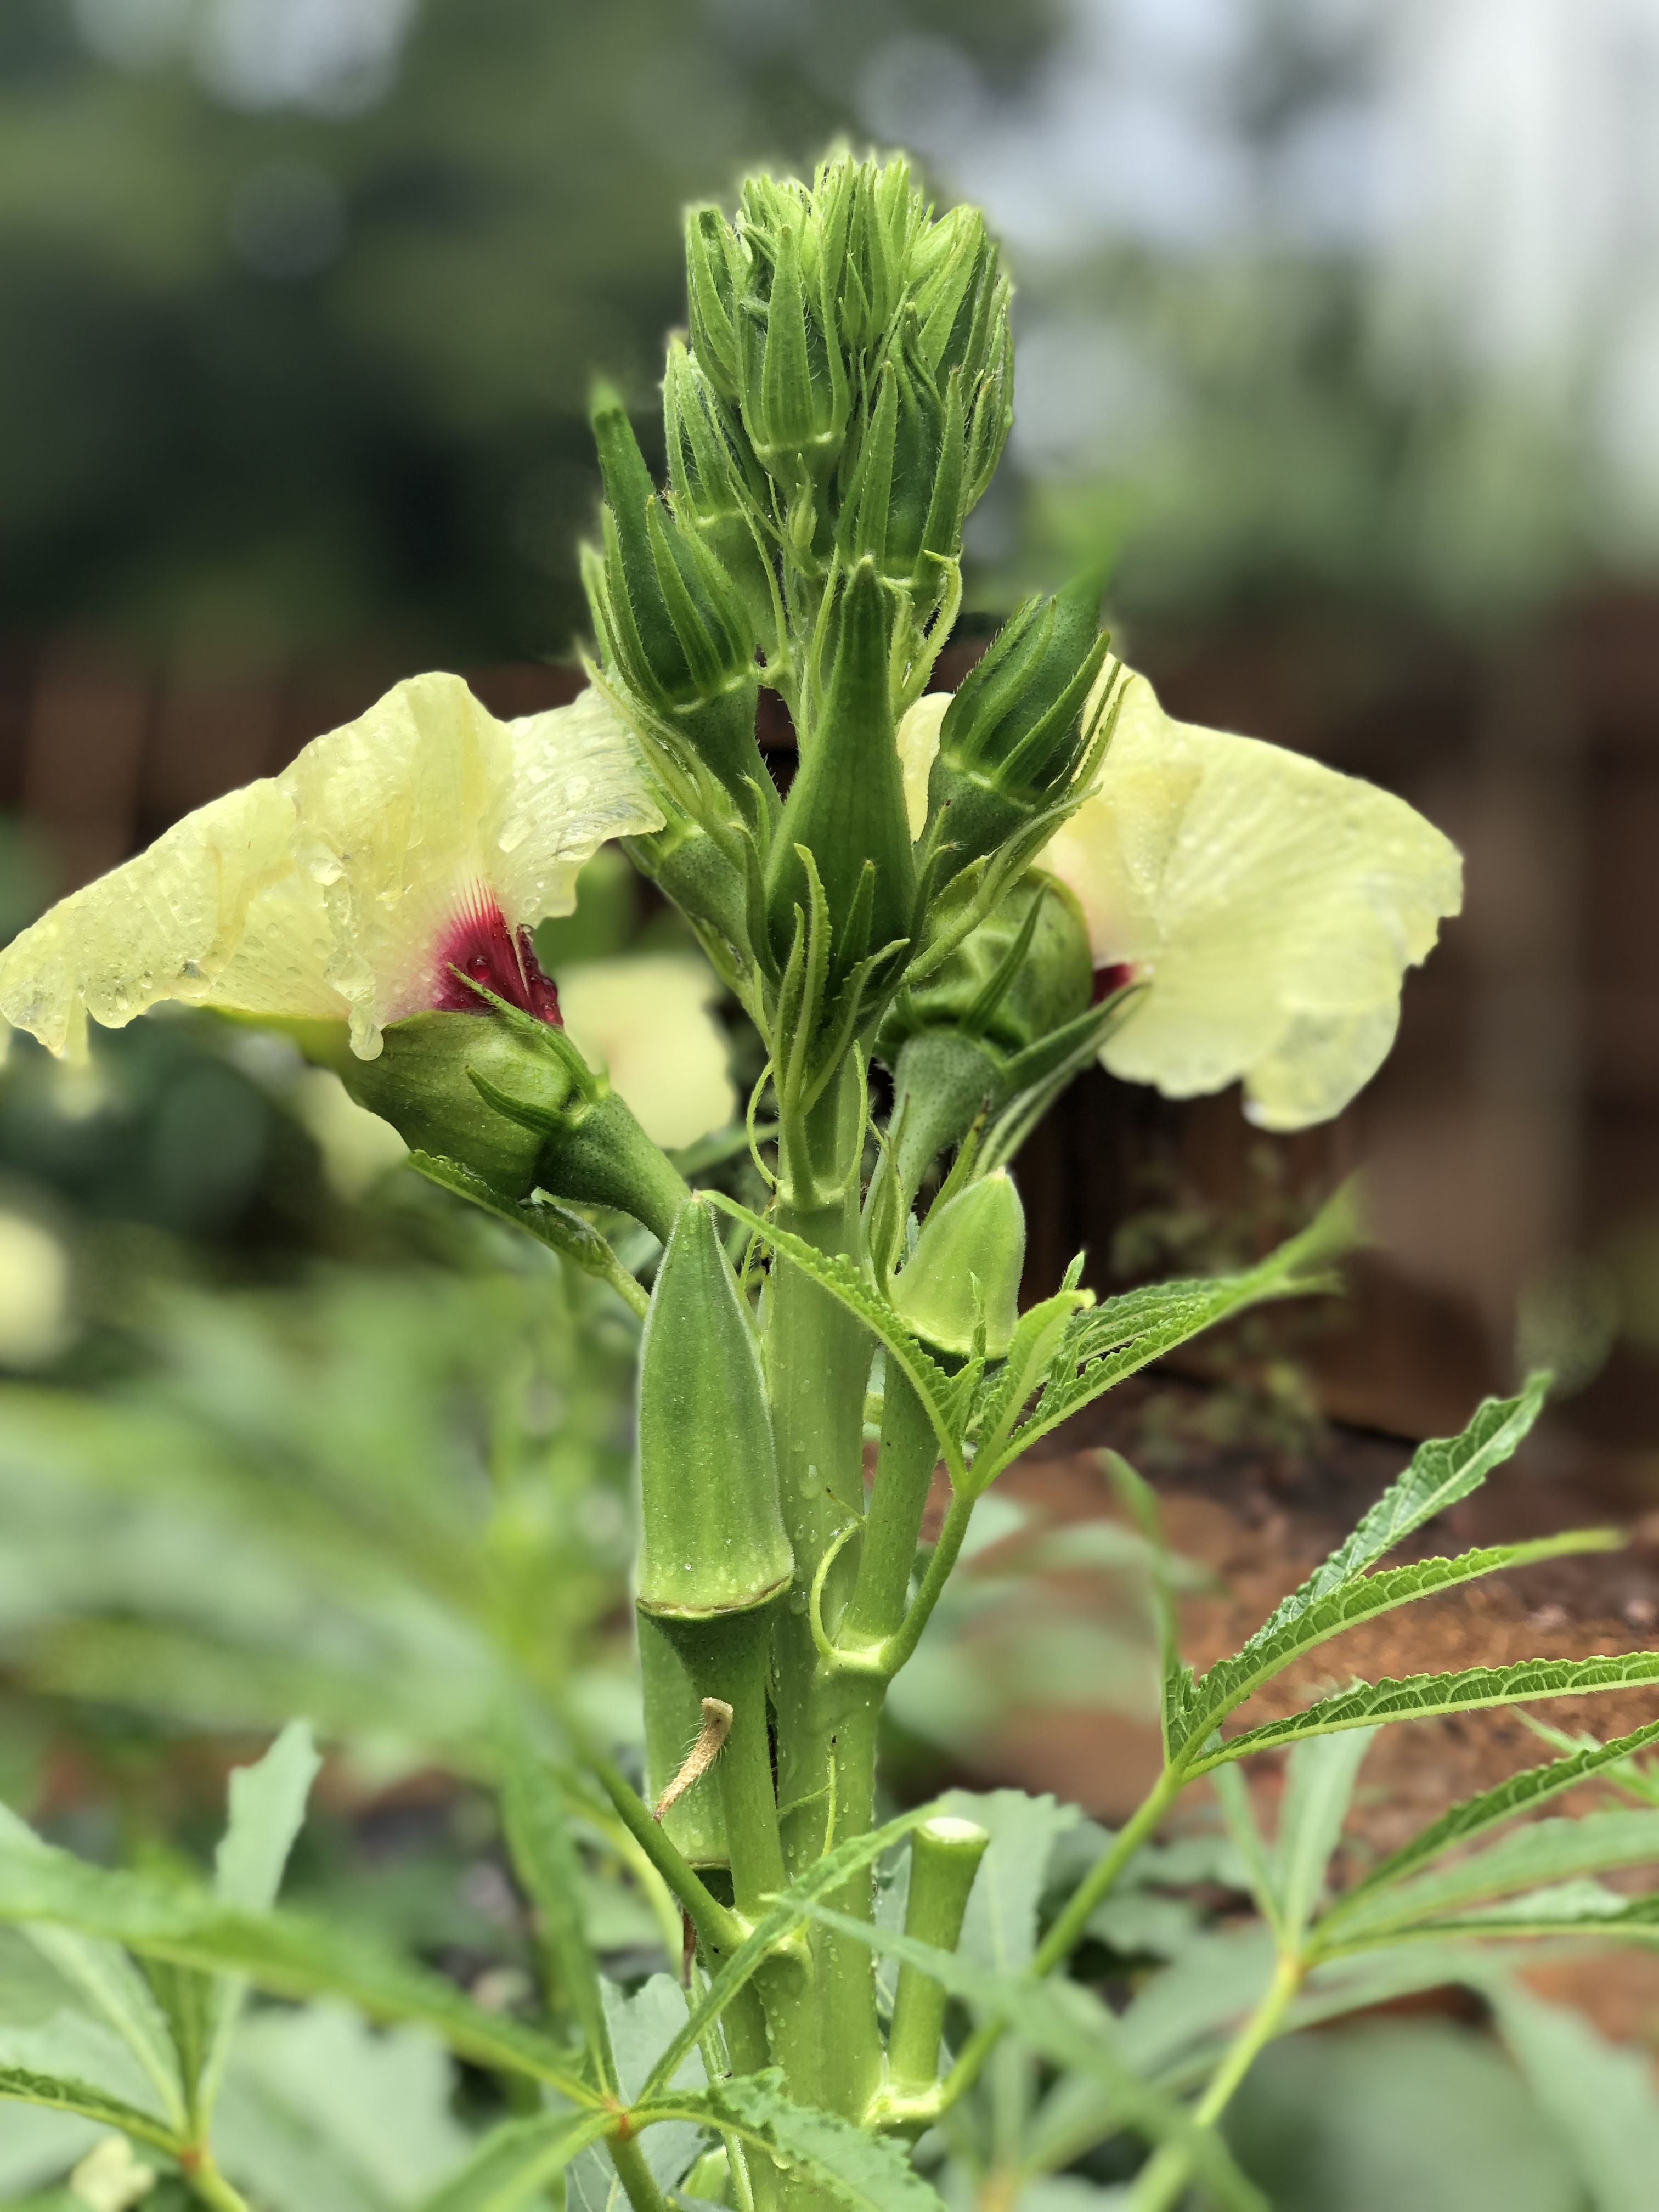
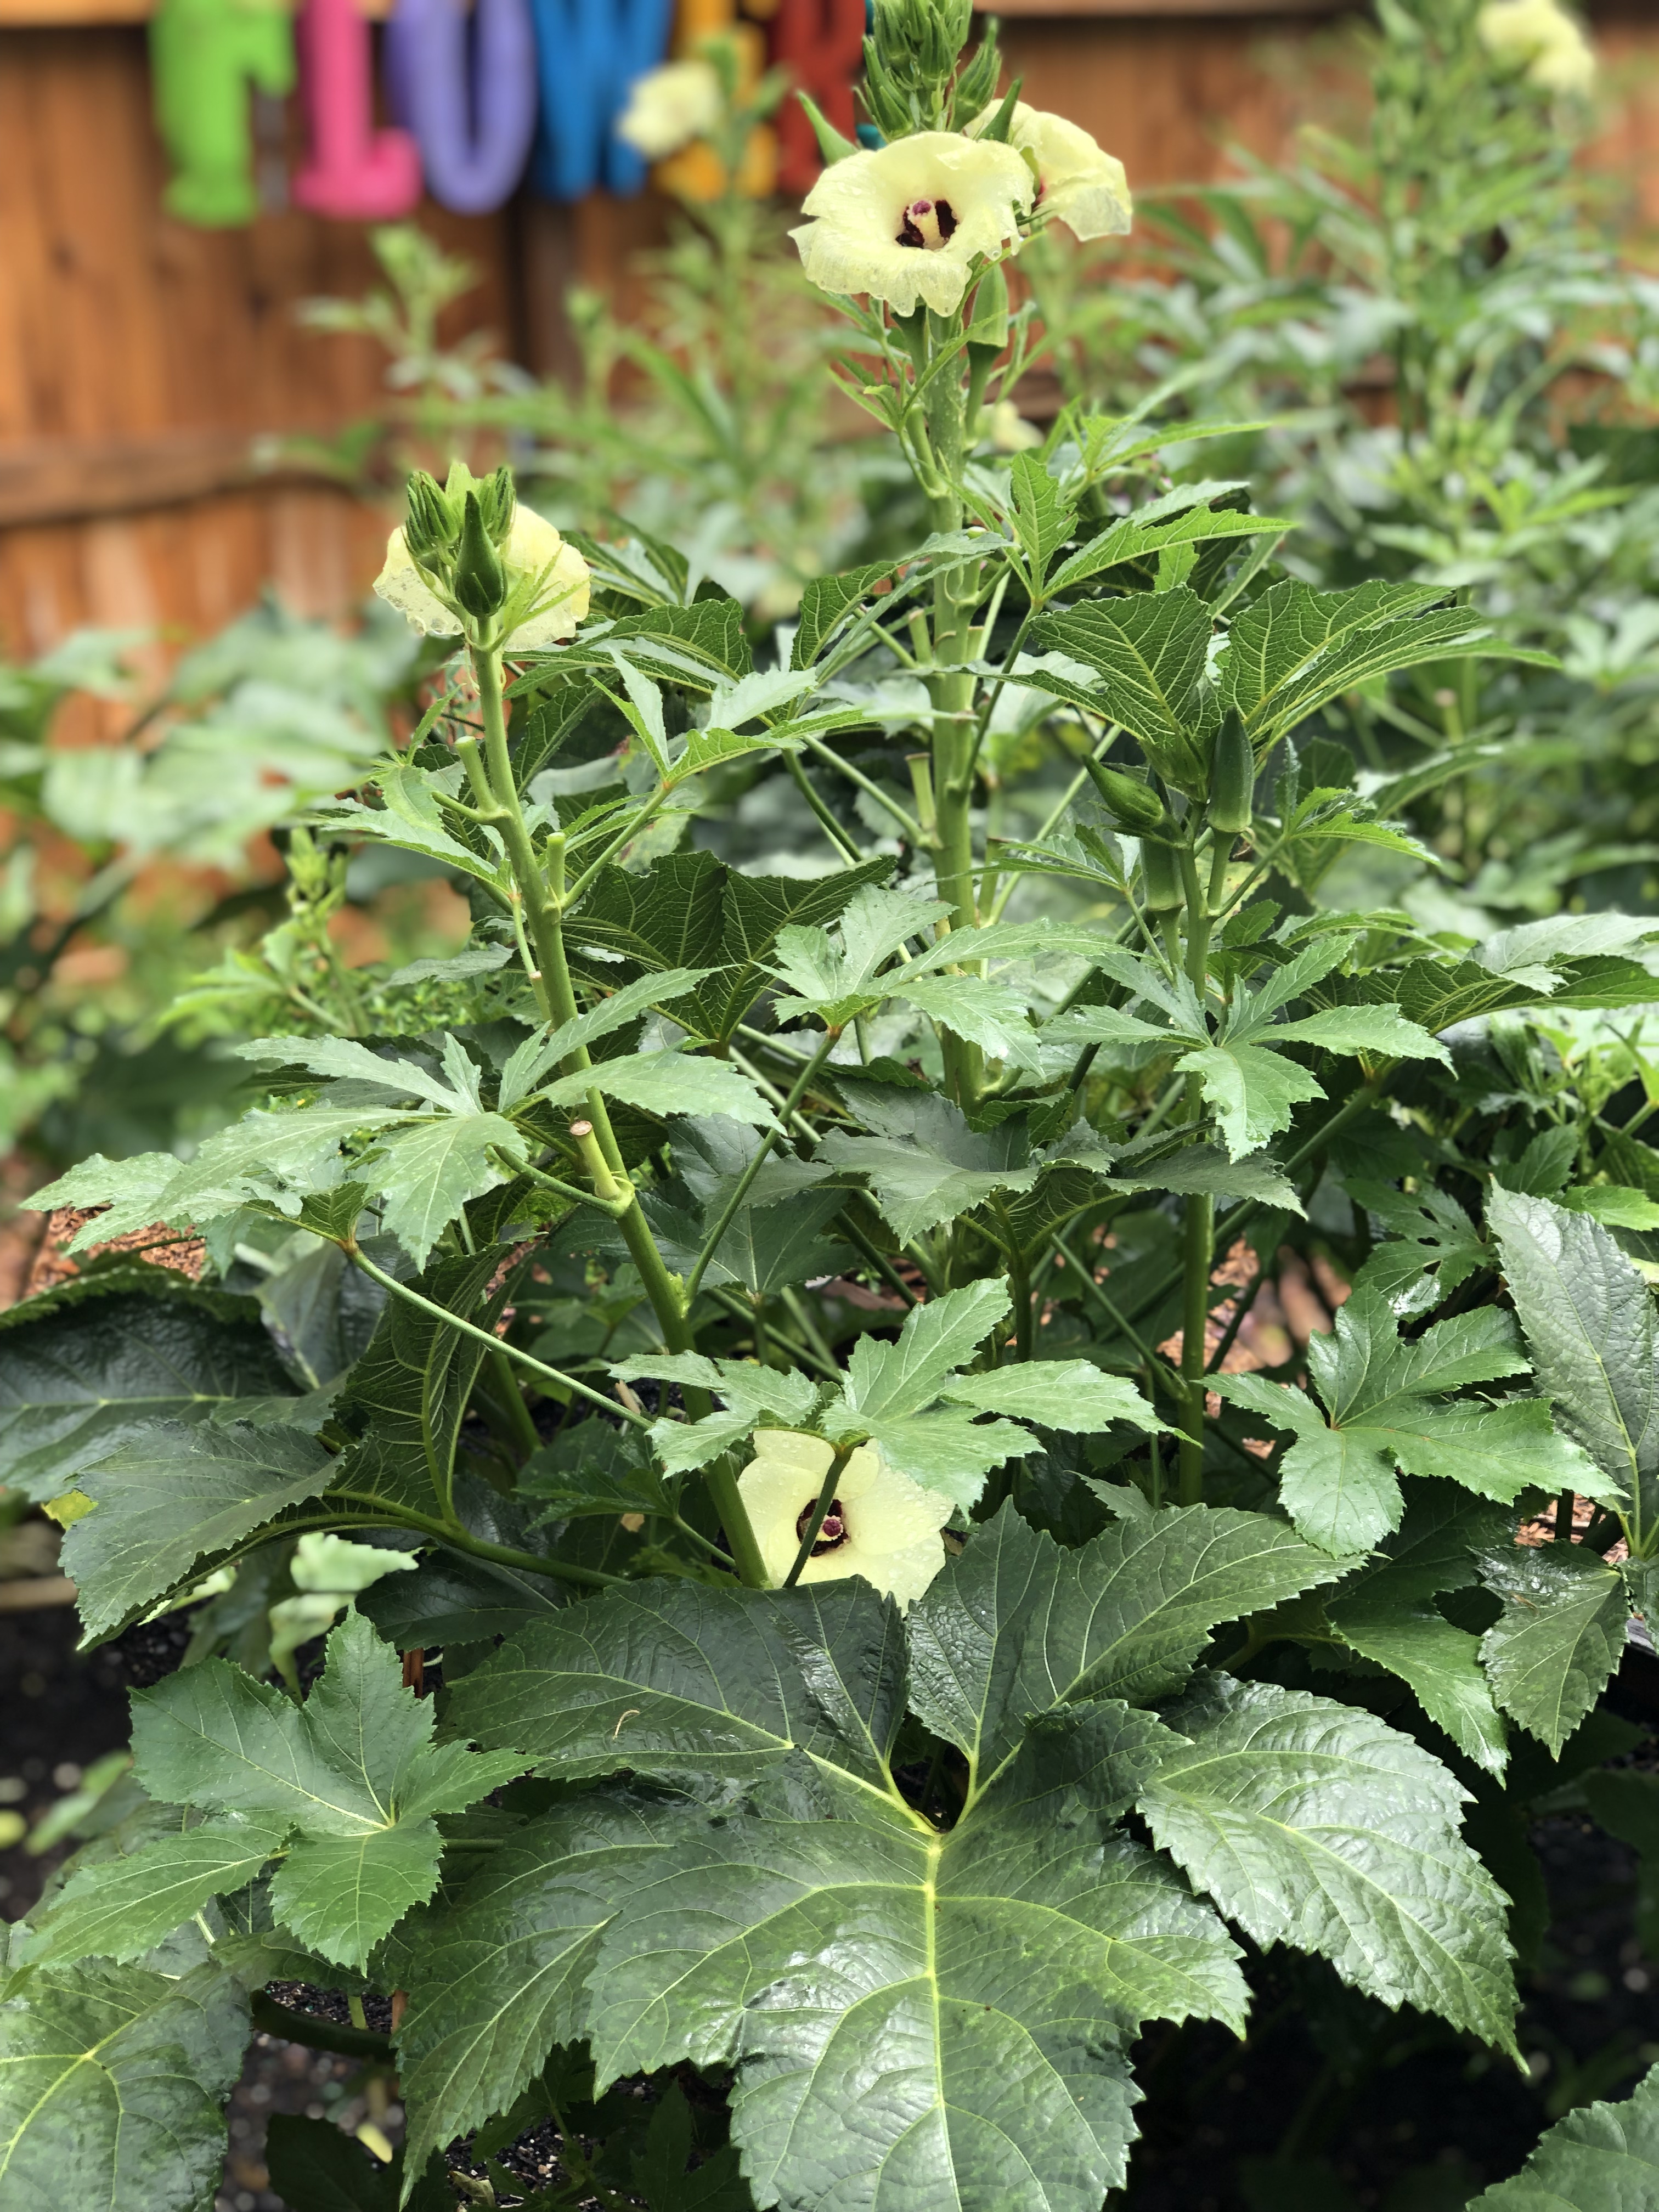
Though Okra (Abelmoschus esculentus) fruit isn’t much more than a thick green hull, slime and seeds and the plant itself is impossibly irritating to the skin, few plants are as integral to Southern heritage. In my mind, okra is among the best vegetables Panhandle gardeners can grow. Not only is it a gorgeous plant – Okra belongs to the Mallow family which also includes beauties like Hibiscus and Cotton – but it’s exceedingly versatile in the kitchen, excellent fried, grilled, roasted, boiled (though you have to acquire a taste for slimy textures to enjoy this method) and most famously, as a thickening agent in Cajun gumbo. Because of this exalted status in Southern culture, whether you enjoy eating okra or not, it’s almost mandatory here to include the plant in one’s garden. Most gardeners stick with the old standard varieties such as ‘Clemson Spineless’ or ‘Cowhorn’ and there is nothing wrong with them, however, these plants are almost too prolific for most gardens (growing upwards of 6-7’), especially for those of us growing in the close confines of raised beds. In the search for a less rambunctious but still ultra-productive cultivar, this summer I trialed ‘Jambalaya’, an F1 hybrid developed by Sakata Seed in 2012, with impressive results!
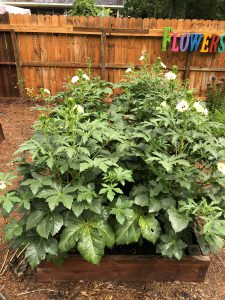
‘Jambalaya’ Okra in the author’s garden.
From my experience growing the cultivar this summer, ‘Jambalaya’ merits consideration in the garden, and is a must for raised bed gardeners, for two primary reasons. First, it was bred to be compact and is considered a dwarf cultivar. This is an awesome attribute, as I typically end the growing season picking okra from a small ladder! Most seed purveyors tout the plant as reaching a maximum height of 3-4’ and while this estimate might be a little conservative, I can attest that ‘Jambalaya’ is greatly reduced in height compared to the standard cultivars. The second advantage of growing this variety is that it begins producing very early relative to its peers and bears heavily. ‘Jambalaya’ fruit begin to ripen in about 50 days, about ten days to two weeks earlier than ‘Clemson Spineless’, a definite advantage if rotating behind a late maturing spring crop like potatoes as I typically do. Though ‘Jambalaya’ is a dwarf plant, in no way are yields reduced. My specimens have produced continuously since late-July and will continue to do so as long as adequate fertility and consistent harvesting are provided.

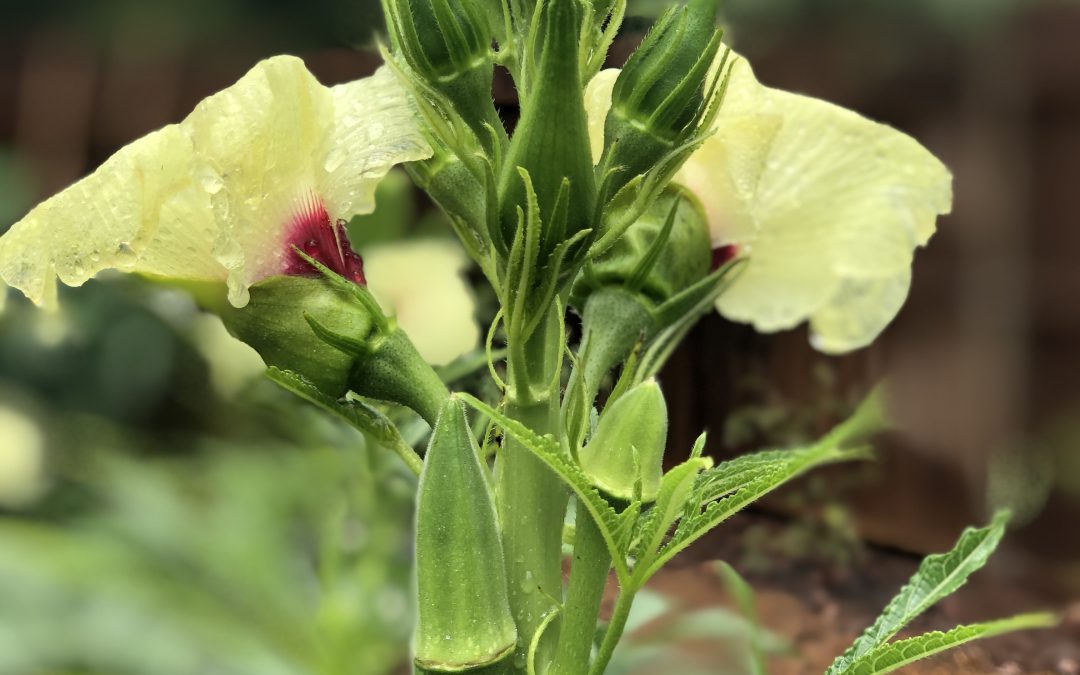
‘Jambalaya’ flower & fruit production.
Like any other okra cultivar, ‘Jambalaya’ has a couple of basic requirements that must be met for plants to thrive. In general, all okra cultivars love Southern summers and patience sowing seed is recommended, allow the soil to warm to at least 70 degrees before planting. Okra also prefers full sun, at least 6 hours per day, any less and yields will be reduced and plants will stretch towards the light. Belonging to the Mallow family, okra requires consistent moisture, particularly when in the flowering and fruiting phase. Finally, it is critical to keep up with your okra harvest as the plants produce! Okra pods grow quickly and should be harvested when they are no more than 3-4” long and still tender, larger pods are tough to the point of being inedible!

‘Jambalaya’ in the author’s garden.
Whether you’re new to the okra growing game or you’re a seasoned gumbo gardener, I highly encourage you to give ‘Jambalaya’ Okra a look next summer. While ‘Jambalaya’ is available through many seed sources, Johnny’s Selected Seeds sells a conveniently small package perfect for backyard gardeners, though they’ll be happy to provide larger quantities as well. In ‘Jambalaya’ you’ll find a nice compact plant that won’t outgrow your space, provide you a summer long harvest of tender green pods, and will rival the ornamentals in your landscape for the title of prettiest plant on your property! Happy gardening and as always, if you have questions about vegetable gardening or any other horticultural or agronomic topic, please contact your local UF/IFAS County Extension office!
by Molly Jameson | Aug 7, 2019

Rachel Mathes, Leon County Horticulture Program Assistant
Article by Rachel Mathes, Leon County Horticulture Program Assistant
Sensory gardens are a great way to involve children and people with special needs with gardening. Gardens provide a no-judgement zone for creative expression and allow us to get down in the dirt every now and then. Because sensory gardens are designed to be appreciated by more than just the sense of sight, they are an approachable way for disabled and non-disabled users alike. By engaging taste, feel, smell, hearing, and more, sensory gardens allow visitors of all ages and circumstances to engage in gardening.
To make your own sensory garden, think about what feeling you would like to experience while visiting your garden. Do you want a calm healing place of introspection or perhaps a vibrant playful area for engaged learning in nature? Having a theme can help you choose the different elements you would like to include in your sensory garden, which can be an entire yard or as small as a container. They are being used more and more in memory care units of nursing homes as well as preschools and elementary schools, but you can make your own right at home.
Water features provide enticing sounds for human visitors and a water source for wildlife. Can you spot the honeybee enjoying the fountain? Photo by Rachel Mathes.
The sound of moving water is calming to many, so a small fountain can be a great addition to your sensory garden. It will also benefit local wildlife by offering them a small watering hole. As long as the water is moving, mosquitos should not be a problem, but mosquito dunks or even the incorporation of mosquito fish are easy solutions to solving mosquito problems in small ponds or fountains. Some plants to consider for their sounds include false indigo (Baptisia australis), switchgrass (Panicum virgatum), and mountain oats (Chasmanthium latifolium). False indigo produces seed pods great for rattling, and when it is windy, switchgrass and mountain oats provide a gentle rustle.
A variety of textures offers the gardener a safe place to interact with nature without worrying about the dangers of poison ivy and other plant irritants. Plants like muhly grass (Muhlenbergia capillaris) offer a multitude of interactions as they sway in the wind, have bright white and pink blooms, and can be braided together in a variety of patterns. The native sunshine mimosa (Mimosa strigillosa) is a low growing ground cover that puts out pink powderpuff flowers and folds up when touched. Some other plants to explore by touch are lamb’s ear (Stachys byzantine), maiden grass (Miscanthus sinensis), the mildly dangerous points of aloe, and the many textures of southern magnolia (Magnolia grandiflora).
There are plenty of smelly plants to entice your nose in the garden. From rosemary to dill, mint and beyond, many herbs do very well here in the Florida Panhandle. Lemon balm and lemongrass bring a punch of citrus without the need for a big citrus tree. Beyond herbs, pine needles give a resinous scent when compressed, gardenias offer heavy sweetness from their voluminous white blooms, and sweet almond verbena (Aloysia virgata) delights with a vanilla almond aroma that carries pleasantly in the wind.
Fragrant blooms can offer pleasant aromas to enhance a sensory garden. Photo by Rachel Mathes.
When it comes to tasting in a sensory garden, fruits and vegetables are an obvious choice. Plenty of annual vegetables can be grown year-round, from leafy greens in the fall, winter, and early spring, to tomatoes and peppers in the summer. Blackberries are an easy to grow favorite in this part of the state, are available as thornless varieties, and take well to growing on a trellis in small spaces. A great edible that many children favor in the Demonstration Garden at the Leon County Extension Office is cranberry hibiscus. The bright red leaves of new growth are a sweet and sour treat they equate to Sour Patch Kids candy. The older leaves can be added into stir fries and salads and the flowers can be cooked into a syrup for making purple lemonade. Herbs can be used for their taste factor as well. But if your sensory garden will be visited by the general public without supervision, I recommend clear delineation for the tasting area so that no one eats anything unpalatable or poisonous by accident.
When setting up your sensory garden, be sure to involve your intended audience. Small children thrive when given a job to do and will enjoy planting sweet herbs alongside you. Even regular maintenance of the garden can involve the participants you hope to engage. The simple acts of weeding and watering can foster a sense of responsibility and empowerment as the visitors gain sensory enrichment through these activities and see the fruits of their labor with time.
Rachel Mathes is the Horticulture Program Assistant for UF/IFAS Extension Leon County.

by Mary Salinas | Aug 1, 2019
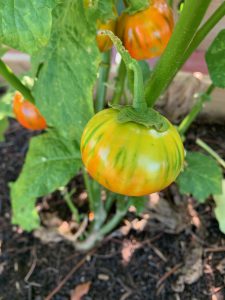
Turkish Orange Eggplant. Photo credit: Mary Salinas, UF/IFAS Extension.
Mid-summer in the Panhandle vegetable garden is prime time to be offering up a great crop of eggplant. This is one of my favorite summertime fruits to grow! (Yes, it is botanically speaking a ‘fruit’ and not a ‘vegetable’.)
Many home gardeners are familiar with the standard ‘Black Beauty’ variety that produces large plump fruit, but there are many other eggplant varieties to try. Take a look at Heirloom Eggplant Varieties in Florida to get some ideas. Gardeners can access dozens of varieties through online seed vendors. Eggplants can be dark purple, purple-striped, pale purple, white, green and even orange. They come in all shapes and sizes and all are delicious to eat, j make sure you learn when to harvest the variety you choose for optimum enjoyment. For example, the Turkish Orange illustrated in the photo should be picked before it turns all orange to avoid any bitterness.
In the panhandle, plant eggplant anytime February through August for harvest late spring through fall. Eggplant is in the nightshade (Solanaceae) family along with tomato, pepper, and potato. Keep that in mind when you are planning your garden for next year to avoid planting members of the same family in the same spot year after year, which encourages recurring disease and pest issues.
Eggplant loves rich soil and benefits from regular fertilization with commercial fertilizers or applications of compost. Eggplant is considered a long season crop and one can expect harvest to begin around 90-110 days after planting seed or 75-90 days if setting out transplants. Eggplant is, in general, more drought tolerant than tomato but it is still good practice keep them consistently moist and avoid letting them completely dry out. Also, while eggplant is self-pollinating, it is an excellent pollinator plant, as many species are attracted to the pretty blooms.
Eggplant is also relatively easy to grow, not generally requiring pruning or staking. Many of the same pests of tomato and pepper will also be attracted to eggplant. Be on the lookout for tomato hornworm and other caterpillar pests. For natural pest control methods, consult Natural Products for Managing Landscape and Garden Pests in Florida
For more information:
Florida Vegetable Gardening Guide
by Mary Salinas | Jul 11, 2019
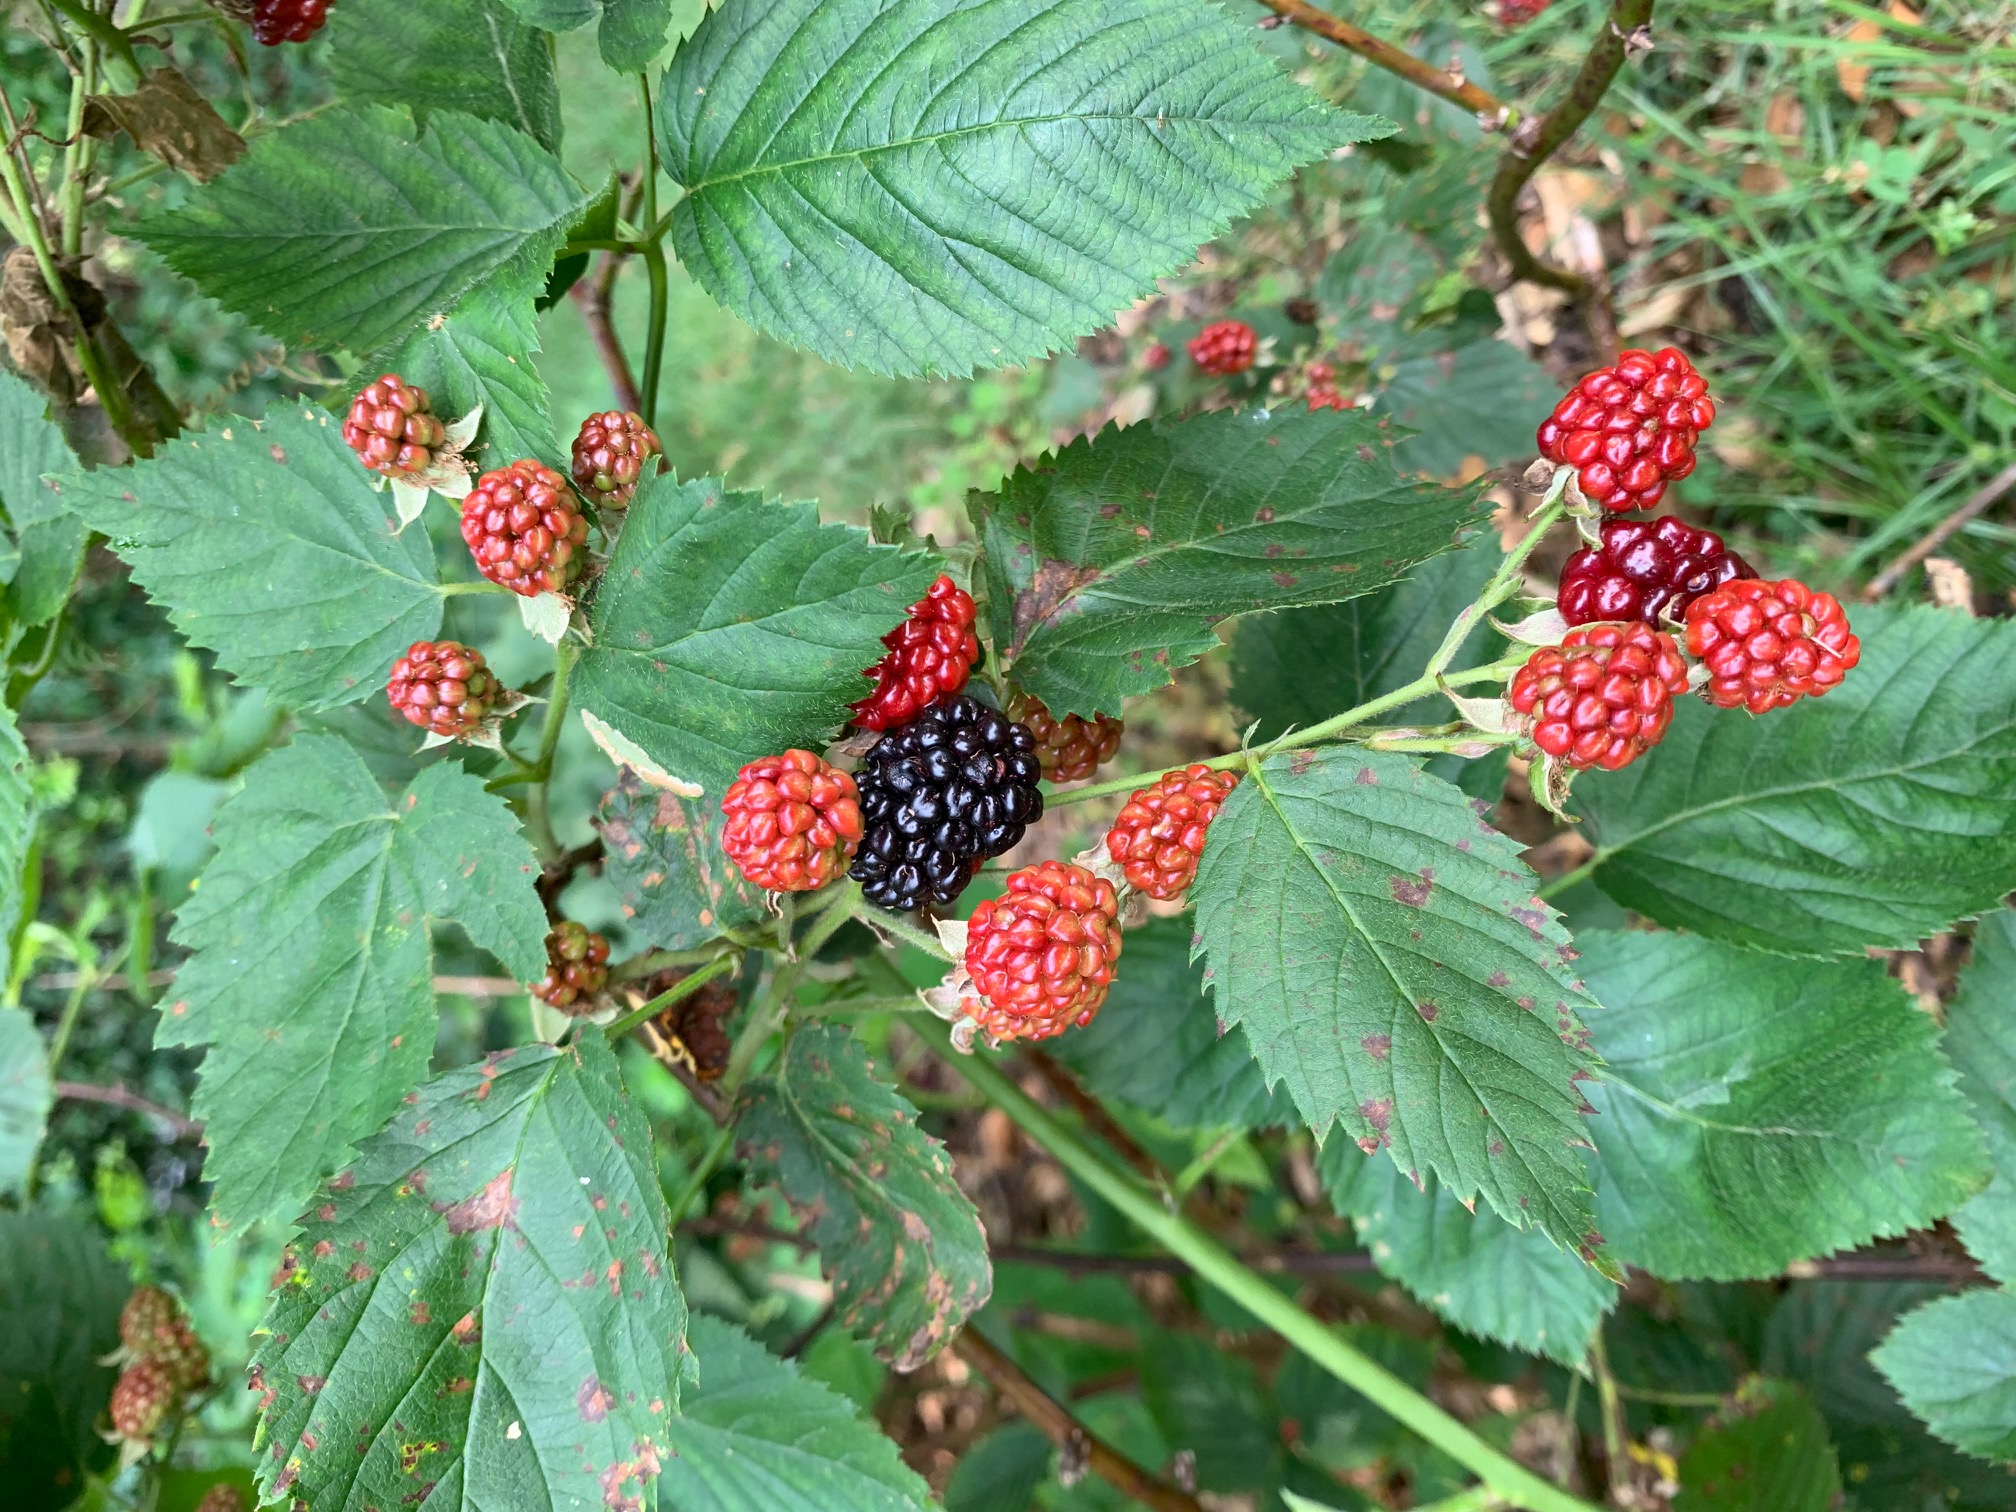
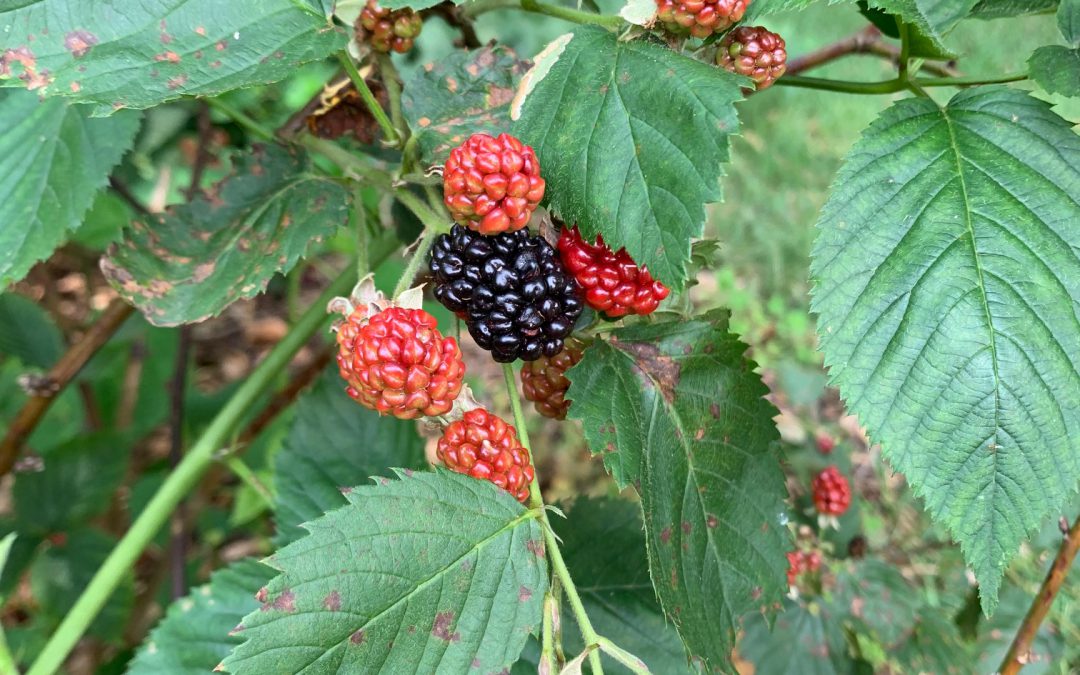
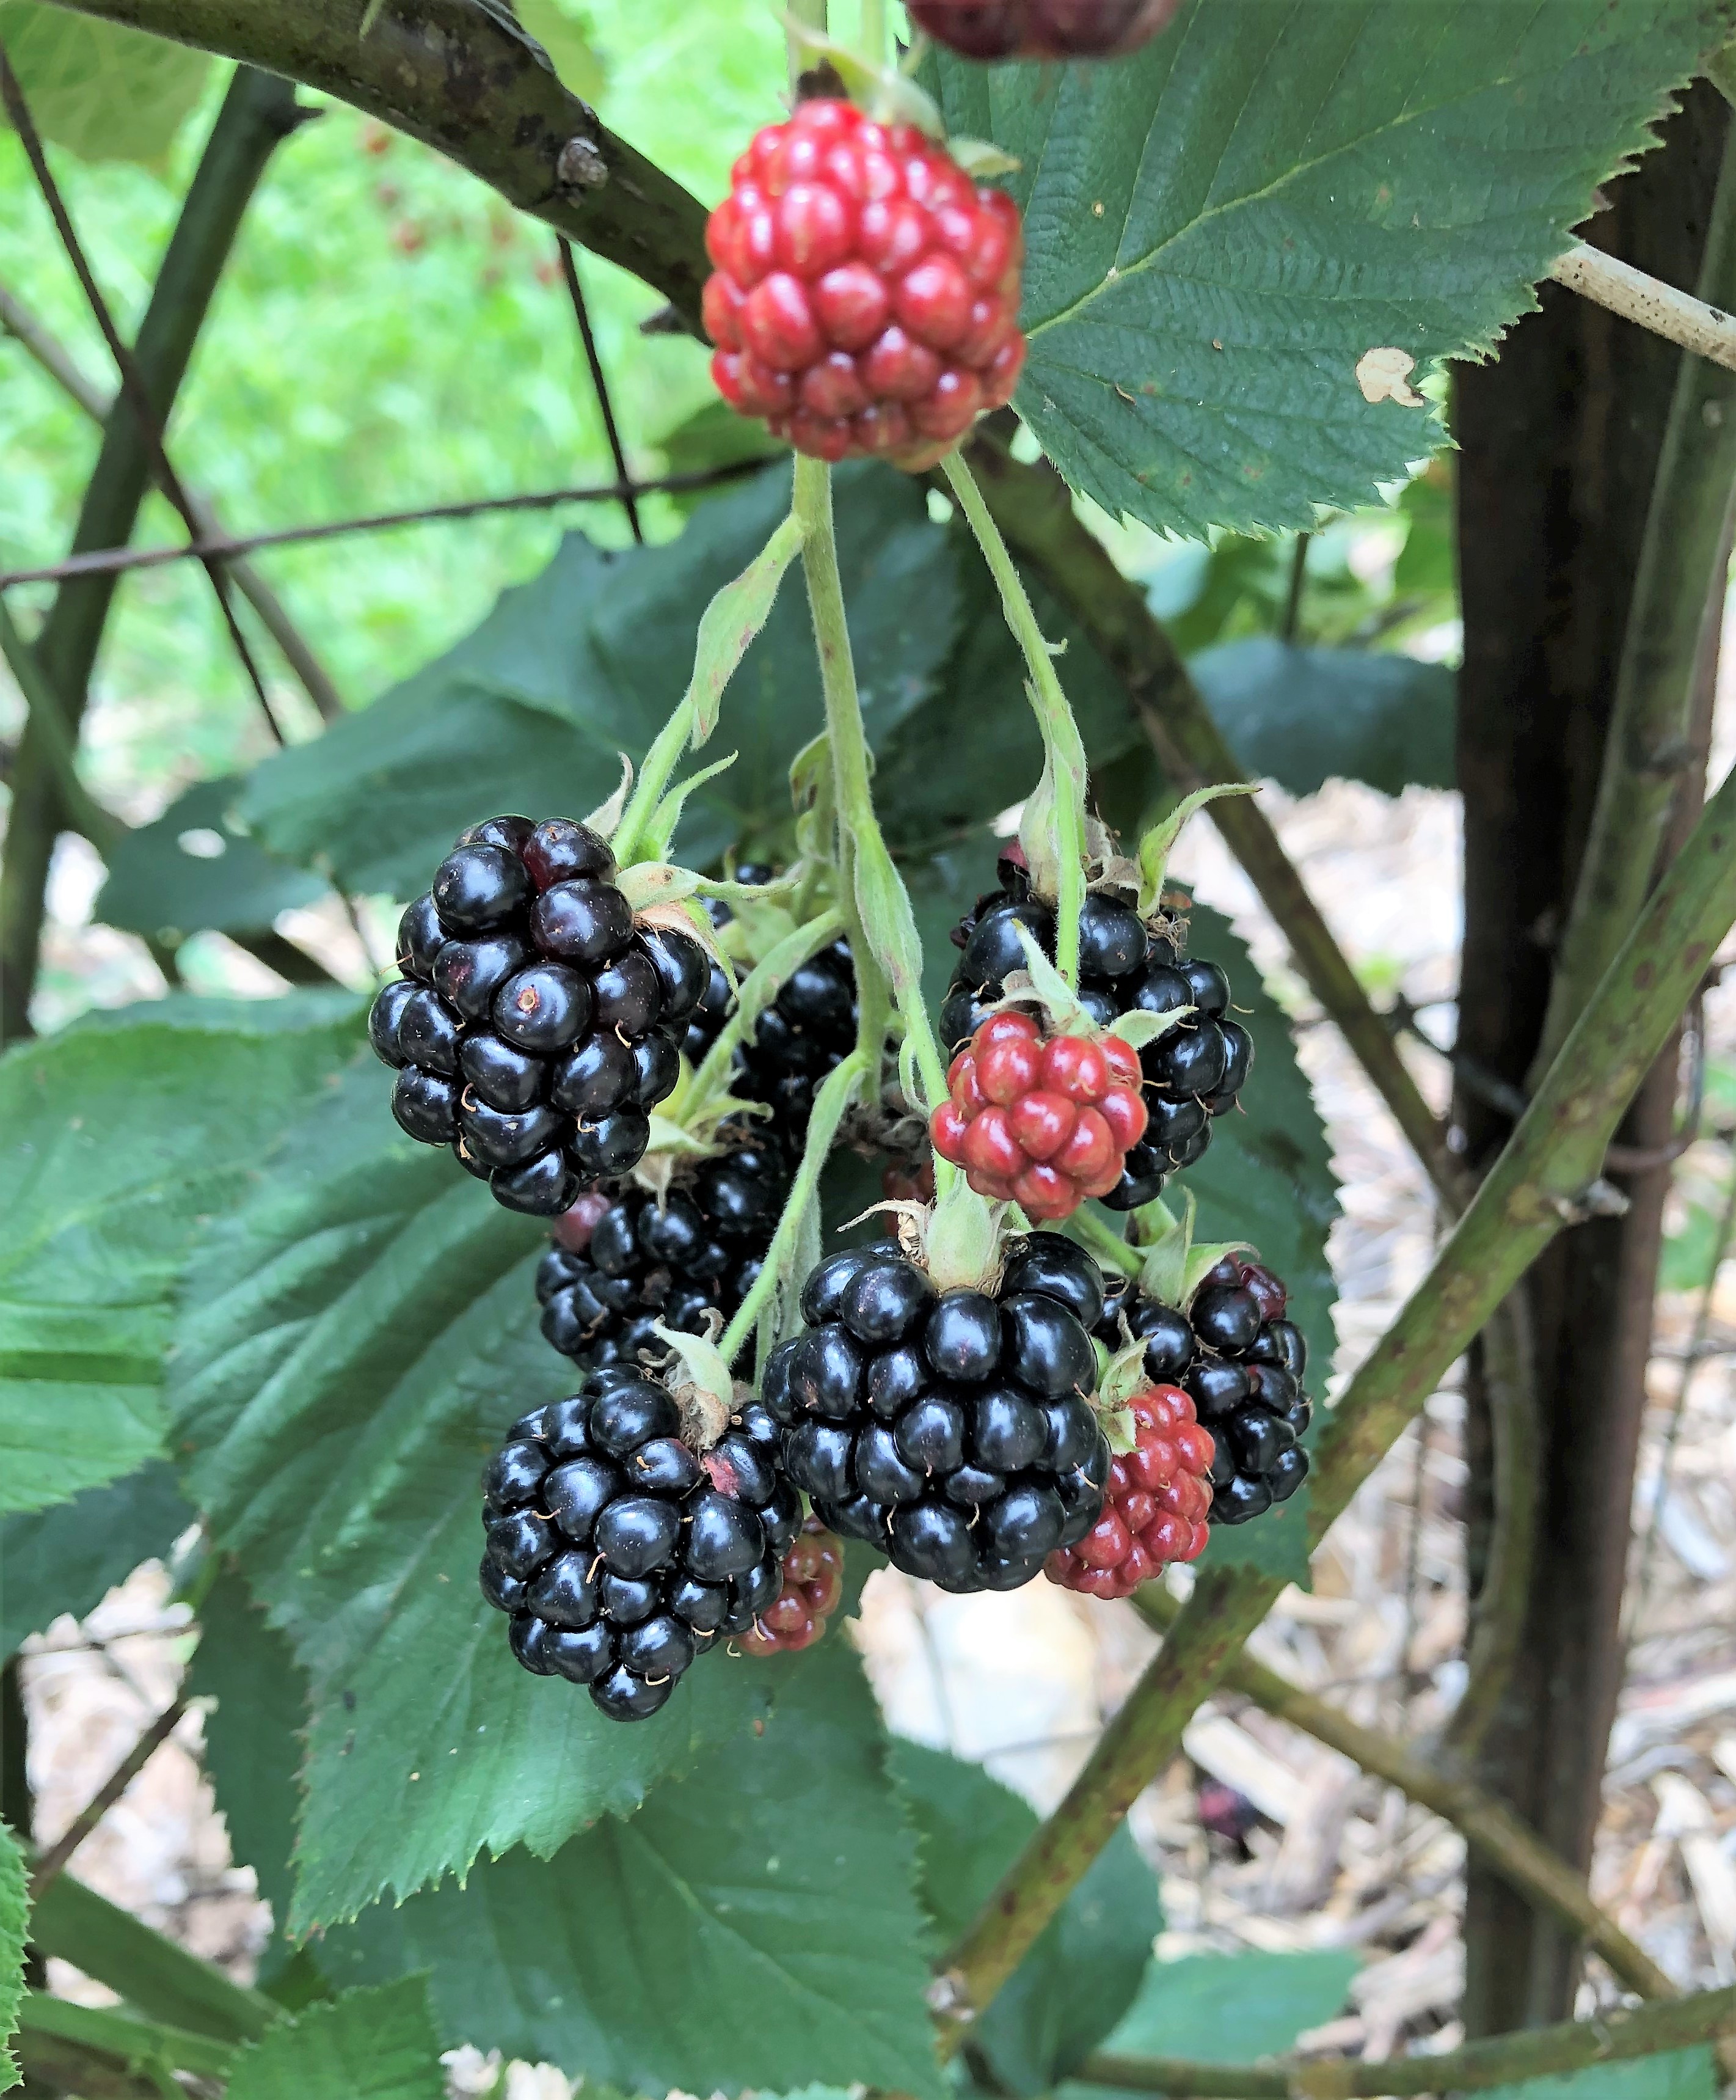
Ripening thornless blackberries. Photo credit: Mary Salinas, UF/IFAS Extension.
To everyone’s delight, the blackberries are ripening in the Santa Rosa County Extension demonstration garden. The blackberry patch is a reliable perennial that continues to provide fresh berries year after year. Before you decide against them because you don’t want a thorny and painful hazard in your landscape, remember that there are thornless blackberry cultivars with fruit just as tasty as the old-fashioned thorny blackberry varieties. However, it is important to take care and make sure that the variety or cultivar you choose is adapted to our Florida climate and chill hours.

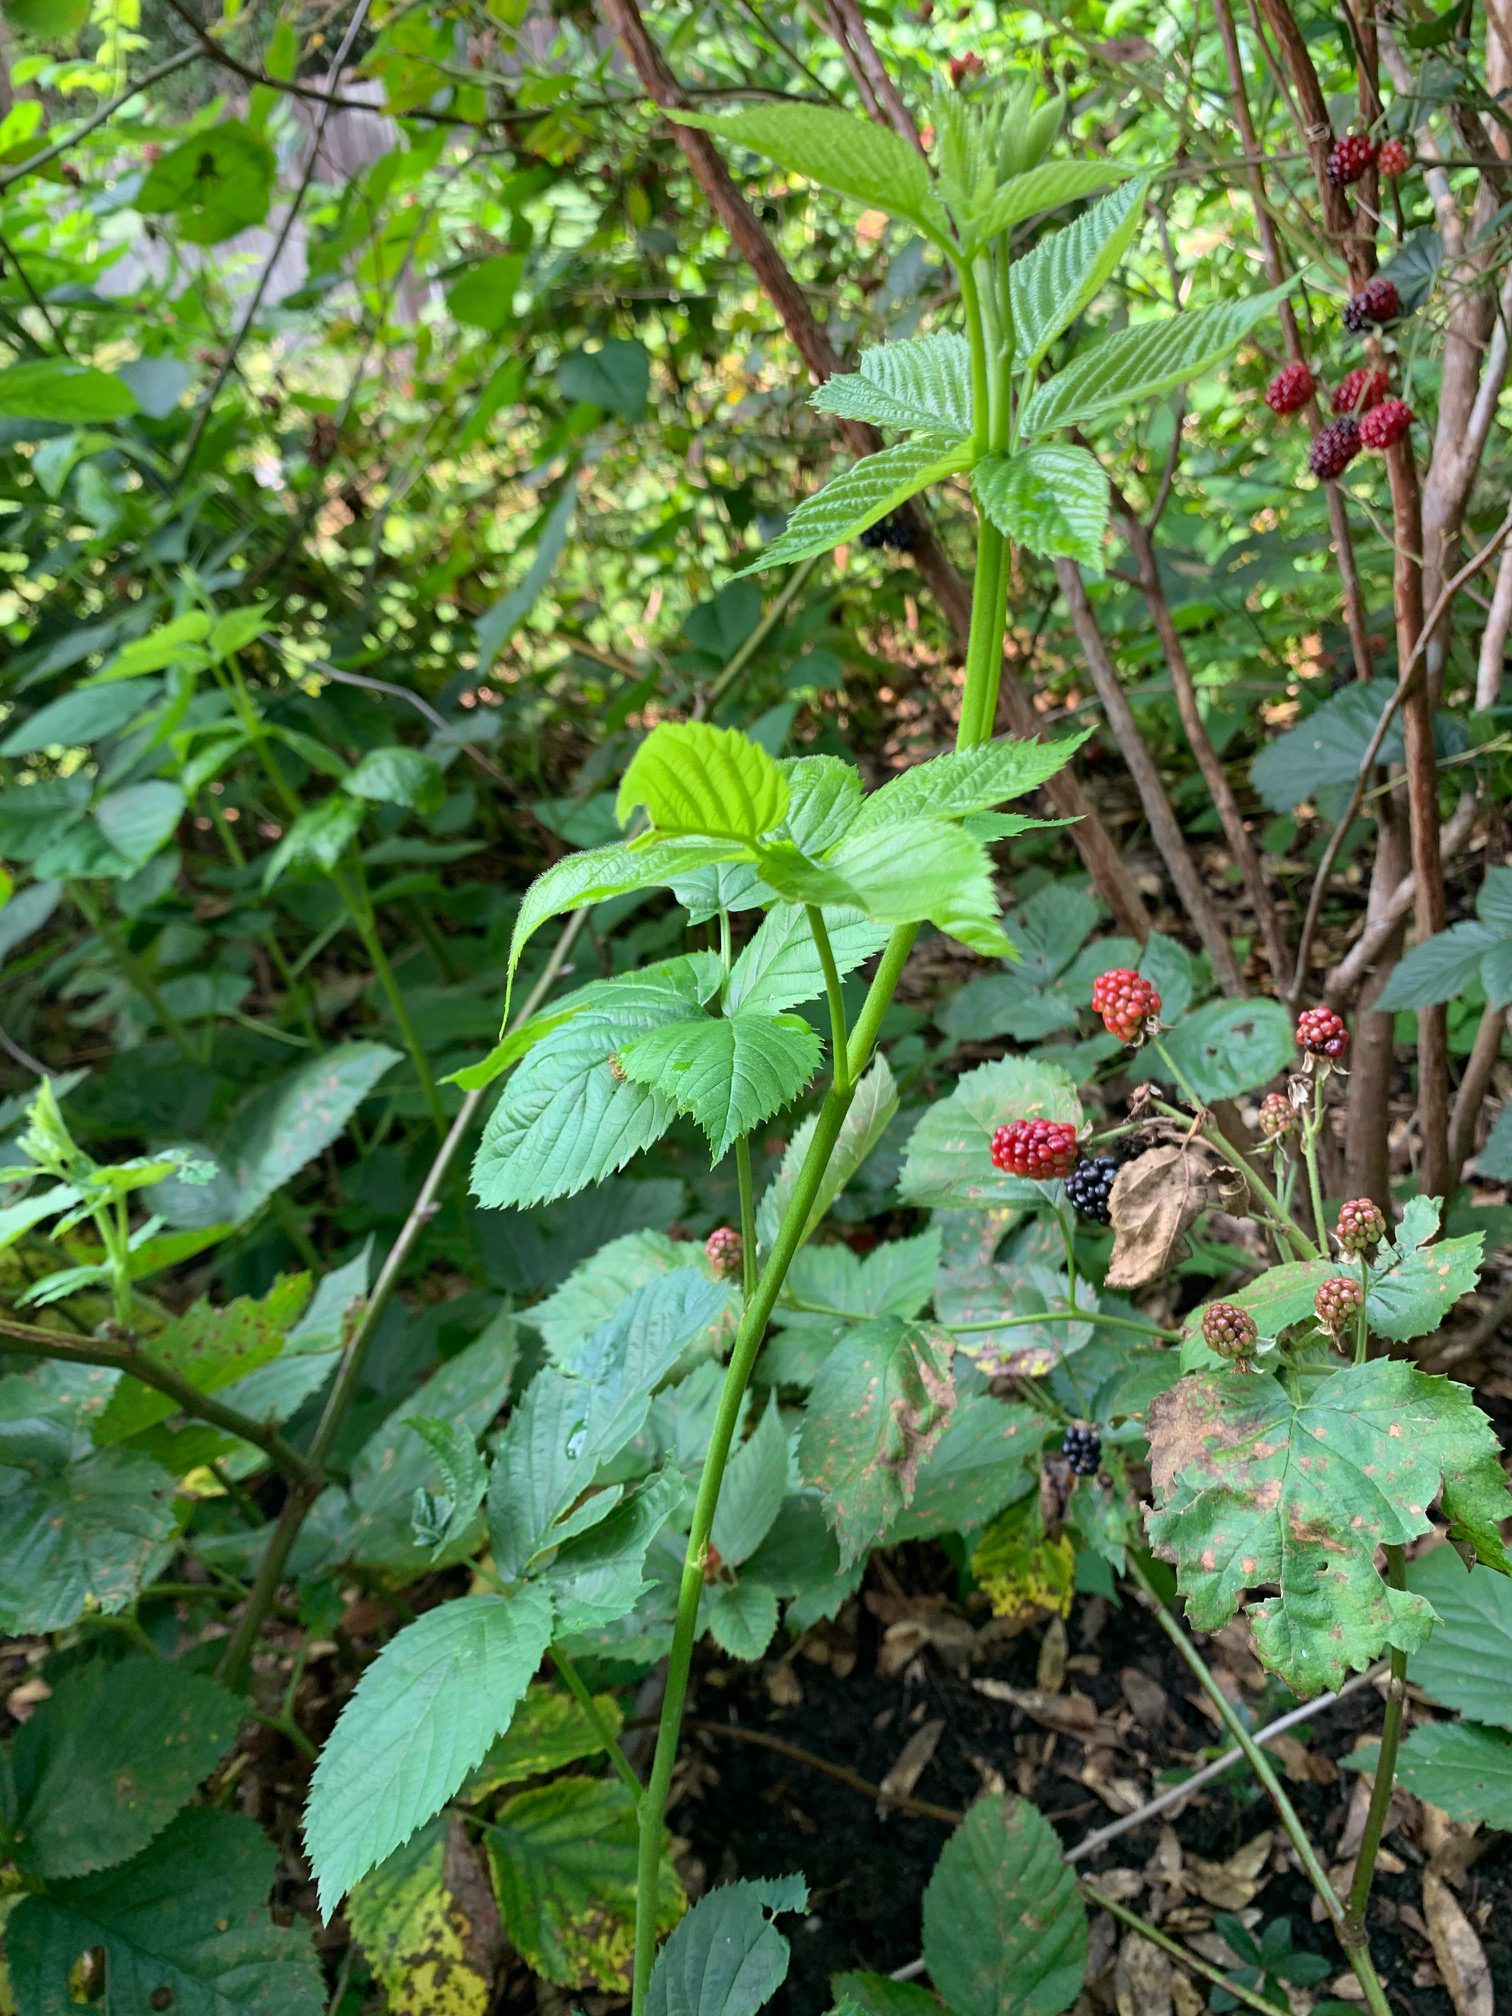
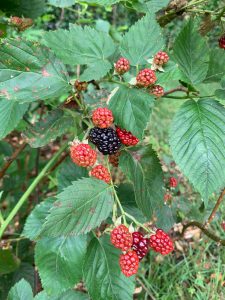
Blackberries bloom and produce fruit on last year’s canes. This year’s growth (the bright green shoot in the front center) will produce next year. Photo credit: Mary Salinas, UF/IFAS Extension.
You can choose a blackberry variety from your local nursery or propagate some plants from a favorite blackberry grown by a friend or neighbor (with permission, of course). Methods of propagation include stem cuttings, root cuttings, tip layering and removing the suckers that arise from the roots.
Plant when the weather is cooler in winter and choose a sunny spot with good soil. Frequent irrigation is crucial during the establishment period and when the fruit is produced. Weed control with organic or plastic mulches is also important to the success of your blackberry patch.
For more information on blackberry cultivars, propagation and growing success please see the University of Florida publication The Blackberry.
by Molly Jameson | Jun 25, 2019
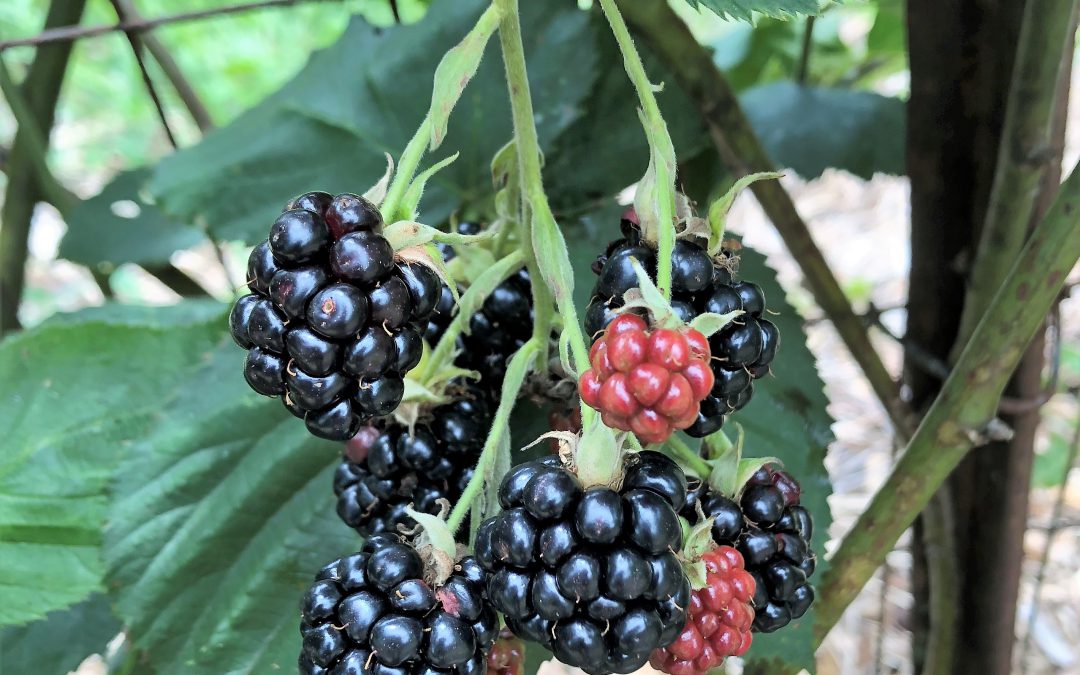
Although blackberries are well adapted to North Florida, many different biotic and abiotic factors can impact fruit production. Photo by Molly Jameson.
Diagnosing Abiotic Blackberry Fruit Disorders
Whether it be wild blackberries you’ve foraged or a prized cultured variety you’ve oh-so-carefully sustained, we are now in prime blackberry season, and there are many sweet, tangy delectable fruits to be eaten.
Blackberry bushes are well adapted to the Florida Panhandle and the plants can be found growing all over – along roadways, in ditches, throughout open fields, and also within forests.
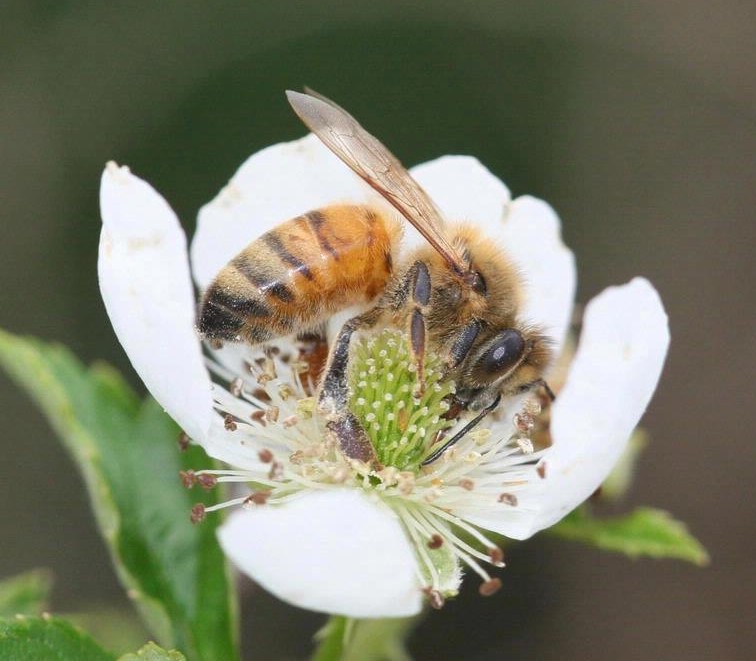
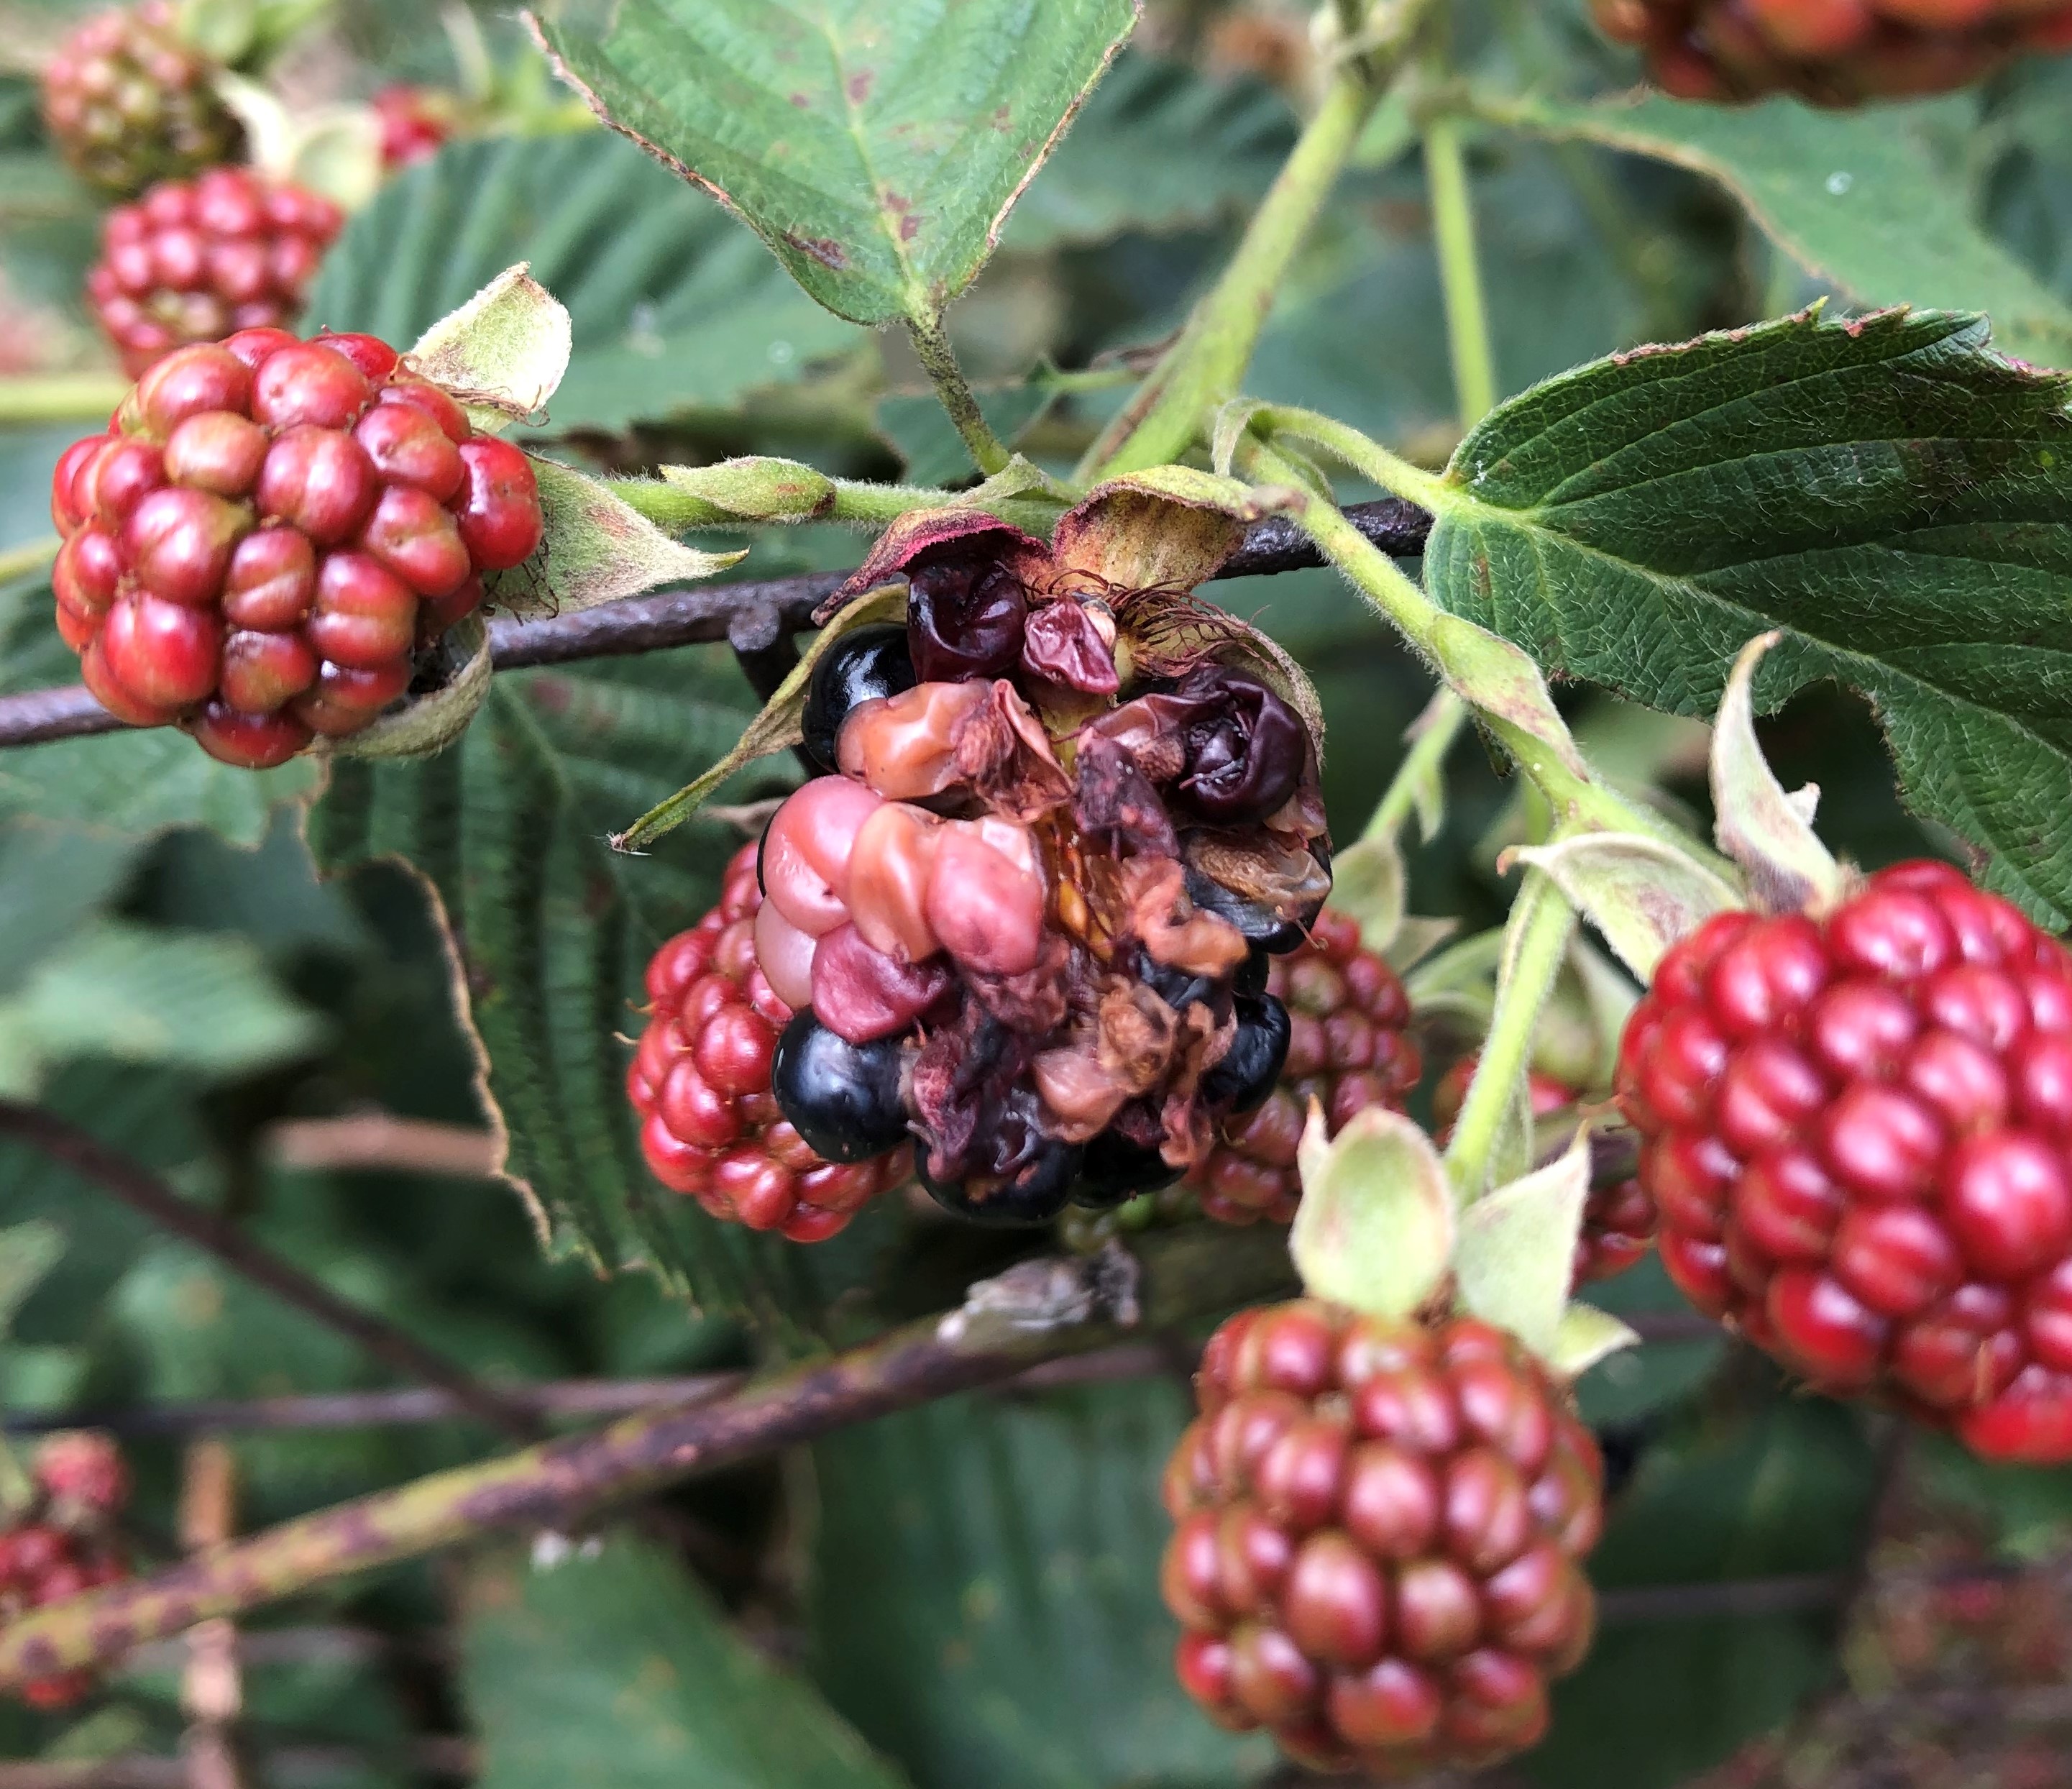
Although wild blackberries and domesticated cultivars thrive in our climate, there is a wide range of factors that could affect blackberry fruiting. When diagnosing plant problems, we tend to blame insects and diseases, but there are many abiotic (non-living) factors that could negatively impact blackberry fruit production. If your blackberry drupelets (the small subdivisions that comprise a blackberry fruit) are compromised, you may be experiencing one or more of the following abiotic blackberry disorders.

Although blackberries can self-pollinate, insect pollination is critical for forming the best blackberries. Photo by Johnny N. Dell, Bugwood.org.
Poor Pollination. Blackberries, strangely enough, are not true berries botanically. True berries only have one ovary per flower (such as bananas, watermelons, and avocados!). Each blackberry flower contains over 100 female flower parts, called pistils, that contain ovaries. To form a fully sized blackberry with many drupelets, at least 75% of the ovaries need to be pollinated. While blackberries can self-pollinate, pollinator insects, such as bees, are very important to ensure adequate drupelet formation. When weather conditions are overly cloudy and rainy, bees are less active. If this coincides with blackberry flowering, you may end up with some blackberries that are nearly drupe-less.
White Drupe. If you notice patches of white and brown drupelets on your most sun-exposed canes, you might have white drupe disorder. When humidity drops and temperature heats up, solar radiation contacting your berries is more powerful, as there is less moisture in the air to deflect the intense heat. Berries that are not protected by leaf coverage, and those on trellises oriented for maximum sun exposure, are most vulnerable to white drupe damage.
Sunscald. Often associated with white drupe, sunscald is most common when temperatures are extreme. Daytime highs in the Florida Panhandle in June and July regularly reach 90°F, if not higher. At these times, fruit exposed to the sun can be hotter than the air temperature around them, which essentially cooks the fruit. As I suspect you’d prefer to cook your fruit after harvest in preparation for blackberry pie, orient your trellis so it gets shade relief during the hottest part of the day and harvest often.

Diagnosing a blackberry issue can be challenging, as there can be more than one culprit impacting the fruit. Photo by Molly Jameson.
Red Cell Regression. One of the not-so-well understood abiotic blackberry disorders is red cell regression, or red drupelet disorder. If you’ve ever harvested blackberry fruit and stored them in the refrigerator for later munching, you may think your eyes are deceiving you when you discover your fruit doesn’t appear as ripe as when you picked it. This regression in color is linked to rapid temperature change, but rest assured, it does not affect the sugar content of the fruit. There are a few things you can do if you think this is affecting your berries, such as harvesting in the morning when the berries are still cool, harvesting when the sky is overcast, or shading your berries pre-harvest. You can also try to cool your berries in stages, perhaps moving from the field, to shade, to A/C, and then to the fridge.
Beyond abiotic stresses, blackberries can also suffer from insect, pest, and disease damage, such as from stink bugs, beetles, mites, birds, anthracnose, leaf rust, crown gall, and beyond. For domesticated blueberry bushes, proper cultivar selection, site selection, planting technique, fertilization, irrigation, propagation, and cane training is important and will allow the plants to grow healthy to defend themselves against any abiotic or biotic nuisance that comes their way.
For more information about growing blackberries, check out the EDIS publication, The Blackberry (https://edis.ifas.ufl.edu/hs104).