by Daniel J. Leonard | Aug 15, 2019
By Evan Anderson, Walton County Agriculture Agent:
Gardening is an attractive pastime, not only for homeowners but also, it seems, for every critter out there that wants a free meal. If a gardener isn’t trying to keep deer, rabbits, or moles out of their crops, they’re fighting against insects of many
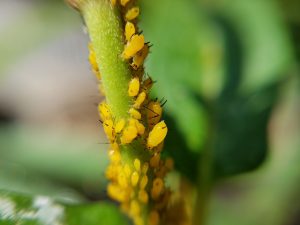
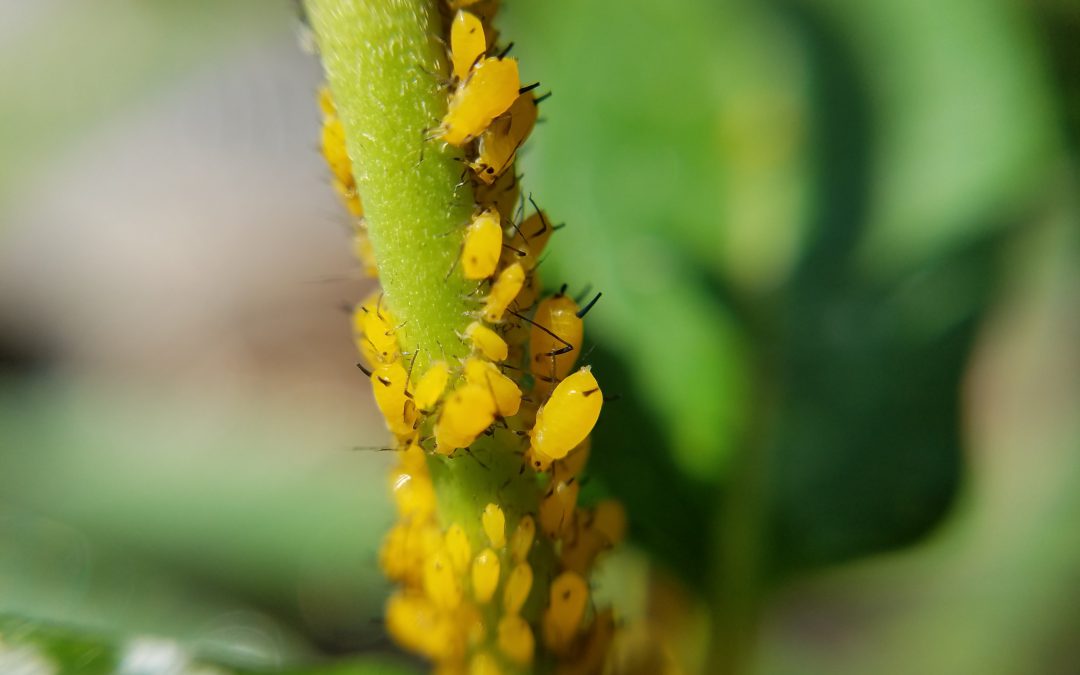
Aphids come in many colors, but are a common (and unwelcome) sight on garden plants. Photo courtesy Evan Anderson.
different sorts. With as many different sorts as there are, it can be dizzying to try and keep track of them and to figure out what’s doing damage to which vegetables.
Just because you see an insect in your garden doesn’t mean it’s a bad one. There are many that can be friends to a gardener, patrolling the plants to snack on pests. It’s important to know what you’re looking at before you try to control them; you might end up killing off a helpful bug instead of one that’s a problem!
It can be helpful to look at the damage done by the insects that are plaguing your garden to figure out what kind they are. Piercing / sucking insects drink the fluids from inside plant tissues, and leave small dots or stippling marks, and may exude honeydew, a stick fluid that sometimes grows sooty mold on

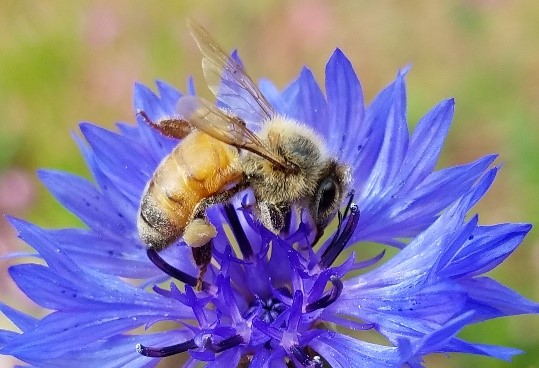
Honeybees are an example of a good bug to find in your garden. They help pollinate crops. Photo courtesy Evan Anderson.
it. These bugs include aphids, scales, mealybugs, spider mites, stink bugs, and thrips.
Chewing insects are those that usually go after plant leaves. They chew holes, and if an infestation is bad, they might defoliate a plant very quickly! Caterpillars, grasshoppers, and some beetles are the worst offenders of this sort.
If you need help identifying or figuring out how to control an insect in your garden or any other horticultural topic, feel free to contact your local UF/IFAS Extension office!
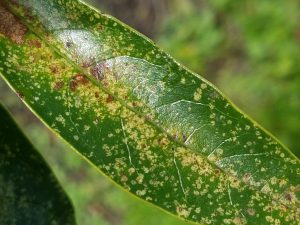
An example of damage from piercing/sucking insects. Photo courtesy Evan Anderson.

by Sheila Dunning | Aug 7, 2019
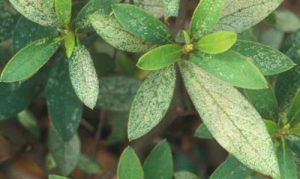
Damage caused by azalea lace bug, Stephanitis pyrioides (Scott), feeding. Photograph by James. L. Castner, University of Florida. Severely damaged leaves become heavily discolored and eventually dry or fall off. Symptoms may sometimes be confused with mite injury, but the presence of black varnish-like excrement, frequently with cast skins attached, suggest lace bug damage (Johnson and Lyon 1991).
You may be noticing the color disappearing from your azaleas right now. Do your azaleas look bleached out from a piercing-sucking insect. The culprit is probably azalea lace bug, Stephanitis pyrioides. This pest overwinters in eggs on the underside of infested leaves. Eggs hatch in late March and early April. The insect then passes through five nymphal instars before becoming an adult. It takes approximately one month for the insect to complete development from egg to adult and there are at least four generations per year. Valuable plants that are susceptible to lace bug damage should be inspected in the early spring for the presence of overwintering lace bug adults, eggs and newly-hatched nymphs. Inspect these plants every two weeks during the growing season for developing lace bug infestations.
Both adults and nymphs have piercing-sucking mouthparts and remove sap as they feed from the underside of the leaf. Lace bug damage to foliage detracts greatly from the plant’s beauty, reduces the plant’s ability to produce food, decreases plant vigor and causes the plant to be more susceptible to damage by other insects, diseases or unfavorable weather conditions. The azalea can become almost silver or bleached in appearance from the feeding lace bug damage.
However, lace bugs often go undetected until the infested plants show severe damage sometime into the summer. By then several generations of lace bugs have been weakening the plant. Inspecting early in the spring and simply washing them off the underside of the leaves can help to avoid damage later and the need for pesticides.
Adult lace bugs are flattened and rectangular in shape measuring 1/8 to 1/4 inch long. The area behind the head and the wing covers form a broadened, lace-like body covering. The wings are light amber to transparent in color. Lace bugs leave behind spiny black spots of frass (excrement).
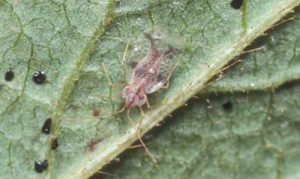
Adult azalea lace bug, Stephanitis pyrioides (Scott), and excrement. Photograph by James. L. Castner, University of Florida.
Lace bug nymphs are flat and oval in shape with spines projecting from their bodies in all directions. A lace bug nymph goes through five growth stages (instars) before becoming an adult. At each stage the nymph sheds its skin (molts) and these old skins often remain attached to the lower surface of infested leaves.
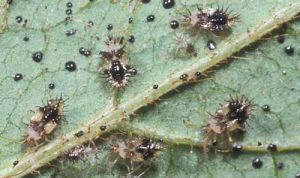
Nymphs of the azalea lace bug, Stephanitis pyrioides (Scott), with several cast skins and excrement. Photograph by James. L. Castner, University of Florida.
Azalea lace bug eggs are football-shaped and are transparent to cream colored. Lace bug eggs are found on the lower leaf surface, usually alongside or inserted into a leaf vein. Adult females secrete a varnish-like substance over the eggs that hardens into a scab-like protective covering.
Other plant species, such as lantana and sycamore, may have similar symptoms. But, realize that lace bugs are host specific. They feed on their favorite plant and won’t go to another plant species. However, the life cycle is similar. Be sure to clean up all the damaged leaves. That’s where the eggs will remain for the winter. Start next spring egg-free.
For more information go to: http://entomology.ifas.ufl.edu/creatures/orn/shrubs/azalea_lace_bug.htm
by Beth Bolles | Aug 7, 2019
We are always on the lookout for an attractive plant for our landscape. At the nursery, some plants have a more difficult time gaining our attention. They may not be as showy, possessing neither colorful flowers nor bold foliage. In these cases, we could be missing out on low maintenance plant that offers its own form of beauty in the right landscape spot.
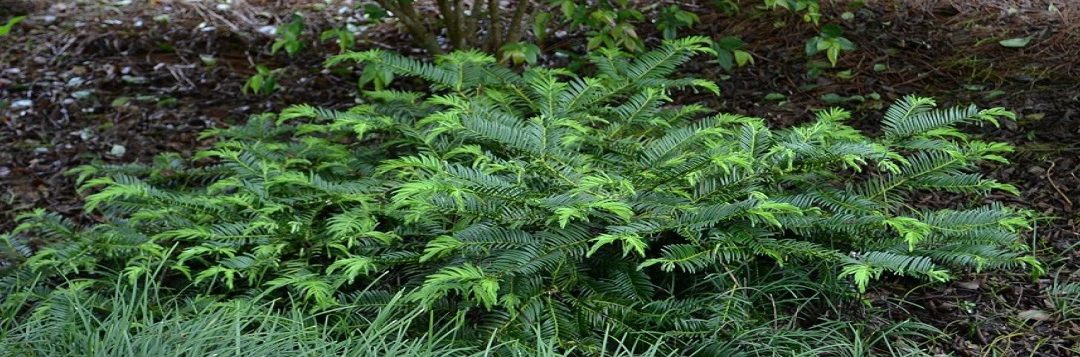
One plant that I love is the Japanese plum yew (Cephalotaxus harringtonia), especially the spreading form ‘Prostrata’. In the nursery container, this plant is nothing special but once established in the landscape it performs well. The conifer type leaves are an attractive dark green and the ‘Prostrata’ selection is low growing to about 2 to 3 feet. An advantage too is that growth is slow so it won’t take over or require routine pruning.
Japanese plum yews grow best in partial shade and once established will be fine with rainfall. For a shadier side of the home, the spreading plum yew has a place as an evergreen foundation plant too.
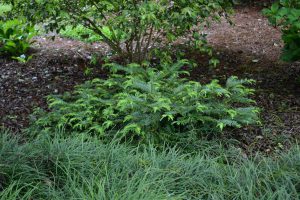
Japanese plum yew in a shaded garden. Photo by Beth Bolles, UF IFAS Extension Escambia County
If the ‘Prostrata’ selection is too low growing for you, consider the ‘Fastigiata’ cultivar that will grow upright to about 8 feet with a 5 foot spread.
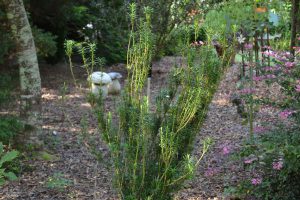
A year old planting of upright Japanese plum yew in filtered light. Photo by Beth Bolles, UF IFAS Extension Escambia County
by Molly Jameson | Aug 7, 2019

Rachel Mathes, Leon County Horticulture Program Assistant
Article by Rachel Mathes, Leon County Horticulture Program Assistant
Sensory gardens are a great way to involve children and people with special needs with gardening. Gardens provide a no-judgement zone for creative expression and allow us to get down in the dirt every now and then. Because sensory gardens are designed to be appreciated by more than just the sense of sight, they are an approachable way for disabled and non-disabled users alike. By engaging taste, feel, smell, hearing, and more, sensory gardens allow visitors of all ages and circumstances to engage in gardening.
To make your own sensory garden, think about what feeling you would like to experience while visiting your garden. Do you want a calm healing place of introspection or perhaps a vibrant playful area for engaged learning in nature? Having a theme can help you choose the different elements you would like to include in your sensory garden, which can be an entire yard or as small as a container. They are being used more and more in memory care units of nursing homes as well as preschools and elementary schools, but you can make your own right at home.
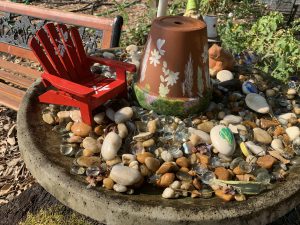
Water features provide enticing sounds for human visitors and a water source for wildlife. Can you spot the honeybee enjoying the fountain? Photo by Rachel Mathes.
The sound of moving water is calming to many, so a small fountain can be a great addition to your sensory garden. It will also benefit local wildlife by offering them a small watering hole. As long as the water is moving, mosquitos should not be a problem, but mosquito dunks or even the incorporation of mosquito fish are easy solutions to solving mosquito problems in small ponds or fountains. Some plants to consider for their sounds include false indigo (Baptisia australis), switchgrass (Panicum virgatum), and mountain oats (Chasmanthium latifolium). False indigo produces seed pods great for rattling, and when it is windy, switchgrass and mountain oats provide a gentle rustle.
A variety of textures offers the gardener a safe place to interact with nature without worrying about the dangers of poison ivy and other plant irritants. Plants like muhly grass (Muhlenbergia capillaris) offer a multitude of interactions as they sway in the wind, have bright white and pink blooms, and can be braided together in a variety of patterns. The native sunshine mimosa (Mimosa strigillosa) is a low growing ground cover that puts out pink powderpuff flowers and folds up when touched. Some other plants to explore by touch are lamb’s ear (Stachys byzantine), maiden grass (Miscanthus sinensis), the mildly dangerous points of aloe, and the many textures of southern magnolia (Magnolia grandiflora).
There are plenty of smelly plants to entice your nose in the garden. From rosemary to dill, mint and beyond, many herbs do very well here in the Florida Panhandle. Lemon balm and lemongrass bring a punch of citrus without the need for a big citrus tree. Beyond herbs, pine needles give a resinous scent when compressed, gardenias offer heavy sweetness from their voluminous white blooms, and sweet almond verbena (Aloysia virgata) delights with a vanilla almond aroma that carries pleasantly in the wind.
Fragrant blooms can offer pleasant aromas to enhance a sensory garden. Photo by Rachel Mathes.
When it comes to tasting in a sensory garden, fruits and vegetables are an obvious choice. Plenty of annual vegetables can be grown year-round, from leafy greens in the fall, winter, and early spring, to tomatoes and peppers in the summer. Blackberries are an easy to grow favorite in this part of the state, are available as thornless varieties, and take well to growing on a trellis in small spaces. A great edible that many children favor in the Demonstration Garden at the Leon County Extension Office is cranberry hibiscus. The bright red leaves of new growth are a sweet and sour treat they equate to Sour Patch Kids candy. The older leaves can be added into stir fries and salads and the flowers can be cooked into a syrup for making purple lemonade. Herbs can be used for their taste factor as well. But if your sensory garden will be visited by the general public without supervision, I recommend clear delineation for the tasting area so that no one eats anything unpalatable or poisonous by accident.
When setting up your sensory garden, be sure to involve your intended audience. Small children thrive when given a job to do and will enjoy planting sweet herbs alongside you. Even regular maintenance of the garden can involve the participants you hope to engage. The simple acts of weeding and watering can foster a sense of responsibility and empowerment as the visitors gain sensory enrichment through these activities and see the fruits of their labor with time.
Rachel Mathes is the Horticulture Program Assistant for UF/IFAS Extension Leon County.

by Mary Salinas | Aug 1, 2019
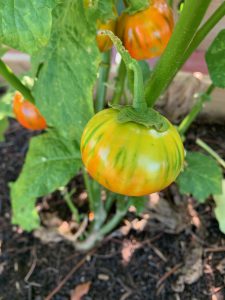
Turkish Orange Eggplant. Photo credit: Mary Salinas, UF/IFAS Extension.
Mid-summer in the Panhandle vegetable garden is prime time to be offering up a great crop of eggplant. This is one of my favorite summertime fruits to grow! (Yes, it is botanically speaking a ‘fruit’ and not a ‘vegetable’.)
Many home gardeners are familiar with the standard ‘Black Beauty’ variety that produces large plump fruit, but there are many other eggplant varieties to try. Take a look at Heirloom Eggplant Varieties in Florida to get some ideas. Gardeners can access dozens of varieties through online seed vendors. Eggplants can be dark purple, purple-striped, pale purple, white, green and even orange. They come in all shapes and sizes and all are delicious to eat, j make sure you learn when to harvest the variety you choose for optimum enjoyment. For example, the Turkish Orange illustrated in the photo should be picked before it turns all orange to avoid any bitterness.
In the panhandle, plant eggplant anytime February through August for harvest late spring through fall. Eggplant is in the nightshade (Solanaceae) family along with tomato, pepper, and potato. Keep that in mind when you are planning your garden for next year to avoid planting members of the same family in the same spot year after year, which encourages recurring disease and pest issues.
Eggplant loves rich soil and benefits from regular fertilization with commercial fertilizers or applications of compost. Eggplant is considered a long season crop and one can expect harvest to begin around 90-110 days after planting seed or 75-90 days if setting out transplants. Eggplant is, in general, more drought tolerant than tomato but it is still good practice keep them consistently moist and avoid letting them completely dry out. Also, while eggplant is self-pollinating, it is an excellent pollinator plant, as many species are attracted to the pretty blooms.
Eggplant is also relatively easy to grow, not generally requiring pruning or staking. Many of the same pests of tomato and pepper will also be attracted to eggplant. Be on the lookout for tomato hornworm and other caterpillar pests. For natural pest control methods, consult Natural Products for Managing Landscape and Garden Pests in Florida
For more information:
Florida Vegetable Gardening Guide
by Julie McConnell | Jul 25, 2019
As an avid gardener and plant collector you might think I’m hyper-aware of everything growing in my yard. Sadly, I’m just as busy and forgetful as the next person and don’t always remember what’s out there. The silver lining to the distracted auto-pilot life we find ourselves in is that occasionally you get brought back into the moment by a show stopping surprise in the garden.
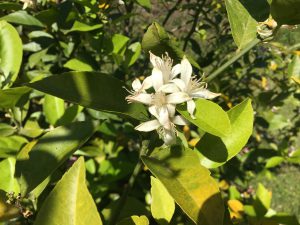
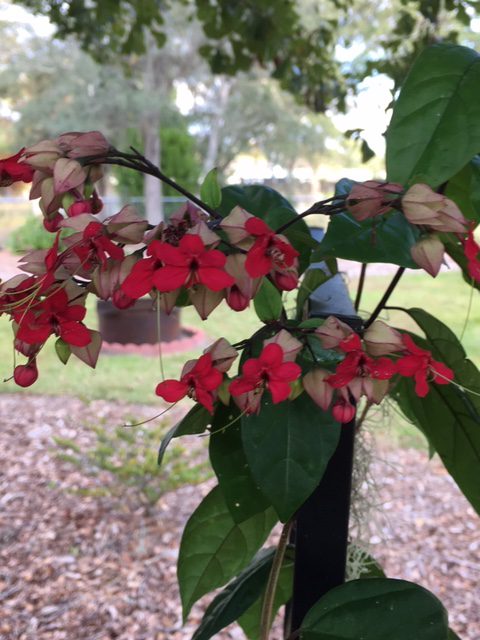
Bleeding Heart Vine is one of those garden gems. Planted in the bright shade of a pair of oak trees in my Northwest Florida yard, the dark green foliage blends into the background most of the year, but when it flowers look out! Panicles of 5-20 white and red flowers brighten up the shady garden. As the flowers fade, they turn a deep mauve that is just as attractive as the fresh flowers.
Some vines can be aggressive growers, but in the Florida Panhandle Bleeding Heart Vine is a relatively slow grower reaching about 15 feet at maturity. It is classified as a twining vine, but may need a little help supporting itself on a trellis. This vine lacks tendrils or suckers that some vines use to attach to structures, which makes it a little easier to redirect if it starts to grow in an undesirable direction. Don’t want it to climb? Prune to stimulate branching and it gets more of a sprawling, bushy shape.
Bleeding Heart Vine prefers moist, well-drained soil and high humidity. It is hardy to 45°F and may need protection in the winter. Personal observations of this plant have shown stem dieback in the winter, but it has grown back for multiple years without protection in Northern Bay County.
Reference and further information at Floridata Plant Profile #1053 Clerodendrum thomsoniae