by Mary Salinas | Jul 7, 2015
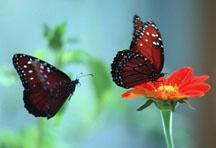
Butterflies are not only beautiful to look at in your landscape; they serve as important pollinators and indicators of the health of our environment. Attracting them to your garden and incorporating some features to get them to stay and make it their home involves a little planning ahead of time for optimum results.
Queen butterfly. Photo credit: Milt Putnam, UF/IFAS.
Choose a location that provides some protection from wind. Trees and shrubs that provide wind protection also serve as a safe harbor from rain and predators. The garden should be mostly sunny with some part sun areas. Ensure that any new plantings have access to a convenient irrigation source so they can be successfully established and maintained in good health.
Now you’ll need to choose the plants. Adults feed on the nectar of many flowering trees, shrubs, perennials, and annuals and, fortunately, there are usually many choices that will meet your site requirements and your taste preferences. In order to keep the butterflies in your garden, certain plants need to be available to serve as host plants for their young. Determine which species of butterfly is common in your area and that you want to attract. Most species have very few plants on which the caterpillars can feed so those host plants need to be chosen wisely. Determine whether any of the plants you already have are host plants and they can be integrated into your butterfly garden. For example, cassia is a host plant for the Cloudless Sulphur and citrus is a host plant for the Giant Swallowtail.
In choosing your nectar plants, select those that are native or Florida-Friendly as they are lower maintenance, giving you less trouble in the long run. Choose plants that have flowers in a variety of color, size, and shape. Different butterflies like to feed at different elevations, so choose trees, shrubs, perennials, and annuals of varying heights. In order to have nectar available throughout the time when the butterflies occur, include plants that bloom at different times of the year. And include some plants that bloom from spring to late fall, like pentas or moss verbena.
Larger plants should be placed in the background with smaller plants layered in the foreground. When you plant smaller annuals and perennials, place them in masses to better attract the butterflies. Consider placing host plants in an area that is in close proximity to the nectar plants, but in an area of your garden that is not a focal point. Host plants can get quite ragged looking from hungry caterpillars!
Good maintenance practices will enhance the health of your garden. Regular fertilization and irrigation if needed will help keep your plants in bloom and healthy; healthy plants are less susceptible to disease and pests. Avoid pesticides as they may harm the very creatures you are trying to attract. Never use Bt or systemic pesticide. If you must, target a pest with lower risk oils or soaps and then only treat the affected plants. Lastly, be aware of beneficial insects that will help you achieve satisfactory control of a pest.
Now that your plants are placed there are several things to do to make your butterfly garden complete. Add a spot where water can puddle on the ground for the adult butterflies to drink. They require minerals from the soil that get dissolved in the water. Also add a rock or log in a sunny spot where butterflies can rest and sun themselves. And consider placing a comfortable place for you to sit and enjoy the beauty of your garden and its inhabitants!
For more information:
Butterfly Gardening in Florida
by Beth Bolles | Jun 29, 2015
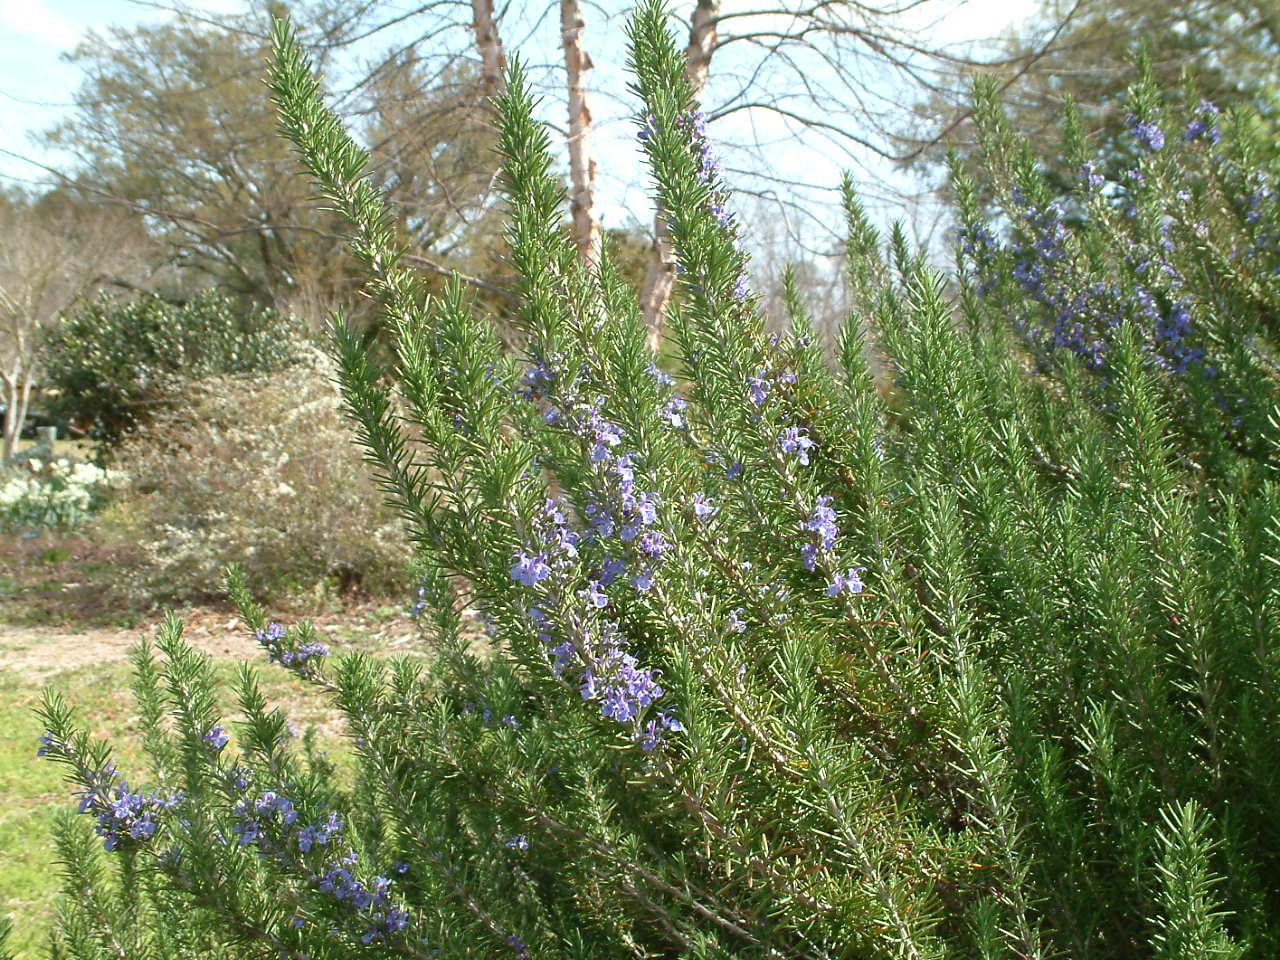
One very popular herb for the backyard garden is the evergreen Rosemary, Rosmarinus officinalis which serves as an attractive landscape shrub in addition to its culinary uses. Rosemary grows best in full sun and well-drained soils. When planted in the ground, rosemary can grow 4-5 feet in height and spread. Plants do have beautiful bluish flowers that form in late winter and early spring, providing nectar for bees.

Rosemary is generally a pest free plant but some gardeners may find damage resulting from an insect pest. Rosemary is one of the hosts for the Southern purple mint moth, Pyrausta laticlavia which will lay eggs on several plants in the mint family. Caterpillars feed on leaves along the stems which become matted with silken threads and frass from the insects. As a result of the feeding, leaves are not useable and plants do not look attractive. Heavy populations will stress plants.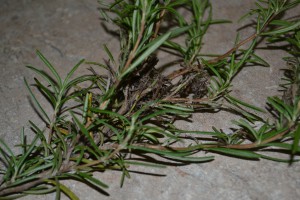
Since rosemary is often used to flavor many foods, many people do not want to use an insecticide on the plant. One least toxic option that can be used safely on edibles is Bacillus thuringiensis. The product is specific for caterpillar management and safe for predators that may help manage some caterpillars. Homeowners may also physically remove caterpillars or prune out damaged stems on larger plants.
by Sheila Dunning | Jun 23, 2015
 Air potato (Dioscores bulbifera) is a perennial, herbaceous self-twining vine that can grow over 60 feet in length, enabling it to climb over and smother many native plants. The Florida Exotic Plant Pest Council (FLEPPC) lists air potato as a Category 1 invasive plant, which means that it has disrupted natural communities and ecological functions by displacing native plant species.
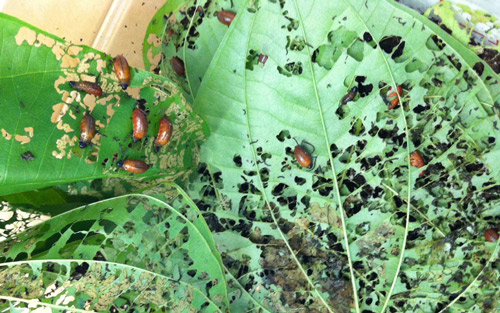
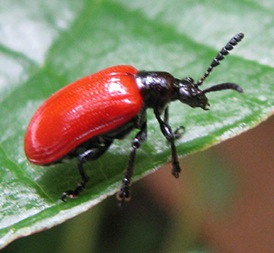
In 2012, a leaf feeding beetle (Lilioceris cheni) was introduced into South Florida from China for biological control of air potato. Although it is too early to determine any potential long-term impacts, the initial results have been promising. The larvae and adults of the air potato leaf beetle feed on the leaf tissue and occasionally the bulbils. The damage to the growing tips of the plant have dramatically reduced its ability to cover native vegetation. Extensive damage to air potato was evident within three months after the first release. Additionally, testing by scientists at the USDA/ARS Invasive Plant Research Laboratory in Fort Lauderdale concluded that the beetle will not complete development on any other plant found in Florida.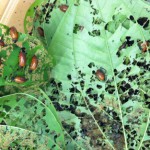
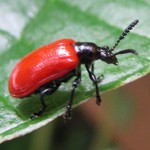 The female air potato leaf beetle lays an average of 1,200 eggs, which develop into larvae in about four days. The young beetles skeletonize the air potato leaves for the next eight days and then pupate into foam-like cocoons. Clumps of cocoons fall to the ground and the adult beetles emerge 13 to 16 days later. There can be a new generation of air potato leaf beetle every month while the weather is warm. For the winter, the adults hide in leaf litter and wait for spring.
The question now is: “How well will they survive through a longer, colder Northwest Florida winter?”. USDA scientists, UF Extension agents and citizen scientists in Bay and Okaloosa County hope to find out. Earlier this month, June 2015, air potato leaf beetles from the Hayslip Biological Control and Research and Containment Laboratory in Ft. Pierce were released into areas containing air potato. They will be monitored over the next year. Look for an update next summer.
by Les Harrison | Jun 15, 2015
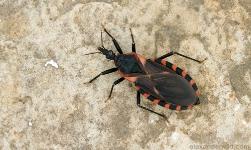
Eastern Blood-sucking Conenose bugs are found in and around plant where they are hunting for insects.
While it is not exactly a jungle “out there” in the landscape, there are some occasionally encountered insects which can inflict pain. The kissing bug and the blood-sucking conenose are native insects which are best not physically encountered.
The native kissing bug, Triatoma sanguisuga, is part of the assassin bug family. This insect is commonly called a kissing bug because it targets the soft tissues around the mouth of mammals as a feeding site.
As if being in the assassin bug family is not bad enough for its image, this pest’s South American cousin is responsible for inoculating victims with Chagas disease. Chagas disease, a protozoan infection, has occurred in some western states but not Florida.
The bloodsucking conenose, in assassin bug family too, is found in north Florida. It is a dark brown, winged bug, 3/4 inch long, with the edges of its abdomen alternating in light and dark colors.
They have a slender, straight beak with piercing-sucking mouthparts. The antennae are inserted on the side of the head between the eyes and the end of the beak.
They are rarely seen during the day, instead hiding in leaf litter and other debris near their intended host. Birds apparently consider them quite tasty and are easy targets for avian predators.
Kissing bugs primarily feed at night on the blood of sleeping animals, such as raccoons and opossums which burrow in the vicinity.
Their life cycle varies considerably depending on temperature, humidity, and availability of hosts. Females lay one egg at a time, up to five eggs each day.
Problems arise when these insects encounter humans. If this creature enters a home or dwelling, its nocturnal habits make humans easy prey.
The bloodsucking conenose will enter into a home by crawling through cracks in the foundation, torn window screens, or other structural flaws or inadequacies. Many times they enter by simply clinging to a domestic pet or to the clothing of an unaware person. Once indoors, they are found in bedding, cracks in the floors and walls, or under furniture.
Most bites from conenose bugs are rarely felt. However, some can be quite painful and infection can occur if the wound is scratched and contaminated.
The assassin bug, the entomological cousin of the kissing bug, usually is encountered in foliage and has little inclination to enter homes. It is capable of delivering a nasty surprise to the unsuspecting gardeners who disturb this ambush predator.
The green leaves and pretty flowers are an ideal habitat for the assassin bug and the kissing bug to put the bite on ideal menu selections. This is something to keep in mind this spring when enjoying the panhandle Florida’s great outdoors.
To learn more about the assassin bug or the kissing bug, contact your UF/IFAS Extension Office.

by Roy Carter | Jun 10, 2015
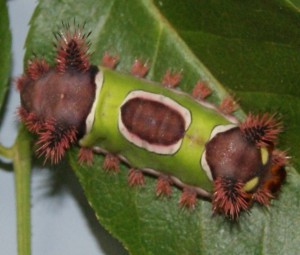
Saddleback Caterpiller, Image Credit Matthew Orwat UF/IFAS
The four major stinging caterpillars occurring in Florida are the Puss Caterpillar, Saddleback Caterpillar, IO Moth Caterpillar and Hag Caterpillar. Some less common ones also occur in the state. These caterpillars do not possess stingers, but have spines (nettling hairs) that are connected to poison glands. Some people experience severe reaction to the poison released by the spines and require medical attention. Others experience only an itching or burning sensation.
Stinging caterpillar’s feed on many pants, but they seldom are present in large enough numbers to cause serious damage. Their stings, rather than feeding, pose the primary threat. That’s why it’s important to learn to recognize and avoid these cantankerous crawlers. My information on stinging caterpillars was provided by Extension Entomologist Dr. Don Short and Dr. D. E. Short of the University of Florida’s Institute of Food and Agricultural Sciences
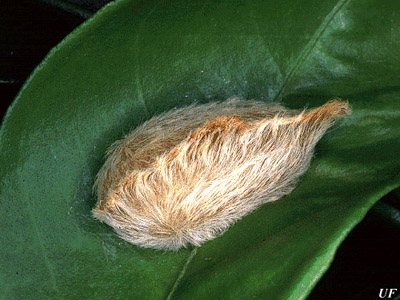
The puss caterpillar is stout bodied, almost an inch long, and completely covered with gray to brown hairs. Under the soft hairs are stiff, poisonous spines. When touched, the spines break off in the skin, causing serve pain. The saddleback caterpillar has a more striking appearance. It’s brown, with a wide green band around the middle of the body. There’s a large brown spot in the middle of the green band, giving the appearance of a brown saddle on a green blanket. The saddleback may exceed and inch in length, and is stout bodied. The main poison spines are born on pairs of projections near the front and rear of the body. There’s a row of smaller stinging organs along each side.
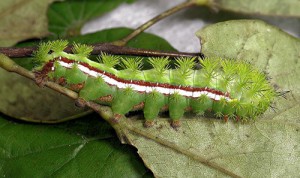
I O Moth Caterpillar, Image Credit UF Entomology
The IO moth caterpillar is pale green, with yellow and reddish to maroon stripes along the sides. It often exceeds two inches in length, and is fairly stout bodied. The poisonous spines, which form rows of bands across the body, are usually yellow with black tips.
The light brown hag moth caterpillar has nine pairs of variable length protrusions along its body, from which poisonous spines extend. The protrusions are curved and twisted, giving the appearance of disheveled hair of a hag.
Most contact with stinging caterpillars occurs in the spring and summer. As might be expected, children, campers, and gardeners are most frequent victims. When playing or working outdoors in infested areas, it pays to wear a long-sleeved shirt, long pants, and gloves.
Reactions to caterpillars poison vary with an individual’s sensitivity. Itching, burning, swelling, and nausea may be experienced. In severe cases, fever, shock, and convulsions may occur. If a person has a history of hay fever, asthma, or allergy or if allergic symptoms develop a physician should be contacted immediate. In cases of milder reactions, a strip of adhesive tape should be placed on and pulled off the affected area repeatedly to remove the spines. Then, apply ice packs, followed by a paste of baking soda and water.
Since so few stinging caterpillars are normally found on plants around the home mechanical methods usually offer the easiest means of control. Just carefully remove and crush the caterpillars, or knock them into a pan of kerosene. If a pesticide is needed, Bacillus thuringiensis (Bt), Seven or Malathion may be used in accordance with label directions for caterpillar control.
For more information on Caterpillars contact your UF/IFAS County Extension Service or visit www.http://edis.ifas.ufl.edu and see Publication 107 – Stinging and Venomous Caterpillars.
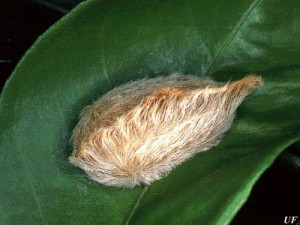
Puss Caterpillar, Image Credit University of Florida
by Roy Carter | May 26, 2015
The proverbial picnic scene aside, ants are pests all of us have to deal with from time to time. Both inside and outside our homes, they feed on and contaminate our food, they build ugly mounds on our lawns, and some ants can inflict painful bites or stings.
Several species of ants are found in Florida. The most common can be grouped into three categories: House-infesting ants, yard infesting ants, and carpenter ants. In this article we’ll talk about ant biology and behavior and how to control them.

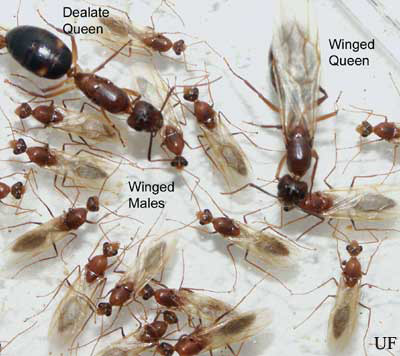
Florida Carpenter Ants. Photo credit: UF/IFAS.
Ants have a life cycle similar to many other insects. They go from egg, to larva, to pupa, to adult. Eggs are almost microscopic in size and hatch into soft legless larvae. The pupa resembles the adult ant, except it is soft, uncolored and immobile. It can take from six weeks to two months from egg to adult.
Ants are social insects. They live in colonies much like bees do. Most colonies have a queen ant, male ants, and worker or female ants. Colonies are started by queens, whose primary function is reproduction. The queen may live for many years and is usually replaced by a daughter queen. Males are produced in very old or large colonies, and their sole function is to mate with the unfertilized female, after which, they die. Worker ants construct, repair and defend the nest, provide food for the colony, and take care of the young ants.
Most ants are omnivorous, which means they will eat anything, through some do have specialized food habits. Ants locate food by random searching; when one ant finds food, she informs the other workers in the colony. The exact method of communication is unknown, but in some cases, ants can leave scent trails that other ants can follow to the food source.
Because ants are attracted to any type of food or food particles, your best bet to controlling ants inside your home is to keep it very clean. Store food in airtight containers. Never substitute insecticides for inadequate housekeeping.
The key to eliminating ants is locating and destroying the colony. Sometimes this can be a real problem, because ants are very adaptable. Outdoor nesting species can sometime nest indoors and vice versa, depending, on the food supply.
To find the ant colony, you have to watch the movement of the ants very closely. Outdoors, many ants are easy to locate, because they deposit earth on the soil surface, and form ant hills. But some outdoor ants build nests under house foundations, in decaying logs, and tree trunks. These can be difficult to locate indoors. Ants may nest in walls, behind baseboards, in cracks, and in decaying wood.
Spray, dusts, granules, and baits can be useful in controlling ants. When using these products, treat baseboards, door and window frames, and cracks and crevices between walls and flooring. Treat all areas where ants appear to have trails. If the nest is located, apply an insecticide to the nest according to the pesticide label.
For more information:
Ants
Fire Ants
Carpenter Ants