Welcome to the world of symbiotic serenity, where ants and aphids work in harmony to create a thriving ecosystem. Ants farming aphids is a fascinating phenomenon in nature, where ants tend to aphids, protecting and nurturing them like precious livestock, while aphids provide the ants with a sweet and nutritious honeydew secretion.
The relationship between ants and aphids is complex and benefits both parties. Aphids, which are soft-bodied sucking insects that feed on plant sap, secreting honeydew – a sugary secretion that aphids produce as waste from their sap consumption. This sweet substance is highly attractive to ants, who actively tend to aphids in order to obtain honeydew as a food source.
One of the most fascinating aspects of ant farming aphids is the behavior exhibited by ants when caring and protecting aphids. Ants are known to carefully tend to aphids, often referred to as “herding”. In doing so, they stroke the aphids with their antennae, stimulating them to release honeydew. Ants then collect and consume this honeydew, which serves as a valuable source of nutrition for them.
Aphids also benefit from this mutualistic partnership by relying on ants for protection from predators such as ladybugs, lacewings, and other aphid predators. In the presence of ants, aphids are less likely to be attacked by natural enemies, which allows them to feed and reproduce more freely. In addition, ants can transport aphids to new feeding sites, which helps aphids access fresh sources of sap.
However, this mutualistic relationship between ants and aphids can also pose problems for gardeners and homeowners. When ants protect aphids from natural enemies, this can result in increased aphid populations and plant damage. Therefore, it is important to control ant farming of aphids in order to manage aphid infestations effectively.
There are several methods gardeners/homeowners can use to manage ant farming of aphids:
Early detection is key. Regularly check for aphids at least twice a week while plants are growing rapidly.
Utilize natural enemies of aphids such as parasitic wasps, lady beetles, lacewing larvae, soldier beetles, and syrphid fly larvae. These insects can help keep aphid populations at an acceptable threshold.
Ant management is crucial. A band of sticky material can be wrapped around the trunk to prevent ants from reaching the aphids.
Prune and dispose of infested branches.
Insecticidal soaps and oils can be used to suffocate aphids. However, these products only kill aphids on contact. Other synthetic insecticides like malathion, permethrin, etc. are alternatives that can control aphids, but they may harm natural enemies and pollinators such as bees.
*Important to note, follow all manufacturers instruction when using chemical products.
In conclusion, ants farming aphids is a captivating example of mutualistic interactions in nature and serve as a compelling reminder of the wonders and intricacies of the natural world.
While the azalea blooms are beautiful, it’s hard to remember what the leaves looked like last summer. But, if you look carefully, you may see some off-colored, bleached out leaves. Those are from a piercing-sucking insect. Its azalea lace bug, Stephanitis pyrioides. They overwinter as eggs on the underside of infested leaves or in the leaf litter or mulch under the shrub. Eggs hatch in late March and early April. The insect then passes through five nymphal instars before becoming an adult. It takes approximately one month for the insect to complete development from egg to adult and there are at least four generations per year. Valuable plants that are susceptible to lace bug damage should be inspected in the early spring for the presence of overwintering lace bug adults, eggs and newly hatched nymphs. Inspect these plants every two weeks during the growing season for developing lace bug infestations.
Damage caused by azalea lace bug, Stephanitis pyrioides (Scott), feeding. Photograph by James. L. Castner, University of Florida.
Both adults and nymphs have piercing-sucking mouthparts and remove sap as they feed from the underside of the leaf. Lace bug damage to the foliage detracts greatly from the plants’ beauty, reduces the plants’ ability to produce food, decreases plant vigor and causes the plant to be more susceptible to damage by other insects, diseases or unfavorable weather conditions. The azalea can become almost silver or bleached in appearance from the feeding lace bug damage.
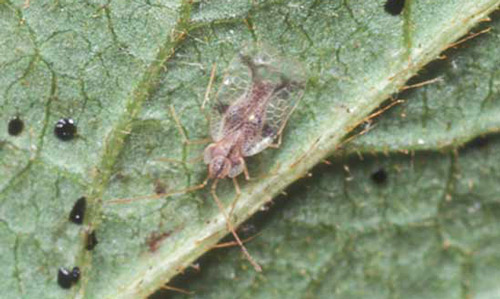
Adult azalea lace bug, Stephanitis pyrioides (Scott). Photograph by Jamba Gyeltshen, University of Florida.
However, lace bugs often go undetected until the infested plants show severe damage sometime into the summer. By then several generations of lace bugs have been weakening the plant. Inspecting early in the spring and simply washing them off the underside of the leaves can help to avoid damage later and the need for pesticides.
Adult lace bugs are flattened and rectangular in shape measuring 1/8 to 1/4 inch long. The area behind the head and the wing covers form a broadened, lace-like body covering. The wings are light amber to transparent in color. Lace bugs leave behind spiny black spots of frass (excrement).
Lace bug nymphs are flat and oval in shape with spines projecting from their bodies in all directions. A lace bug nymph goes through five growth stages (instars) before becoming an adult. At each stage the nymph sheds its skin (molts) and these old skins often remain attached to the lower surface of infested leaves.
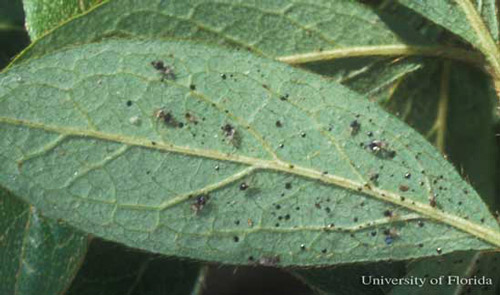
Azalea leaf with azalea lace bugs, Stephanitis pyrioides (Scott), and excrement spots. Photograph by James. L. Castner, University of Florida.
Azalea lace bug eggs are football-shaped and are transparent to cream colored. Lace bug eggs are found on the lower leaf surface, usually alongside or inserted into a leaf vein. Adult females secrete a varnish-like substance over the eggs that hardens into a scab-like protective covering. Other plant species, such as lantana and sycamore, may have similar symptoms. But, realize that lace bugs are host specific. They feed on their favorite plant and won’t go to another plant species. However, the life cycle is similar. Be sure to clean up all the damaged leaves. That’s where the eggs will remain for the winter. Start next spring egg-free.
Math isn’t always fun! Here is Euclid explaining math in Raphael’s The School of Athens. Credit: Creative Commons.
There are a lot of things gardeners need to know to cultivate a beautiful landscape. Between plant zones, scientific names, soil chemistry, and pest identification, being a gardener takes curiosity and willingness to learn new things. Unfortunately, one topic that needs to be well understood, especially when it comes to applying pesticides and fertilizers, is a subject that many cringe when they hear it – mathematics!
Some of the most common mathematical concepts to have a good grasp on for gardening include area, converting decimals to percentages and vice versa, estimating volume and converting units, and determining how much fertilizer to be applied based on your fertilizer grade.
Here’s a couple tips to help you gardeners out with math.
Area
Most often, we need to know the square footage of our gardens. Rectangles are straightforward, you multiply length (in feet) by width (in feet) to get feet squared. Since most yards are not rectangles, we sometimes need to use other shapes to best calculate the area, such as circles and/or triangles. The area (A) of a circle is , where “π” is 3.14 and “r” is the radius (half of the diameter or the distance from the center to the edge). Remember that the little raised 2 means you multiply the radius by itself twice, not by two.
Most of the time, square feet is the best area unit to use. But just in case you need to know, one acre equals 43,560 square feet. So, if you find your lawn is 10,000 square feet, that means you have 0.23 of an acre (10,000/43,560).
Get your calculator’s out! Credit: iStockphoto.
Percent Conversions
This one may be better understood by most, but this becomes important later when we determine fertilizer needed or doing volume conversions. Basically, any percent can be divided by 100 to convert it to a decimal that can be used easily in other calculations. For example, 15% is the same as 0.15 (15/100). The easy way to remember is that 100% is the same as one, and 50% is the same as 0.5.
Volume Estimation and Conversions
Determining volume is required when figuring out how much mulch is needed for a garden bed or soil required for a raised bed. Converting one unit to another is especially important when determining how much pesticide product is needed to prepare a mixture.
For mulch and soil, the cubic feet (cf) or cubic yards (cy) are needed to figure out how many bags or truckloads will be needed. Most bulk products are sold by the cubic yard. Since we are dealing with volume, we need three measurements, the length, width, and depth. If we want to add three inches of mulch to a 500 square foot garden, we multiply the 500 by 0.25 feet (3”/12” equals 0.25 inches) to get 125 cubic feet. That is about 62 bags of mulch from the hardware store, which are often sold in 2 cubic foot bags. If we divide 125 cubic feet by 27 (three feet in a yard so 3’ x 3’ x 3’ = 27) we now have the answer in cubic yards and find that we need about 4.5 cubic yards of mulch. One cubic yard is roughly a half of a full-size pickup truck bed.
When it comes to converting liquid volume units to help with pesticide mixtures, fortunately we have the internet to help. However, it is a good idea to at least be familiar with converting ounces to gallons and vice versa. Since 128 ounces equals 1 gallon, to go from gallons to ounces you multiply by 128. For example, 0.5 gallons equals 64 ounces (0.5 x 128). To go from ounces to gallons, we just divide by 128. For example, 192 ounces equals 1.5 gallons (192/128).
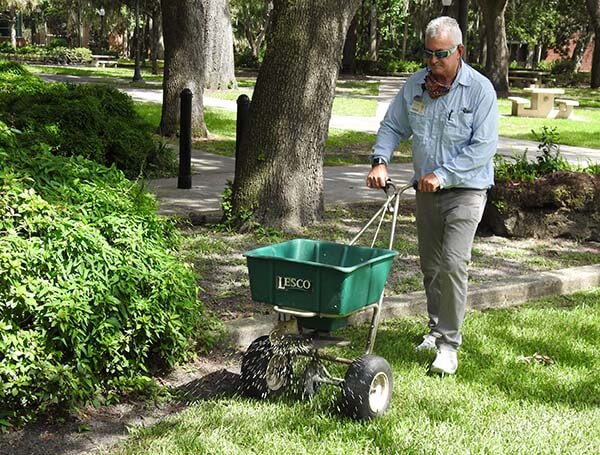
Applying the proper amount of fertilizer keeps your landscape healthier and protects local waterbodies. Credit: UF/IFAS.
Calculating Fertilizer Needed
Okay, bear with me, as we are about to do some hard math and piece together several of the above concepts. First of all, most fertilizer rates are provided by extension resources and given in terms of pounds of a particular nutrient for a set area, usually 1,000 square feet. For example, when using slow-release fertilizer a homeowner should apply no more than one pound of nitrogen for every 1,000 square feet of lawn. To figure out how much actual fertilizer to apply to meet the recommendation, we will need 1) the recommended rate, 2) the size of the lawn, and 3) the fertilizer grade on the product (the three numbers that represent the percent N, P, and K). Our rate is one pound nitrogen per 1,000 square feet. The size of our lawn is 50 feet by 30 feet, so 1,500 square feet. We are going to use a 16-0-8 fertilizer. Now, here is the hard part! To figure out how much of our 16% nitrogen fertilizer will provide one pound of nitrogen, we need to convert 16% to a decimal (16/100 = 0.16) and then divide the amount of fertilizer we need by that number – 1 pound/0.16 – to find that 6.25 pounds of our fertilizer product are required for each 1,000 square feet. Since we have 1,500 square feet, we need to multiply our answer by 1.5, which gives us a total of 9.4 pounds.
Math is hard and there are usually many methods to get the same solution. When using pesticides and fertilizers in the home landscape, it’s important to make sure we’re using the right amount of materials to minimize the chance of harming ourself, our plants, and the local environment. If you need help, or would like someone to check your work, contact your local extension office.
Getting your landscape set up in the spring is an in-depth process. Trees are pruned, soil amended, and the plantings have been accomplished. Now you have exactly the look you want. It would be easy to sit back, open a beverage of your choice, and watch it all come together. Don’t get comfortable just yet, there is a group of pests eyeing your plants. Insects come in many forms, looking to make a meal from your hard work. Do not fear though, there is a straightforward way to protect yourself from these creatures. Integrated pest management is a system of four control approaches designed to mitigate pest damage while minimizing impact on the environment.
Identification is Key
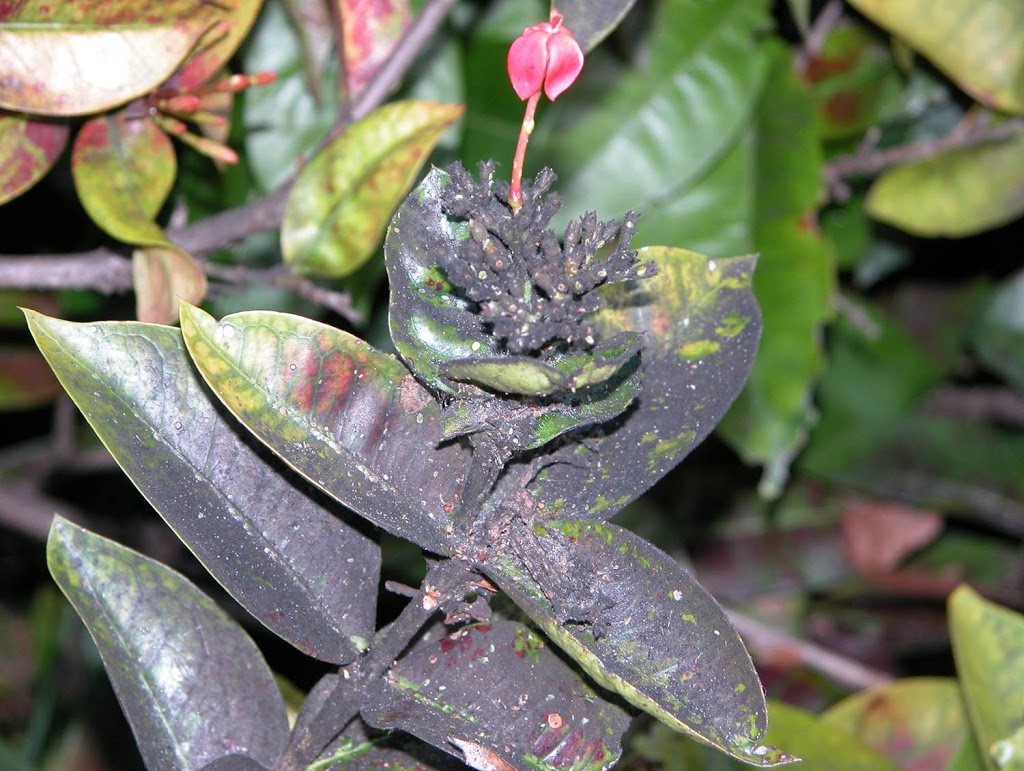
Before any of these steps may begin pests must be identified. This starts with scouting your landscape via visual inspection. Insects leave signs of their presence wherever they visit. Be sure to inspect every part of your plants including the underside of leaves. Here is where you will find insect eggs or frass (excrement) which are tell-tale signs of activity. Once discovered, you need to identify your specific pest. Insects are identified by their mouth parts when assessing plant damage. Chewing insects remove leaf material (think caterpillars and grasshoppers). Speckled leaves of brown and yellow is a symptom of piercing/sucking insects such as aphids. Other times you may only find damage after the fact where black leaves turn out to be covered in sooty mold. The sooty mold grows on the excreted honeydew of aphids, whiteflies. Once identified, it is up to you to decide if the level of damage is worth it and how you would like to approach limiting the damage.
Sooty mold on Ixora Photo Credits: UF/IFAS Kim Gabel
The First Three
The first strategy is cultural control wherein you optimize the environment in which your plant grows. Improved drainage and removal of plants susceptible to insect attack are excellent examples. You should also look into the lifecycle of insect pests to remove anything that will provide habitat. The next control is mechanical. This methodology is the most work intensive but comes with the least environmental impact as insects will be removed by hand. Biological control is like mechanical control except that removal of the pest is left to natural predators. There are many, but birds and lady beetles are best known. Creating habitat for these will help keep insect populations to an acceptable level with the bonus of falling into Florida friendly landscaping philosophies.
Chemicals are Not the Bad Guy
Chemical control is the final approach. Some may be surprised to find this here, but it is effective. With the above in place, you may find there are still insect issues. Chemicals will be your next step but do not feel put off by this approach. Research the best products for your situation and follow the instructions on the label to the letter. The label is designed to reduce risk to you and the environment while providing effective pest control.
Insect pests have plagued gardeners since the first person intentionally planted anything. Controlling these pests using a multipronged approach is the optimal way to reduce damage to your plants while minimizing environmental impact. Following the methodology in this post will bring a pest free landscape that you and your family will enjoy. For more information on integrated pest management, see these Ask IFAS documents, or contact your local extension agent for additional information on this and any topic regarding your gardens and more.
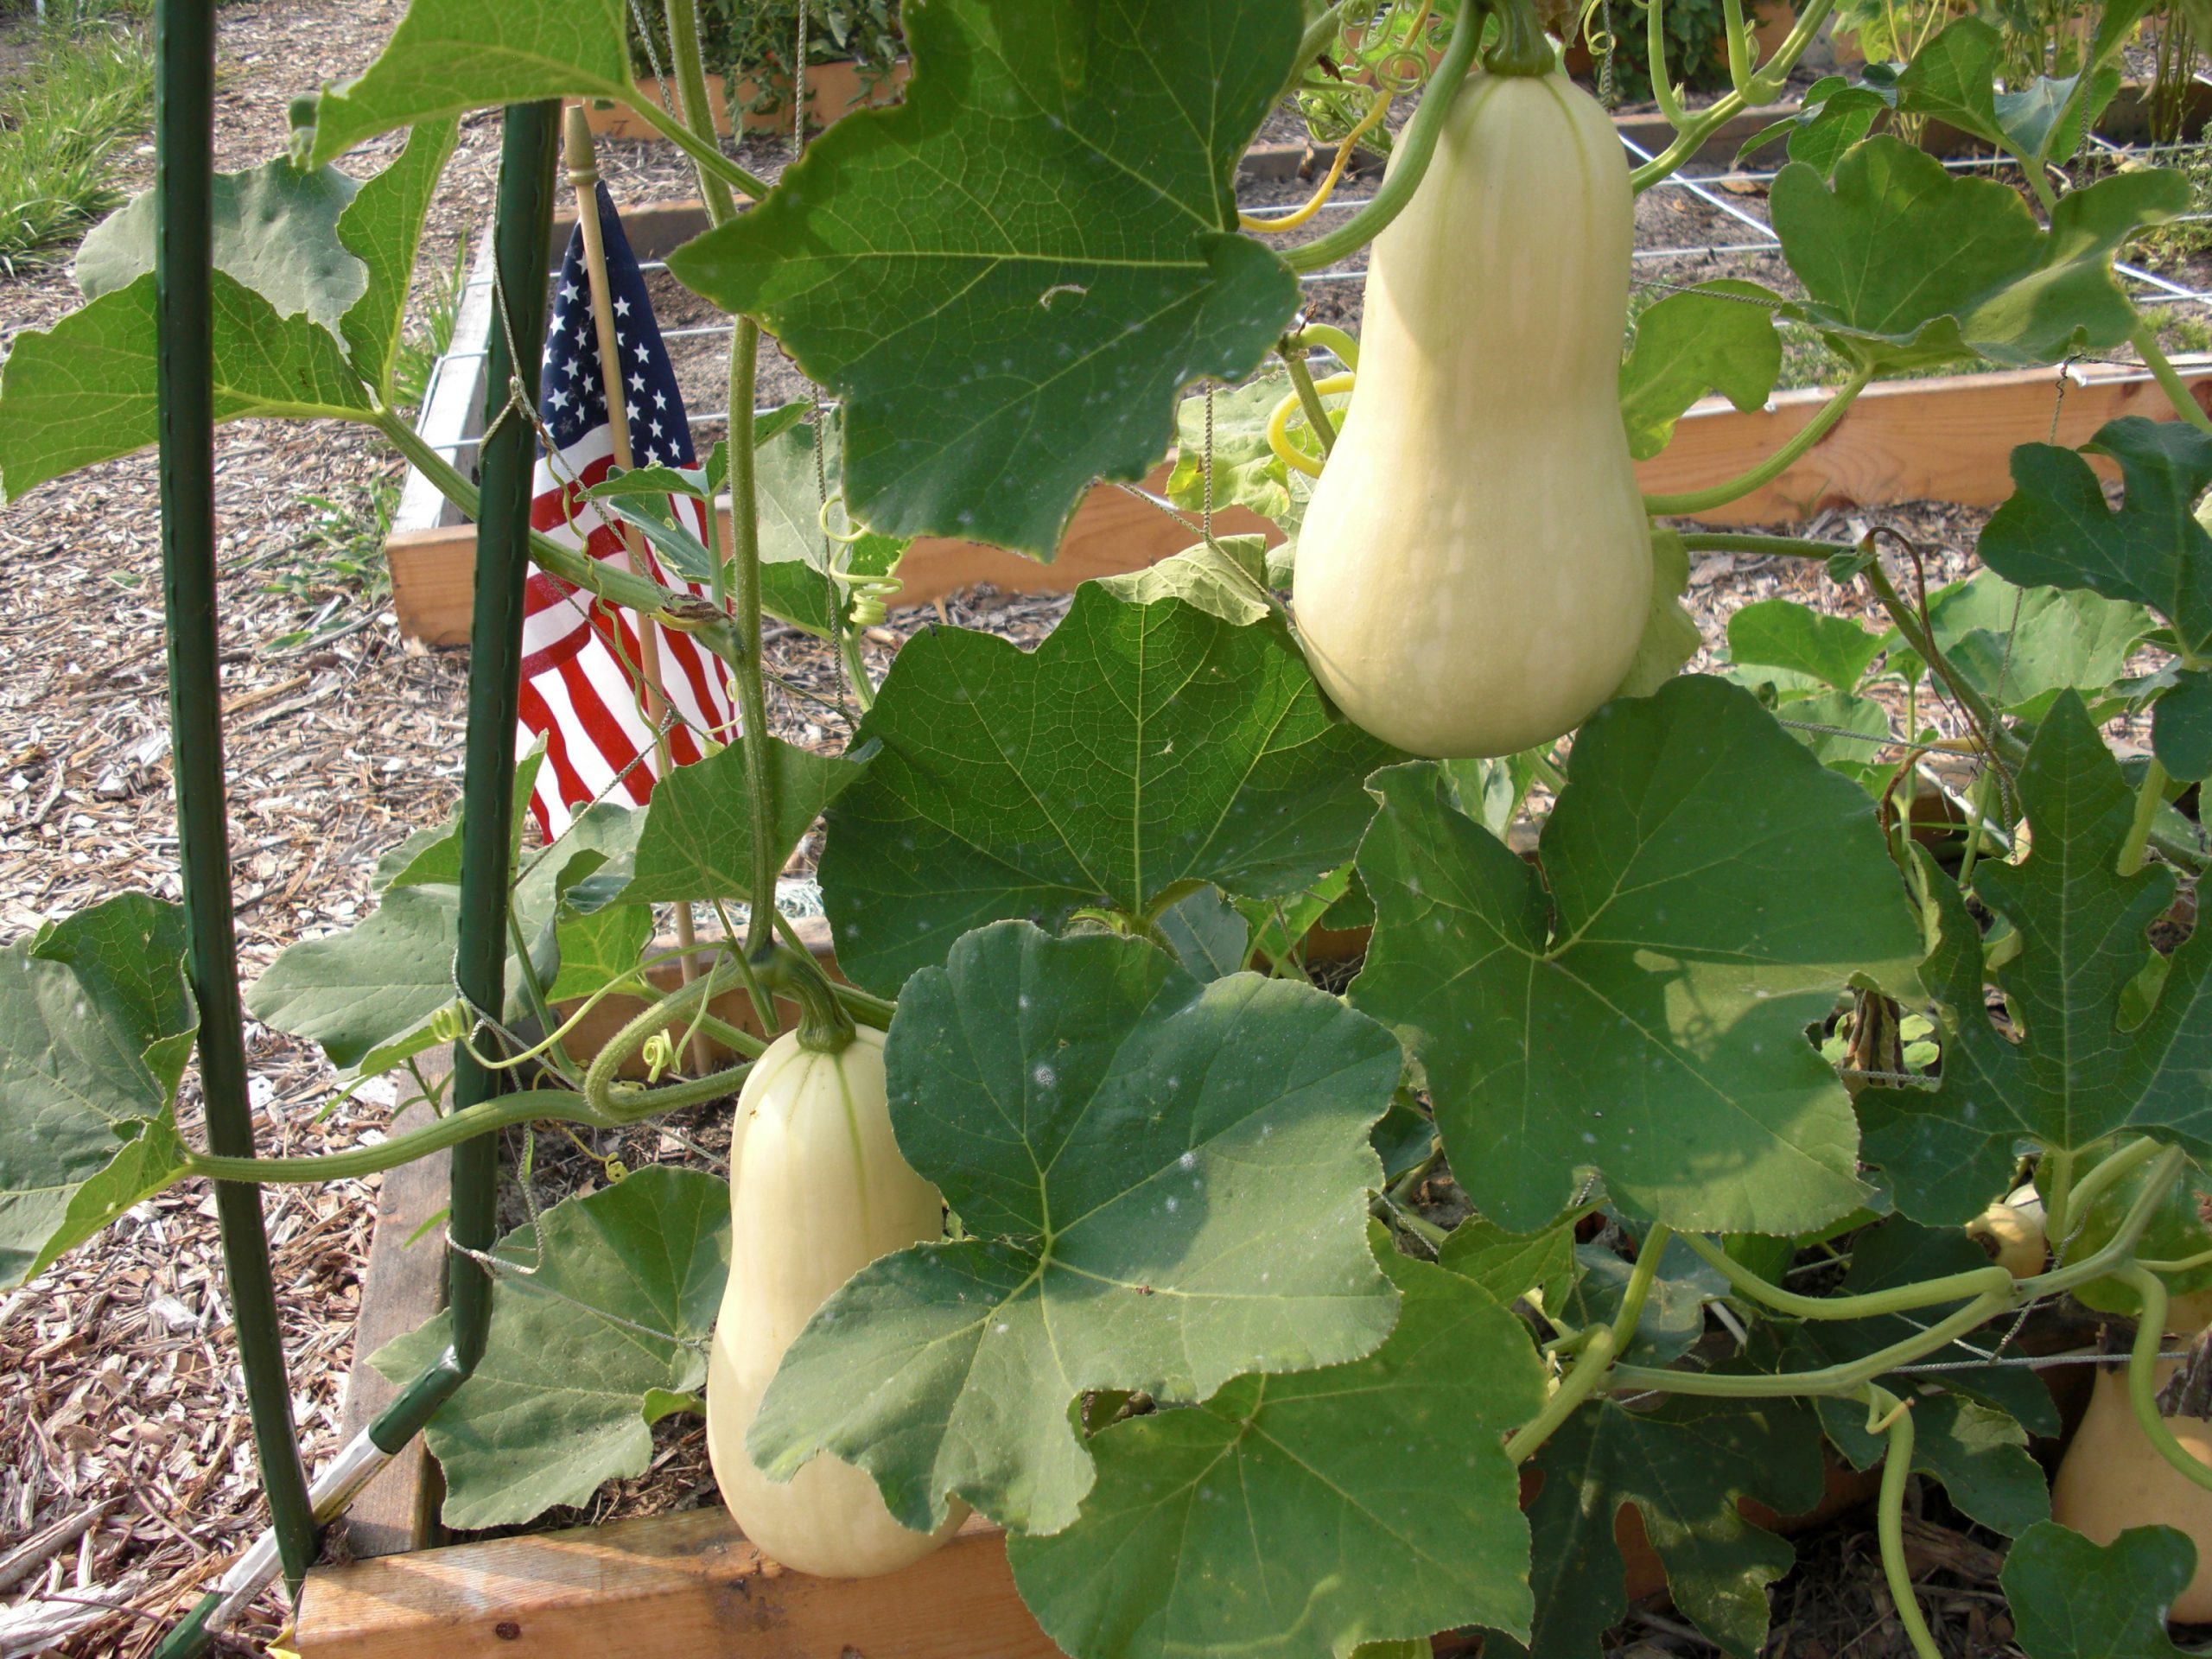
Butternut squash is more resistant to squash vine borers and it has a vining growth habit, perfect for growing on a trellis. Photo by Janis Piotrowski.
Last spring, I fought the good fight against a very pesky garden pest. As the pandemic ramped up, I started working remotely from home, which I figured would at least afford me the ability to scout my patch of summer squash a bit more diligently.
I was able to successfully remove a few tiny eggs that had been deposited individually on the base of the squash’s elongating bright green stems. And, since I planted early in the season, I was able to harvest a few beautiful looking – and very delicious tasting – summer squash for the dinner table. But alas, most of my hard work succumbed to my biggest garden foe: Melittia cucurbitae. Aka, the squash vine borer.
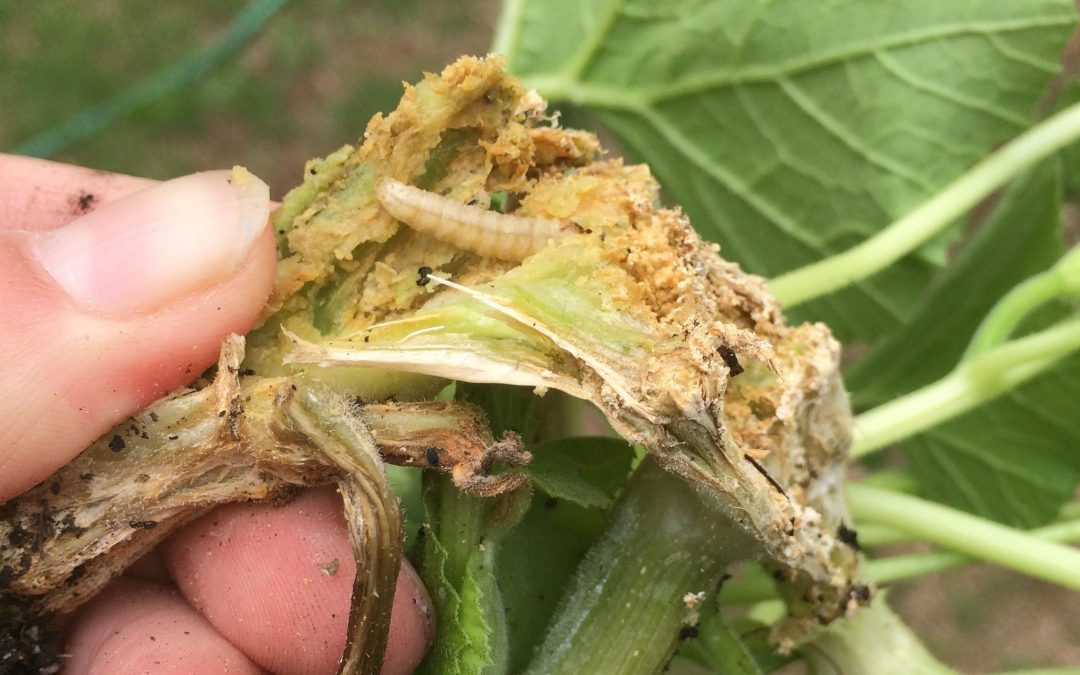
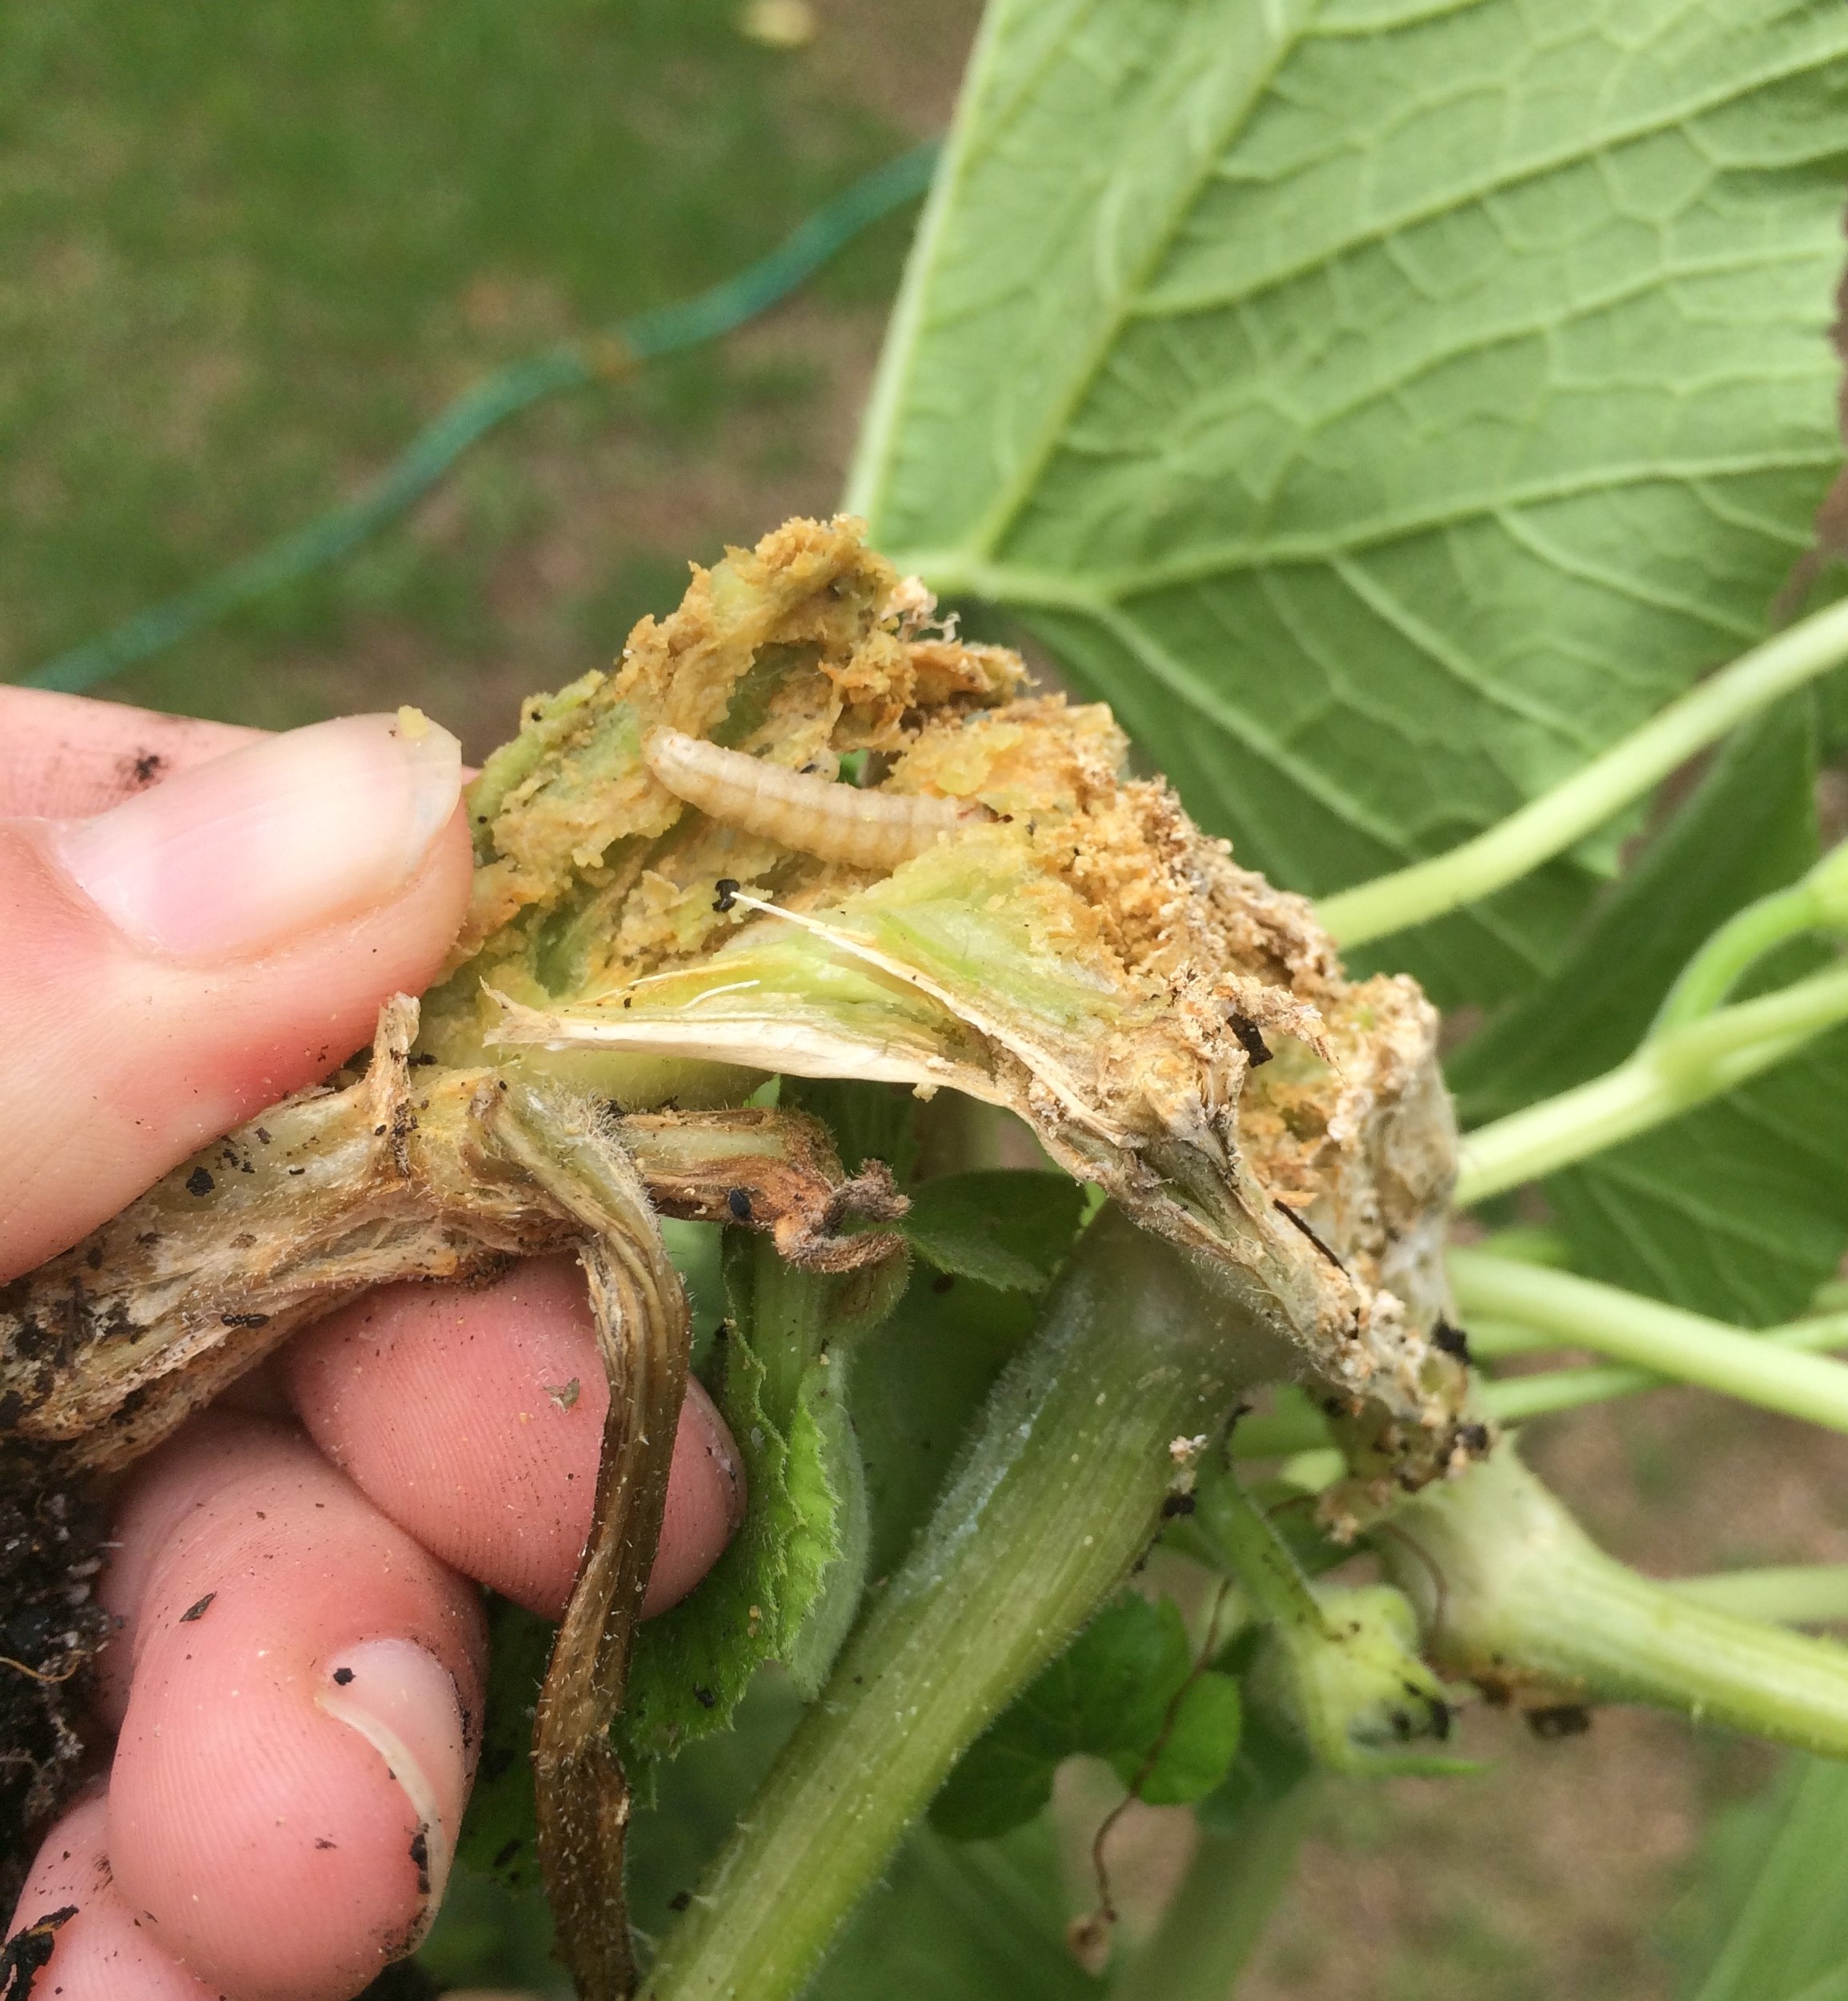
Squash vine borer larvae can most easily navigate the stems of summer squash varieties. Photo by Molly Jameson.
This year, I am trying a new approach. Instead of marching through my garden morning and night swatting wildly at borer moths – or repeatedly coating Baccillus thuringiensis biological insecticide spray over the squash stems every week – I am switching it up. This year, it is all about Cucurbita moschata. Aka, butternut squash.
How can this cucurbit avoid the mighty squash vine borer, you ask? Well typically, after hatching, squash vine borer larvae will quickly chew into the succulent stem of a summer squash variety. These large, hollow stems then act as an open highway for the borers, and they easily work their way up. The stems of butternut squash, on the other hand, are less palatable for the larvae. Their vining habit produces stems that are harder to navigate, thicker, and tougher than summer squash stems. Although not completely resistant, they are certainly not the borers’ preferred host plant.
And thankfully, butternut squash is quite delicious. It can be roasted to accompany just about anything, including spaghetti, lasagna, salads, chilis, and stews. It can also be blended into soups or purees to be paired with herbs and spices, such as turmeric, sage, garlic, and thyme. Or, it can be used as a filling in pies or frittatas, brushed with brown butter to sweeten up the plate as a delicious side dish, or be paired with goat cheese and crackers to be served as an appetizer.
Sometimes, simply omitting your toughest garden foe’s favorite host plant is the best path to both garden and dinner plate success.