Strawberries are being harvested in North Florida now and sweet onions will be harvested soon. Spring is the time to harvest these crops, however; fall is the time to plant these crops in our area.
Planting time and variety selection are keys to sweet onion and strawberry success in North Florida.
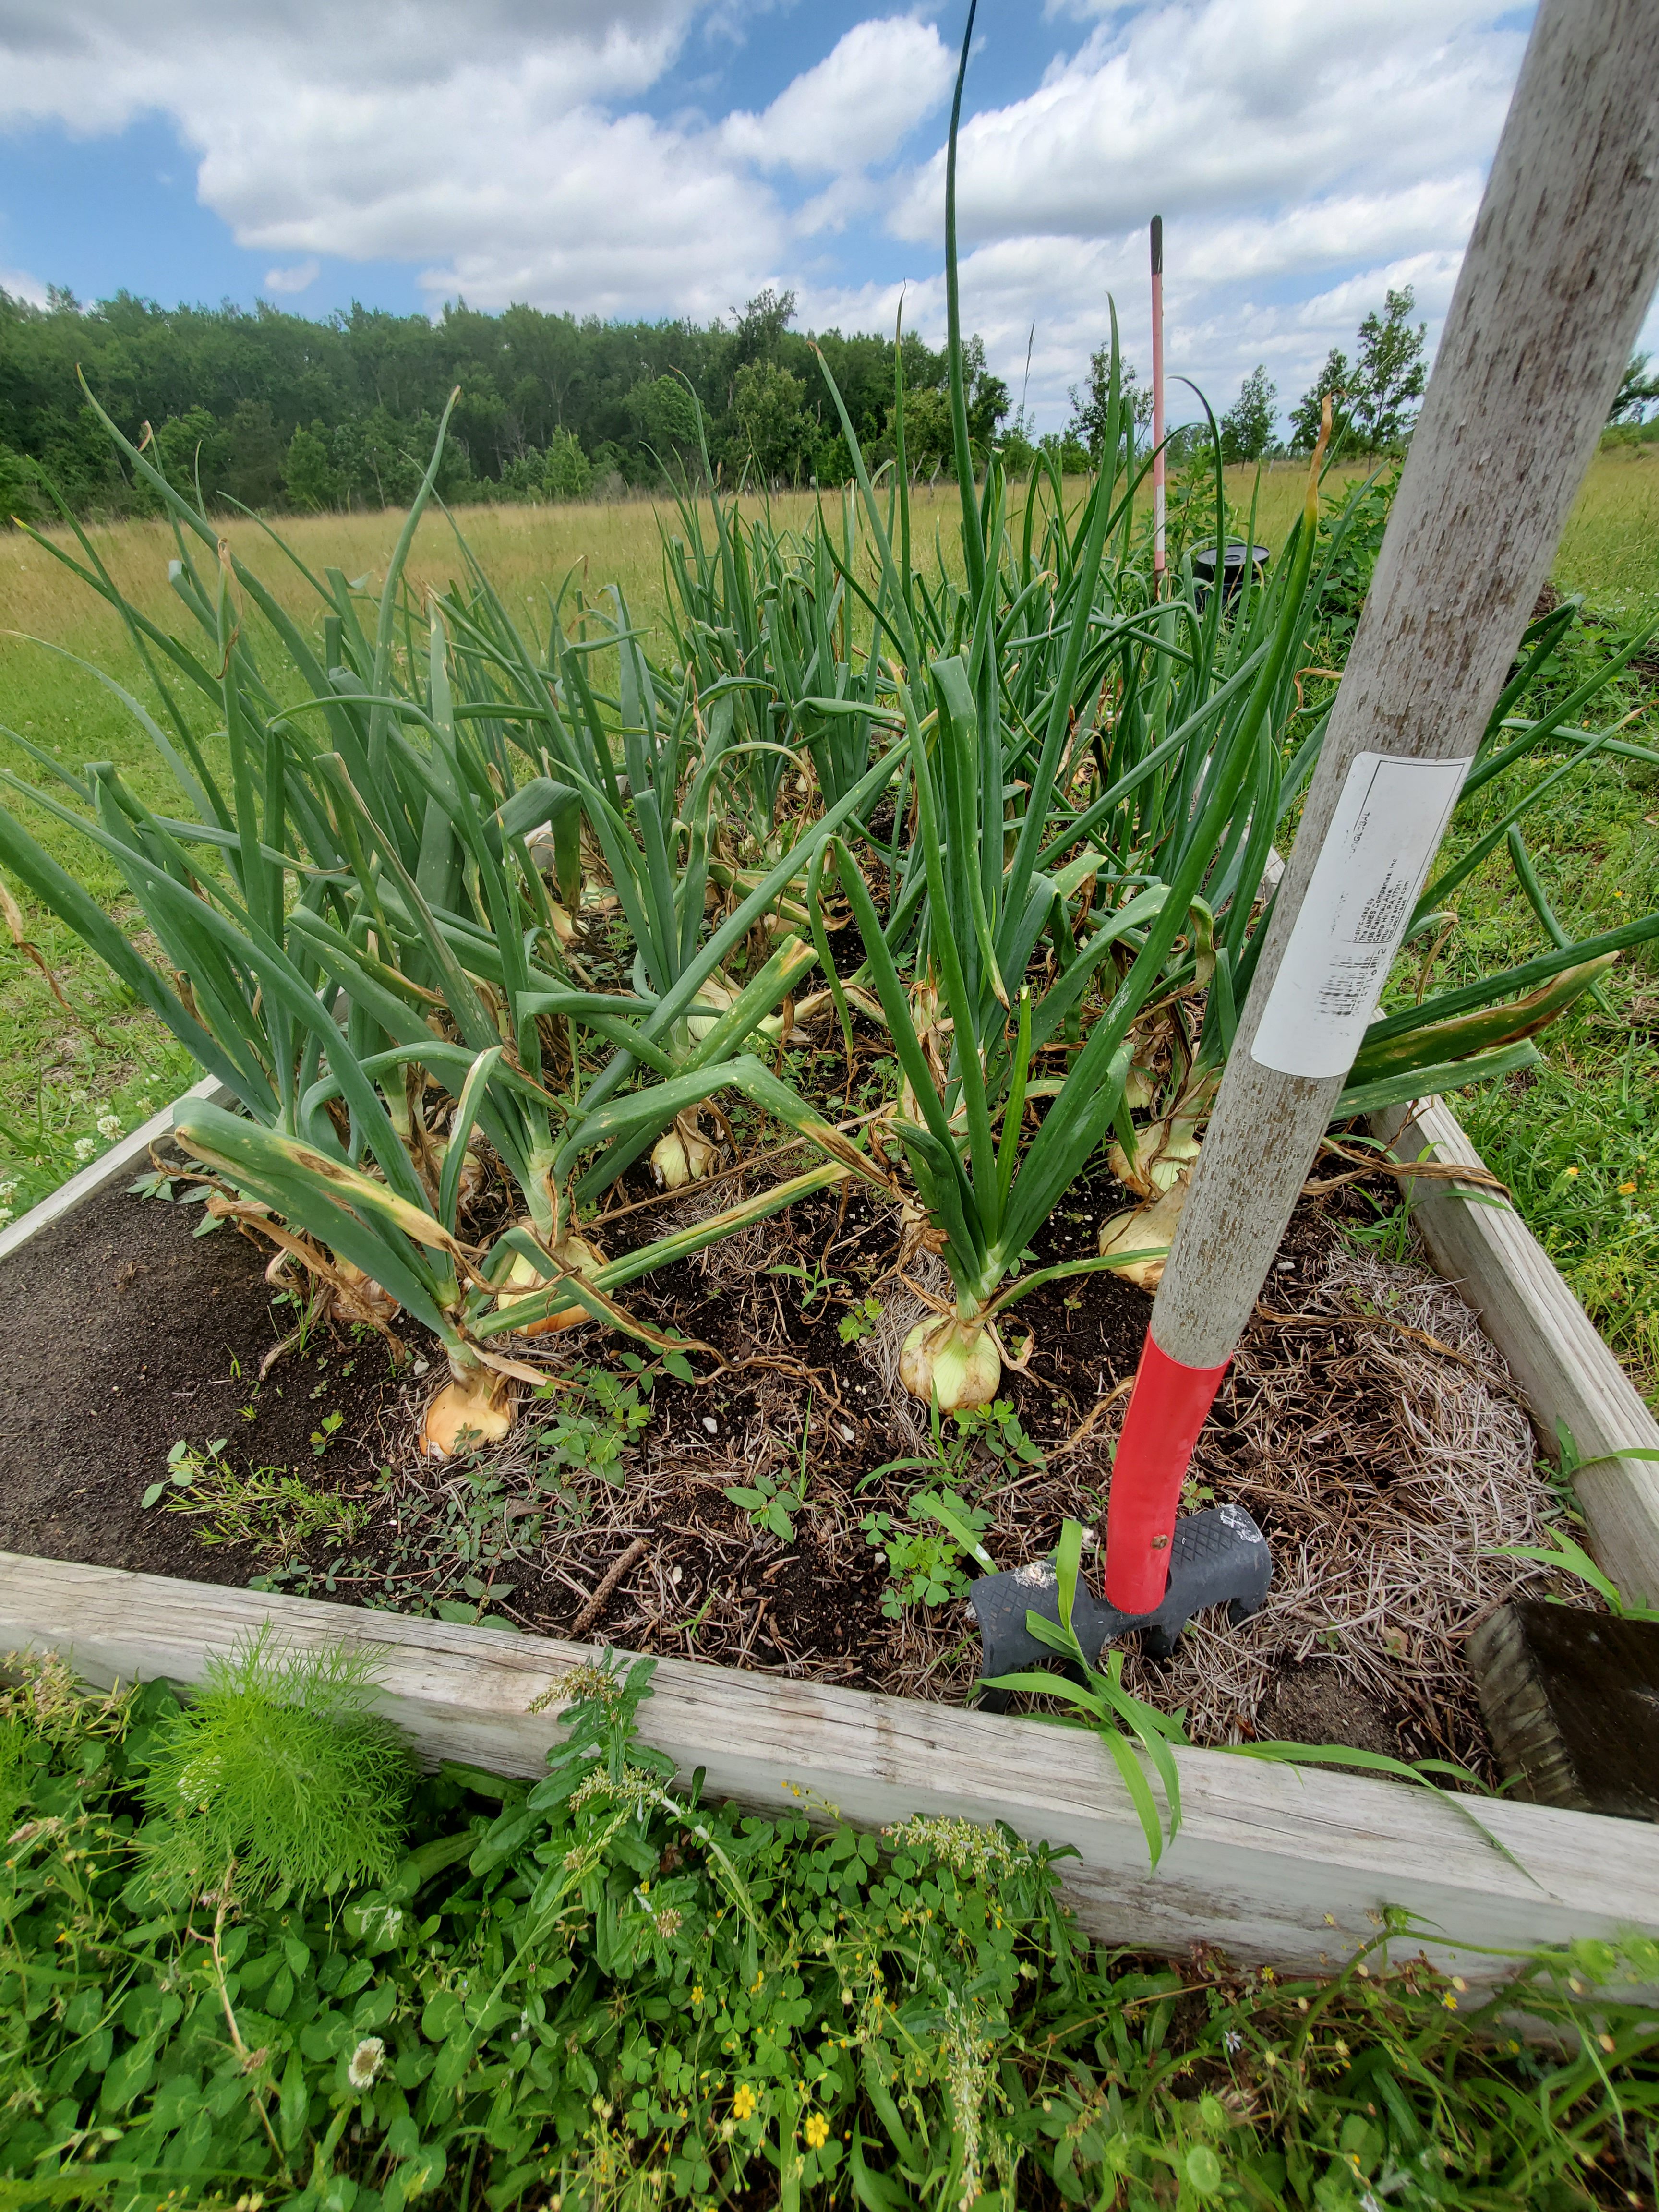
Sweet onions almost ready for harvest in a Calhoun County garden. Credit: Joe Leonard.
We can produce large, tasty sweet onions in North Florida. When using the correct varieties and when planted at the right time, we can produce bulbs up to four inches in diameter with flavor that rivals the famous Vidalia onions.
To be successful at growing large sweet onion bulbs, you have to set out plants in the fall. Waiting to plant in spring, as is done up north, results in small onions. As a matter of fact, onions planted after the first of the year make puny little bulbs. To produce large bulbing onions, you should plant your transplants during October to mid-November. Otherwise, you may get big green onion plants verses big bulbs.
In order to be successful with growing large onions in our area, you have to select the correct varieties. Basically, you need to use varieties of “short-day” onions such as ‘Grano’, ‘Granex’, ‘Texas Grano’, ‘Excel’ or ‘Tropicana Red’. ‘Granex’ is the variety that is used for producing Vidalia onions and St. Augustine Sweets.
Some gardeners seed their onions in September in order to have plants ready for transplanting to the garden later in the fall. Others buy the plants of these varieties during the
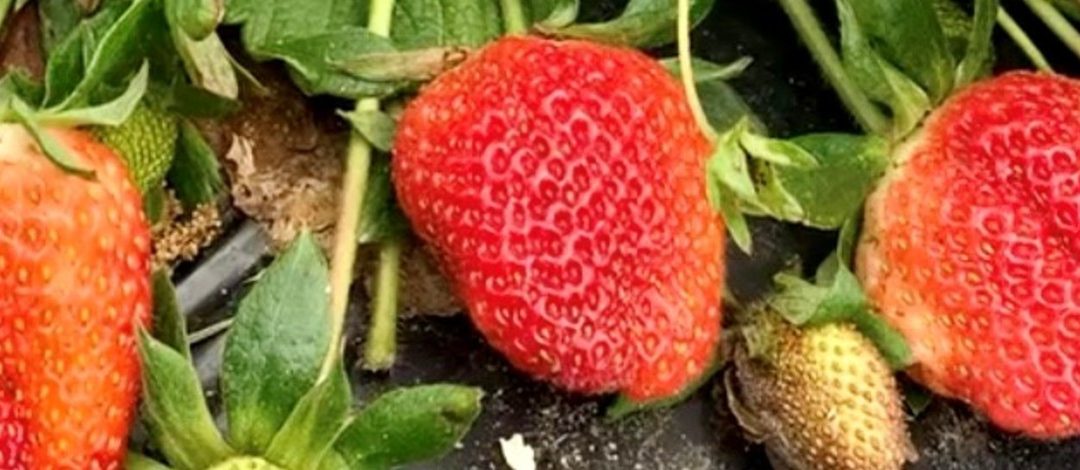
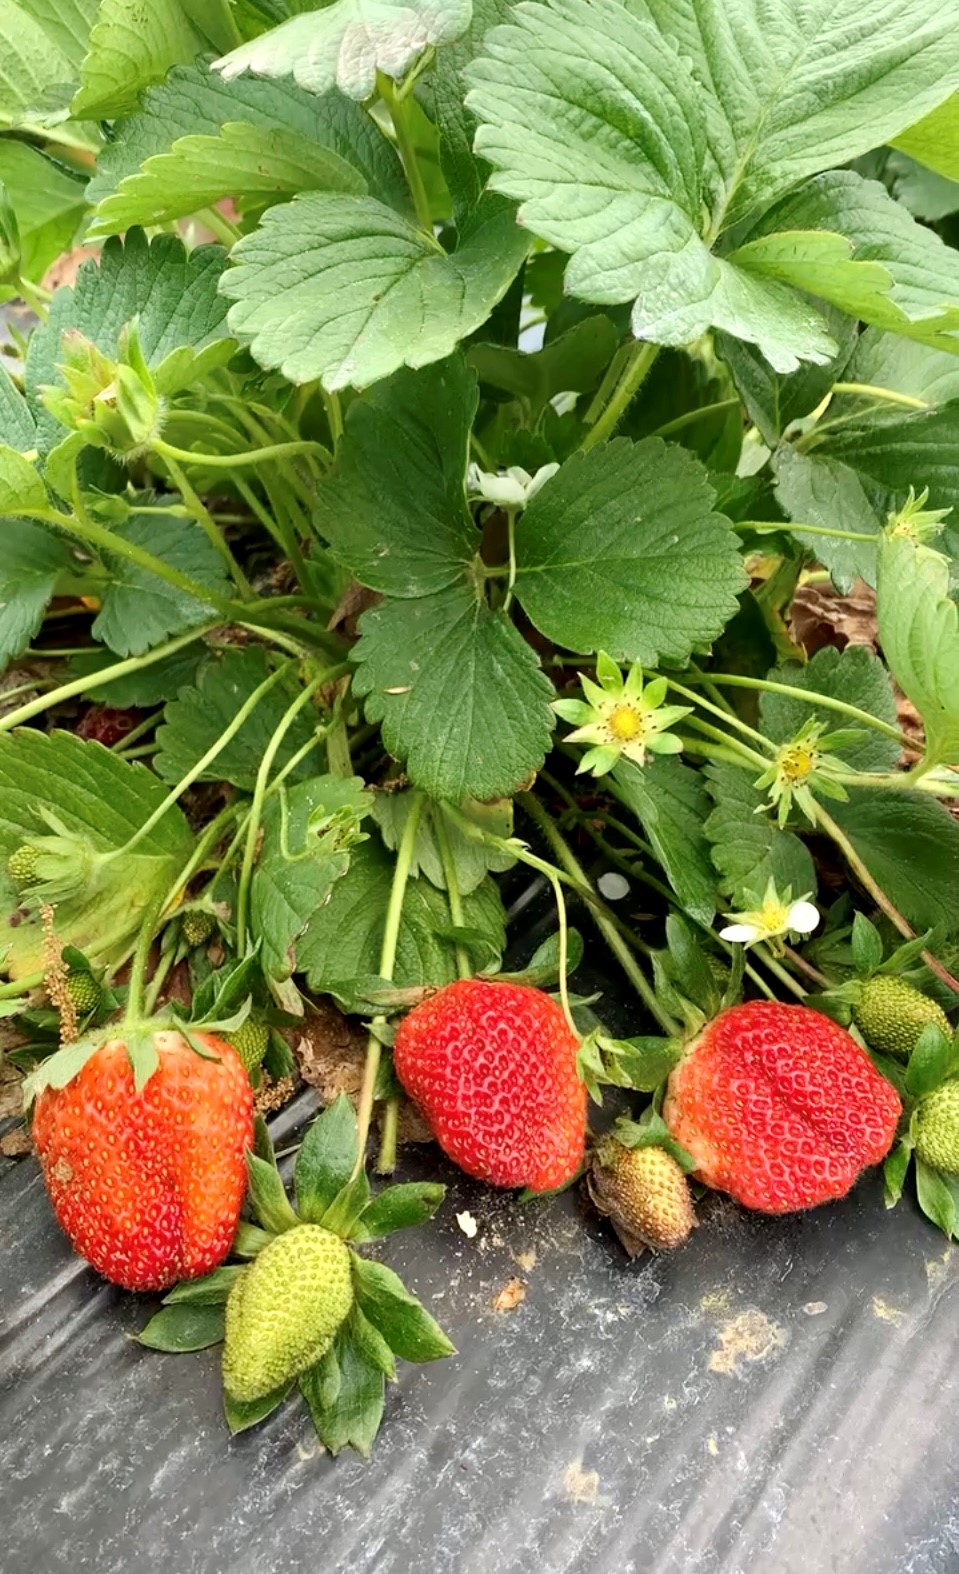
Strawberries ready to harvest in spring. Credit: Larry Williams
fall. These onion plants should be placed four to five inches apart in rows that are twelve to twenty-four inches apart. Fertilization is required during the winter and particularly as the onion bulbs begin to size up in the spring. Onions grow well during our relatively mild winters and will be ready for harvest in early May, as the tops of the plants begin to turn yellow and fall over.
Many gardeners fail with strawberries in North Florida by waiting to plant in spring and by planting the wrong varieties for our area. In Florida, strawberries are treated as annuals
. They are planted during October and November. Like onions, strawberry plants are cold hardy, producing a full sized plant by spring and yielding a crop during March through May. Once you’ve harvested the berries, do away with the plants. It’s not worth trying to carry strawberry plants through our hot, wet summers. Start next fall with fresh plants.
Use only “short-day” strawberry varieties. These include ‘Camarosa’, ‘Sweet Charlie’, ‘Festival’, ‘Chandler’, ‘Dover’, ‘Selva’, ‘Sequoia’, ‘Tioga’, ‘Oso Grande’, ‘Florida Belle’ and ‘Florida 90’. “Everbearing” varieties of strawberries, which are frequently advertised, are not well suited for Florida. More info is available at http://edis.ifas.ufl.edu/hs403.
Enjoy the spring harvest season of these two delicious crops, but plant them in the fall.
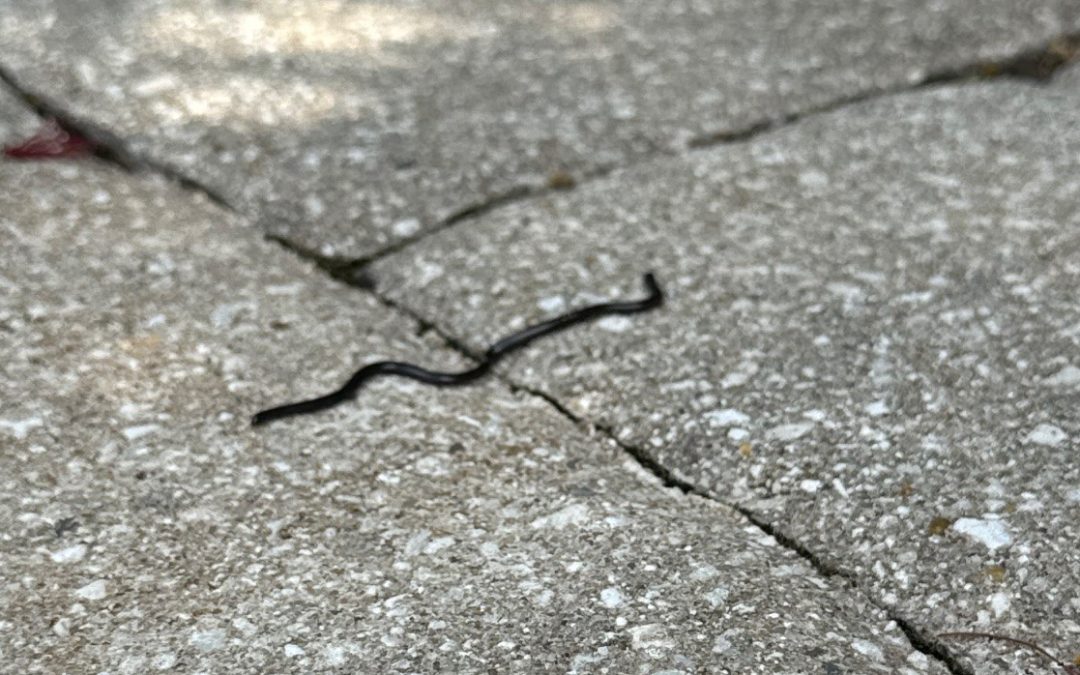
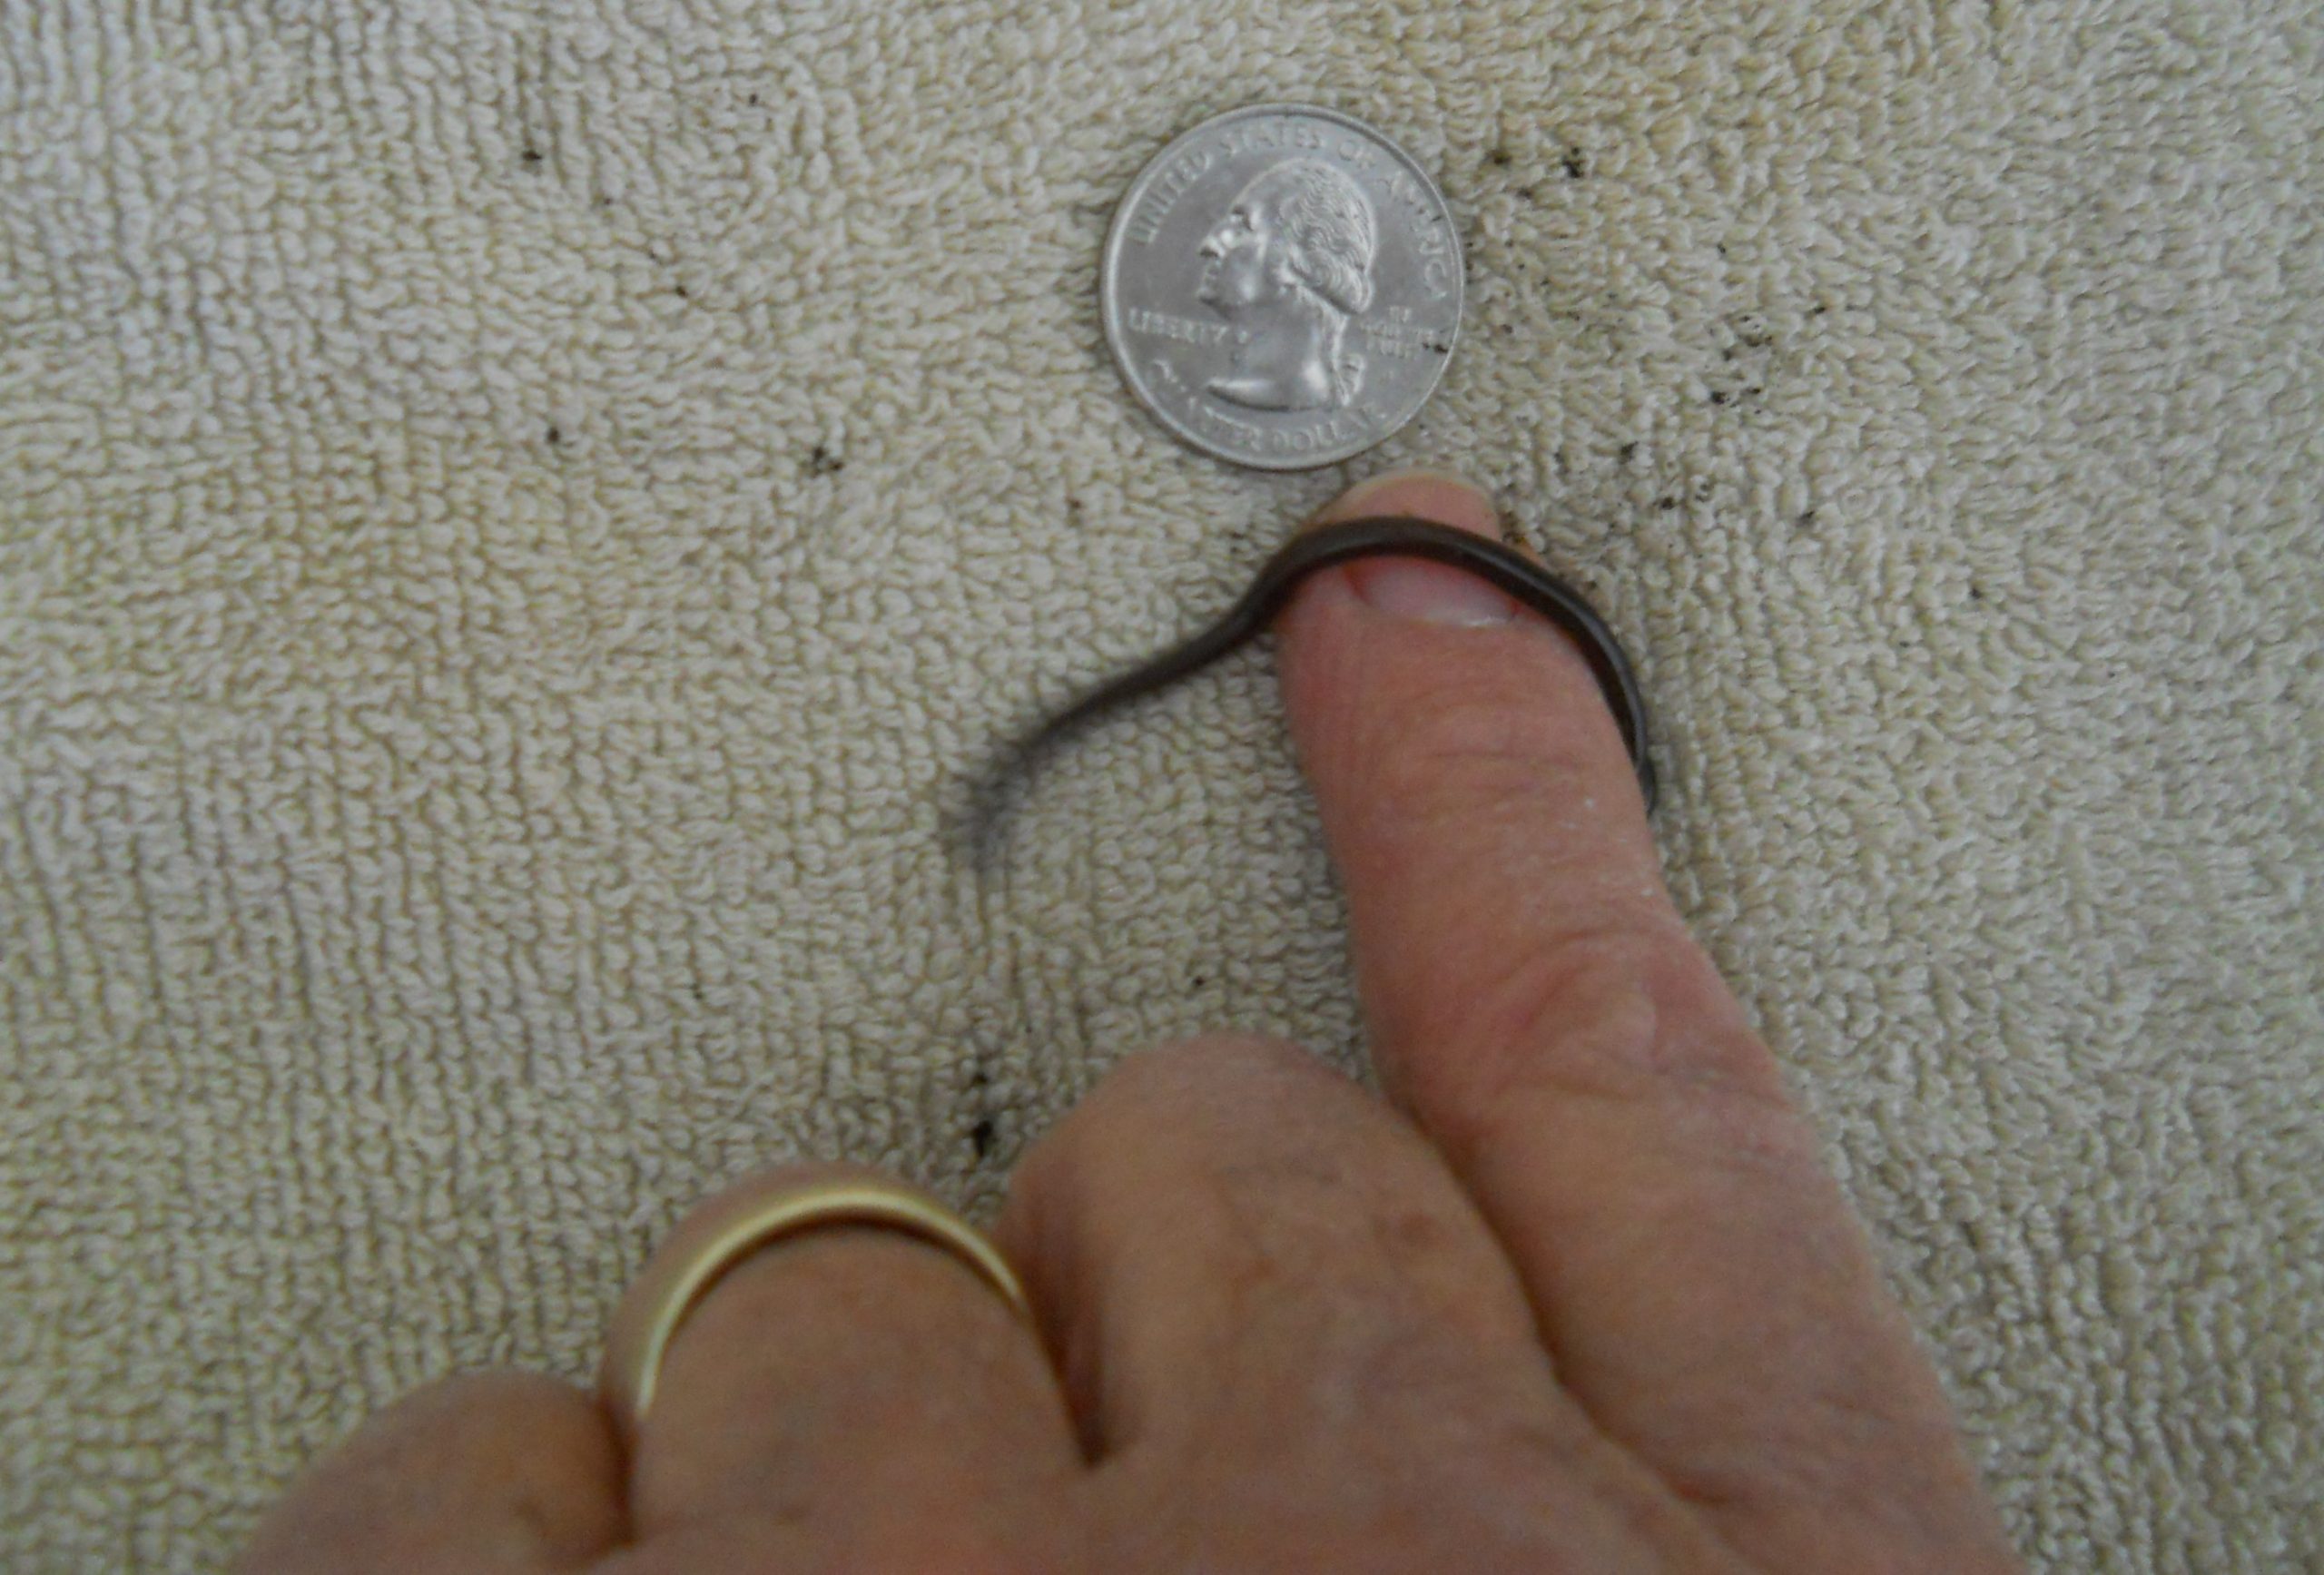
As evidenced by the scale adjacent to a quarter, the Brahminy blind snake looks more like a worm than a typical snake!
Part of the Extension job entails having friends and clientele reach out when they come across something odd while outdoors. I’ve been the recipient of random texts and emailed photos of bizarre-looking squishy finds from the beach, unusual plants, and snakes…lots and lots of snakes. So, when I got photos of a weird little worm-like critter a few months back, I wasn’t the least bit surprised. I’ve actually planned to write about this one for a while, because several people have asked me about it over the years.
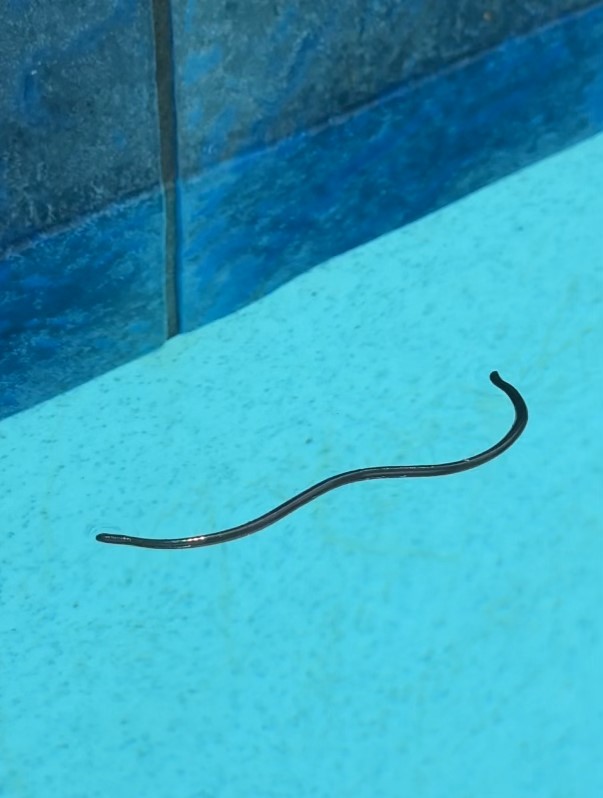
While found most commonly buried in the soil, the Brahminy blind snake can get around in water as well. Photo credit: Huntley Jimenez
The Brahminy blind snake Indotyphlops braminus (also called the “Flowerpot Snake”) is considered a nonnative species due to its origin (Asia & Africa) and movement into natural areas in Florida since the 1970s. Even though it’s not from here, most biologists do not consider them “invasive,” as they do not meet the criteria of causing ecological or economic harm. In fact, I’ve only heard about people finding them in the Pensacola city limits—particularly East Hill or North Hill neighborhoods (but if you’ve seen one elsewhere, let me know!). Like many introduced insects and amphibians, the snake itself is typically transported through the landscape trade. It is small and can easily bury itself in the soil of a large tree or shrub container. These snakes can also swim, as evidenced by video from my friend of one wriggling around in her pool.
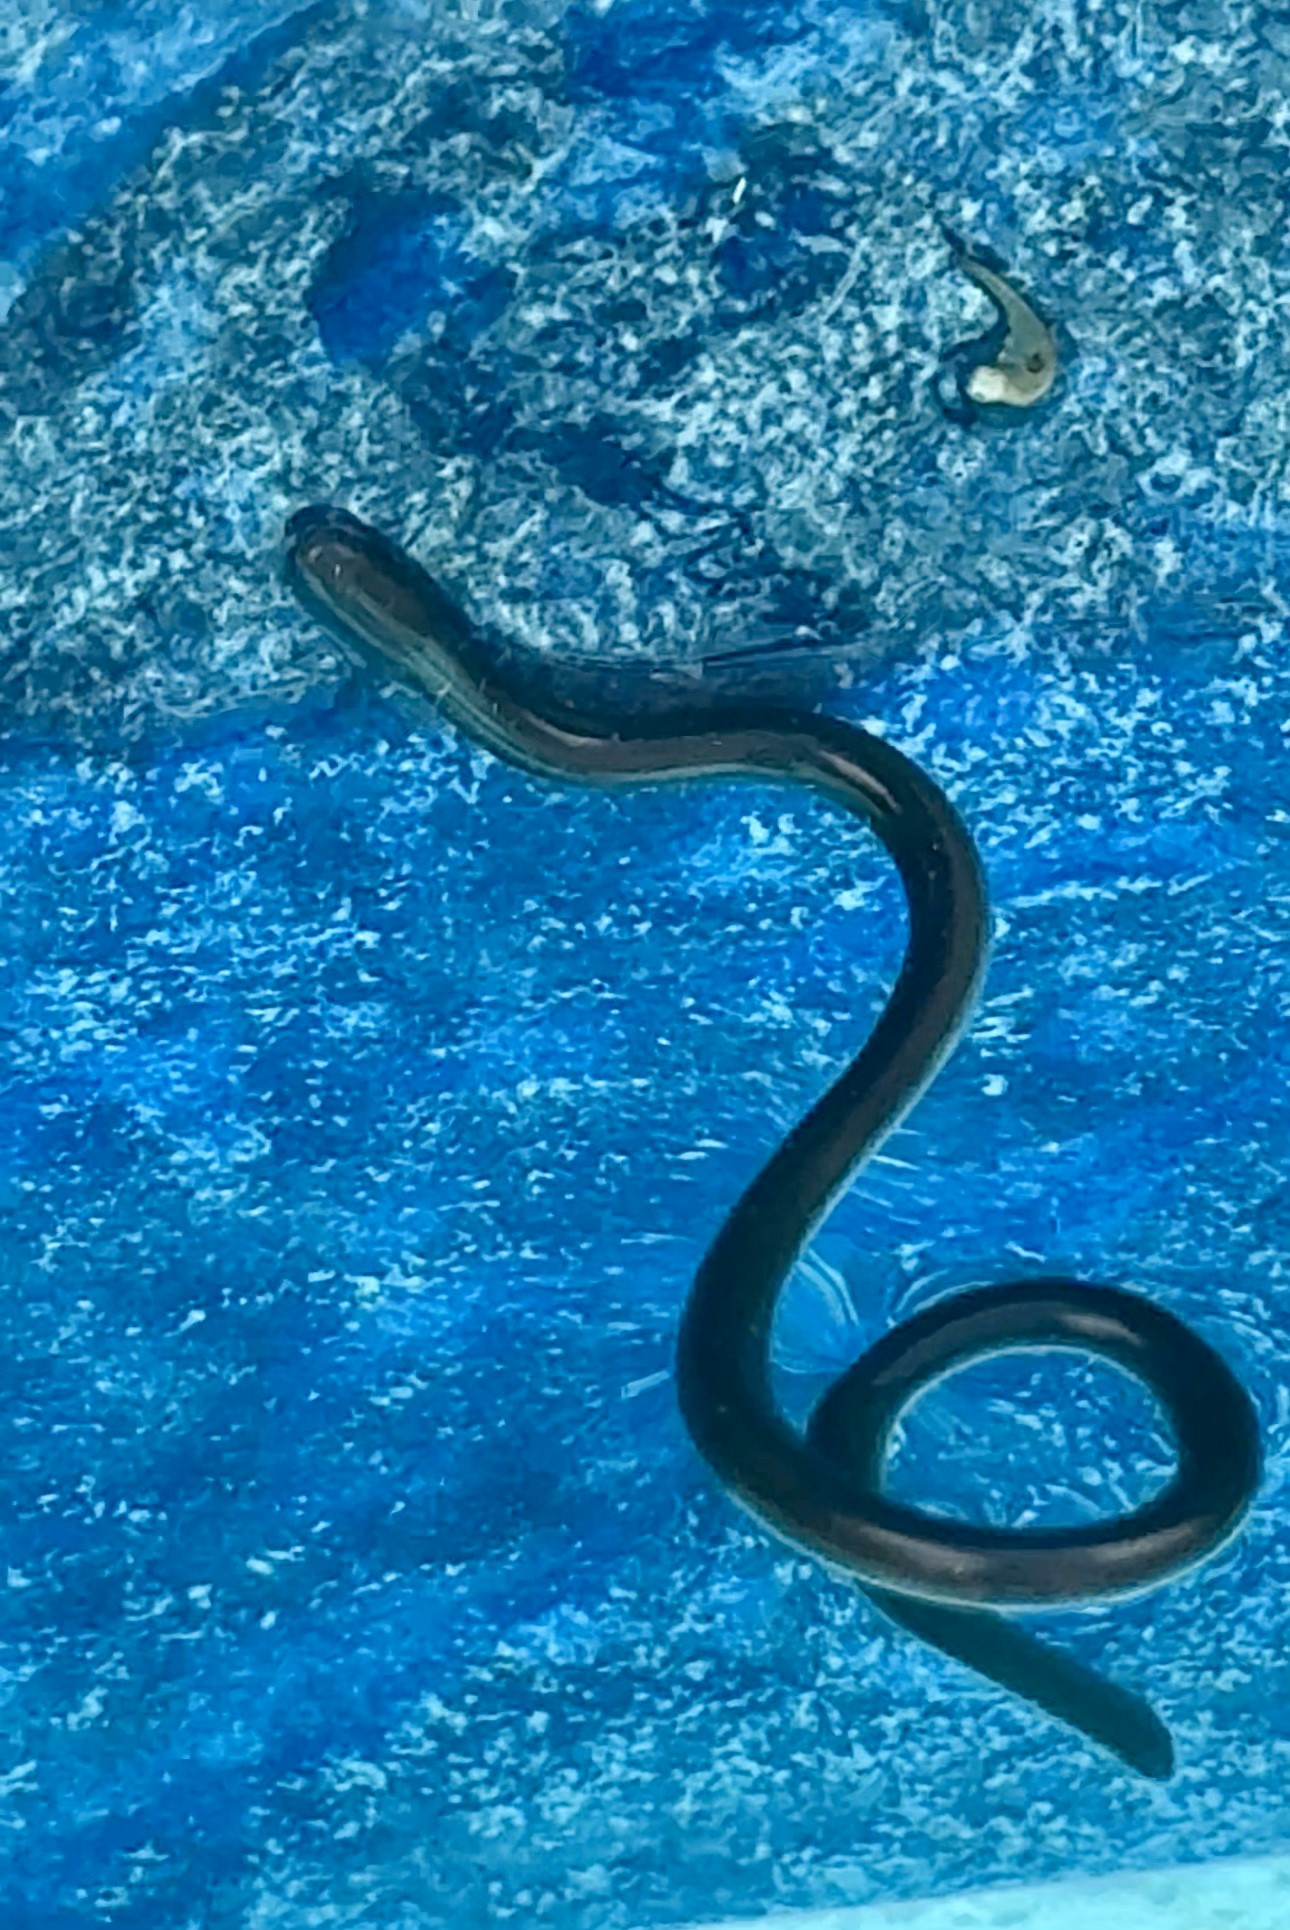
It is easy to see the snake’s deep black coloration in contrast here with the blue pool and water. Their heads and tails are almost identical. Photo credit: Huntley Jimenez
Brahminy blind snakes are members of the Typhlopidae family, which is composed of a cohort of burying snakes that mostly live in underground burrows in the soil. Spending their time in the dark, they have lost the need for vision (like cave-dwelling creatures). They have eye spots that can detect some light, but no detailed visual capability–hence the “blind” in their name. The tiny snakes are solid black (or sometimes purplish gray), about 4-6” long, and truly resemble a worm more than any snake most people are accustomed to seeing. They eat ant and termite eggs and larvae, so many folks would consider their role in the ecosystem rather useful. They are nonvenomous and do not bite, although they will push the slightly pointier posterior end of their bodies onto your skin (this won’t hurt) in a fruitless attempt at self-defense.
Interestingly, Brahminy blind snakes are all female. The species reproduces asexually through a process called parthenogenic thelytoky. The snake’s eggs can divide without a male, and offspring are genetic clones of the mother. Most species with this reproductive adaptation are insects (including the snake’s typical prey, ants), and it is rare among vertebrates. So rare, in fact, that the only vertebrates reproducing via parthenogenesis include several dozen lizards and the Brahminy blind snake. There are plenty of advantages to cutting out the “middle man” so to speak, including faster reproductive cycles and a reduction in energy expenditures related to finding a mate. However, creating genetic clones reduces population diversity, so any disease or innate vulnerability could wipe out relatives without genetic immunity.
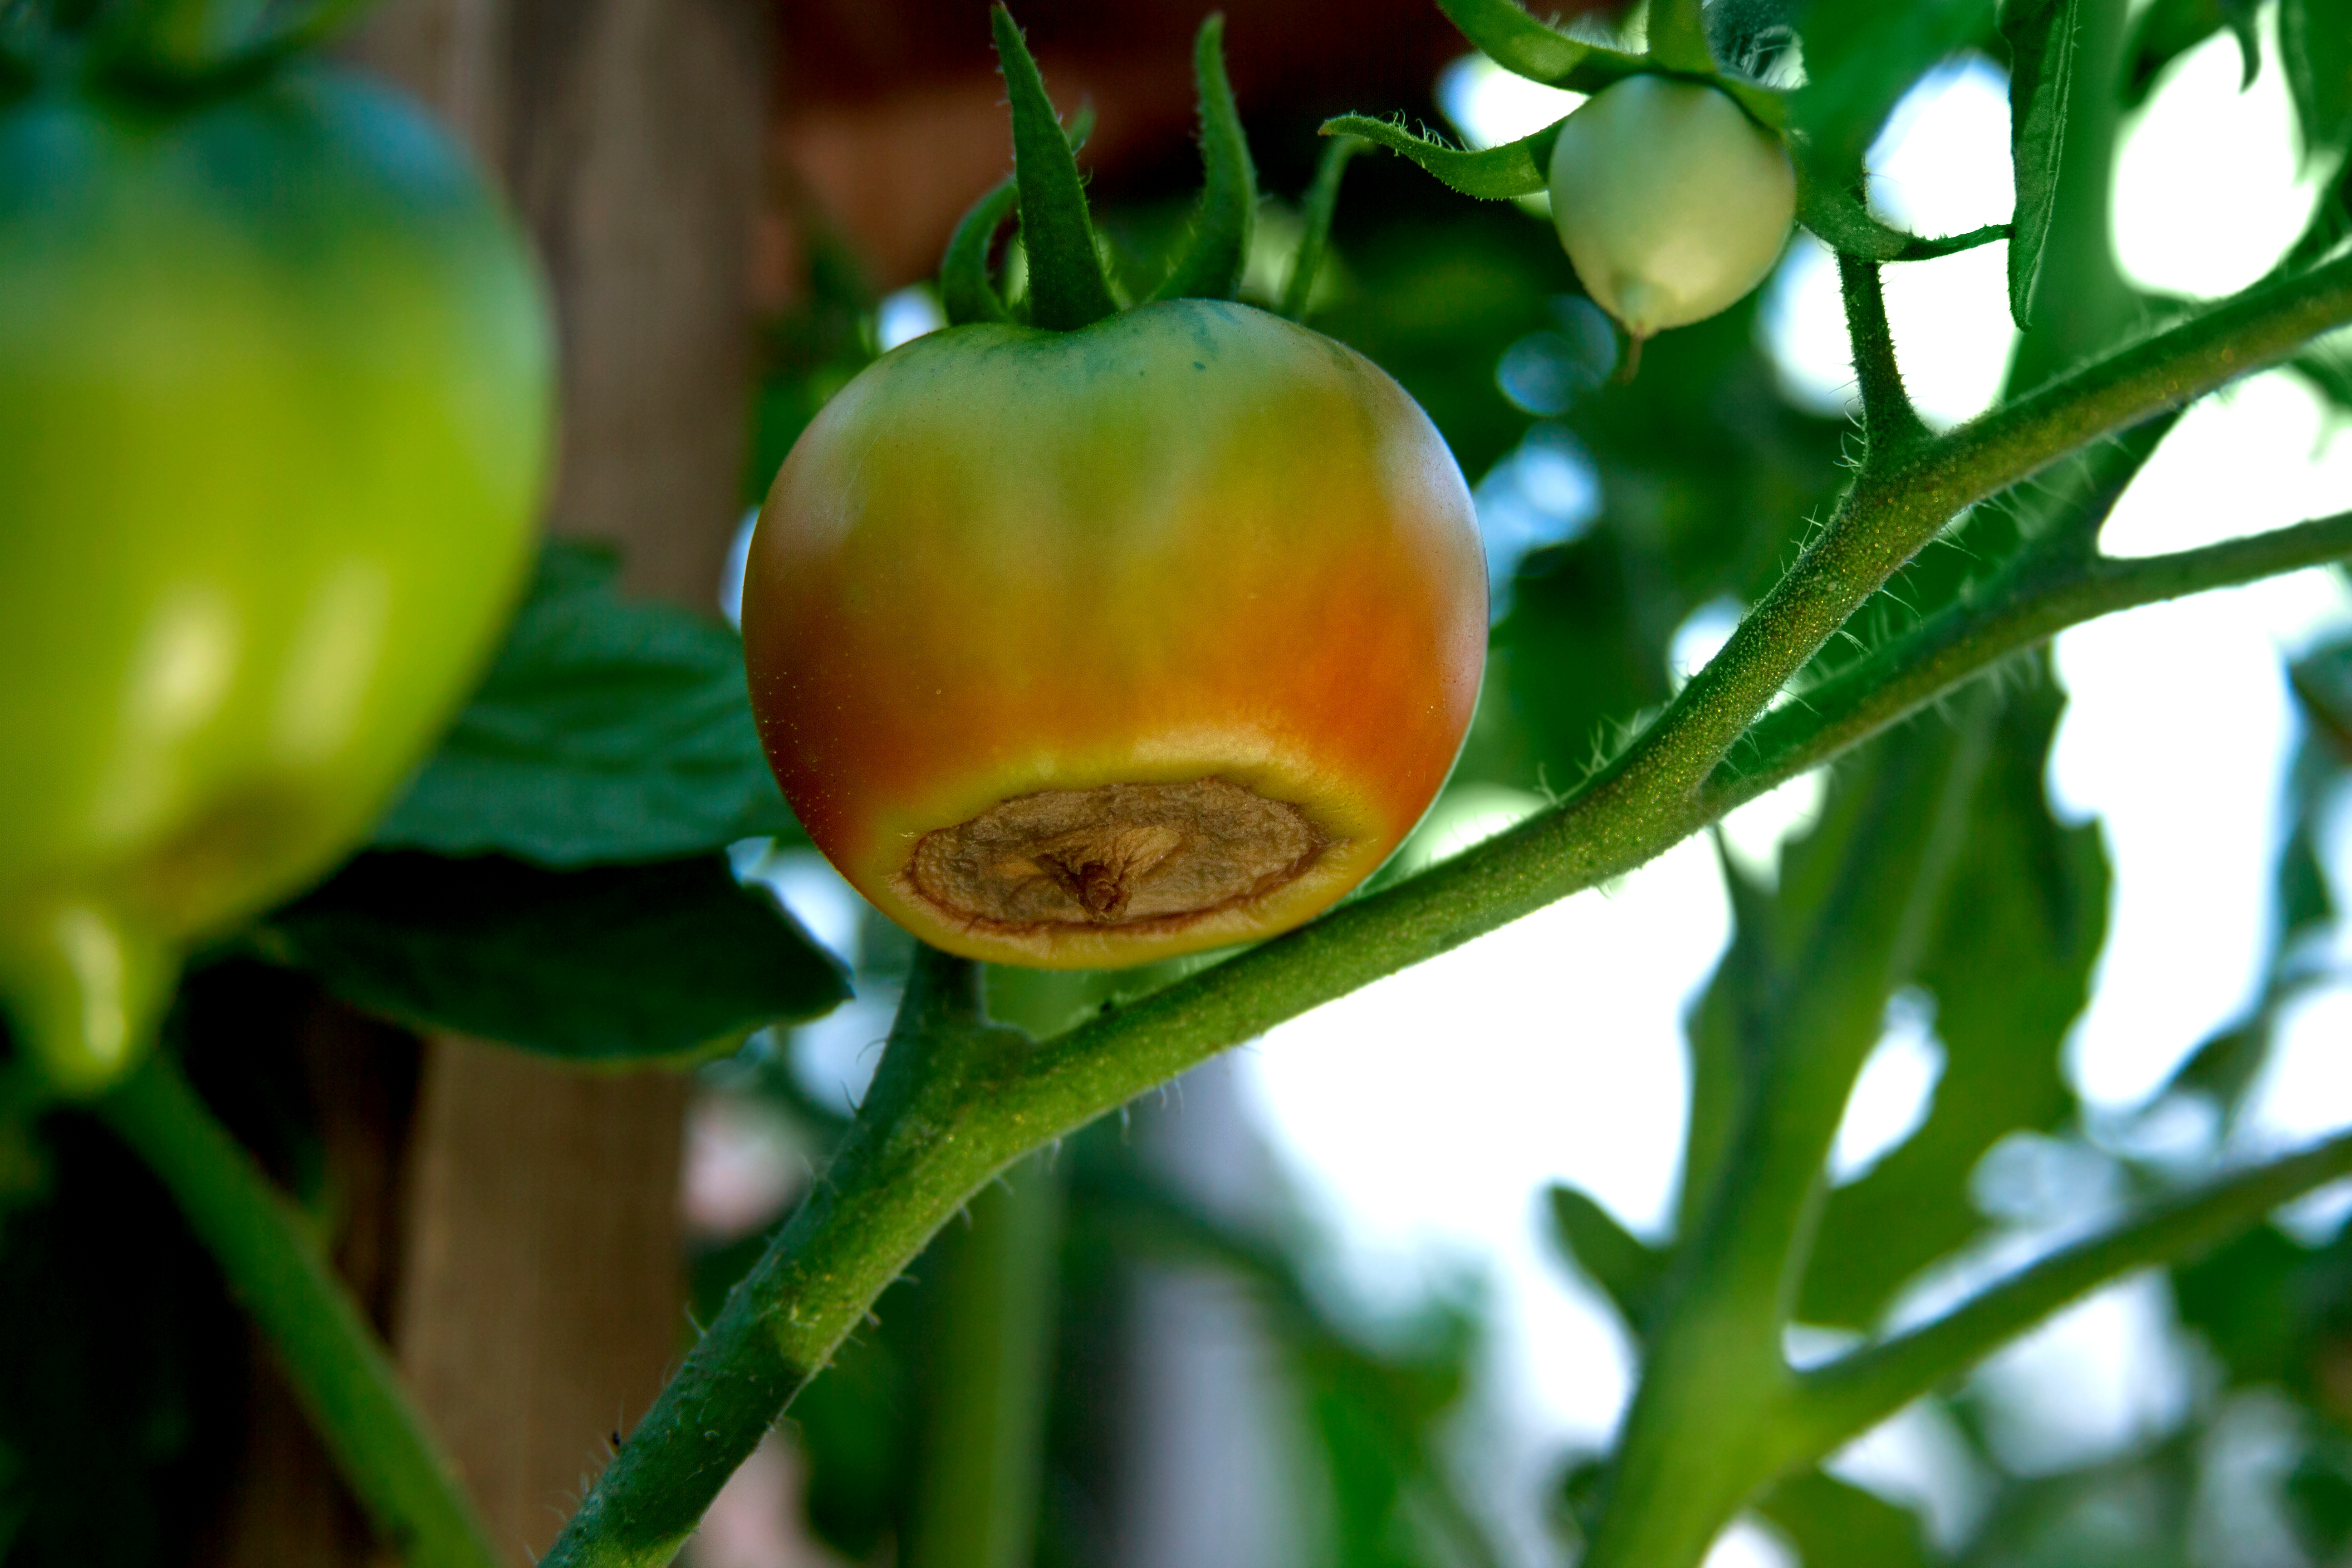
A promising start, until blossom-end rot strikes. Keep your tomatoes healthy by maintaining consistent watering, balanced fertilization, and proper soil pH. Photo by Mila Makhova, Adobe.
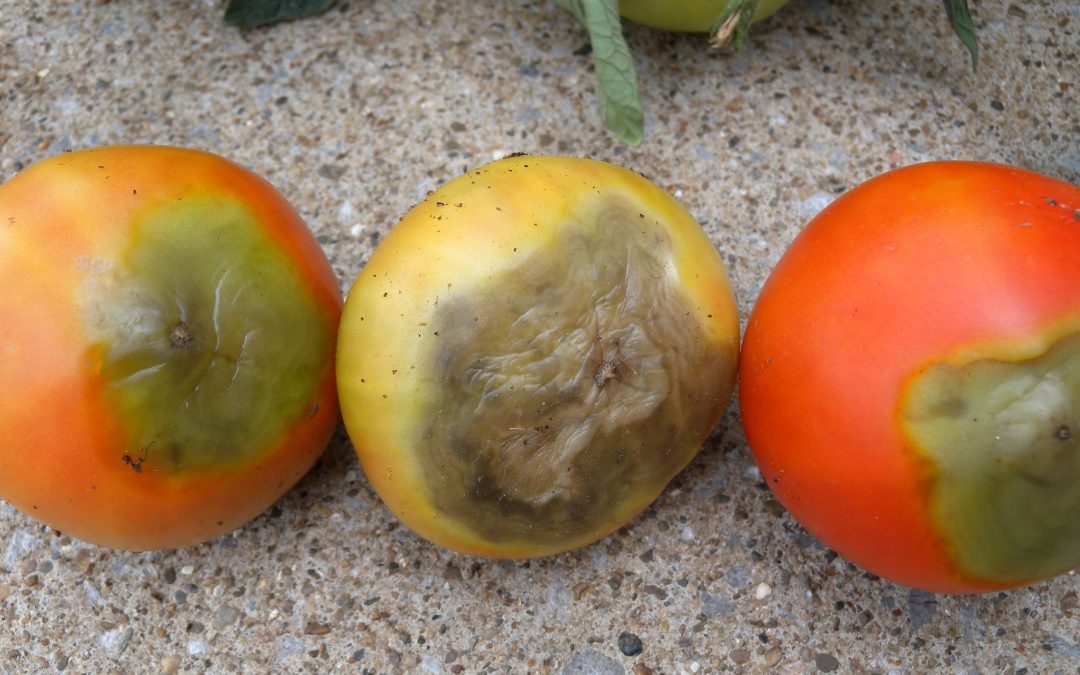
It’s the moment you’ve been waiting for – after weeks of careful tending, the first set of tomatoes is beginning to form. Each day, you check your plants with anticipation, imagining the juicy, homegrown harvest to come. But one morning, while inspecting your developing tomatoes, you notice some have sunken, leathery brown patches at the blossom end. Your excitement turns to frustration – what went wrong?
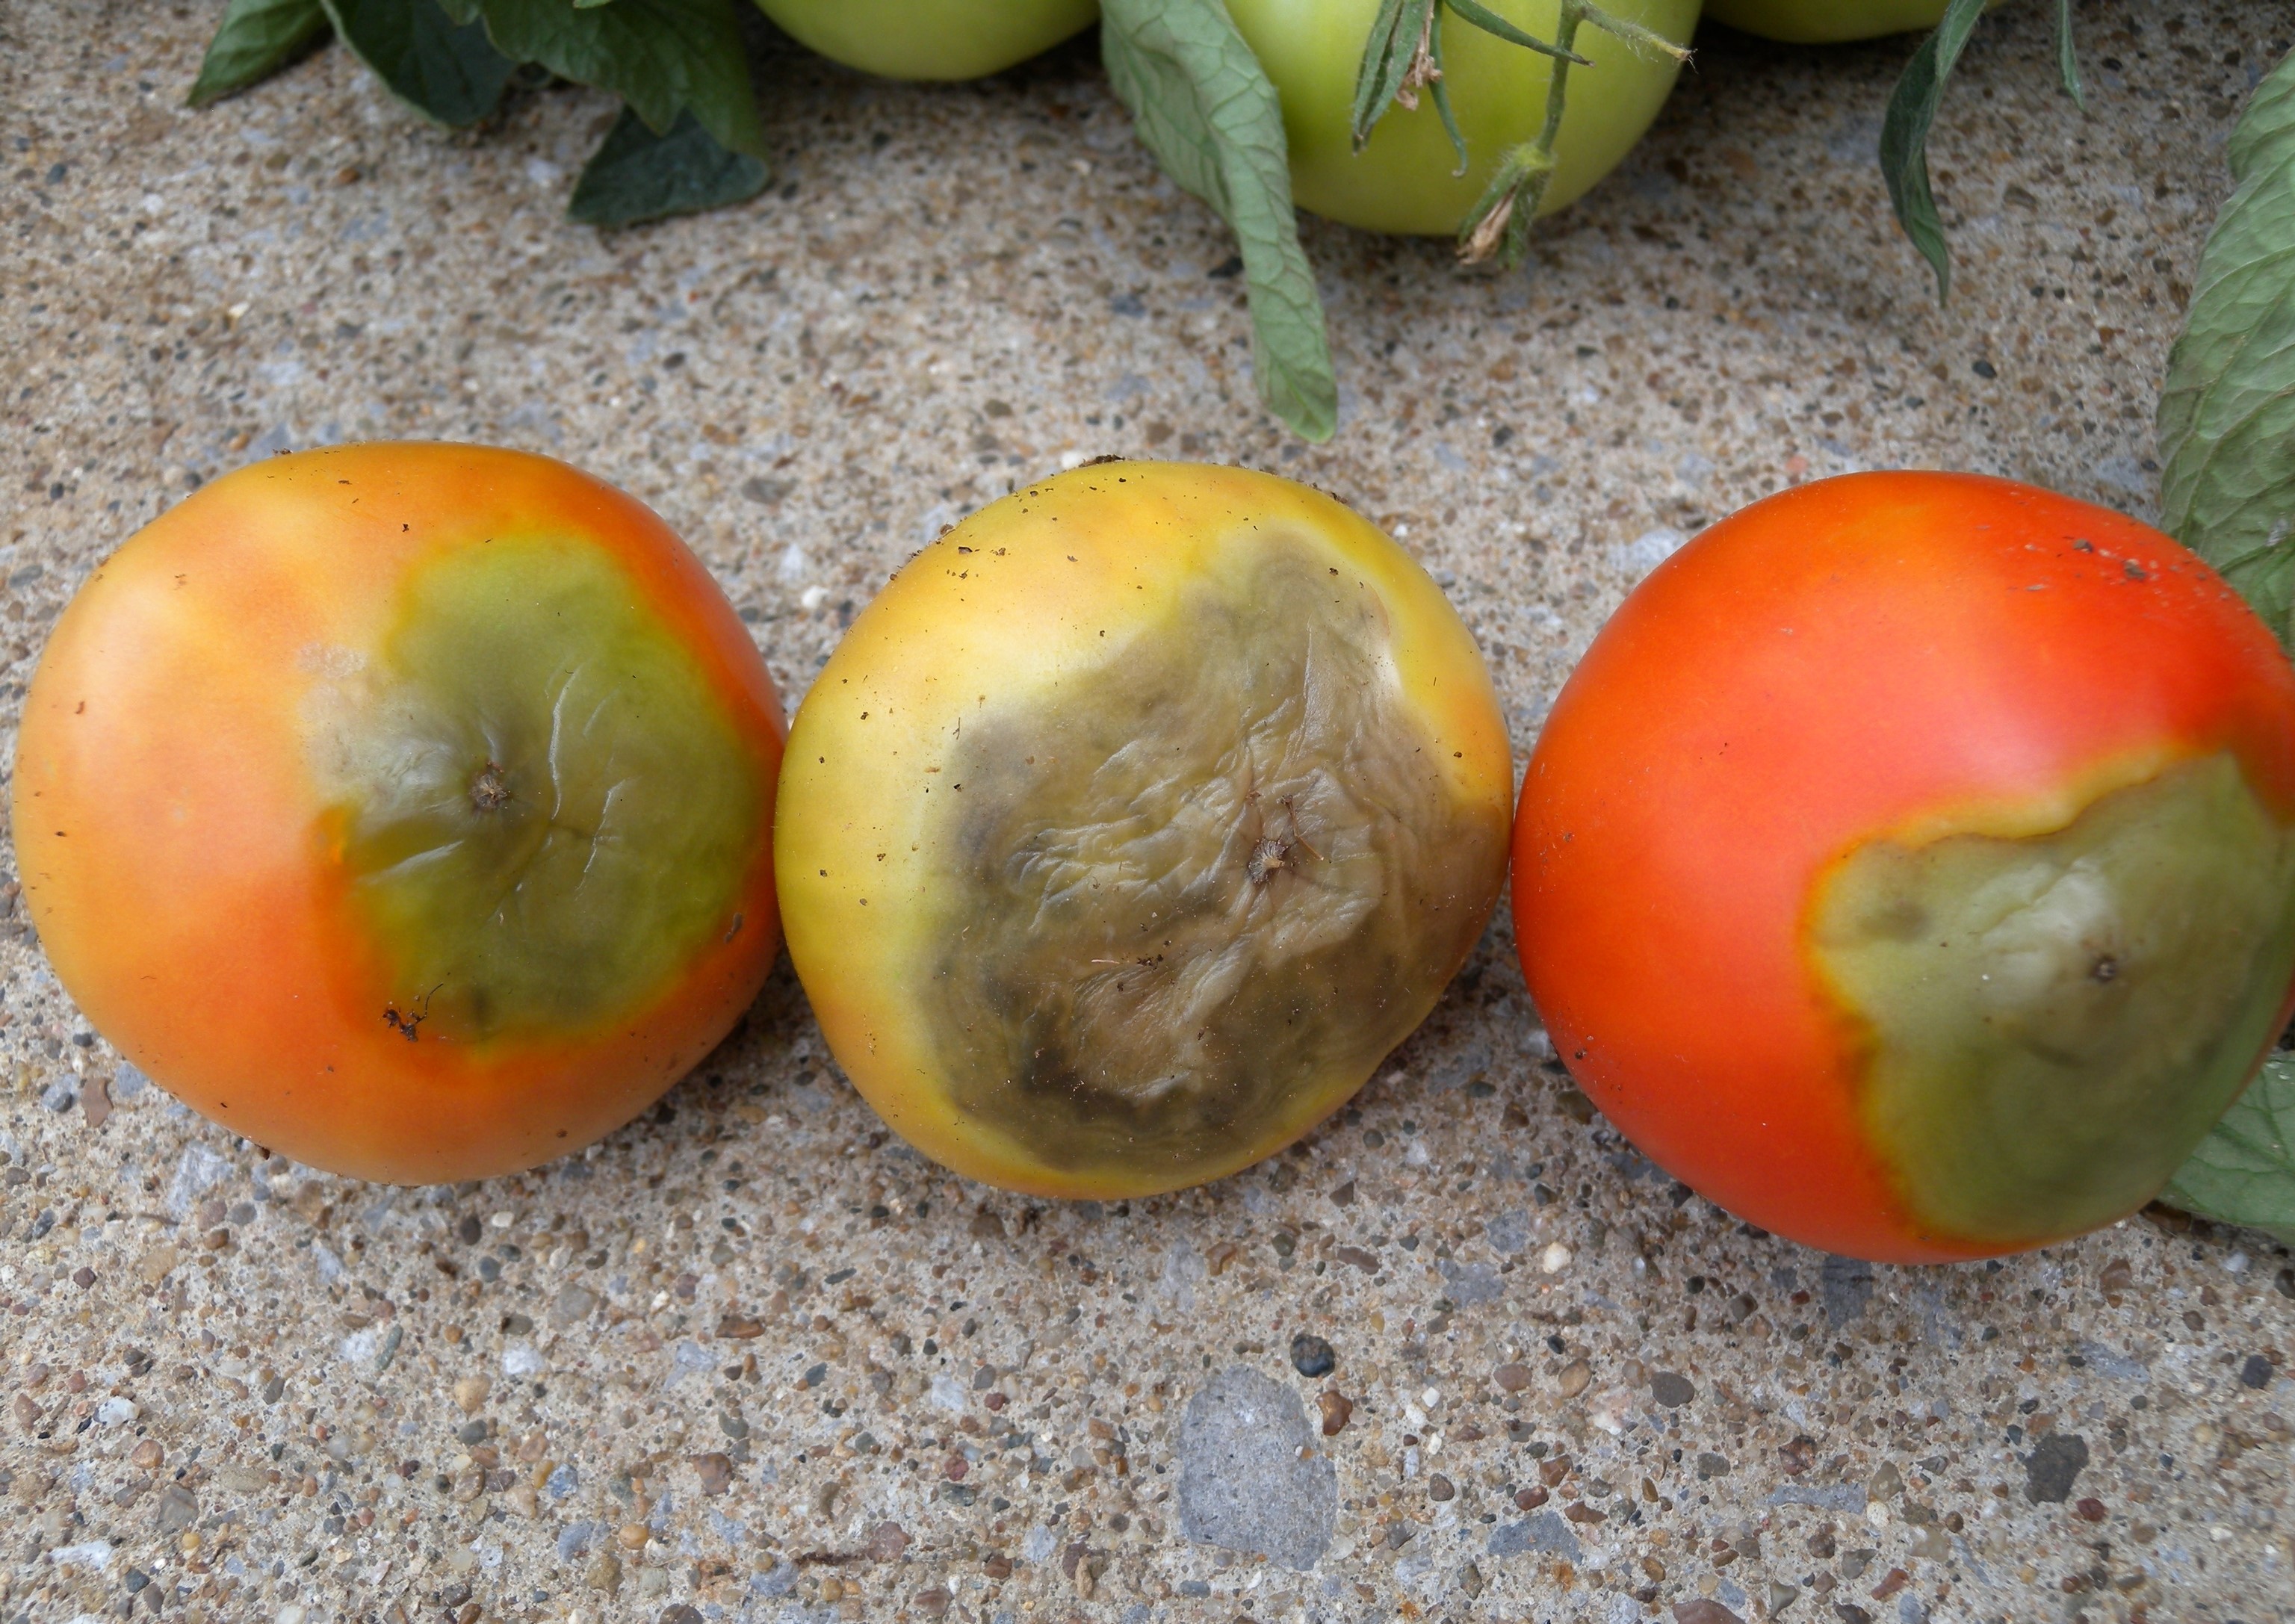
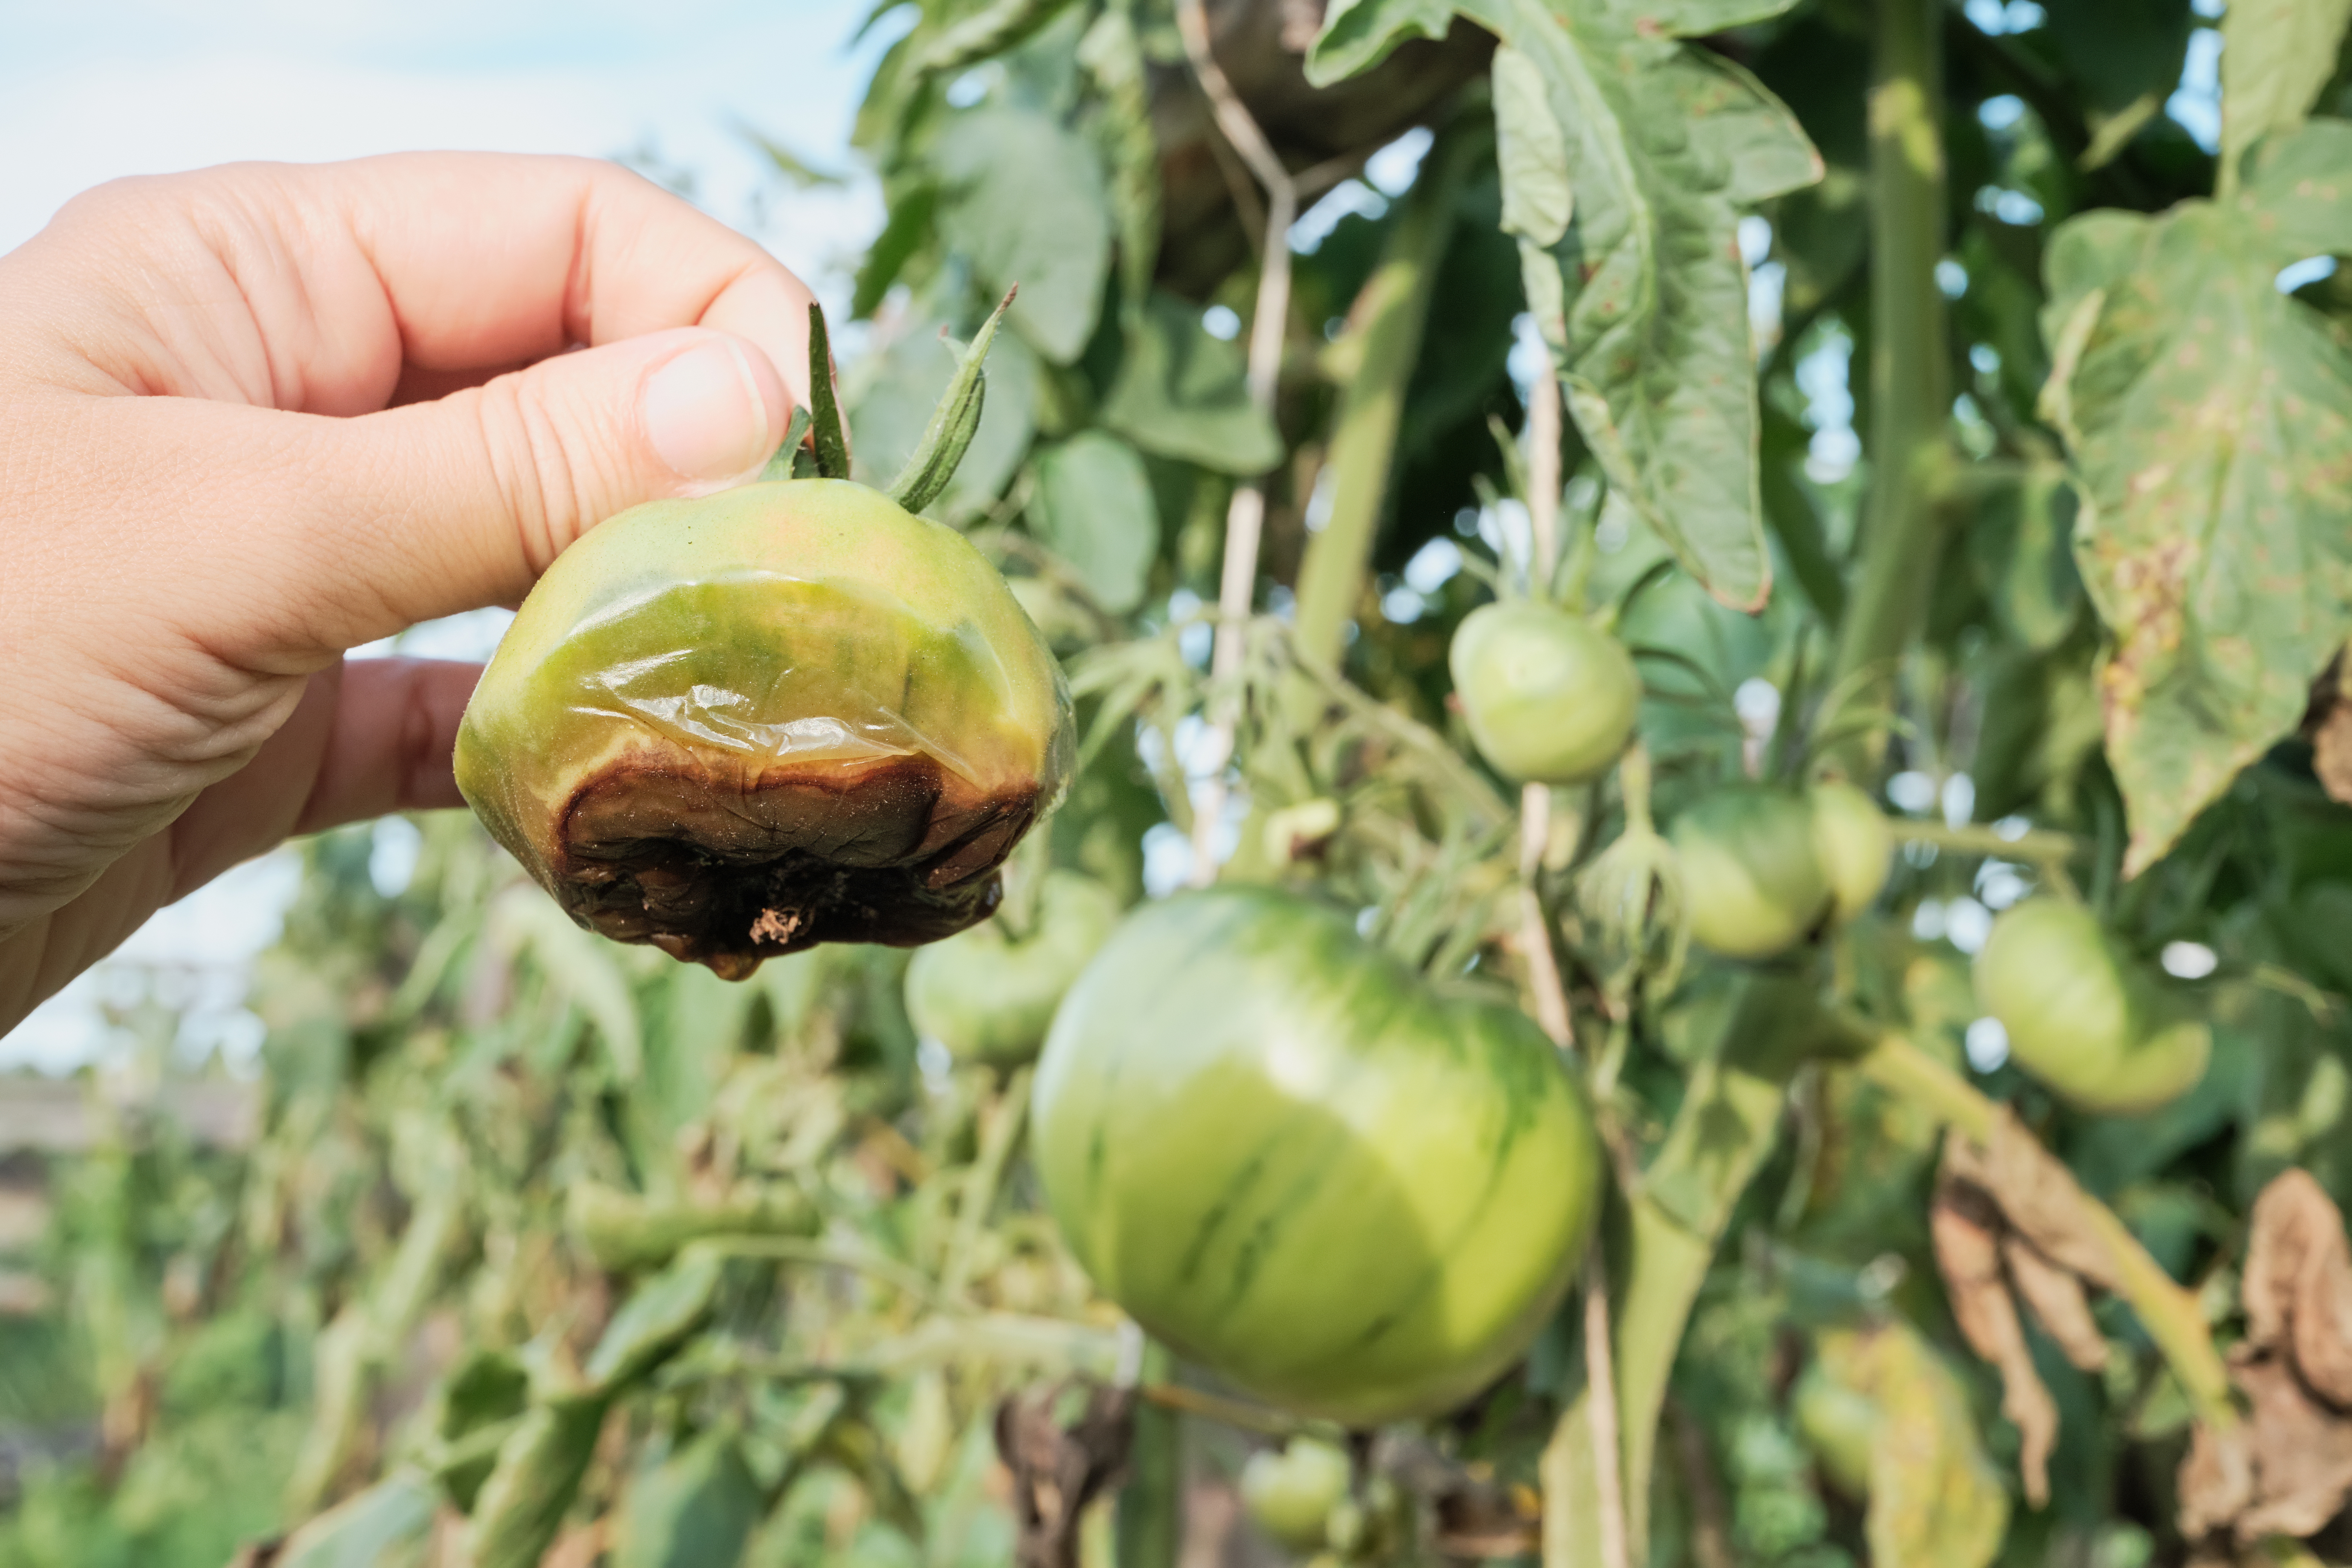
Blossom-end rot is one of the most frustrating disorders for home gardeners and commercial growers alike. This common issue appears as a sunken, leathery brown or black spot at the blossom end of tomatoes, usually occurring on the first fruits the plant produces. Though it may look like a disease, blossom-end rot is actually a physiological disorder caused by calcium deficiency in the fruit. Understanding what triggers it and how to prevent it can help ensure a healthy tomato harvest.
What Causes Blossom-End Rot?
Blossom-end rot can appear at any stage of ripening. These tomatoes developed severe lesions due to calcium deficiency caused by inconsistent watering. Photo by Brenda Kennedy, University of Kentucky, Bugwood.org.
Although blossom-end rot results from calcium deficiency in the fruit, it is rarely caused by a lack of calcium in the soil. Instead, the issue arises when calcium uptake is disrupted due to fluctuations in soil moisture, root damage, or excessive fertilization.
Calcium moves through plants via active transpiration, traveling with water as it evaporates from above-ground plant parts. Since leaves lose more water through transpiration than fruits, calcium is more likely to accumulate in leaves rather than being directed toward developing tomatoes. This imbalance is made worse by excessive nitrogen fertilization, which encourages leafy growth and further diverts calcium away from the fruit.
The following factors contribute to blossom-end rot:
Inconsistent Watering. Calcium is transported through water in the plant, so periods of drought followed by excessive moisture can hinder uptake.
Excess Nitrogen Fertilization. Too much nitrogen, especially in ammonium form, can interfere with calcium absorption and promote excessive foliage growth at the expense of fruit development.
Soil pH Imbalance. Acidic soils (below pH 5.5) can limit calcium availability to plants.
Root Damage. Over-cultivation or compacted soils can reduce root function, limiting nutrient uptake.
Prevention Strategies
A severe case of blossom-end rot on an unripe tomato. Photo by Col Nihko, Adobe.
Blossom-end rot cannot be reversed once it appears, but often the plant will produce healthy fruit as the season progresses. Several cultural practices can help prevent it from occurring in the first place.
Maintain Consistent Soil Moisture. Water deeply and consistently, adjusting for temperature and weather conditions. As a general rule, tomatoes need about an inch of water per week, with an additional half-inch for every 10-degree increase above 60°F. In hot summer months, when temperatures reach the 80s and 90s, this means tomatoes may require closer to two inches of water per week to maintain adequate soil moisture. Mulching with straw, pine needles, or shredded leaves helps regulate soil moisture and reduce evaporation. It is also important to avoid letting the soil dry out completely between waterings to ensure steady calcium uptake by the plant.
Test and Amend Soil. Vegetable gardens, especially those rich in compost, often contain adequate amounts of calcium, but its availability depends on factors like soil pH and consistent watering. A soil test can determine if nutrient or pH adjustments are needed. If the soil pH is below 6.0, applying lime can help raise it to the optimal range of 6.0–6.5, improving calcium availability to plants. If a soil test confirms low calcium levels, adding gypsum (calcium sulfate) can provide a supplemental source of calcium without altering soil pH.
Fertilize Properly. Using a balanced fertilizer with moderate nitrogen is key to preventing blossom-end rot. Avoid high-ammonium formulations, as they can interfere with calcium absorption. Excess fertilization early in the season encourages vigorous leaf growth, diverting calcium away from fruit development and increasing the risk of blossom-end rot.
Choose the Right Tomato Varieties. Cherry and other small-fruited tomato varieties tend to be less prone to blossom-end rot than larger slicing types, making them a good option for gardeners concerned about calcium-related issues.
What to Do If You See Blossom-End Rot
Once symptoms appear, affected fruit will not recover, but the plant can still produce healthy tomatoes with proper care. Remove damaged fruit to encourage new growth and address the underlying moisture and nutrient issues. If watering and fertilization practices are adjusted, subsequent fruits should develop normally.
Some years it can be hard to tell that the season has shifted from winter to spring in Northwest Florida, but this year we are seeing ideal temperatures for summer vegetable gardens as we shift into April. Soil temperature is affected by ambient temperature and the last few weeks of warm weather has helped to make the ground more conducive to germination of warm season seeds and support growth of transplants. If you have not started your garden yet, do not despair, you still have time to get things growing!
Below is a short list of ideas for your vegetable garden, and you can find more detailed information in the Florida Vegetable Gardening Guide.
Direct seed (plant seeds directly into the garden instead of transplant) recommendations:
The Northwest District Agents discussed foodscaping by answering questions submitted by program participants. Included are the panelist’s answers along with supporting publications for the questions. You may view the session on YouTube at https://www.youtube.com/watch?v=wEMXmaZqRTU
When do I start spring vegetable garden? Still follow the guidelines for warm season edibles. Many seeds are started earlier (inside in January/February) and outside (now through April). For established landscapes with large trees, direct sowing is not the best amongst all the roots. Publication: What to Plant Month by Month https://gardeningsolutions.ifas.ufl.edu/plants/edibles/text-version-of-what-to-plant-by-month/
Suggestions for only 4-6 hours of sunlight in an oak tree hammock. Bell peppers can grow in some shade in containers or in the ground. Leafy lettuces for the cooler months. Publication: Peppers in the Shade, https://edis.ifas.ufl.edu/publication/HS368
What herbs work well mixed into the landscape? Many will work but look for those with essential oils such as thyme and rosemary. Mint is good in a container. Add a bay laurel tree for a evergreen selection.
Publication: Herbs, https://gardeningsolutions.ifas.ufl.edu/plants/edibles/vegetables/herbs/
What is the best citrus for North Florida? Satsuma would be a cold hardy selection with delicious fruit. Owari and Brown Select grow well in Panhandle. Tangerine and Meyer lemon is intermediate in cold hardiness. Start fruit in about a year but remove those early to but energy into the tree. Look for harvesting fruit in about 3-5 years. Look at our citrus publication for citrus fertilization with a fertilizer that contains zinc and iron.
Soil test to match plants with the right locations. Publication: The Satsuma Mandarin, https://edis.ifas.ufl.edu/publication/CH116
What fruit trees can I grow? Choose a variety adapted to our area. Peaches, pears, plums, some citrus, Pineapple guava, Loquat. Choose ones with chill hours for our area. Look at Auburn and Georgia selections rather than Florida selections which are more adapted to central and south Florida. Publication: Dooryard Fruit Varieties, https://edis.ifas.ufl.edu/publication/MG248
What about companion planting? One plant will benefit another – attracts beneficials, provides chemicals for a purpose. Use a trap crop that attracts insects to catch them before they move to your desirable fruit.
Marigolds is an example of use around some edibles to reduce nematodes. Publication: Companion Planting, What is It?https://nwdistrict.ifas.ufl.edu/hort/2023/02/21/companion-planting-what-is-it/
What vegetables can I grow on a trellis? Cucumbers, squash, passionflower, pole beans, indeterminate tomatoes benefit for a trellis. Provides shade for ground plants in heat of summer.
Publication: Trellises and Cages for Vegetable Gardens, https://extension.umn.edu/planting-and-growing-guides/trellises-and-cages
I need to add soil to my native/food garden. What are considerations? Sandy soils may need some amendments. Compost should be mixed in and not grow straight in compost. Maybe add ½ inch.
Soil test first so you don’t add too much nitrogen through amendments. Publication: Soils and Fertilizers, https://sfyl.ifas.ufl.edu/lawn-and-garden/soil-and-fertilizer/
What vegetables grows among pine trees and cherry laurel trees? This environment may have a lower pH. Sweet potatoes may work well if you can bank up hills for planting the potatoes.
Make a pine straw bed too to plant sweet potatoes.
Publication: Sweet Potatoes, https://aggie-horticulture.tamu.edu/vegetable/wp-content/uploads/sites/10/2010/10/EHT-026-Easy-Gardening-Sweet-Potatoes.pdfGrowing Miss Figgy and how to fertilize a kumquat tree growing in a large pot?Fruit tree selections that are dwarf may work better and be prepared to up pot. Watering and fertilizer will have to be managed carefully in the container environment. Video: Small Edibles for Small Spaces,https://www.youtube.com/watch?v=3oVTBqs3I44
I have 3-4 blueberry bushes and they are 2-4 years old and haven’t fruited. What is wrong? Know the cultivar so you are sure they have a cross pollinator. Need the right conditions too. Blueberries set in the fall so if fall pruning, you may have cut off flowering structures. Soil pH is critical. Blueberries like acidic soil and they will struggle in higher pH soils. Publication: Blueberry Gardener’s Guide,https://edis.ifas.ufl.edu/publication/MG359
How do I grow lavender in the landscape? Lavender likes low humidity and drier conditions. Soil should be well drained and plants need good air circulation. Maybe try Phenomenal lavender. Grow in a pot that is very well drained and don’t amend soil when planting in the ground. Prune as needed to open up plant. Publication: Lavender, https://edis.ifas.ufl.edu/publication/FP337
Which apple trees grow best in North Florida? You can grow a tree but it does not produce well due to lack of proper chill hours. Try the Shell apple which is more adapted to north parts of the counties.
Our area may get 500-600 hours of chill generally. Publication: Dooryard Fruit, https://edis.ifas.ufl.edu/publication/MG248
How to protect plant from insects without pesticides, including squirrels? Reduce stressed by planting in the right spot and providing care. You will also have many diverse plantings in a foodscape to allow beneficial to help manage pest. Monitoring the garden is very important to catch problems early and physically remove. Consider safer options when pesticides are needed that are labeled for food crops.
Might use some screening for small mammals and fencing for large animals. Motion activated sprinklers and scare devices such as ribbon, foils. Chemical repellents that contain capsaicin. Publication: Natural Products for Pest Control,https://edis.ifas.ufl.edu/publication/IN197
What are the most common vegetables for small spaces?
Some plants will need at least 12 inches of depth such as tomatoes. Lots for winter edibles do well in small spaces and containers. Consider a patio version of the plant. There are small selections of Pineapple guava and Pomegranate although they may produce smaller fruit.
How easy is it to grow in containers?
You can grow in the ground with good soil and if you can work with plants on the ground.
Containers allow you to create the right soil environment easy. You do have to manage water carefully as the heat builds up. Publication: Growing Vegetables in Containers,https://gardeningsolutions.ifas.ufl.edu/plants/edibles/vegetables/growing-vegetables-in-containers/
What are the best tomatoes for the area? Determinate and cherry will perform a little better. Choose early or mid producing plants to get fruit
Panelist’s favorites are:
Everglades and Sungold, Early Girl, Cherokee Purple is an heirloom
What edibles can handle full sun? Most fruit plants like sun since they are needing lots of energy. Water must be available when rainfall is lacking.
Three fruit trees have not produced in 3 years. What do we need to do? We really need to know what they are first. Do they need a plant for cross pollination? Are they flowering but not fruiting? How are they planted? Deep planting will cause a plant to struggle. Contact your Agent for more help.
Will glyphosate residues from a fall application carry over to spring? Chemicals are regulated extensively so follow the label directions for safety. There should not be residue issues with this pesticide.
Try to manage weeds with other techniques like mulches, handpulling, directed watering, soil solarization, etc. Publication: Use of Glyphosate and Herbicide Alternatives for Weed Control in Florida Landscape Planting Beds, https://edis.ifas.ufl.edu/publication/ep580
What are some native plants for foodscaping?
Blueberries, blackberries, Chickasaw plum, pecans, persimmons, Maypop, Mulberry.
Use native plants to attract animals such as beautyberry.
Where can we find compost? Cotton gin to get cotton gin trash will need to be composted first. Manure from equestrian centers or zoos. Make sure it is composted too.
Peanut processing facility.
Escambia County has bloom compost from ECUA.
Note: Amended soil with compost can be flammable. Ash can benefit garden if needed. Test soil pH first so you don’t add too much.