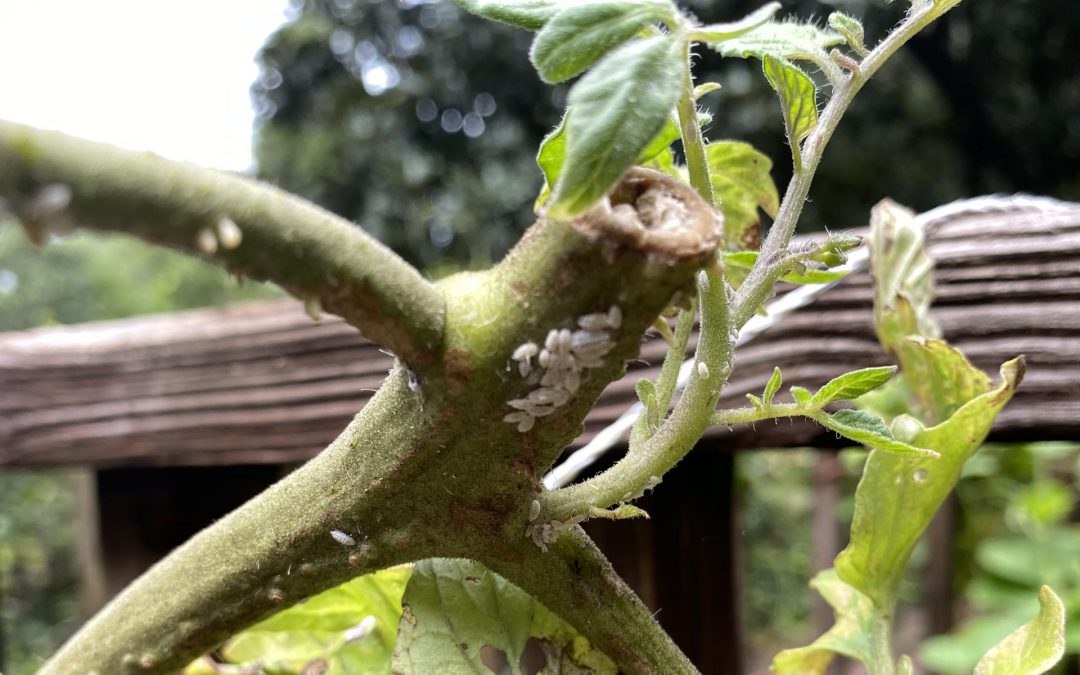
A common question for gardeners at the end of the season is if one should till the soil or use no till practices. Opinions vary regarding this question, even among Extension Agents. However old crops harbor insects, both good and bad. This phenomenon was noticed on some recently cut back tomato plants. The intention was to cut the leftover spring garden tomatoes back to encourage fall production. Instead, a host plant for mealybugs was provided.
Mealybugs on a tomato plant. Photo Credit: Matt Lollar, University of Florida/IFAS Extension – Santa Rosa County
Mealybugs are soft-bodied insects that possess a covering of flocculent, white, waxy filaments. They are about 1/8 inch in length and usually pinkish or yellowish in color. Mealybugs have piercing-sucking mouthparts which they use to siphon fluids from the leaves, stems, and sometimes roots of many ornamental and vegetable plants. Mealybug damage produces discolored, wilted, and deformed leaves.
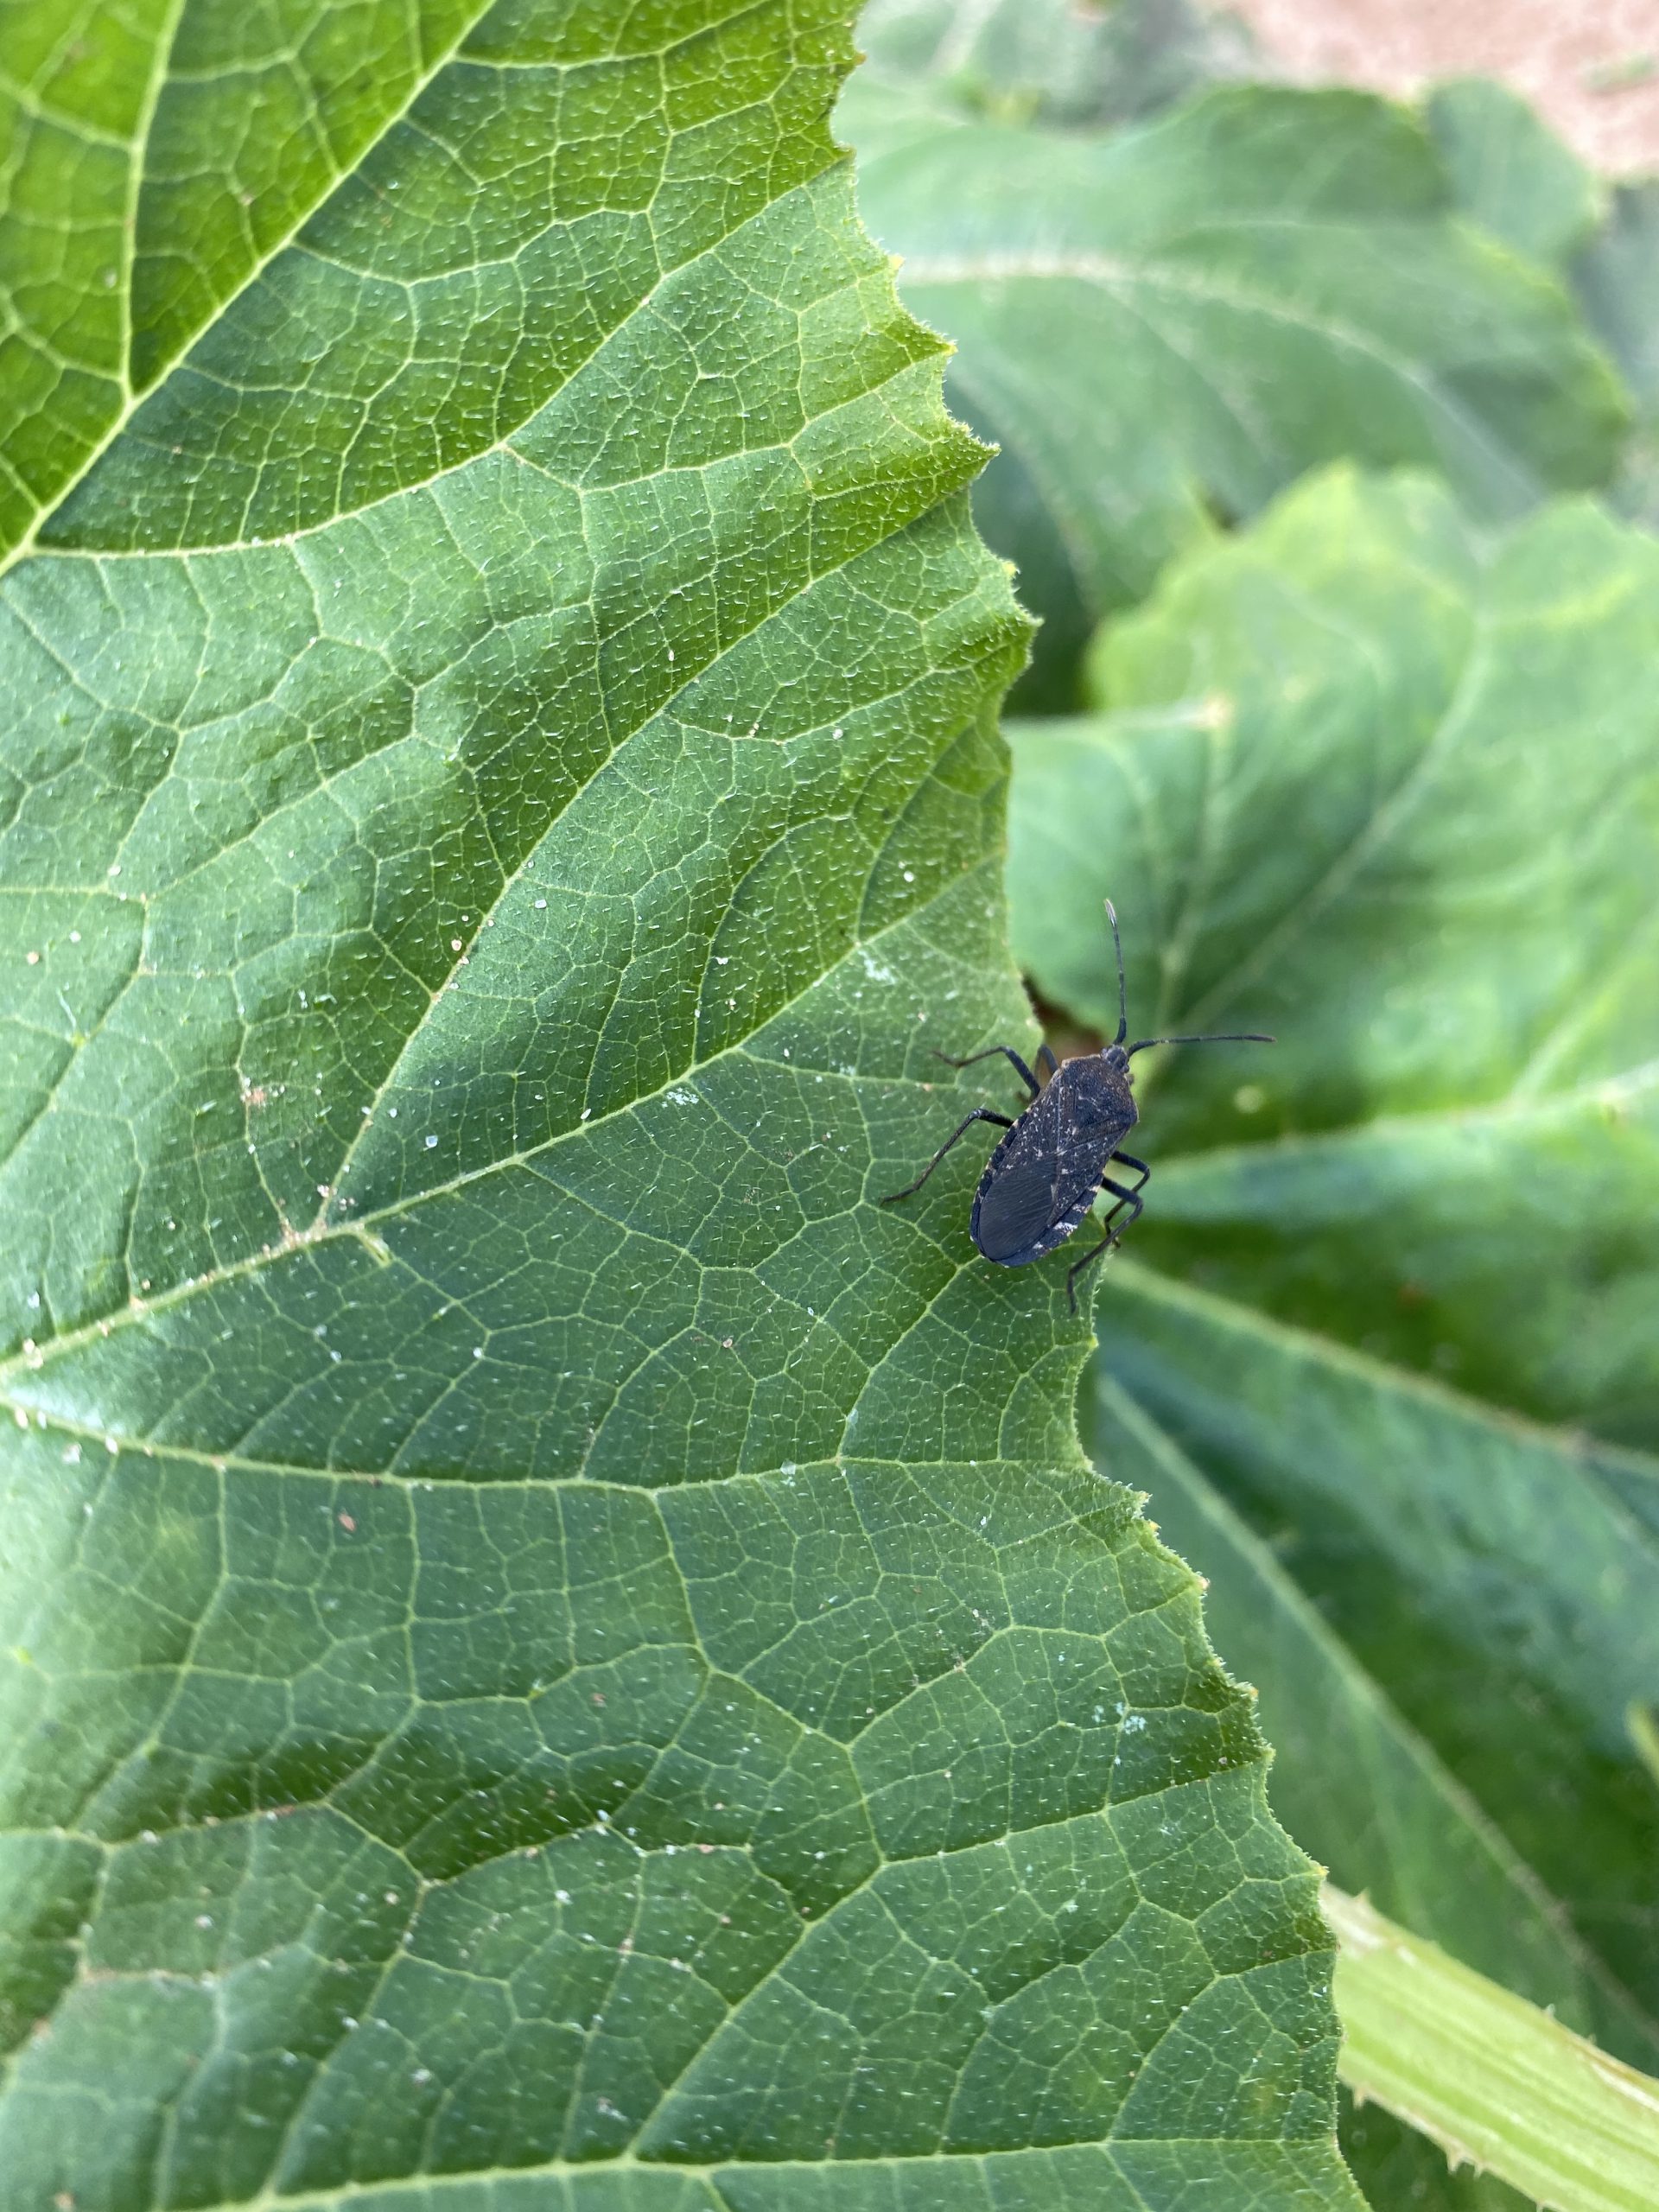
One very common example of an insect pest likely to claim residence in your garden’s crop residue, are squash bugs. They like to overwinter on squash, cucumber, and other cucurbit crop residue. If you choose to not till your garden and leave a portion of last seasons crop in your garden, then you should consider applying an insecticide to your spent crop at the end of the season. A product containing a pyrethrin or pyrethroid as an active ingredient would be a good broad spectrum insecticide to control any pest that may reside on plant residue. More information on pyrethrins and pyrehtroids can be found at the EPA webpage: Pyrethrins and Pyrethroids. If you choose to apply an insecticide, it is important that you follow the information on the label regarding pollinator protection. Another option is to plant a trap crop on the edge of your garden to help attract pest insects away from your desired crops. More information on trap crops can be found in the EDIS Publication: Intercropping, Pest Management and Crop Diversity.
An adult squash bug on a zucchini leaf. Photo Credit: Matt Lollar, University of Florida/IFAS Extension – Santa Rosa County
So the answer to the till or no till question is…it depends. It is really up to the gardener. Yes, the residue from crops will add nutrients and organic matter to your soil, but it could also increase pest pressure in your garden. If you don’t plan to remove crop residue and don’t plan to till, then keep an eye out for what could be hiding in your garden.
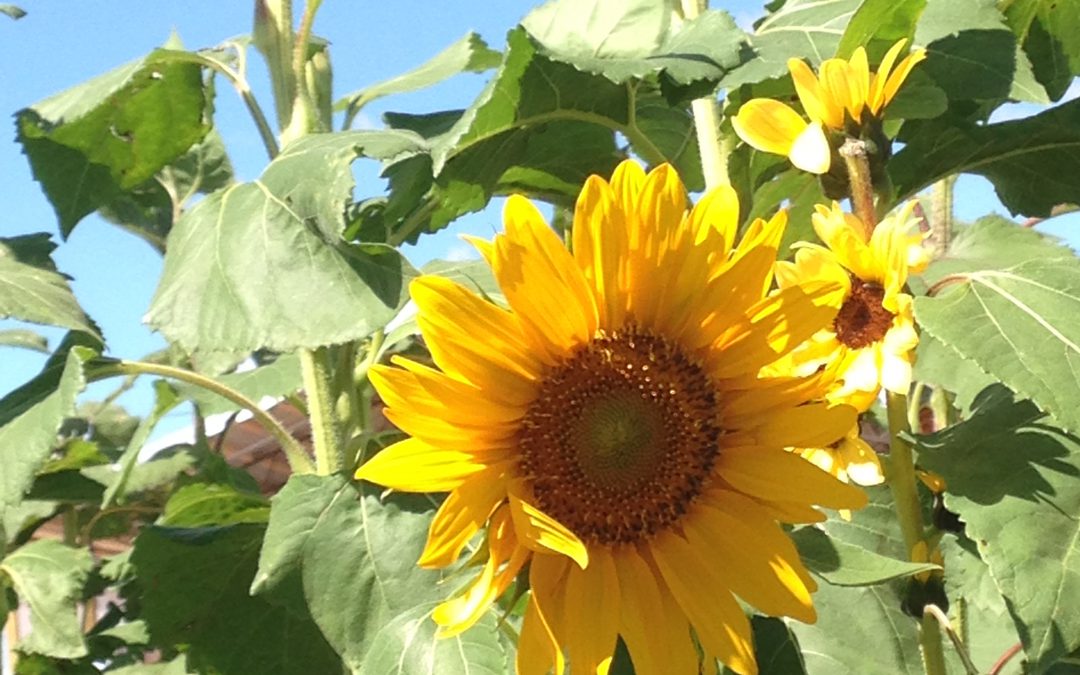
Veteran Master Gardener, Les Furr shares an idea he and his wife had to hide an ugly debris pile following Hurricane Michael. He planted a temporary sunflower screen to block something ugly with something beautiful. Sunflowers can be planted along a road or fence, and provide a lovely addition to your property. The seed can be saved and frozen to provide beauty to your property year after year.
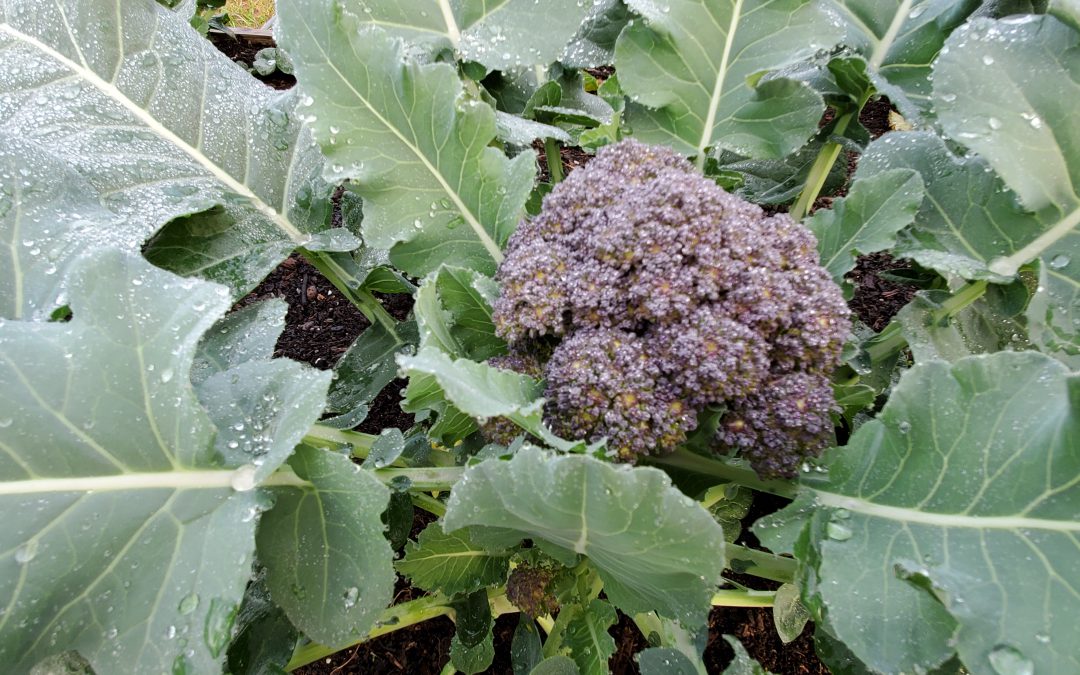
Cruciferous vegetables, mostly cool-season annuals in the Brassicaceae (formerly Cruciferae) family, are part of a healthy diet, prized for their high fiber content and unique sulfur-containing compounds known as glucosinolates. This vegetable family includes things many of us love (or love to hate) like Brussels sprouts, cabbage, cauliflower, collards, kale, mustard, turnips, bok choy, and Chinese cabbage. They’re also commonly grown in Panhandle gardens. However, as anyone who has grown these species knows, some are easier than others. For example, kale and radish are among the easiest of all plants to grow. But get beyond the basics and folks often run into difficulty with species like broccoli and cabbage. The high rainfall/humidity and frequent warm spells experienced here during the growing season often lead to serious pathogen problems, dooming my garden in years past. However, this winter, thanks to a couple of new cultivars, ‘Capture’ Cabbage and ‘Burgundy’ Sprouting Broccoli, I’ve enjoyed a plentiful supply of tasty crucifers!
4’x 8′ raised bed planted with ‘Capture’ on 24″ centers.
‘Capture’ Cabbage, developed by Bejo Seeds of California as a mid-season “white” fresh market cabbage for the South, has been an outstanding performer in my garden this year. Touted as highly resistant to Black Rot and Fusarium Yellows (by far the two most devastating pathogens of Cabbage), I had to try it for myself. I planted seeds 24” apart in my standard 4’ wide x 8’ long x 12” deep raised beds filled with mushroom compost and aged pine bark. Seedlings were fertilized once about three weeks after germination with a general purpose 10-10-10 fertilizer. The plants that developed have been extremely vigorous (I’m glad I paid attention to plant spacing guidelines on the seed packet!) and have not shown ANY evidence of disease, even through an unusually warm and wet winter that would have hammered older susceptible varieties. My plants have begun to develop heads and should be ready for harvest and the kitchen in just a couple more weeks! If you’ve had problems getting a cabbage from germination to head formation and harvest without serious disease pressure, give ‘Capture’ a try next fall!
‘Burgundy’ Broccoli in the author’s raised bed garden.
‘Burgundy’ Broccoli, developed by Elsom Seeds in the United Kingdom, is a unique variety sure to turn heads in your garden. True to its name, the prolific florets are a deep, purple color. Though the central “head” on ‘Burgundy’ is quite small, that’s not the primary feature anyway. Considered a “sprouting” broccoli, this cultivar puts out an abundance of side shoots that make ‘Burgundy’ sort of a cut-and-come-again broccoli, allowing for a long harvest window. Another advantage from a disease avoidance perspective is the short maturity time (the time from planting seeds to having harvestable shoots) of around 40 days! For perspective, a “regular” heading broccoli has a maturity of around 60 day, lots more time for problems to happen. In the same growing conditions described above for cabbage, ‘Burgundy’ performed amazingly well for me, growing strong, healthy stalks, large, unblemished leaves and an abundance of purple shoots with a nice flavor profile!
If you want to enjoy homegrown broccoli and cabbage but disease pressures have made your previous efforts unproductive, give ‘Capture’ Cabbage and ‘Burgundy’ Broccoli a try! These two selections have made it easier than ever to enjoy unique, homegrown, healthy cruciferous veggies. Keep these and other quality, disease-resistant cultivars in mind when planning your winter garden in 2020!
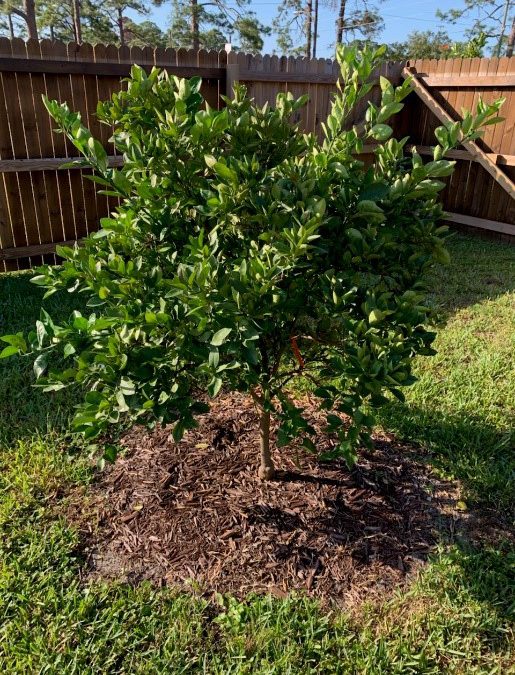
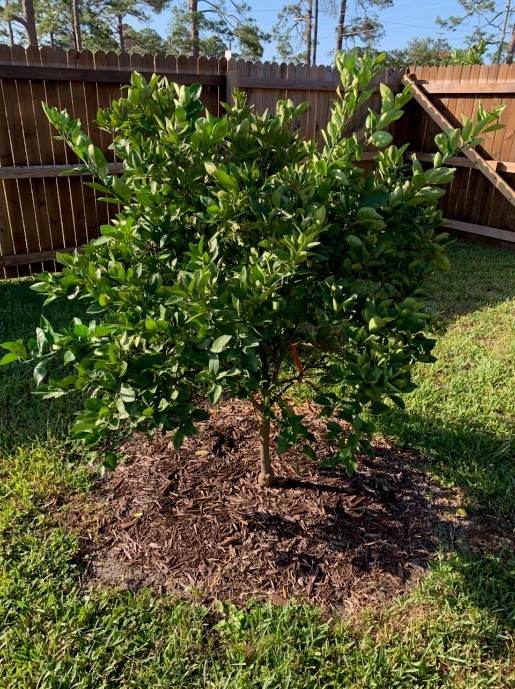
Root rot may develop if citrus trees are mulched closer than 12″ to the trunk
Thankfully, cooler temperatures have finally made it to the Florida Panhandle, but it took until the middle of October. The last two months surely taught us lessons about helping our gardens beat the heat. One strategy to help plants cope with extreme heat or drought is mulching.
Many of us either have or can easily find, piles of wood chip mulch from fallen trees, thanks to the hurricane. This material will come in handy now, as fall and winter mulching is a great gardening practice with many benefits.
Think of mulch as a blanket for plants. By acting as a cover to the root system, mulch can perform as both a cooling factor during warm months and can help warm the root system during cooler weather, as well as assist in retaining moisture. This is important, as regulated soil moisture will accept rain or irrigation water much easier than crusty, dry soil. Water will simply runoff and can cause erosion in dry soil conditions. Mulch is a great weed barrier and is also aesthetically pleasing in the landscape by helping define borders and gives depth. A 3-4” thick layer of mulch, in a 2-3’ diameter, is typically a sufficient amount of mulch for landscape plants and fruit trees.
There are two types of mulch material that you’ll find in our area, organic or inert. Components of organic mulch include compost, bark, leaves grass clippings, straw, wood chips and even saw dust. Straw, wood chips and saw dust contain very little nitrogen, however. If mulching with these materials, it’s a good idea to add some nitrogen fertilizer. One or two cups of a complete fertilizer like 10-10-10 should help you avoid nutrient issues. Organic mulch will need to be replenished yearly to some degree, as it breaks down into a soil amending compost. This breakdown into compost will improve soil water holding capacity and fertility.
Inert mulch can be made of shells, gravel, pebbles, plastic and rubber. However, inert options are not as easy to use in controlling moisture and temperature levels and of course provides no nutrient value. With Inert mulch, you should always fertilize the area first, especially vegetable gardening. Use approximately two pounds of 10-10-10 fertilizer for every 100 square feet of vegetable garden. This may not seem like much fertilizer, but since plastic mulch reduces the amount of fertilizer that leaches out of the root zone of your plants, you can apply less fertilizer to begin with. That’s a big reason why UF/IFAS researchers recommend plastic mulch to commercial vegetable and ornamental producers in Florida, but organic mulches are more appropriate for most home garden settings.
Mulching may be one of the most valuable and cost-effective garden practices. Mulch helps control weeds, conserves moisture, moderates soil temperatures, improves soil fertility and last, but not least, adds to the beauty of the landscape.
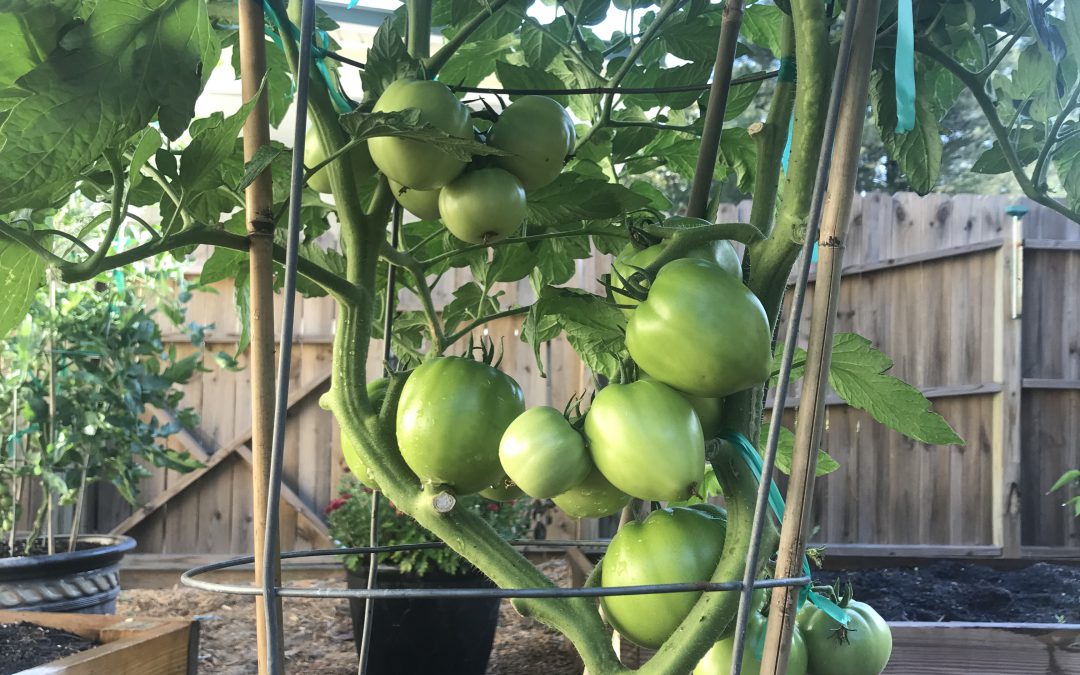
Talk to nearly any Panhandle gardener and one of the first things brought up in conversation is the difficulty growing large, beefsteak/slicing tomatoes (Solanum lycopersicum) in their home garden. Large tomatoes are indeed among the more challenging garden vegetables in North Florida, affected by myriad pests, pathogens and abiotic issues. However, giving up growing this garden favorite is unwarranted as success can be had by following a couple of often overlooked, simple steps to ward off potential problems.
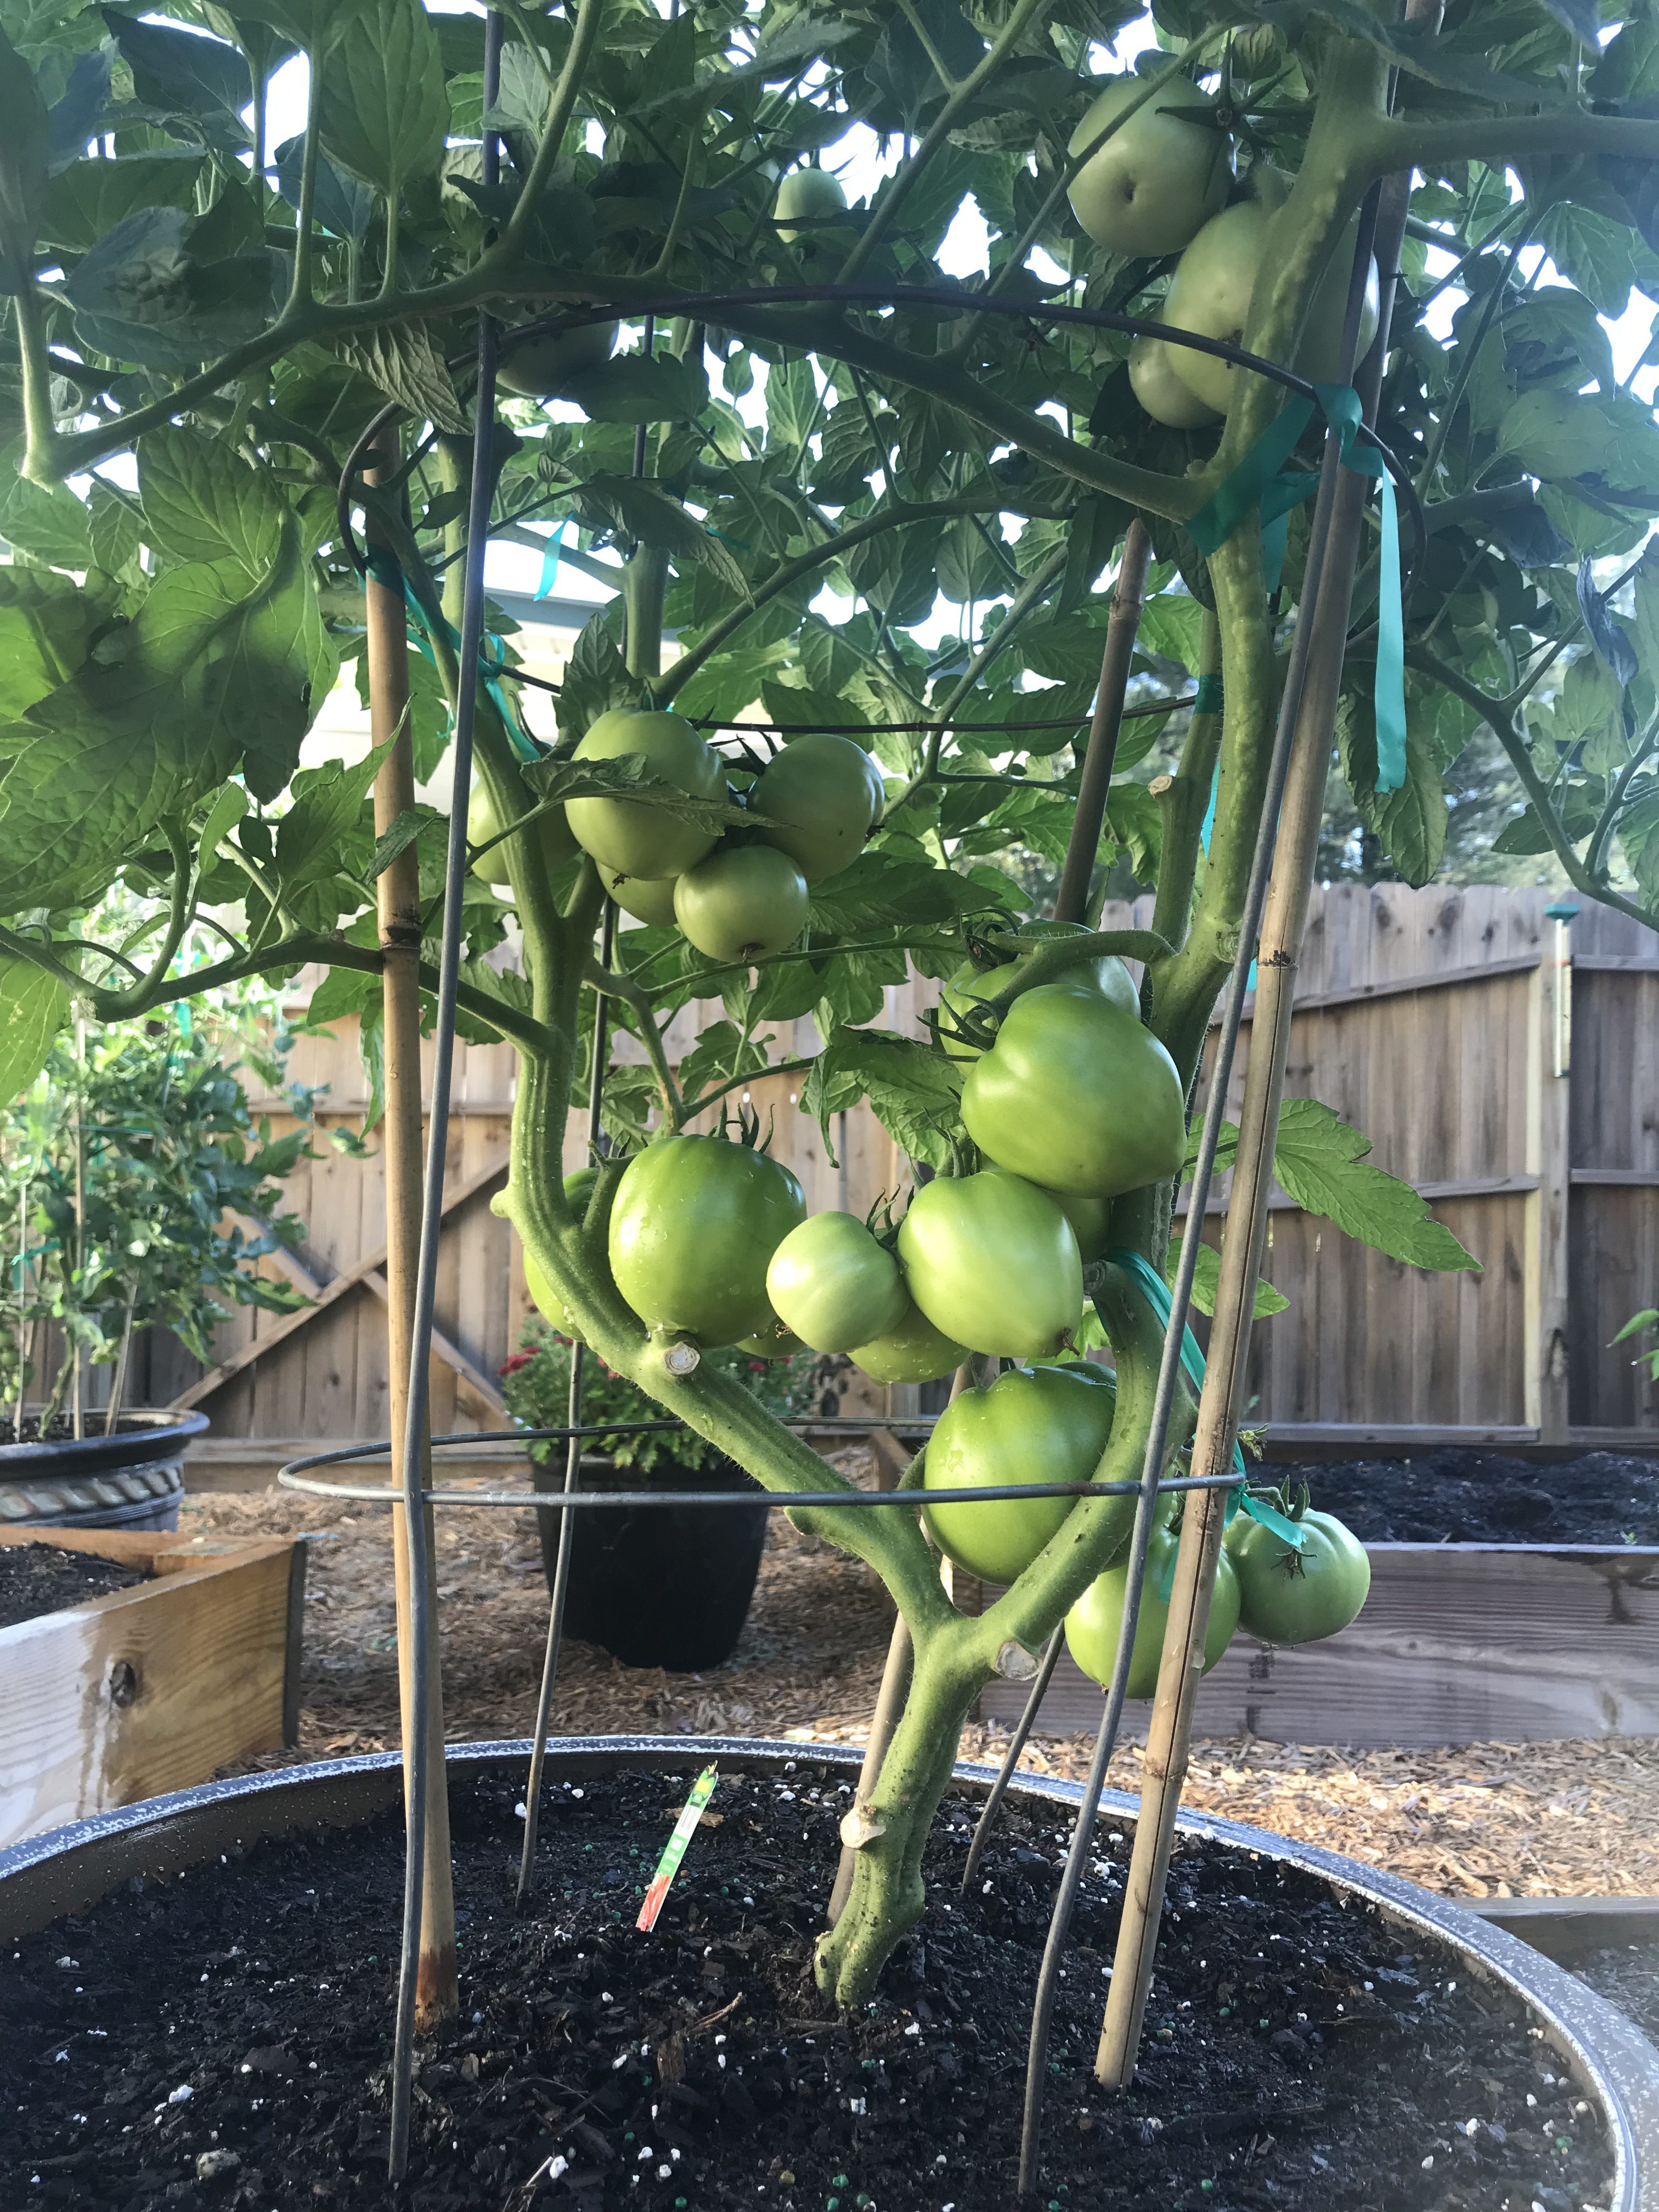
Choose Resistant Cultivars – One of the major recent gardening trends is the rise of heirloom veggies, particularly heirloom tomatoes. While many of these varieties certainly are interesting and often possess superior flavor/texture, heirlooms are, as a group, extraordinarily susceptible to disease in our climate. Fortunately for gardeners, there are a number of excellent varieties available with large resistance profiles to many common diseases and a similar taste profile to heirloom favorites! ‘Big Beef’ (pictured), ‘Better Boy’, ‘Celebrity’, and ‘Skyway’ are just a few of the many great cultivars with extensive disease resistance available as transplants at garden centers or as seed from quality online seed vendors.
Tomato ‘Big Beef’ in 15 gallon decorative container
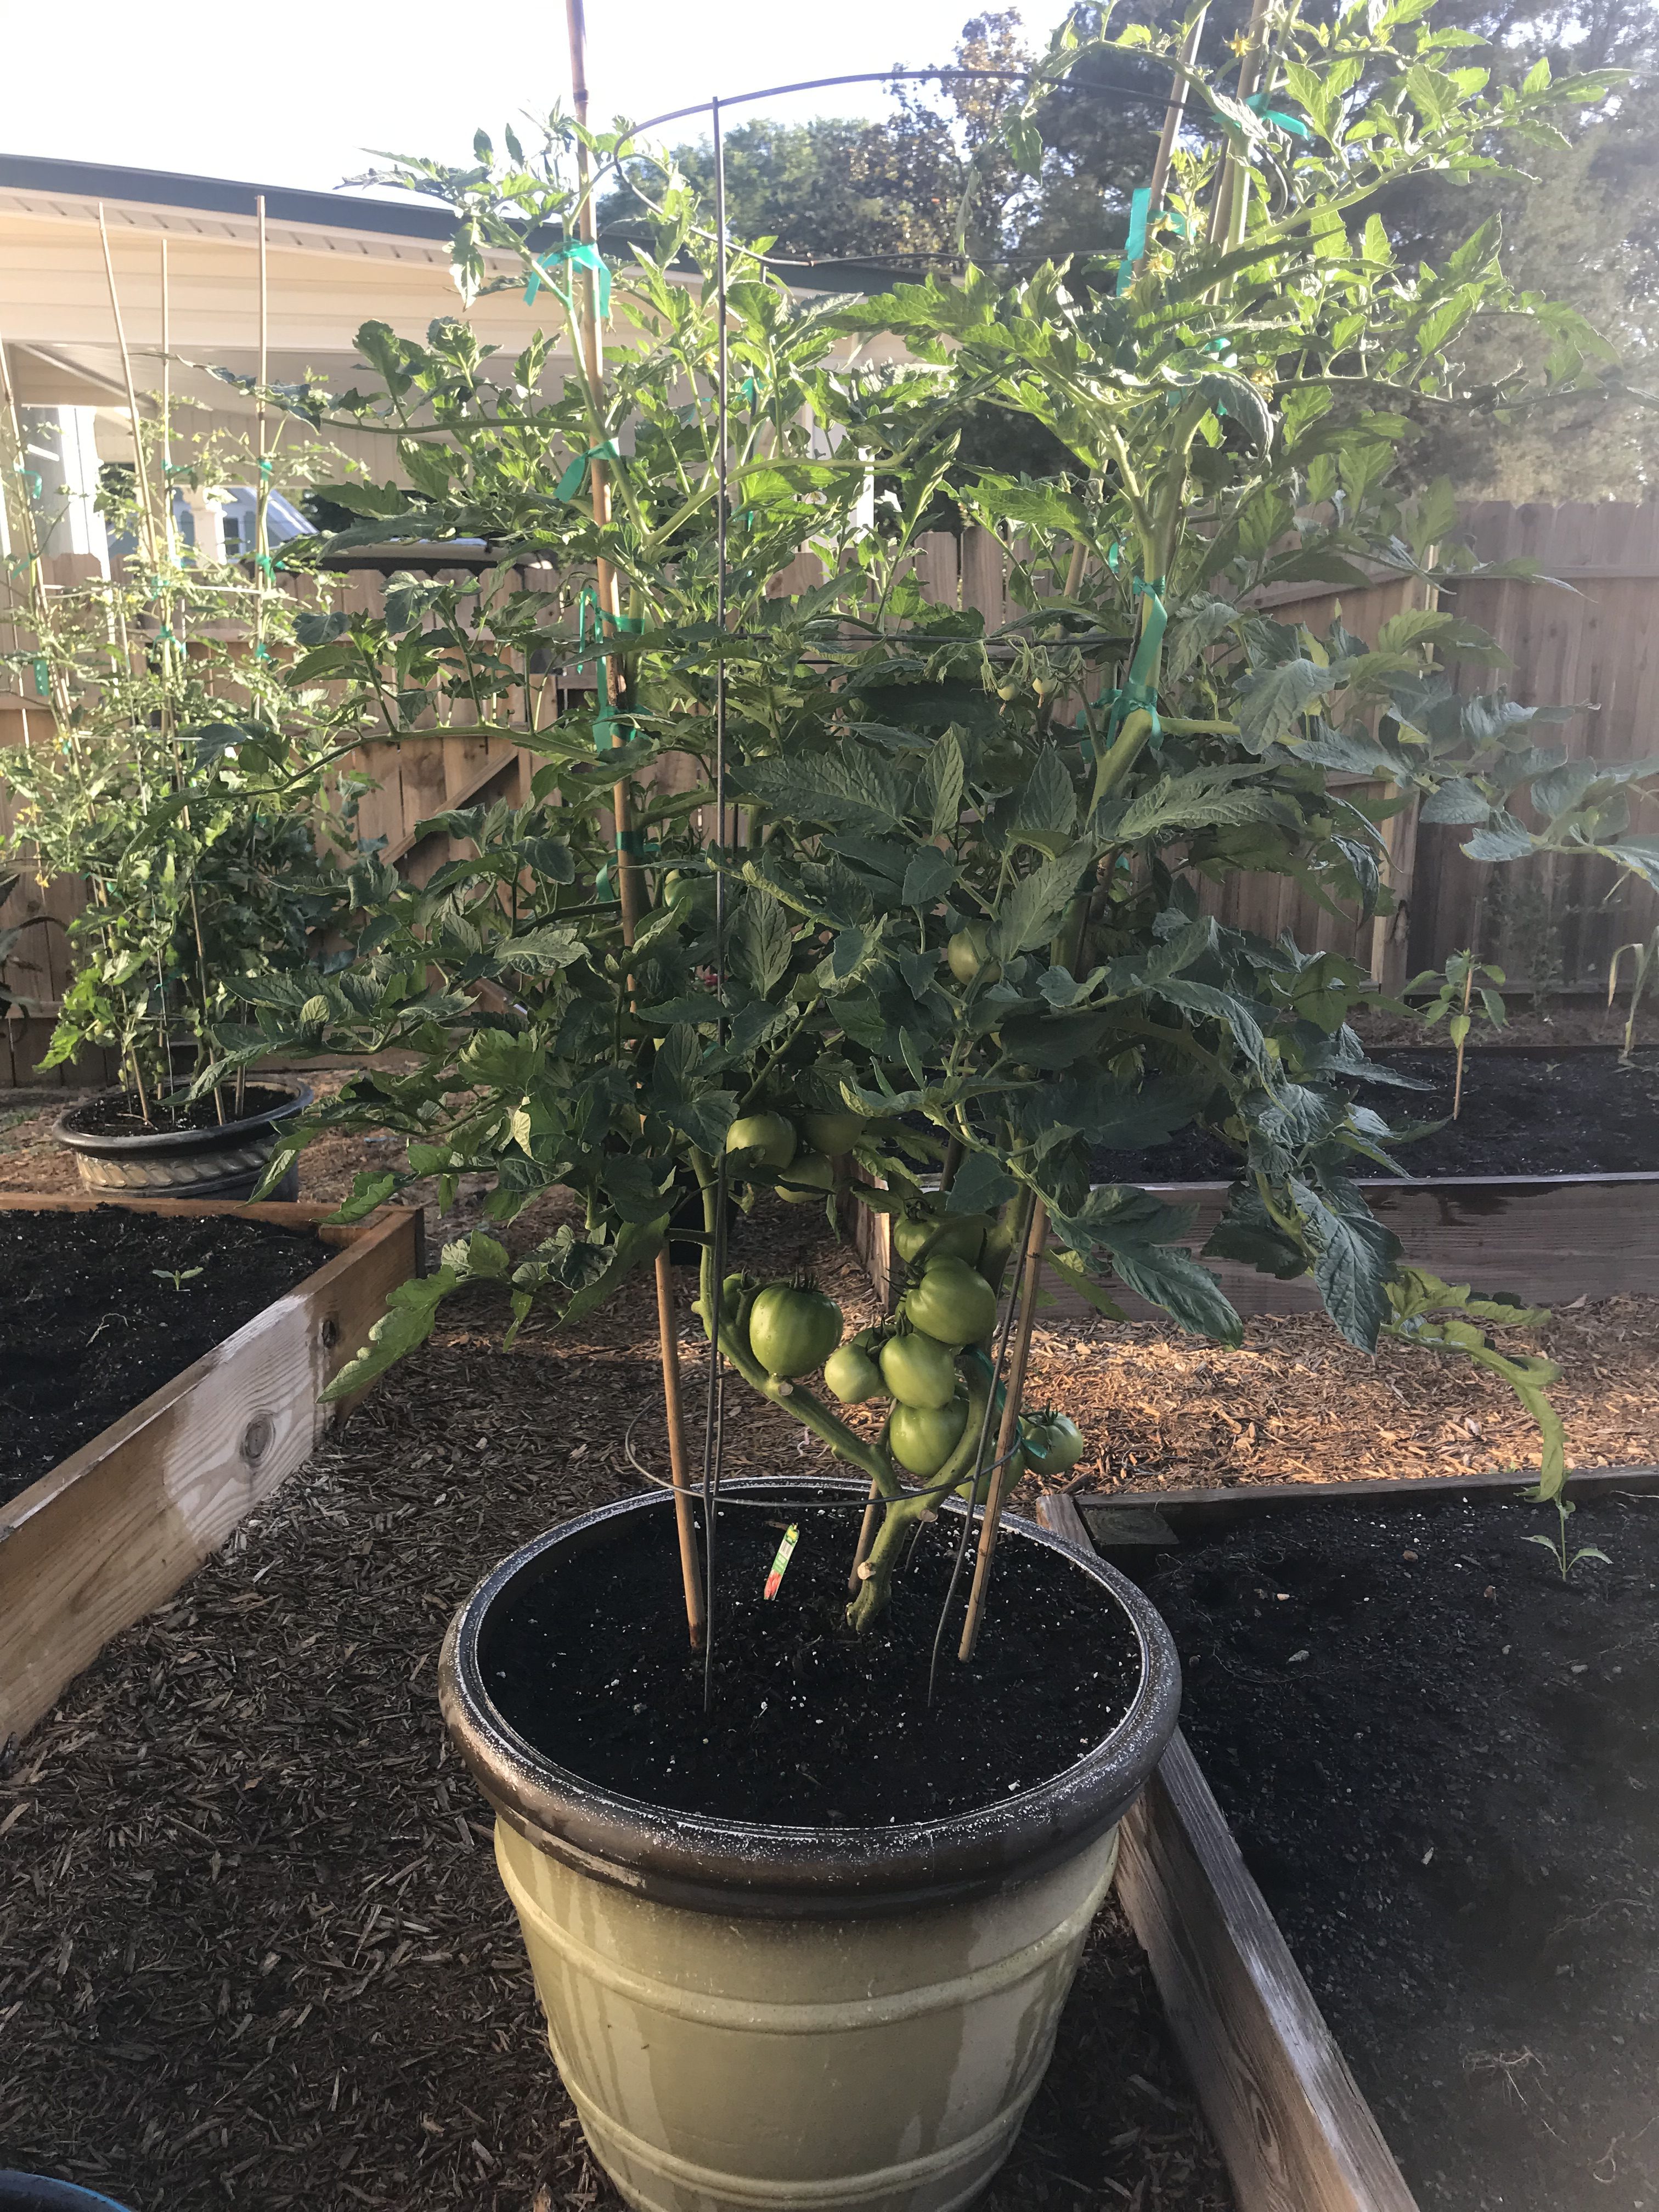
Start Early – Once, you’ve selected the proper cultivar, the next key is to get them in the ground early! I’m convinced one of the primary reasons folks fail with tomatoes is waiting for “traditional” garden planting dates. For instance, an old tradition in the South is to plant your garden on Good Friday before Easter. However, according to Johnny’s Selected Seeds Southeast Sales Representative Blake Thaxton, tomatoes should be germinated and growing in the garden no later than March 15. Mr. Thaxton notes two primary reasons for this, the most important being pest/disease avoidance. Beefsteak tomato varieties take around 70 days from planting to harvest, so a March 15th planting date yields ripe tomatoes around the third or fourth week of May, when pest/disease pressure is still manageable. Pests and disease occurrence becomes exponentially worse in the Panhandle as May trickles into June and July, therefore it is critical that your fruit begin ripening prior to this onslaught. An important second motivation to plant early is that tomatoes stop setting fruit when nighttime temperatures rise above 75°F. At these temperatures, tomato pollen is rendered sterile and though the plant will continue flowering, no fruit will be set.
Mulch – Another overlooked best management practice in backyard veggie gardening is mulching! Those of us who tend flower beds already know many benefits of mulch like soil temperature moderation, weed prevention, and moisture conservation. But for tomato growers, mulch has another benefit – disease prevention! Several serious diseases that affect tomato are soil-borne pathogens (i.e. Early Blight, Late Blight, Bacterial Spot, etc.). These pathogens find their way onto plants either indirectly via water splashing from soil onto leaves or direct contact from leaves and fruit resting on the soil. To prevent these pathogens from infecting plant tissue, apply an organic mulch (preferably wheat straw or tree leaves) under and around plants. This simple step goes a long way toward season-long, yield-saving disease prevention.
Consistent Watering – Everyone knows plants need water but what you might not know is that irrigation consistency makes a huge difference in plant health, particularly tomatoes. Consistent watering is key in helping ward off one of the most frustrating tomato maladies, blossom end rot (BER) – you know, the one where the bottom end of your perfectly good tomato fruit turns to a brownish mush! Though BER is caused by calcium deficiency, the condition is commonly induced by creation of distinct wet and dry periods from non-regular watering, interfering with calcium uptake and availability to the plant. So, while you may have adequate soil calcium, if you don’t water correctly, the condition will happen anyway! It’s also good to keep in mind that mature tomato plants use large quantities of water daily, so during the heat of summer, plants in containers may need to be watered multiple times daily to maintain consistently moist soil. Think about it, you don’t drink 8 glasses of water when you wake up and then never drink again throughout a hot day. A tomato is no different. Allowing your plants to wilt down before providing additional water ruins productivity and can induce BER.
Tomato ‘Big Beef’ demonstrating pruning for soil clearance and airflow.
Pruning – I get it. Once you’ve nursed your baby tomato from a wee transplant or seed into a rapidly growing and flowering plant, it seems counter-intuitive to break out the pruners, but to keep your tomato plant as healthy as possible for as long as possible, that is what you must do! Pruning tomatoes should accomplish two things. First, remove the bottom layer of foliage from the plant base, so that water will not readily splash onto the lowest remaining leaves. (I tend to remove all leaves up to the second set of flowers 8-12” from the soil’s surface.) As with mulching, this prevents bacterial and fungal pathogens from spreading easily from the soil surface onto your plant. Second, tomato plants, especially the vigorous indeterminate varieties, often grow more foliage than is necessary for fruit production. This excess foliage can prevent airflow and trap moisture in the canopy of the plant, promoting disease. To open up the canopy and allow for more airflow, I prune off leaves that grow from the primary stems inward to the center of the plant. The idea is to keep the inside of the plant open while allowing enough leaves to power photosynthesis and shade the developing fruit below.
Tomatoes are notoriously hard to grow, but by following a few easy preventative practices, gardeners can greatly increase their chances of realizing harvestable fruit come summer. Please keep in mind that this is not an exhaustive list that will ensure disease-free plants over the entire growing season (you should also get a soil test to make sure your pH and soil fertility are correct and ideally you’d never work in your tomatoes when they are wet, etc., but this is a good place to start!). However, a little bit of planning and prevention early in the season can make growing tomatoes a lot less frustrating! As always, if you have questions regarding tomatoes or any other horticultural topic, please contact your local UF/IFAS Extension Office. Happy gardening!
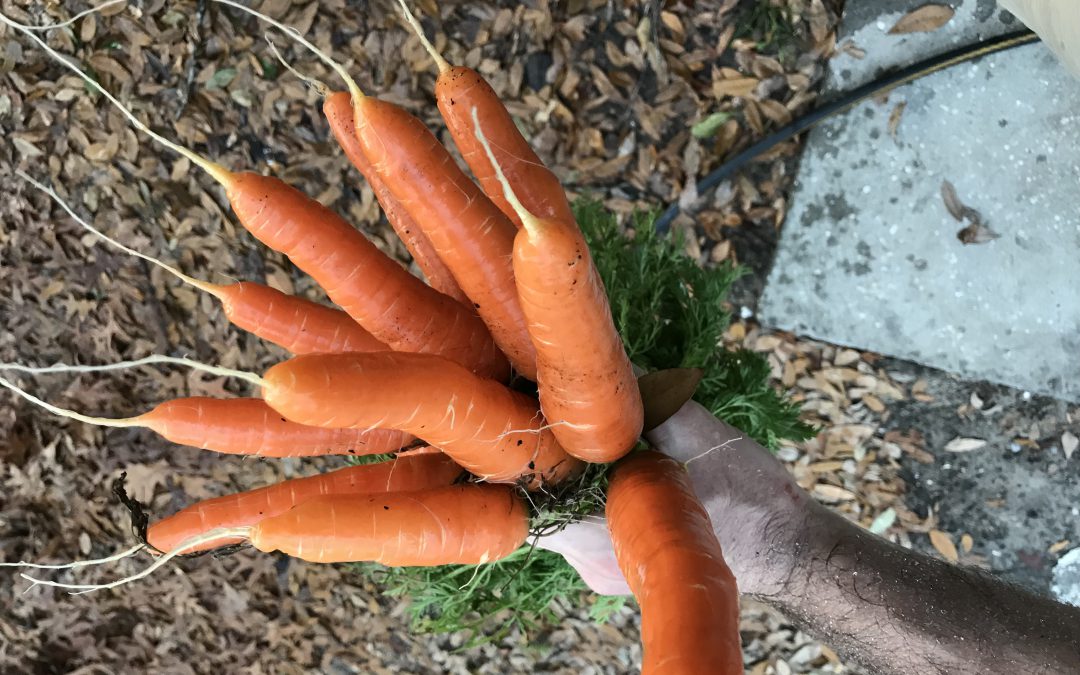
After tending a home vegetable garden for any length of time in the Panhandle, you begin to learn some things. Tomatoes are awfully hard to grow. Raised beds drastically lower the difficulty of gardening in general. You should never plant mint in a permanent veggie garden. Swiss Chard has to be started early because it grows as molasses creeps. Of all of these anecdotal maxims I’ve discovered, the one with the most flavor return on my gardening investment is that carrots should always be a part of your cool season garden. A fresh carrot out of the garden is hard to beat. The difference between a grocery store carrot and one fresh out of your own garden is astonishing and will change your culinary life. Though carrot season in Florida is just ending (my final batch was harvested yesterday), it’s the perfect time to learn about growing carrots here and plan to get some in the ground this fall!
There are a number of reasons to grow and eat carrots. They’re obviously very healthy, though I dispute the whole eat carrots and you’ll have great eyesight thing – apparently I acquired the taste for them too late to help. They go well in more dishes than they don’t. However, the real two reasons you should supplement your grocery store carrot purchases with home grown harvests are that they’re so easy to grow and that there are so many more options than the standard long, thin orange varieties adorning the produce aisle shelves.
‘Bolero’ Carrots
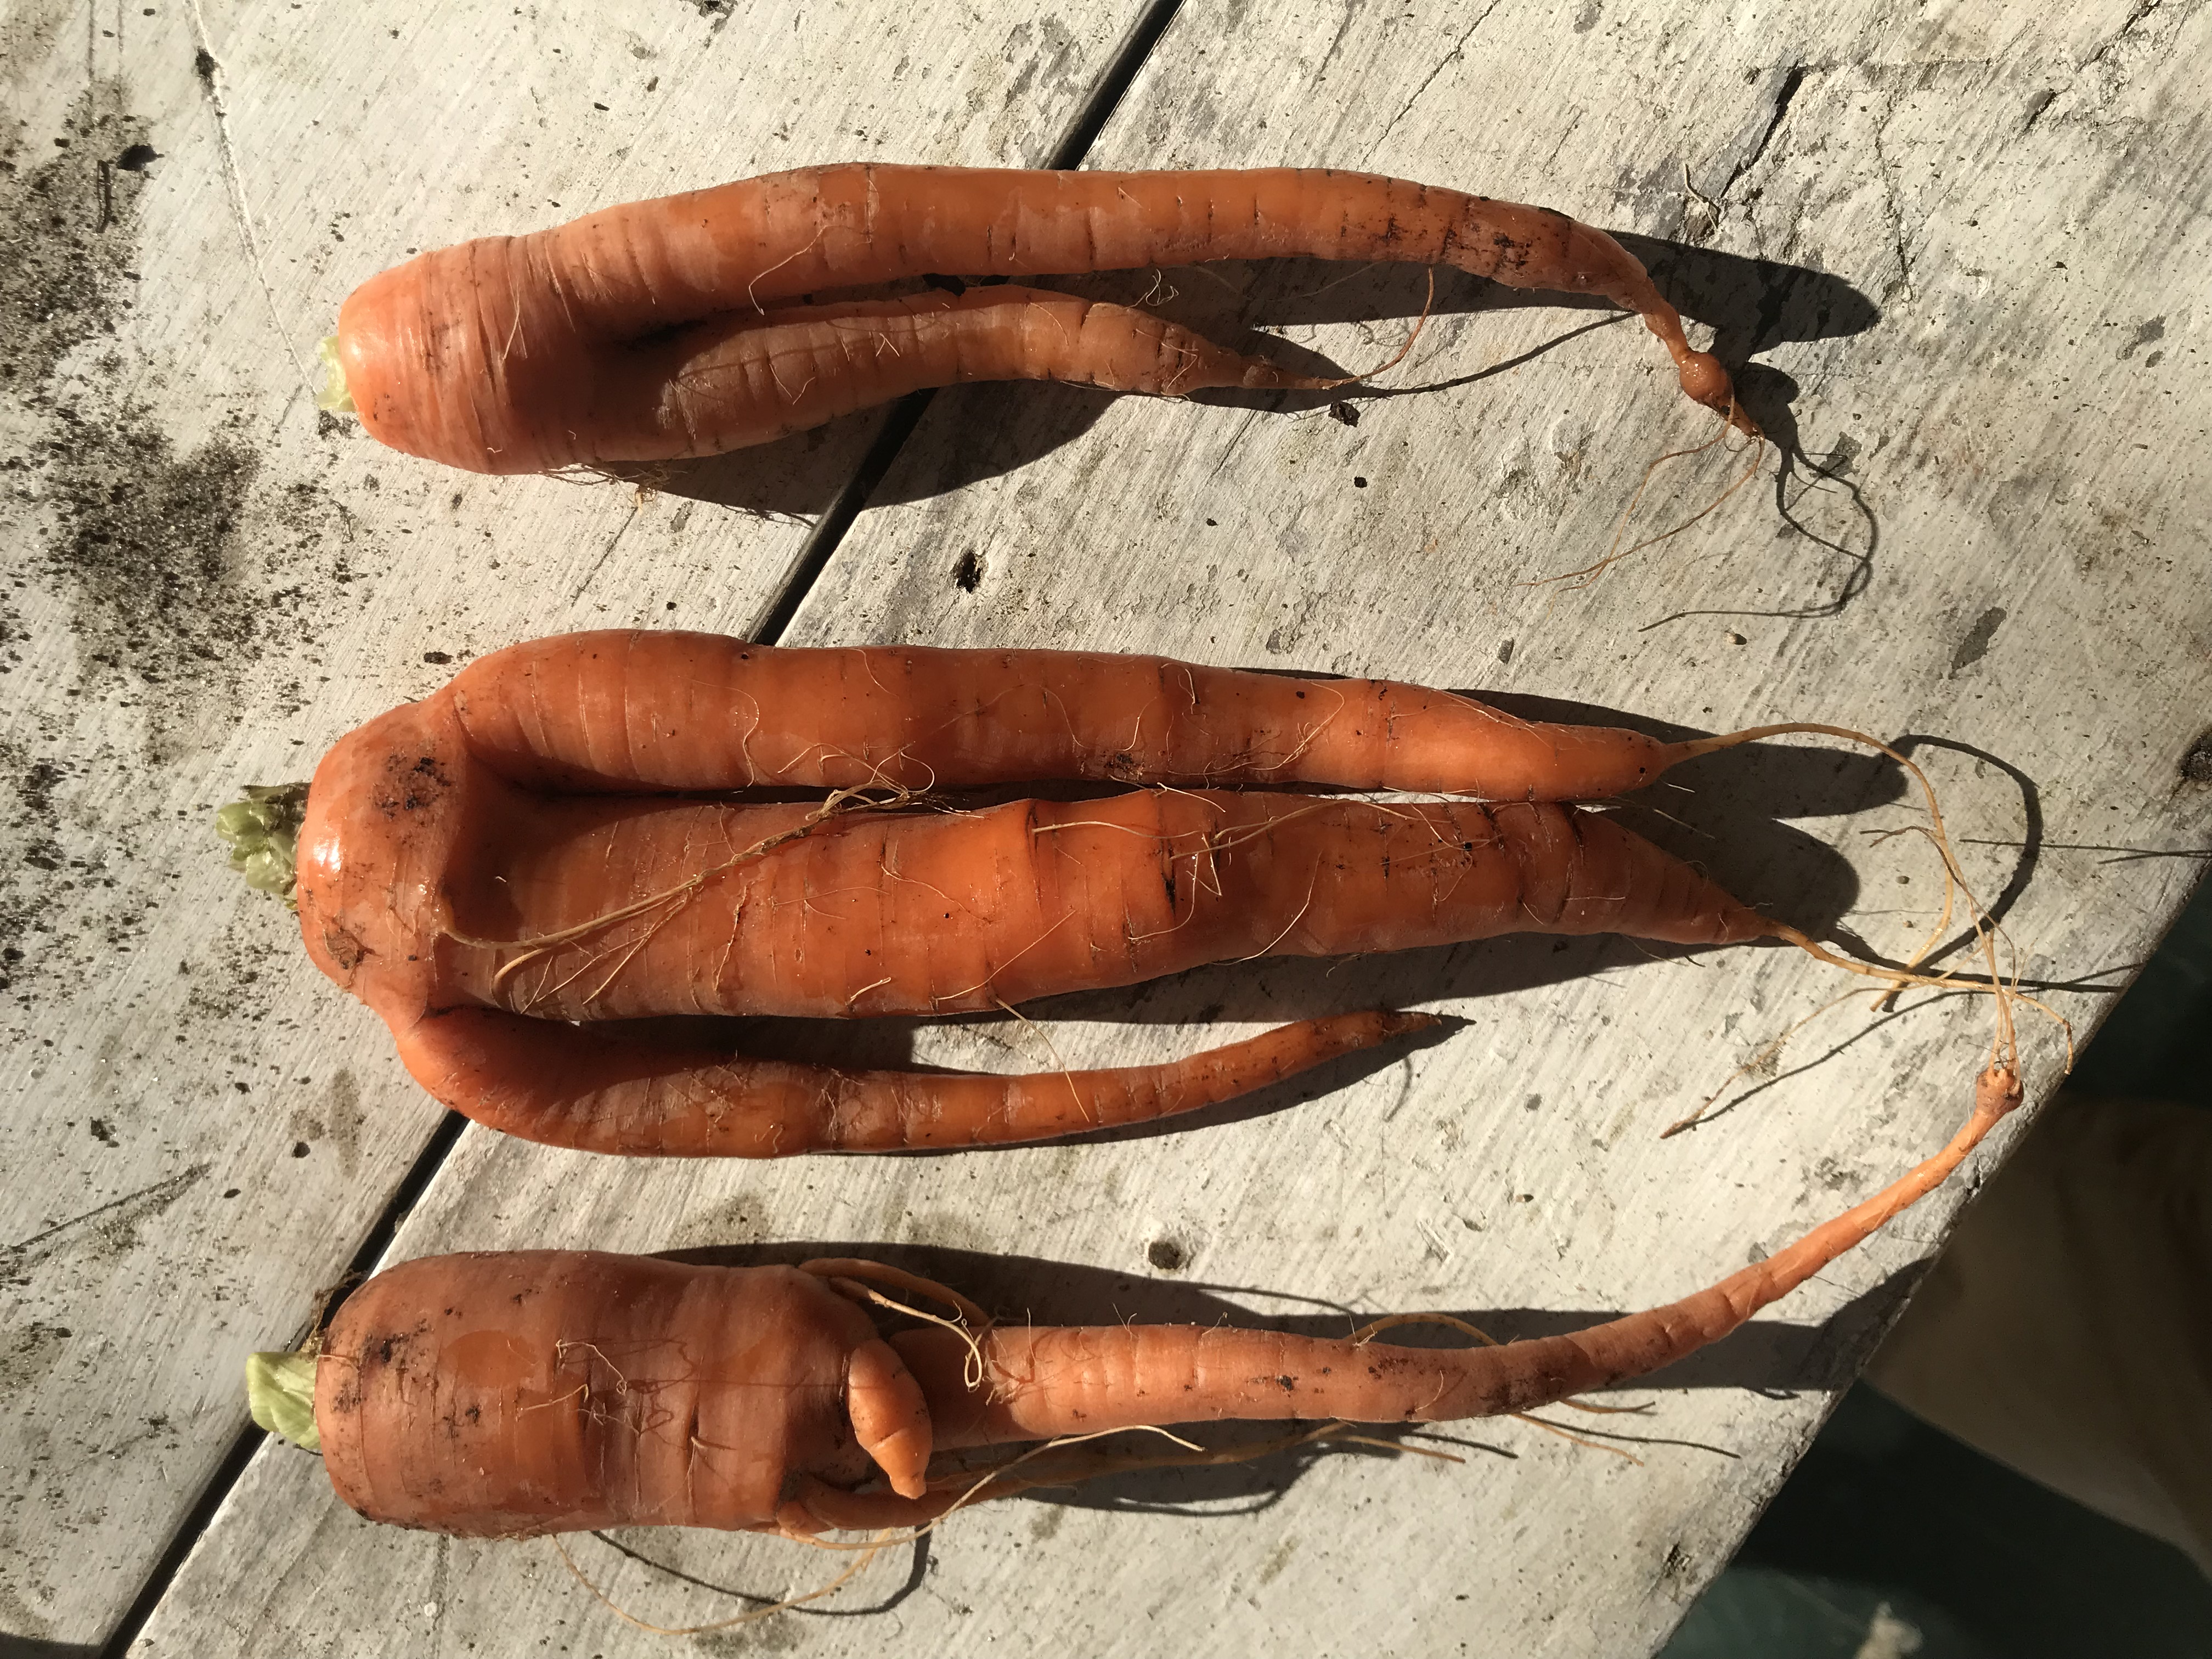
Though carrots are remarkable easy to grow, they do ask a couple of things of gardeners. They are a cool season vegetable and are generally planted from seed beginning in late August through early September in the Panhandle, though successive plantings can continue through at least February if you want to extend your harvest. Also, like many other root vegetables, carrots don’t transplant well so direct seeding in the garden is a must. But before you even consider seeding, care must be taken to make sure the soil bed you’ll be seeding in has been properly prepared. One of the few ways to fail growing carrots is to not start with a loose soil free from any potential obstructions. If the development of the carrot root is disturbed by anything during the germination and growing process (this includes manure aggregates or other clumpy soil, sticks, rocks or even a hard layer of soil hiding under your loose compost), the end product will be deformed. To prevent this, thoroughly till your raised bed soil to at least 12” and break up any larger soil particles that are left with your hands. If you don’t get your soil bed perfect though, fear not, deformed carrots are definitely edible, they just won’t look like they’re supposed to and are more difficult to clean and process!
Deformed carrots due to clumpy compost!
Once you’re ready to plant, I’ve found it easier on poor eyes and fumbling fingers like mine to sprinkle the tiny carrot seeds in shallowly furrowed rows 10”-12” apart and thin the seedlings later, rather than trying to individually space seeds the recommended 1”-3” apart. Finally, these colorful little veggies love water and require good fertility. To ensure good expansion of the edible root, maintain consistent moisture and fertilize at planting with a good slow release fertilizer. Additional fertilizer applications may be required later in the growing season as most carrots take around ten weeks to gain maturity.
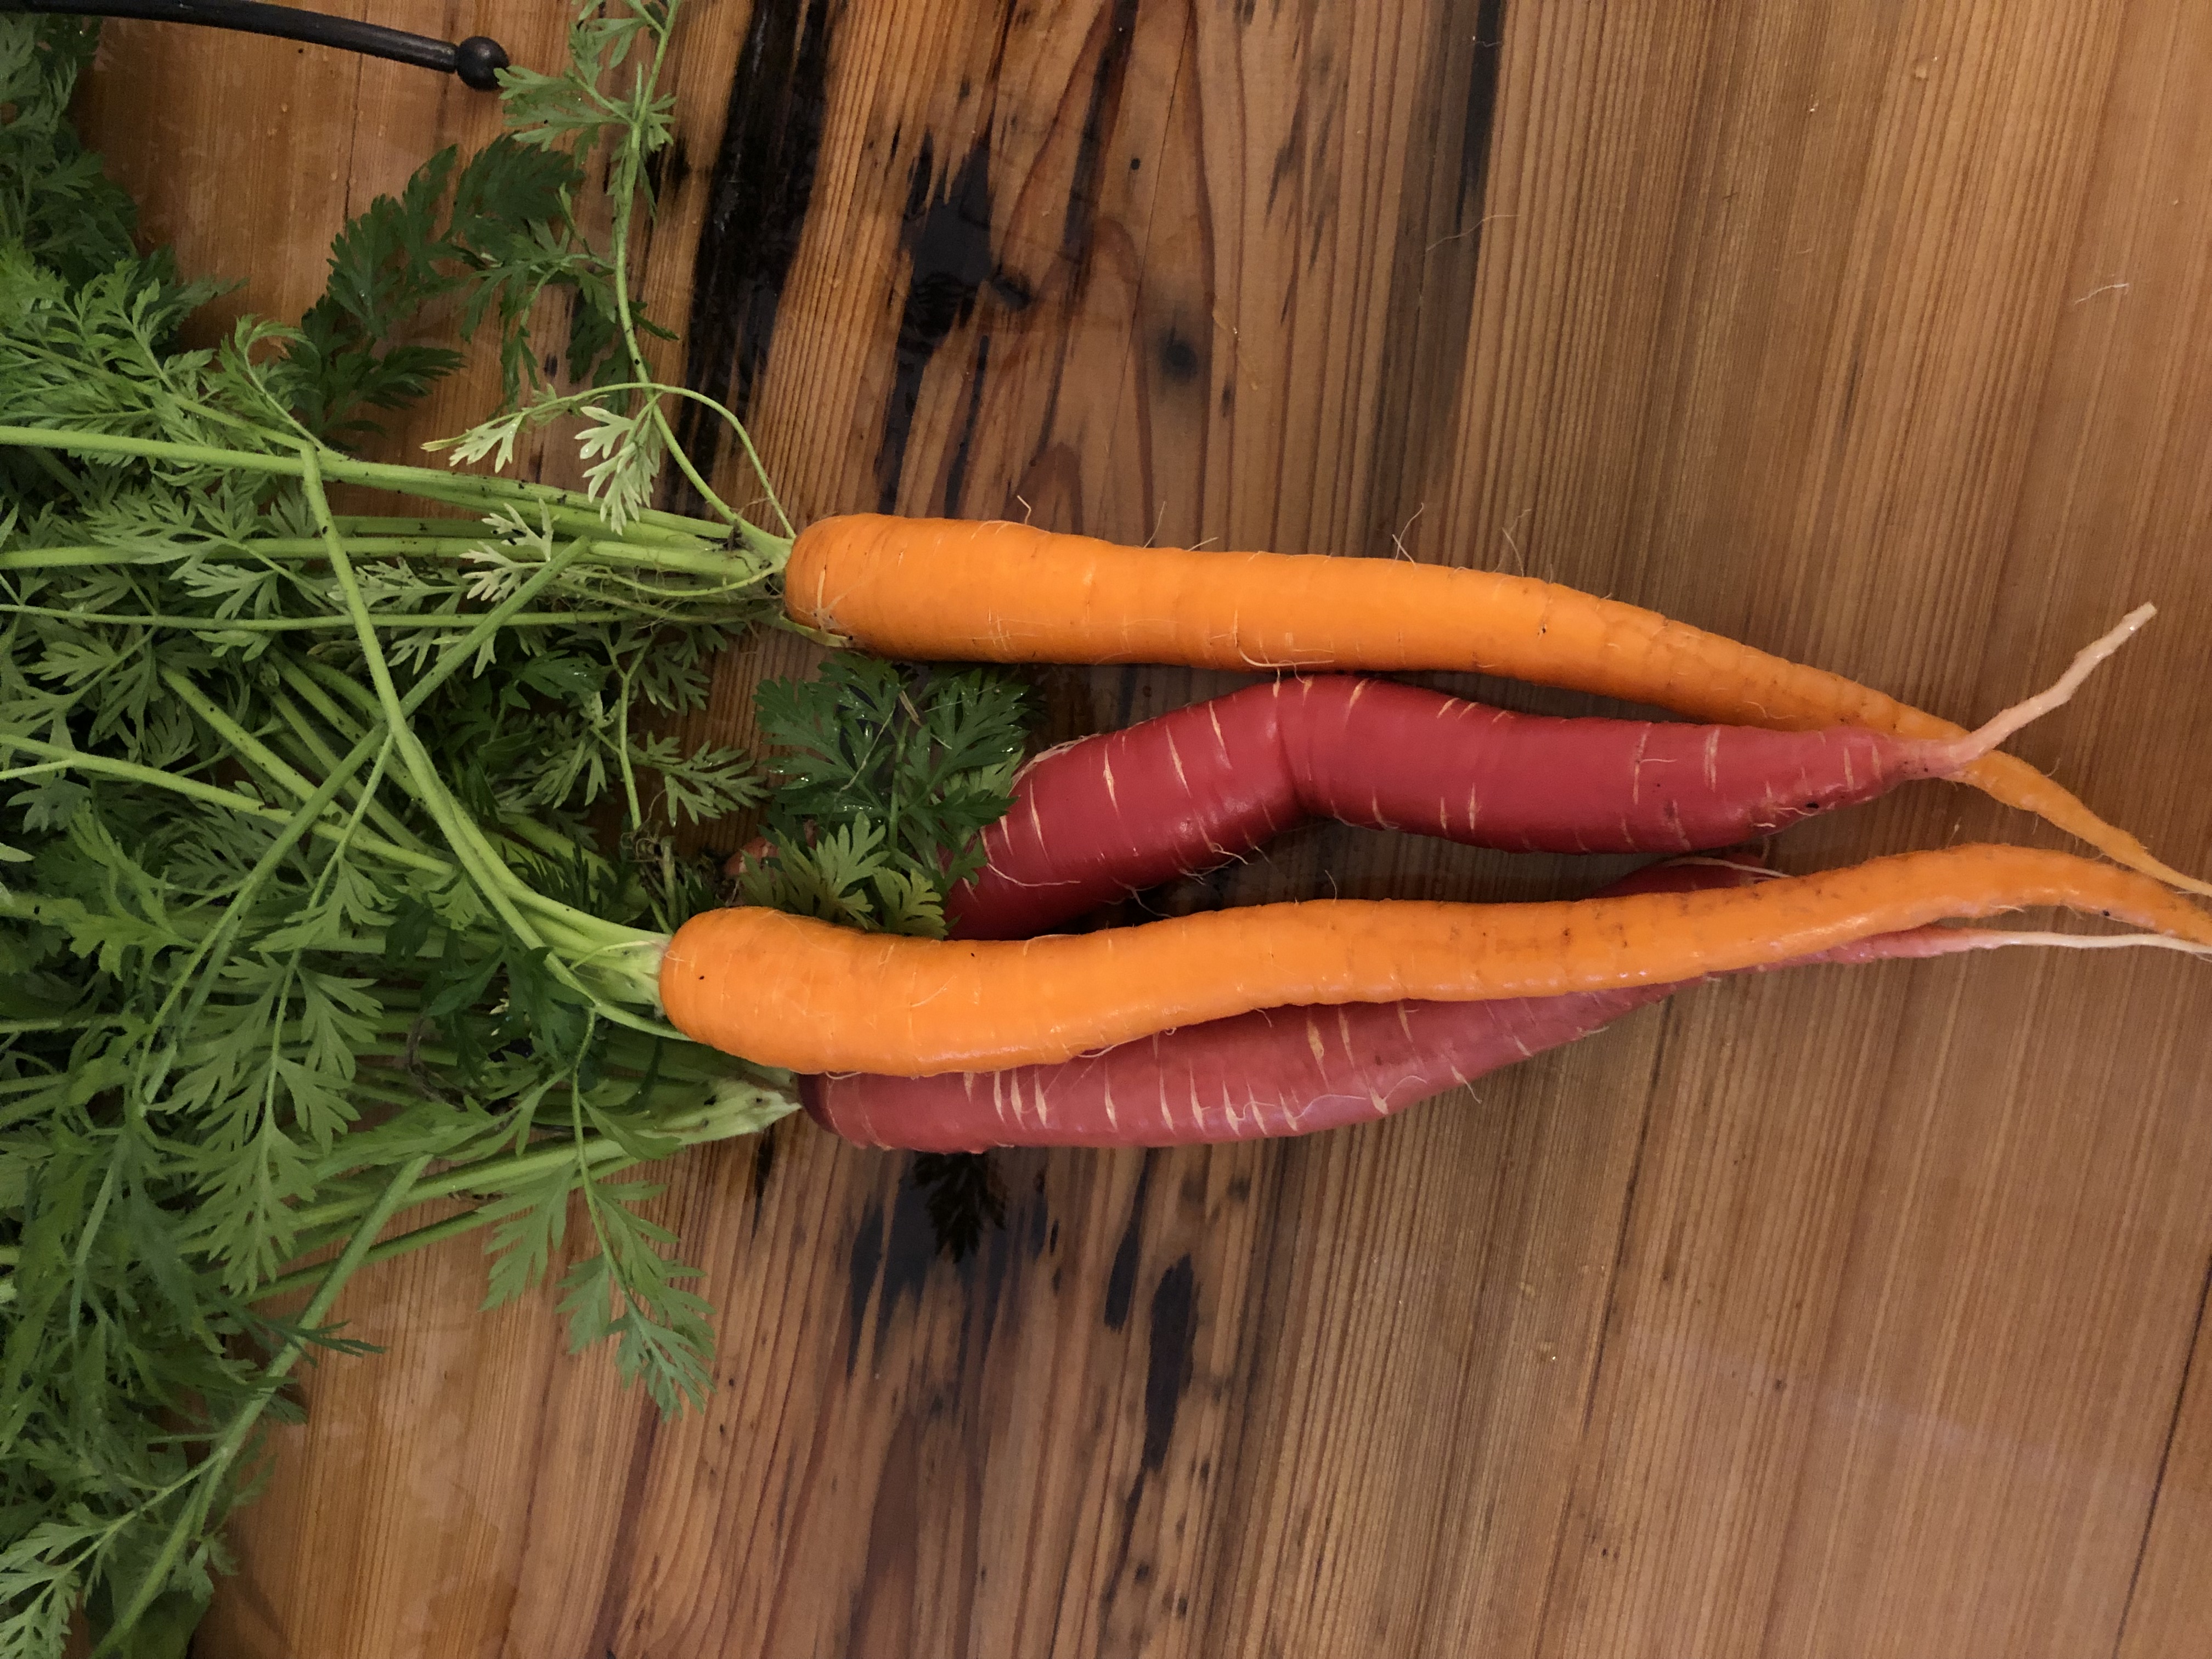
‘Sugarsnax’ (orange) and ‘Malbec’ (red) carrots
In this age of online catalogs, farmer’s markets, and demanding consumers who crave interesting food, the selection of carrot varieties available for gardeners to grow has never been better. Among the hundreds of individual cultivar options are several broad types of carrots you’ll need to choose from. You’re probably familiar with the Imperator types. These are the extra-long, durable carrots most often find in stores. If you have a deep raised bed or other large container, Imperator varieties can be extremely rewarding! I grew the Imperator-type ‘Sugarsnax’ this year and highly recommend it for ease of growing, size and flavor. Next up are the Nantes types. These carrots are medium length and cylindrically shaped. Sometimes called “storage” carrots, these types tend to store well for long periods of time after harvest and retain their flavor well. I’ve tried a few over the last several years and can recommend ‘Bolero’ and ‘Napoli’ with confidence. There is even a carrot type for those of you with shallow raised beds (8” or less) that can’t accommodate the previously listed types! Chantenay type carrots are excellent performers in these situations as they are generally a bit shorter and possess a conical shape with roots wider at the top and tapering to the tip, making a deep soil bed a bit less critical. Finally, there are even some excellent cultivars of carrots in colors other than orange! That’s right, you can grow white, purple, yellow, and even red carrots! I’ve done very well with ‘Purple Haze’ (purple with orange interior), ‘White Satin’ (creamy white color), and ‘Malbec’ (deep, rich red) and highly recommend all three. Keep in mind that the red and purple carrots tend to lose their color when cooked, so the greatest effect is seen when eaten fresh. All of these cultivars can be found at nearly any of the numerous online and catalog seed retainers such as Johnny’s Selected Seeds, Baker Creek Heirloom Seeds, Burpee, and others.
As you can see, carrots are an easy to grow, extremely rewarding vegetable for the home gardener; give some a try in your raised beds next fall! And as always, if you have any questions about growing carrots or any other gardening related question, contact your local UF/IFAS Extension office!