Dr. Ramon Leon, Extension Weed Specialist, West Florida Research and Education Center
Herbicides simplify weed management by allowing you to cover extensive areas in a relatively short time, and reduce the need for time-consuming control practices such as hand weeding. Additionally, many herbicides have the advantage of selective control. Selective herbicides are those that kill weeds without significantly injuring the desired plant. In turfgrass, selective herbicides are particularly important because we do not have the option of using cultivation or non-selective herbicides, as is commonly done in other agricultural systems such as row crops and orchards.
A common misconception is that when a herbicide is registered for use on a given turfgrass species, this herbicide has little negative effect on the turf. In reality, even when the herbicide is registered for a specific turfgrass species, it can cause a certain level of injury. If the herbicide is applied at the recommended label rate, and the growing conditions are ideal, the turfgrass will only suffer minor, temporary injury that may go completely unnoticed. Conversely, the weeds that are susceptible to the herbicide will be severely affected resulting in the desired control.
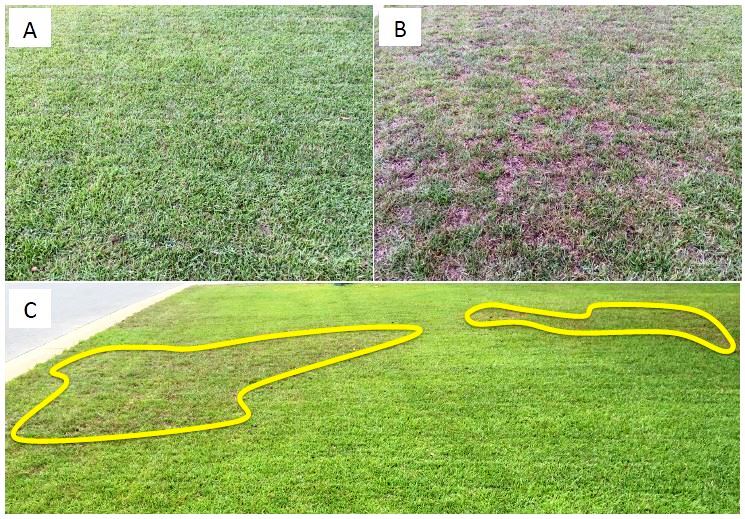
Over the last few summers, there has been an increase in complaints about herbicide injury on sod farms, golf courses, and home lawns after applications of herbicides, especially during the summer months. Many of those complaints originated from situations in which the application was done properly, using the recommended label rate, and thus the level of injury observed was not justified. After studying all these cases, it was determined that at the time of herbicide application the turf was under a moderate level of stress, but not high enough stress to cause visible symptoms. However, when the herbicide was applied the combined effect of the existing stress, and the stress caused by the herbicide made it harder for the turf to maintain the desired quality. For example, Figure 1 below shows that the turf looked fine before the application (A), but after the herbicide was applied, there was a significant loss in turf cover and quality (B). The interesting aspect is that the injury was not present across the entire treated area, but only on patches (C). Those patches corresponded with sand pockets where soil moisture, especially on hot days, was considerably lower than the rest of the area. In that particular case, the irrigation system was providing enough water to help the turf tolerate the moderate stress of high temperatures and limited moisture, but not enough for the turf tolerate the combined stress that occurred after the herbicide was applied.
Figure 1. Centipedegrass growing during the summer in Florida before herbicide application (A), 3 weeks after herbicide (sulfentrazone and metsulfuron-methyl) application (B). Herbicide injury pattern with highlighted areas showing where sand pockets caused drought and heat stress that contributed to herbicide injury (C).
In Florida, there are a combination of environmental factors such as high temperatures and sandy soils that can create stressful conditions limiting turfgrass growth, especially when irrigation is not sufficient to keep the turf hydrated. Furthermore, we also experience periods of excess rainfall, and areas of turf growing under shade. Additionally, pest problems that affect roots and leaves are frequently found in our state. All these conditions affect turfgrass health and its ability to tolerate herbicide applications. For these reasons, turf producers and managers need to be proactive to help turfgrass overcome the injury that herbicides might cause. To achieve this goal, you need to follow five simple steps:
1) Identify weed problems early. Most weed problems will start in the spring for summer weeds and in the fall for winter weeds. Controlling them when they are small not only increases the effectiveness of our applications, but also allows us to implement our control when the turfgrass is less likely to be stressed.
If herbicide applications are needed when conditions might be stressful for the turf (high temperatures and/or dry conditions)
2) Make sure irrigation is adequate (increase frequency or duration if needed) for up to three weeks following application.
3) Reduce mowing frequency and increase mowing height 0.5 inches for up to 3 weeks following a herbicide application, to allow the turfgrass to continue producing energy to support its recovery. Mowing too short and too frequently immediately after the application weakens the turfgrass.
4) Fertilize with a small amount of nitrogen (0.25 to 0.5 lb N/acre) a week or two after herbicide application to help the turf recover and produce new leaves.
5) If the turfgrass is suffering from serious pest problems (pathogens, nematodes or insect infestations) do not apply herbicides on the affected areas until the turfgrass has recovered.
Maintaining optimal turfgrass growth is the best way to ensure that herbicide applications will maximize weed control while still protecting the health and aesthetics of your turfgrass.
For more information on growing turfgrass in Florida, please see the following:
Sometimes when we talk about the size of things we like to estimate and don’t worry too much about being precise, but there are times when as little as a half inch really is a big deal. When talking about landscape maintenance and pest management that half inch can be crucial.
Here are three examples of when less than an inch may be significant.
Bermudagrass lawn cut at half-inch different height. Photo: Julie McConnell, UF/IFAS
Mowing your turf. If you read Mowing Matters last month, you saw mowing height recommendations for common turf types grown in north Florida. We gave a range of heights, but besides referring to the handy chart, you need to pay attention to your specific site. If you begin to mow and the current setting is too low, shut down the mower and adjust the height.
In this picture you can see that just raising the deck up one-half inch prevented the entire yard from being scalped and put under additional stress. After less than a week of proper irrigation the scalped area recovered and the yard looked uniform to casual inspection.
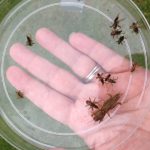
Treating Mole Crickets. The common knee-jerk reaction to seeing adult mole crickets during a mating flight is to treat the lawn. However, when you see the adults they are past the stage of being susceptible to most pesticide treatments. It is also too early to target the next generation – after all you are witnessing mating flights, so time is needed for egg maturation, hatching, and nymph development and feeding before treatment will be effective. Depending on several factors such as temperature and soil moisture nymphs will become active anywhere from 2 weeks to 2 months after adults are seen.
Adult and nymphs of mole crickets. Photo: Julie McConnell, UF/IFAS
Before applying any pesticides, be sure to scout for appropriate life stage (nymphs approximately ½ inch long) and action thresholds of mole crickets by performing a soap flush (details can be found here Mole Cricket IPM Guide for Florida).
Turf Irrigation. It is important to calibrate your irrigation system and make sure that each turfgrass zone is putting out a minimum of one-half inch of water uniformly.
Why this amount? Research has shown that in most Florida soils application of one inch of water will reach the top twelve inches of soil. Healthy turfgrass roots are typically found in the top 4-6 inches of soil, so by applying one half-inch of water per irrigation cycle you should deliver water to turf roots.
To see an example of how to calibrate your system watch this short video demonstration by Dr. Laurie Trenholm, UF/IFAS Turfgrass specialist.
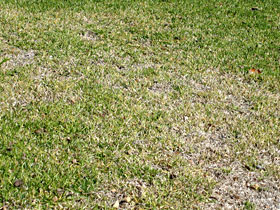
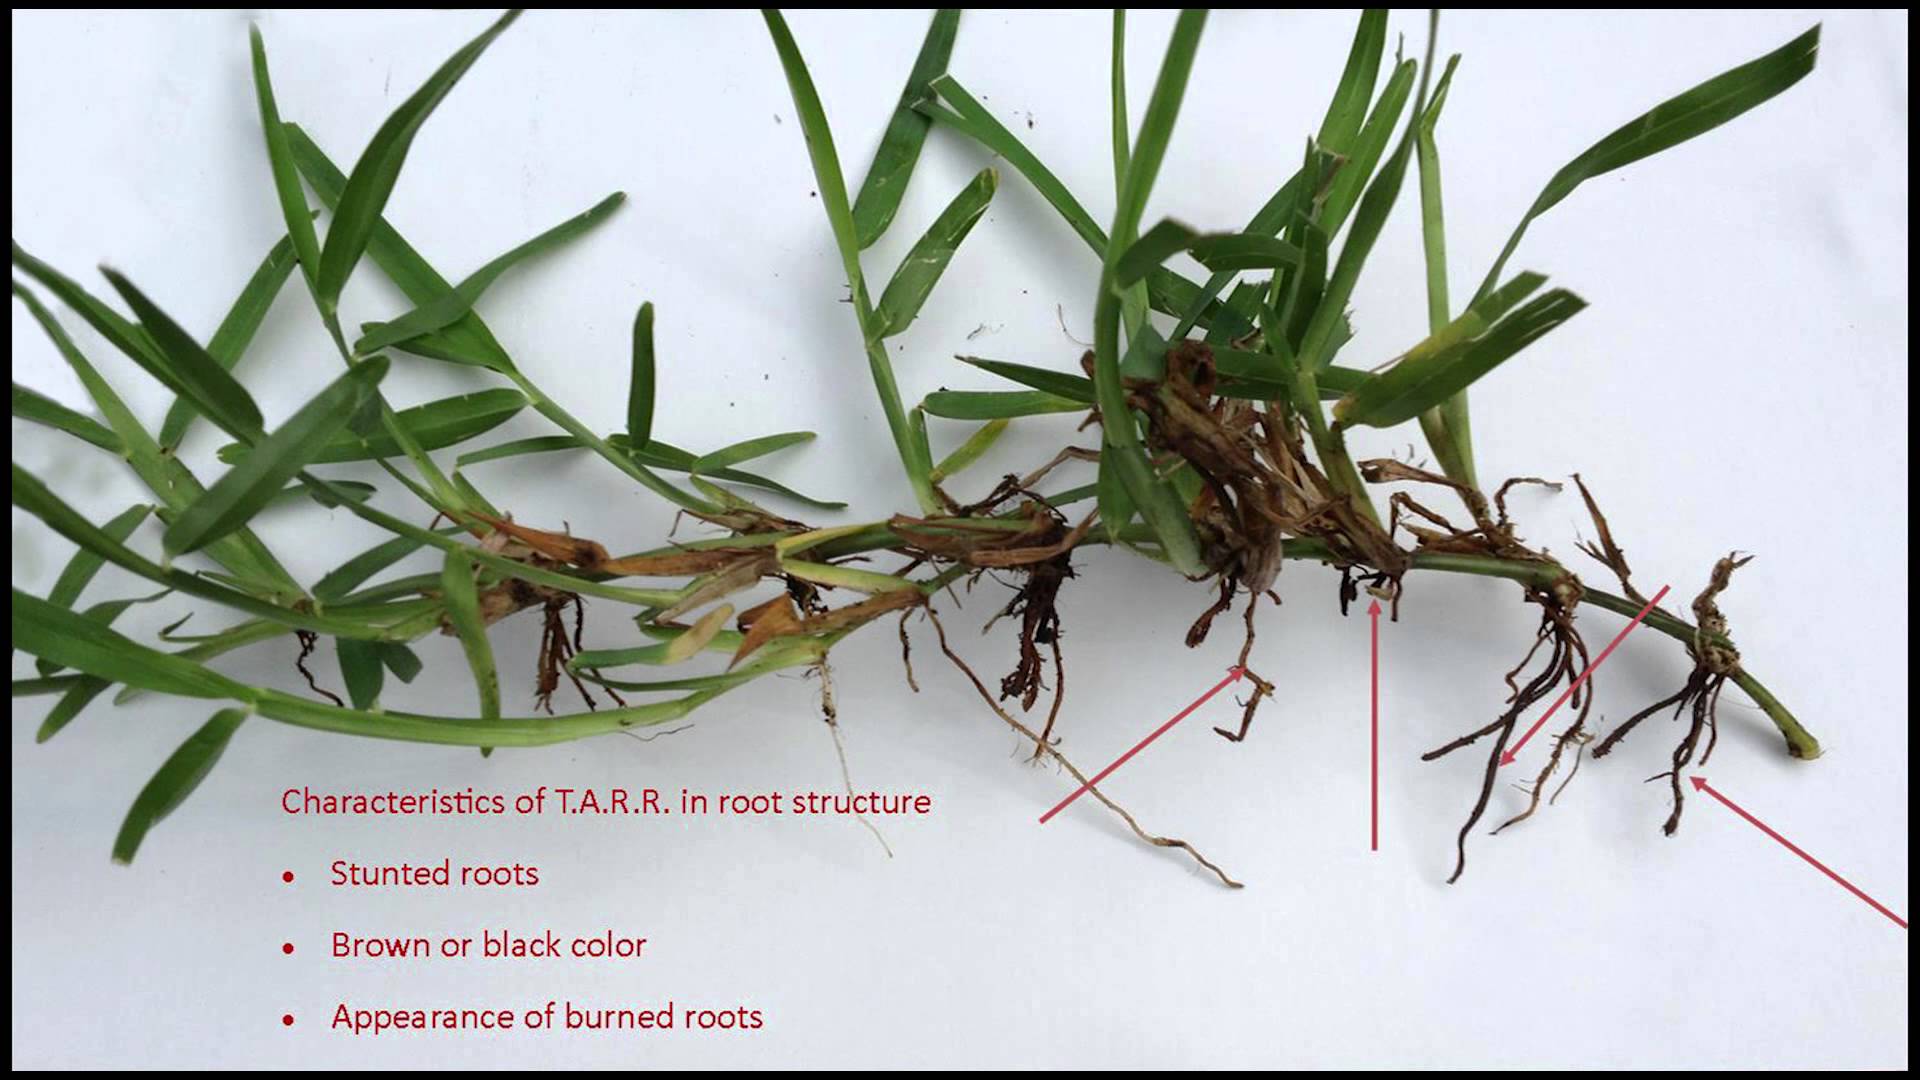
“We have replaced this grass several times over the past few years; and it’s dying again.” I have heard this complaint too many times this summer. Last summer’s heavy rain, the stress of January’s icy weather, and this year’s extended summer have contributed to widespread outbreaks of Take-All Root Rot, a soil-inhabiting fungus Gaeumannomyces graminis var. graminis.
Symptoms of Take-All-Root-Rot. Photo credit: Sheila Dunning, UF/IFAS.
This disease causes yellow grass patches ranging in diameter from a few inches to more than 15 feet. The symptoms first appear in the spring, but the disease can persist all summer and survive the winter. Over time, the entire area dies as the root system rots away. The pathogen is naturally present on warm-season turfgrass roots. High rainfall and stressed turfgrass trigger the disease.
Since the roots are affected, they are not able to efficiently obtain water or nutrients from the soil, nor are they able to store the products of photosynthesis, which result in the loss of color in the leaves. By the time the leaf symptoms appear, the pathogen has been active on the roots for several weeks, probably longer; the disease has been there potentially for years. If the turfgrass is not stressed, leaf symptoms may never be observed.
This disease is very difficult to control once the aboveground symptoms are observed. Measures that prevent or alleviate stress are the best methods for controlling the disease. Any stress (environmental or manmade) placed on the turf weakens it, making it more susceptible to disease. Remember, that every maintenance practice, fertilizer application, and chemical (especially herbicide), application has an impact on turfgrass health. Cultural practices that impact the level of stress experienced by a lawn include:
proper turfgrass species selection
mowing at the correct height
irrigation timing, frequency and volume
fertilizer: nitrogen and potassium sources and application quantities
thatch accumulation, and
soil compaction
The selection of turfgrass species should be based on existing soil pH, sunlight exposure, use of the area and planned maintenance level.
Mower blades must be sharp to avoid tearing of the leaves. Additionally, turfgrasses that are cut below their optimum height become stressed and more susceptible to diseases, especially root rots. When any disease occurs, raise the cutting height. Scalping the grass damages the growing point. Raising the cutting height increases the green plant tissue available for photosynthesis, resulting in more energy for turfgrass growth and subsequent recovery from disease.
If an area of the lawn has an active fungus, washing or blowing off the mower following use will reduce the spread of the disease to unaffected areas.
The amount of water and the timing of its application can prevent or contribute to disease development. Most fungal pathogens that cause leaf diseases require free water (rainfall, irrigation, dew) on the leaf to initiate the infection process. Irrigating every day for a few minutes is not beneficial for the turfgrass because it does not provide enough water to the root zone, but it is beneficial for turfgrass pathogens. It is always best to irrigate when dew is already present, usually between 2 and 8 a.m., and then only apply enough water to wet the root zone of the turfgrass.
Excessively high nitrogen fertility contributes to turfgrass diseases. The minimum amount required for the grass species should be applied. Potassium (K) is an important component in the prevention of diseases, because it prevents plant stress. Application of equal amounts of nitrogen and potassium is recommended for turfgrass health. When turfgrass roots are damaged from disease, it is beneficial to apply nutrients in a liquid solution. However, nitrate-nitrogen increases the severity of diseases, so their use should be avoided when possible. Ammonium-containing fertilizers are the preferred nitrogen sources.
Heavy liming has also been linked to increases in Take-All Root Rot. Since most turfgrasses can tolerate a range of pH, maintaining soil at 5.5 to 6.0 can suppress the development of the pathogen. When the disease is active, frequent foliar applications of small amounts of nutrients is necessary to keep the turfgrass from declining.
Additional maintenance practices that need to be addressed are thatch removal and reduction of soil compaction. Excessive thatch often causes the mower to sink which can result in scalping and reducing the amount of leaf tissue capable of photosynthesizing. Thatch and compacted soil prevent proper drainage, resulting in areas remaining excessively wet, depriving root systems of oxygen. Since recovery of Take-All-Root-Rot damaged turfgrass is often poor, complete renovation of the lawn may be necessary. Removal of all diseased tissue is advised.
As a native soil-inhabiting pathogen, Take-All-Root-Rot cannot be eliminated. However, suppression of the organism through physical removal followed by proper cultivation of the new sod is critical to the establishment of a new lawn. Turfgrass management practices, not chemicals, offer the best control of the disease.
It is acceptable to use fungicides on a preventative basis while rooting in the sod. Azoxystrobin, fenarimol, myclobutanil, propiconazole, pyraclostrobin, thiophate methyl, and triadimefon are all fungicides that can be utilized to prevent disease development while having to excessively irrigate newly laid sod. Ideally, the turf area should be mowed and irrigated prior to a fungicide application. Unless the product needs to be watered in, do not irrigate for at least 24 hours after a chemical treatment. Do not mow for at least 24 hours, to avoid removal of the product attached to the leaf blades.
With all the stresses that our lawns have experienced, it is very important to continue monitoring the turf and be cautious about the cultural practices being used. Take-All Root Rot is likely to flourish. Do not encourage its development. A pathology test with the University of Florida Laboratory can confirm the presence of the disease causing organism. Before resodding again, have the dying sod tested.
A waterfront buffer zone may include a raised berm with native vegetation to slow runoff from a yard before entering the water. Photo credit: Carrie Stevenson
A taste of spring weather has arrived, and people will soon be filling the home improvement stores and getting ready for outdoor projects. If you live on the water or near a storm drain, it’s worth considering buffer zones and best management practices for fertilizing and lawn maintenance.
A waterfront buffer zone is an area the length of one’s property line, typically running about 10 feet (although it can be wider) from the edge of a shoreline (or even a storm drain) into the yard. In this area, the homeowner allows native vegetation to grow along the water and uses low-maintenance plants within the buffer. In this zone, no fertilizers or pesticides are used. Some homeowners will build a small berm to divide the area of maintained lawn (uphill) from the downhill waterfront side. This berm may be composed of a mulched area with shrubbery to catch and filter runoff from the more highly maintained lawn. This combination of actions helps treat potentially polluted stormwater runoff before it reaches the water, and keeps homeowners from using chemicals close to the water. It is often quite difficult to grow turf next to the water, anyway, and this takes the pressure off of someone trying to grow the perfect lawn down to the water’s edge. The buffer zones are often quite attractive and can be an excellent transition between managed turf and the waterfront.
Unmaintained dirt roads along creeks are significant sources of sediment, which can harm the bottom-dwelling insects that form the base of the food web. Photo credit: Carrie Stevenson
Erosion prevention is crucial along waterways, as well. An open, non-vegetated lot can contribute a significant amount of sediment to a storm drain, stormwater pond, or natural body of water. Whether grass, trees, or bushes, any kind of vegetation is preferable to soil washing out of a yard and into the water. Sediment is a problem because it causes water clarity to drop, which can prevent seagrasses from getting the sunlight they need. Once settled, underwater sediment can form a stifling layer that chokes out small insects and invertebrates, which live in the soil and form the basis of the aquatic food chain. With no fish food available, fish may die or move out of an area. The most dramatic examples of this can often be found at dirt roads that cross over creeks. If not managed properly, the clay on these roads can nearly bury a small stream.
Other lawn care techniques for protecting the waterfront and preventing stormwater pollution include not mowing along the water, using a deflector shield and staying 3’-10’ away from the water’s edge when fertilizing, and not allowing grass clippings to blow into storm drains. Large amounts of decaying grass in a waterway can use up available oxygen, endangering aquatic organisms. When applying granular fertilizer, be sure to sweep up any spills on concrete so it doesn’t run into a storm drain. When cutting grass, mow at the highest height recommended for your turf to encourage deep rooting and stress tolerance. Healthy turf is better able to withstand drought, pests, and choke out weeds, reducing the frequency of pesticide and water application.
Summertime is vacation time for people, not plants! While getting ready for that long awaited trip, it’s easy to forget about your lawn, landscape, vegetable garden and house plants. A little time spent preparing your leafy friends for your absence could save you needless worry and hours of extra work when you get back.
Prepare your landscape for your absence. Photo by Mary Derrick, UF IFAS
A vacation may be relaxing and rejuvenating for you and your family, but it can be hazardous, even deadly, for your plants. Unless you make adequate preparations before leaving, you could return to vegetable disaster.
One of the first things you might do before leaving home is ask a neighbor to check your plants periodically while you’re gone. All plants need some care. During an extended vacation container grown plants require special attention and different species have different needs. Be sure you give your friend specific instructions for the care of each type.
If you can’t find someone to personally look after your plants while you’re away, there’s plenty you can do prior to departure to make sure you don’t come home to a limp landscape and sickly house plants. Outdoor container plants should be placed in a shady area to conserve moisture. Under a tree or on the north side of a building are good locations. A thick layer of mulch will help conserve moisture for landscape plantings. Mow your lawn just before leaving, cutting the grass a little closer than usual. An unkept lawn can encourage disease, and it’s a tell-tale sign that no one’s home.
Give lawn and landscape plants a heavy watering – especially recently planted beds, which will need extra moisture. Also, thoroughly spray or dust your plants to protect them from insects and diseases while you’re away. If you have flowering annuals, cut the blossoms before departing. If you don’t, they’ll soon stop blooming. Harvest all ripe or nearly ripe fruits and vegetables. Like flowers, they will continue to produce only if they’re picked frequently. Otherwise, they’ll go to seed.
Do a thorough job of weeding. If weeds are allowed to go to seed while you’re away, you can expect to encounter much more difficult problems later in the season – even next year – when the seeds sprout. Weeding eliminates a major source of competition for your landscape plants’ food and water which may be in short supply during your absence.
Plants kept indoors require special consideration. Before leaving home, place your house plants in a room which receives indirect sunlight. Direct exposure to the sun will dry the soil too quickly. Of course, you don’t want to put your plants in a room that’s too dark, either. Too little light will almost always result in leaf drop. And, just before you depart, be sure to water your house plants thoroughly. This is especially vital, because – unlike lawn grass and landscape ornamentals – house plants cannot benefit from any rain that may fall while you’re gone.
You’ll enjoy your vacation more by making sure your plants are well prepared for your absence.
Captiva St. Augustinegrass Credit: Julie McConnell, UF/IFAS
Mowing is an important and often overlooked landscape best management practices that can increase lawn health.
Most of us mowed lawns to earn some spending money as kids. As long as it was shorter when we finished than when we started our customers were happy. Although mowing seems like a simple chore that anyone can do, it turns out that improper mowing can cause a lot of damage to lawns and can increase pest and disease issues.
Make sure your lawn mower in good working order. Ensure the blades are sharp and the engine is not leaking any oil or gas products that may damage your lawn. Dull or damaged blades will give a ragged cut to grass blades that make it easier for disease and insects to attack your lawn. Leaking fuel products can damage or kill turf. Keep your mower clean by blowing or rinsing it after use, this simple step will also reduce the spread of weeds, insects, and disease.
Know the recommended mowing height for your type of turf (see table below) and follow it! Cutting turf below the recommended height places stress on the grass and encourages shallow roots. Deep roots help turf handle stresses such as drought, shade, insects, disease, or traffic. If any of these circumstances are occurring, the mowing height should be increased and fertilization should be decreased.
Mowing Height Table
Turfgrass Type
Recommended Mowing Height
Bahiagrass
3.0-4.0 inches
Bermudagrass
0.75-1.5 inches
Centipedegrass
1.5-2.5 inches
St. Augustinegrass
3.5-4.0 inches, Dwarf Cultivars 2.0-2.5 inches
Zoysiagrass
1.5-2.5 inches, cultivar dependent
When mowing, never remove more than 1/3 of the leaf blade per cutting. If the grass is overgrown, plan to mow in stages to avoid scalping or removing too much of the leaf blade. Just like shrubs, turf needs leaf surface area for photosynthesis. Allow clippings to fall onto lawns rather than catching them or discharging onto hard surfaces. The grass will decompose rapidly and provide nutrients to the lawn. Clippings that are blown onto sidewalks, streets, or other hard surfaces may be washed into storm drains and get into water systems. Just as decomposed clippings provide helpful nitrogen and phosphorus to our lawns, these same nutrients are harmful to our water bodies. Keeping them in lawns is a great way to recycle and to keep our water clean.
To learn more about caring for your turf click on the link below.